Hiking Las Vegas. The All-in-One Guide to Exploring Red Rock Canyon, Mt. Charleston, and Lake Mead. Branch Whitney. Huntington Press Las Vegas, Nevada
|
|
|
- Aubrey Cox
- 6 years ago
- Views:
Transcription
1
2 Hiking Las Vegas The All-in-One Guide to Exploring Red Rock Canyon, Mt. Charleston, and Lake Mead Branch Whitney Huntington Press Las Vegas, Nevada
3 Hiking Las Vegas The All-in-One Guide to Exploring Red Rock Canyon, Mt. Charleston, and Lake Mead Published by Huntington Press 3665 Procyon St. Las Vegas, NV Phone 702/ Copyright 2011, Branch Whitney 1st Edition 1997, 1998, 2001, 2005 ISBN: $9.98US Inside and Front Cover Photos: Branch Whitney Back Cover Photo: Las Vegas News Bureau Design & Production: Laurie Cabot All rights reserved. No part of this publication may be translated, reproduced, or transmitted in any form or by any means, electronic or mechanical, including photocopying and recording, or by any information storage and retrieval system, without the express written permission of the copyright owner.
4 Dedication This book is dedicated to Kathy Kelbel.
5 Acknowledgments I would like to thank the following people for their guidance and knowledge: Crazy Kenny Amundsen, Mark Throw Down Beauchamp, Davis Dead Horse Finley, Ed Forkos, Luba Leaf, Richard Natale, Eva Pollan, and Wrong Way Richard Baugh. And thanks to the gang at Huntington Press. It s great to work with people who want to do things correctly.
6 Contents Introduction to the Hikes The Purpose of this Book How This Book is Organized The Format of All the Hikes Flora Fauna Cautions The Essentials Volunteering Group Hiking The Bests of the Hikes Red Rock Canyon Fast Facts Difficulty Index Driving Directions to Red Rock Canyon The Hikes Calico Hills Loop: Closed Route Calico Hills Traverse: Route Kraft Mountain: Route Kraft Mountain Loop: Trail and Route Turtlehead Jr. / Red Cap: Double Slot Route Gray Cap Peak: Route Calico Hills I Overlook: Route Calico Hills I Peak: Route Calico Hills II Overlook: Route Calico Hill II Scramble: Route Calico Tank and Peak: Trail and Route Turtlehead Jr. /Red Cap: Route Turtlehead Peak: Trail Keystone Thrust: Trail White Rock Springs Peak: Route Lost Creek Canyon/Children s Discovery Trail: Trail Lost Creek Cave: Trail and Route Lost Creek Overlook: Trail and Route White Rock Hills Loop: Trail La Madre Springs: Trail
7 North Peak via North Peak Wash: Route Bridge Mountain via North Peak Wash: Route Ice Box Canyon: Trail and Route Pine Creek: Trail and Route Magic Mountain and Crabby Appleton: Route Terrace Canyon: Route Mescalito Peak Southern: Route Pine Creek Peak: Closed Loop Gunsight Notch Peak: Route Bridge Mountain via Fern Canyon (North Fork of Pine Creek): Route Fern Canyon: Trail and Route Bridge Vista: Route Oak Creek Canyon: Trail and Route Juniper Peak: Route Oak Creek Overlook: Trail and Route Rainbow Wall via Oak Creek Canyon: Route Cowboy Cave: Trail Fossil Ridge: Trail Las Vegas Overlook (aka Muffin Boulders): Trail First Creek Waterfall: Trail First Creek Peak: Trail and Route Decision Peak: Route White Pinnacle Peak: Route Mt. Wilson: Route Windy Peak: Route Black Velvet Peak: Route First Creek Overlook Peak: Route The Park: Route Mt. Charleston Fast Facts Difficulty Index Driving Directions To Mt. Charleston The Hikes Griffith Peak via Harris Springs: Trail and Route Fletcher Canyon: Trail and Route Mary Jane Falls Overlook: Route Mary Jane Falls: Trail Big Falls: Trail Charleston Peak via Big Falls: Route Trail Canyon: Trail Cockscomb Peak and Traverse: Trail and Route Mummy Mountain: Trail and Route
8 Cathedral Rock: Trail Echo Cliff Overlook: Trail and Route Griffith Peak via South Loop: Trail South Loop to Charleston Peak: Trail Fletcher Peak via Hummingbird Hollow: Route Robber s Roost: Trail Raintree: Trail Charleston Peak via North Loop: Trail Mack s Peak: Route Sisters (South and North): Route Bristlecone Trail: Trail Bonanza Trail: Trail Bonanza Peak: Trail Lake Mead Fast Facts Difficulty Index Driving Directions To Lake Mead The Hikes Frenchman Mountain: Route Lava Butte: Route Anniversary Narrows Peak: Route Hamblin Mountain: Route South Bowl of Fire: Route Northshore Peak and Unnamed Peak: Route North Bowl of Fire: Route Red and Black Mountain: Trail Gold Strike Canyon Hot Springs: Route Fortification Hill: Trail Liberty Bell Arch: Trail Arizona Hot Springs: Route Fortress Butte: Route Glossary About the Author
9 Introduction to the Hikes It has been 15 years since I first started writing Hiking Las Vegas. I had no idea the impact the book and companion website (hikinglasvegas.com) would have on hiking in southern Nevada. Before the book, there were only two main hiking clubs. Now there are more than I can keep track of, some with thousands of members. Thousands have used the book and website to guide them to peaks and destinations. Before the book, summits like Pine Creek, Bridge Point, and White Pinnacle hadn t been named and no one was hiking and scrambling to these seemingly impossible peaks in Red Rock. Now hundreds of people have stood at these and other high points not known 15 years ago. This is a good thing. Hiking Las Vegas details 83 hikes (23 more than the first edition!) in Red Rock Canyon, Mt. Charleston, and around Lake Mead. None of the hikes require technical climbing abilities; however, some of the hikes include class 3 and 4 climbs (explained on pg. 6). If you haven t hiked before or you re not in shape, don t attempt the tougher hikes. Start with the easy ones (there are plenty) and progress to the more difficult. People who are in good shape will find many of the harder hikes challenging and enjoyable. No matter what kind of shape you re in, hiking is fun, inexpensive, and relieves stress. It also improves cardiovascular fitness, not to mention being one of the best ways to enjoy nature. Hiking Las Vegas takes you beyond the lights, congestion, and confusion of Las Vegas to a place where clean air, open space, and magnificent sights await you. This book differs from the first edition in three main ways: Color Photos GPS Waypoints New and updated hikes Color photos make it easier to identify key landmarks, which is critical for many of the hikes. GPS waypoints help guide hikers to their next destination. Using a GPS unit is not mandatory to follow the hikes, but it helps. After leading over 4,000 hikers to over 100 peaks in southern Nevada, I have learned which hikes are their favorites. That s why there are 19 new hikes in Red Rock, five new hikes in Mt. Charleston, and 13 new hikes around Lake Mead. Most of the new hikes in Red Rock do not require an entrance fee, since they are not accessed via the Scenic Loop. This not only saves you money, but also time, since you do not have to drive the Scenic Loop. The Purpose of this Book The goal of Hiking Las Vegas is to help you enjoy the hikes in Red Rock Canyon, Mt. Charleston,
10 and around Lake Mead. Many of these hikes are much more advanced than hikes in other guidebooks. This is why you ll find very detailed hike descriptions. I ve rated the hikes according to three different criteria to help you make an accurate assessment of each one: time (up and back), difficulty (1-5), and how easy it is to follow (1-5). I ve provided explicit directions to the trailheads, photographs of key landmarks on the hikes, and listed waypoints. I ve covered all 83 hikes from start (getting to the trailhead) to finish (getting back to the trailhead safely). How This Book is Organized Hiking Las Vegas is divided into three geographical areas: Red Rock Canyon, Mt. Charleston, and Lake Mead. All are an hour or less driving time from the Strip. Driving directions to all areas are provided in text form and on a map at the beginning of each section. Red Rock Canyon Red Rock Canyon, a mere 18 miles from downtown Las Vegas, is the Bureau of Land Management s recreation showcase in southern Nevada. It s nearly 200,000 acres of multicolored sandstone, canyons, peaks, washes and waterfalls, and a variety of flora and fauna. More than one million people visited Red Rock Canyon in Most people who go to Red Rock don t hike. Instead, they drive around the Scenic Loop, a 13-mile, one-way, paved road that runs in a horseshoe shape around the canyon. Unlike many other popular hiking locales, the advanced hikes in Red Rock Canyon are not crowded. You ll be lucky (or unlucky, depending on your point of view) to see another person while scrambling to the majority of the peaks. Permits are not required for day hikes. The Visitor Center at Red Rock is open from 8:30 a.m. to 4:30 p.m. daily; 702/ Inside, you can avail yourself of bathrooms, water, a short film about Red Rock Canyon, and numerous exhibits. There are also books to buy and use for reference. Other than in the Visitor Center, pit toilets are located at all the major parking areas along the Scenic Loop road. Camping is available at the Red Rock Campground, located about a mile before the turn-off to Red Rock Canyon on the south (left) side of State Route 159. Water, pit toilets, fire pits, trash collection, and picnic tables are furnished. Camping is also allowed above the 5,000-foot level, but you need to obtain a permit by calling the Visitor Center at 702/ at least one day in advance. The permits are good for one night. Leave the permit in the glove compartment of your car. Currently, there s a $7 entrance fee per car to drive the Scenic Loop road. You can also purchase a yearly pass for $30 and all national park passes are accepted. Many of the hikes in this book are accessed via the Scenic Loop, but there are 17 hikes in this book that are located elsewhere and are not subject to an entrance fee. All mileage figures to the trailheads start from the Scenic Loop gate. All of the parking areas and pullouts are well-marked. The Scenic Loop gate is open from 6 a.m. to dusk. You should plan to finish your hike before dark, as hiking after dark can be very dangerous and isn t recommended. Red Rock hikes are done in the spring (lots of water in the canyons), autumn, and winter until there s too much snow or ice. Rock-scrambling hikes are extremely dangerous when there s snow or ice on the rock. Due to the heat, you should not hike in Red Rock during the summer.
11 Mt. Charleston Area The Spring Mountains are the mightiest mountain range in southern Nevada, hemming in the west Las Vegas Valley for 50 miles. The range gets its name from the 30 inches of precipitation that the high peaks grab from the moist winds that reach it from the Pacific Ocean and the Gulf of California. You may have heard of Toiyabe National Forest, the Spring Mountains, Mt. Charleston, Kyle Canyon, Lee Canyon, and other hiking areas near Las Vegas it can get complicated. Toiyabe National Forest, the largest national forest in the continental United States, covers 3,855,960 acres. It spans an area from eastern California to southern Nevada. Within the Toiyabe lies the 316,000-acre Spring Mountains National Recreation Area (SMNRA), which contains the Mt. Charleston Wilderness Area. Kyle Canyon, Lee Canyon, Mt. Charleston, and Bonanza Mountains are part of the Mt. Charleston Wilderness Area. It s managed by the US Forest Service. The only entrance fees are at the campgrounds and Cathedral Rock Picnic area. Campgrounds are located in various areas in Mt. Charleston. To make a reservation call 877/ or visit the website: reserveusa.com. Camping starts at $19 per night. Amenities vary by campground. The warmer months are the best time to hike Mt. Charleston due to the higher elevation (7,000 to 11,918 feet). Beginning in late April, hikers can start doing the lower elevation hikes in Mt. Charleston, such as Fletcher Canyon, which will have lots of water, and Big Falls, the best waterfall in Mt. Charleston. The hiking season usually ends in October, unless you are into cold weather or snowshoeing. Lake Mead Lake Mead National Recreation Area (LMNRA) encompasses 1.5 million acres, which is twice the size of Rhode Island. The lake caters to boaters, swimmers, sunbathers, fishermen, and visitors taking a tour of Hoover Dam a must-see attraction. The surrounding desert provides hikers with a lifetime of exploring. This seemingly barren desert has many treasures waiting for hikers to discover. I have divided Lake Mead into northern and southern areas. Seven of the hikes are located in the northern section, including Anniversary Narrows, one of the premier family hikes in the southwest. Millions of years of wind and water have created a hundred-foot-high slot through the mountain. Don t forget your camera. The six hikes in the southern section feature Gold Strike Hot Springs and Arizona Hot Springs. The hot water will soothe sore muscles. The pools vary and some might be dry, but there are always a few pools waiting for hikers to relax in. Campgrounds are located in various areas around Lake Mead. To make a reservation, call 877/ or visit the website: reserveusa.com. Camping starts at $19 per night. Amenities vary by campsite. LMNRA is managed by the National Park Service. Permits are not required for hiking and there are no restricted hours; however, some hikes do have a $10 entrance fee per car, which is good for seven days. National Park Passes are accepted. The Alan Bible Visitor Center (4 miles northeast of Boulder City on U.S. 93 at Nevada 166) is open from 8:30 a.m. to 4:30 p.m. daily. The winter months are the best time to hike around Lake Mead due to the lower elevations. Beginning late October, hikers can start experiencing all Lake Mead has to offer. The season usually ends in March due to the heat.
12 Important: The rock breaks very easily in the Lake Mead area. Please test all hand and footholds before climbing on the rock. The Format of All the Hikes Every hike in this book is introduced in the format below. Hike: Name of the hike and whether it s a trail or route. Trailhead: Location of the trailhead. The word marked if there s a sign identifying the trailhead. Distance: Round-trip distance, noted in miles. Elevation gain: How high the trail climbs, expressed in feet. Elevation of peak: The height of the peak. If no peak, the highest point on the hike. Time: The time it takes an average hiker to complete the hike. Difficulty: Scale of 1 to 5, where 1 is the easiest. This rating takes into consideration the distance, elevation gain, and the amount of scrambling (class 1-4). Danger level: Scale of 1 to 5, where 1 is the safest. Class: How much climbing is involved (class 1-4). How easy to follow: Scale of 1 to 5, where 1 is a well-maintained trail and 5 is cross-country route. Children: Designates whether it s safe for children (ages 5-11) to hike the trail with adults. Waypoints: (WGS 84). Fees: Entrance fee. Best season: Best season(s) to do the hike. Driving directions: Explicit instructions on driving to the trailhead. Comments: Interesting points and sights along the trail, warnings, and guidelines. The Hike: The step-by-step guide with text, photos, and waypoints. Trails, Paths, and Routes The hikes in this book follow trails, paths, routes, or combinations of the three. A trail is normally well-maintained and easy to follow. Trails in Red Rock are maintained by the BLM and have official trailhead signs, but might be missing signs at intersections. In Mt. Charleston, the Youth Correctional Facility maintains the trails, which also have trailhead signs, but also might be missing signs at intersections. A path is not maintained and might be hard to follow in certain spots. Paths have usually been created by hikers. They range in quality from being as distinct as a trail to being nearly impossible to follow due to lack of use. Paths sometimes begin along established trails, and then splinter off to travel to a different destination. On some of the more obscure paths, cairns mark the way. On some of the paths cairns have been placed to guide hikers; however, they do get knocked down. It s easier to follow an obscure path by looking ahead a few yards, rather than down at your feet. A route is the least distinct of the three; no trail or path exists. A route is hiked by walking from one landmark to the next. All of the rock-scrambling and bouldering hikes in Red Rock are routes.
13 When following a route, it s necessary to remember distinctive landmarks on your way up. This is best done by turning around often so you can see what things will look like when you come back down. Routes appeal to hikers who are adventurous and like to figure out the best way to a landmark. While hiking a route, you may be unsure you are going the correct way. Have faith, hundreds have followed these routes and made it to the peak. Many of the hikes are combinations of trails, paths, and routes. Any time a trail goes over rock for a distance, it becomes a route until the trail resumes. Many routes start from established trails. An example of a combination of the three is the Juniper Peak hike. It starts on the Arnight Trail, becomes a path in the canyon, and turns into a route once it leaves the canyon. Distance and Time In the quick-reference feature that begins all the hikes, the Distance and Time estimates are based on an up and back hike. An example is the Griffith Peak hike (pg. 255): the round trip distance is 10 miles, and it will take 6 to 7 hours to complete. This does not take into account time spent at the peak, waterfall, or other interesting points. If you are one who spends a lot of time at points of interest, make sure to add that into the time it will take to complete the hike. Danger Level The danger-level rating takes into account the possibility of falling, altitude sickness, and potential weather situations. It s mandatory that you tell someone where you are going, which hike you are doing, and when you expect to return. You should always hike with at least one other person, but a party of four is preferred. In case of an accident, one hiker can stay with the victim and the other two can go for help. (See Getting Lost or Stuck, pg. 9.) Climbing Grades Class 1 Normal trail hiking (Bristlecone Trail, Las Vegas Overlook). Class 2 Hiking over rough terrain. The hands are used for balance (Oak Creek, Big Falls). Class 3 Hiking and climbing using hands and feet. The rock is steep, though exposure is not significant (Fletcher Peak, Bridge Mtn.). Class 4 Climbing steep terrain. The exposure is significant and ropes are highly recommended (Pine Creek Peak). Class 5 Rock climbing. Technical climbing skills are a must. The more you learn about climbing, the better prepared you ll be for the more difficult hikes discussed in this book. Rock scrambling and bouldering can be dangerous and some of the hikes in Red Rock and Mt. Charleston require class 3 and 4 climbing skills. Especially in Red Rock, but also in Mt. Charleston, hikers fall regularly, causing serious injury, sometimes resulting in death. Do not hike alone. Some of the hikes go to such remote areas, it could be days before another hiker would find you. Flora
14 Many of the plants in the Southwestern desert and mountains can be used as landmarks while hiking. By being able to identify plants and trees, you can use them as markers to retrace your steps back to the trailhead. The plants and trees I ve used as landmarks in many of the hike descriptions are identified here. bristlecone pine Twisted, knotty pine found at elevations of 9,000 feet and above, with needles in clusters of five (Mt. Charleston). catclaw A dead-looking bush with catclaw-like thorns that will rip your clothes and skin (Lake Mead). (desert) scrub oak Spiny, many-branched, thicket-forming scrub; occasionally a small tree. Grows up to 20 feet tall. Leaves are irregularly shaped, with sharp pointy ends that tear clothing and skin (Red Rock). juniper A 15- to 30-foot-tall tree with scale-like leaves in clusters of three. They produce blue-black berries (Red Rock). pinion pine Short pine with short single needles on the twigs (Red Rock). ponderosa pine Towering trees that can grow up to 100 feet tall, with long needles in clusters of three and lots of bark (Red Rock and Mt. Charleston). manzanita Small shrub with red-barked branches and green non-spiny leaves (Red Rock). yucca Has a clustered trunk with very sharp, thick, bayonet-like leaves 18 to 24 inches long and white and purple flowers (Red Rock). Fauna Red Rock and Mt. Charleston have a variety of animal life, but except for snakes which are rarely seen or heard the danger level from animals is almost non-existent. The remote hikes starting from Bonanza Trailhead in the Mt. Charleston Area offer the best chance of seeing larger animals. Some of the more interesting animals you might see while hiking are discussed below. The mountain lion, also known as the cougar, puma, or panther, is the second largest North American cat. Mountain lions live up to 20 years and can weigh as much as 165 pounds. They re found around the cliffs in Red Rock and in the mountain ranges of Mt. Charleston. Mountain lions are nocturnal. If you re lucky enough to see one, don t run cats love to chase things. In the 15 years I have been hiking I have never seen a mountain lion. Bighorn sheep are brownish-gray with heavy curling horns. They re one of the desert s most adaptive animals. These animals are amazing to watch as they run straight up the mountain slopes, sometimes leaping 20 feet from cliff to cliff. Herd sizes range from about a half dozen to more than 20. During the hot months they stay near water sources. One of the best ways to get a glimpse of bighorn is to look for movement. When standing still, they blend into the environment. Pronghorn look like deer, only they re smaller, with black markings on their faces. They re often mistakenly thought to be part of the antelope family. They re about four-and-a-half feet long, with tails ranging from three to six inches, and black horns less than a foot long. They weigh from 80 to 105 pounds and travel in bands from a dozen to more than 100. They re fast, and can be seen running at
15 more than 40 mph at Red Rock. Desert mule deer are the most common large mammal found in southern Nevada. They re gray with a darker strip along their back and have a black-tipped tail. Their large, wide ears resemble the ears of a mule, which distinguishes them from other types of deer. Late in the day and at night are their active times. In Red Rock they are found among the thick growth along washes. Burros are sometimes seen along State Route 159 between Red Rock Canyon and Spring Mountain Ranch State Park, 2 miles west. They re tame and friendly, and will approach cars that park along the side of the highway to view them. You might be tempted to feed them, but it s not a good idea for the wild burros to get too dependent on handouts. Wild horses (mustangs) are less common, but are occasionally spotted near Cold Creek in Mt. Charleston. Snakes are seldom seen or heard in Red Rock, and almost never in the Mt. Charleston Area. Most snakes in Red Rock and Mt. Charleston are not venemous. Southern Nevada is home to only five species of venemous snakes, all of them rattlesnakes. The most active months for snakes are April and October, and the most active times are early morning and evening. Rattlesnakes normally make a rattling sound to alert enemies before they come too close. If you hear this sound, walk in the opposite direction. In the 15 years I have been hiking, I have seen only eight rattlesnakes, and I ve never met anyone who was bitten by a snake while hiking. The rule of thumb is watch where you re placing your hands and feet. Cautions Weather Who said it s always sunny in Las Vegas? It is most of the time, but the monsoon season begins in mid-july and continues through August. Many days, Mt. Charleston starts with clear skies, only to give way to afternoon thunderstorms. These thunderstorms can be very dangerous; they re often accompanied by lightning and sometimes hail. Being on top of a mountain in a lightning storm is not fun. The trails often turn into streams, and walking in water increases your chances of being struck by lightning. Your best defense is to pay attention to the weather forecasts and begin your hikes early; many storms don t get going until after noon. Still, sometimes it s a tricky call. On many occasions I ve been on a mountain when it looked certain that it would storm, only to have the dark clouds pass over without a drop of rain. Just use your common sense and watch the sky carefully. Flash flooding is a serious problem at Red Rock, though it does not happen often. Much more likely is rock breaking from being saturated with water. Wait at least 24 hours after it rains to do rock-scrambling hikes in Red Rock. Trail hiking is okay, but you will get muddy. Climbing class 3 and 4 rock when the rock is wet is stupid and dangerous. Red Rock hiking season normally runs from mid-september to mid-may. Temperatures in the summer months exceed 100 degrees. If you hike Red Rock during the summer months, choose the short hikes and go early in the morning. Temperatures before 9 a.m. rarely exceed 90 degrees. Most people hike Mt. Charleston during the summer. Dehydration is a serious problem at Red Rock. If you re not acclimated to the desert climate, bring twice as much water as you think you ll need. A minimum of half a gallon for a four-hour hike is recommended. The old adage Drink before you get thirsty is doubly important in the desert. Any
16 water found on the hikes must be treated before drinking. Use a water filter or tablets to purify it. It s brutally hot around Lake Mead in the summer. Do not hike Lake Mead during summer months. Virtually every summer, someone dies of heat stroke while hiking around Lake Mead. Head up to Mt. Charleston during summer months. The Essentials Since all of the hikes are day hikes, little is needed besides the essentials: this book or some kind of hike description, water, food, headlamp, extra clothing, sunglasses, sunscreen, first-aid supplies, pocket knife, matches, balaclava, poncho, and cell phone. Recommended Hiking Shoes/Boots Red Rock Canyon is unique and therefore calls for a special type of hiking shoe/boot. If you are doing rock-scrambling hikes, you need to have Stealth Rubber-type shoes. The soles of these types of shoes give you the maximum amount of friction on sandstone. They will improve your rockscrambling skills. Currently (March 2011), we are wearing Five-Ten-Marvel shoes. They are true to size and comfortable. Models do become obsolete, so if they are not available when you read this book, go for shoes with Stealth Rubber. Do not wear these shoes in Mt. Charleston or around Lake Mead. The rock will quickly ruin Stealth Rubber. Regular hiking shoes are fine for trail hikes in Mt. Charleston. For cross-country hikes, a mediumweight hiking boot is fine. Regular hiking shoes are fine for Lake Mead hikes. Getting Lost or Stuck It s nearly impossible to get lost on the trails in Mt. Charleston. It s easy to get lost or more correctly stuck at Red Rock. The sandstone terrain looks amazingly similar and there are no trails across the sandstone, so finding your way down can be confusing. But there s always a safe way down; if you got up safely, you can get down safely. Remember to pay close attention to the landmarks and turn around often to see what the view will look like when coming down. Using cairns on exploratory hikes is a good idea. You can always remove them on the way down. Carrying 40 feet of rope or webbing can safely get you out of many jams. Though getting lost in Red Rock Canyon is difficult (you can almost always see a road, a trail, or the mouth of a canyon), getting stuck in a place from which you don t know the way down is much more common. Some of the routes up the sandstone traverse multiple ledges. If you forget where you climbed up to a ledge, you might get stuck until you remember the way back down. If you follow the directions and study the photos in this book, turn around frequently, and pay attention to landmarks and cairns, you ll rarely have a problem. If you do get stuck, the first rule is: don t panic. Study the landscape carefully, back track if you need to, and look for the last place you recognize. You ll soon be back on track. If it s getting dark and you re still stuck, you can call Search and Rescue, but only after you have exhausted other possibilities. Obviously if you are in a life or death situation, call Search and Rescue. Several hikes in this book are easy, safe, and follow well-marked trails. I have detailed a wide range of hikes. Many hikers start with the easy hikes and gain confidence. They soon progress to the
17 difficult hikes. This book includes enough advanced hikes to satisfy those people who are looking for challenges. Hiking Etiquette Most hikers go to the mountains to escape the problems of the city. Let s not bring those same problems to the mountains. Always practice no-trace hiking by using these guidelines. Drive and ride. Mountain bikes are allowed only on roads and trails where such travel is permitted; hike only on established trails or paths, on rock, or in washes. Help keep the area clean. Pack up your trash and recycle it, pick up trash even if it s not yours, and dispose of human waste properly. Bury all human waste at least 200 feet from the trail and at least six inches deep. Protect and conserve desert water sources. Carry your own water. Leave pools, potholes, and running water undisturbed. Allow space for wildlife. Teach children not to chase animals. Leave historic sites untouched. Native American rock art, ruins, and artifacts should be left as is for the future. Admire rock art from a distance. Stay out of ruins and report violations. Volunteering If you enjoy hiking in Red Rock or Mt. Charleston and want to volunteer your time and skills, there are a number of ways to do it. Red Rock Friends of Red Rock This is a not-for-profit corporation of volunteers who assist the BLM to protect the natural and cultural resources of the area. A number of volunteer positions are available. Call Jim Sudduth at 702/ or send an to: jim@friendsofredrockcanyon.org. Mt. Charleston Contact the U.S. Forest Service at 702/ , to sign up for the following volunteer programs. Adopt-a-Trail Program This is a monthly trail clean-up. Backcountry Ranger Volunteers help patrol the high elevations during weekends and holidays. The emphasis is on trail surveys, fire prevention, and firefighting. Campground Maintenance Volunteers can help clean up the campgrounds in the Mt. Charleston Area. Information Education Volunteers answer phones, provide visitor information, and assist in preparing informational literature.
18 Lake Mead To volunteer call 702/ or visit: getoutdoorsnevada.org/events.htm. Group Hiking Clubs meetup.com/hiking-las-vegas The premier hiking club in Las Vegas and home to the 52 Peak Club. It s organized by the author, Branch Whitney. You can actually hike with Branch. There s no cost to join or go on the hikes. Many of the hikes are based on this book and the website: hikinglasvegas.com. Las Vegas Mountaineer s Club Offers hiking and climbing outings in southern Nevada. They also offer classroom and field instruction in rock climbing, ice climbing, backpacking, GPS, and more. Visit their website: lvmc.org. Guide Service Hike This Private guided trail hiking and rock scrambling in Red Rock Canyon. Contact them at 702/393-Hike (4453) or visit them at hikethislasvegas.com. Best Waterfalls (seasonal) Lost Creek Waterfall Red Rock Big Falls Mt. Charleston Best Views from the Summit The Park Red Rock Griffith Peak Mt. Charleston Fortification Hill Lake Mead Coolest Summits White Pinnacle Peak Red Rock Cockscomb Peak Mt. Charleston Northshore Peak Lake Mead Toughest Hikes Mt. Wilson Red Rock Charleston Peak via Big Falls Mt. Charleston The Bests of the Hikes
19 Natural Wonders Turtlehead Jr. Double Slot Route Red Rock Calico Tank Red Rock Bridge Mtn. Red Rock Anniversary Narrows Lake Mead Gold Strike Hot Springs Lake Mead Arizona Hot Springs Lake Mead Liberty Bell Arch Lake Mead Best Family Hikes Calico Tank Red Rock Fletcher Canyon Mt. Charleston Anniversary Narrows Lake Mead Wildlife Viewing Mescalito Peak (Bighorn Sheep) Red Rock Bonanza Peak (horses) Mt. Charleston

20 FAST FACTS Location: 18 miles west of Las Vegas, and less than 30 minutes from the Strip. Driving directions: Drive west on Charleston Boulevard (State Route 159). Turn right into Red Rock Canyon. Best seasons: Spring, autumn, and winter Scenic Loop: Hours are 6 a.m. to dusk. It s a 13-mile one-way paved road that provides access to many of the trailheads. Open every day of the year. Visitor Center: Open daily 8:30 a.m. to 4:30 p.m.; 702/ Fees: $7/car, $30/yearly pass. All National Park passes accepted. Permits: None needed for day hiking Camping: About 2 miles before the entrance to Red Rock on State Route 159 is the Red Rock Campground. $10/night. Water and toilets available. Closed during the summer. Website: redrock.org Elevation range: 3,394 feet (1,034 m) to 7,092 feet (2,161 m) Size: 195,610 acres
21 Hikes: Less than 1 mile to 12 miles; all difficulties Dogs: Must be on a leash Horses: Designated trails only Bicycles: Allowed on Scenic Loop Mountain bikes: Designated trails only Firearms: Not permitted Gasoline: None available Managed by: BLM; 702/ Food: Bonnie Springs located along State Route 159, about 5 miles beyond the turn-off for the Scenic Loop. DIFFICULTY INDEX Okay, it s time to hike. This Difficulty Index will help you determine which hikes are best suited for your level of experience. If you re a first-timer, choose from the Easy category. If you have some experience (or are a first-timer with a high fitness level seeking more than an entry-level challenge), check out the Moderate category. Experienced hikers can go right to the Advanced hikes. A similar index listing for Mt. Charleston is found on pg. 250 and Lake Mead s chart is on pg Happy hiking! Easy Hikes: 20 Calico Hills I Overlook: pg. 49 Calico Hills I Peak: pg. 53 Calico Hills II Overlook: pg. 57 Calico Hills II Scramble: pg. 60 Calico Tank and Peak: pg. 64 Cowboy Cave: pg. 190 Fern Canyon: pg. 155 First Creek Waterfall: pg. 198 Fossil Ridge: pg. 193 Ice Box Canyon: pg. 108 Keystone Thrust: pg. 77 Kraft Mountain Loop: pg. 33 La Madre Springs: pg. 97 Las Vegas Overlook (aka Muffin Boulders): pg. 195 Lost Creek Canyon/Children s Discovery Trail: pg. 83 Lost Creek Cave: pg. 85 Lost Creek Overlook: pg. 90 Oak Creek Canyon: pg. 170 Pine Creek: pg. 110 Turtlehead Jr./Red Cap: pg. 69
22 Moderate Hikes: 12 Calico Hills Loop: pg. 17 Calico Hills Traverse: pg. 22 First Creek Overlook Peak: pg. 243 Gray Cap Peak: pg. 42 Kraft Mountain: pg. 29 Magic Mountain and Crabby Appleton: pg. 113 Oak Creek Overlook: pg. 177 Terrace Canyon: pg. 120 The Park: pg. 246 Turtlehead Jr./Red Cap Double Slot Route: pg. 36 White Rock Hills Loop: pg. 94 White Rock Springs Peak: pg. 79 Advanced Hikes: 16 Black Velvet Peak: pg. 236 Bridge Mountain via North Peak Wash: pg. 102 Bridge Mountain via Fern Canyon: pg. 145 Bridge Vista: pg. 159 Decision Peak: pg. 208 First Creek Peak: pg. 200 Gunsight Notch Peak: pg. 139 Juniper Peak: pg. 172 Mescalito Peak: pg. 123 Mt. Wilson: pg. 219 North Peak via North Peak Wash: pg. 99 Pine Creek Peak: pg. 130 Rainbow Wall via Oak Creek Canyon: pg. 184 Turtlehead Peak: pg. 74 White Pinnacle Peak: pg. 215 Windy Peak: pg. 228 DRIVING DIRECTIONS TO RED ROCK CANYON

23 Driving to Red Rock is easy. From the Las Vegas Strip, head west on Charleston Boulevard, which becomes State Route 159 as you approach Red Rock Canyon. About 18 miles from Las Vegas Boulevard, you ll see a Welcome to Red Rock Canyon sign. Turn right into Red Rock Canyon. Once beyond the toll booth, veer right onto the 13-mile one-way Scenic Loop road. The Visitor Center is located less than 400 yards from the start of the Scenic Loop road. Note that a number of hikes start from outside the loop road; in other words, you don t have to pay the entrance fee and travel the loop. Calico Hills Loop Closed Route From the signed Calico Basin/Red Springs Road, drive 1.1 miles and turn left by the Red Springs sign into the parking lot. Park at the far end of the lot near the picnic tables (Waypoint 1).

24 Comments: This hike has everything: rock scrambling, great scenery, and no entrance fee. It s one of the best level 2 hikes in Red Rock Canyon. Once on the south side of Calico Hills, you ll see a lot of people if hiking on a weekend. The Hike: The trail starts along the right side of the parking lot; see Photo 1. The trail divides after 40 yards. Take the right fork. Your first destination is the saddle in Photo 2. It s about a mile away and a 600-foot ascent. Follow any of the paths that head toward the saddle; they eventually merge into one main trail. The grade increases as you follow a vague path along the left side of the gully below the saddle. You ll encounter some class 2 scrambling in the gully. Before reaching the saddle, the gully flattens temporarily. At the saddle (Waypoint 2), you get a good view of White Rock Hills Peak, the Scenic Loop Drive, and the Grand Circle Trail. Your next destination is the boulder in Photo 3. It s a third of a mile away and you lose about 300 feet in elevation. Follow the path that stays along the right side of the gully about 350 yards until you re forced to the left side of the gully by a large boulder (Waypoint 3). Continue about 200 yards to the boulder in Photo 4 (same boulder as in Photo 3). Now the route heads south (Waypoint 4) on a path for 30 yards to a major wash; see Photo 5. You re now on the south side of Calico Hills. Your next destination is Calico Hills 1 Overlook. It s 1 mile away and you ll ascend 350 feet, but lose over 500 feet. This part of the route is a little tricky to follow. After the first 100 yards in the wash, you ll see Calico Hills II Overlook up the hill to your right. Once you see the Overlook, look for a path on the right side and follow it about 50 yards and then drop back into the wash. Once back in the wash, walk


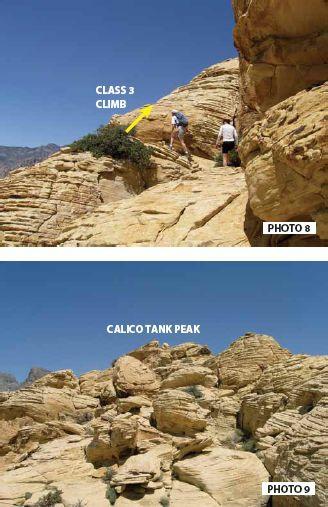
25 40 yards on a large slab of red sandstone (Waypoint 5). Continue another 150 yards on slabs and paths to the small slot in Photo 6 (Waypoint 6). A path resumes at the top of the slot and curves to the left and climbs the ramp to where the hikers are in Photo 7. Once at the top of the ramp (Waypoint 7), Calico Hills I Overlook comes into view and the rest of the route is easy to follow. You are now on the unsigned Grand Circle Trail. When the trail divides, take the left fork. You soon come to a high point where you can see the trail leading to Calico Hills 1 Overlook; see Photo 8. Continue SE to Calico Hills 1 Overlook (Waypoint 8). Go left (away from the parking lot) onto the Calico Hill 1 Overlook trail and follow it 30 yards to a trail just before and to the right of the wooden fence; see Photo 9. Follow the trail back down to the wash as seen in Photo 10. Once in the wash, the walls narrow and you come to a 6-foot pour-off. Once down (Waypoint 9), head SE in the wide wash.
.")
, head for the ridge that s straight ahead. Just before the ridge, turn left onto an old jeep trail.")
26 In 60 yards, scramble over boulders to avoid brush. When you come to the next set of boulders, go left for the easiest way around them. The final down climb is best tackled from the right side. In about 30 yards from the final down climb a trail starts on the left side of the wash (Waypoint 10). As soon as you ascend the trail, you ll see telephone lines off in the distance. Follow the path taking the right fork. The path becomes hard to follow for a few yards. Once the path becomes easy to follow again (Waypoint 11), head for the ridge that s straight ahead. Just before the ridge, turn left onto an old jeep trail. At the high point of the jeep trail, the parking lot is visible. Follow the trail
.")
27 down to the parking lot (Waypoint 1). Calico Hills Traverse Route

28 From Calico Basin, turn right and drive 1.1 miles, then turn left. Drive a few hundred yards and park by the bathrooms. Comments: This is a great scrambling route. Several times you ll be forced off the ridge either to the south or north; going straight won t be an option. This makes the route a lot of fun. Once at the saddle, you have plenty of options. You can bail before the saddle or, once there, continue the traverse to Calico Tank or even Turtlehead Junior. When the high peaks are covered in snow, this route is normally snow free. If there s snow on the route, do not do this hike. The Hike: The hike begins just to the left of the concrete picnic area, as seen in Photo 1 (Waypoint 1). There s no trailhead sign. Walk the gravel road that starts by the sidewalk about 100 yards. The road veers to the left as a path comes in from the right (Waypoint 2). Take the path and head for Calico Hills. The path soon ends, but the direction of travel is obvious. Although you can gain the ridgeline many ways, the route in Photo 2 is easy and has been well-traveled. Waypoint 3 marks the start of the ascent to the ridgeline. Scramble up to the ridgeline veering west as you ascend. Once on the ridge (Waypoint 4), you ll see the Scenic Loop Road off to the south. Head west staying on the south side of the ridge (far side) scrambling past difficulties (class 3 or less). The grade picks up as the route ascends to what is known as Calico 1. Waypoint 5 is the top of the ascent to Calico 1. The route now descends as you head west. Photo 3 shows how the route veers south to avoid climbing the wall. A good landmark is a painting (red, white, and blue) in a rock in Photo 3. Look for the overhanging rock in Photo 4 as you make your way around the south side of the wall in Photo 3. Waypoint 6 is just beyond the overhanging rock. Scramble back up to the ridge. Once on the ridge, you need to get past another obstacle via the traverse in Photo 5. Waypoint 7 is the start of the traverse (exposed, but easy). Once off the traverse, head up an obvious chute and exit left at the scrub oak bush.


29 There s a short class 2-3 scramble to get back up on the ridge. You now veer north up and over boulders and go underneath an overhanging rock to a short down climb and jump across a slot, as seen in Photo 6 (Waypoint 8). Photo 7 shows the next part of the route. I actually step on the scrub oak bush to exit left up the wall. Once up, keep heading west over easy ground until it becomes obvious you have to descend. The south side is your descent route. It s easy and marked by cairns. Once down (Waypoint 9), stay on

30 the south side and continue west over easy rock. At this point you re passing the Calico 1 parking area. Of course, it s some 400 feet below. Soon, the easiest route is to the north side of the ridge. Photo 8 shows the traverse you ll soon be doing. To get to the traverse, go to the right and down a chute to a sick-looking juniper. Exit left at the juniper onto a ledge. Once off the ledge (you re now beneath the traverse), go left and scramble up to the start of the traverse in Photo 8. Waypoint 10 is just past the thin part of the traverse. Follow the ledge around to the south side for about 10 yards. Again, you ll be forced to descend off the ridge on the south side. This is very well-cairned. Waypoint 12 (my GPS skipped over 11) is at the bottom of the descent. Walk about 10 yards, staying on the south side, and look for the bush in Photo 9 (the hiker won t be there!). This is a hard-to-find class 3 down climb. You ll know it when you find it. Once down, hike through the slot, then head west again. The going is easy here for the next 30 yards or so. We re still up high and need to descend. This time the descent is on the north side. Look for the down climb in Photo 10. Descend to the scrub oak (Waypoint 13) marked in Photo 10. Hike through the slot to the west. There s an easy down climb just before the exposed climb in Photo 11. (There s a black-faced hold to make this move.) Once up, veer north over easy rock to the slot in Photo 12. Waypoint 14 is on the far side of the slot. The terrain opens after the slot. Soon you will be forced to the south. Photo 13 shows the ledge
.")

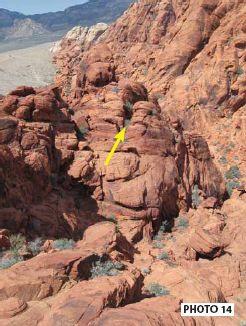
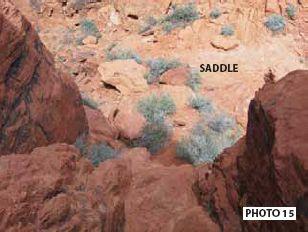
31 you follow around to the left (Waypoint 15). Continue west on wide ledges and descend before hiking to the slot in Photo 14. Waypoint 16 is in the slot. Once through the slot, veer right where you can see the saddle (some call it Guardian Angel Pass). Bypass the first chute and climb down the chute, as seen in Photo 15, to the saddle (Waypoint 17). From here you can continue the traverse, but this description now takes you back to the trailhead. Simply head east following the path down the canyon to the bottom. There are some easy class 3 down climbs, but they can be avoided if you look around. Once down, follow the paths staying near Calico Hills (to the south) until you see the parking lot.
32
. All roads are paved. Comments: This is a fun scrambling route, especially good for beginners.")
33 Kraft Mountain Route From Calico Basin Road, drive 1.1 miles and turn right onto Calico Road. Drive.1 mile and turn left onto Assisi Canyon. Drive.1 mile, turn right onto Sandstone, and drive.6 miles and park (the road ends here). All roads are paved. Comments: This is a fun scrambling route, especially good for beginners. The gully is an easy class 3 climb, but better climbers can find class 4 sections. Watch for catclaw bushes. Photo 1 is an overview of the route to the summit. The Hike: From where you parked, head north on a path that parallels fences on both sides. The path descends steeply into a wash, then back up the other side. Continue about 100 yards to a junction with an abandoned road. Veer west onto the abandoned road and take a quick right onto another abandoned road. Follow the road until it passes the gully in Photo 2. Walk north across the desert to the start of the gully (Waypoint 1).
 The brush disappears around Waypoint 2. Continue a few hundred yards in the drainage to an opening off to the left (Waypoint 3).")
34 There s a short class 3 climb to get into the gully. Once up about 100 feet, the gully curves to the right. Continue up just to the right of the drainage in the gully on easy class 3 rock. (The lower part of the drainage is brushy.) The brush disappears around Waypoint 2. Continue a few hundred yards in the drainage to an opening off to the left (Waypoint 3). There s a great view of Turtlehead Peak from here. From here the terrain backs off to class 1 and occasionally class 2. Photo 3 shows Point 4714, the summit; it s marked with a cairn (Waypoint 4). There s currently a sign-in book. From the summit, head east along the summit ridge; see Photo 4. For the most part, you can stay on the ridge taking in the views both to the north and south. Descend to the first saddle (Waypoint 5). Photo 5 shows large blocks on the ridge. Go north if you want to climb over the blocks (class 3) or south if you want a class 1-2 route past the blocks. If you go around the right side, make sure to stay high near the ridge. Continue to another saddle. Don t try and descend yet; too many cliffs lurk below. Hike along the summit ridge, again taking in the views. Once you see Las Vegas, start looking for the juniper in Photo 6 (Waypoint 6). Veer NE about 40 yards to a large cairn on a boulder; see Photo 7. The descent starts from here.
.")
 and head west on a wide ledge passing another large cairn.")
35 Head down the slope about 80 yards to a large cairn off slightly to the north. If you re tired of the loose terrain, turn slightly north, staying on rock, and descend into the gully (Waypoint 7). If not, you can continue down the loose slope into the gully. As you descend the gully, look for cairns marking a chute. Descend the chute (Waypoint 8) and head west on a wide ledge passing another large cairn. Continue west to a chute, marked by a cairn, and down climb it (class 3). If you don t like the chute,

36 continue west about 30 yards to an easy, but loose, descent. From there, head down the slope to the trail, which is visible. Once on the trail, hike west. Take any path that heads under the power lines. Head for the home with two silver silos on the roof. Your car is on the far side of the home. Kraft Mountain Loop Trail and Route

37 From Calico Basin Road, drive 1.1 miles and turn right onto Calico Road. Drive.1 mile and turn left onto Assisi Canyon. Drive.1 mile, turn right onto Sandstone, drive.6 miles and park (Waypoint 1). The road ends here. All roads are paved. Comments: This is another fun loop hike. There s no fee, great scenery, and a lot of solitude. This hike description includes a class 1-2 workaround of a tricky class 3-4 down climb. Photo 1 is Kraft Mountain. The Hike: From where you parked, head north on a path that parallels fences on both sides. The path descends steeply into a wash and then back up the other side. Continue about 100 yards to a junction with an abandoned road. Veer west onto the abandoned road and take a right fork when it divides (less than 100 yards from the start of the abandoned road). Continue on the path as it weaves around boulders. When the path drops into a small wash and splits, take the left fork (Waypoint 2). Follow this fork about.5 miles to the saddle in Photo 2 (Waypoint 3). This is the only moderately steep part of the hike. From the saddle, continue on the path 350 yards and turn right (Waypoint 4) onto a path that leads down to the wash. When the path goes across sandstone, cairns guide you down the easiest route; see Photo 3. The path resumes at the far end of the sandstone. Continue down the path where it ends in a drop-off above the wash. To avoid a class 3 down climb into the wash, head west 75 yards on a faint path to a class 2 down climb (Waypoint 5) into the wash. This is a little before dense scrub oak. Head SE through the wash. This is locally known as Gateway Canyon. The gray mountain behind you is Turtlehead Peak. The entire wash is very scenic. You ll encounter a few down climbs, all class 2 or easier. When you come to the boulder in Photo 4, follow a faint path up the right bank. (We placed a large cairn on the boulder.) This avoids a tricky class 3-4 down climb. Follow the path about 100 yards across the shelf to an obvious descent slope back into the wash (Waypoint 6).


38 Continue in the wash a little less than a half-mile to a prominent path coming in from the right side (Waypoint 7). Follow the path SE as it starts around the southern end of Kraft Mountain. When you come to a fork, take the prominent right path and continue around the mountain. You ll soon see homes in Calico Basin. Near the homes, numerous paths develop. Take any path that heads under the power lines. Head for the home with two silver silos on the roof. Your car is on the far side of the home.
. Comments: This is the best route to Turtlehead Jr., a local favorite.")
39 Turtlehead Jr. / Red Cap Double Slot Route From Calico Basin Road, drive 1.1 miles and turn right onto Calico Road. Drive.1 mile and turn left onto Assisi Canyon. Drive.1 mile, turn right onto Sandstone Road, drive.6 miles, and turn left on the unsigned gravel road, which serves as a parking area (Waypoint 1). Comments: This is the best route to Turtlehead Jr., a local favorite. The first slot is one of the best in Red Rock! From the summit, you have a variety of options. Photo 1 is an overview of the route from the trailhead. This route is well-cairned.
. Head west on the path and stay on the south side of the drainage. You have a good view of the route from here.")

40 The Hike: Follow the continuation of the gravel road less than a half-mile where it passes by a large foundation. Just past the foundation, the road descends slightly and ends. Follow the southernmost path (Waypoint 2). Head west on the path and stay on the south side of the drainage. You have a good view of the route from here. The path soon drops into the drainage (Waypoint 3), then empties onto slabs of red sandstone. You re now on the north side of the drainage. Continue on the path and across slabs of red sandstone. Photo 2 shows how the route eventually crosses the drainage and heads to the start of the gully. When the path divides, go left, descending into a drainage (Waypoint 4) and over to the start of the gully (Waypoint 5). Scramble a short distance up the gully until a blockage stops your progress. The best way around the blockage is left. Once past the blockage, scramble out of the drainage to the right (Waypoint 6). Walk up steep sandstone about 50 yards until it drops into the drainage. In less than 10 yards, you come to a brushy blockage. Go left (Waypoint 7), up a short path that leads onto angled sandstone along the south bank of the drainage. Don t be lured back into the drainage too soon. Eventually, the south bank drops you into the drainage.
 to the right of the boulder onto a large expanse of flat sandstone. Climb the crack in Photo 4 (class 4) to a ramp.")
. Keep heading west over easy and well-cairned terrain.")
41 Hike 10 yards in the drainage and veer right, climbing a broken wall about 15 feet to a wide ledge. Walk the ledge toward the large boulder in Photo 3 and scramble up (class 3) to the right of the boulder onto a large expanse of flat sandstone. Climb the crack in Photo 4 (class 4) to a ramp. Go left (Waypoint 8) up a short path. Walk the ramp and scramble over a slab balanced on a rib of rock. In a few yards, scramble out to the right (Waypoint 9) to avoid brush. Scramble up sandstone as seen in Photo 5. Continue past cairns to the tree in Photo 6 (Waypoint 10). Keep heading west over easy and well-cairned terrain. Look for the overhanging boulder in Photo 7 (Waypoint 11). When the route is blocked by brush, a path to the left bypasses it. You ll soon pass under the overhanging boulder in Photo 7. About 40 yards beyond the overhanging boulder, descend to the slot as seen in Photo 8. Photo 9 shows the entrance to the slot (Waypoint 12 might be off a little). A pile of cheaters rocks make the climb much easier.
, and squeeze through a constriction. Just before the end of the slot, there s a narrow crack/chute to the right.")
42 Once in the slot, walk a few feet and then go left scrambling up to a wide crack. The slot soon divides. Go into the right fork, scramble up a rib (cheap rock here be careful), and squeeze through a constriction. Just before the end of the slot, there s a narrow crack/chute to the right. (There might be a rope here. Test before using it.) Climb the rope (class 4) to get out onto a wide platform (Waypoint 13). You re just below Upper Calico Tank. Scramble up the sandstone as seen in Photo 10. Once at the tank, you can see Turtlehead Jr. Photo 11 shows where to go next. (Note: The tank may be dry.) Soon, the rest of the route comes into view; see Photo 12. Follow cairns (Waypoint 14) west to a 30-foot wall. Head left around the wall to the climb in Photo 13 (Waypoint 15). Once past the boulders circled in Photo 13, climb the left wall. Now head south (toward Bridge Mountain, which is visible), passing a chute off to the right. Soon, you ll come to the red boulders in Photo 12. Continue to the slot via a wide ledge (Waypoint 16). Scramble through the tight slot and head north to Turtlehead Jr.; see Photo 14.

 to Connection Canyon (locally named). Waypoint 20 is the start of Connection Canyon. This is the same canyon you saw while ascending the route.")
43 You made it (Waypoint 17)! There s a sign-in book hidden in a hole. To the west lies Turtlehead Peak. To the east is Las Vegas and to the SW is the Scenic Loop and Bridge Mountain. This is a good test for the hikes that have lots of class 3 climbing. If you had any trouble, stay away from the Rainbow Wall, Mt. Wilson, Bridge Mountain, Mescalito, and Black Velvet Peak hikes. To Descend: You have lots of options. Descending the route you came up isn t recommended. Descend west to the down climb via a log (Waypoint 18) and into a gully. Once down the gully, head north on a path (Waypoint 19) to Connection Canyon (locally named). Waypoint 20 is the start of Connection Canyon. This is the same canyon you saw while ascending the route. Continue SE down the canyon and eventually to the trail you followed in.

44 Descend the standard Turtlehead Jr. route and follow the trail to Calico Tank. Scramble up to Calico Tank Peak and follow the Red and White route back to the trailhead. Gray Cap Peak Route

45 From the intersection of Charleston Blvd. and I-215, drive west on Charleston 3.9 miles and turn right onto the signed Calico Basin Road. Drive 1.1 miles and turn right onto Calico Road. Drive.1 mile and turn left onto Assisi Canyon. Drive.1 mile, turn right onto Sandstone Road, drive.6 miles, and turn left on the unsigned gravel road, which serves as a parking area. Comments: This is one of the best short scrambling routes in Red Rock and there s no Scenic Loop to drive. This route is well-cairned, but can be tricky to follow in places. You can descend straight off of Gray Cap Peak if you know the route (not included in this description). The Hike: Follow the continuation of the gravel road about 60 yards and veer right (Waypoint 1) onto an unsigned single track path that heads NW (not the path that parallels the road). In 20 yards, the path turns into double-track road that continues heading NW. In 40 yards, turn left onto an unsigned double-track road. In 30 yards, go right onto a double-track road and follow it a little less than a mile to the saddle (Waypoint 2). At some point along this stretch, it becomes a single trail. From the saddle, continue NW on the trail about a half-mile, passing a prominent path before veering right onto a second prominent path, which quickly drops you into the wash. Photo 1 was taken on the path before dropping into the wash and is an overview of part of the route. Head east in the wash 150 yards and scramble up the sandstone, as seen in Photo 2 (Waypoint 3). Use the circled gray
. Follow the drainage less than 40 yards and look for cairns that lead to the right. This is an important turn and is wellcairned; see Photo 3.")
. You re temporarily on a ledge that s on the north side of a deep and narrow drainage.")
46 boulder in Photo 2 as a landmark. Follow a path north across the high desert marked by cairns. At this point, you re left of the drainage in Photo 2. The path travels 100 yards to the drainage (Waypoint 4). Follow the drainage less than 40 yards and look for cairns that lead to the right. This is an important turn and is wellcairned; see Photo 3. Another short-lived path leads you to the ledge in Photo 4. Traverse the ledge (Waypoint 5) and drop into another drainage. Hike roughly 50 yards in the drainage where two cairns mark a class 3 climb on the right side (Waypoint 6). You re temporarily on a ledge that s on the north side of a deep and narrow drainage. Continue to the boulder in Photo 5. Go to the right of the boulder to get above it. Scramble up the face of a steep boulder and down the other side.


47 Stay in the drainage about 40 yards (Waypoint 7) and veer right on a path marked by a large cairn.
.")
48 Continue up the canyon, following cairns. You ll soon be on a ledge high above the drainage. There are lots of cairns here. Just before the rock turns red, there s a thin traverse. Go right and up to avoid the thinnest part of the traverse if needed. Descend into the drainage (Waypoint 8). Continue up the broad drainage over class 2 rock about 150 yards, passing numerous dry tanks to the scramble up the class 3 climb in Photo 6. Follow a ledge to the right, doing an airy traverse/climb (Waypoint 9). Hike 30 yards to the dark boulders shown in Photo 7, and veer left to pass them. Follow cairns about 50 yards over loose rock to the climb in Photo 8 (Waypoint 10). Use the circled scrub oak bush in Photo 8 as a landmark. Follow cairns north as they lead to the top of the ramps in Photo 9 (Waypoint 11). You re now in one of the most scenic areas in the Calico Hills/Turtlehead region. Climb the crack in Photo 10 and traverse across a ledge. Head toward the boulder circled in Photo 11. Continue up loose rock on a faint path (Waypoint 12) to flat ground. From here, the route heads north, then east along the ridge to Gray Cap Peak, shown in Photo 12. If you ve done the Twin Tanks route, you know that route heads NW to the tanks. Head NE descending slightly (Waypoint 13) and follow the route outlined in Photo 13. Head north about 125 yards to the dead tree in Photo 14 (Waypoint 14). The dead tree comes in and out of view as you make your way to it. Head due east toward the limestone (you re still on sandstone) and Gray Cap Peak. In a little over 100 yards, you pick up a path in the limestone (Waypoint 15); follow it less than 100 yards to the peak (Waypoint 16). A sign-in books sits inside a Gatorade container, which needs to be replaced (September 2010). There are great views of several Red Rock peaks out to the south. To the west stand the La Madre

49 Mountains. Turtlehead Peak juts toward the sky out to the west. Las Vegas is visible to the east. To Descend: Retrace your steps. A descent route heads due south down the mountain. It s hard to follow and impossible to describe. As you can see on the topo map, there are some steep sections. It s a great descent route and much faster than retracing your steps.

50 Male Bighorn Sheep are known for engaging in head-to-head combat, which has been observed to last for longer than 24 hours. DesertUSA.com Calico Hills I Overlook Route

51 The signed pull-off for Calico Hills I Overlook (Waypoint 1) is located 1 mile past the fee booth once you turn into Red Rock Canyon from Charleston Boulevard. Comments: This is a good hike to try out your scrambling skills. The overlook offers great views of Calico Basin and Las Vegas. The Hike: Descend the gravel trail 50 yards, passing a sign for the Grand Circle Trail. When the trail ends, head right going between the sandstone boulders and descend into the wash. Photo 1 shows the ramp on the other side of the wash. Cross the wash and hike east about 50 yards diagonally up the ramp (Waypoint 2). Continue east another 40 yards where you intersect a wide slot. Cross the slot seen in Photo 2. Scramble up the far side of the slot to flat ground. Continue east 30 yards paralleling a wall (to your left) to a low spot in the wall and ascend (Waypoint 3). Once up, hike 40 yards to the 75-foot wall. Just before reaching the wall, turn right and climb the chute circled in Photo 3. Waypoint 4 is the top of this chute. Head north toward the gully in Photo 4. The gully isn t visible at first. There s a little exposure to enter the gully (Waypoint 5). The gully is a combination of paths and scrambling. Near the top, veer right into a slot, which leads to open ground (Waypoint 6) as seen in Photo 5. The overlook is just past the boulder in Photo 6.


52 The overlook (Waypoint 7) has a good view of Calico Basin, Kraft Mountain, Gray Cap Peak, and Turtlehead Peak. To Descend: Retrace your steps.
 than the arch on Bridge Mountain.")
53 The Monument, a seldom-climbed peak in south Red Rock, boasts an arch that s much taller (approximately 100 feet) than the arch on Bridge Mountain. Calico Hills I Peak Route
54 Take Charleston Blvd. 16 miles and turn right into Red Rock Canyon. The signed pull-off for Calico Hills I Overlook (Waypoint 1) is located 1 mile past the fee booth. Comments: The peak offers fantastic views of Red Rock Peaks. Photo 1 is an overview of the route. The Hike: Descend the gravel trail 50 yards, passing a sign for the Grand Circle Trail. When the trail ends, veer right, going between the sandstone boulders, and descend into the wash. Photo 2 shows the ramp on the other side of the wash. Cross the wash and hike east about 50 yards up the ramp (Waypoint 2).
 to a low spot in the wall and ascend (Waypoint 3). Once up, hike NW toward the boulder circled in Photo 4.")
55 Continue east another 40 yards where you intersect a wide slot. Cross the slot seen in Photo 3. Scramble up the far side of the slot to flat ground. Continue east 30 yards paralleling a wall (to your left) to a low spot in the wall and ascend (Waypoint 3). Once up, hike NW toward the boulder circled in Photo 4. A path weaves through the brush passing by a brushy slot to the left. Photo 5 (Waypoint 4) shows the long climb the route follows. At the top of the climb, the terrain flattens temporarily (Waypoint 5).


56 Continue scrambling, as seen in Photo 6. The boulder circled in Photo 6 has the word Gary on it. Follow a broken ledge (Waypoint 6) out to the west about 40 yards until an easy scramble leads to the peak; see Photo 7. The peak (Waypoint 7) doesn t have a sign-in book, but it does have fantastic 360-degree views. If
57 you have hiked the Calico Traverse route, the peak will look familiar. To Descend: Retrace your steps. Calico Hills II Overlook Route

58 The signed pull-off for Calico Hills II Overlook (Waypoint 1) is located 2.1 miles past the fee booth. Comments: This is another short and fun scrambling hike in Calico Hills. The overlook offers fantastic views of Calico Hills the mountains that make up the Escarpment and La Madre Mountain. Photo 1 is an overview of the route. The Hike: From the marked trailhead, the trail descends rapidly toward the wash. When the trail forks in about 60 yards, take the first right and then in 20 yards take the first left. Follow the trail into the sandstone wash. Photo 2 shows the three catch basins. If there s water in the last catch basin, climb on the left or traverse on the right side. At the top of the third catch basin (Waypoint 2), the path
.")

59 resumes. The path splinters, but most of the forks lead to the obvious gully some 50 yards away; see Photo 3. Once in the gully, stay near the west wall. After a couple hundred yards, veer to the east side of the gully and scramble up to the saddle (Waypoint 3). From the saddle, hike past the tower in Photo 4, following a path 80 yards NW to the climb in Photo 5. Once up, scramble through a slot until the terrain opens up (Waypoint 4). Walk about 40 yards and scramble up the rock to the south. You can now see the overlook; see Photo 6. You ll descend about 40 feet to a low point (Waypoint 5) before scrambling up to the overlook (Waypoint 6). There s no cairn or sign-in book, but the 360-degree views are well worth the effort. To Descend: Retrace your steps, or, if you re familiar with the area, you can scramble over to Calico Tank and then down the gully you ascended.

60 Calico Hill II Scramble Route

61 The signed pull-off for Calico Hills II Overlook (Waypoint 1) is located 2.1 miles past the fee booth. Comments: There s lots of fun class 2 and class 3 climbing with some exposure. This is another good test hike for the longer scrambling routes. You should have some experience with scrambling before attempting this hike. Photo 1 is an overview of the route. The Hike: From the marked trailhead, the trail descends rapidly toward the wash. When the trail forks in about 60 yards, take the first right; in 20 yards, take the first left. Follow the trail into the sandstone wash. Photo 2 shows the three catch basins. If there s water in the last catch basin, climb on the left or traverse on the right side. At the top of the third catch basin (Waypoint 2), the path resumes. The path splinters but most of the forks lead to the obvious gully some 50 yards away; see Photo 3. Once in the gully stay near the west wall. About 300 yards up, there s an obvious gully off to the NE. A large pinion pine stands at the entrance; see Photo 4. Once near the pine (Waypoint 3), a path leads into the gully. Scramble up the gully to the chockstones in Photo 5.


62 Once past the chockstones, continue 25 yards to an overlook on the north side of the gully. From the overlook (Waypoint 4), you can see the second gully and the high point, your destination; see Photo 6. Descend off the overlook into a six-foot-wide slot. Head south 20 yards in the slot and turn left, entering the gully you saw from the overlook.

. Good views of the Scenic Loop and Las Vegas are seen from the peak.")
63 In about 75 yards from where you entered the gully, boulders create a class 3 climb (Waypoint 5). Continue up the gully to the climb onto the staircase-like rock in Photo 7. Scramble left 15 yards between brush to the chute in Photo 8. Climb the chute to the crack in Photo 9. Climb about six feet up the crack and out of the crack on the right. Scramble about 75 feet up to the top of the dome-shaped boulder (Waypoint 6). Good views of the Scenic Loop and Las Vegas are seen from the peak. To Descend: Retrace your steps. It s a little tricky finding the crack in Photo 9. Pay attention as you scramble up the final climb so you can locate it.

64 Calico Tank and Peak Trail and Route The signed pull-off for Sandstone Quarry is located 2.9 miles past the fee booth. The signed trailhead (Waypoint 1) is at the far end of the parking lot. Comments: This is one of the most popular trails in Red Rock. Water in Calico Tank can vary from dry to a depth of several feet and can be frozen in the winter. The peak is only 15 minutes from the tank and offers great views. The Hike: From the parking lot, follow the wide trail 30 yards where it crosses a wash and resumes by the trail sign on the far side. When the trail divides, take the right fork as indicated by the
 to the right. It s about.75 miles to the tank from here.")

65 trail sign. You soon walk past a signed Agave Roasting Pit, part of Indian history. Just beyond the Agave Roasting Pit, go right as indicated by the trail sign. In a few yards, the trail turns into a gravel wash. In about 40 yards, leave the wash via an unsigned trail (Waypoint 2) to the right. It s about.75 miles to the tank from here. Follow the sandy trail as it heads SE; see Photo 2. The trail disappears as it ascends a sandstone ramp; see Photo 3. Just beyond this ramp, you ascend sandstone steps off to the right. If in doubt of the route, just stay low in the bottom of the drainage. You come to an easy climb by a log in Photo 4. Just past the climb, veer left up sandstone steps. At the top of the steps, veer right across level ground. Soon, you ll ascend two sets of sandstone stairs. At the top of the second set of stairs, you see a notch off in the distance; Calico Tank sits on the far side of the notch; see Photo 5. Continue on the trail to another high point. From here, Calico Tank is just a few hundred yards. After ascending a final set of steps, the terrain flattens. Keep heading the same direction (SE) until Calico Tank comes into view; see Photo 6.


66 Descend to the tank (Waypoint 3). The tank can range from dry (summer months) to icy (winter months). This is a great spot to relax and have a snack. You can return by retracing your steps or scramble to Calico Tank Peak. The scramble is short, but much different than the trail you just hiked. It involves class 3 climbing, using your arms and legs to climb steep (not vertical) rock. It s a 200-foot ascent to the peak.

, head to the high point as seen in Photo 9 (Waypoint 6).")
67 To Calico Tank Peak: Calico Tank Peak stands to the north of Calico Tank. You need to hike to the NE side of the tank before starting the ascent to the peak. Start by walking to the right of the water as seen in Photo 6. Once up, turn left walk about 10 yards and turn left again, ascending a class 2 chute. Veer right and ascend the chute (Waypoint 4) in Photo 7. It s a class 3 climb. At the top of the chute, you get a great view of the tank below. Go left and up as seen in Photo 8. There s a short class 3 climb. Once up (Waypoint 5), head to the high point as seen in Photo 9 (Waypoint 6). Normally, a cairn marks the peak and there s a sign-in book. To Descend: Retrace your steps.
68

69 Turtlehead Jr. /Red Cap Route The signed pull-off for Sandstone Quarry is located 2.9 miles past the fee booth. The marked trailhead is at the west end of the parking lot (Waypoint 1). Comments: If you re looking for a short scrambling hike, this is it. Turtlehead Jr. is one of the highest points in Calico Hills. The scrambling is similar to Bridge Mountain, only shorter. The start of this hike follows the Calico Tank hike. If you like this hike, you should do the amazing Turtlehead Junior Double-Slot Route, one of the best short scrambles in Red Rock Canyon. The Hike: From the parking lot, follow the wide trail 30 yards where it crosses a wash and


70 resumes by the trail sign on the far side. When the trail divides, take the right fork as indicated by the trail sign for Calico Tank. You soon walk past a signed Agave Roasting Pit, part of Indian history. Just beyond the Agave Roasting Pit, go right as indicated by the trail sign. In a few yards the trail turns into a gravel wash. Walk past the unsigned turn-off for Calico Tank (Waypoint 2) and continue in the wash as it narrows; see Photo 1.
.")

71 As the wash bends to the left, take an unmarked dirt path that comes in on the right side and head up to the high point as seen in Photo 2 (Waypoint 3). Descend the other side from the high point and continue until you can scramble up the sandstone to the east as seen in Photo 3 (Waypoint 4). Scramble and walk 150 yards SE to the start of the climb in Photo 4 (Waypoint 5). This is where the fun begins. Climb to the right of the first crack. About 45 feet up, you ll come to a flat spot; go left and continue climbing another crack till you come to a bush. Climb past the bush to the top of the crack. At the top of the crack, climb to the right onto the buttress. Cautiously, step over the crack you just climbed and carefully traverse about 10 feet until the ledge widens (Waypoint 6). Walk another 10 yards (same direction) to the scramble in Photo 5 (Waypoint 7) to your right. Continue a short distance, scrambling past an 8-foot slab of sandstone standing on its side to the top

72 of the chute; see Photo 6. At the top of the chute, the sandstone flattens out. To the north is a 100-foot cream-colored wall. Walk toward the wall. A few feet before the wall, look to your left for a narrow slot. Scramble up the slot. At the top of the slot stand three cracks you must climb one of the class 3-4 cracks. Photo 7 shows the narrow slot and the left-most crack (Waypoint 8). At the top of the cracks, the sandstone turns from cream to red. Head east toward the summit, hiking across a section of broken rock chips, then past two dry-catch basins. The final ascent follows the outline in Photo 8. You made it (Waypoint 9)! There s a sign-in book hidden in a hole. To the west lies Turtlehead Peak. To the east is Las Vegas and to the SW is the Scenic Loop and Bridge Mountain. This is a good test for the hikes that have lots of class 3 climbing. If you had any trouble, stay away from Rainbow Wall, Mt. Wilson, Bridge Mountain, Mescalito, and Black Velvet Peak hikes. To Descend: Although you ll descend by the same route, the sandstone looks amazingly similar and it s easy to become confused. Climb off the summit block and head toward Turtlehead Peak, passing the catch basins. Once you see the rock change from red to cream, go left and look for the crack you climbed. Go down the narrow slot. From there, turn right and look for the chute that had the large slab. Climb down the chute. Don t turn left until you can t climb down the chute any farther. Walk to the left and cross over the crack, then onto the buttress. Climb down the crack toward the bush. At the bush, go left and walk down the beehive sandstone. Head NW 150 yards looking for the gravel-filled wash. Follow the wash about 30 yards to a faint dirt path that appears to your left. Follow the path, which quickly disappears into sandstone, and go down the other side. The dirt path starts up again. Follow it until it dumps you into another gravel wash. Go left into the wash (same as you hiked in earlier) and follow it to the trailhead.

73 Turtlehead Peak Trail The signed pull-off for Sandstone Quarry is 2.9 miles past the fee booth. The signed trailhead is at the far end of the parking lot (Waypoint 1). Comments: Turtlehead Peak, Photo 1, is the most climbed peak in Red Rock Canyon. This BLM Trail is very hard to follow and needs more signs; however, the direction of travel is fairly obvious and the views from the peak make it worthwhile. The Hike: Hike NW 75 yards on the trail until it disappears into a shallow wash. Walk NW 10 yards in the wash to a sign where the trail resumes. Continue on the trail to a major fork where a small sign indicates to take the left fork to Turtlehead Peak (Waypoint 2). The trail climbs a small hill and then descends into the wash. Walk about 50 yards NW in the wash. A sign indicates where the trail resumes. The trail forks again; take either fork, as they soon rejoin. The trail soon drops into a wash (Waypoint 3) and travels about 60 yards before the trail continues.
 and enters the wash.")
 and follow it to the ridge (Waypoint 7). Once on the ridge the trail resumes.")
74 The trail curves north and heads directly for Turtlehead Peak; see Photo 2. Follow the trail several hundred yards toward the ridge. Soon the trail starts to spider web, but the direction of travel is obvious. The trail descends (Waypoint 4) and enters the wash. Photo 3 shows the rest of the route and the class 2 climb (Waypoint 5) that lies ahead. Once beyond the climb in Photo 3 veer left and follow a path until it ends in a wash (Waypoint 6). Continue to the ridge that lies about 200 yards away. Just pick one of the numerous paths (they are all loose) and follow it to the ridge (Waypoint 7). Once on the ridge the trail resumes. Head SE a quarter of a mile to the peak. The views from the summit are well worth the effort. There s a sign-in book in an ammo box at the peak (Waypoint 8). To Descend: Retrace your steps by heading NW down the trail. Keep an eye out where the trail turns south and heads down the slope and into the wash. Once in the wash watch for the trail on the west side of the wash to resume. Follow the trail back to the parking lot.

75 Keystone Thrust Trail The signed gravel road for White Rock Springs is 5.8 miles past the fee booth. Drive a half-mile up the gravel road to the trailhead; see Photo 1 (Waypoint 1). Comments: The trail is the shortest hike that leads to the famous Keystone Thrust fault line. The Hike: The trail starts off with a slight incline as it heads due north. It soon passes a roasting

.")
76 pit, marked by a BLM sign. The trail crosses a wash in 80 yards and veers to the right; see Photo 2. Hike another 75 yards and go right at the signed fork. You ll immediately walk up steps made from railroad ties as the trail heads for Cactus Hill. It curves to the west of Cactus Hill, then descends onto the sandstone as seen in Photo 3 (Waypoint 2). Sandstone on the east side and the gray dolomite rock and vegetation on the west side mark the fault line. The fault line is the result of an earthquake millions of years ago. To Descend: Retrace your steps.

77 White Rock Springs Peak Route The gravel road for White Rock Springs is 5.8 miles past the fee booth. Drive a half-mile up the gravel road to the trailhead (Waypoint 1). Comments: This is a good hike to introduce people to scrambling. There are plenty of options to do more scrambling if you want. Route finding is easy until the route heads south. The peak is visible from the trailhead; see Photo 1.
. There s no trail or path to follow.")
.")
78 The Hike: Follow the signed Keystone Thrust Trail 100 yards where it crosses the wash. Head west in the wash; do not continue on the Keystone Thrust Trail. Hike the wash 40 yards and then head south up the slope to the ridge; see Photo 2 (Waypoint 2). There s no trail or path to follow. Once on the ridge (Waypoint 3), there s a faint path along the west side of the ridge. Follow the path about 50 yards to the chute in Photo 3. Waypoint 4 is the top of the chute. There s another path to follow that s just to the north of the crest of the ridge. Once this path fades, keep hiking NW on the ridge about 400 yards to the start of another path (Waypoint 5). Follow the path, passing Waypoint 6 where the grade temporarily flattens. Photo 4 shows the next bump you ascend on the ridge. The peak is off to the left. Continue almost 700 yards to a break in the ridge as seen in Photo 5 (Waypoint 7).
. The route now travels to the west side and ascends slabs to the summit (Waypoint 9).")
79 Once through the break the route heads south and the route-finding becomes more demanding. Follow the line of least resistance on the west side. You ll soon descend to an obvious saddle. Hike around to the east side on a faint path and head up to the notch in Photo 6 (Waypoint 8). The route now travels to the west side and ascends slabs to the summit (Waypoint 9). From the peak, you can see the formidable route up the north side of White Rock Hills Peak. The south side of White Rock Springs Peak has a 300-foot drop-off. If you plan to do White Rock Hills Peak from here, you must backtrack to the correct descent gully. This route is on my website: To Descend: Retrace your steps.

80 When planning to climb any peak made of sandstone, it is recommended that you wait 24 to 48 hours after major rains or snow to allow the rock to dry sufficiently. The Bureau of Land Management Lost Creek Canyon/Children s Discovery Trail Trail
81 Turn right from Charleston Blvd., drive to the fee booth, and through the Scenic Loop gate. Drive 7.3 miles and turn right at the marked turn-off for Willow Springs. Drive.2 miles to the marked Lost Creek parking area. Comments: This is a great beginner s hike. The seasonal waterfall is spectacular, considering it s in the desert. You can start at either trailhead, since they form a loop. Photo 1 is the waterfall during late winter. The Hike: The Lost Creek Trail heads SW toward the mouth of Lost Creek. The trail remains almost flat the entire hike. In about 50 yards, the trail climbs enough to see the greenery near the mouth of the canyon, an unexpected sight in the middle of the desert. The trail crosses Red Rock Wash and goes up a set of stone steps. Soon a minor fork comes in at the left, which leads to the creek. It s only a 30-yard walk, well worth the effort. There is a metal bench for people to sit and view the water. The trail soon encounters another fork, which leads to the same creek. As the trail climbs a small hill, it passes by two wooden benches and divides. If you want to make a loop out of the hike without going to the waterfall, go right at the divide and continue onto the Children s Discovery Trail. Most hikers continue on the Lost Creek Trail to the waterfall. After about 100 yards, you ll finally cross Lost Creek. A boulder has fallen from above providing an arch the trail goes under. The waterfall is in sight from this point. To Descend: Retrace your steps or start back on the same trail, crossing Lost Creek and heading west onto the Children s Discovery Trail by the wooden benches. Follow the trail to the parking lot.
.")
82 Lost Creek Cave Trail and Route The signed pull-off for Willow Springs is 7.3 miles past the fee booth. Turn right and drive.2 miles to the signed Lost Creek parking area (Waypoint 1). Comments: This is a great beginning scrambling hike for kids with adult supervision. There s a big payoff at the cave that makes for a great photo opportunity (see the last photo). This route was very well-cairned when I last looked.

 and stops at the boulders in Photo 3 (Waypoint 3).")
83 The Hike: Hike 50 yards south on Lost Creek Trail and turn left onto the signed SYMC Trail. In less than 100 yards, the trail crosses Red Rock Wash. Rocks outline the trail through the wash. The trail resumes and soon crosses another wash. Veer left as this wash crossing is harder to follow. The trail resumes in about 10 yards. Follow the trail about 50 yards and leave the trail heading up the path in Photo 2 (Waypoint 2); the trail makes a hard left here. Follow any of the numerous paths about 50 yards up the slope toward the wall. Just before the wall, the path curves west (right) and stops at the boulders in Photo 3 (Waypoint 3). Head west on a path walking on top of two flat boulders to the climb in Photo 4 (Waypoint 4). Once on the boulder, turn south and scramble up to flat rock. Your e now on top of the wall. Head east about 20 yards to the path in Photo 5. Follow the path about 30 yards. The cave is in sight now; see Photo 6. There s one more wall you have to climb. Good climbers will have no problem, but beginners or those with children will want to veer left to the tree in Photo 7 and climb the wall here (Waypoint 5).

.")
84 Keep scrambling up until you see the east side of the cave in Photo 8. Keep ascending until you see the opening in the cave in Photo 9 (Waypoint 6). To Descend: Retrace your steps.
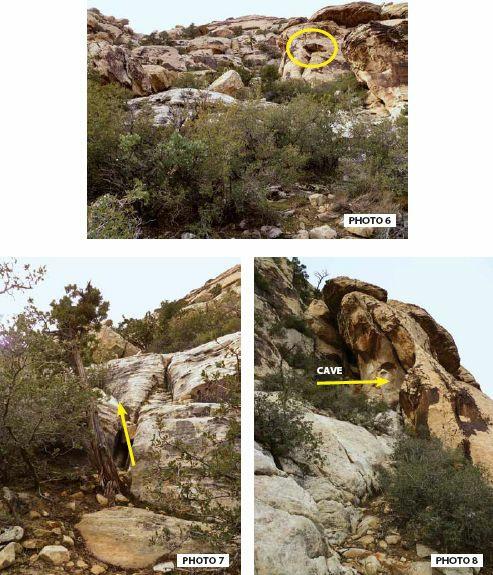
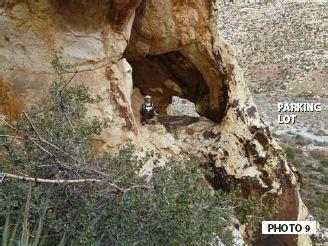
85

86 Lost Creek Overlook Trail and Route The signed pull-off for Willow Springs is 7.3 miles past the fee booth. Turn right and drive.2 miles to the signed Lost Creek parking area (Waypoint 1). Comments: An easy route with a big reward awaits anyone who has a couple hours and the desire to see the upper Lost Creek Waterfalls. This hike avoids the crowds that the main waterfall can have. The best chance of seeing the falls flowing is during late winter and early spring. I ve seen bighorn
.")
.")
87 sheep numerous times on this hike. Photo 1 is an overview of the route. The Hike: The hike starts at Lost Creek Trail and heads west. It soon crosses Red Rock Wash. After ascending a series of stone steps, the trail climbs wooden steps and onto a boardwalk. In less than 100 yards, turn west on an unsigned trail (Waypoint 2). Photo 2 shows a boulder to help you identify the trail. In 40 yards, you ll pass a kiosk explaining how ancient people lived in the area. Follow the trail about 100 yards to a sign that reads: Willow Springs Trail.85 miles. Go left onto this trail and weave between the wall and boulder in Photo 3 (Waypoint 3). Walk about 20 yards and veer right onto the main trail. Photo 4 shows an overview of the next part of the route. Many paths branch off from this main trail. Make sure to stay on the main trail. Hike about 100 yards and turn right (Waypoint 4) onto the path by a wilderness sign. (It might be missing.) Hike 10 yards and again take the right fork. Continue about 40 yards to a major fork that heads south up the slope (Waypoint 5). If you stay on the main trail, it starts to descend beyond this point. Follow the path about 75 yards to the wall in Photo 5. Scramble up the wall. The ascent is easier by going to the west. Once up, head east on the sandstone ledges (Waypoint 6) to the boulder circled in Photo 6. From the boulder (Waypoint 7), go south and head toward the upper Lost Creek Waterfalls, which soon

88 come into view. If the upper falls are flowing, you can walk down to the top of the lower falls. Start your descent as seen in Photo 7 (Waypoint 8). Carefully make your way to the top of the lower waterfall. There s exposure here. If you slip and fall, you ll die. To Descend: Retrace your steps back to the path leading down the slope. Turn left onto the main trail and follow it back as it descends into Red Rock Wash. Cross the wash and follow the trail to the paved road. Go east and follow the road about a third of a mile back to the trailhead. This is a little quicker than going the way you ascended.

89 White Rock Hills Loop Trail

90 The signed pull-off for Willow Springs is 7.3 miles past the fee booth. Turn right and drive a halfmile to where the pavement ends (Waypoint 1). Comments: This is a good fitness-type hike. In fact, many people jog this loop. Since this is a loop hike, you can begin at White Rock Springs or at Willow Springs. The hike follows many different BLM trails. I chose to begin the hike at Willow Springs, since it s a paved road. The Hike: From where you parked, start hiking on the unsigned Rocky Gap Road. A large sign reads, Not a County Maintained Road, near the start of the road. In about a half-mile, turn north onto the signed La Madre Springs Trail as seen in Photo 1 (Waypoint 2). The grade is mild. To the east stands the backside of White Rock Hills. Three large boulders and a small trail sign mark where you turn right onto a different trail, leaving the La Madre Trail; see Photo 2 (Waypoint 3). The trail weaves NE around the back side of White Rock Hills Mountain. It has a slight incline as it crosses a dry wash. You ll soon pass a small hill of brown rocks that look out of place. When the trail passes the reddish sandstone in White Rock Hills Mountain, the incline becomes moderate. The trail climbs a small hill, which lies directly in front. At the top of the hill there s a good view of Calico Hills to the east and the Rocky Gap Road to the south. As the trail heads NE, it weaves around the north side of White Rock Hills. A gentle descent marks the coming of White Rock Springs parking
91 lot. The signed trail continues in the SW corner of the parking lot (Waypoint 4). Follow the trail about 100 yards and go left at the fork onto the abandoned dirt road. The trail descends as it passes to the east of White Rock Hills. The trail drops into a ravine. At the bottom of the ravine the trail veers left, and then weaves through a patch of bushes before climbing out of the ravine. At the top of the ravine the trail travels down into a depression, which is a collecting place for water, evident by the amount of trees and greenery. A small ridge to the east is the trail s next destination. Once over the ridge, the unsigned turn-off for the Grand Circle Trail comes in from the left (SE). Do not turn onto the Grand Circle Trail. Soon the paved road to Willow Springs comes into view. The trail gently descends as it heads west toward Willow Springs parking area. Go right at the intersection, as the trail parallels the road. (If you head straight you would cross the road and be at Lost Creek trailhead.) The trail crosses a concrete slab that is part of a BLM exhibit of an ancient roasting pit. The trail continues on the far side of the concrete; do not go left onto the spur trail. Once the trail passes a boulder the size of a house, go left 30 yards to the Willow Springs parking lot. Follow the road a short distance to your car. There are more routes to White Rock Hills Peak than any other peak in Red Rock Canyon.
. There s a parking area along the left side of the road.")
92 La Madre Springs Trail The signed pull-off for Willow Springs is 7.3 miles past the fee booth. Turn right and drive to the end of the paved road and then drive another half-mile on the gravel road to the sign in Photo 1 (Waypoint 1). There s a parking area along the left side of the road. Note: A high-clearance vehicle is needed to drive to the trailhead. Comments: La Madre Spring is a year-round water source for animals in the area. There are great views of the rugged west face of White Rock Hills Mountain along the trail. If you don t have a highclearance vehicle, you can walk the Rocky Gap Road to the trailhead. This adds 1 mile total to the hike.

93 The Hike: Follow the road north as it heads for the springs. In about a half-mile, you pass the signed turn-off for the White Rock Hill Loop Trail (Waypoint 2). Stay on the main trail. When the trail passes a grove of juniper trees, look for concrete foundations. These are the remains of cabins and an archery range. The trail soon comes to a high point, then descends slightly to the springs and dam as seen in Photo 2 (Waypoint 3). To Descend: Retrace your steps. North Peak via North Peak Wash Route
94 The signed turn-off for Willow Springs is located 7.3 miles past the fee booth on the Scenic Loop Road. It s.6 miles drive on the paved road to the start of the unsigned and rough Rocky Gap Road. Walk, or drive a high-clearance 4WD vehicle, 2.4 miles along the Rocky Gap Road and park off to the right (Waypoint 1). Note: Your mileage will vary on the Rocky Gap Road, but the parking spot is obvious, though not signed. Comments: North Peak used to be listed as the highest sandstone peak in Red Rock Canyon. GPS units have revealed it s actually the second highest peak, Mt. Wilson being the first. This route travels up the scenic and steep North Peak Wash. This is the real North Peak, not the crappy limestone peak the BLM lists. Don t attempt this hike in high winds. The hike: Continue south on the Rocky Gap Road about a third of a mile (it s faster to walk than drive) to the North Peak Wash. It will be to your left, as seen in Photo 1 (Waypoint 2). The North Peak Wash is a strenuous scramble with 1,300 feet of elevation gain in 1,100 yards. In the first hundred yards, the scenery changes dramatically from the gray limestone to the reddish sandstone marking the Keystone Thrust, where younger sandstone lies on top of the older limestone. There are two class 3 dry waterfalls to climb. Approach both waterfalls from the left side. Make sure to stay in the main wash; don t veer into the south-heading forks. The top of the wash is known as Top of the Escarpment (Waypoint 3). The terrain levels out here and you have a good view of North Peak, which looks more like a bump than a peak from this angle; see Photo 2. Approach from the south side and scramble to the summit (Waypoint 4). To Descend: You can descend the wash or hike down the North Peak Path. The path is much easier on the knees. If you choose to hike the path, start by descending to the ridge in Photo 3, where the North Peak Path begins (Waypoint 5). A large cairn marks the path if the wind didn t blow it down. Follow the path down the sandstone looking for cairns. Once the path enters the limestone it s very easy to follow and you ll be able to see your car.

95 You lose about four degrees in air temperature for every 1,000 feet you ascend.

96 Bridge Mountain via North Peak Wash Route The signed turn-off for Willow Springs is located 7.3 miles past the fee booth on the Scenic Loop Road. It s.6 miles drive on the paved road to the start of the unsigned and rough Rocky Gap Road. Walk, or drive a high-clearance 4WD vehicle, 2.4 miles along the Rocky Gap Road and park off to the right (Waypoint 1). Comments: Bridge Mountain is the crown jewel in Red Rock Canyon. From any angle it looks impossible to climb without using ropes. This route takes you around the vast Ice Box Canyon with 1,000-foot vistas down into the depths of the canyon. You ll cross the famous Keystone Thrust where
 to the North Peak Wash.")
97 the older limestone lies over the younger sandstone. This is a must-do route for any serious peak bagger. Look for two black lines marking the route beginning at the first chute. Do not attempt this hike in high winds. The Hike: Continue south on the Rocky Gap Road almost a half-mile (it s faster to walk than drive) to the North Peak Wash. It will be to your left; see Photo 1 (Waypoint 2). The North Peak Wash is a strenuous scramble with 1,300 feet of elevation gain in 1,100 yards and two class 3 dry waterfalls. Approach and climb both waterfalls from the left side. As you ascend the North Peak Wash, you cross from limestone to sandstone marking the Keystone Thrust, where younger sandstone lies on top of the older limestone. Make sure to stay in the main wash; don t veer into the southheading forks. The top of the wash is known as Top of the Escarpment (Waypoint 3). The terrain levels out here and you have a good view of North Peak, which looks more like a bump than a peak from this angle. Head SE 125 yards to the orange boulder in Photo 2 (Waypoint 4). At the boulder you can see Bridge Mountain out toward the southeast. From this point you ll hike south around various forks of Ice Box Canyon before intersecting the traditional route to Bridge Mountain. Descend south off of the sandstone and follow a hiker s path about 1,200 yards to the reddishbrown sandstone bowl that sits at the top of a fork of Ice Box Canyon. This bowl is visible from the orange boulder; see Photo 3. You have a great view into Ice Box Canyon along the bowl. Another hike climbs out of Ice Box Canyon and up this bowl. See my website for the route. Once across the bowl, descend off the east side (Waypoint 5). Hike south into a red-bottom slickrock wash. Your next key landmark is the red crag in Photo 4. Eventually, you ll come to the last fork of Ice Box Canyon (Waypoint 6). Go to the west to get around it. Once past this fork, head NE across the sandstone. Make sure to stay about 50 yards below the red crag in Photo 4. Photo 5 provides an overview of the next part of the route. Just beyond the crag, you ll descend onto a shoulder that leads to Bridge Mountain. From here, you ll head toward Bridge Mountain by climbing down the shoulder to a bench. You can t veer too far off course because of the sheer drop-offs on either side. Look for cairns to help keep you on course.
.")
98 The first part of the route across the shoulder is flat with numerous and somewhat confusing cairns marking the way. Just keep heading toward Bridge Mountain. The second part of the route descends nearly 300 feet and is well-marked. You have to navigate three chutes to make this 300-foot descent. Photo 6 shows the first chute (Waypoint 7). Follow cairns and black lines past the manzanita to a pinion that marks the top of the second chute (class 3) as seen in Photo 7. Once down, hike 20 to 30 yards heading directly for Bridge Mountain and scramble down the third chute. About 10 yards beyond the chute, down climb the final wall (class 3). You ve descended the shoulder. Hike NE across the bench to the base of Bridge Mountain (Waypoint 8). The base is a safe place to leave hikers who are having second thoughts. Photo 8 shows an overview of the first part of the climb. Follow the yellow lines up the crack. If it s windy, stay in the crack; otherwise, climb out of the crack to the right and up the beehive sandstone as indicated by the yellow arrows. People who have a fear of heights should stay in the crack. The climb outside of the crack is exposed. Staying in the crack is more protected, but it s a harder climb.


99 When the beehive sandstone levels, a line of rocks directs you west. Step over the crack, follow the ledge 10 yards, turn north, and scramble up the sandstone 75 yards to the natural bridge; see Photo 9. On the other side of the bridge (arch), a giant ponderosa pine leans against the sandstone. This is a great area to take a break and photos. Go under the bridge and friction climb along the left wall. A log lies near the wall. At the top of the bridge the dome-shape peak of Bridge Mountain can be seen. Go SE across the sandstone rim and around the Hidden Forest.


100 The final ascent heads NE along a steep ramp, which is well marked with cairns; see Photo 10. At the top of the ramp, head south 40 yards to the peak (Waypoint 9). A cairn with a sign-in book inside an ammo box marks the peak. A natural shelter lies just below the peak. This is a good place to have lunch and escape the wind. The view from the peak is awesome. To Descend: Retrace your steps back to the Top of the Escarpment (Waypoint 3). From here you can descend the steep North Peak Wash or hike down the North Peak Path. The path is much easier on the knees. If you choose to hike the path, start by descending down to the ridge in Photo 11, where the North Peak Path begins (Waypoint 10). A large cairn marks the path if the wind hasn t blown it down.


101 Follow the path down the sandstone looking for cairns. Once the path enters the limestone, it s very easy to follow and you ll be able to see your car. Ice Box Canyon Trail and Route
102 Drive past the fee booth and through the Scenic Loop gate. The signed parking area for Ice Box Canyon is 8 miles past Scenic Loop gate (Waypoint 1). There are bathrooms at the trailhead. Comments: Winter offers the best chance to see the waterfall flowing; however, the water makes it more difficult to reach the waterfall. This popular hike can be done in the summer months, if you get an early start. Be careful not to twist an ankle on the numerous rocks on the trail. Photo 1 shows Ice Box Canyon from the start of the trail. The Hike: The trail heads SSW as it descends toward Red Rock Wash. As the trail crosses the wash, it heads to the right, instead of going directly across. Rocks mark the left boundary of the trail. Flat rocks are used as stairs as the trail climbs out of the wash. Just before reaching the top of the bank, the trail goes off to the right and continues toward the mouth of the canyon. The incline becomes slight as the trail passes manzanita bushes and desert scrub oak. Although spur trails have developed, continue on any trail toward the mouth of the canyon. In the winter months, the snowmelt from above fills the stream with rushing water, which is strange to hear as you walk through the middle of a desert. The trail travels near the top of the wash. Huge ponderosa pines lie at the edge of the stream. Numerous side paths head down into the wash, but for faster travel, stay on the trail. When the trail divides, take either fork as they rejoin in about 75 feet. As you near the mouth of the canyon, walls rise hundreds of feet. The walls prevent the sun from shining in the canyon, hence the name Ice Box.
 to reach the waterfall.")

103 The trail veers left and descends down into the wash (Waypoint 2). It s easy to miss this turn-off; however, if you do, the trail ends shortly thereafter. Just retrace your steps, about 30 yards, to the turn-off. Once in the wash, it s about a quarter-mile of boulder hopping (class 2) to reach the waterfall. Many side paths off to the left have been created to avoid the water. These paths are not maintained by the BLM and are very brushy. Just head deeper into the canyon; you can t get lost. Photo 2 shows the scramble to the base of the waterfall. These are class 3 friction moves. Sticky rubber shoes are recommended. The waterfall ranges from dry in the summer months to roaring in late winter and early spring. To Descend: Retrace your steps. Look to your left for the official trail that leads out of the wash. It s not marked by the BLM.
104 Pine Creek Trail and Route The signed parking area for Pine Creek Canyon is 10.3 miles past the fee booth. Comments: This is a great beginner s hike with excellent scenery, history, and a year-round pool. Although you can end the hike at any point, the pool is very scenic and refreshing. This hike travels through the south fork of Pine Creek, as seen in Photo 1. The Hike: Pine Creek Trail descends in a southerly direction and soon turns west toward the mouth of the canyon. Mescalito, a small but majestic pyramid-shaped mountain, splits the canyon into north and south forks. This route heads into the south fork. When the trail passes the concrete foundation of the old Wilson homestead, you ve hiked.8 miles. The trail divides a little past the foundation. Head right when the path forks. The juniper tree in Photo 2 is your landmark (Waypoint 2). The trail descends in about 30 yards and divides; again, take the unsigned right fork. The trail again divides in about 40 yards. Go straight following a path through the brush and descend into the wash. Hike about 50 yards in the wash and exit the wash, as seen in Photo 3 (Waypoint 3). The path climbs steeply for about 50 feet before leveling off. Follow the most prominent path (too many side paths to describe) as it heads SW and ends at the main wash (Waypoint 4). You re now in the south fork of Pine Creek Canyon. The wash heads SW and is mostly class 1. Numerous paths have been created to avoid walking in water; however, most months the wash has little water. After several hundred yards, you ll come to a pool that is the perfect place to sit and admire the beauty of Pine Creek; see Photo 4. The pool marks the end of the hike, as continuing up the canyon involves some class 3 scrambling. Keep an eye out for bighorn sheep. They come down to the wash for water. These amazing animals are the acrobats of the canyons. They seemingly run up vertical walls with ease. To Descend: Retrace your steps.
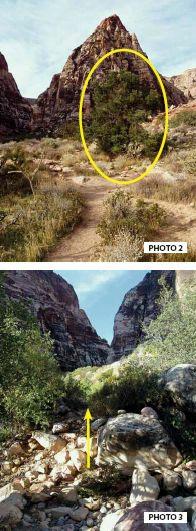
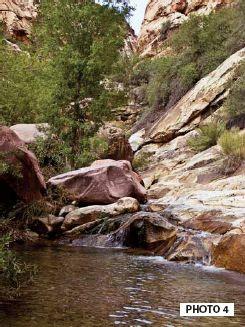
105
106 Magic Mountain is considered one of the best short hikes in Red Rock Canyon by most hikers.

107 Magic Mountain and Crabby Appleton Route The signed parking area for Pine Creek Canyon is located 10.3 miles past the fee booth (Waypoint 1). Comments: This is a great winter hike; It s short, east-facing, and has relatively low elevation. The route twists and turns, appearing to dead end before reaching the summit of Magic Mountain. From there, you have the option of bagging Crabby Appleton, about 20 minutes away. The descent is down the climber s gully, much faster than retracing your steps. Photo 1 is Magic Mountain from the trailhead. The Hike: Follow the Pine Creek Trail.8 miles to the old Wilson homestead. It s to the left of the trail. Just beyond the homestead, go left on the signed Arnight Trail (Waypoint 2). Follow it about 50 yards and cross the creek (normally dry). In about 30 yards, go left on the signed Arnight Trail. The trail divides in about 10 yards; go left and walk up the hill. About 40 yards after the trail flattens,
.")
, turn right and keep ascending. When the path forks, veer left and keep ascending. Finally, you ve gained the slope and the terrain flattens (Waypoint 8).")
108 leave the trail (Waypoint 3) and head southwest following cairns; see Photo 2. In about 50 yards, a path begins (Waypoint 4). Follow the path about 100 yards where it ends at a drainage (Waypoint 5). The drainage is mainly class two and decent rock. When you come to a 30-foot wall, climb the crack in Photo 3 (Waypoint 6). At the top of the climb, go left onto an obvious path that leads to an easy 10-foot down climb. Ascend a steep path and veer right when brush blocks forward progress. At a small boulder field (Waypoint 7), turn right and keep ascending. When the path forks, veer left and keep ascending. Finally, you ve gained the slope and the terrain flattens (Waypoint 8). Now the fun begins! Head southwest, following a path for about 60 yards to the tree growing out of the rock in Photo 4. Climb the crack (class 3+) below the tree (Waypoint 9). Once up, walk 10 feet, turn right, and follow an obvious path through the brush. Climb the six-foot wall and exit left. Traverse the exposed ledge in Photo 5 (Waypoint 10). Scramble up and over large boulders. Make your way to the still-standing, burnt, dead tree in Photo 6. There s a short down climb before you get to the dead tree.
, hike to the black varnished wall in Photo 8. Drop down into a slot just below the black wall.")
 In about 40 yards, climb a class 3 wall (Waypoint 13). Continue to the point where the path makes a hard right (Waypoint 14).")
109 Just beyond the tree, turn right and follow a path 30 yards to a cairn marking a slot. Photo 7 shows a window, a key landmark. Scramble up the slot and turn left before the window. Climb over the boulders and crawl through the tunnel. Once through the tunnel (Waypoint 11), hike to the black varnished wall in Photo 8. Drop down into a slot just below the black wall. Climb down out of the slot using the tree and scramble through the tunnel in Photo 9. Once through the tunnel (Waypoint 12), go left onto a path that stays along the left wall of the gully. (From here to the chimney the route is fairly obvious.) In about 40 yards, climb a class 3 wall (Waypoint 13). Continue to the point where the path makes a hard right (Waypoint 14). Follow the obvious path past Waypoint 15, up and over rock to the class 3 chimney in Photo 10 (Waypoint 16). Climb the chimney, exit right, and walk to the official summit (Waypoint 17), only 10 yards away. The summit offers great and unique views of numerous other peaks in the area. You can climb the class 4 crag in Photo 11. There s also a sign-in book there.


110 To Crabby Appleton: Doing Crabby Appleton is optional, but you ll want to follow the route to the top of the climber s gully. It s a much faster descent than retracing your steps. Photo 12 shows the magnificent ridge that leads to the summit of Crabby Appleton. Getting over to the ridge encompasses some tricky route-finding. The south side of Magic Mountain has a lot of crappy rock. Be careful. The descent is well-cairned. To begin from the summit of Magic Mountain, head south, descending to the half-dead tree that lies between two crags. Hug the left side next to the scrub oak to avoid loose rock. Down climb two obvious spots located in the crappy-rock section. Once down the second down climb (they re only 10 yards apart), walk 30 yards SE along the base of the wall (Waypoint 18) until brush forces you to climb a small wall on your left. Once up you ll see the crack that leads to the start of the Crabby Appleton ridge; see Photo 13.
 and head west along this cool ridge; see Photo 14. You soon come to the obstacle in Photo 15.")
111 If you don t want to do Crabby Appleton, find a path to your left that leads to the descent gully (Waypoint 22). Skip to Descending the Climber s Gully for directions. Climb the crack in Photo 13 (Waypoint 19) and head west along this cool ridge; see Photo 14. You soon come to the obstacle in Photo 15. You can go around to the right and climb the class 3 wall with over 500 feet of exposure. If that s not your cup of tea, go around to the south. Once past the climb (Waypoint 20) in Photo 15, continue on the north side of the ridge. There s some exposure here. Near the top of the ridge make a U-turn. The summit cairn is in sight. Waypoint 21 marks the sign-in book, which is hard to find. It lies just before the summit register in a crack. Please return it to the same spot.
.")
112 To Descend: Retrace your steps to the climb in Photo 15. You might want to go around to the south side. Down climbing on the north side is extremely exposed. A fall here is certain death. Follow the ridge back to the down climb in Photo 13. Head east to the top of the Climber s Descent Gully (Waypoint 22). Descending the Climber s Gully is very straightforward and is mostly class 1 and 2. Once out of the gully, look for cairns marking an easy class 2 down climb (Waypoint 23). Continue on the path about 100 yards to the unsigned official trail (Waypoint 24) and turn left. You can see Pine Creek parking lot. Follow the path 250 yards to another path just past the trail sign with the double arrows (Waypoint 25). Follow this path north almost 400 yards to where it descends a slope (Waypoint 26). This is a different route than the old way. You don t turn right and walk 75 yards like we used to. Once down the slope, the path spider-webs, making it impossible to describe. Just head north on any path until you reach the official trail. Turn right and follow it back to the trailhead.
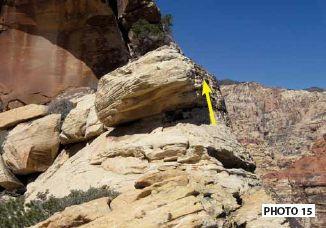
113
114 Terrace Canyon Route The marked parking area for Pine Creek Canyon (Waypoint 1) is located 10.3 miles past the fee booth. Comments: Terrace Canyon is one of the prettiest canyons in Red Rock. Spring is a great time to see water cascading down the canyon. The Hike: Pine Creek Trail descends in a southerly direction and soon turns to the west toward the mouth of the canyon. Mescalito, a small, but majestic pyramid-shaped mountain, splits the canyon into north and south forks. This route heads into the South Fork. When the trail passes the cement
115 foundation of the old Wilson homestead, you have hiked.8 miles. The trail divides a little past the foundation. Head right when the path forks. The juniper tree in Photo 1 is your landmark (Waypoint 2). The trail descends in about 30 yards and then divides; again take the unsigned right fork. The trail again divides in about 40 yards. Go straight following a path through the brush (Waypoint 3) and descend into the wash. Hike about 50 yards in the wash and exit the wash as seen in Photo 2 (Waypoint 4). The path climbs steeply for about 50 feet before leveling off. Follow the most prominent path (too many side paths to describe) as it heads SW and ends at the main wash (Waypoint 5). You are now in the South Fork of Pine Creek Canyon. Once in the wash, hike and boulder (mainly class 2) through the south fork of Pine Creek until the canyon divides. You ll see three ponderosa pines (one dead) standing guard just before the divide (Waypoint 6). Hike into the south fork of the canyon just to the left of the third (largest) pine and scramble up the boulders. This fork has plenty of class 2 and 3 bouldering. Continue several hundred yards climbing over boulders.
, though it s not obvious; see Photo 4.")
116 In approximately 30 minutes you come to the connector wash that comes in from the south and leads to Gunsight Notch and Terrace Canyons. Cairns mark the start of the wash; see Photo 3 (Waypoint 7). Notice the down tree in Photo 3. It s a great landmark. Hike SE up the wash a few hundred yards. The canyon divides again (Waypoint 8), though it s not obvious; see Photo 4. Look for a cairn on top of a boulder. Continue straight scrambling up large boulders. The canyon and wash soon bend to the right. Follow the wash, marked by cairns, a few hundred yards to the start of Terrace Canyon; see Photo 4 (Waypoint 9). Continue a few hundred yards up a series of cascading dry/wet falls (easy class 3) to any place that looks good to sit and relax, taking in the beauty of the canyon. Sandstone becomes slippery around water, so be careful. To Descend: Retrace your steps.

117 Mescalito Peak Southern Route The signed parking area for Pine Creek Canyon (Waypoint 1) is located 10.3 miles past the fee booth. Comments: If you re in good shape, comfortable on class 3 rock, and have good route-finding skills, you ll love this hike. Look for numerous cairns along the route. At the peak, you re looking almost straight down 1,000 feet into the south fork of Pine Creek. Photo 1 is Mescalito Peak.

. The path climbs steeply for about 50 feet before leveling off.")
118 The Hike: Pine Creek Trail descends in a southerly direction and soon turns west toward the mouth of the canyon. Mescalito splits the canyon into north and south forks. When the trail passes the concrete foundation of the old Wilson homestead, you ve hiked.8 miles. The trail divides a little past the foundation. Head right when the trail forks. The juniper tree in Photo 2 is your landmark (Waypoint 2). The trail descends in about 30 yards, then divides; again take the right fork. The trail divides again in about 40 yards (Waypoint 3). Go straight on a short spur path that descends into the wash. Hike about 60 yards and exit the wash as seen in Photo 3 (Waypoint 4). The path climbs steeply for about 50 feet before leveling off. Follow the most prominent path (too many side paths to describe) as it heads SW and ends at the main wash (Waypoint 5).
 standing guard just before the divide. Veer right heading into the north fork. This is known as the Mescalito Fork of Pine Creek.")
.")
119 Once in the wash, hike and boulder (mainly class 2) through the south fork of Pine Creek about.33 miles until the canyon divides. You ll see three ponderosa pines (one dead) standing guard just before the divide. Veer right heading into the north fork. This is known as the Mescalito Fork of Pine Creek. Scramble 50 yards to a huge 30-foot red boulder, which stops forward progress. Go left to get past the boulder and traverse 50 yards through a boulder field before dropping back into the wash (Waypoint 6). In about 350 yards, you come to three huge gray boulders (Waypoint 7); go around them to the right. Hike another 450 yards to the rock slide area in Photo 4 (Waypoint 8). It will be to your right.

120 About 50 yards before the rock slide, the south wall of the canyon recesses. About one-third of the way up the wall, you ll see trees and vegetation growing in this recess. Use this as a landmark to locate the rock slide both now and when you descend. Scramble NW 50 yards up the rock slide. Just past the first pinion pine, follow a loose path to your left. You ll hike past two more pinions to a sandstone wall marked by erosion holes. Climb the class 3 wall as seen in Photo 5. Follow a path NE to a precarious ledge in Photo 6 (Waypoint 9; it becomes wider) for about 100 yards and hike to the large boulder circled in Photo 7 (Waypoint 10). Photo 6 also shows a tree that looks like a windsock. You ll eventually hike just to the east of it. Once past the boulder, head NE across solid sandstone about 75 yards, then head up the sandstone to the start of a loose path (Waypoint 11). Head 40 yards up the path and then follow it as it heads east (Waypoint 12). Scramble up the chute in Photo 8 (Waypoint 13). If you walk on red sandstone, you ve missed the chute. At the top of the chute, you re treated to a fantastic view of Bridge Mountain, Bridge Vista, Bridge Point, the north fork of Pine Creek, and the red-topped Mescalito Peak. The windsock tree is behind you to the right. Walk about 50 yards east (away from the windsock tree), then start the descent (Waypoint 14) to a saddle in the distance. When you cliff-out, scramble down to your right (Waypoint 15). Once down, hike NE and go to the

121 left of the dead tree and boulder in Photo 9. Wedge through two boulders and continue about 15 yards to a loose class 2 chute (Waypoint 16). Descend the chute 40 yards until it becomes brushy. To avoid the brush, traverse 20 feet along a narrow sandstone ledge. Descend off the ledge to a path that weaves through the brush 15 yards. Continue around the boulder in Photo 10. From here, you can see the saddle. It s only 50 feet below; you re almost down! Once around the boulder, make your way to an obvious dirt-filled chute. To your right (SE) is the final sandstone crag you have to climb down to get to the saddle. Climb off the south side of the crag to the saddle (class 3).

122 Once at the saddle, veer right about 10 yards to the top of a deep chute. Carefully traverse across the head of the chute. It s an awkward move. Walk 30 yards to the slot in Photo 11 (Waypoint 18). It will be on your left. Hike through the slot and descend left. Photo 12 shows hikers scrambling around the head of a gully, visible from the far end of the slot. Once on the other side of the gully, continue east about 75 yards, as seen in Photo 13. Turn left and follow a path to the red ramp in Photo 14. At the top of the ramp make a U-turn, scramble past a pinion, and turn right on a wide ledge with a big drop-off; see Photo 15. Walk about 70 yards along the wide ledge and then veer left at the cairns (Waypoint 21). Continue another 40 yards to the peak (Waypoint 22). The view down into the south fork of Pine Creek is awesome! To the north lies Bridge Mountain and Bridge Point; to the south stand Juniper Peak, Rainbow Wall and Peak. Pine Creek Trail snakes through the desert out to the east. An ammo box containing the sign-in book is about 25 feet before the cairn that marks the peak, tucked between two large boulders. To Descend: Retrace your steps.


123 Pine Creek Peak Closed Loop

124 The signed parking area (Waypoint 1) for Pine Creek Canyon is 10.3 miles past the fee booth. Comments: This just might become your favorite hike in Red Rock Canyon. Once you leave the wash, it s more than two hours of solid climbing. The peak offers outstanding views of other peaks and their routes. Photo 1 shows the peak from the trailhead. Numerous cairns help keep you on route. The Hike: Pine Creek Trail descends in a southerly direction and soon turns west toward the mouth of the canyon. When the trail passes the concrete foundation of the old Wilson homestead, you ve hiked four-fifths of a mile. As you approach the mouth of Pine Creek, the Mescalito splits the canyon into north and south forks. The trail divides a little past this foundation. Take the right by the juniper tree. The trail descends in about 30 yards and then divides; again take the right fork. The trail again divides in about 40 yards. Go straight and descend into the wash. (Taking the right fork leads into Fern Canyon.) Hike about 50 yards and exit the wash on the path sometimes marked by a cairn (Waypoint 2). The path climbs steeply for about 50 feet before leveling off. Follow the most prominent path (too many side paths to describe) as it heads SW and ends at the wash (Waypoint 3).
 pine and scramble up into the left fork of the canyon (Waypoint 4). This fork has plenty of class 2 and 3 bouldering.")

125 Once in the wash, boulder through the south fork of Pine Creek until the canyon divides. You ll see three ponderosa pines (one dead) standing guard just before the divide. Hike past the third (largest) pine and scramble up into the left fork of the canyon (Waypoint 4). This fork has plenty of class 2 and 3 bouldering. As you continue bouldering your way through the canyon, it looks like the canyon ends. The canyon makes a sharp left, not apparent until you come to that spot. When the canyon curves to the west, hike another 300 yards looking for the boulder on the north wall; see Photo 2. It signals your departure from the wash. A cairn also marks this point. This point is about 70 yards beyond the spot where you leave the wash to go up the back way to Juniper Peak. (See Juniper Peak hike.) Head NE through an opening in the brush and climb the ramp in Photo 3 (Waypoint 5). Head north 20 yards to a large cairn and climb (class 4) the steep-angled wall in Photo 4 (Waypoint 6).
.")
126 Once up, head east about 60 yards to the red sandstone (Waypoint 7). Climb the red sandstone angling to the left. Once on the white sandstone, climb the obvious crack that heads under a roof; see Photo 5. Traverse under the roof and climb the chute on the far side (Waypoint 8). The terrain opens up and, normally, this is the first time you re in the sun. Photo 6 shows the ridge and the peak. You re now on top of the roof, though it s not obvious.
 about 60 yards to a prominent cairn that marks where you climb an eastheading ramp (Waypoint 11).")
127 Head east 50 yards and climb the low-angled wall (Waypoint 9) to the next level. Head SW over easy terrain (Waypoint 10) about 60 yards to a prominent cairn that marks where you climb an eastheading ramp (Waypoint 11). Continue west to another east-heading ramp and climb it (Waypoint 12). These two ramps are fairly obvious, since continuing west would land you on difficult (class 5) rock. Continue ascending, cutting back to the east (Waypoint 13) to avoid steep rock. Here s where the route differs from the original route for those who have done this hike before: Instead of veering west (you will see numerous cairns), turn NE toward the dead tree in Photo 7. Once you ascend 50 or so yards, veer left to the tree in Photo 8 (Waypoint 14). You re now on the ridge. Immediately climb the airy but easy rock to gain the crest of the ridge. Continue west along the ridge 30 yards until a roof forces you to the right. Photo 9 shows the steep wall (class 4) you climb (Waypoint 15). Once up, cross over to the south side of the ridge and climb the ramp in Photo 10. Continue over easy rock 100 yards where you meet up with the original route at the flat expanse of sandstone with great views (Waypoint 16).
. Start the climb by heading up the center of the wall as shown in Photo 12.")
128 Photo 11 was taken from Waypoint 16 and shows the next part of the route. Climb the broken wall a little right of center. Once up, the ridge momentary flattens and a major climb stands before you (Waypoint 17). Start the climb by heading up the center of the wall as shown in Photo 12. Climb the wall next; it has a rope hanging down it. Follow cairns to the class 4 climb (Waypoint 18). Once up, the terrain flattens and the peak is visible again; see Photo 13. Scramble up an easy class 2-3 wall as you continue along the ridge (Waypoint 19).
 and then continue west along the ridge. In 40 yards, another obstacle prevents continuing on the crest of the ridge.")
. Once beyond the pinions, veer slightly to the right and continue up a chute with a bit of brush.")
129 In less than 100 yards, the ridge becomes too steep. Go to the north side of the ridge and climb the ramp by the lone pinion seen in Photo 14 (Waypoint 20). Climb to the eastern-most point of the ramp (airy here) and then continue west along the ridge. In 40 yards, another obstacle prevents continuing on the crest of the ridge. This time, go around the south side of the ridge and descend about 25 feet before traversing. It s a little airy here (Waypoint 21). Continue on the south side of the ridge to the two pinions in Photo 13 (Waypoint 22). Once beyond the pinions, veer slightly to the right and continue up a chute with a bit of brush. At the top (Waypoint 23), you realize the peak is still a good distance away; see Photo 15.
 and continue up the crest of the ridge. Continue to the ponderosa in Photo 17.")
. The views from the peak are outstanding.")
130 Drop off the ridge to the north and follow an obscure path. When the path starts to descend (about 60 yards), climb (class 2) back on top of the ridge. Climb the chute in Photo 16 (Waypoint 24). Cross over the ridge to the south side at the cairn. Climb the 15-foot class 3 wall (Waypoint 25) and continue up the crest of the ridge. Continue to the ponderosa in Photo 17. From the ponderosa, walk to the wall in Photo 17 and climb it (class 3). At the top of the wall (Waypoint 26) the peak comes into view. Head over to the chute in Photo 18 and scramble up it (class 2). Walk around to the south side of the summit block and walk up to the top. A cairn marks the summit (Waypoint 27). The views from the peak are outstanding. You can see many routes to other peaks including part of the Bridge route, Bridge Point, part of the route to Mescalito, Pine Creek to Rainbow Wall, and Gunsight Notch route. Make sure to sign the book. To Descend: Head west about 300 yards to the limestone. A path begins (Waypoint 28), but it s short-lived. Head down the sandstone (Waypoint 29) to the wash. Hike down into the south fork of Pine Creek. There are two spots during the first 700 yards of entering the wash where you can get into trouble. In both cases descend along the north side of the wash. Go through an arch made by boulders

131 when you come to the second spot. Gunsight Notch Peak
132 Route The signed parking area for Pine Creek Canyon (Waypoint TH) is 10.3 miles past the fee booth. Comments: This is a variation on the standard route to Gunsight Notch Peak. The route features incredible views, solid rock, and more scrambling, with several descent options. The Hike: Pine Creek Trail descends in a southerly direction and soon turns to the west toward the mouth of the canyon. Mescalito, a small but majestic pyramid-shaped mountain, splits the canyon into north and south forks. This route heads into the South Fork. When the trail passes the concrete foundation of the old Wilson homestead, you ve hiked.8 miles. The trail divides a little past the foundation. Head right when the path forks. The juniper tree in Photo 1 is your landmark (Waypoint 1). The trail descends in about 30 yards, then divides; again take the unsigned right fork. The trail again divides in about 40 yards. Go straight following a path through the brush and descend into the wash.
 as it heads SW and ends at the main wash (Waypoint 3). You re now in the South Fork of Pine Creek Canyon.")
 standing guard just before the divide (Waypoint 4).")
133 Hike about 50 yards in the wash and exit the wash as seen in Photo 2 (Waypoint 2). The path climbs steeply for about 50 feet before leveling off. Follow the most prominent path (too many side paths to describe) as it heads SW and ends at the main wash (Waypoint 3). You re now in the South Fork of Pine Creek Canyon. Once in the wash, hike and boulder (mainly class 2) through the south fork of Pine Creek until the canyon divides. You ll see three ponderosa pines (one dead) standing guard just before the divide (Waypoint 4). Hike into the left fork of the canyon just to the left of the third (largest) pine and scramble up the boulders. This fork has plenty of class 2 and 3 bouldering. Continue several hundred yards climbing over boulders. In approximately 30 minutes, you come to the connector wash that comes in from the south and leads to Gunsight Notch and Terrace Canyons. Cairns mark the start of the wash; see Photo 3 (Waypoint 5). Notice the down tree in Photo 3. It s a great landmark.
.")

134 Hike SE up the wash a few hundred yards. The canyon divides again (see Photo 4), though it s not obvious. Scramble into the east fork and hike less than 100 yards to the start of Gunsight Notch Canyon, a reddish-sandstone canyon (Waypoint 6). Hike up the steep canyon 100 yards to where the terrain levels and look left for the boulders in Photo 5. Scramble up the steep sandstone to the right of the boulders and parallel the black wall about 40 yards to the roof in Photo 6. Go under the roof (Waypoint 7) and follow the wall as it curves east toward a larger wall. Head south to an easy scramble up the wall as seen in Photo 7. Follow the wide ledge (Waypoint 8) as it heads south. You ll soon be looking down into Gunsight Notch Canyon. As the ledge curves east, you see the slanted slope in Photo 8. Head north up this slope. Once the terrain flattens (Waypoint 9), head up to the crack in Photo 9.
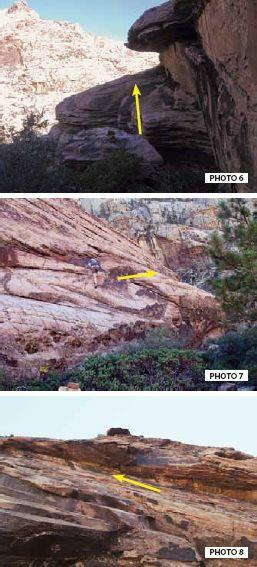
135

136 Photo 10 shows the start of the climb. It looks different close up as compared to Photo 9. About halfway up the climb, the sandstone turns to red (Waypoint 10). Continue climbing to the tree. Parallel the obvious wall until an easy climb gets you on top of it. Head east along the broad ridge. Soon Gunsight Notch Peak comes into view. Continue to the peak as outlined in Photo 11. Waypoint 11 is the start of the final climb to the peak. A dead tree stands at the summit. Make sure to sign the register in the ammo box. Gunsight Notch Peak (Waypoint 12) offers great views in all directions. To Descend: You have a few descent options. You can take the standard route down Gunsight Notch Canyon or descend Gunsight Notch into Juniper Canyon. The latter is quicker and more interesting. A third option is to traverse over to Juniper Peak, but this requires a rappel.
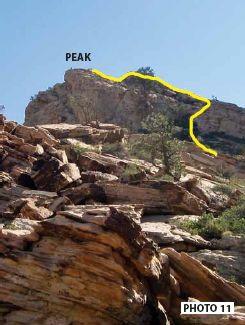
137
138 Bridge Mountain via Fern Canyon (North Fork of Pine Creek) Route The signed parking area for Pine Creek Canyon is 10.3 miles past the fee booth. Waypoint 1 is the trailhead. Bridge Mountain isn t visible from the trailhead. Comments: Bridge Mountain is one of the crown jewels in Red Rock Canyon. You can t claim to be a peak bagger without having stood on the summit. Most hikers say this is the best route there, and I agree. The upper part of Fern Canyon (north fork of Pine Creek) is spectacular. Once at the summit, you have lots of descent options: Hike over to Bridge Point and descend that route; hike over to North Peak and descend via Graffiti Canyon (car shuttle), or retrace your steps. Note: If you re familiar with the route into Fern Canyon, you can skip the next several paragraphs.

.")
139 The Hike: Pine Creek Trail descends in a southerly direction and soon turns to the west toward the mouth of the canyon. Looking toward the canyon, you see ponderosa pines towering above the desert floor. It is rare to encounter these pines below 6,000 feet. The elevation along the trail is about 4,000 feet. Mescalito, a small but majestic pyramid-shaped mountain, splits the canyon into north and south forks. This route heads into the North Fork, also known as Fern Canyon. When the trail passes the concrete foundation of the old Wilson homestead, you have hiked.8 miles. The trail divides a little past this foundation. Head right as seen in Photo 1 (no sign). The juniper tree is your landmark (Waypoint 2). In about 30 yards, the trail divides; again take the right fork. The trail divides again in about 40 yards. Take the right fork, which weaves through scrub oak trees. If you miss this fork, you will descend into the wash way too soon.
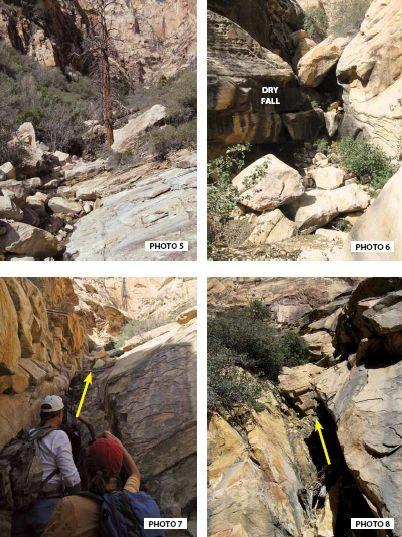
140
, which drops into the wash farther than other paths. The path ends at the wash. You re now in Fern Canyon. A popular rock climb named Dark Shadow starts here.")
141 Once the trail emerges from the trees, it climbs (class 1) red sandstone ledges. Just after the ledges, the paths start to spider web. Ascend to the highest path (Waypoint 3), which drops into the wash farther than other paths. The path ends at the wash. You re now in Fern Canyon. A popular rock climb named Dark Shadow starts here. The route through the wash is well-cairned and easy to follow, though alternative routes have been created to avoid excessive water from snow melt. Route through Fern Canyon: Start by heading up the wash. In a few yards, the route crosses the water, then heads to the south wall. The route stays along the south wall for most of the way through the wash. In a few hundred yards, you come to the boulder and log. Photo 2 shows how to get past this obstacle. In a nutshell, go to the right of the large boulder, then behind it and finally scramble up. The route then heads back along the south wall. Soon you ll come to the tunnel in Photo 3.

142 Continue up the wash heading for the brushy-looking chute in Photo 4. It s not actually brushy. The seasonal waterfall (Waypoint 4) lies just below this chute. The best way to approach the waterfall and chute is along the north wall. This is a new route and makes it much easier to get to the rock bridge that bypasses the water. Follow the chute in Photo 5 to the top where you have a great overlook (Waypoint 5) of the wash you just hiked through. Continue west across the sandstone about 30 yards to an obvious chute (Waypoint 6). The chute drops you back into the wash. Brush divides the wash; pick your way through. Eventually, you ll be along the north side of the wash. Photo 5 shows the next part of the hike through the wash. In about 100 yards you ll come to the dry fall in Photo 6. This is a difficult climb, but there is a rope there. If the rope is gone or not in good shape, backtrack about 20 yards and follow a path (Waypoint 7) off to the north that bypasses the dry fall. This path may be brushy. No matter which route you take, you soon have to stem to get past a boulder. Stay in the wash overcoming obstacles as you head west. Waypoint 8 is the last dry fall you climb before leaving the wash; see Photo 7. It can be very slick. Veer right and climb the chute as seen in Photo 8 and exit left. Be careful of prickly pears in the chute. Continue up 30 yards and step over the obvious log to your left. Scramble about 25 yards where the rock gets very steep and head south onto a ramp (Waypoint 9). The ramp ends and the terrain really opens up. This is where hikers get confused. It appears you ll be boxed in by vertical walls. Study Photo 9. Initially, you want to head about 80 yards NW toward, but not all the way to, the small pinion circled in Photo 11. Hike toward the wall and whitish boulder in Photo 10 when they
.")

143 come into view. At the white boulder, go left on an obvious path (Waypoint 10), which leads to the top of the boulder. You re now above the wall. The next part of the route, though tricky to follow, is well-cairned. Now veer right about 30 yards to the pinion in Photo 11 and up onto the ledge (Waypoint 11). Follow a path about 20 yards to the wall. To get above the wall, walk left along the base of the wall to the boulder in Photo 12. Climb onto the backside of the boulder, which gets you above the wall. Head east across wide ledges and follow cairns to the tree in Photo 13. Just before the tree, head left up steep sandstone 10 yards, then go right to a hard class 3 climb at Waypoint 12. The climb is to your left. Watch your head at the top of the climb. Walk almost 10 yards on the exposed ledge, where you ll find an easy exit to your right. Walk across the tilted sandstone about 15 yards to the slot in Photo 14.


144 Continue on the ramp in Photo 15 as it bends to the left. Believe me, it goes! The ramp curves and heads north (Waypoint 13). Don t be fooled by cairns on a lower ledge. Stay on the ledge until you see black watermarks and scrub oak in Photo 16. Just before the scrub oak in Photo 16, head right under a branch of a juniper and an easy chute. Again, the terrain opens up here. Follow cairns across the high-desert terrain about 100 yards. Photo 17 shows the big wall you ll parallel and the summit of Bridge Mountain. The high-desert terrain gives way to sandstone. Veer left as you ascend the steep sandstone to the chute in Photo 18. The chute (Waypoint 14) is the only place to get above the imposing wall you ve been looking at for some time now. At the top of the chute, exit right via an easy, but exposed, ledge. Down climb off the ledge (Waypoint 15). Continue NE over easy rock about 50 yards where you meet up with the normal route to Bridge Mountain. If you know the route from here, you can stop reading. Photo 19 shows the crack you climb and the summit of Bridge Mountain. Head across sandstone to the start of the crack. Photo 20 shows the start of the lower part of the crack (Waypoint 16). Photo 21 shows the steeper part of the crack. You climb the crack or go right onto the face. The face is actually easier, but much more exposed. When the terrain flattens, go left on a ledge about 20 feet to the next climb in Photo 22 (Waypoint 17). Climb this crack (class 3) to the arch. Go inside the arch and climb the crack (class 3) in Photo 23.
 and head 35 yards to the summit (Waypoint 19). Congratulations! This was a tough route, but I think you will agree it s a great one.")
145 Photo 24 shows the final part of the route. Veer south (right) to the rim, which has a great view down into Fern Canyon. Start up the disjointed ramp shown in Photo 24. At the top of the ramp, do a 180 (Waypoint 18) and head 35 yards to the summit (Waypoint 19). Congratulations! This was a tough route, but I think you will agree it s a great one. The peak off to the east is Bridge Point. In between Bridge and Bridge Point stands Bridge Vista. I m giving you ideas for future hikes. Don t worry: I have you covered. I have routes to both peaks! To Descend: Lots of options, but if you don t know them, retrace your steps.
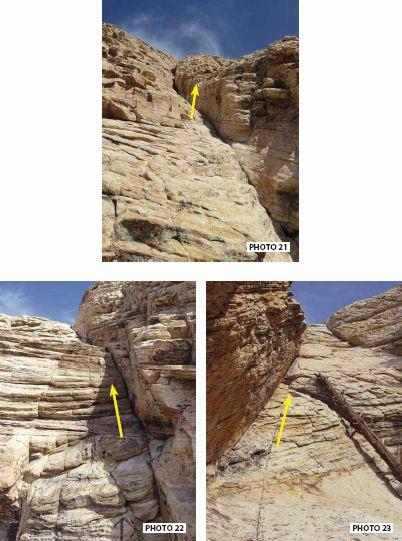
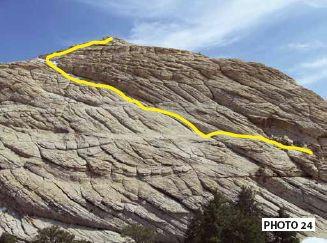
146

147 Fern Canyon Trail and Route

148 Drive past the fee booth and through the Scenic Loop gate. The signed parking area for Pine Creek Canyon is 10.3 miles past Scenic Loop gate. Comments: This hike has various stopping points. Once in the wash, it s less than 100 yards to the ferns. This hike is 2 miles round trip. More adventurous hikers will want to hike to the seasonal waterfall. That hike is 4 miles round trip, involves class 3 climbing, and is much more difficult. The best time to see the waterfall flowing is late winter and early spring. The Hike: Pine Creek Trail descends in a southerly direction and soon turns to the west toward the mouth of the canyon. Looking toward the canyon, you see ponderosa pines towering above the desert floor. It s rare to encounter these pines below 6,000 feet. The elevation along the trail is about 4,000 feet. Mescalito, a small but majestic pyramid-shaped mountain, splits the canyon into north and south
. The juniper tree is your landmark (Waypoint 2).")
149 forks. This route heads into the North Fork, also known as Fern Canyon. When the trail passes the concrete foundation of the old Wilson homestead, you ve hiked.8 miles. The trail divides a little past this foundation. Head right as seen in Photo 1 (no sign). The juniper tree is your landmark (Waypoint 2). In about 30 yards, the trail divides; again take the right fork. The trail again divides in about 40 yards. Take the right fork which weaves through scrub oak trees. If you miss this fork, you will descend into the wash way too soon. Once the trail emerges from the trees, it climbs (class 1) red sandstone ledges. Just after the ledges, the paths start to spider web. Ascend to the highest path (Waypoint 3), which eventually drops into the wash further than other paths. The path ends at the wash. You are now in Fern Canyon. A popular rock climb named Dark Shadow starts here. The route through the wash is well cairned and easy to follow, though alternative routes have been created to avoid the excessive water from snow melt.

150 Route through Fern Canyon: Start by heading up the wash. In a few yards, the route crosses the water and then heads to the south wall. You ll come to a very pretty spot with ferns; see Photo 2. This is one of the best spots to end the hike and enjoy the beauty of the canyon. To the seasonal waterfall: The route stays along the south wall for most of the way through the wash. In a few hundred yards, you come to the boulder and log. Photo 3 shows how to get past this obstacle. In a nutshell, go to the right of the large boulder, then behind it, and finally scramble up as the photo shows. The route then heads back along the south wall. Soon you ll come to the tunnel in Photo 4. Continue up the wash heading for the brushy looking chute in Photo 5. The seasonal waterfall (Waypoint 4) lies just below this chute; see Photo 6. The burros in Red Rock Canyon are generally half the size of a horse, with the average weight of about 400 pounds.

151 The Bureau of Land Management Bridge Vista Route The signed parking area for Pine Creek Canyon is 10.3 miles past the Scenic Loop gate. Comments: I believe this hike will become a classic. It has all the components: a striking profile from the south, lots of fun climbing, and great views from the summit.

.")
152 The Hike: Pine Creek Trail descends in a southerly direction and soon turns to the west toward the mouth of the canyon. Looking toward the canyon, you see ponderosa pines towering above the desert floor. It s rare to encounter these pines below 6,000 feet. The elevation along the trail is about 4,000 feet. Mescalito, a small but majestic pyramid-shaped mountain, splits the canyon into north and south forks. This route heads into the North Fork, also known as Fern Canyon. When the trail passes the concrete foundation of the old Wilson homestead, you ve hiked.8 miles. The trail divides a little past this foundation. Head right as seen in Photo 1 (no sign). The juniper tree is your landmark (Waypoint 2 ). In about 30 yards the trail divides; take the right fork. The trail divides again in about 40 yards. Take the right fork, which weaves through scrub oak trees. If you miss this fork, you ll descend into the wash way too soon. Once the trail emerges from the trees, it climbs (class 1) red sandstone ledges. Just after the ledges, the paths start to spider web. Ascend to the highest path (Waypoint 3), which drops into the wash farther than other paths. The path ends at the wash. You re now in Fern Canyon. A popular rock climb

153 named Dark Shadow starts here. The route through the wash is well-cairned and easy to follow, though alternative routes have been created to avoid the excessive water from snow melt. Route through Fern Canyon: Start by heading up the wash. In a few yards, the route crosses the water, then heads to the south wall. The route stays along the south wall for most of the way through the wash. In a few hundred yards, you come to the boulder and log. Photo 2 shows how to get past this obstacle. In a nutshell, go to the right of the large boulder, then behind it, and finally scramble up as the photo shows. The route then heads back along the south wall. Soon you ll come to the tunnel in Photo 3. Continue up the wash heading for the brushy-looking chute in Photo 4. (It s not actually brushy.) The seasonal waterfall lies just below this chute. The best way to approach the waterfall and chute is along the north wall. This is a new route and makes it much easier to get to the rock bridge that bypasses the water. Follow the chute (Photo 4) to the top, where you have a great overlook (Waypoint 4) of the wash you just hiked through. Now the route leaves the wash and heads for the peak. Photo 5 shows the first part of the route. From the overlook, follow a path that heads NW to the 10-foot chute in Photo 5. Once up the chute, head NE about 40 yards to the step across (Waypoint 5). It s obvious; there s no other way to go. It s exposed and requires good balance. You can down climb and climb back up instead. Either way, continue on a narrow ledge to the wall in Photo 6. Parallel the wall about 40 yards, where you have an option of a class 4 climb (Waypoint 6) or to descend steep rock and go around. Photo 7 shows the class 4 climb. The photo shows the two black face walls to climb. Once up, head right along a wide sloping ledge. The other route descends the steep slope and heads to the ledge in Photo 8. The ledge is below and out to the east from where you re standing.
, and follow the ledge to the easy class 3 climb.")
154 Here are the details: Descend the steep and exposed slope toward the main wash about 40 feet to the first semi-level spot. Walk left 15 feet and down climb (five feet) to easy ground. Ascend north, paralleling the wall to your left to the larger wall in front of you. Once at the wall, head right to the ledge (see Photo 9), and follow the ledge to the easy class 3 climb. The cactus is your landmark. Continue up a few yards to the next climb (class 3), as seen in Photo 10. Exit right walking up a steep ramp and veer left where the terrain flattens. Both routes join up here. Hike 60 yards north over easy rock to the sometime-wet sometime-dry waterfall in Photo 11. It s a two-part climb (class 3). Even when the rock is wet, it s not slippery. At the top of the dry fall (Waypoint 7), the route meets up with the old route. Don t head west, even though you ll see cairns. Those are for the old route. Photo 12 shows the next climb (class 3), about 50 yards NE from the top of the waterfall you just climbed. Photo 12 also shows the east wall of the gully which leads to the peak. At the top of the climb in Photo 12, head 100 yards east paralleling a wall to the north. This wall must be 800 feet high. You won t go near it, just parallel it. You ll soon come to huge boulders (Waypoint 8) that mark where you turn north and scramble to beneath the overhanging rock in Photo 13. Other prominent cairns lead off to the east, but that s not the standard route.
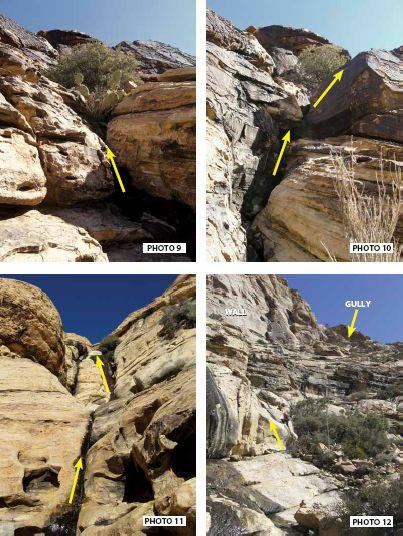
155
 rock toward the wall in Photo 16.")
156 Once beyond the ledge that goes beneath the overhanging rock in Photo 13, head north up the rock and exit right as seen in Photo 14. Continue up the crack in Photo 15 (Waypoint 9). Head north up a very steep slope 40 yards where the grade backs off. The terrain opens up here. Head north about 80 yards up steep, but easy (class 1 and 2) rock toward the wall in Photo 16. You won t hike all the way to the wall. Cairns mark when you stop ascending and begin traversing east over flat ground (Waypoint 10). Continue to Photo 17, veering left to get up onto the ledge (Waypoint 11).
 in Photo 19.")
. Ascend via a faint path 50 yards to the top of the ridge.")
157 Veer left up another steep slab of sandstone to the options shown in Photo 18 (Waypoint 12). Either continue up the loose rock or climb the wall (class 3+). Both routes meet at the top of the climb. Once up head east about 60 yards to the dead tree (Waypoint 13) in Photo 19. Find and follow a path that heads north to the start of the wide gully (Waypoint 14). Ascend the gully always staying in the main gully. There are two minor forks to the west. It s a long steep trek. Eventually, you ll come to top of the gully (Waypoint 15). Ascend via a faint path 50 yards to the top of the ridge. A faint path descends the north side of the ridge. Look for a huge red cairn sitting on white sandstone (Waypoint 16).
. Do not ascend here; instead, continue to the scramble to the tree in Photo 22 (Waypoint 19).")
.")
158 From the cairn, head west, crossing a small drainage to the scramble in Photo 20 (Waypoint 17). Hike to the hidden chute behind the shoulder in Photo 20. Continue ascending, following cairns to the tree in Photo 21 (Waypoint 18). Do not ascend here; instead, continue to the scramble to the tree in Photo 22 (Waypoint 19). Scramble up next to the tree and exit left to a crack marked by a large cairn. Follow cairns across an exposed traverse (Waypoint 20). Once up, head to the dead log in Photo 23 (Waypoint 21). Climb the slot circled in Photo 23. There s a large tree missing its top due to the wind. Finally, the summit block comes into view. Head to the west end of the block (Waypoint 22). Continue around to the south side via a wide ledge with fantastic views. Walk the ledge about 35 yards to the tree in Photo 24, which marks the final class 4 scramble to the summit. Congratulations. You made it to a peak (Waypoint 23) that s a favorite of everyone who has stood at this special place. Bridge Mountain, the big brother to Bridge Point, stands to the west. The sign-in book is in a crack just before the summit cairn next to a plant. To Descend: Retrace your steps.
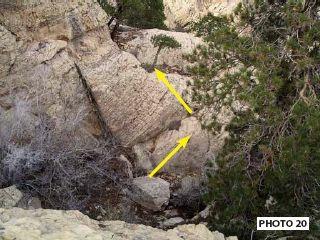

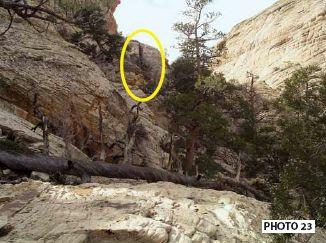
159
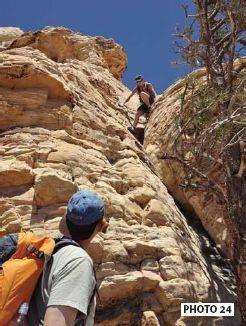
160
. Comments: This is a classic bouldering route through one of the most scenic canyons in Red Rock. You ll scramble up and over car-size boulders!")
161 Oak Creek Canyon Trail and Route The signed turn-off for Oak Creek Canyon is located a little more than 12 miles past the fee booth. Turn right on the gravel road and drive.7 miles to the trailhead (Waypoint 1). Comments: This is a classic bouldering route through one of the most scenic canyons in Red Rock. You ll scramble up and over car-size boulders! The Hike: Photo 1 shows the correct trail and Oak Creek Canyon in the background. Follow the trail SW a little more than a mile to a prominent, but unsigned, path off to the right (Waypoint 2). Do

162 not turn off onto the signed Knoll Trail. Follow the path about a quarter-mile to a small boulder field (Waypoint 3). You can now head left down into the wash or continue on the path, which starts up again on the far side of the boulder field. Descending into the wash is more scenic, but longer. If following the path, continue another 150 yards, taking a right when the trail forks. The path soon ends in the wash (Waypoint 4). Either route you follow, make sure to notice where you enter the wash. It s not marked and you ll need to find this spot on the way out. Hike through the wash, scrambling up and over boulders the size of SUVs! This is fun. You shouldn t encounter more than class 3 scrambling. There are often paths leading around the tougher class 3 obstacles. Continue to the scenic spot in Photo 2. This is a perfect place to stop, have lunch, and admire the beauty of Oak Creek Canyon. To Descend: Retrace your steps.

163 Juniper Peak Route The signed turn-off for Oak Creek Canyon is located 12.2 miles past the fee booth. Turn right and drive.7 miles on an excellent gravel road to the parking lot. Comments: This hike has plenty to offer: a trail to warm up on, bouldering through a magnificent canyon, and class 2 and 3 scrambling. Great views of Rainbow Wall, Brownstone Wall, and an awesome overlook into the south fork of Pine Creek make this one of the best hikes in Red Rock Canyon. For people who mainly hike on trails, this route will test your navigational skills. Use common sense.
, which heads straight for Juniper Canyon.")

164 The Hike: Head west on the signed Arnight Trail (see Photo 1), passing a shallow wash around a half-mile. Continue on the trail another quarter-mile and turn SW onto a prominent path (Waypoint 1), which heads straight for Juniper Canyon. Follow this path about 200 yards until it intersects a prominent trail. Go right 15 yards and turn left onto another path. Follow this path about 100 yards to a major fork and turn right, heading for the enormous boulder in Photo 2. (The boulder is also a landmark during the hike back to the trailhead.) The path passes the boulder, then drops into a wash. Go left in the wash, walk 10 yards, turn right, and follow a steep path up and out of the wash. When the path intersects another trail, turn left, walk about 15 yards, and turn left onto the unsigned Juniper Canyon Path. Follow this path a few hundred yards to a fork. Take the right fork, which heads for Juniper Canyon. (If you miss this turn, you ll soon be heading east toward the trailhead.) After a few hundred yards, the path climbs a hill and then parallels a wash coming from Juniper Canyon (Waypoint 2). You ll scramble over a few boulders before the path dead-ends in the wash. Climb the huge boulders in front of you (class 3) and follow cairns as you weave through the wash. Stay in the main wash watching for cairns. After about 100 yards, the wash narrows and becomes much steeper. At the top of the wash, head right onto a hiker s path. Traverse 25 yards to level ground passing by a fallen log (Waypoint 3). Continue on the well-defined path about 300 yards to a two-

165 foot-high boulder (Waypoint 4). The path divides here; take the right fork and follow it 10 yards into another wash. Go west in the wash about 30 yards to an opening in the brush where a path starts. It will be to your right; see Photo 3. Hike 30 yards up the steep path to a small boulder field. Head SW through the boulder field (Waypoint 5), aiming for a large blackface boulder at the far side of the boulder field. A cairn sits on top of the boulder, see Photo 4. Just to the right and a little beyond the boulder, the path resumes, then travels 30 yards and empties out onto white sandstone. The reddish-brown towering wall is Brownstone Wall. The next part of the route parallels Brownstone Wall to a gully, your next major landmark. The gully is located at the north end of Brownstone Wall and lies below the two Turtle boulders in Photo 5. Scramble NW toward the Turtle boulders. You ll be on slabs of sandstone and hikers paths as you make your way to the gully below the Turtle boulders. This part of the route is very well-cairned. The hiking is mostly class 1 and 2. Once near the Turtle boulders, follow a path that cuts through the manzanita and ends at a juniper tree. Just behind the juniper lies a low point in a sandstone wall. Climb the wall (class 3) and scramble up the small chute (class 3) in Photo 6. You re now just below the Turtle boulders.
.")

166 Hike west up the beehive sandstone until it becomes too steep. Veer north and hike to the top of the gully, where a fantastic overlook 1,000 feet down into the south fork of Pine Creek stands just to the north (Waypoint 6). From here, you re only 10 minutes from the peak. From the top of the gully, head south, passing the second of three large ponderosa pines. Traverse east about 25 yards on sandstone ledges marked by numerous cairns. The route makes a 180-degree turn and heads west. Climb off the sandstone ledge and under the boulder in Photo 7. Hike 30 yards to the large pinion pine tree. Turn left (SE) and hike 20 yards going between two small sandstone crags

167 to the boulder that marks Juniper Peak (Waypoint 7). You made it. Make sure to sign the register. Across Juniper Canyon stands Cloud Tower, a 1,200- foot-high pillar capped with crimson rock. If you look real hard, you might see climbers on the NE face of Cloud Tower. Just to the right of Cloud Tower stands the impressive 1,200 foot Rainbow Wall. To Descend: Retrace your steps. The most significant geological feature of Red Rock Canyon is the Keystone Thrust Fault, which began to develop approximately 65 million years ago. The Bureau of Land Management Oak Creek Overlook

168 Trail and Route The signed turn-off for Oak Creek Canyon is located 12.2 miles past the fee booth. Turn right and drive.7 miles on an excellent gravel road to the parking lot (Waypoint 1). Comments: This hike will become a classic scrambling route in Red Rock Canyon. Although this is not a high summit, it s a wild route with great vistas from the top. Photo 1 shows the Overlook, the start of an arch, and Oak Creek Canyon. This route is well cairned. The Hike: From the trailhead, hike about 1 mile on the Oak Creek Trail. Once the trail heads across red dirt, turn right on the first path heading toward the canyon (Waypoint 2). Follow this path about.25 of a mile to a small boulder field (Waypoint 3). The path resumes on the far side of the boulder field. Continue on the path veering right when it forks. It soon ends at the wash (Waypoint 4). Hike through the wash about 150 yards to the boulder circled in Photo 2. The boulder sits below the arch circled in Photo 1. Turn left (Waypoint 5) onto the path next to the boulder; see Photo 3.
. Follow cairns to the left of a fallen log.")
 past a cairn and traverse to the chute in Photo 7 (Waypoint 10).")
169 Follow the path about 50 yards to where it ends. Go left along a ledge for 10 yards, scramble up, turn right, and climb as seen in Photo 4 (Waypoint 6). Once up, hike between the boulder and tree. Head left to a wide, sloping ledge, and walk about 35 yards to the boulder in Photo 5 (Waypoint 7). Follow cairns to the left of a fallen log. Continue about 40 yards on a path aiming for the Overlook. Cross a deep, but small drainage to the climb in Photo 6 (Waypoint 8). It s not as steep as it looks. Climb the open face in Photo 6 and veer left into a narrow chute. Exit the chute to the right. Head left (Waypoint 9) past a cairn and traverse to the chute in Photo 7 (Waypoint 10). Climb the chute in to the brush. A cairn marks the exit to the right. Climb the wall (class 3) in Photo 8 (Waypoint 11). Once up, head left about 100 yards through a wide slot to a small saddle. Go under the boulder in Photo 9 and climb onto the ramp (easy, but awkward). Continue to the walls. Head right toward the pine in Photo 10. When you come to a large cairn on the ground, head left away from the pine; see Photo 11. Follow the prominent path about 30 yards and bypass a six-foot wall by going to the right of it.
 before using.")
 side of the ramp. The Overlook is just to the north.")
170 Climb the crack in Photo 12. There s a rope to assist with the climb. Always test ropes (pull very hard on it) before using. Once up, hike a few feet to the ramp in Photo 13 (Waypoint 12). Walk off the far (right) side of the ramp. The Overlook is just to the north. There s one final climb before reaching the Overlook (Waypoint 13).
.")

171 To Descend: From the summit, retrace your steps to the ramp in Photo 13. Head over to the top of the crack, seen in Photo 14 (Waypoint 12). Once the first hiker is down, have them hold the rope so it does not fall into the crack. Once down, follow the route back to the wash in Oak Creek Canyon. The descent of the wall in Photo 8 is actually very easy. Note: You can park on State Route 159 and walk to the trailhead. This avoids having to drive the Scenic Loop Road and only lengthens the hike into the canyon by eight minutes or so.

172
. The signed trailhead is located at the south end of the parking lot. Comments: Imagine looking straight down 1,200 feet into Juniper Canyon.")
173 Rainbow Wall via Oak Creek Canyon Route The marked turn-off for Oak Creek Canyon is 12.2 miles past the fee booth on the Scenic Loop Road. Turn right on this excellent gravel road and drive.7 miles to the trailhead (Waypoint 1). The signed trailhead is located at the south end of the parking lot. Comments: Imagine looking straight down 1,200 feet into Juniper Canyon. That s exactly what you do once you hike to the edge of the 1,200-foot Rainbow Wall. This is one of the most rewarding hikes in Red Rock Canyon. Do not attempt this hike unless you are comfortable on class 3 rock and in very good shape. Due to varying hikers abilities, water in the wash, and brush, the hike description does not tell you how to get around boulders in the wash. Most work-arounds are cairned. The Hike: The signed trail starts off heading SW toward the mouth of Oak Creek Canyon. The canyon lies between Mt. Wilson on the south and Rainbow Peak on the north. Just after 1 mile from the trailhead, leave the trail and head west onto an unsigned hiker s path that heads into the canyon
 after.33 miles. Boulder through the wash almost 400 yards to the enormous boulder in Photo 1. Waypoint 4 is on the ledge of the boulder.")
174 (Waypoint 2). When you come to boulders continue straight; do not drop into the wash. The path resumes past the boulders. Both times the path forks, take the right fork. The path drops into the wash (Waypoint 3) after.33 miles. Boulder through the wash almost 400 yards to the enormous boulder in Photo 1. Waypoint 4 is on the ledge of the boulder. Continue in the wash another 50 yards where a huge wall of boulders seemingly block the canyon. Just behind these boulders is the north fork of Oak Creek, your next destination. Scramble up the right side of the boulders (class 2). A short path begins and leads to a class 3 climb that has a few cheater rocks on the ground to make the move easier (Waypoint 5). You are now in the north fork. Boulder through the wash. When you come to obstacles, look for cairns marking the best way around. All work-arounds are class 3 or less. The first major landmarks are two huge ponderosa pines that stand about 500 yards up the canyon; see Photo 2. Waypoint 6 is along the east bank of the wash. The going is fast here, but the rock can be slick. About 100 yards before the ponderosas you ll come to a steep, slick, section of sandstone on the left bank, as seen in Photo 3 (Waypoint 7). Follow the traverse as outlined in the photo. Climb about 30 feet up the left rib to a small horizontal crack. When the crack stops, diagonal up to the right to another horizontal crack and follow it to a small boulder field. If you re not comfortable with the traverse, avoid it by scrambling about 30 yards up the lowangled slab located on the east bank to a large overhang. The overhang will be to your left. Go under this; you ll feel like you re in a cave. After 30 yards climb out on the left side and head toward the left bank. You ll have to friction climb a short slab (25 yards) of sandstone. Either approach leads to a small cairned boulder field. Scramble up the boulders looking for an easily-missed opening through the scrub oak (Waypoint 8). It will be on your right side. Go through the opening and follow a path 40 yards back into the wash. You re now only 50 yards from the first ponderosa.
. Just beyond this point the canyon bends to the west. You are now past the brush.")

175 Continue up the center of the wash. Waypoint 9 is a smaller ponderosa, not visible in Photo 2. In about 40 yards you ll pass a much taller ponderosa. Continue another 50 yards to the waterfall in Photo 4. A dead tree stands at the top of the dry fall (Waypoint 10). Just beyond this point the canyon bends to the west. You are now past the brush. The true beauty of the canyon is revealed here. Magnificent colors and stunning formations present themselves in this last leg of the canyon. As you look up the canyon, you can see the limestone cliffs marking the end of the canyon. Although not steep, parts of the wash are extremely slick. Use caution when descending this section of the canyon. Scramble to the last dry fall; water might be running down the center; see Photo 5. About 100 yards past the last dry fall, the wash forks; see Photo 6. You will leave the wash here (Waypoint 11) and scramble up the very steep and scenic ridge that overlooks the canyon. This part of the route is different from the original route and better. Stay on the far right of the ridge. Head to the wall in Photo 7 (Waypoint 12) and climb the chute (class 4), or traverse to the far left and up. Keep ascending steep rock until it levels (Waypoint 13) and you are forced west (left). Waypoint 14 is a second wall that forces you west (left) about 15 feet to an easy class 3 chute. The sandstone gives way to broken chip sandstone and the grade lessens. Keep ascending almost 200 yards to a

, your final destination. Congratulations, you made it! A large cairn sits at the top of the wall. There s a sign-in book inside the cairn.")
176 well-worn path (Waypoint 15). Soon the red ramp comes into view; see Photo 8. Waypoint 16 is the top of the red ramp. Photo 9 shows the next part of the route. A path starts after you cross the boulders and heads north around the wall. Once the path ascends, leave it by walking north (Waypoint 17) over to the white sandstone to the top of Rainbow Wall about 300 yards to the NW. Photo 10 shows the backside of Rainbow Wall (Waypoint 18), your final destination. Congratulations, you made it! A large cairn sits at the top of the wall. There s a sign-in book inside the cairn. Peer straight down from the edge of the wall 1,200 feet into Juniper Canyon. To Descend: Although there are options, the fastest is retracing your steps. You can also descend via Gunsight Notch and back out Juniper Canyon.
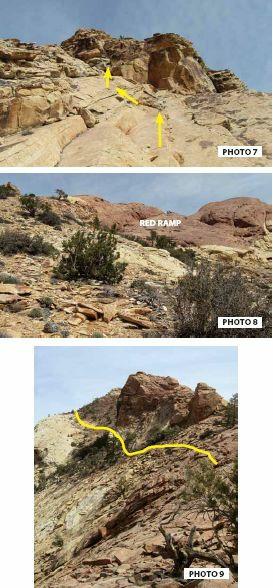
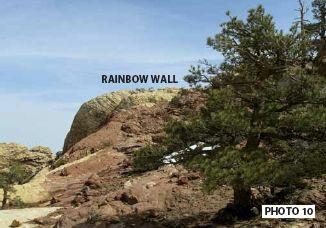
177

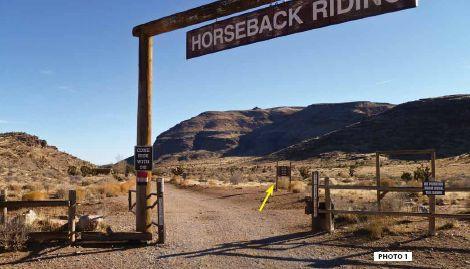
178 Cowboy Cave Trail
179 Travel west on Charleston Boulevard until you come to a signed parking lot for the horseback riding stables; see Photo 1. The parking lot is 1 mile past the turn-off for Red Rock Canyon. Comments: This is a good hike for beginners and people who like caves. The cave is hidden in the limestone walls above the wash and is actually very large with numerous rooms. Enter at your own risk. Flashlights are mandatory.
. Head south on the road about 250 yards where the road ends at the horse corral; see Photo 2.")
180 The Hike: Ten yards in the gate, turn right onto the third trail (Waypoint 1). The trail heads east with no elevation gain. Off to the left is a horse corral. Continue hiking almost 300 yards where the trail intersects a gravel road (Waypoint 2). Head south on the road about 250 yards where the road ends at the horse corral; see Photo 2. At the far end of the corral, the trail descends into a wash on the east side (Waypoint 3). The trail heads southeast toward the east canyon; see Photo 3.


181 Follow the trail about 700 yards. Just before the trail crosses the wash you ll pass two small caves. The main cave is hidden in the east (opposite) wall. See Photo 4 for the general area of the cave. Cross the wash via the trail that ends at the limestone cliffs. Scramble up the cliff about 30 feet and look for a faint path that heads north. Follow the path 30 yards where it makes a U-turn and heads south for 10 yards to the cave; see Photo 5. Years ago the cave was littered with glass. It appears to be much cleaner now, but keep an eye out for glass. The cave extends into the mountain, but you have to crawl on your stomach beyond the first room. To Descend: Retrace your steps.

182 Fossil Ridge Trail Travel west on Charleston Boulevard until you come to a signed parking lot for the horseback riding stables; see Photo 1. The parking lot is 1 mile past the turn-off for Red Rock Canyon. Comments: This is one of the easiest hikes in Red Rock that rewards hikers with great views of major Red Rock peaks. Since this is a loop hike, it can be done in either direction, but hiking counterclockwise has the best views. This trail is shared with mountain bikers and horseback riders. The Hike: From the parking lot, walk under the Horseback Riding sign and make an immediate right onto the first trail (Waypoint 1). Follow the trail south as it weaves across the desert a third of a mile before it climbs a minor ridge. Off to the west are great vistas of the Red Rock peaks: Monument, Mt. Wilson, Rainbow Peak and Wall, Juniper Peak, and Bridge Mountain. In about a mile, the trail divides (Waypoint 2). Continue straight about 200 yards toward the conglomerate rock pile

183 seen in Photo 2. As the trail weaves behind the conglomerate rocks, it divides (Waypoint 3). Take the left fork. The trail now travels along the top of Fossil Ridge. Many fossils are found in the limestone rocks along this ridge. Below to your right is Fossil Canyon, another easy hike. Follow the trail as it descends off the ridge via switchbacks and back to the trailhead, which is visible. Las Vegas Overlook (aka Muffin Boulders) Trail

184 Travel west on Charleston Boulevard until you come to a signed parking lot for the horseback riding stables (Waypoint 1). The parking lot is 1 mile past the turn-off for Red Rock Canyon. Comments: Great vistas of Red Rock Peaks and Las Vegas are seen from the boulders. The Muffin boulders are really huge conglomerate boulders. How did they get up there? It makes you stop and wonder. Photo 1 shows an overview of the route and the Muffin boulders. The Hike: Hike the dirt road about 100 yards to the horse corral. As the road bends to the right, turn left on an unmarked path (Waypoint 2) that parallels the horse corral. As the path passes the horse corral it crosses a small drainage. Once on the other side of the drainage, veer left, cross a prominent trail, walk 10 yards, and turn right onto a less prominent path (Waypoint 3) that heads directly for the Muffin boulders; see Photo 2.
 as it switchbacks up a slope. Continue on the main trail (Waypoint 6); do not turn right onto a prominent trail.")
185 Follow the path about 300 yards where it intersects a prominent trail (Waypoint 4). Go left following the trail about.25 miles (always stay on the main trail) to a drainage. Cross the drainage and follow the trail (Waypoint 5) as it switchbacks up a slope. Continue on the main trail (Waypoint 6); do not turn right onto a prominent trail. After several hundred yards the trail parallels a drainage. It eventually crosses the drainage (Waypoint 7) near a dry fall. It then heads up a slope via switchbacks. Soon the Muffin boulders come into view; see Photo 3. Follow the trail to the boulders (Waypoint 8). There s no cairn or sign-in book, but the views are outstanding. Out to the west are numerous peaks in Red Rock Canyon. Back to the east is Las Vegas. To Descend: Retrace your steps. The bobcat, the most abundant cat in the Southwestern United States, resides in Red
 side of the road (Waypoint 1).")
186 Rock Canyon. It hunts nocturnally, so it won t be seen by hikers unless disturbed from its daytime resting place. The Bureau of Land Management First Creek Waterfall Trail Drive west on Charleston Boulevard to the signed First Creek parking area on the right (west) side of the road (Waypoint 1). You ll pass the entrance to Red Rock Canyon. Don t turn into Red Rock Canyon. Comments: It s amazing to be walking through the middle of the desert and find a seasonal waterfall just feet from the trail.
 fork; the right fork is blocked off by a row of rocks. Walk another 300 yards to the unsigned path (Waypoint 2) in Photo 1.")
187 The Hike: The trail immediately crosses a dry wash and heads SSW toward the mouth of First Creek Canyon. In about a half-mile, the trail divides. Take the south (left) fork; the right fork is blocked off by a row of rocks. Walk another 300 yards to the unsigned path (Waypoint 2) in Photo 1. Follow this path NW about 100 yards to the edge of the wash. The path heads toward a group of pine trees. The waterfall is located down in the wash. You can t see it from the path until you re almost on top of it. If the waterfall is flowing, let your ears guide you. There are plenty of places to sit and enjoy the waterfall. There s an unsigned path about 25 yards to the east of the waterfall that leads to the bottom of the waterfall, seen in Photo 2 (Waypoint 3). To Descend: Retrace your steps.

188 First Creek Peak Trail and Route Drive west on Charleston Boulevard (State Route 159) to the marked First Creek parking area on the right side of the road (Waypoint 1). Don t turn onto the Scenic Loop. Comments: This peak is tougher than it looks. The route has some airy climbing, exposed traverses, and fun bouldering. The peak offers great views into both forks of First Creek and the hidden bowl route to Mt. Wilson. Photo 1 is the peak from along the trail. It s very hard to see from the trailhead.
. From this point, the trail divides into numerous paths.")
189 The Hike: Follow the signed trail toward the mouth of First Creek Canyon. When it forks, take the left (south) fork. Rocks block the right fork. About 1.25 miles from the trailhead, the trail goes down a small hill and under a branch of a 20-foot desert scrub oak (Waypoint 2). From this point, the trail divides into numerous paths. Follow any path that stays near the creek. Just before the path enters the creek, take the south path, which climbs a hill. At the top of the hill, the path merges with other paths. Continue west toward the canyon. The path divides at a 20-foot juniper (Waypoint 3). Follow the north path down a hill. At the bottom of the hill, a large log has fallen along the path. Eventually the path goes across a band of red sandstone. About 15 feet after the path changes back to dirt, it forks. Take the north fork (Waypoint 4).
. You re now in the main wash.")

190 The path weaves between two boulders and then heads west into the canyon. Continue toward the large cottonwood tree in Photo 2. Do not hike straight to the cottonwood tree; there are bees! Instead, follow a faint path well before the cottonwood tree that travels to the right before leading back to the cottonwood tree (Waypoint 5). You re now in the main wash. From here, I ll point out key landmarks that you should pass. Look for footprints in the gravel and cairns to keep you on the route. Boulder about 300 yards up the canyon to huge rocks that have formed tunnels. This is called the Maze; see Photo 3. Once through the Maze, continue up the wash another 300 yards to the class 3 chimney in Photo 4. At the top of this chimney (Waypoint 6), a 100-foot dead tree leans against the north bank of the wash. The canyon divides just past the tree. Hike NW into the right fork of the canyon. Hikers encounter brush in this fork, because they stay in this fork too long. Boulder about 50 yards up this fork to the obvious opening through the brush on the west side, as seen in Photo 5 (Waypoint 7). Once through the opening, head west and boulder a couple hundred yards to the bottom of the Cascading Waterfall. Scramble 70 yards up the steep sandstone wall along north bank to the top of the Cascading Waterfall. A large ponderosa pine stands at the top; see Photo 6 (Waypoint 8). It s a great place to take a break. The waterfall may be dry. You ll leave the wash now and start your trek to the peak, which is to the south. Hike past the
. Avoid brush at the top of the notch by climbing out to the right.")

191 almost dead ponderosa tree, which will be to your left. Scramble up the low-angled wall to the pine in Photo 7 (Waypoint 9). Traverse left about 40 yards to the chute in Photo 8. Scramble about 75 yards up the chute, and then traverse right along a small ledge system to the notch in Photo 9 (Waypoint 10). Avoid brush at the top of the notch by climbing out to the right. Head NW 40 yards to the two pines in Photo 10. Just before the two pines (Waypoint 11), go left up the low-angled wall for about 30 yards, then turn right scrambling up the chute. Head toward the dead tree in Photo 11. The terrain flattens and you ll soon parallel a wall to your left. Look for a tall ponderosa with the top snapped off. It s located in a chute west of where you are. Waypoint 12 marks where you head west on an obvious but short-lived path to the chute with the tall ponderosa. The traverse is easy, but exposed; see Photo 12. You ll lose sight of the ponderosa until in the chute.


192 Scramble up the chute toward the tall ponderosa with the top snapped off. There s an 8-foot class 4 wall you need to climb. Once near the ponderosa (Waypoint 13), go left, scrambling over boulders and to the ponderosa. Veer slightly left and continue in the chute about 40 yards going through a slot.


193 Just beyond the slot turn right (Waypoint 14) and hike over flat terrain about 25 yards to a wide ledge that overlooks First Creek Canyon. At this point, the limestone is only a few hundred yards to the west. Head west about 50 yards, crossing an obvious chute to the class 3 wall in Photo 13. Climb the left corner of the wall eight feet to a ledge. Follow the ledge under the pine branches to just before the crack (about 20 feet). Climb the wall 25 feet to the top. There s exposure here! Once at the top of the wall, head SW up the sandstone until the terrain changes to high desert. Now head south about 150 yards on a faint path weaving around the brush to the peak, as seen in Photo 14 (Waypoint 15). Climb the NE face to the top. The summit offers a great view of both forks of First Creek Canyon. From the peak, you can see First Creek Canyon isn t all that long. It s amazing how much time it takes to boulder to the end of this tough canyon. The normal route to Mt. Wilson follows First Creek to the end of the canyon. I first did this peak in There was one at the peak. Like most peaks, one can come in from the west avoiding all the climbing and all the fun. It s a short walk from the limestone to the peak. Descend: Retrace your steps off the summit and head down the path you followed up. Veer west (Waypoint 16) of the wall you climbed in Photo 12 on open slabs. Descend until the sheer drop-off before the wash. Veer north onto the ledge in Photo 15 (Waypoint 17). This is the same ledge you walked in Photo 12. Walk to the far side of the ledge and then descend the obvious chute to the left. (You crossed this chute during the ascent.) You ll pass Waypoint 18 in the chute. Once out of the chute head east in the wash. Continue to the top of the Cascading Waterfall in Photo 6. From here retrace your steps back to the trailhead.
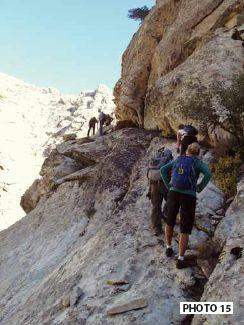
194

195 Decision Peak Route Take Charleston Boulevard (State Route 159) to the marked First Creek parking area on the right side of the road (Waypoint 1). You ll drive past the entrance to Red Rock Canyon. Do not turn into Red Rock Canyon. Waypoint 1 is the trailhead. Comments: The route to this little-known peak travels through the south fork of First Creek Canyon, a beautiful area that few have ever hiked through. There is an exposed traverse and one friction climb on the route. This peak sees only one party per year!
. From this point the trail divides into numerous paths.")
.")
196 The Hike: Follow the signed trail west toward the mouth of First Creek Canyon. When it divides, take the left (south) fork. Rocks block the right fork. In about a mile and a quarter from the trailhead, the trail descends and passes under a branch of a 20-foot scrub oak (Waypoint 2). From this point the trail divides into numerous paths. Follow any path that stays near the creek. You will always be to the south of the creek. Just before the path enters the creek, take the south fork, which climbs a hill. At the top of the hill, the path merges with other paths. Continue west toward the canyon. The path divides at a 20-foot juniper. Follow the north fork down a hill passing a log (Waypoint 3). Continue west 100 yards following the most prominent path (Waypoint 4), which avoids numerous side paths. Eventually the path goes across a band of red sandstone. About 15 feet after the path changes back to dirt, it forks. Take the north fork. If you continue straight, you encounter massive brush.


197 The path weaves between two boulders and then heads west into the canyon. Continue on the path about 75 yards toward the large cottonwood tree; see Photo 1 (Waypoint 5). Do not hike to the cottonwood tree. There are bees! Instead follow a faint path that travels to the right of the cottonwood tree and hike south until you are in the main wash. From here I ll point out key landmarks that you should pass. Look for footprints in the gravel and cairns to keep you on route. Boulder about 300 yards up the canyon to huge rocks that have formed tunnels. This is called the Maze; see Photo 2. Waypoint 6 is just before the Maze. Continue up the wash another 300 yards to the class 3 chimney in Photo 3. Just after the chimney the canyon divides (Waypoint 7). Veer left into the south fork; see Photo 4. In the first 100 yards you ll come to a class 5 climb. Follow a path about 10 yards around to the right and scramble up on a ledge, which drops you back into the wash. In another 30 yards stem up a chute. In about 100 yards the canyon opens up into a red bottom terrace (Waypoint 8). At the top of the terrace the canyon divides again, although the left fork ends at a massive wall. Hike into the north (right) fork.

 about 40 yards through the brush to a 50-foot,")
198 In about 30 yards before the log and wall in Photo 5, scramble out of the wash up along the right side of the canyon to avoid a class 5 dry fall. Descend back into the wash and continue. Follow a path (Waypoint 9) about 40 yards through the brush to a 50-foot, still-standing, dead tree. Head south a few
 and climb it. Continue to the lowangled slab in Photo 7. Easier rock is found by veering left.")
 and head east around the higher wall as shown in Photo 9. Be careful if the sandstone is wet. It s very slippery.")
199 yards to the sandstone slab. Scramble up the slab about 20 yards and duck under branches of a juniper. Once past the juniper the brush disappears. Continue to the awkward, 4-foot wall in Photo 6 (Waypoint 10) and climb it. Continue to the lowangled slab in Photo 7. Easier rock is found by veering left. Near the top of the slab, go left following a path (Waypoint 11) through the brushy drainage and up to the low-angled wall. Traverse the wall as seen in Photo 8 (Waypoint 12) to the scrub oak bush. Scramble up the wall (it s less steep here) and head east around the higher wall as shown in Photo 9. Be careful if the sandstone is wet. It s very slippery. Once around the corner, walk out on the ledge (Waypoint 13) for a great view of First Creek and the south face of Mt. Wilson. Keep walking south about 200 yards along the ledge to the dry fall in Photo 10 (Waypoint 14). Either climb the right corner of the dry fall, or, if you have stealth rubber hiking shoes, walk up the center of the fall. This is an exposed, almost 100-foot, class 4 friction climb. Once up, head SW to the peak; see Photo 11 (Waypoint 15). To Descend: Head NW off the peak through broken sandstone to the bowl in Photo 12 (Waypoint 16). At the bottom of the bowl, look for a cairn marking a descent route through the brush; see Photo 13 (Waypoint 17). Continue descending, veering slightly left, to a steep descent down a slippery slab. Veer right, following a path that hugs the right wall (Waypoint 18). Once around the corner, you meet up with the route you ascended. Retrace your steps across the traverse in Photo 8.
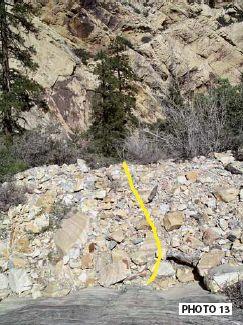
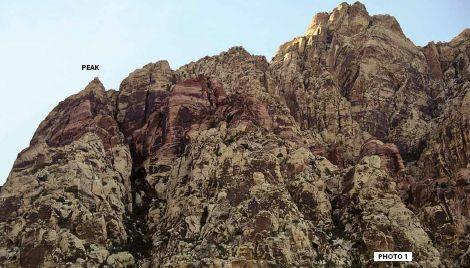
200
201 White Pinnacle Peak Route Take Charleston Boulevard (State Route 159) west to the signed First Creek parking area on the right side of the road. You don t drive on the Scenic Loop to access the trailhead. Comments: This is the gnarliest peak in Red Rock and, in fact, one of the most uncivilized peaks in the Southwest. If you re looking for exposure, you ve found it. The route has some challenging class 4 climbing. Depending on where you re standing, the gully looks impossible. It isn t. Bring 25 feet of rope or webbing to pass packs up the chimney. Photo 1 is the peak. Tip: Due to brush along the route, wear long pants. The Hike: The trail heads SSW toward the mouth of First Creek Canyon. When the trail divides in about a half-mile, take the south (left) fork; the right fork is blocked off by a row of rocks. Walk about 300 yards to the path as seen in Photo 2 (Waypoint 1).
.")

202 Follow the path about 150 yards crossing above the waterfall (may be dry) and pick up any path heading west toward the canyon. Initially, the closer you stay to the wash, the better the path. Follow the path to the ridge below the gully. Hike the ridge to the start of the gully as seen in Photo 3 (Waypoint 2). It s a little less than 2 miles from the trailhead to the start of the gully and about 900 feet of elevation gain. The length of the gully is only 500 yards, but you gain almost 1,000 feet. There s lots of class 3 and some class 4 climbing in the gully. Look for cairns to stay on route. Even though you re in a gully and getting lost is impossible, you need to follow the route to avoid horrible brush. Enter the gully on the right side. In less than 100 yards, the gully forks. Veer left, staying in the more prominent gully. Follow the path that weaves through the brush. When the path leads to a chute filled with brush, look to your left for a cairn and climb the wall. Continue on the path, squeezing by a prickly pear. Just beyond the prickly pear, climb a chute, exiting left by stepping on a log. Continue to the class 4 crack in Photo 4. Test the rope before using it to climb the crack. The path resumes and heads left at the top of the crack. Continue up the gully to the major chimney in Photo 5.
 and through the small hole to the north. You ll have to take your pack off to fit through the hole. Be careful of loose rock and dirt.")
 as seen in Photo 6. Once up, you have a great view of Indecision Peak and First Creek Canyon. Turn east and get ready for one of those once-in-a-lifetime experiences.")
203 This is a wild chimney! Hike under the boulder and climb on top of it (class 3) from the back side. Stem up the wall (class 4) and into the back of the chimney. Be careful of loose rock. Scramble up (class 4) and through the small hole to the north. You ll have to take your pack off to fit through the hole. Be careful of loose rock and dirt. Use your rope to hoist packs through the hole. The path resumes cutting through the brush. In about 150 yards, the path ends at a steep sandstone wall. Scramble up the wall (class 3) as seen in Photo 6. Once up, you have a great view of Indecision Peak and First Creek Canyon. Turn east and get ready for one of those once-in-a-lifetime experiences. Walk the very exposed ridge about 75 yards to the peak; see Photo 7. This summit is beyond cool! It s 400 feet down to the left and over 1,000 feet down to the right. To Descend: Retrace your steps. Descending the chimney is easier than ascending it. For once, larger people have it easier than smaller hikers. You can hook up a rope by a tree near the top of the chimney if needed.

204 Mt. Wilson Route Drive west on Charleston Boulevard (State Route 159) to the marked First Creek parking area on the right side of the road (Waypoint TH). You don t drive on the Scenic Loop Road to access the trailhead. Comments: This is one of the most difficult hikes in Red Rock Canyon. The ascent up the Hidden Bowl is very strenuous, but the views from Mt. Wilson are the most dramatic in Red Rock. I ve
205 named some key landmarks to make it easier to follow the route. The route through the canyon depends on the time of year, amount of water in the wash, your climbing ability, and the grapevines. Get a very early start; you don t want to descend in the dark. Your starting time isn t limited to the Scenic Loop hours, since the trailhead is along NV159. The route is cairned. I highly recommend you use a GPS to follow this route. Tip: Due to break-ins at the trailhead, make sure to leave valuables at home or take them with you. The Hike: Follow the signed trail west toward the mouth of First Creek Canyon. At about a mile and a half, the trail narrows to single-track width. Continue as the trail descends slightly and passes near large scrub oak trees. From this point the trail divides into numerous paths. Follow any path that stays near the creek. Just before the path enters the creek, take the south fork, which climbs a hill. At the top of the hill, the path merges with other paths. Continue west toward the canyon. When the path divides at a 20-foot juniper, follow the north fork down a small hill. At the bottom of the hill, a log has fallen across the path. Eventually, the path goes across a band of red sandstone (Waypoint 1). About 15 feet after the path changes back to dirt, it forks. Take the north fork. If you continue straight, the path soon ends in brush. The path weaves between two boulders, then heads west into the canyon. Follow the path through the brush and scramble up a large low-angled boulder. Continue on the path and scramble up the boulders to the large cottonwood tree in Photo 1. You re finally in the wash (Waypoint 2). From here to where you leave the canyon, I ll point out key landmarks that you should pass while bouldering in the wash. Look for footprints in the gravel and cairns to keep you on route. Boulder through the wash past numerous class 3 sections. About 250 yards from where you entered the wash, you ll come to an enormous boulder. Climb as shown in Photo 3 or veer left and scramble up to a path, then back into the wash. Continue through the wash about 100 yards to what s called the maze; giant boulders create a hole you scramble through; see Photo 3. The wash divides twice (not the canyon); both times take the left fork, which are free of brush. Soon after the second divide, you ll hike alongside the south wall of the canyon until the wash narrows and you come to the chimney in Photo 4.

206 The chimney is an easy class 3 climb. At the top of the chimney, a 100-foot dead tree leans against the north side of the wash. The canyon divides just beyond the tree. Hike NW into the right fork of the canyon. Hikers encounter brush in this fork, because they stay in the fork too long. Boulder about 40 yards up this fork to an obvious opening through the brush on the west side; see Photo 5 (Waypoint 3). Once through the opening, continue straight a couple hundred yards in the Brush-Free wash (locally named) to the start of the sometimes dry Cascading Waterfall; see Photo 6 (Waypoint 4). Scramble up and traverse the north wall to a large ponderosa pine at the top of the cascading waterfall. It s a great place to take a break. Continue up the wash about 70 yards to a large cairn along the north side of the wash. Leave the wash by scrambling NE up the low-angled slab in Photo 7 (Waypoint 5).


207 Scramble 30 yards up the slab in Photo 7 and turn left, climbing a crack. Follow the crack 10 feet, turn right, and follow the crack as it passes between two scrub oak bushes. Once beyond the scrub oak, traverse right 20 yards along a small ledge to a cairn. Continue traversing until you go around a corner and the terrain opens up. The traverse is well-cairned; see Photo 8. Head 75 yards up the steep slab of sandstone to the black section of sandstone circled in Photo 9. Continue 20 yards beyond the black section of sandstone to the top. You ve climbed out of the canyon; you now have to drop into the Hidden Bowl. Unfortunately, you have to lose elevation before ascending the Bowl. Head NW up the shoulder as seen in Photo 10 (Waypoint 6). The Hidden Bowl becomes visible from the ridge. From the top of the ridge, descend the ramp about 40 feet and make a hard left onto a wide sandstone ledge; see Photo 11. Follow cairns and a path though brush to the start of the bowl (Waypoint 7). Unfortunately, a class 5 dry fall lies ahead. You must go around to the east to get above it. Traverse across the bowl and then up and left as seen in Photo 12. You cross Waypoint 8 at the top of a short climb up a boulder. Walk across sandstone and then follow a path around the east side of the dry fall. The good news is you re now above the dry fall (Waypoint 9); the bad news is it gets very strenuous from here.

208 Ascend easy ramps and move east to the eastern part of the bowl. Photo 13 shows the eastern section of the bowl (Waypoint 10). Ascend NE almost 200 yards up the steep section of the bowl before hiking NW Waypoint 11 to avoid a near vertical wall ahead. Follow cairns up the broken sandstone to the ramp in Photo 14 (Waypoint 12). Continue up steep sandstone to the right of the alcove as seen in Photo 15 to the top of the bowl (Waypoint 13). You ve just gained more than 1,500 feet in about two-thirds of a mile!

209 Head NW above the alcove about 200 yards to an awesome vista (Waypoint 14). It s very flat here and normally not windy; the perfect place for lunch. This isn t the peak, but it s only 15 minutes away. To reach the peak, hike NW up the hill in Photo 16. Follow a path to the top of the hill and down to the saddle just before the summit. Ascend easy rock to the summit.
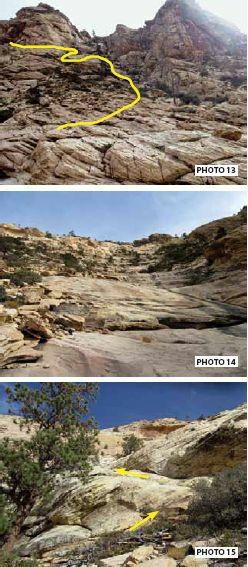
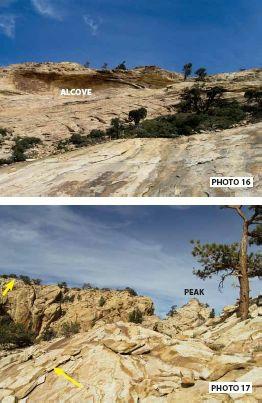
210

211 Wow! You made it. A small cairn hides the sign-in book; you have to look for it. Take in the views from the highest sandstone peak in Red Rock Canyon. You ve just climbed one of the toughest peaks in Red Rock. To Descend: Retrace your steps. Descending is faster. Look for cairns; many were actually made specifically for the descent. To be safe, you should have at least four or more hours of daylight left. This means leaving the peak by 12:30 p.m. if you re doing the hike in late autumn or winter. Windy Peak Route
. Drive.1 mile and turn left. Drive.9 miles and turn right.")
212 Drive south on I-15 and exit on Blue Diamond Road (State Route 160). Head west 15.7 miles, then turn right onto an unmarked gravel road. If coming from SR 159, turn right onto 160, drive 5 miles and turn right onto the same unmarked gravel road. (This is not the road to Black Velvet trailhead). Drive.1 mile and turn left. Drive.9 miles and turn right. Drive about 1 mile, veering left when the road forks to avoid some rough spots. Park at a large circular pull-out (Waypoint 1). You re now across from Windy Peak; see Photo 1. Note: A high-clearance vehicle is needed. Your mileage will differ once you re on the gravel roads. Return to Vegas: From the trailhead, drive north 1 mile, to where the road comes to an intersection. There are two roads to the left. Take the left-most road. The other road dead-ends, though it seems that would be the road to take. Follow the road back to State Route 160.

.")
213 Comments: The expanse at the summit is impressive. It s somewhat like the summit at Mummy Mountain, very flat and a large area. Mud Springs Canyon lies to the north of Windy Peak. Windy Canyon lies to the south of Windy Peak. This route follows the trail/path and then heads up the enormous ramp before ascending the south face. The Hike: Follow the path as it heads down and crosses the wash. The path resumes on the far side of the wash. In about 30 yards, go right when you come to an intersection. In a few hundred yards the path heads toward chocolate-colored boulders. The path forks near the boulders; take the left fork (Waypoint 2). The path travels to the right of the boulders and soon crosses a wash. In about 80 yards, the path forks again; take the left fork (Waypoint 3). When the path becomes obscure, look for cairns. The path (very obscure here) climbs a small hill (Waypoint 4) before intersecting with another path. Go left onto this path as it heads for the canyon. The path crosses to the south side of the drainage at boulders (Waypoint 5). Head right as the path travels up the canyon. You are now on the south side of the drainage with a good view of the ramp you will soon be hiking; see Photo 2. The grade picks up as the path climbs the steep hill. The path briefly climbs rock (Waypoint 6), making it harder to follow. Now it gets steep and loose as the path climbs the hill. Finally you come to level ground (Waypoint 7). Again you get a
. Head across the ledge about 50 yards to a drainage below. Descend (Waypoint 9) into the drainage; see Photo 5.")
214 good view of the ramp; see Photo 3. Leave the main path for a side path that travels to the base of the wide ledge in Photo 4. There s a short class 2-3 scramble to get onto the ledge in Photo 4 (Waypoint 8). Head across the ledge about 50 yards to a drainage below. Descend (Waypoint 9) into the drainage; see Photo 5. Head up the drainage about 40 yards. There s some brush and a few class 3 moves. Exit right at an opening in the brush (Waypoint 10). Ascend a very loose and steep path. The path descends and crosses a drainage to a ramp (Waypoint 11) that leads to the main ramp; see Photo 6. Scramble up the ramp to the main ramp; see Photo 7 (Waypoint 12). It s a long, steep scramble up to the top of the ramp. The climbing is no harder than class 3. Photo 8 shows the view looking west from the top of the ramp. Follow cairns and a path around to the right of the wall in the photo.

 as it hugs the wall to the class 3 climb in")
215 Class 4 Option: Scramble up the wall as seen in Photo 9 (Waypoint 13). This eliminates the worst part of the path, mainly the brush. Either route you take, they meet up in less than 100 yards. Continue on the path about 50 yards (it s not brushy) as it hugs the wall to the class 3 climb in Photo 10 (Waypoint 14). Continue scrambling up low-angled walls to the wide ledge in Photo 11 (Waypoint 15).
 is the last ramp the route ascends. Stay on a ridge to the left of the brushy drainage.")
216 Walk 50 yards on the ramp to where you re forced to switchback up another ramp. Hike 30 yards and switchback again up another ramp. The ramps are class 1 and there are lots of cairns. Photo 12 (Waypoint 16) is the last ramp the route ascends. Stay on a ridge to the left of the brushy drainage. Once you have walked past the brushy drainage, veer right (NE) toward the ponderosa in Photo 13 (Waypoint 17). The peak stands 40 yards to the NE of the ponderosa; see Photo 14. A small cairn marks the peak (Waypoint 18). A sign-in book lies just below the cairn in an ammo box. Because of the established path, this peak is more popular than some. There s also a route from Lovell Canyon, which is very easy but boring. Take a minute to look how large the area is around the peak. About 30 yards south of the peak is an official survey marker dated Although no name for this peak is given, the numbers listed on the survey marker are: T22SR58E and S21 S22.


217 To Descend: Retrace your steps by heading SW back to the ponderosa in Photo 13. Scramble west down the sandstone ramps to the path. This avoids the down climbs in Photos 9 and 10. Follow the

218 path around the wall to the top of the major ramp. Descend the sandstone ramp several hundred yards to a small cairn that marks where you turn south down across a wash and up the loose slope. Descend the slope and scramble across the sandstone. Hike up the next little slope to the rocky slope. Scramble south about 50 yards across the slanted sandstone ledge in Photo 4. You ll see a path start at the bottom of the sandstone. It cuts through the manzanita bushes. Continue on the path, eventually descending a steep slope. When the path comes to a boulder field, look to the south for the continuation of the path. Follow the path down the rest of the slope and cross the drainage. Continue on the path where, at times, it s hard to follow. If you lose the path, it s no big deal since most of the time you can see your car at this point.
 Just past the bathrooms, the road changes to gravel. Drive 1.9 miles to a gate. Make a left just before the gate and follow the road.7 miles to Black Velvet parking area (Waypoint 1).")
219 Black Velvet Peak Route From I-15 and Blue Diamond Road (SR 160), head west 15.3 miles then turn right onto an unmarked gravel road. (If you pass mile marker 16, you ve gone too far.) Just past the bathrooms, the road changes to gravel. Drive 1.9 miles to a gate. Make a left just before the gate and follow the road.7 miles to Black Velvet parking area (Waypoint 1). If coming from SR 159, turn right onto 160 and drive 4.6 miles to the paved road. Photo 1 is Black Velvet Peak. Comments: Quite simply, this is one of the best hikes in Red Rock Canyon. Black Velvet Wall


220 towers almost 2,000 feet. You ll hike past the base of the wall and stand at the top of the wall looking down 2,000 feet to the canyon you hiked through. A GPS is recommended to follow this route. The Hike: Follow the obvious but unsigned gravel road as it heads west toward Black Velvet Canyon. The road forks in a couple hundred yards; take the right fork, which narrows to a single-track trail. When the trail forks again, follow the left fork, which soon goes across red dirt before descending into the wash (Waypoint 2). Scramble through the wash about 300 yards until you see a class 5 30-foot dry fall. To bypass the dry fall, go left and follow a path that leads to the start of the exposed third class ledges; see Photo 2. These are the famous Black Velvet Ledges. They re exposed, but an easy class 3. Once above the ledges, drop back into the wash and boulder several hundred yards up the canyon encountering several class 3 sections. When the canyon divides (Waypoint 3 is a little before the divide), go west into the largest fork; see Photo 3. Scramble about 300 yards up this steep sandstone canyon (it will feel much longer) to the 50-foot log in Photo 4. You ll leave the wash at this point. Head south up the steep dry waterfall, which can be seen behind the log in Photo 4. Up to this point, the route was easy to follow. Now it becomes tricky in certain places. Look for

, you ll see Black Velvet Peak and two other unnamed peaks; see Photo 8. From here, you ll walk along the famous Keystone Thrust Fault.")
221 cairns if you lose the route. Scramble up the waterfall toward the three trees in Photo 5 (Waypoint 4). A 40-foot wall sits about 50 yards behind the trees. To get to the top of the wall, go right along the bottom of the wall, to a point where you can climb the six-foot wall in Photo 6. Hike south along the sandstone ledge in Photo 7 to a faint path that travels up loose red-chipped sandstone. At the top (Waypoint 5), you ll see Black Velvet Peak and two other unnamed peaks; see Photo 8. From here, you ll walk along the famous Keystone Thrust Fault. Notice how the terrain changes from sandstone to limestone. Follow the path as it goes around the heads of Black Velvet Canyon. The path traverses without gaining or losing much elevation. You pass Waypoints 6 and 7 as you follow the path. It becomes hard to follow at times, but keep heading toward the peaks. Once you re within about 100 yards of the first peak, you ll descend to a section of reddish dirt and rock (Waypoint 8). Photo 9 shows the route around the first peak.


222 The route becomes harder to follow from the reddish dirt to just beyond the first peak. Look for cairns. Hike NE out on the white sandstone until you can easily climb off to the north (Waypoint 9). Go north about 25 yards to a wall with black varnish at the bottom; see Photo 10. Turn west and hike up the brushy slot to a drop-off. About 15 feet before the slot ends, find a hole on the right. Squeeze through the hole. Once up (Waypoint 10), walk NE toward the first peak. There s a huge drop-off to your left. Walk about 50 yards until you come to the head of the drop-off. Go north climbing over boulders. You re now on the other side of the drop-off. A few yards ahead off to the right is what appears to be a very tricky traverse; see Photo 11. It s not as bad as it looks. Once past the traverse, the second peak comes into view. You re now past the first peak; see Photo 12. From here, your direction of travel is obvious. Approach the second peak, which is the highest peak, from the south side. Scramble along the crest of the ridge (Waypoint 11). There are two short down climbs before reaching the peak (Waypoint 12). This peak doesn t have the stunning views of Black Velvet Peak; however, there s a sign-in book. To the north about 200 yards and 100 feet less in elevation stands Black Velvet Peak.
. You made it! You can admire the view from here, but for an awesome view head NW toward the very top of Black Velvet Canyon Wall.")

223 Continue east along the same ridge 15 yards to a large cairn and path that leads to Black Velvet Peak. Go north on the path and descend the slope. Once at the low point, scramble up to Black Velvet Peak (Waypoint 13). You made it! You can admire the view from here, but for an awesome view head NW toward the very top of Black Velvet Canyon Wall. You re looking down 2,000 feet at the canyon you were hiking earlier in the day. You might see climbers on the wall. To Descend: If you don t have a GPS, make a note of the time. This will help you find the path that travels down the ridge. Start by heading south retracing your steps back up to the same ridgeline near the second peak. Veer slightly SE as you climb onto the ridgeline. Once on the ridge, hike east several hundred yards. There s an occasional path and numerous cairns. Veer south of the first peaklet you come to. Again, head south to avoid climbing to a second peaklet. Once past the peaklet, head up to the ridgeline and pick up the path as it heads east. Now, look at your watch. Once 25 minutes has past since you left Black Velvet Peak, start looking for a path that heads north down the slope. It s marked by two large cairns and a third cairn off to the left. Also, a log sits about 10 yards down the slope next to the path (Waypoint 14).

224 The path heads north toward Whiskey Peak, which lies about 600 feet below. The path is easy to follow and well-cairned. About halfway down to the desert floor, the path stops descending and starts traversing due north. Look to your left for large cairns marking the traverse. In about 150 yards, Whiskey Peak comes into view. From that point, you ll be scrambling down class 2-3 sandstone. Descend into the gully that lies before Whiskey Peak. Go to the north side of the gully and pick up the path that weaves NE toward the desert floor. Luckily, numerous paths avoid the brush and are easy to navigate. About halfway down, the main path leaves the gully, heads north, and traverses a reddish alluvial fan. When the path divides, head down the switchbacks; don t continue north on the path. (You ll end up back in the canyon.) Make sure to descend the easy class 2 chute. Follow the path down to the desert floor. When the path intersects the main trail, follow it east back to your car.

225 First Creek Overlook Peak Route Drive south on I-15 and exit on Blue Diamond Road (SR 160). Set your trip odometer to zero when you pass Rainbow Blvd. Drive another 20.3 miles, and turn right onto the paved and signed Lovell Canyon Road. Drive 3.1 miles and turn right onto dirt road 540. Drive another 2.1 miles, never turning off the main road, to where the road is blocked by boulders courtesy of the BLM; see Photo 1 (Waypoint 1). A high-clearance vehicle is needed.

226 Comments: If you like spectacular views, this hike is for you. Great views of First Creek Canyon, First Creek Peak, Griffith Peak, Bridge Mountain, Rainbow Peak, Mt. Wilson, Indecision Peak, and the Monument are seen from the peak. Look for cairns at the entrance to all the forks in the washes. The Hike: Begin hiking NE on the same road now blocked by numerous boulders and logs. In a few hundred yards the road narrows and turns into a wash (Waypoint 2). Continue north in the main wash about 500 yards to a major fork; see Photo 2 (Waypoint 3). Hike into the right fork. Follow the wash NE almost a half-mile to another fork and hike into the right fork (Waypoint 4). In about 300 yards the wash divides again. Hike into the left, more prominent fork (Waypoint 5). In about 75 yards you ll encounter another fork. This time take the right fork. You ll soon see the wall in Photo 3. The wash soon disappears. Veer west on a minor ridge where a path begins (Waypoint 6) and leads to the ridge (Waypoint 7). From the ridge you have a great view down into First Creek Canyon.


227 Hike north on a faint path about 100 yards to First Creek Overlook Peak; see Photo 4 (Waypoint 8). The view from here will take your breath away. It s one of the best in Red Rock Canyon. There s only a small cairn at the peak, and no sign-in book as of November To Descend: Follow the path south back to the overlook. Find the same path you hiked up and follow it down the steep slope to the wash. Continue in the washes to your vehicle. If you re an experienced hiker, there s a ridge just to the south of the wash. Descend the slope to the ridge. The ridge is flat and very fast. In about a half-mile, the ridge goes up a small hill. Just before the hill, descend north off the ridge into the wash. This avoids the last part of the wash, which is brushy. Continue in the washes to your vehicle. The Park

228 Route Take Blue Diamond Road west to Lovell Canyon Road and turn north. Drive 1 mile and turn right onto a gravel road #541. In.2 miles the road divides; take the right fork (unmarked). In about 3.1 miles the road becomes tougher to navigate in a passenger car, and a small stream of water flows in the middle of the road. There are two small pull-offs along the right side of the road; park in either one. If you continue to drive, there are two boulders that make it a tight squeeze for any vehicle to get through without damage. Comments: This is one of the most amazing places in Red Rock Canyon. I call it The Park, because from a distance it looks like a park. It s a quarter mile of flat sandstone with tall trees and sheer drop-offs. It s a must-do hike to this idyllic place. The Hike: From where you parked, hike NE along the same road passing a Rainbow Mountain Wilderness sign just before the two boulders. It s a flimsy sign and might be gone. Just beyond the boulders is Waypoint 1. The road splits here; take the right fork. Walk about 200 yards along the gravel road, passing a road that comes in from the left.
. Another landmark is two gravel roads merge here. The trail is 10 yards to the left (north) of where the roads merge.")

229 You ll see an Agave Roasting Pit marked by a sign, though the sign might be gone; see Photo 1. Behind and to the left of the Agave Pit is an unmarked trail. You ll want to find this trail (Waypoint 2). Another landmark is two gravel roads merge here. The trail is 10 yards to the left (north) of where the roads merge. A lousy path also starts here, because hikers can t find the trail. Keep looking and you will find the trail. Hike north on the trail 200 yards to a well-defined drainage (Waypoint 3). Go east into the drainage. In 40 yards you ll pass a large tree that has fallen into the drainage. In 25 yards beyond the tree you scramble up a small class 2 dry fall. The drainage twists and turns as it heads east toward a saddle. You pass Waypoint 4 as you continue in the drainage. In about three-quarters of a mile from where you entered the drainage, hike east into a prominent fork marked with a cairn and log (Waypoint 5), as seen in Photo 2. Hike east in the drainage about 100 yards to another divide (Waypoint 6). Take the right fork and follow it until it fades and a path travels the last 100 yards to the ridge. At the ridge (Waypoint 7) you are treated to one of the most dramatic views in Red Rock Canyon. The Red Rock Mountains rise from the desert floor like skyscrapers. The canyon floor lies over 1,000 feet below. You can see a pond in the middle of Spring Mountain State Park. It s a key landmark during the descent; see Photo 3.
230 Head south on a path that stays on the crest of the limestone ridge. You are treated to great views of Sandstone Mountain and the deep forks of Sandstone Canyon. Do not try to traverse on the east side of the ridge the terrain is too loose. Continue almost a half-mile along the ridge to a high point (Waypoint 8). From here, you can see The Park; see Photo 4. There s a large cairn on an outcropping at the high point. Use it as a landmark when you ascend from the Park. Descend the slope via a path into the drainage, which turns into a sandstone wash. You ll soon realize The Park is a large area. There are some awesome drop-offs to the SE. Take time to explore and relax in this special place. To Return: Start by heading west up the sandstone to the right-most drainage. Follow it to the ridge. Look for the outcropping with the cairn on it. Head north along the ridge via the path. Make sure you are always close to the ridge, which has a view down into the canyons. There are a couple of places where the ridge divides. You don t want to follow the wrong ridge. Continue on the ridge to where you can see the pond in Photo 3. Head west onto the path that travels down the slope and eventually leads into the drainage. Follow the drainage west to the main drainage. Go west into the main drainage. Once past the fallen tree, the trail intersects the drainage in about 40 yards. Go left on the trail 200 yards to the trailhead. Follow the gravel road 200 yards west to your car.

231 FAST FACTS Location: 35 miles northwest of Las Vegas Driving directions: Go north on US 95, then left on State Route 157 or 156. Best seasons: May through September Visitor Center: Open 7 days a week in summer; 9 a.m. to 4 p.m.; 702/ Drive 18.4 miles along State Route 157. Located by the Ranger Station on left side of SR 157. Fees: $8/car to park and picnic at Cathedral Rock and Old Mills picnic areas. Permits: None needed for day hiking. Camping: Kyle Canyon, Fletcher View, Kyle Canyon RV Site, Hilltop, Mahogany Grove McWilliams, and Dolemite. Reservations; 877/ Website: reserveusa.com Elevation range: 7,000 to 11,918 feet Size: 316,000 acres Hikes: Less than a mile to 20+ miles
232 Dogs: Yes, but only on designated trails with a leash. Horses: On designated trails only Bicycles: Yes, but the roads are narrow. Mountain bikes: On designated trails only Firearms: None permitted Gasoline: None available Fires: Ground fires and wood gathering prohibited. Stoves are okay. Managed by: U.S. Forest Service; 702/ Food: Available at the Mt. Charleston Lodge DIFFICULTY INDEX Easy Hikes: 6 Big Falls: pg. 263 Bristlecone Trail: pg. 318 Fletcher Canyon: pg. 256 Mary Jane Falls: pg. 261 Robber s Roost: pg. 300 Trail Canyon: pg. 272 Moderate Hikes: 6 Bonanza Peak: pg. 325 Cathedral Rock: pg. 283 Echo Cliff Overlook: pg. 286 Mack s Peak: pg. 308 Mary Jane Falls Overlook: pg. 258 Raintree: pg. 302 Difficult Hikes: 10 Bonanza Trail: pg. 320 Charleston Peak via Big Falls: pg. 266 Charleston Peak via North Loop: pg. 304 Cockscomb Peak and Traverse: pg. 274 Fletcher Peak via Hummingbird Hollow: pg. 296 Griffith Peak via Harris Springs: pg. 253 Griffith Peak via South Loop: pg. 290 Mummy Mountain: pg. 280 Sisters (South and North): pg. 311 South Loop to Charleston Peak: pg. 292
233 DRIVING DIRECTIONS TO MT. CHARLESTON Mt. Charleston is an easy drive from Las Vegas. There are two main hiking areas in Mt. Charleston: Kyle Canyon and Lee Canyon. When driving from Las Vegas, you ll pass the Santa Fe Hotel and Casino; from there it s a six-mile drive on US 95 to State Route 157. To get to US 95 from the Las Vegas Strip, take I-15 north to US 95 and head north. If the trailhead is in Kyle Canyon, take US 95 north to State Route 157. Turn west onto SR 157 and travel 17 to 21 miles into Kyle Canyon. If the trailhead is in Lee Canyon, turn west onto State Route 156. Lee Canyon lies at the end of SR 156. State Route 158 is a nine-mile road that begins along 157 and dead-ends into SR 156. Some of the trailheads are located on SR 158. To get to the hikes that originate at the Bonanza Trailhead, take US 95 to Cold Creek Road. Go west on Cold Creek Road for 16 miles until the road dead-ends into Bonanza Trailhead.
 Follow the gravel road 6 miles to the trailhead (Waypoint 1). A highclearance vehicle is needed. Comments: Griffith Peak has the best views of any summit in Mt. Charleston.")
234 Griffith Peak via Harris Springs Trail and Route On Harris Springs Road, drive 3.2 miles and turn right at the sign for Griffith Peak trailhead. (The sign might be missing.) Follow the gravel road 6 miles to the trailhead (Waypoint 1). A highclearance vehicle is needed. Comments: Griffith Peak has the best views of any summit in Mt. Charleston. This is a magnificent trail with incredible vistas along much of the hike. It s a must-do! The Hike: The trail starts at an easy pace as it makes its way west toward a saddle that lies between Harris and Griffith Peaks. A stunning view of Lovell Canyon is to the south. The first part of the trail started out as a road built by the CCC in the 1940s. President Roosevelt came to inspect the road and asked the foreman the road s destination. When the foreman said he didn t know, the president ordered the construction stopped. The road dead-ends, but the trail keeps going. If you look down to the south, a blue car sits at the bottom of a ravine. Apparently, someone thought the road went somewhere.

235 The trail stays below and to the south of Harris Peak as it heads toward the saddle and Griffith Peak; see Photo 1. Take a break at the saddle and look northwest for a stunning view of Kyle Canyon. A long rest isn t needed, since you ve only gained a few hundred feet in elevation. The incline increases as the trail starts climbing over the rocky cliffs that stand SW of the saddle. The trail offers great views of Mummy Mountain, Kyle Canyon, and Mary Jane Falls by looking north. At the top of the switchbacks, walk over to the ledge for a great view of Kyle Canyon. The trail heads SW as it makes its way to the base of Griffith Peak. Red Rock Canyon is off to the east. The dome-shaped mountain is Bridge Mountain. During the summer months a variety of flowers grow near the trail. Once at the top of the switchbacks, a hill off to the SW is often mistaken as Griffith Peak. Griffith lies behind this hill. The trail flattens out as it winds through an area that suffers from an old forest fire. Past the burnt area, the trail becomes steep as it heads south toward the peak. When the trail empties into a meadow (Waypoint 2), the hike becomes a route and leaves the trail; see Photo 2. The trail does not travel to the peak. This is a steep trek gaining 600 feet in less than 700 yards. There are two hills to climb and then the actual peak. As you climb higher, a hiker s path begins. Once on the path, follow it past gnarly bristlecones to the summit (Waypoint 3). The wind and lower temperatures make Griffith Peak refreshing in the summer and cold in the winter. The rocks at the peak contain numerous fossils; millions of years ago the entire area was underwater. Look at them, but leave them so others can marvel at ancient history. Charleston Peak stands to the west and Mummy Mountain lies across Kyle Canyon to the north. Back to the SE is Red Rock Canyon. The views don t get any better than this! To Descend: Retrace your steps.

236 Fletcher Canyon Trail and Route Go west on SR 157 and drive 18.2 miles. Parking is along the south side at pull-outs, located within 100 yards of the trailhead shown in Photo 1. Comments: The trail can be hiked as an easy 2-mile up and back or 4-mile up and back. It s worth doing the 4-mile hike. The canyon walls close in and during spring there s lots of water. The 4-mile up-and-back hike ends at a unique seasonal waterfall.

237 The Hike: The well-maintained trail heads north and offers a good view of rocky cliffs in the distance. It soon crosses a rocky wash and continues on the far side. The first mile of the trail has a slight grade, making it suitable for a person of any fitness level. A large tree lies across a creek bed at the end of the one-mile maintained trail. Children can test their balancing skills by trying to walk across the tree. Although this marks the end of the one-mile maintained trail, the rest of the trail is easy to follow. As the trail heads NW, cliffs on both sides begin to close in. Water normally flows year-round in the creek bed. The trail crosses the creek bed a few times and splits, then rejoins a few hundred feet ahead. The canyon walls become tighter as the trail goes deeper into Fletcher Canyon. The trail winds around the wash and between the canyon walls. It turns south, empties into the creek bed, and weaves between 100-foot-tall canyon walls. When the creek bed turns sharply to the north, boulder hopping becomes the best way to navigate; see Photo 2. Water may be flowing in parts of the creek bed as you continue through the slot canyon. Up ahead, the creek bed divides. The right fork dead-ends in about 75 yards. A huge boulder aptly named Obstacle Rock blocks the entrance to the left fork of the creek bed, creating a stopping point for some hikers. There s also a seasonal waterfall; see Photo 3. A small opening at the bottom-left corner provides a way past Obstacle Rock. It s a tight squeeze and short people might need help. From the trailhead to this point is about 2 miles. You could continue, but you ve seen the best part of the canyon already. To Descend: Retrace your steps.
.")
238 Mary Jane Falls Overlook Route Go west on SR 157 for 20 miles and veer onto Echo Drive at the hairpin curve. Drive.4 miles and turn left at the sign for Mary Jane Falls. Drive a couple hundred yards on the gravel road and turn left into the signed Old Ski Tow parking lot. The unmarked trailhead is located at the far side of the parking lot (Waypoint 1). A passenger car can drive to the trailhead. Comments: Great views of Mary Jane Falls, Mummy Mountain, Coxcomb Ridge, and SR 157 are seen from the overlook. The first part of this route is extremely steep. You gain 500 feet in less than a quarter of a mile. If you re looking for a short hike, this is a good workout and has some great views. Photo 1 is the overlook from the trailhead. There s some loose rock on this route. Also small cacti hide in the rocks. Watch where you place your hands.
 and you see a drainage down to the south. Follow the steep path up to the base of the towering wall.")
.")
239 The Hike: Follow the extremely steep gravel road south up the hill as seen in Photo 2. In a few hundred yards, the road turns into a path and bends to the left. The path finally levels (Waypoint 2) and you see a drainage down to the south. Follow the steep path up to the base of the towering wall. Traverse left past the lone ponderosa in Photo 3 to the class 2 ramp in Photo 4. At the top of the ramp (Waypoint 3) there s a short class 3 climb to get onto the ridge. Head NW up the wide ridge as seen in Photo 4, aiming for the high point. Near the high point, watch for loose rock. Scramble up to the high point as seen in Photo 5 (Waypoint 4). You now have the option of climbing up the wall (class 3) or bypassing it to the right. Once beyond the high point, continue 50 yards to the overlook. There s no sign-in book, but a cairn marks the overlook (Waypoint 5).


240 From here you can see Mary Jane Falls, The Hood, Mummy Mountain, and Cockscomb Peak and Ridge out to the north. To Descend: Retrace your steps. Walk the ridge all the way out to a drop-off and then down climb to the ramp in Photo 4. From there the rest of the route is obvious. Mary Jane Falls Trail
. A passenger car can drive to the trailhead.")
241 Go west on SR 157 for 20 miles and veer onto Echo Drive at the hairpin curve. Drive.4 miles and turn left at the sign for Mary Jane Falls. Drive.2 miles on the gravel road to the parking lot. The trailhead is located at the far north side of the parking lot (Waypoint 1). A passenger car can drive to the trailhead. Comments: This is a perfect hike for beginners or if you re unsure you ll like hiking. If you don t enjoy this trail, forget hiking. Mary Jane Falls is the most popular hike in Mt. Charleston. The Hike: The trail begins at a leisurely pace, winding through ponderosa pines and aspens. As you head NW, it becomes apparent the trail leads into a huge canyon. Looking toward the south, you see the cliffs that hide Big Falls. There s an unmarked divide at.75 miles. Veer right, continuing on the trail; see Photo 1 (Waypoint 2). As you proceed up the trail, Big Falls comes into view out to the
. An alcove behind the waterfall lets you look out through the water into the canyon below.")
242 south. It s the most spectacular waterfall in Mt. Charleston. Several switchbacks take you up to and along the north-canyon wall. The trail continues to climb and then heads directly to Mary Jane Falls; see Photo 2 (Waypoint 3). An alcove behind the waterfall lets you look out through the water into the canyon below. Use caution climbing to the alcove. The wet rocks are slippery and people get hurt every year. The waterfall flows year-round, but heaviest in springtime from the snowmelt. The trail continues for about 100 yards and terminates at another large cave. To Descend: Retrace your steps. If you have the energy, you can hike to Big Falls. Big Falls Trail
243 Go west on SR 157 for 20 miles and veer onto Echo Drive at the hairpin curve. Drive.4 miles and turn left at the sign for Mary Jane Falls. Drive.2 miles on the gravel road to the parking lot. The trailhead is located at the far side of the parking lot (Waypoint 1). A passenger car can drive to the trailhead. Comments: Big Falls is the most spectacular waterfall in the Spring Mountains. It drops over 100 feet, crashing into the rocks below. The best time to see the waterfall is late spring as the snow melts. By late summer the waterfall is just a trickle. The Hike: The trail heads NW winding through ponderosa pines and aspens. The grade is easy and the cool mountain air is a welcome reprieve from the heat of Las Vegas. In about.75 miles, as the trail veers to the right, continue straight onto the gravel path; see Photo 1 (Waypoint 2). Hike 75 yards up the path, passing an obvious path on the left, and continue as the path bends SW at a large fallen tree; see Photo 2. The grade is easy as the path heads toward the huge drainage. The path crosses a minor drainage (Waypoint 3) and resumes on the far side; see Photo 3. Follow the path another 100 yards down into the drainage (Waypoint 4). From this point, the hike is a route. Start boulder-hopping up the drainage. Be careful; some of the boulders are very slippery. When you see a large boulder blocking the wash, follow an obvious path

244 up the left bank. The path descends (it s loose here) back into the wash just beyond the boulder. Continue a few hundred yards up the drainage to the waterfall. Depending on the amount of water in the drainage, you might want to follow a path up on the west side of the drainage. Big Falls roars when the sun melts the winter snow, resulting in a large amount of water at the base of the falls (Waypoint 5). When there s a breeze, it creates a refreshing mist. Normally, the water is too cold to play in; see Photo 4. To Descend: Retrace your steps. Look for the path that leads back to the trailhead. It will be on your left. Charleston Peak via Big Falls Route
245 Take US 95 north 14 miles and go west on SR 157, drive 20.6 miles, and continue onto Echo Drive at the hairpin curve. Drive.4 miles and turn left at the sign for Mary Jane Falls. Drive.2 miles on the gravel road to the parking lot. The signed trailhead is located at the far end of the parking lot (Waypoint 1). Comments: Charleston Peak is the highest summit in southern Nevada and the only treeless peak. This classic route is one tough hike and not recommended as your first route to Charleston Peak, as there is class 3 and some class 4 climbing. Because of loose rock, limit the number of hikers to four.

246 The Hike: Head NW along Mary Jane Trail almost.75 miles. As the trail veers to the right, continue straight onto the unsigned gravel path; see Photo 1 (Waypoint 2). Hike 75 yards up the path, passing an obvious path on the left, and continue as the path bends SW at a large fallen tree; see Photo 2. The grade is easy as the path heads toward the main drainage that leads to Big Falls. The path crosses a minor drainage (Waypoint 3) and resumes on the far side; see Photo 3. Follow the path another 100 yards down into the drainage that leads to Big Falls (Waypoint 4). When you see a large boulder blocking the drainage, you can climb the wall just to the left of the boulder (class 4) or follow a path up the left bank. The path descends back into the drainage just beyond the boulder. Continue to Big Falls, a seasonal waterfall and climb the small wall to the left of Big Falls (class 3).

 to the west.")
247 You have a 400-foot climb that leads above Big Falls waiting for you. An obvious path leads to the start of the climb (Waypoint 5). There are many options up the wall. The climbing ranges from class 3 to 4. About halfway up, a well-defined path starts and leads to a meadow (Waypoint 6). Follow a faint path south through the meadow about 100 yards and cross the springs (may be dry) to the west. There are lots of thorns here. Once across, hike west about 200 yards up (Waypoint 7) the steep, wooded slope in Photo 4 to the
.")
248 top, where a seldom-used primitive camping site sits; see Photo 5 (Waypoint 8). From the campsite, head west on a path about 50 yards into a drainage; see Photo 6. Hike 300 yards up the drainage. Just before a year-round snow bank, head west up the steep, loose bank (no path). At the top of the bank (Waypoint 9), head west 40 yards through the aspens, junipers, and bushes toward the obvious 60-foot wall. Parallel the wall via a path. When the path ends, hike a few yards to your right where another path starts that overlooks a gully. Don t descend into the gully yet; instead follow the path (Waypoint 10). When the path fades, head SW 40 yards toward a jagged wall. Some cairns mark the route. Head west on a defined path that hugs a wall (Waypoint 11) and then passes a giant bristlecone pine that has bushes growing near its trunk; see Photo 7 (Waypoint 12). Just beyond the bristlecone, head south 75 yards to a 100-foot wall. Once at the wall, traverse west about 40 yards and climb the first scree-filled chute you come to; see Photo 8. Hike less than 100 yards to the main gully; see Photo 9 (Waypoint 13). Start hiking up the gully (known as Airplane Gully). If you encounter deep snow banks, hike out to the left of the gully. When you come to the class 5 wall (Waypoint 14), go left about 70 yards through or around a rock arch to a chute; see Photo 10 (Waypoint 15). Climb the chute, exit right, traverse about 25 yards on a wide
249 ledge, and climb the wall at the weak point (Waypoint 16). Head NW up loose rock with an occasional wall to climb about 170 yards to a tight climb between a bristlecone and a wall (Waypoint 17). Head NW 25 yards back to the gully. You are now about 500 yards below the ridge. Hike up the gully until it turns into a scree slope. Head up the scree slope to the ridge where you intersect the South Loop Trail (Waypoint 18). Follow the South Loop Trail west about.75 miles to the peak (Waypoint 19). To Descend: I strongly recommend against descending the way you came up. You have two choices: South Loop Trail or North Loop Trail to Trail Canyon. I recommend the latter; you ll be closer to the Mary Jane trailhead where you parked your car. Take the North Loop Trail 6 miles to the signed Trail Canyon Trail. Head south 2 miles on Trail Canyon to the trailhead. Walk about 150 yards down Echo Road to the marked gravel road to Mary Jane trailhead. Follow the gravel road to your car. Because water may be the heaviest thing to carry on a hike, try stashing bottles on the way up to retrieve later on the way down. DayHiker.com
. Comments: This trail causes more confusion than any other in the Mt. Charleston area. It s often mistakenly called the North Loop Trail.")
250 Trail Canyon Trail Loop Take US 95 north 14 miles to State Route 157. Go left for 20 miles and turn onto Echo Drive at the hairpin curve. Drive a half-mile to the trailhead sign for Trail Canyon. There s limited parking at the trailhead (Waypoint 1). Comments: This trail causes more confusion than any other in the Mt. Charleston area. It s often mistakenly called the North Loop Trail. It does meet up with the North Loop Trail 2 miles from the trailhead, but is its own trail. From the junction of those two trails, you can go west onto the North Loop Trail to Charleston Peak; you can go east, following a path that runs along Cockscomb Ridge; or you can go straight, following the North Loop Trail east to Raintree, a giant bristlecone pine. Lots of options here; however, this hike description only goes to the point where Trail Canyon intersects the North Loop Trail. The Hike: The trail starts in a northerly direction at a leisurely pace, paralleling a dry drainage

251 that lies to the west. It winds through thick groves of aspens as it heads toward the North Loop Trail junction. To the east lie the rocky cliffs of Cockscomb Ridge. About a half-mile into the hike, the North Rim Ridge can be seen by looking to the NW. Straight ahead stands Mummy Mountain. The grade becomes moderate as the trail switches back through pinion pines. Soon you can see Charleston Peak by looking to the left. The trail flattens out briefly, then climbs a small hill as it heads due east toward Cockscomb Ridge. From this point, it s about 100 yards to the junction of Trail Canyon and the North Loop Trail. Once at the marked junction, a number of options are available. You can go right and follow a path that runs along the Cockscomb Ridge. This path is about a mile (up and back) in length and offers great views of Kyle Canyon. Another option is to go left onto the North Loop Trail and hike six more miles to Charleston Peak. This shouldn t be done on a whim. A third option is to go straight onto the North Loop Trail to Raintree, the oldest living thing in southern Nevada. It s about 1.5 miles from the junction, with plenty of steep switchbacks during the return. To Descend: Retrace your steps. Cockscomb Peak and Traverse Trail and Route
. Comments: This new route, which traverses the entire Cockscomb Ridge, has been elevated to one of the best hikes in Mt.")
252 Take US 95 north 14 miles to State Route 157. Go west (left) on 157 for 20 miles and turn onto Echo Drive at the hairpin curve. Drive a half-mile to the signed trailhead for Trail Canyon (Waypoint TH). Comments: This new route, which traverses the entire Cockscomb Ridge, has been elevated to one of the best hikes in Mt. Charleston. Great vistas from Cockscomb Peak, two other summits, caves, and two arches make this a great hike. For over a decade, it was believed the only way to traverse the ridge was by a mandatory rappel. We found a class 3 down climb in This descent route is much better than the old one, and once you re on the Trail Canyon trail, it s a seven-minute walk to the trailhead!

253 Note: There is no Waypoint 3. The Hike: Follow Trail Canyon Trail 2 miles to the signed junction with the North Loop Trail (Waypoint 2). At the junction, head south on an unsigned hiker s path that travels along the crest of Cockscomb Ridge. In less than 75 yards, the ridge treats you to great views of Kyle Canyon and surrounding peaks. Continue south on the hikers path about a third of a mile to an outcrop. Follow the path as it hugs the west wall going around the outcrop. The path climbs back to the ridge and travels within 30 yards of the sheer face of Cockscomb Peak. The route now leaves the ridge by descending on the east side via a down climb by the dead tree in Photo 1 (Waypoint 4). Be careful; it s very loose. Traverse south (right) along the base of the wall on a faint path about 50 yards and climb a wall (class 2) near the tree in Photo 2 (Waypoint 5). Veer left and up 10 yards to the climb in Photo 3 (class 3). Continue south about 25 yards to the climb in Photo 4 (class 3-4). The exit is very loose; make sure hikers below are protected from possible rock fall. Veer south and up 25 yards and break through the wall in Photo 5. Continue up easy rock back up to the ridge. Head north to Cockscomb Peak, only 30 yards away. A small cairn with a sign-in book marks the peak (Waypoint 6). The vista from the peak is one of the best in Mt. Charleston. To the south stands the continuation of the rocky ridge you ll traverse.
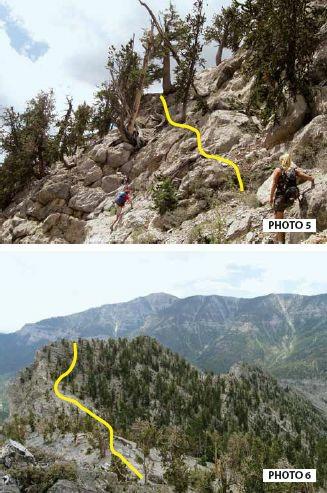
254
. Now the route differs from the original route.")
255 Retrace your steps south down off of Cockscomb Peak and continue south almost a quarter-mile along the ridge, then off to the west to a break in the wall (Waypoint 7) that leads back up on the ridge; see Photo 6. Walk the ridge less than 100 yards to the high point of the second peak (Waypoint 8). Now the route differs from the original route. Instead of descending to Trail Canyon Trail, the route descends the steep south face and continues. This descent is impossible to describe step by step, but here are the general guidelines (the route is very well-cairned).
. Veer left, following cairns to a rope that assists an easy, but loose, down climb.")
256 Walk to the far south side of the current peak and start looking for cairns off to the west. The route switchbacks down the steep slope. About halfway down, go under a tree branch while stepping over a log (Waypoint 9). Veer left, following cairns to a rope that assists an easy, but loose, down climb. Actually, the rope is more of a landmark than a necessity. Keep descending, passing the wild-looking bristlecone in Photo 7, to an obvious saddle (Waypoint 10). The route descends the east side of the ridge. Hug the wall to the right to aid the loose descent. Once down, the route becomes better. Continue on a faint path about 350 yards to the easy class 2 chute in Photo 8 (Waypoint 11). Once up, veer right onto a wide ledge and climb an eight-foot wall. Continue back up to the ridge where the final peak towers before you; see Photo 9. Head around to the west side (Waypoint 12). Hug the wall as you descend a very loose slope, passing an arch back to your left. (You can descend through the arch, but it s extremely loose.) Follow the wall around and ascend slightly on to a wide ledge; see Photo 10. Follow the ledge, always staying next to the wall, about 100 yards to a class 2-3 climb that leads to the summit. Waypoint 13 is in the middle of the final climb. It s loose in spots. Waypoint 14 marks the third and final summit. This flattop summit offers great views, as do the other summits. A cairn marks the summit; there s no sign-in book yet (August 2010). To Descend: Retrace your steps down the final climb, passing Waypoint 13. In about 30 yards, pass the down climb; logs mark where you veer south descending about 10 yards. Ascend back up to the summit ridge. Walk the ridge to an obvious pinnacle (Waypoint 15). This cool-looking pinnacle is

257 visible from Trail Canyon Trail and looks impossible to hike to. From the pinnacle, descend west down loose rock to a flat area. A cool arch stands here, but you won t see it until you re next to it; see Photo 11. From the arch, hug the wall and descend. In about a quarter-mile, you come to a wide ledge that provides somewhat better footing (Waypoint 16). It s short-lived. There s an easy descent off the ledge. The wall you ve been hugging pulls away to the left. Traverse over to it via a path and continue descending. Soon the wall disappears and Trail Canyon Trail becomes visible. Once you intersect the trail (Waypoint 17), head south on the trail 300 yards back to the trailhead. Mummy Mountain Trail and Route
258 Drive north on US 95 to State Route 157. Turn left and drive 20 miles, then veer onto Echo Drive at the hairpin curve. Drive a half-mile to the trailhead sign for Trail Canyon. Comments: Mummy Mountain is the second highest peak in Mt. Charleston. This is the perfect beginner s mountaineering route to give you a feel for real mountaineering. If you like this hike, you can shoot for hikes in the High Sierra. From the summit of Mummy Mountain, you can see Red Rock Canyon, Las Vegas, and Lake Mead. Tip: Hiking poles can help ascending and descending the loose scree slope. The Hike: The trail starts in a northerly direction at a leisurely pace, paralleling a dry creekbed that lies to the west. It winds through thick groves of aspens as it heads toward the North Loop Trail junction. To the east lie the rocky cliffs of Cockscomb Ridge. About a half-mile into the hike, the North Rim Ridge can be seen by looking to the northwest. To the north lies Mummy Mountain. The grade becomes moderate as the trail switches back through pinion pines. Just past this point, Charleston Peak can be seen by looking to the west. The trail flattens out briefly, then climbs a small hill as it heads due east toward Cockscomb Ridge. Continue a short distance to the junction of North Loop Trail. From the junction, the North Loop Trail heads northwest. A half-mile from the junction, you pass Cave Springs, a year-round source of water. A pipe carries water into a horse trough. Continue on the trail as it weaves through the aspens. The trail leaves the aspens and switches back across a scree slope. About 60 yards along the second switchback (about 1.25 miles from the junction), you leave the trail and head north up the scree slope; see Photo 1 (Waypoint 1). The scramble up the scree slope gains almost 600 feet in elevation. At the top of the slope, numerous logs and a large cairn mark this spot for your descent route (Waypoint 2). A path heads east toward the west side of Mummy Mountain. In 25 yards, the path temporarily disappears and you scramble up a low-angled rock face. Follow the path and cairns as you continue east toward Mummy Mountain. The path becomes easy to follow as it climbs up a slope. At the top of the slope, the path again disappears. Head ENE about 30 yards and you ll pick up the path (Waypoint

259 3). Head north on the path about 300 yards to the chute in Photo 2. Climb the chute and head east about 100 yards to the high point on Mummy Mountain (Waypoint 4). Congratulations! You made it to the second highest peak in Mt. Charleston. Look for an army box containing a register at the peak. A three-foot-high shelter made out of logs lies about 60 yards to the west of the high point. This is a perfect place to escape the wind and have lunch. To the southwest towers Charleston Peak; to the southeast stands Griffith Peak and Red Rock Canyon; a little farther to the east is Las Vegas and Lake Mead. To Descend: Retrace your steps by hiking to the chute. It lies 40 yards west of a shelter made out of logs. Follow the path down the class 2 chute. At the bottom of the chute, go south onto the welldefined path. It parallels Mummy Mountain until it turns SW toward the ridgeline. Once on the ridgeline, the path heads west and descends about 70 yards down the north side of the ridgeline. This is where people lose the path. Look for cairns. Follow the path down to where it goes across limestone. Climb down the far side of the limestone (class 1 or 2). The path resumes and heads west along the ridgeline. At the logs and cairn, follow the path south down the scree slope to the North Loop Trail. Be careful on the scree slope. Go east onto the North Loop Trail and follow it back to Trail Canyon. Take Trail Canyon 2 miles to the trailhead.
 side of the road, less than 100 yards beyond the fee booth. The entrance fee is $8 per car.")
260 Cathedral Rock Trail Take US 95 north 14 miles to State Route 157. Go left on 157, drive past the hairpin turn, and turn right into Cathedral Rock Picnic Area; see Photo 1. The signed trailhead is on the west (right) side of the road, less than 100 yards beyond the fee booth. The entrance fee is $8 per car. Parking is available across from the trailhead; however, it s full on weekends. An alternative trailhead and parking are located on State Route 157 about a half-mile past the hairpin turn on the west side of the road. There s no parking fee. A restroom is located at the alternative trailhead. A concrete stairway leads to the alternative trailhead. Do not park in no-parking zones. You ll get an expensive ticket. Comments: Cathedral Rock, the second-most popular trail in Mt. Charleston, is the perfect hike for beginners. You can see Cathedral Rock, the huge pinnacle that looms above the Mt. Charleston

261 Lodge, by looking at the imaginary 10 o clock position as you approach the hairpin turn on 157. From the peak, you enjoy fantastic views of the Lodge and Kyle Canyon. The Hike: From the signed trailhead; see Photo 1, the trail starts in a westward direction at a slight grade. It winds through thick patches of aspens and evergreens before passing by the alternative trail. The trail turns south and heads toward the magnificent Echo Cliffs. The Cliffs have a sheer drop of almost 1,000 feet. As the trail snakes to the west of Echo Cliffs, a side trail leads to a small seep. Water flows from the seep in the spring. Once past Echo Cliffs, the trail heads west and the grade becomes steeper as it makes its way across a slope. As you traverse the slope, you can see the destruction an avalanche can wreak on a mountain. Many trees and boulders are still misplaced by an avalanche that happened years ago. The trail flattens out as it heads toward the backside of Cathedral Rock. This is the easiest and most enjoyable part of the trail, a cakewalk through a forest, and you forget that you re 8,000 feet above sea level. Save your energy for the last quarter-mile of the trail; it s steep. When the trail divides, go right on the unmarked footpath; see Photo 2. About a half-dozen switchbacks lead to the top of Cathedral Rock. The view becomes more spectacular with every step. On the far northeast side is a place to sit and admire the view. Mt. Charleston Lodge lies 1,000 feet below and farther to the east you can see the desert floor. To the north is Mummy Mountain, to the northwest Mary Jane Falls, and to the west Charleston Peak. If you eat lunch, you might have a visitor or two. This is the only place in the world you ll have the opportunity to see the Palmer chipmunk. As hard as it is, resist feeding them. By feeding them they become dependent on humans for their food. In the winter the chipmunks must rely on their foodgathering skills or perish. Watch children closely at the top; the drop-offs are more than 500 feet at the edges. Railings have been erected, but they seem to entice people to climb down to them.


262 Trailhead 2: The alternative trailhead is seen in Photo 3. Walk up the stairs and turn left onto the trail, which starts out with a moderate incline and continues to climb until it intersects Cathedral Rock Trail in less than a half-mile. This alternative trail is shorter, but steeper. To Descend: Retrace your steps. Echo Cliff Overlook Trail and Route
263 Take US 95 north 14 miles to State Route 157. Go left on 157, drive 21 miles, and turn right into Cathedral Rock picnic area. The signed trailhead is located.1 mile past the fee booth on the right (west) side of the road. The entrance fee is $8 per car. Parking is available across from the trailhead, but it may be full on weekends. If the parking areas are full or closed, parking is also available just before entering the picnic area on the right (west) side of the road by the bathroom. It is a quartermile walk to the trailhead from the secondary parking at the bathroom. Comments: Although this cliff isn t named on topo maps, I call it the Southern Echo Cliff. Spring Fork flows year round, but early summer is the best time to see the most water. The overlook offers great views out to the north and seeing the switchbacks from 600 feet above is very cool. This route is well-cairned (July 2010). Note: This hike starts at the South Loop trailhead, not Cathedral Rock trailhead, which is only 30 yards away. The Hike: The South Loop Trail as seen in Photo 1 (Waypoint 1) starts off at an easy pace as it heads SSW. The grade increases rapidly as the trail turns easterly. When it weaves through the aspens, you get your first view of Echo Cliff by looking south; see Photo 2.
 and hike on an unsigned path about 150 yards to Spring Fork, a year-round water source.")

264 The trail turns back southwest and travels along the base of Echo Cliff. Follow the trail to the far end of the eighth switchback. Leave the trail by the boulder in Photo 3 (Waypoint 2) and hike on an unsigned path about 150 yards to Spring Fork, a year-round water source. Photo 4 shows how the route crosses Spring Fork and resumes by the rock wall (Waypoint 3). From the rock wall, follow a steep and loose path about 60 yards where it begins to level. Descend left (Waypoint 4) on a faint path and hike across the obvious drainage. The path resumes and heads straight up the loose slope; see Photo 5. Luckily, the path is short-lived. When you come to a small
 and heads north 175 yards to the overlook; see Photo 6.")
265 cliff band, go left and scramble to the top of the cliff band. After 20 yards of loose terrain, you come to a second cliff band. Cairns mark the easiest route up (class 3). You can avoid the cliff band by going around to the right. At the top of the cliff band, a faint path starts (Waypoint 5) and heads north 175 yards to the overlook; see Photo 6. The path is very well cairned. The overlook (Waypoint 6) offers great views and is the perfect place to take a break. That s the South Loop Trail, almost 600 feet below. Less than a quarter-mile NW is the first overlook on the South Loop Trail. Farther off to the NW stands Charleston Peak. To Descend: Retrace your steps.

266 High altitude and summer time are brutal to the skin. Put on sunscreen, cloudy or not. DayHiker.com Griffith Peak via South Loop Trail Take US 95 north 14 miles to State Route 157. Go left on 157, drive 21 miles, and turn right into Cathedral Rock picnic area. The signed trailhead is located.1 mile past the fee booth on the right (west) side of the road; see Photo 1 (Waypoint 1). The entrance fee is $8 per car. Parking is available across from the trailhead, but it may be full on weekends. If the parking areas are full or closed, parking is also available just before entering the picnic area on the right (west) side of the road. It is a quarter-mile walk to the trailhead from the entrance of Cathedral Rock picnic area.

267 Comments: Griffith Peak offers one of the best views in the Mt. Charleston area. You can find numerous fossils in rocks around the peak. The Hike: The South Loop trail starts at an easy pace as it heads SSW. The grade increases rapidly as the trail heads east and passes east of Echo Cliffs. It winds through ponderosa pines, white furs, and smaller aspens. The aspens are colorful during the autumn months. As the trail turns back to a SW direction, it passes through the two sets of cliffs. To the north is Echo Cliffs; to the south is an unnamed cliff range. A small cave is located near the bottom of the unnamed cliffs. Off to the south is Springs Fork where water flows year round. It is a short quarter-mile trek to the springs. The trail becomes a series of moderate switchbacks as it climbs up the back side of Echo Cliffs. A great overlook is at the top of Echo Cliffs; Kyle Canyon, Mummy Mountain, and Cathedral Rock are all in view. The overlook is 2 miles from the trailhead. The trail leaves the overlook and heads west with a gradual incline. It crosses a dry drainage and starts a series of moderate switchbacks that take you to the South Rim Plateau. Many of the switchbacks on the north end offer great views of Kyle Canyon, Cathedral Rock, and Mummy Mountain. The landscape changes into a delightful meadow before reaching the plateau. The last quarter-mile is steep, but offers a good view of Griffith Peak. Upon reaching the South Rim, a sign indicates the distances to Charleston Peak, Harris Saddle, and back to Kyle Canyon the trailhead. Griffith Peak isn t listed. The elevation is 10,700; the distance to this point is 4 miles. Go left onto the trail and head toward Griffith Peak. In about 400 yards, the trail divides. Follow the path up to Griffith Peak; see Photo 2. It s a short strenuous trek to the peak. (The trail goes around Griffith Peak and back down to Harris Saddle. It doesn t go up to Griffith Peak.) The wind and lower temperature make Griffith Peak refreshing in the summer and cold in the winter. Numerous fossils are in the rocks at Griffith Peak. Look at them, but leave them, so others can marvel at ancient history, from when the entire area was underwater. To Descend: Retrace your steps.
 side of the road. The entrance fee is $8 per car.")
268 South Loop to Charleston Peak Trail Take US 95 north 14 miles to State Route 157. Go left on 157, drive 21 miles, and turn right into Cathedral Rock Picnic Area. The marked trailhead is located one-tenth of a mile past the fee booth on the right (west) side of the road. The entrance fee is $8 per car. Parking is available across from the trailhead but it may be full on weekends. If the parking areas are full, closed, or you don t want to pay to park, parking is also available just before entering the picnic area on the right (west) side of the road; see Photo 1. It is a quarter-of-a-mile walk to the trailhead. Comments: The trail takes you to the highest point in southern Nevada. You re almost 10,000 feet above Las Vegas. Once you reach the grassy wonderland, the hiking becomes easy. If you are into camping, this is one of the best spots in all of Mt. Charleston. The last half-mile is very strenuous, but the views from the peak make it all worthwhile. The Hike: The South Loop Trail (Waypoint 1) starts off at an easy pace as it heads SW. The grade

269 increases rapidly as the trail turns easterly and passes to the east of Echo Cliffs. As the trail turns back SW, it passes through the two sets of cliffs. To the north is Echo Cliffs; to the south is an unnamed cliff range. Also to the south is Springs Fork, one of many springs in Mt. Charleston. It s a short quarter-mile trek to the springs. The trail follows a series of switchbacks as it climbs the back side of Echo Cliffs. There s a great overlook at the top of Echo Cliffs (2 miles from the trailhead); Kyle Canyon, Mummy Mountain, and Cathedral Rock can be viewed from here; see Photo 2. The trail leaves the overlook and heads west with a gradual incline. It crosses a drainage and starts a series of switchbacks that leads to the South Rim Plateau. Many of the switchbacks on the north end offer grand views of Kyle Canyon, Cathedral Rock, and Mummy Mountain. The landscape changes into a meadow before reaching the plateau. The last 100 yards are steep, but the view of Griffith Peak helps ease the pain. Upon reaching the plateau, a sign indicates the distances to Charleston Peak, Harris Saddle, and back to Kyle Canyon (the trailhead). The elevation is 10,700 feet; the distance to this point is 4 miles. The trail heads west and soon enters a delightful meadow. This part of the trail is referred to as The Meadows and is a favorite spot for campers. The grade is slight with a few downhill sections. Charleston Peak comes into view several times during the ramble through the meadow. The Meadows gives way to a grove of timber as the trail heads west and the grade increases. The trail hugs the ridgeline for more than half a mile, offering remarkable views of Kyle Canyon, Mt. Charleston Lodge, and State Route 157. Directly across the canyon is Mummy Mountain, and to the west is North Ridge Rim. The trail turns away from the ridgeline and heads SW before it climbs to another ridge. Off to the left is an unnamed peak that many hikers mistake for Mt. Charleston. The trail rises to a saddle and Mt. Charleston ridgeline comes into view; see Photo 3. The trail heads NW toward the summit and away from the false peak. About 150 yards past the saddle, a faint path to the south travels down to Peak Springs. The half-mile trek down to Peak Springs is very steep and you lose 900 feet in elevation. The hike back up to the trail is a killer, but if you need water, Peak Springs is a reliable source.

270 Due to the wind and elevation, the landscape becomes harsh. Bristlecone pines are reduced to twisted dwarfs. You re above 11,000 feet at this point, but luckily the incline is moderate. Charleston Peak looks more like a ridge than a summit from this angle. Just off the trail to the right are the remains of a 1955 plane crash. The last half-mile to the peak is a steep 20% grade. Just before the peak the trail forks. Both trails go to the peak; however, the main trail is less steep. The wind can be harsh above the treeline. Bring a windbreaker. It s important to drink plenty of water before this final ascent. One cause of altitude sickness is a lack of water! Congratulations, you re standing, or lying down questioning your sanity, at the highest point in southern Nevada (Waypoint 2). Take a moment to experience the silence, breathe the clean air, and be thankful you re in good enough shape to stand at the peak. The summit offers a fantastic 360-degree view of southern Nevada, eastern California, and southern Utah. An ammo box contains a sign-in book. A dug-out fort that holds 10 people is a favorite resting point before starting back down. You can return the way you came up or make a loop by hiking down the North Loop Trail to Trail Canyon. (See the North Loop and Trail Canyon hikes for more information.) Please clean up after eating at the peak. Because people have left food, numerous bugs are now at the peak. We need to correct this before it becomes a major problem. To Descend: If you want to make a loop out of the hike, walk west 6 miles down North Loop Trail to the signed Trail Canyon Trail. Go SW onto Trail Canyon and follow it 2 miles to the trailhead. If you parked at South Loop trailhead, walk down Echo Drive to State Route 157 (Kyle Canyon Road). Turn right and walk a half-mile to Cathedral Rock Picnic Area. Walk a quarter-mile into Cathedral Rock Picnic area to the South Loop trailhead.

271 The wreckage from a 1955 plane crash can still be found near the summit of Mt. Charleston. It s estimated that the pilot miscalculated the elevation by about 50 feet. Las Vegas Review-Journal Fletcher Peak via Hummingbird Hollow Route
. A three-mile marker is on the right side of the road.")
272 Take US 95 north 14 miles to State Route 157. Go left on SR 157, drive 17.7 miles, and turn right onto State Route 158. Drive 3 miles to a small gravel pull-off on the left side of the road; see Photo 1 (Waypoint 1). A three-mile marker is on the right side of the road. Comments: The view from Fletcher Peak is one of the best in Mt. Charleston. The route has been greatly improved over the years. Although it s impossible to get lost hiking through the canyon, the route described here is the most efficient. Many of the loose sections have been eliminated and the route is well-cairned, making it easy to descend the way you ascend. This eliminates the walk from North Loop trailhead back down State Route 158 to the trailhead (where you parked). The old descent route was much longer. Note: Due to stinging nettle in the canyon, you might want to wear long pants. The ammo box containing the sign-in book is at the sister peak (August 2010). It s only five minutes away, but doesn t have the views of the real peak. The Hike: From the unmarked trailhead, follow the wide gravel path about 40 yards and turn south onto an unmarked gravel path (Waypoint 2). In about 60 yards, the path begins to parallel a drainage.
 heading for the dead tree in Photo 2. Once beyond the dead tree, hike to the north wall.")
273 In the lower part of the canyon, the path stays close to the north wall. Follow the path almost 300 yards to a short section of slabs (Waypoint 3). Just beyond the slabs, veer right on a steep and loose path. Continue on the path about 250 yards (Waypoint 4) heading for the dead tree in Photo 2. Once beyond the dead tree, hike to the north wall. Follow a path 40 yards, passing another dead tree. Descend into the drainage and follow a path that stays in the drainage. (The old route heads up the north slope on very loose terrain.) The path leaves the drainage to avoid brush (Waypoint 5), but quickly resumes in the drainage. Continue 70 yards to the class 5 dry fall in Photo 3. Follow a steep path to the right of the dry fall. It cuts back to the left and passes by the boulder in Photo 4. You re now above the dry fall. Continue up the drainage. A spring starts. Follow the path to the right of the year-round spring. The path soon curves to the west. A short side path (Waypoint 6) leaves the drainage and travels north to a great overlook (Waypoint 7) of Hummingbird Hollow Canyon, the canyon you just hiked up. You now follow numerous drainages to a saddle between Fletcher Peak and the North Loop Trail. The saddle is about.75 miles to the west. Descend off the overlook and follow a path that heads SW in the dry drainage. About 40 yards after entering the drainage, another drainage splits off to the left; do not go into that one. (You might not see this side drainage.) In another 40 yards, you ll see a rockslide area to your right. The path and drainage make a sweeping left and head west. Follow a path in the drainage (lots of cairns) about a third of a mile where you step over a giant fallen log (Waypoint 8). About 30 yards beyond the log, the path veers to the right and continues in the drainage. Hike another 200 yards, veering slightly north where you walk through a small narrows (Waypoint 9). If you start to see walls in front of you, head north. Once past the narrows, follow the path and drainage SW about a third of a mile to the saddle (Waypoint 10). The saddle offers great views especially of Mummy s Toe. At the saddle, head SE following a path a half-mile to the peak. The path has become much easier to follow. You ll cross a few minor saddles, Waypoint 11 being the final saddle before the summit (Waypoint 12). The peak offers great views of the North Loop Trail, Mummy s Toe, Charleston Peak, Griffith Peak, and part of Red Rock Canyon. There s a sign-in book inside an ammo box at the sister peak,

274 which is a five-minute hike. Because of trees, the sister peak doesn t have the great views this peak has. To Descend: Retrace your steps. Start by heading NW down the ridge on the path almost a halfmile to the saddle. Descend into the shallow drainage following cairns and paths. Near the overlook (Waypoint 7), it will look different, since you bypass the overlook. Soon the spring begins and you know you re on the correct route. Continue on the path, which bypasses the dry fall. You re now in Hummingbird Canyon. Work your way down the canyon to the trailhead. Robber s Roost Trail
. The trail begins across from the parking lot.")
275 Take US north miles to State Route 157. Turn left (west) on State Route 157 and drive 17.7 miles to State Route 158. Turn right (north) on State Route 158. Drive 3.4 miles to a paved parking lot on the right side of the road (Waypoint 1). The trail begins across from the parking lot. Comments: This cave, according to local legend, was a hideout for Mexican bandits when they made their raids into Southern Nevada and Utah. The Hike: Head west up the gravel trail toward the limestone cliffs. The grade is strenuous, but short. Caution is urged, due to the steepness and gravel on the trail. Once at the rocky cliffs, there s much to explore and climb. Who knows, you might find some loot hidden by the Mexican bandits! To Descend: Retrace your steps.
 side of the road; see Photo 1 (Waypoint 1).")
276 Raintree Trail Take US 95 north 14 miles to State Route 157. Turn left on 157, drive 17 miles, and turn right onto State Route 158. Travel 5 miles to the North Loop trailhead sign, located on the left (west) side of the road; see Photo 1 (Waypoint 1). Comments: This is an easy hike that travels to a 3,000-year-old bristlecone pine, the oldest living thing in the region, named Raintree. The North Loop Trail serves as the trailhead for many hikes and ultimately goes to Charleston Peak. The Hike: The trail starts off at an easy grade, wandering past ponderosa pine, pinion pine, and

277 mountain mahogany. June through September, a number of colorful flowers grow alongside the trail. To the east on Angel Peak rests a large, white, ball-shaped observatory. The trail has a few moderate switchbacks before reaching a plateau, where there s a good view out to the NE. Several bristlecone pines are scattered throughout this area, indicating you re above 9,000 feet. After 12 moderately steep switchbacks, the trail climbs to its highest elevation (10,200 feet). It then descends 150 feet over the next third of a mile before reaching Raintree, the giant bristlecone pine seen in Photo 2 (Waypoint 2). Just think: This tree was alive during the height of the Roman and Persian empires. A wooden sign next to Raintree indicates options and the distances to other destinations, but doesn t mention the tree itself. You shouldn t hike to Charleston Peak unless you re prepared. The hike is another 8 miles from this point. It takes an additional 7-10 hours (round trip) and the temperature rarely exceeds 60 degrees at the peak. To Descend: Retrace your steps. Charleston Peak via North Loop Trail
278 Drive north on US 95 to SR 157. Turn left on 157, drive 17.7 miles, and turn right onto SR 158. Drive 5 miles to the North Loop trailhead sign, which is located on the left (west) side of the road. Comments: Charleston Peak is the highest point in southern Nevada and the only treeless peak in the region. You must come prepared for this all-day hike. You can do it as a backpack, but there s no water at the primitive campsites. A shorter route begins at Trail Canyon and meets up with the North Loop trail at the junction. This route is 16 miles, round trip. See the last page of this hike for details. The Hike: The trail starts off at an easy grade, wandering past ponderosa pine, pinion pine, and mountain mahogany. To the east on Angel Peak is a large, white, ball-shaped observatory. The trail has a few moderate switchbacks before reaching a plateau, about 1.5 miles from the trailhead. Several bristlecone pines scattered throughout this area indicate you re above 9,000 feet. After 12 moderately steep switchbacks, the trail climbs to 10,200 feet. It then descends 150 feet over the next.33 miles. Looking west, you can see glimpses of Mummy Mountain. The limestone cliffs of Mummy s Toe hover directly in front of the trail. Raintree, the giant bristlecone pine, is more than 3,000 years old and acts as a dividing point. A wooden sign next to Raintree indicates your options and the distances. Continue another 1.5 miles to the junction of Trail Canyon; see Photo 1. From the junction, hike the North Loop Trail as it heads northwest around Mummy Mountain. The grade is moderate as you enter the dead forest. A people-caused fire in the late 1940s burned more than 500 acres. Scattered throughout the dead forest are aspens that turn orange and yellow in the autumn. Look to the south for a great view of Kyle Canyon. Directly in front looms Charleston Peak; see Photo 2. About a mile from the junction is Cave Springs; see Photo 3. Water runs into a horse trough and a path goes up to a cave-like overhang above it. The North Loop Trail continues southerly through the dead forest and aspens, as the grade becomes steeper. It makes a horseshoe bend and heads NE before switching back and heading west toward the North Rim Ridge. A little less than a mile from the horseshoe bend, a series of bluffs to the left of the trail offers great views of Kyle Canyon. The aspens disappear up here, since the elevation is more than 10,000 feet. The trail flattens as it heads SW around the series of bluffs. Charleston Peak goes in and out of


279 view as the trail starts to imitate a roller coaster. The trail flattens out again and cuts through a forest of bristlecone pines. Three overlooks to the north offer the first views of the Sisters, Mack s Peak, and McFarland Peak. They also make good campsites. The third overlook also has a great view of Charleston Peak and Kyle Canyon, making this one of the best views in the Mt. Charleston area. The trail continues in a southwest direction as it winds along the base of cliffs. A few short but steep switchbacks bring you to the North Rim Ridge. Plan to spend a few minutes catching your breath while you take in the fantastic view of all the northern mountains of the Mt. Charleston area. The trail remains flat as it heads southeast below Devil s Thumb; see Photo 4. Mt. Charleston comes in and out of view as the trail traverses the rocky ledges. Trees are scarce, since the elevation is higher than 11,000 feet. The trail heads around a few bluffs; it seems to take forever to arrive at the base of Charleston Peak. It makes one switchback and climbs around a final bluff before the near mile-long trek to the peak. The last part of the trail is a series of steep switchbacks with a 17% grade. It s important to drink plenty of water before and during this section. One cause of altitude sickness is a lack of water!


280 Congratulations! You re standing at the highest point in southern Nevada. Take a moment to experience the silence, breathe the clean air, and be thankful you re in good enough shape to be standing on the peak. The peak offers a fantastic 360-degree view of southern Nevada, eastern California, and southern Utah. An Army box contains a sign-in book. A dug-out fort is a favorite resting spot before starting back down. To Descend: Retrace your steps. Starting the hike from Trail Canyon Distance: 16 miles Time: 7 10 hours Driving directions: From Las Vegas, head north on US 95 to NV 157. Turn left on 157, drive 20 miles, and veer onto Echo Drive at the hairpin curve. Drive a half-mile to the trailhead sign for Trail Canyon. The Hike: Follow Trail Canyon Trail 2 miles to the intersection of the North Loop Trail. Head west on the North Loop Trail. Follow the above directions from the intersection of these two trails. Mack s Peak
 Follow the gravel road 4.3 miles to the end (Waypoint 1). There s lots of parking here, but no amenities. A high-clearance vehicle is recommended.")
281 Route Take US 95 north 28 miles to State Route 156. Turn left (west) onto 156 and drive 13.6 miles to the signed Mack s Canyon Road. (If you pass the intersection of 158/156, you ve gone too far.) Follow the gravel road 4.3 miles to the end (Waypoint 1). There s lots of parking here, but no amenities. A high-clearance vehicle is recommended. Comments: Mack s Peak is a good introductory mountaineering hike. It s a half-day hike, not too long. Fantastic views in all directions are seen from the peak. The rock is loose on the ramp. Be careful! The Hike: The unmarked route begins where boulders block vehicles from continuing on the
. The tree stump in Photo 2 is your landmark. It s an enlargement of Photo 1.")
, and gain the ridge to the north. Head NW up the steep slope a quarter-mile to the dominant ridge (Waypoint 4).")
282 gravel road. Mack s Peak isn t visible from the trailhead due to the ridgeline the route eventually climbs. The road heads southwest. In a little less than a half-mile, go west into a drainage; see Photo 1 (Waypoint 2). The tree stump in Photo 2 is your landmark. It s an enlargement of Photo 1. In about 250 yards, a huge tree has fallen into the drainage. An obvious path leads around the tree. About 50 yards past the huge tree, the drainage becomes brushy. Leave the drainage (Waypoint 3), and gain the ridge to the north. Head NW up the steep slope a quarter-mile to the dominant ridge (Waypoint 4). Mack s Peak comes into view as you make your way to the ridge; see Photo 3. The idea is to aim for a saddle on the ridge. If you go too far to the east, you ll be climbing onto the ridge, only to hike down the west side of the same ridge. Near the top of the ridge, a path forms and leads to the saddle. From the ridge/saddle, you ll follow a path about a half-mile west to a ramp that leads to the summit. You can bypass the first bump on the ridge by traversing via a path on the west side. From here, follow the path to a large burnt bristlecone that marks the ramp; see Photo 4 (Waypoint 5). The ramp heads south and is filled with loose rocks. At the start of the ramp, it s best to climb to an obvious higher ramp (about 12 feet above the lower ramp), which avoids much of the loose rock. This higher ramp merges with the lower ramp in about
. The peak extends northerly and becomes very narrow past the sign-in book.")
283 30 yards. Continue to the top of the lower ramp. Go right, making an almost 180-degree turn, and follow a path 75 yards to the peak. A cairn and ammo box with a sign-in book mark the peak (Waypoint 6). The peak extends northerly and becomes very narrow past the sign-in book. A second peak lies 200 yards to the north; however, it s very tricky coming off the north side of the first peak. Massive McFarland Peak lies to the SW and the Sisters rest to the SE. To Descend: Retrace your steps down via a path to the same ramp you ascended. If a group is descending the ramp, let individuals descend the ramp and walk to the far right before the next person starts down. Most people descend the lower part of the ramp by sliding down the rocks. The rocks tumble off the ledge and crash down by the entrance of the ramp. Once off the ramp, follow the path down the ridge a half-mile. When the ridge starts to ascend (small cairn here), descend south down the slope. You don t have to hike down the same drainage you hiked up. Just keep descending to the gravel road. Once at the road, head east and follow it back to your car. Sisters (South and North) Route
284 Take US 95 north 28 miles to State Route 156. Turn left (west) onto 156 and drive 16 miles to Old Mills Campground, which is on the right side of the road. Park near the phone booth to avoid the $8 parking fee. Since this is a round-trip hike, it doesn t make sense to park closer to the trailhead and pay the $8. Comments: Fun climbs, challenging route-finding, two summits, and a round-trip route make this one of the best hikes in Mt. Charleston. Great views of Mack s Peak, McFarland Peak, and the North Sister are seen from the South Sister. The Sisters are also called Big and Little Sisters and Tough and Easy Sisters. The Hike: Walk west on the paved road past the fee booth. As you walk the road you get a good view of the South Sister; see Photo 1. You walk the road almost a half-mile to where the pavement ends and the unsigned trail begins; see Photo 2 (Waypoint 1). There s a nice restroom with running water just before the trailhead on the left.
 onto an unsigned path.")

285 Once on the trail, hike about a third of a mile and turn west (right) onto an unsigned path. (It s the only prominent path that branches off of the main trail.) Use the tree stump circled in Photo 3 as your landmark (Waypoint 2).

, your first peak, South Sister, comes into view out to the east; see Photo 4.")
286 In about 100 yards, the path curves to the right and parallels a drainage. You ll soon pass a down U.S. Forestry sign. After a couple hundred yards, the path crosses the drainage to the left side. In 40 yards the path crosses back to the right side and becomes faint for 30 yards or so. Waypoint 3 marks where the path becomes prominent again. In about 70 yards, the path heads NW and climbs steeply (500-foot elevation gain) for 700 yards to a saddle (Waypoint 4). Walk NE about 400 yards up the slope to the ridge. You gain almost 400 feet on this little walk! At the ridge (Waypoint 5), your first peak, South Sister, comes into view out to the east; see Photo 4. Head east about 800 yards following a path along the top of the ridge to the start of a loose slope that leads to a saddle just below the summit of South Sister. Pick any path and head up the loose slope to the saddle. This part is very strenuous. You can veer left and climb on solid rock near the top of the slope to avoid the scree. At the saddle, go north and climb the chute seen in Photo 5 (Waypoint 6). Once up the chute, scramble the last few feet to the summit ridge. The peak is about 30 yards NE along the narrow ridge (Waypoint 7). Be sure to sign the book. Great views of Mack s Peak and McFarland Peak are out to the northwest. You also get a good view of Mummy s Forehead, Chin, and Mummy Mountain by looking southeast.

287 One Sister down, one to go! From the South Sister continue along the ridge 70 yards NW to a class 3 down climb (Waypoint 8) on the right (east side) of the ridge. This is just 10 yards before a steep drop-off, shown in Photo 6. Once off the ridge, head south and down climb to a lower level. Now head north toward the North Sister. In about 20 yards, you ll come to a nine-foot arch. Go to the east of it, descend slightly, and traverse the ledge in Photo 7. Continue over easy ground. When you re forced to the east or west of the ridge, go west and do a short down climb. Stay near the wall (to your right) and continue to the wide chute in Photo 8.

288 Now cross to the east side of the ridge and descend easy terrain for 50 yards. You now have a good view of the North Sister. Continue toward North Sister via two class 3 down climbs. This part of the route is well-cairned. When you come to the end of the ridge (vertical drop-off), backtrack about 10 yards to the class 2 chute on the west side of the ridge; see Photo 9 (Waypoint 9). Descend the chute. Head north 30 yards to a log leaning against a crack in the wall; see Photo 10. Climb through the crack (class 3) to a saddle that separates the South and the North Sisters (Waypoint 10). At the saddle, look east to see a rock arch near the top of a 50-foot rock spire. It makes a great photo. The sheer walls of the North Sister are directly in front of you. From here the idea is to traverse the west side of the North Sister to a point where you can climb to the summit ridge. There s a path along much of the traverse. To start the traverse: On the far side of the saddle lies an outcrop; head north going to the west of the outcrop. Continue north following a faint path. When the wall starts to pull away, go east and scramble 60 yards to the wall. Continue north along the wall. You ll pass two small caves (Waypoint 11). Beyond the caves, a shoulder juts out from the wall. Go around it. Continue northwest on a path 40 yards and climb over a second shoulder. Stay high near the wall (to your right) where the footing is better. Continue to the ridge in Photo 11 (Waypoint 12).
. This is a much better climb than the old route.")
. The view from the North Sister is fantastic. You can see part of the route you just hiked. State Route 156 is to the south.")
289 An obvious log marks an easy climb onto the ridge in Photo 11. Once on the ridge, head east about 40 yards walking up loose scree to the base of the wall. Here s where we found a new climb: out to the left is a wide ledge. Walk about five yards on the ledge and climb the wall in Photo 12 (Waypoint 13). This is a much better climb than the old route. At the top of the wall, the bristlecone pines are abundant. Head NE up the slope on a faint path toward the peak. Climb the chute in Photo 13 (Waypoint 14). You re just below the peak. Continue along the summit ridge to the cairn marking the peak (Waypoint 15). The view from the North Sister is fantastic. You can see part of the route you just hiked. State Route 156 is to the south. Across 156 are the three peaks that comprise Mummy s Head. A sign-in book rests in a cairn. To Descend: The descent route is very fast. You should be back to your car in about 90 minutes. The descent route is just to the east of your ascent. A very well-worn path starts the loose descent down the scree slope; see Photo 14. Be very careful of dislodging rocks onto hikers below you. Descend the scree slope about 150 yards, and then head east (Waypoint 16) to the ridge. Once on it, follow it to a saddle (Waypoint 17), which is just before it starts to ascend. Head down the scree slope into a drainage.

290 Follow the drainage about a mile to State Route 156 (Waypoint 18). Go west on the road about a half-mile back to your car, which is at Old Mills Campground.

291 Bristlecone Trail Trail Take US 95 to State Route 156. Go west on SR 156 and drive to the end of the road at the Las Vegas Ski and Snowboard Resort. Park at the far end of the parking lot. The marked trailhead is on the west side. The kiosk is located within the first 25 yards of the start of the trail; see Photo 1. Comments: This is the most-hiked trail in the area. It s a great trail to introduce children to hiking. If doing the entire loop, the end of the trail is about a half-mile down the highway from the trailhead. Mountain bikes are allowed on the trail. The Hike: The well-maintained trail starts at an easy pace and heads west. The trail soon forks; take either way, since they come together in about 100 yards. You ll walk by a thick forest of aspen and white fir that turn golden yellow in the autumn. The trail ascends a series of switchbacks the trees help keep you cool during the moderate incline. After climbing to a highpoint, the trail snakes down the backside of a mountain. After 2 miles, the trail follows an abandoned gravel road and soon
292 forks. The trail to the left goes to Bonanza Peak trailhead. Bonanza Trail is a 12-mile trail that passes Clark Pond, McFarland Peak, and Bonanza Peak. The Bristlecone Trail continues on the abandoned road and descends into a canyon. At about 4 miles, the trail passes the Old Mill Road which heads downhill to a picnic area. The trail terminates at a dirt parking lot. Follow the dirt road to State Route 156, walking west to the trailhead. Bristlecone pines are the oldest known tree species in the world, and they live in the mountain regions of only six western states of America. Blueplanetbiomes.com Bonanza Trail Trail
: Take I-15 to US 95.")
293 To Las Vegas Ski and Snowboard Resort: Take US 95 north to State Route 156. Go west on SR 156 to the Las Vegas Ski and Snowboard Resort. State route 156 ends here. Park at the far end of the upper parking lot. The trailhead is on the NW side of the parking lot. Directions to Bonanza Trailhead (Cold Creek): Take I-15 to US 95. Go north 33 miles on US 95 and turn west (left) on the signed Cold Creek Road. Drive 16 miles until the road dead ends at the Bonanza trailhead. The last 2 miles are on an excellent gravel road. Comments: This hike takes you to some of the most remote areas in Mt. Charleston. If doing it as a day hike, the best way is with two groups of people. One group starts at Las Vegas Ski and Snowboard Resort trailhead; the other group starts at Bonanza Peak trailhead. When the groups meet along the trail, they exchange car keys. This avoids the car shuttle, a 60-minute drive. The faster group should start at Bonanza Peak trailhead.
 starts at an easy pace and heads west; see Photo 1.")

294 If backpacking, the hike makes a good three-day trip, averaging around 10 miles per day. Although the trail passes Wood Spring, it s not reliable. Make sure to carry water. This hike description starts from Lee Canyon, at the Bristlecone Trail. The Hike: The well-maintained Bristlecone Trail (Waypoint 1) starts at an easy pace and heads west; see Photo 1. It soon forks; go either way, since they come together again in about 100 yards. The trail winds through a thick forest of aspen and white fir that turns golden yellow in the autumn. The trail ascends a series of switchbacks the trees help keep you cool during the moderate incline. After climbing to a high point, the trail snakes down the backside of a slope. After 2 miles, the trail follows an abandoned gravel road. Soon the trail forks; a sign stands at the intersection of Bristlecone trail and the beginning of the Bonanza trail. Go left onto Bonanza Trail; see Photo 2. The trail starts at an easy pace and then uses moderate switchbacks as it climbs about a mile to a saddle. At the saddle a path forks off to the west. Continue north on the Bonanza trail. The trail climbs northwest via a series of steps to a ridgeline. Once you reach the ridgeline, the trail stays to the west side of the ridge. One of the rugged-looking Sisters stands to your right; see Photo 3. Turn around and look at the backside (NW side) of Mt. Charleston. From this angle it looks impossible to climb without ropes. (There are actually two trails that lead to the summit.)

295 The Bonanza trail becomes steep as it passes rock outcroppings and climbs to another ridgeline. At the ridgeline look to your right for a 30-foot rock pinnacle as a reference point. Once the trail travels back to the west side of the mountain, there s a good view of Clark Pond down to the west; see Photo 4. From this view, the water looks very green. The rugged-looking mountain to the east is Mack s Peak. The grade becomes easy along this section and you forget you re 10,000 feet above sea level. As the trail heads west, it comes off the ridgeline and goes through a mostly barren area. McFarland Peak lies directly ahead; see Photo 5.

296 The trail climbs to another ridgeline and stays to the east as it makes its way to McFarland, then heads south as it descends a series of short switchbacks. Just before the start of the switchbacks, look for a rock outcropping with a log leaning against it. A path starts from the outcrop and leads to McFarland Peak. The Bonanza trail continues SW around McFarland losing almost 500 feet until it comes to a ridgeline. It now descends another 500 feet using switchbacks. The trail turns north and levels at it nears the bottom of a canyon. From the bottom of the canyon, the trail climbs about 400 feet in.75 miles to Wood Spring, which is really just a pipe coming out of the ground; see Photo 6. You re now past the halfway point. About 50 yards beyond Wood Spring, a footpath intersects the trail by a small sign. If camping, follow the footpath about 50 yards to a primitive camping area; see Photo 7. After crossing Wood Spring, the trail climbs 1,000 feet in 1.5 miles to the west side of Bonanza Mountain. Once the trail passes Bonanza Peak, the hiking becomes easy as the trail stays to the west of the ridge. (There s no path leading to Bonanza Peak it s a short cross-country route to the summit.) The trail travels about 1 mile, making a gentle descent to a prominent saddle. From the saddle the trail descends over 2,000 feet along the final 4 miles of the hike. The trail ends at the signed Bonanza trailhead (Waypoint 2). This area is known as Cold Creek. McFarland Spring lies just north of the trailhead. Normally, it s a dependable water source. To Return: Jump in your car and drive back to Las Vegas Ski and Snowboard Resort or turn around and retrace your steps.

297 According to the National Park Service, poisonous animals such as snakes, spiders, and scorpions are not often seen because they are most active after dark. Bonanza Peak Trail
298 Take US 95 north 33 miles and turn west (left) on the signed Cold Creek Road. Drive 16 miles until the road dead-ends into the Cold Creek trailhead (Waypoint 1). The last 2 miles are on an excellent gravel road. Comments: Though Bonanza Peak is part of the SMNRA, many locals don t consider it part of the Mt. Charleston area because it s past State Route 156. The drive is only a few minutes longer than to the Lee Canyon Ski area, and the opportunity for solitude and to catch a glimpse of wild horses roaming free makes the few extra miles worth the effort. The Hike: The well-maintained trail starts with a leisurely pace at the trail sign; see Photo 1. The trail ascends a series of switchbacks as it winds through ponderosa pines. The grade becomes steeper during the switchbacks, but the view eases the pain. Out to the SW you can see the backside of Mummy Mountain. You can t help but notice the acres of burned trees from a fire years ago, which serve as a reminder just how dry conditions become in these mountains. The trail becomes steeper as it switches back among the white firs. In this area, many white lupin and bluish phalux flowers grow alongside the trail. After numerous switchbacks, the trail heads in a southeast direction and levels. Looking up toward the ridgeline, you ll see a rocky cliff, which indicates you re near the saddle. Once at the saddle; see Photo 2. Take a break and keep your eyes open for wild horses grazing. The town of Pahrump is visible out to the west.

299 From the saddle, the trail heads southwest, staying below the ridge to the east. After a short incline, the trail flattens out into the most enjoyable part of the hike. Pinecones litter the trail. A large rock outcrop indicates the peak is close. Unfortunately, the trail doesn t travel to the peak. Here s the easiest way to find the peak: Continue on the trail until you come to a switchback that starts to descend. Leave the trail at this point (a large cairn marks the spot, but it may be gone) and hike less than 100 yards up to the ridgeline. Once on the ill-defined ridge, head southeast a little over 100 yards till you see a large cairn. The cairn marks the peak and contains a sign-in log. Bonanza Peak (Waypoint 2) isn t as prominent as other peaks in the area. The view from Bonanza Peak is both unique and surprising. The uniqueness comes from seeing the various peaks in Mt. Charleston from this angle, and the surprise is how close you are to them. To the SE stands Charleston Peak. From this angle, it looks unapproachable. Mack s Peak lies almost due east; it s the closest peak and appears to be only a couple of miles away. The rugged-looking McFarland Peak is southwest of Mack s Peak. To Descend: Retrace your steps. The bark of some ponderosa pines has a vanilla or butterscotch scent; get close to smell it!

300 FAST FACTS Location: 20 to 35 miles east of Las Vegas Driving directions: To get to the northern region, use Lake Mead Boulevard (NV 147), to Northshore Drive, where you ll turn left. To get to the southern region, take US Highway 93/95 or I-215 to Boulder City. Make a left at the second stop light continuing on Highway 93 toward Hoover Dam. Best season: Winter Visitor Center: Open 8:30 a.m. to 4:30 p.m.; 702/ Fees: $10 entrance fee per car for some of the day hikes, depending on the location of the trailhead. Good for seven days. All National Park passes accepted. Permits: None needed for day hiking Camping: Boulder Beach, Las Vegas Wash, Callville Bay, Echo Bay, and Temple Bar. Near Lake Mohave: Cottonwood Cove and Katherine. First come, first served. Website: home.nps.gov/lake/planyourvisit/campgrounds.htm Elevation range: 1,200 feet (371 m) to 5,639 feet (1,718 m)
301 Size: 1.5 million acres (includes Lake Mead) Hikes: Less than half a mile to 10 miles Dogs: Must be on a leash Horses: Permitted, but no designated trails Bicycles: Yes, but the roads are very narrow. Mountain bikes: Allowed on the numerous back-country roads Firearms: Hunting allowed in designated signed areas. No target practicing. Gasoline: Boulder City Managed by: U.S. Park Service, 702/ Food: Boulder City, Marinas, Hoover Dam, and other locations DIFFICULTY INDEX Easy Hikes: 6 Arizona Hot Springs: pg. 368 Gold Strike Canyon Hot Springs: pg. 359 Lava Butte: pg. 335 Liberty Bell Arch: pg. 364 Red and Black Mountain: pg. 357 South Bowl of Fire: pg. 345 Moderate Hikes: 7 Anniversary Narrows Peak: pg Fortification Hill: pg. 362 Fortress Butte: pg. 372 Frenchman Mountain: pg. 331 Hamblin Mountain: pg. 341 North Bowl of Fire: pg. 352 Northshore Peak and Unnamed Peak: pg. 348
302 DRIVING DIRECTIONS TO LAKE MEAD To the Northern Lake Mead Hikes Take I-15 to Lake Mead Boulevard. Go east until you come to the National Park s entrance on Lakeshore Road. See the driving directions in each hike for specific directions to each trailhead. To the Southern Lake Mead Hikes Take I-15 to US Highway 93/95. Follow US 93 to Boulder City, about 23 miles. If you live in the southern part of town, take I-215 to Highway 93/95, and head south to Boulder City.

303 Frenchman Mountain Route From Bonanza Blvd. and Hollywood Blvd., drive east on Bonanza Blvd. a half-mile to the barricades in Photo 1 (Waypoint 1). Comments: Frenchman Peak literally hovers over Las Vegas. Many routes lead to the summit. This is probably the best, though one of the more aggressive, routes, with almost no loose rock. If you do this hike in the morning, you ll be in the shade along the lower part of the route, so dress appropriately. The Hike: Head toward the cave in Photo 1. Just before the cave, follow the gravel road that heads north. When the road divides in about 200 yards (Waypoint 2), follow the right fork as seen in Photo 2. Continue another half-mile on the gravel road where it ends in the gully. Photo 3 is the gully as seen from the gravel road. Hike up the gully a couple hundred yards where it divides. Scramble into the left gully as seen in
.")
304 Photo 4 (Waypoint 3). The gully, unfortunately, is marked with green-and-white arrows. Scramble up the solid bottom gully to the class 3 climb in Photo 5 (Waypoint 4). Once up, veer left as seen in the photo. Do not pull on the cable. Continue scrambling on excellent rock to the headwall, and exit via a ledge as seen in Photo 6 (Waypoint 5). Head up to the towers in Photo 7. This is the only loose part of the route. You ll intersect a gravel road (Waypoint 6) just before the towers. Follow it south about 50 yards to the towers. Although this is the peak, it doesn t feel like it, due to all the man-made equipment. Continue south on a hiker s path about 250 yards to a large cairn near a small cross. You pass another large one before reaching the cairn with an ammo box and sign-in book. This feels like a peak! There are fantastic views of Las Vegas and Mt. Charleston to the west. Lake Mead and surrounding mountains are out to the east. To Descend: Retrace your steps back to the first towers and follow the road about 50 yards before heading down the loose slope. Look for the two white arrows in Photo 8, which mark the ledge you traversed on the way up. This is the only difficult spot to find. Continue retracing your steps back to the trailhead.
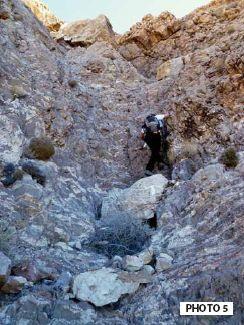
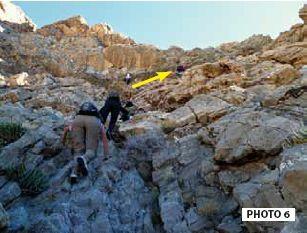
305


306 Lava Butte Route
 and go left. You ll pass a small sign that reads Lava Butte. Drive.3 miles (2.3 miles total) and park anywhere near the tower (Waypoint 1).")
307 From the intersection of Lake Mead Boulevard and Hollywood Blvd., continue on Lake Mead 6.7 miles and turn right on a prominent gravel road with a kiosk on the right. Drive.7 miles and take the left fork. Drive 1.3 miles (2.0 miles total) and go left. You ll pass a small sign that reads Lava Butte. Drive.3 miles (2.3 miles total) and park anywhere near the tower (Waypoint 1). A passenger car can drive to the trailhead. Photo 1 is a picture of Lava Butte. Comments: A great workout-type hike with one of the best views of Lake Mead. The Hike: From the unmarked trailhead, head SE toward the saddle in Photo 2. Once on the ridge (Waypoint 2), head SW toward the peak; see Photo 3. There s a hiker s path to follow for most of the route. At first, the path stays to the east of the crest of the ridge. Near the summit the path travels the crest. The climb to the peak is short, but fairly strenuous. The peak (Waypoint 3) offers a great view of Lake Mead. Looking west you ll see Frenchman


308 Mountain, Las Vegas, and Mt. Charleston. To the NE stand the Muddy Mountains. To the south is the McCullough Range. Make sure to sign the register in the ammo box. To Descend: Retrace your steps. Anniversary Narrows Peak Route
309 From the intersection of Lake Mead Boulevard and Northshore Road, go north (left) on Northshore Road, drive 12.3 miles to mile marker 16, make a left onto the signed Callville Wash North Road (94), and park here (Waypoint 1). Currently, the road is washed out and you ll have to walk the road to Lovell Canyon Wash. Comments: This is really two hikes. You can just do the Narrows or continue to the peak. If just doing the Narrows, simply retrace your steps. If the road is still washed out, the up-and-back distance is 5 miles; otherwise, it s 2 miles. In my opinion, this is the best hike in the Lake Mead area. The Narrows is something that has to be seen. It s a miracle of nature. Seeing the Bowl of Fire from the saddle is one of the most dramatic sights in the Lake Mead area. The climb to the peak is thrilling. Although you have many options to return, hiking down the north side and walking through the Narrows again is the best option. If it s windy, don t do this hike. The Hike: Walk.2 miles where the road divides. Take gravel road 94A and follow it about 1.3 miles (staying out of washes) past an unsigned parking area down into the unsigned Lovell Wash (Waypoint 2). Head north through the wash. The wind and rain have created fantastic sculptures into the sides of the wash. As the wash curves to the left, you can see remnants of Anniversary Mine ( ) on the right bank. A side journey up along the right side of the wash follows an old orecar track through two short tunnels. Once past the tunnels, follow the path 30 yards as it bends to the right and drops back into the wash. About 100 yards beyond the tunnels, the wash narrows and you ll enter the locally named Anniversary Narrows section of the wash; see Photo 1 (Waypoint 3). It s unbelievable that thousands of years of wind and rain created the Narrows. At times the walls are only five feet wide, but tower 100 feet above. This is a special place. Watch for slippery boulders. After 150 yards the walls recede and the wash widens again. About 200 yards from the Narrows, the wash curves and the majestic Muddy Mountains appear. A minor wash forks off to the left, but stay in the main wash. After several hundred yards, the wash curves to the right and a minor wash continues straight. Stay in the main wash, but watch for this

310 minor wash, as it s used as a landmark. About 100 yards past the minor wash, you ll see a large cairn to your left and a major wash coming in at a sharp angle from the left. To your right lies the minor wash; see Photo 2. Hike NE in the minor wash. In less than 50 yards, you ll see a patch of green malachite up on the right bank. Just beyond the malachite, the wash curves to the left (Waypoint 4). Leave the wash (a cairn marks the exit) and walk NE about 70 yards, paralleling a minor ridge to your right. Once beyond the minor ridge, a saddle comes into view to the SE; see Photo 3. This is your next objective. As you start toward the saddle, you ll come to a deep wash. Go north onto a minor ridge, following footprints down into the deep wash. Walk five yards in the deep wash and turn left into a minor wash. Walk 15 yards in the wash to a large cairn. Veer right leaving the wash. Head toward the saddle via the ridge in front of you. Although just as you gain the ridge it appears you ll have a steep descent, you can avoid it by hiking to the left. Continue on the ridge where a path begins. Just before the saddle the ridge becomes steep. Stay on the crest; do not drop off either side (too loose). At the saddle (Waypoint 5), you have an incredible view of the Bowl of Fire. Follow a well-worn path SW as it heads up toward Anniversary Narrows Peak. It climbs steadily as it gains the ridge. The path soon crosses to the south side of the ridge, becomes faint, then climbs back up to the ridge. Once on the ridge, you ll boulder hop (class 2) until the peak comes into view. It s marked with a wooden stake (Waypoint 6). There s a sign-in book at the summit along with magnificent views. From here, you have numerous options. You can return the way you came, descend south to your car (visible from the summit), or continue along the ridge dropping north into the wash and hiking back through Anniversary Narrows. This is the best return route and it s especially appealing to photographers, since the light in the Narrows will be different.

.")
311 To Descend: Continue SW along the ridge; see Photo 4. You re treated to great views both north and south. For the most part, stay near the cliff where the rock is better. Continue to a minor bump on the ridge. Veer left to a cairn and climb the rock to a high point. From here you can see a saddle, which marks the descent. To get off the high point, stay along the right side and follow cairns. Once down, head to the saddle; see Photo 5. A large cairn on a boulder marks the start of the descent. To avoid a big cliff just below, hike diagonally to the left about 60 yards to a large cairn on red rock (Waypoint 7). From the cairn, descend the red rock (loose), then down into a drainage as shown in

312 Photo 6. Go left in the wash, through the Narrows, and up the gravel road to your car. Hamblin Mountain Route
 to a small pull-out a little past mile marker 18.")
313 Take Lake Mead Boulevard east to Northshore Road. You ll have to stop at the fee booth along the way. If you don t have a pass, it s $10. Go left on Northshore Road and drive 15 miles (go the speed limit; this is a dangerous road) to a small pull-out a little past mile marker 18. The unmarked pull-out is on the left side of the road where there are trash cans. Comments: Vistas of Pinto Valley, Lake Mead, Bowl of Fire, and Las Vegas make this one of the more scenic hikes in Lake Mead. This is a new route that avoids crossing numerous washes. The Hike: There s a faint, unmarked path across from the parking lot. Follow it south a short distance to Cottonwood Wash (locally named and not signed). If you can t locate the path, walk.1 mile west along Northshore Road from where you parked and drop into Cottonwood Wash by the flimsy wilderness sign (Waypoint 1). If you pass mile marker 18, you ve walked too far. You ll hike almost 2 miles SE toward Lake Mead in Cottonwood Wash. During those 2 miles, you pass Cottonwood Springs, normally dry and not marked. Continue in the wash past cottonwood trees and climb a distinct half-limestone half-sandstone low-angled wall. It s an easy class 3 climb; however, there s a class 1 work-around off to the right. Make sure to stay in Cottonwood Wash when another large wash branches off to the left. When Cottonwood Wash starts to snake, keep an eye out for a SW-heading drainage. It comes in from the west; see Photo 1 (Waypoint 2). Head right into the small SW drainage. About 75 yards past the two chocolate-colored pinnacles in Photo 1, the drainage divides. Take the SW-heading fork, a narrow drainage about five feet deep (Waypoint 3). If you re in the correct drainage, you step up and over a three-foot wall within the first 50 yards. There s a path to the left you can follow. Stay to the left of the red-colored bank as shown in Photo 2. In 50 yards, the drainage divides again; hike into the right fork. A hiker s path also parallels this drainage. The grade increases here. The drainage narrows and you soon come to a little class 2-3 climb; see Photo 3 (Waypoint 4). Immediately after the climb in Photo 3, leave the drainage by the catclaw bush and head right on a path. When the path ends (about 100 yards), hike west (no path), crossing Waypoint 5. Continue cross-country (some up and down here) to a very wide drainage. From the climb in Photo 3 to the very wide drainage is less than 200 yards.

314 Once in the wide drainage, head south on a hiker s path. You ll hike this drainage a little more than a half-mile to a saddle. You pass Waypoint 6 as you ascend the drainage. Photo 4 shows an easy class 2 climb you encounter about halfway up the drainage. The path becomes easier to follow as you get closer to the saddle and the drainage narrows with steeper walls. When the path forks, follow the left fork up to the saddle (Waypoint 7) where you can see a sliver of Lake Mead. Head south on the well-defined path and follow it about a third of a mile to the summit; see Photo 5. Although very scenic, it can be windy along this part of the route. Just below the summit, veer right to avoid a short class 3 climb. The summit (Waypoint 8) offers great views of the numerous peaks surrounding Las Vegas. Red Rock Canyon and Mt. Charleston stand to the west. The colorful Bowl of Fire is to the north. Of course, Lake Mead is visible out to the south. There s a sign-in book at the summit. To Descend: Retrace your steps. When the path divides, make sure to take the right fork, which leads down into the drainage. Look for a cairn marking where you leave the drainage and hike crosscountry (less than 150 yards) to the path that leads to the climb in Photo 3. From here follow the drainage and hiker s path back to Cottonwood Wash. Head north in Cottonwood Wash almost 2 miles. Just before Northshore Road there s a cairned path that leads to the parking area on your right side.

315 According to the U.S. Weather Service, day-time temperatures in Lake Mead average between 89 and 105 in the summer, and average between 44 and 67 in the winter. South Bowl of Fire Route
316 Take Lake Mead Boulevard east to Northshore Road. You ll have to stop at the fee booth along the way. If you don t have a pass, it s $10. Go left and drive 14.7 miles (go the speed limit; this is a dangerous road) to a small pull-out a little past mile marker 18. The unmarked pull-out is on the left side of the road where there are trash cans (Waypoint 1). Comments: This is a good hike for beginners, those with families, and photographers. You can easily extend this hike if you want to explore more. Watch for catclaw bushes in the washes. The hike is much easier to follow than the hike in the book Hiking Southern Nevada.
 where you cross Callville Wash (Waypoint 3).")
317 The Hike: Head NW across the desert.33 miles, veering east of the grayish hill shown in Photo 1. As you make your way around the east side of the grayish hill (Waypoint 2), a good path starts. Once around the hill, the path divides. Follow the right fork NW about 300 yards (becomes faint at times) where you cross Callville Wash (Waypoint 3). Continue heading toward the reddish cliffs as seen in Photo 2. The path becomes faint at times, but your direction of travel is obvious. Continue heading NW where you follow the path down into a large wash (Waypoint 4). Cairns mark this spot, which is crucial when hiking back out. The wash divides in 30 yards; follow the left fork. Continue almost a half-mile to the boulders shown in Photo 3, which marks the entrance to the Bowl of Fire. Going up and around the boulders to the left provides the easiest way around them. The red sandstone starts here. Stay in the main wash. When the wash ends, veer right into the drainage marked by huge boulders as seen in Photo 4 (Waypoint 5). Follow this drainage passing the huge boulders (Waypoint 6) to a high point (Waypoint 7). From the high point you can see the wash, which you descend to and follow easterly; see Photo 5.
 toward the entrance to the Bowl of Fire.")
318 Follow the wash less than 100 yards where it divides. Hike into the right reddish sandstone fork (Waypoint 8). The wash heads east as you start making your way back out of the Bowl of Fire. Soon the wash divides; again take the right fork. You soon pass by the square-shaped pinnacle in Photo 6. You re now heading south (Waypoint 9) toward the entrance to the Bowl of Fire. Continue about 400 yards to a large cairn that marks a path off to the right (Waypoint 10). Although you can stay in the wash, it s faster to follow the path. When the path ends, drop back into the wash and follow it less than 50 yards to the boulders in Photo 4. Going around to the right is the easiest way around them. Follow the wash almost a half-mile to the path you descended to drop down into the wash (Waypoint 4). The path will be to your left. Follow the path back across the desert crossing Callville Wash, and this time veer to the left of the gray hill. Once around the hill your car is visible.
, where there are bathrooms and trash cans. Photo 1 is Northshore Peak from the parking lot.")
319 Northshore Peak and Unnamed Peak Route Take Lake Mead Boulevard east to Northshore Road. Turn left, drive 17.2 miles on Northshore Road, and make a left into the paved parking area (Waypoint 1), where there are bathrooms and trash cans. Photo 1 is Northshore Peak from the parking lot. Comments: This is one of the best peaks around Lake Mead. Although you can just do Northshore Peak, it s well worth doing the second peak. It has some nice exposure and fun climbing, and it s too long of a drive to just do Northshore Peak. There are great views from along the ridgeline and at both summits.
 than traverse the east side.")
 and head west up the ridge as in Photo 4. Staying along the north end of the ridge finds better rock and good views out to the north.")
320 Note: Always test your handholds before committing to a climb on any Lake Mead hike. The rock is known to break! The Hike: Cross the road and head south across the open desert. Once you get beyond the small ridge to the west, you can see your first destination which is the saddle in Photo 2. It s easier to drop into the drainage (Waypoint 2) than traverse the east side. The drainage ends at a headwall. The easiest route up is to the left; see Photo 3. Waypoint 3 marks the class 2 chute to the east. Once up, hike across the saddle (Waypoint 4) and head west up the ridge as in Photo 4. Staying along the north end of the ridge finds better rock and good views out to the north. Photo 5 shows the last part of the route to the summit. Just before the summit, there s a small down climb. The easiest way down is about 20 yards south from the edge of the ridge. Waypoint 5 marks the class 2-3 down climb. Continue a little more than 100 yards to the summit (Waypoint 6). A cairn marks the summit of Northshore Peak. The summit offers great vistas of the Bowl of Fire and the Muddy Mountains to the north, Lake Mead to the south, and the Spring Mountains to the west. It should take about an hour to get to the summit. You ve hiked 1.3 miles from the trailhead and gained 984 feet. There s a sign-in book inside the cairn. Okay, it s decision time. You can retrace your steps back to your car or continue south about a halfmile up the knife-edge ridge to an unnamed peak. If you re wondering whether you can handle the Moapa Peak hike, which has a scary knife-edge ridge, try this one first. On to the Second Peak: Photo 6 shows the route. It s very straightforward. Stay near the crest of the ridge where the rock is better and descend south about.25 miles to the saddle. Start the ascent staying on the crest of the ridge or, if you don t like the exposure, move south.
 that s directly on the ridge. The grade backs off and you can see the cairn that marks the peak.")
, passing by Waypoint 9, to the first obvious break in the steep cliff to the north.")
321 When you encounter a wall, go to the far right and scramble up a class 2-3 chute (Waypoint 7). Immediately gain the crest of the ridge, walk 20 feet, and climb the bump (class 3) that s directly on the ridge. The grade backs off and you can see the cairn that marks the peak. Continue to the peak (Waypoint 8). You ve hiked a total of 1.87 miles so far. The sign-in book is a single piece of paper in a glass jar. To make a loop out of the hike, continue south and descend the ridge (good rock here), passing by Waypoint 9, to the first obvious break in the steep cliff to the north. It s about 150 yards from the summit. Descend (class 2) about 30 feet to a very wide ledge and head north back toward the peak you just left (Waypoint 11). Look for cairns and be careful as there s lots of loose rock. For the most part, you ll be near the wall to your right. The final down climb pulls away from the wall. Look for a
. Follow the path as it heads north across the loose rock.")
322 big cairn and solid rock. You step across onto a block of rock (Waypoint 13) and work your way down the final 15 feet of the wall. It s easy, but loose. Once down, descend very loose rock heading toward the peak in Photo 7. In about 50 yards, there s a path (Waypoint 14). Follow the path as it heads north across the loose rock. The path is short-lived, but gets you through the loose junk. Keep heading north just beyond a small ridge to the descent in Photo 8 (Waypoint 15). Two cairns mark the descent. There s no good way down everything is loose but this looked like the best route. It s loose, but there no cliffs and you can use the wall that s to your left to aid the descent. Descend 250 yards to the drainage (Waypoint 16), which is in sight. Follow the drainage north out to Northshore Road. Go right and walk just over a mile to your car.
, where there are bathrooms and trash cans.")
323 North Bowl of Fire Route Take Lake Mead Boulevard east to Northshore Road. You ll have to stop at the fee booth along the way. If you don t have a pass, it s $10. Go left on Northshore Road and drive 17.2 miles, then make a left into the paved parking area (Waypoint TH), where there are bathrooms and trash cans. Comments: This is one of the best hikes around Lake Mead. In the middle of the barren desert sits the brilliant reddish rock called the Bowl of Fire. Think of it as a miniature Red Rock Canyon. A GPS is recommended to follow this route.

. In about 100 yards, the slot canyon forks; take the right fork.")
324 The Hike: Hike the Northshore Summit trail a few hundred yards to a divide; take the right fork. The red Fire Cliffs come into view. Soon after you see the cliffs, turn left onto a path that travels a ridge as it heads toward the Bowl of Fire. At Waypoint 1, descend west off the ridge the path has been following. Hike NE of the hill and mountain in Photo 1. Once past the hill, head NW and drop into Callville Wash (Waypoint 2). Head NW in the wash about 350 yards to a divide. Take the left fork passing a wilderness sign. Walk about 400 yards and go left into the first narrow slot canyon (Waypoint 3). In about 100 yards, the slot canyon forks; take the right fork. Take the right fork again when the canyon divides and follow this canyon to the start of the Bowl of Fire; see Photo 2 (Waypoint 4). Head west about a half-mile to a deep canyon. This canyon runs the length of the Bowl of Fire, south to north. Descend into the canyon at Waypoint 5. Use the pinkish crag circled in Photo 3 as a landmark. This is a difficult spot to find.

325 Once in the canyon, head north about 150 yards to an opening along the west wall of the canyon. Scramble through the opening (class 3) as shown in Photo 4. Once through the opening, head SW about 100 yards to a wall. Scramble left just before the wall into a huge dry tank with lots of vegetation. Hike SW into a small boxed canyon. About 50 yards into the canyon on the right side is an amazing rock formation that looks like the fingers of a skeleton. Photo 5 shows an overview of the above paragraph. Climb out of the canyon on the right wall (class 3) as shown in Photo 6. Once up, head west about 80 yards and descend (class 1) south to a wash (Waypoint 6). From the wash, hike south about 400 yards to the top of the Fire Cliffs; see Photo 7 (Waypoint 7). The top of the Fire Cliffs is a great place to eat lunch and admire the view out to the south. From the Fire Cliffs, descend NW about 450 yards to Waypoint 8. Head about 200 yards SW to a 50-foot drop-off. Backtrack about 30 yards from the drop-off to a notch in the left wall of the sandstone (Waypoint 9). Use the boulder in Photo 8 as a landmark. Climb down (class 2) to the wash below. Once down, you ll hike west and eventually south about 750 yards in the wash. Waypoint 10 marks where the wash leaves the Bowl of Fire. Head east in the same wash about 600 yards to Waypoint 11, where you leave the wash. Trudge up the loose bank and head east across the desert a little over a mile to the saddle; see Photo 9 (Waypoint 12). From the saddle, head east on the path. Hike to the right of a dark-colored hill (point 705 on the topo map). Cross Callville Bay wash (Waypoint 13) and continue east almost a half-mile to the south of the formation circled in Photo 10. Continue east, where you intersect the trail you walked at the start of the hike (Waypoint 14). Follow the trail almost.75 of a mile back to the trailhead (Waypoint TH).
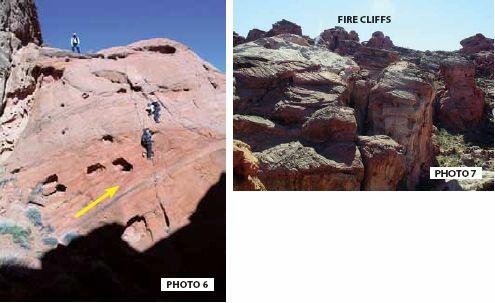
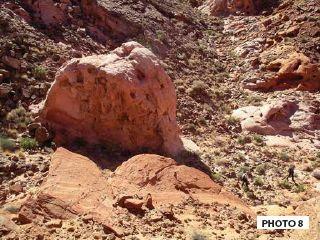
326


327 Red and Black Mountain

328 Trail From the intersection of US Hwy. 93/95, drive 3 miles east to Boulder City. Continue on US 93 by making a left turn at the second stop light (the sign reads Lake Mead: Hoover Dam ). Drive.7 miles to the marked River Mountain Trail parking lot on the left. Comments: This is a good family hike with great views of Las Vegas and Lake Mead. You can do both peaks or just one. The trail is well-signed, but you have to watch for them. Dogs are allowed on the trail with a leash. No bikes. Hoover Dam is a short seven-mile drive from the trailhead. The Hike: The River Mountain Trail starts to the left of the kiosk (Waypoint 1), located at the far end of the parking lot; see Photo 1. The trail parallels a concrete water retention channel for about 100 yards before turning west. In another 100 yards, the trail makes a hard right, as indicated by a green sign. When the trail crosses a gravel road, continue straight as indicated by the sign in Photo 2. Waypoint 2 is just beyond this trail. Red and Black Mountains come into view as the trail heads toward a saddle, which lies between the two mountains. Switchbacks lead to this saddle (Waypoint 3), which has a trail sign indicating both Red and Black Mountains. From the saddle, head west toward Red Mountain, which has a 10-foot-high pole at the summit. In
, marked by a black-and-silver pole. If you re lucky, you can watch people ziplining down the mountain.")
329 about 100 yards, the trail intersects a road and parking area. The trail veers to the left. A gate blocks cars from driving on the road. Follow the trail as it switchbacks to the summit (Waypoint 4), marked by a black-and-silver pole. If you re lucky, you can watch people ziplining down the mountain. Check out Bootleg Canyon Flightlines for more information; 702/ The views are awesome from the peak. Retrace your steps back to the saddle. To Black Mountain: Continue straight on the main trail and veer right in less than 50 yards as indicated by the trail sign. Follow the trail a little less than a half-mile to the summit of Black Mountain (Waypoint 5). There s a bench and two informational plaques at the overlook. The views are awesome. To Descend: Follow the trail back to the saddle. Descend the River Mountain Trail to the trailhead. Gold Strike Canyon Hot Springs Route

330 From the intersection of US Highway 93/95, drive 3 miles east to Boulder City. Continue on US 93 by making a left turn at the second stop light (the sign reads Lake Mead: Hoover Dam ). Drive 5.3 miles, passing the Hacienda Casino, and turn right onto SR 172, the exit for Hoover Dam. At the stop sign, turn right, drive.1 mile, and turn left on gravel Road 75 A. Drive.2 miles to the trailhead. A passenger car can drive to the trailhead. Photo 1 shows the trailhead (Waypoint 1). Comments: This is a visually stunning hike. The wash travels between deep canyon walls and weaves through waterfalls. The rocks and boulders can be slippery. Although it s possible to hike all the way to the Colorado River, this route description stops at the main hot springs. The amount of water in all the hot springs varies greatly. If the main spring is dry, continue down the canyon a short distance, looking for additional springs. Ropes assist the tricky down climbs.

331 Faint green arrows painted on rocks mark the route. Since the hot springs are in an open area, it s best to have your swimsuit on underneath your hiking clothes. The Hike: From the trailhead, the wash heads east with a gentle decline. Soon you re walking between 100-foot-high canyon walls with incredible rock formations around every turn. You eventually come to the first dry falls. Follow the path that goes to the left. It drops back into the wash once past the falls. Photo 2 shows the only tricky dry fall. Use the steps that have been chiseled into the boulder to aid your descent. The boulder is slippery; take it slow. There is normally a rope to aid the descent. About 70 yards past the dry fall, you pass under electrical wires. Just beyond the electrical wires the canyon forks. Stay in the main canyon and continue in the wash where you ll soon start to see water. Continue, following the green arrows around the boulders and dry falls. In less than a halfmile, you come to the hot springs; see Photo 3 (Waypoint 2). The water is very warm, perfect for soothing sore muscles. Even when the temperature in the early parts of the canyon is cold, the hot springs warm the air around it. Depending when you re there, this spring could be six feet deep or dry. You can continue hiking down to the Colorado River, passing more hot springs on the way. The route down to the river is obvious. To Return: Retrace your steps. If your boots are wet, be careful of slipping. Make sure to veer to the right when passing under the power lines. If in doubt, just follow the numerous footprints.

332 Signs of heat exhaustion include cool, moist, pale or red skin, headache, nausea, dizziness, and exhaustion. Move the victim to a cool shaded area and give him water to drink. The National Park Service Fortification Hill Trail

333 From the intersection of US Highway 93/95, drive 3 miles east to Boulder City. Continue on US 93 by making a left turn at the second stop light (the sign reads Lake Mead: Hoover Dam ). Drive 7 miles to the new bridge over the Colorado River. Do not take the Hoover Dam exit. From the Welcome to Arizona sign at the far end of the bridge, drive.8 miles and veer right on the signed Kingman Wash Access Road (Exit 2). At the stop sign, turn left, going under the highway to the signed Kingman Wash Access Road. Follow this gravel road for 3.4 miles, where you ll pass an outhouse at Painter s Cove. Turn right here, continue another 2.7 miles, and park near a small metal trailhead sign located on the left (north) side of the road; see Photo 1 (Waypoint 1). Note: Your mileage might vary. Comments: The view from Fortification Hill rivals any vista around Lake Mead. On a clear day, with snow covering Charleston Peaks, an award-winning photograph awaits. A mile-long mesa lies at the top of Fortification Hill. The Hike: From the trailhead, follow the trail 10 yards and veer right as the trail climbs onto the ridgeline. Some steep sections are followed by level terrain. Eventually, you ll pass the huge boulders that have rolled down from the top of the mesa. From the boulders, it s about 150 yards of steep terrain to the base of a wall. Once at the wall, the path traverses east and levels. Follow the path about 100 yards where it ends at a class 2 climb; see Photo 2 (Waypoint 2). Once above the wall, the path continues north. It soon makes a hard left and uses switchbacks as it climbs to the mesa (Waypoint 3). The path becomes defined along the mesa as it heads south almost a half-mile to the peak. This is the most enjoyable part of the hike. The last 50 yards before the peak are moderately steep. The view from the summit (Waypoint 4) will take your breath away. To the west lie Lake Mead, then Las Vegas, and the snowcapped peaks of Mt.Charleston. Hoover Dam sits to the southwest. The rugged Muddy Mountains stand to the north. In front of them you can catch glimpses of the Bowl of Fire. Northeast of the peak lies remnants of a volcanic crater. It s a short hike from the peak. There s a sign-in book

334 inside an army box. To Descend: Retrace your steps. About 200 yards past the huge boulders, you can follow a steep path down into the wash. Following the wash back to the trailhead is much faster and avoids loose sections on the trail. Liberty Bell Arch Trail

335 From the intersection of US Highway 93/95, drive 3 miles east to Boulder City. Continue on US 93 by making a left turn at the second stop light (the sign reads Lake Mead: Hoover Dam ). Drive 7 miles to the new bridge at Hoover Dam. Do not take the Hoover Dam exit. From the Welcome to Arizona sign at the far end of the bridge, drive 3.1 miles and turn left at the signed White Rock Canyon Trailhead Access. Cross the highway and follow the paved road.1 mile to the huge parking lot. Comments: This is a must-do hike. Thousands of years of wind have formed an arch through conglomerate rock. If that wasn t enough, the lunch spot overlooks the Colorado River. The rugged terrain and the solitude of this hike will appeal to anyone who likes the outdoors. This description was done after the highway construction and is accurate. The older hike descriptions are not valid, since the old trailhead was demolished during highway construction. The Hike: From the parking lot, follow a hiker s path under the highway; see Photo 1. Once past the highway you will see the sign in Photo 2 (Waypoint 1). Walk about 100 yards west down the wash. There s no real path, but the direction of travel is obvious. Leave the wash and hike NW crosscountry (Waypoint 2) toward an abandoned gravel road, as seen in Photo 3. Once on the road (Waypoint 3), follow it about a half-mile until you see the bridge in Photo 4. Start looking for a path (unsigned) that heads west. Numerous cairns mark this spot. This is the path that leads to Liberty Bell Arch (Waypoint 4). The path soon curves SE and descends a slope. At the bottom of the slope the path passes between


336 a couple of large boulders before it makes a U-turn and heads SW up another slope. The path turns west and travels up another slope to the top of an old mine. A wooden sled-like piece of mining equipment rests near the mine. Follow the path down the back side of the slope where it soon makes a hard right before it forks. To go to the mine, take the right fork. The mine, about 50- feet long, was active back in the forties; see Photo 5 (Waypoint 5). From the mine, retrace your steps to a wash that heads south toward Liberty Bell Arch. You ll eventually pass greenish rocks that lie in the wash. About 80 yards beyond the greenish rocks, the path resumes along the right bank and travels NW up a gentle slope. Near the top of the slope, the arch comes into view; see Photo 6. At the top of the slope, the path intersects another path. Go left onto the path as it heads toward the Arch. When you come to a high point, you re less then 200 yards from the Arch. The path swings to the left and continues SE as it climbs a slope. The path disappears when it goes over rocks. Look for cairns if you lose the path. Once the terrain flattens, the path is easy to follow. Continue on the path as it heads south to an awesome overlook of the Colorado River and White Rock Canyon. This is a perfect place for lunch if there s no wind (Waypoint 6). To Descend: Retrace your steps.

337 The Lake Mead National Recreation Area is America s first and largest recreational area in the United States and is the fifth most visited national park in the United States. LakeMeadOnline.com Arizona Hot Springs Route
338 From the intersection of US Highway 93/95, drive 3 miles east to Boulder City. Continue on US 93 by making a left turn at the second stop light (the sign reads Lake Mead: Hoover Dam ). Drive 7 miles to the new bridge over the Colorado River. Do not take the Hoover Dam exit. From the Welcome to Arizona sign at the far end of the bridge, drive 3.1 miles and turn left at the signed White Rock Canyon Trailhead Access. Cross the highway and follow the paved road.1 mile to the huge parking lot (Waypoint 1). Comments: If you plan to soak in the hot springs, wear your bathing suit under your clothes. Once near the hot springs, there are few secluded places to change. I also recommend you bring a pair of Tevas; they make walking in the water easier. The hot springs produce 400 gallons of water per minute with a temperature range from 85 to 120 degrees. Warning: An amoeba common to thermal pools may be present and could enter through your nose, causing a rare infection. Do not dive into the hot springs or submerge your head. The depth of the water at the hot springs varies. Make sure to eat and drink before starting the hike back to the trailhead. It s much harder due to the ascent. The Hike: From the parking lot follow a hiker s path under the highway; see Photo 1. Once past the highway, you ll see a sign that reads: Lake Mead National Recreation Area White Rock Canyon Lake Mojave (Colorado River) 2.3 miles. Arizona Hot Springs 2.8 miles. However, the sign was moved from the real trail during construction. The actual trail lies about 100 yards south up on the ridge in Photo 2 (Waypoint 1).
 that leads through the magnificent White Rock Canyon. The twisting narrow canyon is composed of volcanic rock.")

339 The trail heads SW toward the Colorado River. In 200 yards the trail divides; take the right fork as indicated by the trail sign. The trail soon drops into a wide wash (Waypoint 3) that leads through the magnificent White Rock Canyon. The twisting narrow canyon is composed of volcanic rock. Follow the wash through the canyon almost 2 miles until it ends at the Colorado River (Waypoint 4). It should take about an hour to reach the river. Once at the river, the route-finding and the terrain become trickier. Go south onto a trail, as indicated by the trail sign. You ll walk on a ledge just above the river. The trail pulls away from the river and travels to the low-angled wall in Photo 3. Scramble up the wall. Follow the arrows (brown and white) up the slab to the climb (class 2) in Photo 4. You can avoid the climb by following a path down to the right, around the rock, and back up a steep slope where it joins the trail. At the top of the climb in Photo 4, the trail resumes and soon descends rather steeply into the canyon that leads to the hot springs. You ll pass a trail marker just before entering the canyon.
.")

340 Hike east in the wash. You ll soon encounter water flowing from the hot springs. Be careful of slippery rocks as you climb a number of small falls. If you brought Tevas, now is the time to put them on. Climb a 20-foot steel ladder as seen in Photo 5, and continue a short distance to the hot springs; see Photo 6 (Waypoint 5). Don t be surprised if others are enjoying the hot springs. After soaking, it s important to eat something. The hot water zaps a person s energy. To Return: Retrace your steps down the ladder and continue about 100 yards through the canyon to a trail sign. Go right at the trail sign and follow the same trail back to White Rock Canyon. Turn east and hike up the canyon for 2 miles. Once the canyon walls recede, look for a trail sign. Veer right onto the trail. When the trail ends, hike under the highway to your car.
. Drive 7 miles to the new bridge over the Colorado River. Do not take the Hoover Dam exit.")
341 Fortress Butte Route From the intersection of US Highway 93/95, drive 3 miles east to Boulder City. Continue on US 93 by making a left turn at the second stop light (the sign reads Lake Mead: Hoover Dam ). Drive 7 miles to the new bridge over the Colorado River. Do not take the Hoover Dam exit. From the Welcome to Arizona sign at the far end of the bridge, drive 3.1 miles and turn left at the signed

342 White Rock Canyon Trailhead Access. Carefully cross the highway and follow the paved road.1 mile to the huge parking lot (Waypoint 1). Comments: The top of the butte is larger than a football field, with great views in every direction. After summiting, you have the option of heading down to the hot springs. Fortress Butte is visible from the trailhead. Warning: An amoeba common to thermal pools (hot springs) may be present and could enter through your nose causing a rare infection. Do not dive into the hot springs or submerge your head. The Hike: From the parking lot, follow a hiker s path under the highway; see Photo 1. Once past the highway, you ll see a sign that reads: Lake Mead National Recreation Area White Rock Canyon Lake Mojave (Colorado River) 2.3 miles. Arizona Hot Springs 2.8 miles. However, the sign was moved to this location from the actual trail during construction. The actual trail is 100 yards south on the ridge in Photo 2 (Waypoint 2). Follow the trail as it heads SW toward the Colorado River. In 100 yards, the trail divides; take the left fork. Follow the trail down and across a small wash and continue onto the single-track trail. When the trail widens, veer left to find the continuation of the single-track trail. Soon you come to a divide (Waypoint 3). Veer right along a faint trail which soon becomes obvious again. As you come to a rise, the peak comes back into view; see Photo 3. Follow the trail down into a drainage. The trail almost immediately leaves the drainage and parallels it along the left side. Leave the trail near the craggy pinnacle in Photo 4 and walk about 75 yards to a small saddle (Waypoint 4). Descend a small drainage into a wide wash. Head west in the wash about 70 yards to an intersection with another

343 wash. Go south in the new wash and hike about 200 yards. Photo 5 shows the next part of the route. Hike up the loose slope in a drainage veering to the far right side of the milkshake-colored rock. Ascend a class 2 rock to a large cairn. Continue up easy rock and veer left at the large wall ahead. Work your way up the face via cairned chutes and a bighorn-sheep path. Climbing is easy, class 3 or less. Once up, a large cairn marks the descent (Waypoint 5). Walk south a few hundred yards to the summit (Waypoint 6). There s a book to sign and incredible vistas in every direction. Walk the perimeter of the butte; you ll get an appreciation of the forces it took to create this island in the sky. To Descend: Retrace your steps. Once past the large cairn, you can hike NW, dropping into the wide wash and head SW down to Arizona Hot Spring; otherwise, retrace your steps back to the trailhead.
344 Glossary bouldering: Using hands and feet to climb over, around, or down large boulders. Most bouldering routes are in the canyons of Red Rock. buttress: A large flat portion of rock that stands out from a wall behind it. cairn: A pile of rocks used to mark a path or route. canyon: A deep narrow valley with high steep sides. catch basin: A depression in sandstone where water collects. chimney: A steep narrow chute with parallel walls. chute: A steep well-worn passage. A chute is larger than a crack, but smaller than a gully. closed loop: A trail or path that makes a complete circle. conglomerate: A rock composed of many types of pebbles and minerals. crack: A fracture in a rock; varies in size. crag: A sandstone wall scaled by technical climbers. cryptobiotic soil: A fragile type of soil found near Lake Mead. Do not walk on it. face: The steep side of a mountain. fall: A normally dry place that becomes a waterfall when it rains or snows. A dry fall is a class 2 or higher climb. gully: A broad low-angled depression that runs vertically down the side of a mountain. narrows: A tight passageway in a wash, formed by wind and water erosion over thousands of years. open loop: A trail or path that makes an incomplete circle. The trailhead and the trail s end are in different locations. pass: An obvious cleft or break in a ridgeline where it s possible to cross. path: A non-maintained pathway that s more difficult to follow than a trail, but easier to follow than a route. Some paths are former trails that have become overgrown or faded. pull-out: A place to park along a paved road. A pull-out is either paved or made of gravel or dirt. ramp: An inclined sandstone ledge. ravine: A small, narrow, steep-sided valley that s larger than a gully, but smaller than a canyon. rock scrambling: Class 2 and class 3 climbing up and over rock without the use of ropes. route: A trek that s hiked by using landmarks. There are no marked paths or trails to follow. saddle: A low point between two peaks, ridgelines, or high points. sandstone: Porous rock made of sand. scree: An accumulation of small rocks found on a slope. slope: A very low-angled face of a mountain. summit: The peak of a mountain. switchback: The zigzag pattern in a trail or path that makes it easier to go up the side of a mountain. talus: Loose rock and gravel on a slope. tank: A place larger than a catch basin where water gathers after a rainstorm. topo map: A map showing the details of the contour of the land by means of lines and symbols.
345 trail: A well-maintained pathway that s easy to follow. trailhead: The starting point of a trail, path, or route. vista: A distant view from a high point or peak.

346 About the Author Branch Whitney, also the author of Hiking Southern Nevada, Hiking the High Sierra, and Hiking the Southwest, has led more than 2,000 hikers to more than 100 different summits in southern Nevada and beyond. He has named over 25 peaks in southern Nevada and has found over 60 routes. His website (hikinglasvegas.com) is the primary source for hiking and mountaineering information for southern Nevada.
347 About Huntington Press Huntington Press is a specialty publisher of Las Vegasand gambling-related books and periodicals, including the award-winning consumer newsletter, Anthony Curtis Las Vegas Advisor. Huntington Press 3665 Procyon Street Las Vegas, Nevada 89103

348

349 TAKE THE GAMBLE OUT OF HIKING AROUND LAS VEGAS Branch Whitney has hiked and climbed more than 3,000 miles, led more than 2,000 hikers to summits, and blazed wild and rewarding scrambling routes, all over the Southwest. When Whitney claims that some of the best hiking and rock-scrambling in the United States are within an hour of the Las Vegas Strip, you can believe him. Covering Red Rock Canyon, Mount Charleston, and Lake Mead, Hiking Las Vegas is the definitive all-encompassing guide to the best outdoor adventures surrounding Sin City. The hikes range from relaxing trails perfect for families to challenging climbs for advanced daredevils. Whatever your level of fitness and experience, this book has an adventure for you. Every hike includes driving directions to the trailhead; a quick-reference guide to difficulty, distance, elevation, and completion time; step-by-step instructions on how to get from the trailhead to the final destination; gorgeous color photos and helpful waypoints; and dozens of quick tips so you can stay safe while getting the best views possible. The first edition of Hiking Las Vegas has been the best book on the subject for more than 15 years; this new edition is destined to top even that for conquering the mountains that surround the numberone travel destination in the world.
Hiking Las Vegas.com
 Hike: Mt. Wilson via First Creek Canyon route Trailhead: First Creek marked Distance: 10 miles up and back Elevation gain: 3,400 feet Elevation of Peak: 7,070 feet Time: 7 to 9 hours (up and back) Difficulty:
Hiking Las Vegas.com
 Hike: Juniper Peak up and back Trailhead: Oak Creek Canyon marked Distance: 5.5 miles round trip Elevation gain: 2,200 feet Elevation peak: 6,109 feet Time: 4 to 5 hours - Up and back Difficulty: 3 Danger
(west) onto Charleston Boulevard. Drive 16 miles on Charleston and turn right into Red Rock
 onto Charleston Boulevard. Drive 16 miles on Charleston and turn right into Red Rock") Hike: North Peak and Ice Box Overlook up and back Trailhead: 2.5 miles up the Rocky Gap Road not mark Distance: 5 miles round trip Elevation gain: 2,694 feet Elevation Peak: 7,094 feet Time: 3 to 5 hours
Hike: North Peak and Ice Box Overlook up and back Trailhead: 2.5 miles up the Rocky Gap Road not mark Distance: 5 miles round trip Elevation gain: 2,694 feet Elevation Peak: 7,094 feet Time: 3 to 5 hours
Children's Discovery Trail Guide - Lost Creek
 Children's Discovery Trail Guide - Lost Creek Thank you for spending time learning and observing some of the secrets of Red Rock Canyon Conservation Area has to offer. Feel free to talk to a ranger if
beach. Make the ford and follow the trail out to the junction with Red Creek Tr in an open grassy area.
 Description: This is a moderate to slightly strenuous 22.8 mile backpack (add 2.6 miles if you do the packless out and back to the Lion s Head) that will have you exploring nearly every thing that is The
Route #2) Mt. Massive - Southwest Slopes
 Mt. Massive - Southwest Slopes") Route #2) Mt. Massive - Southwest Slopes Difficulty: Class 2 Ski: Advanced, D6 / R2 / III Exposure: Summit Elevation: Trailhead Elevation: Elevation Gain: Round-trip Length: Trailhead: County Sheriff:
Route #2) Mt. Massive - Southwest Slopes Difficulty: Class 2 Ski: Advanced, D6 / R2 / III Exposure: Summit Elevation: Trailhead Elevation: Elevation Gain: Round-trip Length: Trailhead: County Sheriff:
Tiger Mountain State Forest:
 98 60 hikes within 60 miles: SEATTLE 20 Tiger Mountain State Forest: West Tiger Mountain Three Loop i KEY AT-A-GLANCE INFORMATION Length: 5.1 miles round-trip Configuration: Loop Difficulty: Moderate difficult
Note: Coordinates are provided as Universal Transverse Mercator UTM Zone U21, North American Datum 1983 (NAD 83).
.") Northern Traverse Route Description The Northern Traverse (formerly the North Rim Traverse) is an unmarked and rugged backcountry hiking route. It is known be a demanding hike, because of its terrain and
Northern Traverse Route Description The Northern Traverse (formerly the North Rim Traverse) is an unmarked and rugged backcountry hiking route. It is known be a demanding hike, because of its terrain and
GOLDEN EARS PROVINCIAL PARK
 GOLDEN EARS PROVINCIAL PARK Trail Information as of October 10 th 2015 Do not underestimate the mountainous wilderness of Golden Ears Provincial Park. The combination of rugged terrain and rapidly changing
BRYCE CANYON COUNTRY Boulder Mountain Scenic backways itinerary
 BRYCE CANYON COUNTRY Boulder Mountain Scenic backways itinerary Boulder Mountain Area The high plateaus of the Aquarius Plateau (Boulder Mountain), are heavily forested and covered in countless winding
Little Grand Canyon near Pomona, Illinois
 Little Grand Canyon near Pomona, Illinois Below: View of the trail and the terrain created using the Map My Hike app Below: Summary of the hike created using the Map My Hike app Presented by: Jennifer
playwinterpark.com Off The Beaten Path Hikes Hiking Recommendations for the Adventurous Hiker
 playwinterpark.com Off The Beaten Path Hikes Hiking Recommendations for the Adventurous Hiker Hike: Devil s Thumb (difficult) Length: 3.93 miles one-way Elevation: Trailhead 9609 Destination 12,236 Trailhead
Telluride-to-Moab Alternative Singletrack Options
 Telluride-to-Moab Alternative Singletrack Options Day 1 Day 1 Alternate 1: Galloping Goose to Deep Creek. 18.4 miles, ascent 3,530ft, descent 1,388ft. This is fun, flowey, moderate to intermediate singletrack
Arches of the. Sandflats Area. By Virginia Allen
 Arches of the Sandflats Area By Virginia Allen TABLE OF CONTENTS Introduction Dedication Road Log Arches 1. Perforated View Arch 2. Fee Booth Arch 3. Windsong Arch 4. Weird Arch 5. Resting Arch 6. Bike
LOWER SPRING CANYON - CAPITOL REEF
 LOWER SPRING CANYON - CAPITOL REEF Rating: Moderate Hike Length: 5-7 hours (10-11 miles) Gear: Standard Hiking Gear Maps: Fruita, UT; Twin Rocks, UT; Water: A filterable spring a bit over 1/2 way. Recommend
Route Combo) Mt. Bierstadt - Bierstadt, Sawtooth, Evans
 Mt. Bierstadt - Bierstadt, Sawtooth, Evans") Climbing 14ers can be very dangerous, please read the Mountaineering Safety Page and make sure you have a map+compass and can use them effectively, without the help of electronic devices. Route Combo)
Climbing 14ers can be very dangerous, please read the Mountaineering Safety Page and make sure you have a map+compass and can use them effectively, without the help of electronic devices. Route Combo)
ANGEL PEAK SCENIC AREA
 Activities: Facilities: ANGEL PEAK SCENIC AREA Hiking, photography, watchable wildlife, camping, picnicking. Note: While formal hiking trails in the area are limited, dispersed hiking opportunities abound
Lava Mountain Trail Distance: Elevation Range: Trail Type: Difficulty: Season: Driving Distance: Driving Time: USGS Maps: Pros Cons
 Lava Mountain Trail Distance: 13.4 miles (including the side trip to North Star Lake) Elevation Range: 5900'-8330' Trail Type: singletrack Difficulty: moderate Season: late June-October Driving Distance:
Self-Guided Walk Langdale Pikes. Start & Finish: NT car park (free to members) at Sticklebarn - on the right just beyond the New Dungeon Ghyll hotel.
 at Sticklebarn - on the right just beyond the New Dungeon Ghyll hotel.") Self-Guided Walk Langdale Pikes Key Information These mountains form a collection of spires and cliffs on the north side of Langdale. This walk visits four of the main tops Pavey Ark, Harrison Stickle,
Self-Guided Walk Langdale Pikes Key Information These mountains form a collection of spires and cliffs on the north side of Langdale. This walk visits four of the main tops Pavey Ark, Harrison Stickle,
Mount Daly a Most Prominent Peak via South Ridge
 Mount Daly a Most Prominent Peak via South Ridge Difficulty: Class 3 Exposure: Exposed in places along the ridge Summit Elevation: 13,305 Elevation Gain: 4100 from trailhead; 1800 from Capitol Lake camp
Skiing and Snowshoes on Un-groomed Fernan Saddle Terrain
 Skiing and Snowshoes on Un-groomed Fernan Saddle Terrain Three ski or snowshoe routes are available from the Fernan Saddle Parking Lot which either do not cover routes ordinarily groomed for snow machine
Location: Height: Access: Distance: Elevation: Season: Difficulty: Lat/Long: Directions:
 Upper Eagle Falls Upper Eagle Falls (~20 ft.) is a short hike up from the roadside at the Eagle Falls picnic area. It is very difficult to get a parking spot here during the day, so it is recommended to
CAMELBACK MOUNTAIN: CHOLLA TRAIL
 CITY OF PHOENIX :: Camelback Mountain: Cholla T rail 21 CAMELBACK MOUNTAIN: CHOLLA TRAIL IN BRIEF Camelback Mountain is the tallest point in the city of Phoenix. From the 2,704-foot summit of Camelback,
Other Agencies and Organizations
 Daniel Boone National Forest 1700 Bypass Road WInchester, KY 40391 859-745-3100 Location Northern terminus is near Morehead, Kentucky. Southern terminus is located in the Big South Fork NRRA in Tennessee.
Erskine Creek via Pisgah Rock and Jack Evans
 Erskine Creek via Pisgah Rock and Jack Evans 4 hrs 30 mins 7.1 km Circuit Very experienced only 6 421m This walk visits some great lookouts and explores the lower section of Erskine Creek. Most of the
Backpacking Trip Planning. Presenters: Dana Perry Christine Fogarty
 Backpacking Trip Planning Presenters: Dana Perry Christine Fogarty 1 Agenda New to planning trips? Location and physical trail Common terminology Trip selection & research The Trip Flow Plan What is it
Route #1) Mt. of the Holy Cross - North Ridge
 Mt. of the Holy Cross - North Ridge") Climbing 14ers can be very dangerous, please read the Mountaineering Safety Page and make sure you have a map+compass and can use them effectively, without the help of electronic devices. Route #1) Mt.
Climbing 14ers can be very dangerous, please read the Mountaineering Safety Page and make sure you have a map+compass and can use them effectively, without the help of electronic devices. Route #1) Mt.
Section 7: Pick Up Where You Left Off! S-Tree Road over the Todd Road
 2018 TRACE NOTES Helpful information for your adventure on Section 7 of the Hiker Challenge. Start Point S-Tree Rd. End Point Intersection Todd Rd. / Hale Ridge Rd. WEATHER DECISION Weather Alert!!!! Potential
Witte Museum Tour Painted Shelter on the Rio Grande River Saturday June 2, :30 A.M. 3:00 P.M.
 Witte Museum Tour Painted Shelter on the Rio Grande River Saturday June 2, 2018 9:30 A.M. 3:00 P.M. This tour is limited to 35 participants (Ages 12 and up) All minors must be accompanied by a parent or
A DESERT CAMPING GUIDE FOR ANZA BORREGO DESERT STATE PARK
 A DESERT CAMPING GUIDE FOR ANZA BORREGO DESERT STATE PARK With over 500,000 acres of beautiful terrain, Anza Borrego Desert State Park offers endless opportunities for Boy Scout Troops, Venture Crews and
Hole in the Rock Scenic Backway
 Hole in the Rock Scenic Backway The Hole in the Rock Scenic Backway leads one along the pioneer path created by a Mormon Expedition. Approximately 55 miles one-way from Highway 12 to the Hole-inthe-Rock,
Witte Museum Tour Meyers Spring Ranch Tour Saturday, September 1, a.m. - 4 p.m.
 Witte Museum Tour Meyers Spring Ranch Tour Saturday, September 1, 2018 10 a.m. - 4 p.m. This tour is limited to 35 participants (Ages 12 and up) All minors must be accompanied by a parent or legal guardian.
Trail Beginning Elevation: 7553 ft The Poison Creek Trailhead is located at the end of National Forest Road 646E (NF-646E).
.") West Mountain Trails Poison Creek Trail #134 Length: 2.9 miles (4.7 km) Difficulty Horseback: A good trail for the first time west mountain rider, some steep sections Hiking: Most Difficult USGS Maps:
West Mountain Trails Poison Creek Trail #134 Length: 2.9 miles (4.7 km) Difficulty Horseback: A good trail for the first time west mountain rider, some steep sections Hiking: Most Difficult USGS Maps:
San Luis Obispo. Bishop Peak Felsman Loop Eagle Rock Maino Open Space Poly Canyon Poly P Other Areas
 San Luis Obispo Bishop Peak Felsman Loop Eagle Rock Maino Open Space Poly Canyon Poly P Other Areas 1 JCT. ELEV. 72 400 00 0 FELSMAN LOOP GATE LOOP RIDGE 600 FENCE JCT. ELEV. 860 1000 1200 BISHOP PEAK
ABOUT THE PARKS NANTAHALA NATIONAL FOREST MOUNTAINS NATIONAL PARK CHEROKEE NATIONAL FOREST PISGAH NATIONAL FOREST GREAT SMOKY HIKING TRAILS
 ABOUT THE PARKS GREAT SMOKY MOUNTAINS NATIONAL PARK NANTAHALA NATIONAL FOREST CHEROKEE NATIONAL FOREST PISGAH NATIONAL FOREST GREAT SMOKY MOUNTAINS NATIONAL PARK Straddling the border between North Carolina
Sunday / Monday - Osceolas
 AMC August 3, 2015 Sunday / Monday - Osceolas 0 1737 ft 2007, Appalachian Mountain Club. All rights reserved. Notes Created by AMC White Mountain Guide Online wmgonline.org 1 Distance Time Elev Change
Stephens State Park Trails
 TRAILS OF ALLAMUCHY MOUNTAIN & STEPHENS STATE PARKS Allamuchy Mountain and Stephens State Parks contain 28 marked trails providing access to diverse landscapes for walking, hiking, biking, bird-watching,
Leura Cascades to Gordon Falls Reserve
 Leura Cascades to Gordon Falls Reserve 1 hr 15 mins 1.8 km One way Moderate track 200m From Leura Park to Gordon Falls Park, this diverse walk offers fantastic views of the Jamison Valley, as well as two
Driving Time: 3 hours (allow extra time for stops)
") Scenic Byways loop This journey takes visitors through the eastern edge of Mt. Rainier National Park and along two of Washington s most beloved scenic byways, the Chinook Byway and the White Pass Scenic
Scenic Byways loop This journey takes visitors through the eastern edge of Mt. Rainier National Park and along two of Washington s most beloved scenic byways, the Chinook Byway and the White Pass Scenic
CRAZY HORSE TRAIL GUIDE
 CRAZY HORSE TRAIL GUIDE Abridged Version: July 2016 This is a short form of our interpretive trail guide for the Crazy Horse Trail. The full version of the guide has a more detailed description of the
Grizzly Peak A - East Ridge July 15, 2012
 Grizzly Peak A - East Ridge July 15, 2012 Difficulty: Difficult Class 2/Class 3 Upper Elevation: 13,995 feet Trailhead Elevation: 11,360 feet Elevation Gain: 3,000 feet Round-trip Length: 6.0 miles Trailhead:
Avalanche Awareness and Leading a Companion Rescue
 Avalanche Awareness and Leading a Companion Rescue Introduction: Traveling in the backcountry is a great way to enjoy the outdoors and friends. It s important that when we travel in the backcountry we
Asheville & WNC Hikes
 Asheville & WNC Hikes Amazingly, we have 3,000+ miles of free public hiking trails near Asheville, including 1,600 miles in the Pisgah and Nantahala National Forests, 850 miles in Great Smokey Mountains
Avalanches and the Mount Whitney Basin
 Avalanches and the Mount Whitney Basin 10 April 2006 by Bob Rockwell Prelude Avalanches are a fact of life in high mountains in winter, and we take courses to find out about them. We learn how to assess
C E N T R A L C A T S K I L L S
 120 C E N T R A L C A T S K I L L S Central Catskills Once out of the southern parts of the Catskills, the Long Path enters the more well traveled and civilized regions. The trail joins the Devil s Path,
Kuruwita Erathna Trail to Sri Pada (Adam s Peak)
") Kuruwita Erathna Trail to Sri Pada (Adam s Peak) Trail Difficulty: Easy Moderate Strenuous Tough Trail Head: Adevikanda, Erathna (near entrance to mini-hydro power plant) Nearest Town: Erathna Nearest
Kuruwita Erathna Trail to Sri Pada (Adam s Peak) Trail Difficulty: Easy Moderate Strenuous Tough Trail Head: Adevikanda, Erathna (near entrance to mini-hydro power plant) Nearest Town: Erathna Nearest
Mt. Thielsen Trip Report: April 29, 2012
 Mt. Thielsen Trip Report: April 29, 2012 Outing Organizer: Geoff Hance, with Brent McGregor Elevation Gain: 3,800 feet, over warming snow, with an exposed summit block Distance: About 9 miles round trip
Colorado Life Zone Scavenger Hunt
 Colorado Life Zone Scavenger Hunt Below are worksheets created for all the habitats or life zones. They were designed with the intention of breaking the class up into small groups, and having students
GIFFORD PINCHOT NATIONAL FOREST
 GIFFORD PINCHOT NATIONAL FOREST 9341 Wright Meadow 93 Spencer Meadow Spencer Butte 4247' 30 30A 19 24 80 31C Lewis River Lower Falls 5 Quartz Creek 90 Taidnapam Falls Upper Falls 31 Spencer Peak 3861'
THE WITTE MUSEUM ROCK ART FOUNDATION 24th ANNUAL RENDEZVOUS February 23-25, 2018
 THE WITTE MUSEUM ROCK ART FOUNDATION 24th ANNUAL RENDEZVOUS February 23-25, 2018 Participation is limited to 130 guests. The format of the Rock Art Rendezvous will focus on site tours of the remarkable
Itinerary Overview. Continental Divide Alpine Backpacking 22 days Ages Course Description
 Itinerary Overview Continental Divide Alpine Backpacking 22 days Ages 16-18 Course Description Welcome, you re in for an experience of a lifetime! Imagine hiking through rolling forests, sharing alpine
Itinerary Overview. Sawatch Range Mountaineering Ages days
 Itinerary Overview Sawatch Range Mountaineering Ages 14-16 22 days Course Description Welcome, you re in for an experience of a lifetime! Imagine hiking through rolling forests, sharing alpine meadows
Ribbon Cliff - Ribbon Mesa text and photos by Charlie Hickenbottom
 Ribbon Cliff - Ribbon Mesa text and photos by Charlie Hickenbottom Looking for something a little different than Sage Hills or Saddlerock? Perhaps something a little wilder, a little less traveled? Look
Hiking. Lesson 4.1. Fitness. Hiking
 Lesson 4.1 By Carone Fitness If you enjoy walking, you will probably enjoy hiking. The main difference between hiking and fitness walking is the change in terrain. is typically done in a forest, wilderness,
Guthega to Mt Twynam. 2183m. 1583m. 6 hrs 45 mins 14.8 km Return. Experienced only. 913m
 Guthega to Mt Twynam 6 hrs 45 mins 14.8 km Return Experienced only 5 913m This walk starts from Guthega and makes its way along the Snowy River to the Illawong Lodge, via the Blue Cow Creek flying fox.
The temperature is nice at this time of year, but water is already starting to be scarce.
 In March of 2003, Scott Morrison and I went backpacking in the Grand Canyon. The temperature is nice at this time of year, but water is already starting to be scarce. Another issue with this time of year
National Parks and Beyond
 National Parks and Beyond Canyons, Mesas and Hoodoos Nevada Utah Arizona Red Rock Canyon National Conservation Area Las Vegas, Nevada Begin your adventure under the neon lights of Las Vegas, an oasis in
Southwest Family Adventure. 7 Days
 Southwest Family Adventure 7 Days Southwest Family Adventure See three amazing National Parks Grand Canyon, Bryce, and Zion on this epic camping trip designed with families in mind. Every day offers magnificent
Crystal Lake Area Trails
 Lake Area Trails Welcome to the Lake area of the Big Snowy Mountains! This island mountain range in central Montana features peaks reaching to 8,600 feet and long, high ridges from which vistas of the
Trail Phasing Plan. Note: Trails in the Clear Creek Canyon area (Segments will be finalized in the future to minimize wildlife impacts
 Note: Trails in the Clear Creek Canyon area (Segments 2 5 and a future JCOS connection) will be finalized in the future to minimize wildlife impacts Trail Phasing Plan P Parking 3 Easy Trail Intermediate
Camp Geronimo Rainbow Trails
 Camp Geronimo Rainbow Trails With over 5,000 acres of surrounding national forest, the possibilities of getting out and seeing the wilderness are almost limitless. Camp Geronimo offers some of the greatest
Itinerary Overview. Colorado San Juan Mountaineering 15-days
 Itinerary Overview Colorado San Juan Mountaineering 15-days Course Description Welcome, you re in for an experience of a lifetime! Imagine hiking through rolling forests, sharing alpine meadows with mountain
Walking and Hiking in Tirol
 Walking and Hiking in Tirol Emergency app Tirolean Mountain Rescue Service There is a lot to learn about mountain climbing and that takes time! Just like skiing, initial climbing experiences should be
Saturday Hike - Hancock Loop & Out
 AMC August 3, 2015 Saturday Hike - Hancock Loop & Out 0 2487 ft 2007, Appalachian Mountain Club. All rights reserved. Notes Created by AMC White Mountain Guide Online wmgonline.org 1 Distance Time Elev
PHILMONT EXPEDITION UNIT REGISTRATION FOR 2020
 PHILMONT EXPEDITION UNIT REGISTRATION FOR 2020 REMINDERS: Your unit representative may enter the system anytime from October 30 thru December 2. Any unit can enter the registration system in consecutive
Southern Utah University Hike Brochure
 Southern Utah University Hike Brochure Taylor Creek Trail Twenty minutes from Cedar City Red Hollow An hour and a half from Cedar City Fees: Entrance fee to Kolb Canyon Length: 5 miles round trip Length:
Itinerary Overview. Maroon Bells Mountaineering 22-days. Course Description
 Itinerary Overview Maroon Bells Mountaineering 22-days Course Description Welcome, you re in for an experience of a lifetime! Imagine hiking through rolling forests, sharing alpine meadows with mountain
2019 DAY HIKE AT IRON MOUNTAIN SATURDAY, JANUARY 19
 WHERE? In Google Maps, paste the following coordinates for Iron Mountain: 32.978215,-116.972593 or CLICK ON THIS LINK. I. Purpose of the Day Hike A. THE WBC Day Hike is a relatively short trail hike to
Tumbler Ridge Global Geopark
 Tumbler Ridge Global Geopark WILDERNESS WATERFALLS These waterfalls are in remote locations, no trails exist, and GPS is required. Not every geosite needs a hiking trail. Providing ready access to all
Great Basin Drive, Yosemite to Las Vegas (C18A-3)
") Great Basin Drive, Yosemite to Las Vegas (C18A-3) After finishing up with the California parks, I left Yosemite and entered the Great Basin, which spans a large area east of the Sierra Nevada mountains
Great Basin Drive, Yosemite to Las Vegas (C18A-3) After finishing up with the California parks, I left Yosemite and entered the Great Basin, which spans a large area east of the Sierra Nevada mountains
Bryce Canyon Country ATV Multi-Day Itinerary
 Bryce Canyon Country ATV Multi-Day Itinerary Look for more trail information and maps on these web-sites listed below. www. Casto Canyon Kick off your ATV adventure with this 36 mile round-trip ride through
DOGS ARE NOT PERMITTED ON TRAILS OR TOURS
 Tuesday, January 1, 2008 9:00 a.m. Hike Voices, Visions, and Views of Alcoholic Pass 3 Hours Hike Alcoholic Pass! Experience and discover the prehistory, history, and present day journey of those who have
Three Sisters Wilderness Oct. 2009
 Three Sisters Wilderness Oct. 2009 I was in Bend, OR and had the whole day to travel back to Boise so I decided to take a hike to the popular Green Lakes and summit the South Sister in Three Sisters Wilderness.
Glacier National Park
 Glacier National Park West Glacier, MO Page 1 Page 3-6 Report Rough Draft Glacier National Park Glacier National Park is located in the northwest corner of Montana and extends into Canada. It is located
CIEC 9 PEAKS AWARD SUPPLEMENT POSSIBLE ROUTES FOR THE 9 PEAKS AWARD TRIP
 CIEC 9 PEAKS AWARD SUPPLEMENT POSSIBLE ROUTES FOR THE 9 PEAKS AWARD TRIP As you plan your trip, be aware of 3 regulations in this wilderness: 1. Camp only in designated campsites. 2. No campfires allowed.
CRANBERRY. Introduction
 Introduction Introduction The Cranberry Boulders are a group of 60 problems set in a beautiful mossy forest above the Cranberry Creek. The boulders are located approximately 36km south of Revelstoke on
The Cleo s Bath North Side Hike
 The Cleo s Bath North Side Hike This hike is a cross-country hike from Pinecrest Lake to the north side of Cleo s Bath. It is quieter and much less crowded than the normal route, which goes up the south
Logan Canyon Hiking Trail Guide
 C a c h e V a l l e y V i s i t o r s B u r e a u Logan Canyon Hiking Trail Guide Monique Beeley Legend Trail Location Guide WASATCH CACHE NATIONAL FOREST WILDERNESS PAVED WATER TRAILHEAD 9 Logan River
County Line trail - Miller Peak to Little Navaho
 County Line trail - Miller Peak to Little Navaho 7-17-2008 This hike features a portion of the County Line trail in the Teanaway that receives extremely little use despite offering a spectacular ridge-run
Sunrise Ranch 6890 acres, Jeff Davis County, Texas On the Fort Davis Scenic Loop
 Sunrise Ranch 6890 acres, Jeff Davis County, Texas On the Fort Davis Scenic Loop 432-386-2821 Cell 432-426-2024 Office james@kinglandwater.com King Land & Water LLC P.O. Box 109, 600 State Street, Fort
Chapter The All-new, World-class Denver International Airport Identify Describe Know Describe Describe
 Chapter 10 The aerospace subject is very large and diverse. As seen in previous chapters, there are many subject areas. So far you have learned about history, weather, space and aerodynamics. Now you will
The gorges of Mohican Park in Ohio create a hiker's paradise Sunday, May 22, 2011 By Bob Downing, Akron Beacon Journal
 Pittsburgh Post-Gazette The gorges of Mohican Park in Ohio create a hiker's paradise Sunday, May 22, 2011 By Bob Downing, Akron Beacon Journal Bob Downing Big Lyons Falls drops 80 feet into a shady U-shaped
The Witte Museum Rock Art Foundation White Shaman Preserve Guided Tours
 The Witte Museum Rock Art Foundation White Shaman Preserve Guided Tours Every Saturday, September through May These tours are limited to 20 participants (ages 12 and up) All minors must be accompanied
Rogue Gorge (Mt. Stella) Roadless Area-- T30S R3E (primarily in portions of Sections 23, 26, 33, 34 & 35)
 Roadless Area-- T30S R3E (primarily in portions of Sections 23, 26, 33, 34 & 35)") Rogue Gorge (Mt. Stella) Roadless Area-- T30S R3E (primarily in portions of Sections 23, 26, 33, 34 & 35) Rogue River-Siskiyou National Forest--High Cascades Ranger District Upper, higher elevation trail
Rogue Gorge (Mt. Stella) Roadless Area-- T30S R3E (primarily in portions of Sections 23, 26, 33, 34 & 35) Rogue River-Siskiyou National Forest--High Cascades Ranger District Upper, higher elevation trail
Kitimat. Pacific Inland Coast. Hiking Guide Kitimat, British Columbia, Canada
 Kitimat Pacific Inland Coast Hiking Guide Kitimat, British Columbia, Canada 2010-2011 Sites and Trails Emergency Call 911 Police - Fire - Medical 2 Welcome to Kitimat This information was produced to assist
Axe and Saw Permit: Safe Use of Axes
 Page 1 of 7 Objective: The objective of this workshop guide is for the Scout Leader and/or Scout youth to be able to describe and demonstrate safe use of the Axe. Axe or Hatchet: What s the difference?
TUPPER DESIGNATED ACCESS ROUTE
 TUPPER DESIGNATED ACCESS ROUTE 1 FOR ACCESS/EGRESS TO CONNAUGHT, LOOKOUT, STONE ARCH, PORTAL PATHS AND TUPPER TRAVERSE EGRESS Length: 2.6km Vertical Gain: +162m / -83m (Values are for access. For egress,
TriPyramids via Slide Trails
 AMC August 12, 2010 TriPyramids via Slide Trails 0 2999 ft 2007, Appalachian Mountain Club. All rights reserved. Notes Created by AMC White Mountain Guide Online wmgonline.org 1 Distance Time Elev Change
Photographing Upper Peninsula Waterfalls
 Photographing Upper Peninsula Waterfalls Tod Poirier Freelance Photographer Photography is one of my passions. The following spread showcases several Upper Peninsula waterfalls. At times a single drop
Typical avalanche problems
 Typical avalanche problems The European Avalanche Warning Services (EAWS) describes five typical avalanche problems or situations as they occur in avalanche terrain. The Utah Avalanche Center (UAC) has
Trekking at Peuma Hue
 Trekking at Peuma Hue Peuma Hue is a paradise for those who love hiking and trekking. A large variety of trails cross pristine forest, ancient rocks and stunning waterfalls with beautiful views over the
Charnley Explorer June 24 - July 15, 2018 Bachsten Creek and the Charnley River. Second draft: 14 November 2017
 Charnley Explorer June 24 - July 15, 2018 Bachsten Creek and the Charnley River. Second draft: 14 November 2017 The best part of the original section one is now part of out Gibb Road Gorges trip. The dates
Hike at Pico Blanco Labor Day Weekend!
 Hike at Pico Blanco Labor Day Weekend! The Pico Blanco Hymn Here among the trees majestic Pleasures you will find On the trails of Pico Blanco With your friends and mine Trail the Eagle ever onward This
Merritts Traverse. 1928m
 Merritts Traverse 3 hrs Hard track 5.8 km Circuit 4 167m This walk starts with a scenic journey to the top of the hill on the chairlift. Starting along Merritts Nature walk, this walk soon detours down
Greenbush Town Hall / Fire Station
 Page 1 of 18 Course Description Greenbush Town Hall / Fire Station Both races start in front of the Greenbush Town Hall / Fire Station, just south of Highway 23 on Sugarbush Road. Parking will be in the
Dadder Cave and Jack Evans track
 Dadder Cave and Jack Evans track 2 Days 10.3 km Circuit Very experienced only 535m This fairly short overnight walk is a great way to explore Erskine Creek. The walking along Erskine creek is mostly off
Below is an example of a well laid-out template of a route card used by the Sionnach Team which is a good format to begin with.
 Route Card A route card is used as a navigational aid to hill walkers by setting out a step by step plan for an intended hike. It is good practice to make out a route card before every hike you or your
Difficult Run Stream Valley Park
 Difficult Run Stream Valley Park The more intense mountain bikers have known about for Difficult Run for some time. Equestrians have known it longer. Eight miles of unpaved trail, the Rails to River Trail
Griffith Park Trail Run Trail Guide Click for
 The Griffith Park Trail Run by Hike- LosAngeles.com Griffith Park Trail Run Trail Guide Click for downloadable cell phone guide and map from EveryTrail. DISTANCE: 4.55 Miles ELEVATION: 1280' ELEVATION
Matthiessen State Park Dells Area Hike
 90 Easy Hikes Close to Home At the south end of the hike, you ll climb on top of a mound left over from a former coal-mining operation in the park. Not far from Goose Lake Prairie, the town of Morris hosts