Victorian Frills Appliqué
|
|
|
- Sherman Elmer Harrison
- 6 years ago
- Views:
Transcription


1 Victorian Frills Appliqué Pack Designs Note: Some designs in this collection may have been created using unique special stitches and/or techniques. To preserve design integrity when rescaling or rotating designs in your software, always rescale or rotate designs using the handles directly on-screen. NC078_48 Kitten Appliqué 3.39 X 2.77 in X mm 5,110 St. R NC079_48 Blue Butterfly Appliqué 2.88 X 2.41 in X mm 6,563 St. R NC080_48 Green Butterfly Appliqué 2.99 X 2.64 in X mm 5,512 St. R NC081_48 Flying Bird Appliqué 3.91 X 3.08 in X mm 7,708 St. R NC082_48 Pair of Birds Appliqué 4.83 X 5.33 in X mm 11,114 St. R L NC083_48 Pretty Bird Appliqué 4.64 X 5.35 in X mm 8,531 St. R L NC084_48 Tulips 1 Appliqué 4.87 X 5.02 in X mm 9,805 St. R L NC085_48 Tulips 2 Appliqué 3.48 X 4.84 in X mm 6,232 St. R NC086_48 Tea Pot Appliqué 2.73 X 2.81 in X mm 4,482 St. R NC087_48 Tea Cup Appliqué 1.77 X 2.70 in X mm 3,201 St. R NC088_48 Poodle Appliqué 4.18 X 3.87 in X mm 9,832 St. R NC089_48 Silver Filigree Accent 1.70 X 2.49 in X mm 2,130 St. R Software is licensed to the original purchaser for use at one location OESD, LLC. All rights reserved. 1


2 Victorian Frills Appliqué Pack Designs Note: Some designs in this collection may have been created using unique special stitches and/or techniques. To preserve design integrity when rescaling or rotating designs in your software, always rescale or rotate designs using the handles directly on-screen. NC090_48 Gold Filigree Accent 2.26 X 2.53 in X mm 2,610 St. R NC091_48 Filigree Border.77 X 5.59 in X mm 3,216 St. R L S NC092_48 Filigree Corner 4.37 X 4.37 in X mm 4,133 St. R NC093_48 Filigree Medallion 4.22 X 4.84 in X mm 12,392 St. R NC094_48 JUMBO Frame 5.09 X 7.13 in X mm 13,174 St. R L NC095_48 Victorian Boot Appliqué 3.34 X 3.35 in X mm 6,903 St. R NC096_48 Cameo 1 Appliqué 3.62 X 4.70 in X mm 11,126 St. NC097_48 Cameo 2 Appliqué 3.62 X 4.70 in X mm 11,012 St. NC098_48 Cameo 3 Appliqué 3.62 X 4.70 in X mm 9,355 St. R NC099_48 Lady With Parasol Jumbo Appliqué 7.81 X 9.90 in X mm 27,060 St. R L Software is licensed to the original purchaser for use at one location OESD, LLC. All rights reserved. 2
3 Victorian Frills Appliqué Pack Designs Listings below indicate color sample, stitching order and suggested thread color number in Isacord, YLI Fine Metallic, Yenmet or YLI Variegated threads. NC078_48 Kitten Appliqué n 1. Background Swirls n 2. Placement Stitch n 3. Cut Line & Tackdown n 4. Dark Brown Swirls n 5. Cover Stitch NC079_48 Blue Butterfly Appliqué n 1. Placement Stitch n 2. Cut Line & Tackdown n 3. Cover Stitch n 4. Dark Brown Swirls NC080_48 Green Butterfly Appliqué n 1. Background Swirls n 2. Wing Placement Stitch n 3. Tackdown n 4. Cover Stitch n 5. Butterfly Body & Swirls NC081_48 Flying Bird Appliqué n 1. Background Swirls n 2. Placement Stitch n 3. Cut Line & Tackdown n 4. Cover Stitch n 5. Dark Brown Swirls NC082_48 Pair of Birds Appliqué n 1. Branch Swirls n 2. Left Bird Placement Stitch n 3. Left Bird Cut Line & Tackdown n 4. Left Bird Cover Stitch n 5. Right Bird Placement Stitch n 6. Right Bird Cut Line & Tackdown n 7. Right Bird Cover Stitch n 8. Dark Brown Swirls NC083_48 Pretty Bird Appliqué n 1. Placement Stitch n 2. Cut Line & Tackdown n 3. Cover Stitch n 4. Branch Swirls n 5. Dark Brown Swirls NC084_48 Tulips 1 Appliqué n 1. Leaves & Flowers n 2. Placement Stitch n 3. Cut Line & Tackdown n 4. Cover Stitch n 5. Dark Brown Flower Shading NC085_48 Tulips 2 Appliqué n 1. Leaf & Vines n 2. Flower Placement Stitches n 3. Tackdown n 4. Cover Stitches n 5. Flower Swirls NC086_48 Tea Pot Appliqué n 1. Placement Stitch n 2. Cut Line & Tackdown n 3. Cover Stitch n 4. Dark Brown Swirls NC087_48 Tea Cup Appliqué n 1. Background Swirls n 2. Placement Stitch n 3. Cut Line & Tackdown n 4. Dark Brown Swirls n 5. Cover Stitch NC088_48 Poodle Appliqué n 1. Background Swirls n 2. Poodle Placement Stitch n 3. Tackdown n 4. Cover Stitch n 5. Poodle Swirls NC089_48 Silver Filigree Accent n 1. Single Color Design NC090_48 Gold Filigree Accent n 1. Single Color Design NC091_48 Filigree Border n 1. Single Color Design NC092_48 Filigree Corner n 1. Single Color Design NC093_48 Filigree Medallion n 1. Single Color Design NC094_48 JUMBO Frame n 1. Single Color Design NC095_48 Victorian Boot Appliqué n 1. Background Swirls n 2. Placement Stitch n 3. Cut Line & Tackdown n 4. Cover Stitch n 5. Dark Brown Swirls NC096_48 Cameo 1 Appliqué n 1. Placement Stitch n 2. Cut Line & Tackdown n 3. Dark Brown Shading n 4. Light Brown Swirls n 5. Cover Stitch NC097_48 Cameo 2 Appliqué n 1. Placement Stitch n 2. Cut Line & Tackdown n 3. Dark Brown Shading n 4. Light Brown Swirls n 5. Cover Stitch NC098_48 Cameo 3 Appliqué n 1. Placement Stitch n 2. Cut Line & Tackdown n 3. Dark Brown Shading n 4. Light Brown Swirls n 5. Cover Stitch NC099_48 Lady With Parasol Jumbo Appliqué n 1. Background Swirls n 2. Handle n 3. Figure Placement Stitch n 4. Tackdown n 5. Cover Stitch n 6. Parasol Placement Stitch n 7. Tackdown n 8. Cover Stitch n 9. Figure Swirls n 10. Parasol Swirls NOTE: Appliqué Fabric Not Included. Software is licensed to the original purchaser for use at one location OESD, LLC. All rights reserved. 3


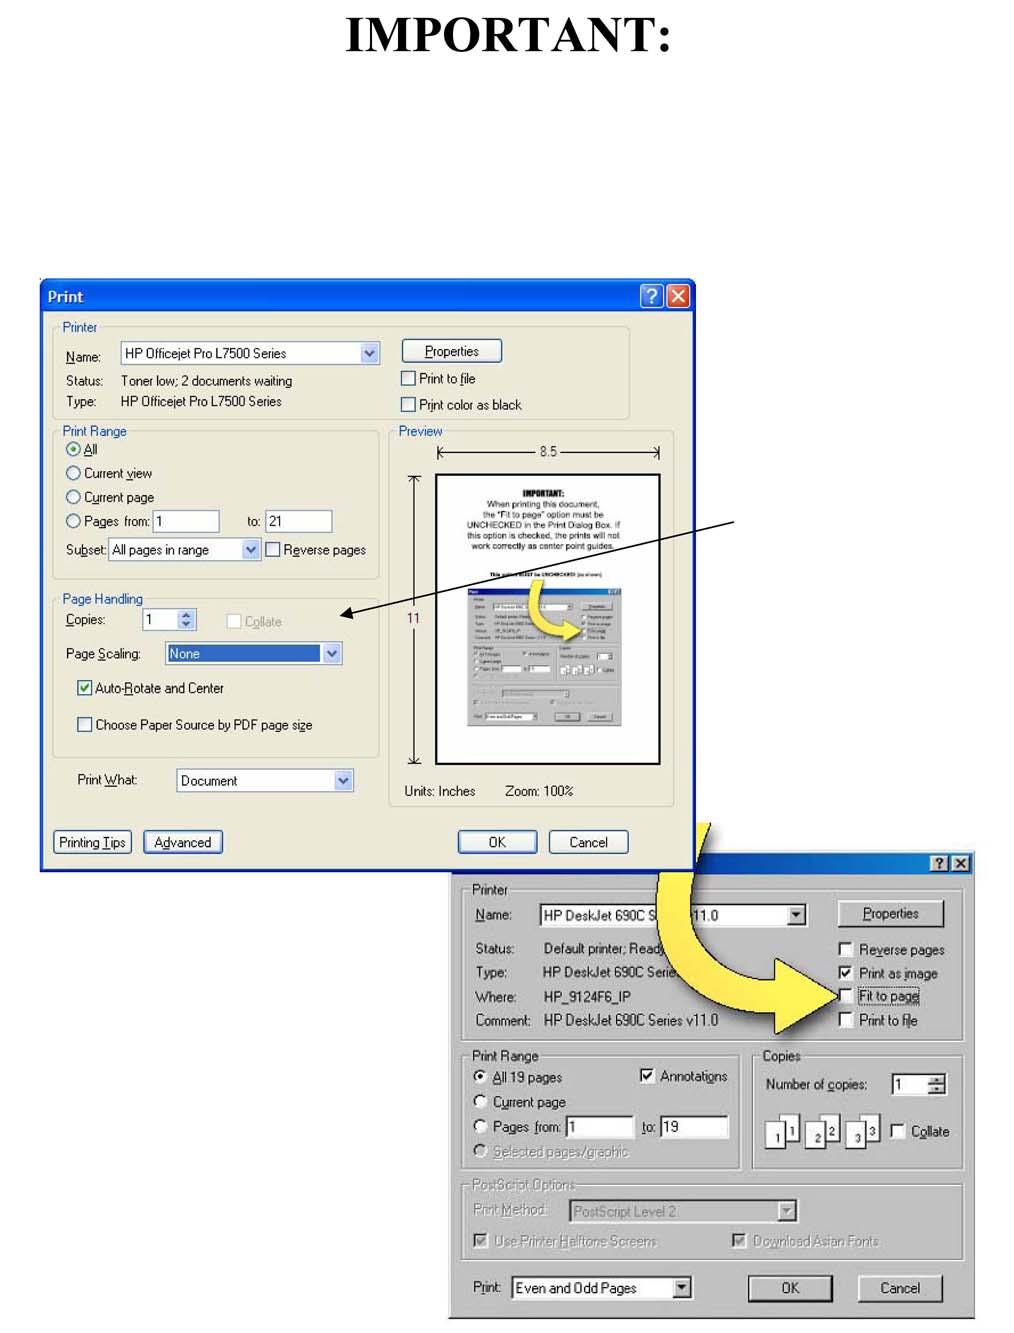
4 Appliqué Instructions 1. Print out the necessary pages from the PDF of the appliquè pattern(s). 2. Mark the right side of the pattern pieces so you ll know which direction to lay the pattern on the fabric. 3. Lightly spray the wrong side of the pattern pieces with temporary adhesive spray and allow it to set for a few minutes. 4. Place the pattern pieces on the right side of the fabric and carefuly cut them out. PHOTO 1 5. Sew the placement stitch on your hooped fabric. PHOTO 2 6. With the paper still stuck to the right side of the appliqué fabric, spray the wrong side of the fabric with temporary spray adhesive. 7. Place the fabric inside the sewing placement stitch so that it matches the stitching line then remove the paper pattern. PHOTO 3 8. Sew the tackdown. PHOTO 4 9. Sew the remainder of the design and repeat for any remaining pieces. PHOTO 5 NOTE: The patterns are sized for the designs as they were made. If you resize the design, you will need to resize the pattern the same amount. You can print out the pattern at the normal size then copy it on a copy machine at the changed size, i.e. resize the designs to 80%, resize the printed pattern to 80%. TIP: When Printing the patterns, make sure that the Fit to page option is UNCHECKED in the Print Dialog Box. If this option is checked the printed patterns will not be actual size Software is licensed to the original purchaser for use at one location OESD, LLC. All rights reserved. 4
5
6 Appliqué Patterns Software is licensed to the original purchaser for use at one location OESD, LLC. All rights reserved. 6
7 Appliqué Patterns Software is licensed to the original purchaser for use at one location OESD, LLC. All rights reserved. 7
8 Appliqué Patterns Software is licensed to the original purchaser for use at one location OESD, LLC. All rights reserved. 8
9 Appliqué Patterns Software is licensed to the original purchaser for use at one location OESD, LLC. All rights reserved. 9
10 Appliqué Patterns Software is licensed to the original purchaser for use at one location OESD, LLC. All rights reserved. 10


11 Victorian Frills Appliqué Pre-cut appliqué files for use with BERNINA NC078_48_CWA For Use With the Bernina 2.22 X 3.24 in X mm 1,704 St. NC079_48_CWA For Use With the Bernina 3.33 X 2.87 in X mm 2,173 St. NC080_48_CWA For Use With the Bernina 2.29 X 2.57 in X mm 1,371 St. NC081_48_CWA For Use With the Bernina 2.98 X 3.30 in X mm 1,872 St. NC082_48_CWA01 For Use With the Bernina 2.73 X 2.13 in X mm 1,241 St. NC082_48_CWA02 For Use With the Bernina 2.27 X 2.64 in X mm 1,425 St. NC083_48_CWA For Use With the Bernina 2.50 X 2.76 in X mm 1,418 St. NC084_48_CWA01 For Use With the Bernina 1.80 X 1.78 in X mm 996 St. NC084_48_CWA02 For Use With the Bernina 2.02 X 2.02 in X mm 995 St. NC085_48_CWA01 For Use With the Bernina 1.89 X 1.76 in X mm 1,034 St. NC085_48_CWA02 For Use With the Bernina 1.75 X 1.89 in X mm 1,030 St. NC086_48_CWA For Use With the Bernina 3.24 X 2.91 in X mm 2,308 St. Software is licensed to the original purchaser for use at one location OESD, LLC. All rights reserved. 11

12 Victorian Frills Appliqué Pre-cut appliqué files for use with BERNINA NC087_48_CWA For Use With the Bernina 2.23 X 1.73 in X mm 1,137 St. NC088_48_CWA For Use With the Bernina 3.80 X 4.13 in X mm 3,381 St. NC095_48_CWA For Use With the Bernina 2.39 X 3.46 in X mm 2,001 St. NC096_48_CWA For Use With the Bernina 4.09 X 5.16 in X mm 2,676 St. L NC097_48_CWA For Use With the Bernina 4.09 X 5.16 in X mm 2,676 St. L NC098_48_CWA For Use With the Bernina 4.09 X 5.16 in X mm 2,676 St. L NC099_48_CWA01 For Use With the Bernina 3.58 X 3.19 in X mm 2,061 St. NC099_48_CWA02 For Use With the Bernina 5.89 X 9.17 in X mm 6,045 St. L Software is licensed to the original purchaser for use at one location OESD, LLC. All rights reserved. 12
13 Victorian Frills Appliqué Pre-cut appliqué files for use with BERNINA NOTE: Placement Stitch and Basting Stitch should match your background fabric. NC078_48_CWA For Use With the Bernina n 3. Bernina Cut 1... Cut 1 n 4. Bernina Cut 2... Cut 2 n 5. Bernina Cut 3... Cut 3 n 6. Bernina Cut 4... Cut 4 NC079_48_CWA For Use With the Bernina n 3. Bernina Cut 1... Cut 1 n 4. Bernina Cut 2... Cut 2 n 5. Bernina Cut 3... Cut 3 n 6. Bernina Cut 4... Cut 4 NC080_48_CWA For Use With the Bernina n 3. Bernina Cut 1... Cut 1 n 4. Bernina Cut 2... Cut 2 n 5. Bernina Cut 3... Cut 3 n 6. Bernina Cut 4... Cut 4 NC081_48_CWA For Use With the Bernina n 3. Bernina Cut 1... Cut 1 n 4. Bernina Cut 2... Cut 2 n 5. Bernina Cut 3... Cut 3 n 6. Bernina Cut 4... Cut 4 NC082_48_CWA01 For Use With the Bernina n 3. Bernina Cut 1... Cut 1 n 4. Bernina Cut 2... Cut 2 n 5. Bernina Cut3... Cut 3 n 6. Bernina Cut 4... Cut 4 NC082_48_CWA02 For Use With the Bernina n 3. Bernina Cut 1... Cut 1 n 4. Bernina Cut 2... Cut 2 n 5. Bernina Cut 3... Cut 3 n 6. Bernina Cut 4... Cut 4 NC083_48_CWA For Use With the Bernina n 3. Bernina Cut 1... Cut 1 n 4. Bernina Cut 2... Cut 2 n 5. Bernina Cut 3... Cut 3 n 6. Bernina Cut 4... Cut 4 NC084_48_CWA01 For Use With the Bernina n 3. Bernina Cut 1... Cut 1 n 4. Bernina Cut 2... Cut 2 n 5. Bernina Cut 3... Cut 3 n 6. Bernina Cut 4... Cut 4 NC084_48_CWA02 For Use With the Bernina n 3. Bernina Cut 1... Cut 1 n 4. Bernina Cut 2... Cut 2 n 5. Bernina Cut 3... Cut 3 n 6. Bernina Cut 4... Cut 4 NC085_48_CWA01 For Use With the Bernina n 3. Bernina Cut 1... Cut 1 n 4. Bernina Cut 2... Cut 2 n 5. Bernina Cut 3... Cut 3 n 6. Bernina Cut 4... Cut 4 NC085_48_CWA02 For Use With the Bernina n 3. Bernina Cut 1... Cut 1 n 4. Bernina Cut 2... Cut 2 n 5. Bernina Cut 3... Cut 3 n 6. Bernina Cut 4... Cut 4 NC086_48_CWA For Use With the Bernina n 3. Bernina Cut 1... Cut 1 n 4. Bernina Cut 2... Cut 2 n 5. Bernina Cut 3... Cut 3 n 6. Bernina Cut 4... Cut 4 NC087_48_CWA For Use With the Bernina n 3. Bernina Cut 1... Cut 1 n 4. Bernina Cut 2... Cut 2 n 5. Bernina Cut 3... Cut 3 n 6. Bernina Cut 4... Cut 4 NC088_48_CWA For Use With the Bernina n 3. Bernina Cut 1... Cut 1 n 4. Bernina Cut 2... Cut 2 n 5. Bernina Cut 3... Cut 3 n 6. Bernina Cut 4... Cut 4 NC095_48_CWA For Use With the Bernina n 3. Bernina Cut 1... Cut 1 n 4. Bernina Cut 2... Cut 2 n 5. Bernina Cut 3... Cut 3 n 6. Bernina Cut 4... Cut 4 NC096_48_CWA For Use With the Bernina n 3. Bernina Cut 1... Cut 1 n 4. Bernina Cut 2... Cut 2 n 5. Bernina Cut 3... Cut 3 n 6. Bernina Cut 4... Cut 4 NC097_48_CWA For Use With the Bernina n 3. Bernina Cut 1... Cut 1 n 4. Bernina Cut 2... Cut 2 n 5. Bernina Cut 3... Cut 3 n 6. Bernina Cut 4... Cut 4 NC098_48_CWA For Use With the Bernina n 3. Bernina Cut 1... Cut 1 n 4. Bernina Cut 2... Cut 2 n 5. Bernina Cut 3... Cut 3 n 6. Bernina Cut 4... Cut 4 NC099_48_CWA01 For Use With the Bernina n 3. Bernina Cut 1... Cut 1 n 4. Bernina Cut 2... Cut 2 n 5. Bernina Cut 3... Cut 3 n 6. Bernina Cut 4... Cut 4 NC099_48_CWA02 For Use With the Bernina n 3. Bernina Cut 1... Cut 1 n 4. Bernina Cut 2... Cut 2 n 5. Bernina Cut 3... Cut 3 n 6. Bernina Cut 4... Cut 4 Software is licensed to the original purchaser for use at one location OESD, LLC. All rights reserved. 13

14 Making Precut Appliqué Using BERNINA Cutwork Accessory SUPPLIES Cut-Away Stabilizer Temporary Spray Adhesive Appliqué Fuse & Fix Stabilizer Embroidery Thread Stabilizer that is appropriate for your project BERNINA PREPARE APPLIQUE FABRIC Starch appliqué fabric 2-3 times following manufacturer s instructions. Appliqué fabric should be crisp. Iron Appliqué Fuse & Fix to the wrong side of the starched appliqué fabric following instructions on product packaging. CUT APPLIQUÉ PIECES 1. Hoop one layer of Cut-Away Stabilizer. 2. Send first CWA file to the embroidery machine. (CWA files are the pre-cut appliqué files to use with the ; these files will end in CWA01, CWA02, and CWA03 etc. The number of CWA files available for each design will depend upon how many separate appliqués each design contains.) 3. Stitch the first color, this will be the placement stitch. 4. Remove the hoop from the machine but do not remove the stabilizer from the hoop. Spray the hooped stabilizer with temporary spray adhesive. Lay prepared appliqué fabric over the placement stitch, being sure to completely cover the stitching. Apply pressure to appliqué fabric to ensure it is adhered. 5. Stitch the second color, this will be the basting stitch. It is meant to baste the appliqué fabric to your hooped stabilizer. 6. Replace normal stitch plate with the CutWork stitch plate. 7. Unthread the machine. 8. If necessary, turn off the upper thread control on your machine. Refer to your machine s user manual. Note that the most recent version of the 830 will perform this task automatically. 9. Replace embroidery needle with the. 10. Replace embroidery foot with foot #44 (If you do not have foot #44 you can leave foot #15 on the machine; foot #44 will simply keep the cut fabric from flagging as much). PHOTO Attach the hoop to the machine. 12. To cut the first appliqué piece follow the thread changes on your machine screen and turn the dial on the CutWork tool as required. 13. Remove the hoop from the machine. 14. Gently remove cut appliqué piece, trimming any thread that may have not been cut completely. PHOTO Repeat as needed for designs with multiple appliqué pieces TACkdOwn APPLIQUÉ And COmPLETE EmBROIdERy design Replace the embroidery needle and rethread the machine. Replace the embroidery foot #15. Spray hoop sized piece of stabilizer that is appropriate for your project and adhere to wrong side of background fabric or project that is to be hooped. Hoop fabric/project and stabilizer. Attach hoop to machine. Send the embroidery file to the machine (this is not a CWA file). Stitch design as normal following the thread changes on the provided thread chart stopping after each Appliqué Placement Stitch. Software is licensed to the original purchaser for use at one location OESD, LLC. All rights reserved. 14


15 Making Precut Appliqué Using BERNINA Cutwork Accessory After stitching an Appliqué Placement Stitch, take the precut appliqué pieces required and peel off the cutaway backing and the release paper revealing a sticky backing. PHOTO 2 Remove hoop from machine, but do not remove the fabric from the hoop. Adhere precut appliqué piece evenly over the Appliqué Placement Stitch; use pressure to make sure pieces stick well. PHOTO 3 Reattach hoop to machine. Continue stitching design until all appliqué pieces are placed and all stitching is complete. PHOTO 4 PHOTO 2 note: design pictured is for instructional purposes and may not be included in this collection. PHOTO 3 PHOTO 4 Software is licensed to the original purchaser for use at one location OESD, LLC. All rights reserved. 15
Lace Ornaments. Pack Files
 Pack 61071 20 Files Note: Some designs in this collection may have been created using unique special stitches and/or techniques. To preserve design integrity when rescaling or rotating designs in your
0% Interest for 60 months
 Newsletter & Class Schedule - March and April 2019 Special Limited Time Financing Offer 0% Interest for 60 months on $3,000 and up See store for details. INTRODUCING THE NEW BERNINA L460 OVERLOCKER BERNINA
Written By: Brittany McCrigler
 Installing a Zipper in a Patagonia Fleece Jacket Replace the zipper in your fleece jacket. Written By: Brittany McCrigler ifixit CC BY-NC-SA www.ifixit.com Page 1 of 19 INTRODUCTION [video: https://vimeo.com/48376830]
Zippers, Zippers, and More Zippers with Donna Cash
 Zippers, Zippers, and More Zippers with Donna Cash Let s talk about closure, closure with zippers! In this class you will learn all about the different types of zippers and how to insert these in a variety
Bernette 234 Serger Repair Manual READ ONLINE
 Bernette 234 Serger Repair Manual READ ONLINE Epinions.com: Read expert reviews on bernette - Upper Looper - Juki/Bernette Serger Machines Part #A2512-234 Fits the following Models Fits the Following Juki
The Hot Mess Casserole Carrier Skill Level: Intermediate
 The Hot Mess Casserole Carrier Skill Level: Intermediate Designed By Sara Lawson Sewn By Sara Lawson www.sewsweetness.com This casserole carrier is the perfect companion to your on-the-go meal. It conveniently
INSTALLATION INSTRUCTIONS for automatic awnings
 Custom made Awnings and Blinds Item No 0756 INSTALLATION INSTRUCTIONS for automatic awnings AUTOMATIC AWNING IMPORTANT INFORMATION BEFORE INSTALLING YOUR AUTOMATIC AWNING Updated 08/09/15 AN AWNING INSTALLATION
Wave Curtain Workroom Guide
 Wave Curtain Workroom Guide Introduction to Wave Wave is a neat and stylish curtain heading system by Silent Gliss. It is created through combining a specially designed heading tape and Wave glider-cord
Butler Personnel Parachute Systems, LLC
 Butler Personnel Parachute Systems, LLC 1820 Loudon Avenue NW PO Box 6098 Roanoke, VA 24017-0098 (540) 342-2501 (540) 342-4037 (FAX) Info@butlerparachutes.com Butler Personnel Parachute Systems Back Pack
Tablet Case Tutorial sewinharmony.wordpress.com
 Experience Level This is recommended for someone who is an advanced beginner sewer. You will be sewing mostly straight lines, but will be sewing through many layers of fabric and working with very precise
FEATURES & BENEFITS OF THE TOW PRO LITE :
 To Protect & Preserve PRODUCT MANUAL & FITTING GUIDE tow pro lite TYPE: SEMI - FIT EACH TOW PRO LITE COMES WITH THE FOLLOWING : 16 side securing straps & buckles (8 either side) 1 HITCH STRAP & buckles
Golf Simulator Impact Screen and Enclosure Kit Assembly Instructions & User Manual
 Golf Impact Screen Care & Use If you feel that your screen is stretched too tight or too loose, adjust the size of your frame by moving the tubes of the frame in or out of the fittings. Keep enough space
Operation and Maintenance Instructions for the TrimMaster Clipper
 Operation and Maintenance Instructions for the TrimMaster Clipper Safety Alert: Read the following instructions completely before operating the clipper. The clipper is designed for indoor use only, and
INSTALLATION INSTRUCTIONS for vertical awnings
 Custom made Awnings and Blinds Item No 0759 INSTALLATION INSTRUCTIONS for vertical awnings IMPORTANT INFORMATION BEFORE INSTALLING YOUR Updated 08/09/15 AN AWNING INSTALLATION IS A HOME IMPROVEMENT PROJECT
User s Manual Trampoline 8
 User s Manual Trampoline 8 Model! WARNING Read all precautions and instructions in this manual before using this equipment. Save this manual for future reference. Maximum user weight 17 lbs. ASSEMBLY IMPORTANT
OVERVIEW PEUTEREY PEUTEREY 40 / PEUTEREY 30
 BACKPACK MANUAL OVERVIEW PEUTEREY PEUTEREY 40 / PEUTEREY 30 Congratulations on your purchase of a SALEWA Pack. We want to be sure that you understand and utilize your new SALEWA pack in the best way. Following
Apple Watch Screen Replacement
 Apple Watch Screen Replacement Replace the screen (OLED display + digitizer) on your Apple Watch. Written By: Andrew Optimus Goldberg ifixit CC BY-NC-SA www.ifixit.com Page 1 of 17 INTRODUCTION Cracked
special order Step 1: Body, upper back insert Step 2: Front neck insert Step 3: Upper neck Step 4: Lower neck, side panels Step 2: Side inserts 4
 WOMEN S SEMI-RACERBACK JERSEY BACK VIEW WOMEN S PERFORMANCE GAME SHORT Step : Body, upper back insert Royal Step : Body Royal Step : Front neck insert Step : Upper neck Step : Lower neck, side panels Step
BOAT COVER USER GUIDE BOAT ACCESSORIES
 BOAT COVER USER GUIDE BOAT ACCESSORIES Boat Cover Warranty Details The product is guaranteed to be free from defects in workmanship and parts for a period of 36 months from the date of purchase. Defects
VILLAGE OF WINNETKA, ILLINOIS DEPARTMENT OF COMMUNITY DEVELOPMENT
 AWN VILLAGE OF WINNETKA, ILLINOIS DEPARTMENT OF COMMUNITY DEVELOPMENT AWNING PERMIT APPLICATION Important note regarding Awning Code changes Effective March 4, 2003, awning regulations were modified to
PIONEER LITE PATIO AWNING OWNER'S MANUAL
 A Manual Crank Operated Awning RV OWNER'S MANUAL TABLE OF CONTENTS Introduction... 2 Operating the Awning... 3 To Open the Awning:... 3 Adjusting the Pitch... 4 Rain Release Setting... 4 Setting the Arms
ECLIPSE USER MANUAL AMXMAN REV 2. AUTOMETRIX, INC. PH: FX:
 ECLIPSE USER MANUAL AMXMAN-12-02 REV 2 AUTOMETRIX, INC. www.autometrix.com service@autometrix.com PH: 530-477-5065 FX: 530-477-5067 1: Concepts Awning Terminology All awnings have essential framing members:
ipad mini 4 Wi-Fi Volume Control Buttons Replacement
 ipad mini 4 Wi-Fi Volume Control Buttons Replacement Replace the volume control buttons in an ipad mini 4 Wi-Fi. Written By: Evan Noronha ifixit CC BY-NC-SA www.ifixit.com Page 1 of 21 INTRODUCTION Use
ipad mini 4 LTE Home Button Assembly Replacement
 ipad mini 4 LTE Home Button Assembly Replacement Replace the home button assembly in an ipad mini 4 LTE. Written By: Evan Noronha ifixit CC BY-NC-SA www.ifixit.com Page 1 of 25 INTRODUCTION Follow the
DIY Suspension Trainer - Take Your Gym Anywhere - Inspired by Monkii Bars 2
 instructables DIY Suspension Trainer - Take Your Gym Anywhere - Inspired by Monkii Bars 2 by Jake_Of_All_Trades Body weight training, also known as calisthenics, is a tremendous way to improve your flexibility,
Table of Contents. Introduction to the AquaTrak AquaTrak Parts List Tank Frame Assembly Pulley System Assembly...
 56679 V0309 Table of Contents Introduction to the AquaTrak................................................... 2 AquaTrak Parts List... 3 Tank Frame Assembly... 4 Pulley System Assembly... 6 AquaTrak Maintenance...10
All support information for BERNINA sewing, embroidery and quilting machines as well as software at a glance.
 Bernina 800 Manual All support information for BERNINA sewing, embroidery and quilting machines as well as software at a glance. Bernina 800DL Serger Machine. In just one pass, you can cut, sew and finish
OVERVIEW GUIDE GUIDE 45 / GUIDE 35
 BACKPACK MANUAL OVERVIEW GUIDE GUIDE 45 / GUIDE 35 Congratulations on your purchase of a SALEWA Pack. We want to be sure that you understand and utilize your new SALEWA pack in the best way. Following
A Statistical Method for Eliminating False Counts Due to Debris, Using Automated Visual Inspection for Probe Marks
 A Statistical Method for Eliminating False Counts Due to Debris, Using Automated Visual Inspection for Probe Marks SWTW 2003 Max Guest & Mike Clay August Technology, Plano, TX Probe Debris & Challenges
Insert Chapter/Page No.
 HARTZELL PROPELLER INC. One Propeller Place Piqua, Ohio 45356-2634 U.S.A. Telephone: 937.778.4200 Fax: 937.778.4215 MANUAL REVISION TRANSMITTAL MANUAL (61-13-70) Composite Propeller Blade Field Maintenance
APRIL - JUNE NEWSLETTER YEAR
 302 W. Main Street, Montrose, CO 81401 Phone 970-249-1600 Email: ladybugz@qwestoffice.net APRIL - JUNE NEWSLETTER YEAR 2014 --- not to hot and not too cold a little windy sometimes but it s the time of
Operating Instructions
 A) ORIENTATION View capsule filling video online at www.profiller.com Cam Lever 1. Place Caps Tray onto Filler with Position I and II markings in front. Check that Cam Lever is set to 3 o clock. 2. Pour
OWNER'S MANUAL CAMPOUT TABLE OF CONTENTS
 OWNER'S MANUAL CAMPOUT RV Before operating the awning, carefully review the Owner's Manual. The manual contains important safety information, detailed operating instructions, common maintenance procedures
Mystery Ranch System Fitting Directions
 Mystery Ranch System Fitting Directions Bigfoot 5200, Yeti 4300 & Roswell 2300 Multiple packbags mate with the same custom-fit suspension. Wrapframe Two adjustable torso lengths: Short Torso fits torsos
14' x 32' x 12' Round Top Round Style Shelter Assembly Instructions
 14' x 32' x 12' Round Top Round Style Shelter Assembly Instructions Description Model # 14' x 32' x 12' RoundTop Garage - Gray 62669 Recommended Tools Please read instructions COMPLETELY before assembly.
Backpack Care Pack Carefully Carry a Small Repair Kit Animal Damage Clean Your Pack Properly
 Backpack Care The old adage, "Take care of your equipment and it will take care of you" is an important truth to live by for campers, hikers and backpackers, and one that is very true when it comes to
Features. Le Petit Mon Ami YOUR NATIONAL DISTRIBUTOR. YOUR FAVORITE BRANDS.
 Le Petit Mon Ami The Out and About bag collection is a smaller lighter version of the Getaway collection. The design incorporates all of the amenities of its larger counterpart, the Mon Ami Kennel. It
Safety Tips. Welcome. Contents. Care & Maintenance
 Safety Tips Welcome At Oz Trampolines, we are passionate about your family s safety when using our trampolines and accessories. We have put together a list of safety tips and advice which will help ensure
Flexible Pavement Design
 Flexible Pavement Design FAARFIELD 1.3 Workshop Starting Screen No Job Files Created Click on New Job Presented to: VI ALACPA Airport Pavements Seminar & IV FAA Workshop By: David R. Brill, P.E., Ph.D.
INSTINCT ALASKAN TENTS
 INSTINCT ALASKAN TENTS GEAR GUIDE CABELA S SET NUMBER: 58-2656, 58-1600, 58-2658 PLEASE READ THIS MANUAL IN ITS ENTIRETY PRIOR TO USING THIS PRODUCT. VISIT WWW.CABELAS.COM OR CALL 1-800-237-4444 FOR ASSISTANCE.
ultimate traffic Live User Guide
 ultimate traffic Live User Guide Welcome to ultimate traffic Live This manual has been prepared to aid you in learning about utlive. ultimate traffic Live is an AI traffic generation and management program
Termination Procedure LC 1.6mm & 2.0mm Connectors: 1060XX Series
 Connector Piece Parts LC Simplex Connector Boot LC Duplex Connector LC Connector CriMp Tulolng LC Duplex Clip Boot 86001-0110, Rev. B USN30MFO/5/2010 Procedure Chart Procedure Tool Required Tool Part Number
OWNER'S MANUAL AWNING EXTEND R TABLE OF CONTENTS
 OWNER'S MANUAL AWNING EXTEND R RV Before operating the awning, carefully review the Owner's Manual. The manual contains important safety information, detailed operating instructions, common maintenance
Bernina cps software updates. Bernina cps software updates.zip
 Bernina cps software updates Bernina cps software updates.zip condition. The box and USB dongle are labeled as "Update", however, this bernette Embroidery Software Customizer. With the bernette embroidery
July like us on FACEBOOK FOLLOW us on PURCHASE YOUR DREAM HOME Page 1 SAVE THE DATE MORTGAGE FAIR page 2
 like us on FACEBOOK FOLLOW us on INSTAGRAM @TheVillagesAtCoverley July 2018 PURCHASE YOUR DREAM HOME Page 1 SAVE THE DATE MORTGAGE FAIR page 2 news & updates in the villages page 3 diy hammock chair page
PEUTEREY 40 PEUTEREY 30
 OVERVIEW Congratulations on your purchase of a SALEWA Pack. We want to besure that you understand and utilize your new SALEWA pack in the best way. Following you will find a description of all functions
NM-11 INSTRUCTION MANUAL WARNING!! TO REDUCE THE RISK OF INJURY, USER MUST READ AND UNDERSTAND THIS INSTRUCTION MANUAL. ORIGINAL INSTRUCTIONS
 NM-11 INSTRUCTION MANUAL WARNING!! TO REDUCE THE RISK OF INJURY, USER MUST READ AND UNDERSTAND THIS INSTRUCTION MANUAL. ORIGINAL INSTRUCTIONS Date of purchase:... NM-11 manual.en 05/2017 - SSM Produkt
NEW. Long Sleeve Volleyball Jersey. 3V672L1-72 Cloth $ V6VTL1 - VT Cloth $94.00 Sizes: XS -XXL Oversize: 3XL
 SPECIAL ORDER NEW Long Sleeve Volleyball Jersey V67L - 7 Cloth $94.00 V6VTL - VT Cloth $94.00 Sizes: XS -XXL Oversize: XL Tight fit construction Y neck design with piping Upper yoke insert Yoke and side
LV/119 Cummberbund CONTENTS WARNING INTRODUCTION ASSEMBLY ABOUT US USER S GUIDE
 LV/119 Cummberbund USER S GUIDE CONTENTS 01. 02. 03. 09. WARNING INTRODUCTION ASSEMBLY ABOUT US WARNING! This manual and its contents should be carefully reviewed by all persons who have the responsibility
Operating Instructions
 Operating Instructions OVERVIEW Read the Before You Begin section on page 11 of the ProFiller 3700/3800 Manual v 1.2.1 before using this machine. A. ORIENTATION OF OUTER CAPSULES Orient the capsules as
RIDGE 380 SWAG INSTRUCTION MANUAL. Part No companionleisure.com.au
 RIDGE 380 SWAG INSTRUCTION MANUAL Part No. 777090 IMPORTANT Read these instructions for use carefully. Familiarise yourself with the product before use. Keep these instructions for future reference. PARTS
Assembling & Fitting Instruction August 2015
 Assembling & Fitting Instruction August 2015 Wave Curtain Heading System Silent Gliss 6010, 6020, 6100, 6103, 6290, 6380, 6465 Silent Gliss 3840, 6120 Silent Gliss 5090, 5200, 5400 Silent Gliss 5100, 5600
Pattern: a christmas bunny suit. Archive: Quartz December Sweet Dreams Quilt Studio
 Pattern: a christmas bunny suit Pattern: a christmas story lamp Pattern: a christmas story pano 001 Pattern: a christmas story shotgun Pattern: bacon pano 001 Pattern: basket needle case in-out Pattern:
Deep Cleaning a Passap is a three step process: Tear down, Clean, and Reassemble.
 kni!sings Deep Clean A Passap Duomatic Deep Cleaning a Passap is a three step process: Tear down, Clean, and Reassemble. I won t mislead you. Your nerves will be on edge while you take apart your precious
All of these configurations are from one 2005 Blue Ultralite Trayman. Just slide the straps up and over your shoulders and they will slip into place.
 All of these configurations are from one 2005 Blue Ultralite Trayman. Just slide the straps up and over your shoulders and they will slip into place. The back edge of the Shoulder Strap has a slight bend
By Ray Grissom. Builder s Guide
 By Ray Grissom Builder s Guide Contents Preface...2 Grade Level Appropriateness...2 Using This Guide...3 Safety Information...4 Parts Identification...5-8 Student Parts Assemblies...9 Remote Control Setup...
SOLHARO ASSEMBLY & INSTALLATION INSTRUCT IONS
 A. Introduction: SOLHARO ASSEMBLY & INSTALLATION INSTRUCT IONS Rev. 01/30/2012 The Solharo is an external, retractable, tensioned sun shading system designed to fit over a sunroom or wood pergola. The
LODGE 460 CABIN. Part No ASSEMBLY & CARE INSTRUCTIONS
 LODGE 460 CABIN Part No. 920645 ASSEMBLY & CARE INSTRUCTIONS SPECIFICATIONS PRE USE Size: 460L x 360W x 240H cm Material: Heavy duty polycotton blend Walls: 250g/m2 Roof: 340g/m2 Windows: 6 Side & Rear
Version 9: Guide to the Big Changes
 Version 9: Guide to the Big Changes This document describes some of the big changes introduced with our Version 9 release. It s designed specifically for customers that are familiar with our earlier versions,
Assembly instructions for Eurotramp trampolines Series: Ultimate, Grand Master Exclusiv, Grand Master, Master
 Assembly instructions for Eurotramp trampolines Series: Ultimate, Grand Master Exclusiv, Grand Master, Master 1. Assembly instructions 2. Attaching the plastic coated steel cables on the Ultimate frame
Film-Tech. The information contained in this Adobe Acrobat pdf file is provided at your own risk and good judgment.
 Film-Tech The information contained in this Adobe Acrobat pdf file is provided at your own risk and good judgment. These manuals are designed to facilitate the exchange of information related to cinema
Wednesday, August 2, :00 PM Commission Chambers 100 N 5 th Street Leavenworth, Kansas AGENDA
 Leavenworth Preservation Commission Wednesday, August 2, 2017 5:00 PM Commission Chambers 100 N 5 th Street Leavenworth, Kansas 1. Call to order, determine a quorum AGENDA 2. Approval of Minutes: June
ABS Model Background Stand
 ABS Model Background Stand Product Overview: The completely redesigned Ravelli ABS model background stand is 10' tall by 12.3' wide. It is comprised of two tripod stands and four 3 cross bar sections and
Contents. Awnings USA - Full Protective Hood Manual Instructions ft 11" - 11ft 6" Awnings
 Awnings USA - Full Protective Hood Manual Instructions Contents Warning We recommend that two or more people are required to lift the awning into place. 4ft 11" - 11ft 6" Awnings 8 x Expansion bolts **
S-Series Hotel App User Guide
 S-Series Hotel App User Guide Version 1.2 Date: April 10, 2017 Yeastar Information Technology Co. Ltd. 1 Contents Introduction... 3 About This Guide... 3 Installing and Activating Hotel App... 4 Installing
How to make an inflatable cube
 How to make an inflatable cube Beta instruction manual produced by Tools for Action. First Edition November 2015. Paris. Second Edition March 2016. Materials & Tools Mylar insulation foil (we use Parotec
OVERVIEW LITE TRAIN LITE TRAIN 14 BP
 BACKPACK MANUAL OVERVIEW LITE TRAIN LITE TRAIN 14 BP Congratulations on your purchase of a SALEWA Pack. We want to be sure that you understand and utilize your new SALEWA pack in the best way. Following
You will most likely need to trim off the top of the zipper. Between the end of the zipper and the side of your purse -Make sure you leave the width
 Zippers I was asked to show how I use zippers in purses. I started out making purses with zippers 30 yrs ago. Back then Velcro hadn t been heard of yet. I prefer zippers sometimes because they can be sturdier
KNIFE SHARPENING TECHNIQUE
 SharpX A Information on Sharpening Technique Including Sharpening Instructions Sharpening is one of mans oldest skills and has laid the foundation for the development and survival of mankind. From the
LASER PRINTABLE LABELS. Laser Labels Printable Materials Chart Circuit Board and Component Idenfication Wire and Cable Marking...
 LASER PRINTABLE LABELS Laser Labels Printable Materials Chart...... 98 Circuit Board and Component Idenfication..................... 99 101 Wire and Cable Marking................ 102 Data Communications
Written By: Sam Lionheart
 ipad Air Wi-Fi LCD Replacement Use this guide to replace the LCD screen in your ipad Air. Written By: Sam Lionheart ifixit CC BY-NC-SA www.ifixit.com Page 1 of 27 INTRODUCTION Replace a damaged or nonfunctioning
PEAK 1 GENERAL INFORMATION 1.1 THE CONCEPT 1.2 SAFETY 1.3 THE SPEED SYSTEM 2 THE EMERGENCY PARACHUTE 2.1 EMERGENCY PARACHUTE ASSEMBLY
 PEAK 1 GENERAL INFORMATION 1.1 THE CONCEPT 1.2 SAFETY 1.3 THE SPEED SYSTEM 2 THE EMERGENCY PARACHUTE 2.1 EMERGENCY PARACHUTE ASSEMBLY 3 ADJUSTING YOUR PEAK 3.1 ADJUSTING THE SITTING POSITION 3.2 ADJUSTING
Twin-Hinge System Designed to prevent hinge tearing due to excessive open and close for lasting durability and long life.
 Molded Ring Binders 1 Molded Ring Binders 5 Colors to Choose From: Med (CB) Seafoam Green (SF) 1 Molded Binders - 5-year guarantee Holds 250 sheets Patented twin hinge design Top & Side Open models / 3
General Canopy Folding and Packing Instructions for H-X Series Personnel Parachute Canopies. Manufactured by Butler Parachute Systems, Inc.
 General Canopy Folding and Packing Instructions for H-X Series Personnel Parachute Canopies Manufactured by Butler Parachute Systems, Inc. Issued 24 July 1998 This set of instructions is for the routine
Carbon Lite Volleyball system ( Either in packages or components ordered separately )
") Instruction Manual VB7222 Carbon Lite Volleyball system ( Either in packages or components ordered separately ) Customer Service (800) 247-7668 P A R T S L I S T Item Qty Description Item Qty Description
Instruction Manual VB7222 Carbon Lite Volleyball system ( Either in packages or components ordered separately ) Customer Service (800) 247-7668 P A R T S L I S T Item Qty Description Item Qty Description
SELF-FEEDING FIRE. Overview. What you will need JAMIE & JIMMY S FRIDAY NIGHT FEAST SERIES 6
 SELF-FEEDING FIRE JAMIE & JIMMY S FRIDAY NIGHT FEAST SERIES 6 Overview An ingenious self-sufficient design not only keeps campers warm and cosy at night, but it s the perfect low maintenance solution to
K SIGNAGE & TRAFFIC CONTROL. Table of Contents
 Table of Contents K1. ACCOMMODATION OF TRAFFIC... 1 K2. MINIMUM CONSTRUCTION SIGNING... 1 K3. SUBDIVISION SIGNS... 2 K4. TRAFFIC CONTROL DEVICES... 2 K4.1 Traffic Signs Regulations... 2 K4.2 Materials...
Please read this guide carefully. It tells you how to prepare your cutting plotter for production use in a few easy steps.
 OPERATING GUIDE for Secabo C30 and C40 cutting plotters Congratulations on purchasing your Secabo cutting plotter! Please read this guide carefully. It tells you how to prepare your cutting plotter for
Grid Iron Silver. Light Old Gold Light Orange Maroon Navy. Giants Cream. Kelly. Gold. Grid Iron Silver. Light Old Gold Light Orange Maroon Navy
 Color and Fabric Guide Fabric # Aqua Baseball Grey Black Blazer Gold Burnt Orange Cardinal Columbia Blue Dark Green Diamond Pink Giants Cream Gold Grid Iron Silver Kelly Light Old Gold Light Orange Maroon
Cassette-folding arm-awning markilux 990
 Cassette-folding arm-awning markilux 990 Mounting instructions 1. Overview 1 Projection profile 2 Folding arm 3 Fabric 4 Console 5 Cassette 6 Covering cap 7 Wall bracket 2. Mounting brackets 2.1 Overview
7000 SERIES-KAI 7205 STAINLESS STEEL TAILORING SHEARS 8 INCHES 7230 STAINLESS STEEL TAILORING SHEARS 9 INCHES
 PAGE 1 CONTENTS 1 7000 SERIES - KAI 3-4 2 V5000 SERIES - KAI 5 3 N5000 SERIES - KAI 6-8 4 TAILORING SCISSORS - DRAGONFLY 9-10 5 TAILORING SCISSORS - CEO 11 6 SOFTY CUT - COSMO 12 7 HIGH QUALITY TAILORING
3 Reclosable Fasteners
 3 Reclosable Fasteners Hook and Loop 274 Dual Lock 276 Traditional reclosable fasteners such as zippers, screws, bolts, snaps, hooks or latches get the job done, but if you want more choice for your product
ASSEMBLY INSTRUCTIONS
 ASSEMBLY INSTRUCTIONS NT-MG1158 58" Glass and Metal TV Stand Safety information and specifications...2 Tools needed...3 Parts...3 Hardware...4 Assembly instructions...5 Safety information and specifications
Timeless Collection Awnings
 Protection against the elements Timeless Collection Awnings To protect your awning from external elements, always retract your awning in rain, storm or windy situations. Failure to do this may damage the
Installation Guide: Round Trampoline
 Trampolines & trampoline parts designed to survive in the harsh Oz climate. www.oztrampolines.com.au Installation Guide: Round Trampoline Safety Tips Here at Oz Trampolines we are passionate about your
Silent Gliss. Hand Operated Curtain Track Systems
 Hand Operated Curtain Track Systems Hand Operated Curtain Track System 1080 Product Information ersatile, sturdy hand-operated curtain track for domestic or contract use For medium weight curtains Elegant,
Primrose Awnings Full Cassette Manual & Electric Instructions
 Primrose Awnings Full Cassette Manual & Electric Instructions Contents for Full Cassette Awning 1 x Remote control receiver box 2 x Remote hand-held zappers 1 x 5 metre cable 1 x Template sticker **The
Introduction of Interlining P. 2
 JG TEXTILE LIMITED Address: 25/F., Saxon Tower, 7 Cheung Shun Street, Lai Chi Kok, Kowloon, Hong Kong. Tel: 852 36932300 Fax: 852 36932800 Email: sales@jgtextile.com Website: www.jgtextile.com Content
PIONEER LITE PATIO AWNING
 A Manual Crank Operated Awning RV OWNER'S MANUAL Before operating the awning, carefully review the Owner's Manual. The manual contains important safety information, detailed operating instructions, common
INSTALLATION INSTRUCTIONS for folding arm awnings
 Custom made Awnings and Blinds Item No 0757 INSTALLATION INSTRUCTIONS for folding arm awnings IMPORTANT INFORMATION BEFORE INSTALLING YOUR Updated 08/09/15 AN AWNING INSTALLATION IS A HOME IMPROVEMENT
Outline. Background Design Use Troubleshoot
 RepRap Background Outline Background Design Use Troubleshoot Self-replicating rapid prototyper...reprap 3 Wealth without money The background to the Bath Replicating Rapid Prototyper Project AdrianBowyer
Wall Tent Set Up & Care Instructions
 Wall Tent Set Up & Care Instructions Congratulations on the purchase of your new Colorado Tent! Your Wall Tent frame includes color coded poles for easy set up. Wall (Side) Poles: Red Roof / Rafter Poles:
Special Order Color & Fabric Guide
 Special Order Color & Fabric Guide Fabric # Aqua Baseball Grey Black Blazer Gold Burnt Orange Cardinal Columbia Blue Dark Green Diamond Pink Giants Cream Gold Grid Iron Silver GT Gold Kelly Light Old Gold
TCWS54 BLACK DIAMOND BURNER KIT INSTRUCTIONS
 INSTALLER: Leave this manual with the appliance. CONSUMER: Retain this manual for future reference. These instructions are supplementary to the Installation and Operating Instructions supplied with the
Delivers the BEST SPRAY FINISH available on the market today! MADE IN THE USA WITH GLOBAL COMPONENTS
 & Delivers the BEST SPRAY FINISH available on the market today! MADE IN THE USA WITH GLOBAL COMPONENTS Graco Handheld Sprayers the Best Choice for Small TrueCoat II sprayers are the fastest and easiest
The Events Structure Product Guide
 Product Description The Axion range offers a extremely strong semi permanent event structure, these units can be used in all weathers and can be installed in any location. Providing a contemporary space
Installation manual. Drop-arm awning. V120 Napoli
 Installation manual Drop-arm awning V120 Napoli Installation manual drop-arm awning V120 Napoli Content 1. Drop-arm awning * 2. Control a. Manual control: crank handle b. Manual control: strap coiler
ipad mini 4 Wi-Fi Display Assembly Replacement
 ipad mini 4 Wi-Fi Display Assembly Replacement Replace the display assembly, including the LCD screen, home button, and front glass digitizer in an ipad mini 4 Wi-Fi. Written By: Evan Noronha ifixit CC
TCWS.38NG03.C BLACK DIAMOND BURNER KIT INSTRUCTIONS
 IMPORTANT: THESE INSTRUCTIONS ARE TO REMAIN WITH THE HOMEOWNER These instructions are supplementary to the Installation and Operating Instructions supplied with the fireplace and should be kept together.
Come rain or shine its fine out with ScooterPac. Take a quick read of this manual to get the most out of your folding canopy.
 YOUR USER MANUAL Come rain or shine its fine out with ScooterPac. Take a quick read of this manual to get the most out of your folding canopy. Contents 1 Quick start guide 5 Fitting your canopy 9 Detailed