Come rain or shine its fine out with ScooterPac. Take a quick read of this manual to get the most out of your folding canopy.
|
|
|
- Austin Flowers
- 5 years ago
- Views:
Transcription

1 YOUR USER MANUAL


2 Come rain or shine its fine out with ScooterPac. Take a quick read of this manual to get the most out of your folding canopy.

3 Contents 1 Quick start guide 5 Fitting your canopy 9 Detailed guide to using your canopy 15 How to keep your canopy clean brighten your day scooterpac.com

4 Quick start guide - feature guide 1 Hard perspex screen Coloured coded velcro Basket fixing access 1 Access zips

5 Quick start guide - feature guide 2 Securing plunger 1 Fixing spiggot Adjustable arms
6 Quick start guide First fit the canopy to your scooter Next fold out the frame of the canopy Tip: Get your local dealer to fit the canopy or see page x


7 Then unfold the sides one at a time Lastly zip up the sides for total protection!
")

8 You will need; Fitting the canopy - before you start Allen key(s) Spanner(s) 1 x Hand wheel You may need; Socket wrench Longer bolts Velcro

9 Arrange the fixings 1. Spigot 2. M8 Nyloc nuts X 2 3. M8 washers x 4 4. M6 Hex bolt 5. M6 Nyloc nut 6. M6 Nylon washer x 2
10 Slot the spigot onto the accessory bar under the scooter seat Tip: ensure that your accessory bar is smooth and rust free before fitting
11 Insert the hand wheel onto the nut on the accessory bar and tighten up You may need; If there is no nut on the accessory bar you may need a ball-pin bolt. Call or your local dealer.


12 Remove the bolts on the armrests Tip: there may not be bolts on the arm, they may be on the the seat


13 Next undo the quick-release clips on the adjustable arms of the frame, and take out the bracket.
14 Now bolt these brackets to the armrests with the bolts you removed earlier. The bracket can be fitted either way around. (You may need slightly longer bolts to do this.) Do not tighten. Tip: use the hole in the bracket which orientates it best
15 Once the brackets and spigot are fitted, simply slide the frame into them. Then tighten the bolts on the armrest. Tip: loosen the arms on the frame so that they slide
16 Next simply push the frame towards the scooter, and tighten the quick-release clamps then tighten the bolts onto the spigot. With the smaller bolt put a nylon washer either side of the frame. With the large nuts use the metal washers.
17 Now tighten the arms of the frame, ensuring that they are level.
18 The ScooterPac is now ready for use!

19 Detailed guide to using your canopy The ScooterPac folding canopy is as functional as it is beautiful. To achieve this we included colour coded velcro and super flexible material amongst other innovations to make things simpler when folding your canopy away. Follow this simple guide to get the most from your ScooterPac. 1 Tip: Refer to page x for parts diagrams
20 Easiest way to fold out your canopy Firstly take the main frame and lift it up.

21 The plunger on the side of the frame will engage.

22 Next fold the windscreen down
23 Now the front protection panel can be folded down and attached to the front of the scooter Tip: If there isn t a suitable front bumper use velcro to secure the canopy to the front
24 The side protection panels can now be unfolded from the rear. 1 2
25 While holding the top corner of the side panel pull the zip around to the front of the scooter. Repeat to both sides.

26 The canopy is now ready for use. To access the scooter simply un-do the zip from the bottom of the canopy.
27 To open the canopy slightly for ventilation or at traffic crossings, simply unzip the side from the rear of the canopy.


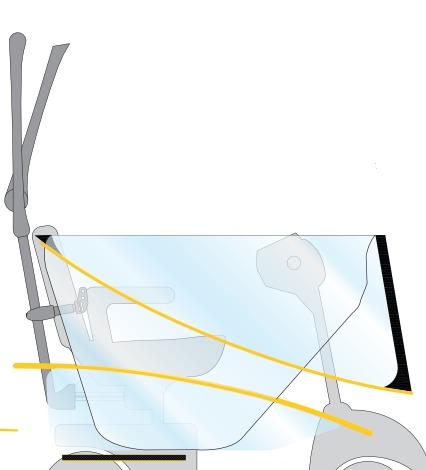
28 Easiest way to fold your canopy away. The first step is to unzip the canopy from the bottom, holding it in the middle. This makes the next step easy which is to match the yellow velcro at the top of the side panel to the bottom of the side panel


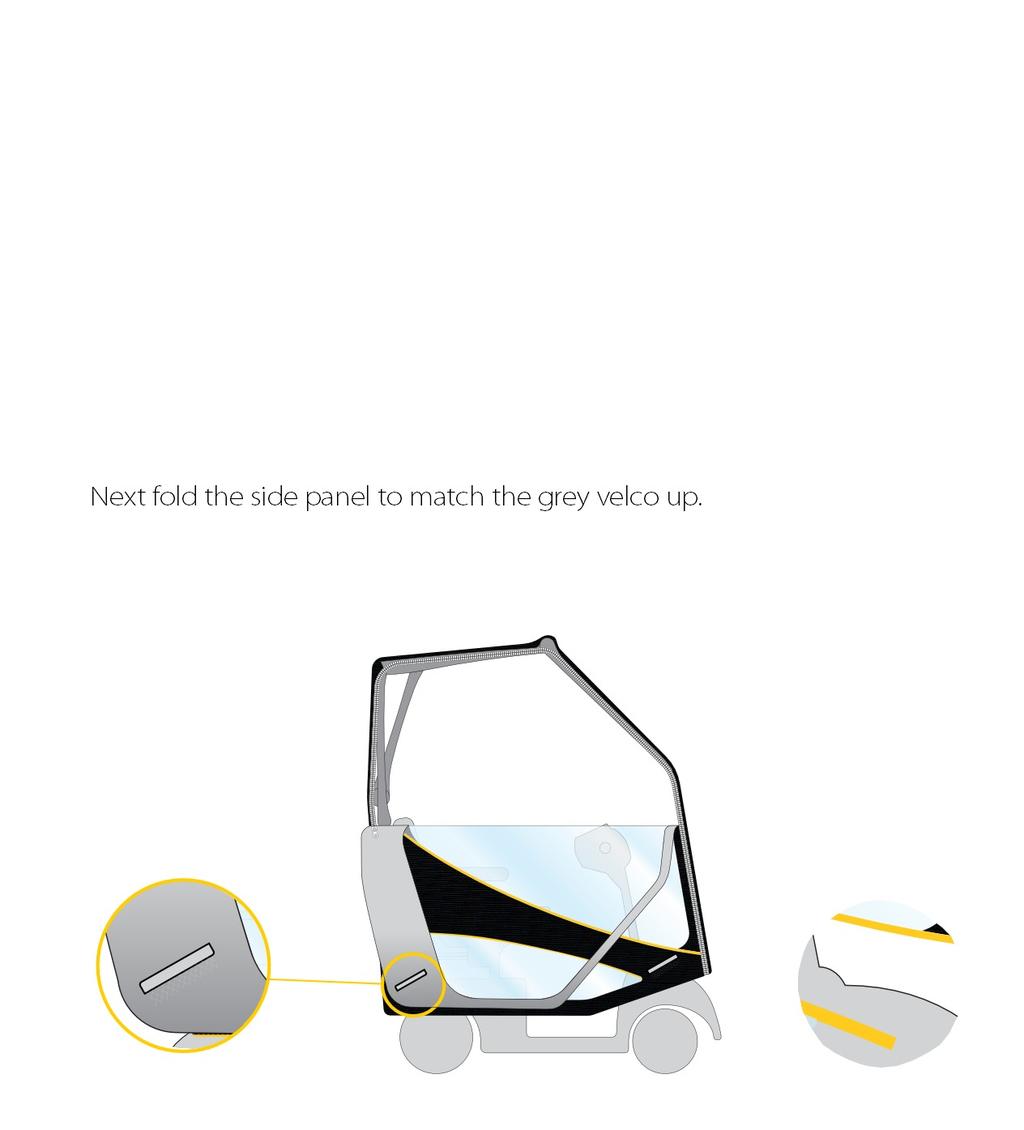
29 Next fold the side panel to match the grey velco up.


30 Now fold the panel red velcro to red velcro, around to the rear of the frame. Repeat for both sides.

31 Next undo the securing strap at the front and fold up the front protective panel and stick the velcro to the top of the windscreen.
32 Then fold the windscreen up onto the roof section, while holding the roof down with the other hand - be sure to mind your fingers!

33 Now release the plunger and fold the frame down to the rear of the scoter
34 Lastly slide the bag over the canopy.

35 How to clean your ScooterPac The ScooterPac canopy material is a specialist mildew resistant fabric, which is waterproof too, however all this can t stop the usual deposits finding their way onto it! We recommend cleaning your canopy with a weak mixture of fairy liquid and water, and a sponge. DO NOT USE BLEACH. Leave the canopy fully opened out in a well ventilated place to dry before using again. Tip: To repell water and dirt from your windscreen use Rain X from Halfords
36 dealer stamp Lifestyle mobility products ScooterPac 1 Carlton Road Lowestoft NR33 0RU tel info@scooterpac.com
33100 LH - Batwing Awning RH - Batwing Awning
 33100 LH - Batwing Awning 33200 RH - Batwing Awning 1. Check Part No./Kit is correct 3. Fit roof rack accessory 2. Read through instruction before installing 4. Check and recheck all fasteners are secure
INSTALLATION INSTRUCTIONS
 INSTALLATION INSTRUCTIONS Accessory HATCH KIT Application 2009 ELEMENT Publications No. AII 41008 Issue Date DEC 2008 PARTS LIST Tent bag 13 Stakes 4 Guide ropes Tent 2 Awning pole caps Gear loft 2 Tie
Rhino-Rack FOXWING ECO Awning 31117
 Rhino-Rack FOXWING ECO Awning 31117 Important: Please read these instructions carefully prior to installation. Please refer to your fitting instruction to ensure that the roof racks are installed in the
ROOF-TOP SAFARI TENT. ASSEMBLY & CARE INSTRUCTIONS Part No ENSURE YOU READ AND UNDERSTAND THESE INSTRUCTIONS PRIOR TO INSTALLATION
 ROOF-TOP SAFARI TENT ASSEMBLY & CARE INSTRUCTIONS Part No. 933101 ENSURE YOU READ AND UNDERSTAND THESE INSTRUCTIONS PRIOR TO INSTALLATION CONTENTS Parts List...2 Drawing & Tools You Will Need...2 Tent
ASSEMBLY & CARE INSTRUCTIONS
 ASSEMBLY & CARE INSTRUCTIONS 7 x TRAILER TENT SERIES 3 9 Part No. FT3711 - on road FT3923 - off road OPTIONAL SUNROOM Wall and floor kit Part No. FT3723 - on road FT39 - off road OPTIONAL SPARE ROOM Roof,
ASSEMBLY & CARE INSTRUCTIONS. 7 x4 TRAILER TENT SERIES 4 9. OPTIONAL SUNROOM Wall and floor kit. OPTIONAL SPARE ROOM Roof, wall and floor kit
 ASSEMBLY & CARE INSTRUCTIONS 7 x TRAILER TENT SERIES 9 Part No. TM709 OPTIONAL SUNROOM Wall and floor kit Part No. TM723 OPTIONAL SPARE ROOM Roof, wall and floor kit Part No. TM76 Please keep these instructions
HANDLE AND WHEEL KIT INSTALLATION
 HANDLE AND WHEEL KIT INSTALLATION Select EB and EM Series Generators Honda Power Equipment Your generator is equipped with a wheel kit and folding handle kit for easy transport and convenient storage.
INSTALLATION INSTRUCTIONS
 INSTALLATION INSTRUCTIONS Accessory HATCH KIT Application 201 PILOT Publications No. VERSION 1 Issue Date 201 PARTS LIST Stake bag Tent bag 13 Stakes 4 Guide ropes Tent 2 Awning pole caps 2 Tie straps
Installation Guide: Round Trampoline
 Trampolines & trampoline parts designed to survive in the harsh Oz climate. www.oztrampolines.com.au Installation Guide: Round Trampoline Safety Tips Here at Oz Trampolines we are passionate about your
Rhino-Rack SUNSEEKER II Awning 2.0 metres (32109)
") Important: Please read these instructions carefully prior to installation. Please refer to your fitting instruction to ensure that the roof racks are installed in the correct locations. Check the contents
Important: Please read these instructions carefully prior to installation. Please refer to your fitting instruction to ensure that the roof racks are installed in the correct locations. Check the contents
Rhino-Rack FOXWING Awning by OZTENT
 Important: Please read these instructions carefully prior to installation. Please refer to your fitting instruction to ensure that the roof racks are installed in the correct locations. Check the contents
Rhino-Rack SUNSEEKER II Awning
 Important: Please read these instructions carefully prior to installation. Please refer to your fitting instruction to ensure that the roof racks are installed in the correct locations. Check the contents
PR-429BF-600M. Bell 429 Blade Fold Kit Operations Manual
 Table of Contents Table of Contents... 1 Record of Revisions... 2 References... 3 Introduction... 4 Contact Information... 4 Prerequisites... 5 First Time Use... 6 Blade Clamp Placement... 6 Blade Clamp
INSTALLATION INSTRUCTIONS
 INSTALLATION INSTRUCTIONS Accessory HATCH KIT Application 2014 CR-V Publications No. AII 50018 Issue Date JULY 2013 Put this information in the glove box with the vehicle owner s manual PARTS LIST 4 Guide
FEATURES & BENEFITS OF THE TOW PRO LITE :
 To Protect & Preserve PRODUCT MANUAL & FITTING GUIDE tow pro lite TYPE: SEMI - FIT EACH TOW PRO LITE COMES WITH THE FOLLOWING : 16 side securing straps & buckles (8 either side) 1 HITCH STRAP & buckles
INSTALLATION INSTRUCTIONS
 GENUINE PARTS INSTALLATION INSTRUCTIONS 1. DESCRIPTION: Hatch Tent 2. APPLICATION: See dealer application chart 3. PART NUMBER: 999T7 XR100 and 999T7 XY100 4. KIT CONTENTS: Item Qty Description A 1 Tent
Rhino-Rack SUNSEEKER Awning Black
 Rhino-Rack SUNSEEKER Awning Black 1. Check Part No./Kit is correct 3. Fit roof rack accessory 2. Read through instruction before installing 4. Check and recheck all fasteners are secure Layout 2.0m - 32132
Rhino-Rack SUNSEEKER II Awning (32105)
") (32105) Important: Please read these instructions carefully prior to installation. Please refer to your fitting instruction to ensure that the roof racks are installed in the correct locations. Check the
(32105) Important: Please read these instructions carefully prior to installation. Please refer to your fitting instruction to ensure that the roof racks are installed in the correct locations. Check the
CONVEX Awning Instructions
 CONVEX Awning Instructions IMPORTANT NOTE: Please take a few minutes to become familiar with this entire document BEFORE beginning your installation. The time you spend doing this is well spent and will
OWNER'S MANUAL CAMPOUT TABLE OF CONTENTS
 OWNER'S MANUAL CAMPOUT RV Before operating the awning, carefully review the Owner's Manual. The manual contains important safety information, detailed operating instructions, common maintenance procedures
INSTRUCTION MANUAL ALEKO RETRACTABLE AWNING
 INSTRUCTION MANUAL for ALEKO RETRACTABLE AWNING www.alekoproducts.com FAILURE TO FOLLOW THESE INSTRUCTIONS MAY RESULT IN PERSONAL INJURY! 1 Important Safety Precautions WARNING NOTE: FOR PERSONAL SAFETY,
Standard Awning Installation Instructions
 Standard Awning Installation Instructions Important Note: Please become familiar with this entire document BEFORE beginning your installation. The time you spend doing this is well spent and will make
Otter Pro X-Over Lodge Installation and Set-Up Instructions
 Otter Pro X-Over Lodge Installation and Set-Up Instructions Otter Pro X-Over Lodge Fits Magnum Otter II & Pro Sled Only Parts Identification and Check List MODEL NUMBERS: Complete Pkg Pro X-Over Lodge
MYRIAD Banner Stand is a trademark of Skyline Exhibits. Patent Pending PN32294-B. MYRIAD Banner Stand
 is a trademark of Skyline Exhibits Patent Pending 1.1 1. Banner Stand Setup 1.1 Remove banner stand from standard case or Arrive Portable Display & Workstation and assemble pole. 1.2 Insert pole into base
π H-3505 GARAGE CANOPY PARTS SAFETY uline.com TOOLS NEEDED 10' X 20' X 8'
 π H-3505 GARAGE CANOPY 10' X 20' X 8' 1-800-295-5510 uline.com TOOLS NEEDED Safety Glasses Wrench or Socket 9/16" or 14mm Tape Measure Phillips Screwdriver Rubber Mallet PARTS Cables x 5 2-way Corner Foot
Motorized Oasis Awning RTS Motor Cord Replacement Instructions *Helpers Needed*
 RETRACTABLE AWNINGS For Technical Support visit us at www.sunsetter.com/ownerscorner or Call Toll Free 800-670-7071 Fax 877-224-4944 Motorized Oasis Awning RTS Motor Cord Replacement Instructions *Helpers
VEPR Round Drum Disassembly and Assembly
 VEPR 12 25 Round Drum Disassembly and Assembly Required Tools ¼ Allen Wrench Flat Head Screwdriver Drum Parts List Drum Body Carousel Center Bolt Dummy Rounds Carousel Lock Spring Clear Drum Cover Step
quick and easy installation guide
 www.directdriveopener.com quick and easy installation guide Back 2 Front. Motor Carriage 2. C-rail. Chain. Limit stops. Slide in part (tensioner) Rail assembly Insert C-rail parts () into the connecting
Assembly. Step 3. Attach the safety bracket (7) to the Pivot ARM (6).
 to the Pivot ARM (6).") Assembly Step 1. A. Stand the base of the machine by separating the U-frames (1,2). Pull the Front and Rear U-Frames (1,2) as far apart from each other as possible. Then push down on the middle of the
Assembly Step 1. A. Stand the base of the machine by separating the U-frames (1,2). Pull the Front and Rear U-Frames (1,2) as far apart from each other as possible. Then push down on the middle of the
Softopper Installation Instructions (CB)
") Softopper Installation Instructions (CB) Please read instructions thoroughly before starting installation **Remove all contents of the Softopper carefully to protect from scratches.** Windows scratch easily!
Softopper Installation Instructions (CB) Please read instructions thoroughly before starting installation **Remove all contents of the Softopper carefully to protect from scratches.** Windows scratch easily!
AND LOAD CANOPY RACK SPECIFICATIONS
 8MAY15 INSTRUCTIONS for the LOCK AND LOAD CANOPY RACK SPECIFICATIONS and SAFE LOADING REQUIREMENTS The Lock and Load ladder carrier for Truck Caps is a rack designed to mount to the top of a pickup truck
Gerjak Dear Customer, You will find below information that includes: Is the caravan rail in order? Is everything in place?
 Gerjak Dear Customer, We would like to wish you much pleasure with your new Gerjak product. We very much appreciate that you have chosen our product! Following are some hints and tips to give you pleasure
INSTALLATION INSTRUCTIONS AND OWNER'S MANUAL AWNINGS. For trailers & motor homes with straight sides TOOLS REQUIRED
 AWNINGS INSTALLATION INSTRUCTIONS AND OWNER'S MANUAL For trailers & motor homes with straight sides TOOLS REQUIRED 1/4" electric drill Ratchet handle kit 3/8" & 7/16" socket No. 1 and No. 2 screwdriver
Otter Pro XT Cabin Installation and Set-Up Instructions
 Otter Pro XT Cabin Installation and Set-Up Instructions Otter Pro XT Cabin Fits Medium Otter Pro and Otter II Sled Only Parts Identification and Check List MODEL NUMBERS: Complete Pkg Pro XT Thermal Cabin
RCCK. Pivot Plug 2x. Sharp Screw 2x TAKE TIME - READ AND UNDERSTAND INSTRUCTIONS COMPLETELY!
 RCCK Revolution Cargo Conversion Kit Congratulations on your purchase of the BOB Revolution Cargo Conversion Kit (RCCK). It s designed to easily convert your existing BOB Revolution stroller frame into
Ridgeline (A) Installation Instructions
 Installation Instructions") Ridgeline (A) Installation Instructions Please read instructions thoroughly before starting installation **Remove all contents of the Softopper carefully to protect from scratches.** Windows scratch easily!
Ridgeline (A) Installation Instructions Please read instructions thoroughly before starting installation **Remove all contents of the Softopper carefully to protect from scratches.** Windows scratch easily!
OWNER S MANUAL. Addison 3 Person Cushion Swing. Product code: UPC code: Vendor Item: SC-160-2NGS. Date of purchase: / /
 OWNER S MANUAL Addison 3 Person Cushion Swing Product code: 0-03843271-2 UPC code: 769455 761293 Vendor Item: SC-160-2NGS Date of purchase: / / 1 PARTS Read through all the instructions before beginning
IMPORTANT OWNER-OPERATOR INSTALLATION INSTRUCTIONS. Part # A7006
 IMPORTANT OWNER-OPERATOR INSTALLATION INSTRUCTIONS Part # A7006 Parts List Wobble Stopper Body Wobble Stopper Shaft Camper Bracket Lower Bracket Assembly Upper Bracket Upper Bracket Clamp 3/8 SAE Flat
LITE Spear Awning Instructions
 LITE Spear Awning Instructions IMPORTANT NOTE: Please take a few minutes to become familiar with this entire document BEFORE beginning your installation. The time you spend doing this is well spent and
READ ME FIRST! IMPORTANT WARNING! ENG. Roof top tent
 Roof top tent ENG TENT031 220 min READ ME FIRST! Thank you for purchasing a Front Runner Roof Top Tent. Before you start, take a moment to familiarize yourself with these Fitting Instructions and the components
Honda Ridgeline Installation Instructions
 Honda Ridgeline Installation Instructions READ THIS... If you read these instructions from beginning to end before starting you will probably not need to look at them again during the installation, but
1946 READ AND SAVE THESE INSTRUCTIONS!
 EasyAwn Installation, Care and Maintenance Manual EasyAwn Quality, Since 1946 EasyAwn, LLC Toll Free: 877-EasyAwn http://www.easyawn.com READ AND SAVE THESE INSTRUCTIONS! EasyAwn Quarter Round Awning Installation
Otter XT Cabin Installation and Set-Up Instructions
 Otter XT Cabin Installation and Set-Up Instructions Otter XT Cabin Fits Medium Otter Wild Sled Only Parts Identification and Check List MODEL NUMBERS: Complete Pkg Otter XT Cabin 200962 2 1 PARTS LIST
Primrose Awnings - Standard Manual Instructions
 Primrose Awnings - Standard Manual Instructions Contents Warning 1.5m - 3.0m Awnings 4 x Expansion bolts (2 per bracket)** 2 x brackets 1 x Awning 1 x Winder handle 3.5m - 4m Awnings 6 x Expansion bolts
Primrose Awnings Full Cassette Manual & Electric Instructions
 Primrose Awnings Full Cassette Manual & Electric Instructions Contents for Full Cassette Awning 1 x Remote control receiver box 2 x Remote hand-held zappers 1 x 5 metre cable 1 x Template sticker **The
VACATION'R A ROOM FOR VERTICAL ARM AWNINGS 2015 & ON
 RV VACATION'R A ROOM FOR VERTICAL ARM AWNINGS 2015 & ON Before operating the awning, carefully review the Owner's Manual. The manual contains important safety information, detailed operating instructions,
EEZI - AWN series 1000 / 2000 Awning bracket
 EEZI - AWN series 1000 / 2000 Awning bracket RRAC063 INSTALL TIME: 15 mins IMPORTANT WARNING! IT IS CRITICAL THAT ALL FRONT RUNNER PRODUCTS BE PROPERLY AND SECURELY ASSEMBLED AND ATTACHED TO YOUR VEHICLE.
Instructions: PermaPRO
 Instructions: PermaPRO WARNING! Cover for storage use only. Do not occupy the RV while cover is on the RV. Do not run the RV engine with the cover on. WARNING! Installation is best done with two people
10x10 LogoTent SETUP INSTRUCTIONS. The Triple Threat
 10x10 LogoTent SETUP INSTRUCTIONS The Triple Threat THANK YOU FOR YOUR PURCHASE! INCLUDING: 1 10x10 Canopy 1 10x10 LogoTent Frame 1 Back Full Wall 1 Right Half Wall 1 Left Half Wall 2 Half Wall Bars LogoTent
functionality with the necessary maintenance tools stored in a convenient built in tool box, as well as parallel handles for
 GuilloMax User Manual The Guillomax has distinct features such as its unique structure and ease of cutting. It combines symmetry with functionality with the necessary maintenance tools stored in a convenient
Made of durable, lightweight polyester & vinyl material - the same material used for tents. No drilling required.
 BUENA VISTA + RV Before operating the awning, carefully review the Owner's Manual. The manual contains important safety information, detailed operating instructions, common maintenance procedures and other
READ AND SAVE THESE INSTRUCTIONS! EasyAwn Standard Awning Installation
 EasyAwn Installation, Care and Maintenance Manual EasyAwn Quality, Since 1946 EasyAwn, LLC Toll Free: 877-EasyAwn http://www.easyawn.com READ AND SAVE THESE INSTRUCTIONS! EasyAwn Standard Awning Installation
Softopper Installation Instructions
 Softopper Installation Instructions (O.S.) Please read instructions thoroughly before starting installation **Remove all contents of the Softopper carefully to protect from scratches.** Windows scratch
Insruction manual Dukki
 Insruction manual Dukki Introduction Pg. 1 Product description Pg. 2 3 Assembly and disassembly Pg. 4 Installation and adjustment Pg. 5 12 Maintenance Pg. 13 Parts Pg. 14-17 INDEX 1. Introduction 1 2.
Primrose Awnings - Full Cassette Manual & Electric Instructions
 Primrose Awnings - Full Cassette Manual & Electric Instructions Contents Warning 2.0m - 3.5m Awnings 8 x Expansion bolts ** 2 x brackets 1 x Awning 1 x Winder 4.0m - 5.0m Awnings 12 x Expansion bolts **
13401 Brooks Drive Baldwin Park, CA p f shademakerusa.com
 13401 Brooks Drive Baldwin Park, CA 91706 p 626.338.8810 f 626.338.8816 info@shademakerusa.com shademakerusa.com 2018 Shademaker. All rights reserved. SMOM-POLARIS-1018 W A R R A N T Y : Upon receipt of
CHANGING YOUR LANDSCAPE SINCE 1945 OWNER S MANUAL. Tow Hitch Replacement Kit For Rough Cut Trailcutters. Starting Serial # L
 CHANGING YOUR LANDSCAPE SINCE 1945 OWNER S MANUAL Tow Hitch Replacement Kit For Rough Cut Trailcutters 21100 Starting Serial # L118-023001 Tools Required: Wrench/Socket Qty. Size (1) 1-1/8 (1) 1-1/16 (2)
Solera Family and Screen Room. Installation and Owner s Manual (For Aftermarket Applications) Table of Contents
 Table of Contents") Solera Family and Solera Family and Installation and Owner s Manual (For Aftermarket Applications) Table of Contents Introduction 2 Preparation 2 Resources Required 2 Installation 3 Install Upper Brackets
Solera Family and Solera Family and Installation and Owner s Manual (For Aftermarket Applications) Table of Contents Introduction 2 Preparation 2 Resources Required 2 Installation 3 Install Upper Brackets
Assembly TOOLS REQUIRED: 17mm and 14mm or equivalent wrenches.
 Instructions for 3 Trimmer Rack, 3TR* *Patents Pending Assembly TOOLS REQUIRED: 17mm and mm or equivalent wrenches. 15 26 26 16 15 16 Attach the lower mounting brackets to the Trimmer Rack poles as shown
USER MANUAL FLEXI Tent&Trailer Comfort
 USER MANUAL FLEXI Tent&Trailer Comfort CONGRETULATIONS! By choosing a Combi-Camp tenttrailer, you have made a choice for quality and sustainablilty. We hope you will have lots of careless holidays with
* * KR54-F, KR9854 & KR9954 Installation Instructions. Read All Warnings Before Starting Installation! Index:
 *941061-00* 941061-00 Keyed Removable Mullion KR54-F, KR9854 & KR9954 Installation Instructions CLASSIFIED CLASSIFIED C Read All Warnings Before Starting Installation! Index: General Information ----------------
Rhino-Rack Sunseeker II Base Tent (32119)
") Important: Please read these instructions carefully prior to installation. Please refer to your fitting instruction to ensure that the roof racks are installed in the correct locations. Check the contents
Important: Please read these instructions carefully prior to installation. Please refer to your fitting instruction to ensure that the roof racks are installed in the correct locations. Check the contents
Installation Instructions
 Installation Instructions 3rd Generation Chevy Blazer & GMC Jimmy 3 Please read instructions thoroughly before starting installation **Remove all contents of the Softopper carefully to protect from scratches.**
FULL AWNING MANUAL. Product No. OFA003. OFA003-UM-0316-Rev.A
 FULL AWNING MANUAL Product No. OFA003 OFA003-UM-0316-Rev.A FULL AWNING. IMPORTANT! PLEASE READ THIS GUIDE THOROUGHLY BEFORE ATTEMPTING FIRST SETUP. PARTS REFERENCE: 1. 2. 3. 4. 5. 6. Main Awning Section
Otter XT 650 Cabin Installation and Set-Up Instructions
 Otter XT 650 Cabin Installation and Set-Up Instructions Otter XT 650 Cabin Fits Medium Otter Wild Sled Only Parts Identification and Check List MODEL NUMBERS: Complete Pkg Otter XT 650 Cabin 200891 2 1
When moving the frame don t force anything! Move the leg to allow the brace to go over the rod.
 THE IDLER Assembly and Care Instructions General notes Please read these instructions in their entirety before constructing your Idler Construction Before you begin constructing your Idler consider where
USER MANUAL FLEXI Tent&Trailer Comfort
 USER MANUAL FLEXI Tent&Trailer Comfort CONGRETULATIONS! By choosing a Combi-Camp tenttrailer, you have made a choice for quality and sustainablilty. We hope you will have lots of careless holidays with
ABS Model Background Stand
 ABS Model Background Stand Product Overview: The completely redesigned Ravelli ABS model background stand is 10' tall by 12.3' wide. It is comprised of two tripod stands and four 3 cross bar sections and
Otter Pro XT 1200 Cottage Installation and Set-Up Instructions
 Otter Pro XT 1200 Cottage Installation and Set-Up Instructions Otter Pro XT 1200 Cottage Fits Small Ultra-Wide Otter Pro and Otter II Sled Only Parts Identification and Check List MODEL NUMBERS: Complete
Vanagon Ladder Kit Assembly & Installation Instructions
 Rocky Mountain Westy Vanagon Ladder Kit Assembly & Installation Instructions Introduction Thank you for purchasing the Rocky Mountain Westy Vanagon Ladder Kit. We pride ourselves in the products we develop
VACATION'R A ROOM FOR VERTICAL ARM AWNINGS 2015 & ON
 VACATION'R A ROOM FOR VERTICAL ARM AWNINGS 2015 & ON RV Before operating the awning, carefully review the Owner's Manual. The manual contains important safety information, detailed operating instructions,
FEATURES & BENEFITS OF THE TOW PRO ELITE :
 To Protect & Preserve PRODUCT MANUAL & FITTING GUIDE tow pro elite TYPE: TAILORED FIT EACH TOW PRO ELITE COMES WITH THE FOLLOWING: 8mm thick body armour material QUICK ZIP SYSTEM to aid fitting 2 CLEAR
Auxiliary 63.5l Fuel Tank Ford/Mazda Pick-up Truck 2012-Current READ ME! IMPORTANT WARNING!
 Auxiliary 63.5l Fuel Tank Ford/Mazda Pick-up Truck 2012-Current ENG FTFM006 90 min READ ME! Thank you for purchasing a Front Runner Ford/Mazda Pick-Up Truck 2012 - Current Fuel Tank. Before you start,
Primrose Awnings Half Cassette Manual & Electric Instructions
 Primrose Awnings Half Cassette Manual & Electric Instructions Contents Contents for 2m, 2.5m, 3m Awnings 2 x wall brackets 4 x expansion bolts (2 per bracket)** 1 x Awning Contents for 3.5m, 4m and 4.5m
10 X 20 X 8 Dome Canopy
 10 X 20 X 8 Dome Canopy Warning Keep all flame and heat sources away from this tent fabric. Refer to labels for flamability specification. It is not fire proof. The tent fabric will burn if left in continuous
OWNER S MANUAL AND WARRANTY FORM
 OWNER S MANUAL AND WARRANTY FORM Jet Tent F25-25DX manual.indd 1 WARNING Never use any fuel-burning products (stoves, lanterns, heaters, etc.) inside or within proximity of this tent. Use of fuel-burning
Primrose Awnings Half Cassette Manual & Electric Instructions
 Primrose Awnings Half Cassette Manual & Electric Instructions Contents for 2.5m, 3m Awnings 4 x Expansion bolts (2 per bracket)** 2 x brackets 1 x Awning Contents for 3.5m, 4m Awnings 6 x Expansion bolts
Genesis. Side Burner Accessory Installation. Step 3. Step 1. Step 2. For use with Genesis Gas Barbecues Only
 Genesis Side Burner Accessory Installation For use with Genesis Gas Barbecues Only Step 1 WARNING: All gas controls and supply valves should be in the OFF position. You will need: Side burner assembly
Contents. Awnings USA - Full Protective Hood Manual Instructions ft 11" - 11ft 6" Awnings
 Awnings USA - Full Protective Hood Manual Instructions Contents Warning We recommend that two or more people are required to lift the awning into place. 4ft 11" - 11ft 6" Awnings 8 x Expansion bolts **
INSTALLATION INSTRUCTIONS
 INSTALLATION INSTRUCTIONS Accessory FABRIC ROOF/ REAR PANEL (5P) P/N 0SR85-HL4-222A (Black) 0SR85-HL4-221C (Camo) Application SXS1000M5P/M5D Honda Dealer: Please give a copy of these instructions to your
3x3 Pop Up Gazebo with Side Panels
 '-,- 3x3 Pop Up Gazebo with Side Panels Assembly Instructions - Please keep for future reference 650/1974 Width - 3m Depth - 3m Height - 270cm ~ Important: Make sure all the guy ropes and ~ pegs are used,
READ AND SAVE THESE INSTRUCTIONS! EasyAwn Spear Awning Installation
 EasyAwn Installation, Care and Maintenance Manual EasyAwn Quality, Since 1946 EasyAwn, LLC Toll Free: 877-EasyAwn http://www.easyawn.com READ AND SAVE THESE INSTRUCTIONS! EasyAwn Spear Awning Installation
Cabinet Mount Assist Lift n Lock Instructions
 Cabinet Mount Assist Lift n Lock Instructions PART LIST 2 @ Gas Cylinder 1 @ Lock Bar 2 @ Rubber Sleeve (preset) 4 @ Stopper Pin (2pcs preset) 4 @ Saddle Block 8 @ 19mm Black PVC Cap 5 @ 14mm Black PVC
OWNER'S MANUAL CAMPOUT TABLE OF CONTENTS
 OWNER'S MANUAL CAMPOUT RV Before operating the awning, carefully review the Owner's Manual. The manual contains important safety information, detailed operating instructions, common maintenance procedures
> INSTRUCTIONS MANUAL < CAN SOFA BY RONAN & ERWAN BOUROULLEC HAY
 > INSTRUCTIONS MANUAL < CAN SOFA BY RONAN & ERWAN BOUROULLEC HAY > INTRODUCTION < In the Can sofa, Ronan and Erwan Bouroullec are seeking to go beyond the creation of a practical, elegant and comfortable
MONOFLEX UMBRELLA OWNER'S MANUAL PXMF- SS
 MONOFLEX UMBRELLA OWNER'S MANUAL PXMF- SS2013.01 Distributed by Shadescapes Americas www.shadescapesamericas.com; 970.527.7070 For assembly assistance or questions please contact ShadeScapes Americas at
BowDown. MiniMuM Crossbar spread 24 (61CM) Steel Hook (2X) Buckle Strap (2X) Plastic Tube (2X) Plain Strap (2X) SHORT BLACK T-BOLT (2x) BOWDOWN (2x)
 Steel Hook (2X) Buckle Strap (2X) Plastic Tube (2X) Plain Strap (2X) SHORT BLACK T-BOLT (2x) BOWDOWN (2x)") BowDown MiniMuM Crossbar spread 24 (61CM) Heavy Duty strap (2x) SHORT BLACK T-BOLT (2x) BOWDOWN (2x) Bow Stern Tie Down Buckle Strap (2X) Plastic Tube (2X) Plain Strap (2X) Steel Hook (2X) IMPORTANT WARNING
BowDown MiniMuM Crossbar spread 24 (61CM) Heavy Duty strap (2x) SHORT BLACK T-BOLT (2x) BOWDOWN (2x) Bow Stern Tie Down Buckle Strap (2X) Plastic Tube (2X) Plain Strap (2X) Steel Hook (2X) IMPORTANT WARNING
WARNING USING AND CARING. for use in extreme or varied soil conditions. For optional sand pegs Oztent recomends use of a Bluescrew Oztent Edition.
 OWNER S MANUAL WARNING Never use any fuel-burning products (stoves, lanterns, heaters, etc.) inside or within proximity of this tent. Use of fuel-burning products inside or within proximity of this tent
CAR ROOF TENT (MODEL#: YC0002A) USER MANUAL
 USER MANUAL") CAR ROOF TENT (MODEL#: YC0002A) USER MANUAL CONTENTS BRIEF INSTRUCTION 1.Characteristics and application 2.Material & Specification 3.Main parts HOW TO USE 1.Attached parts and tools 2.lnstallation diagram
CAR ROOF TENT (MODEL#: YC0002A) USER MANUAL CONTENTS BRIEF INSTRUCTION 1.Characteristics and application 2.Material & Specification 3.Main parts HOW TO USE 1.Attached parts and tools 2.lnstallation diagram
IMPORTANT OWNER-OPERATOR INSTALLATION INSTRUCTIONS C3215/C3215A
 IMPORTANT OWNER-OPERATOR INSTALLATION INSTRUCTIONS C3215/C3215A Minor movement (or settling) can occur in some incidental harsh driving conditions (On or off road). A rubber bed mat is not a requirement
Instructional Booklet
 Instructional Booklet 936-894-3292 Thank you for choosing The Bathmaster! You are on your way to creating an unmatched bathing experience both for you and the lucky animal. The Bathmaster is designed to
ROOFTOP CARGO BAG (FRONT OF VEHICLE) HOOK (x4) ATTACHMENT STRAP (x4)
 HOOK (x4) ATTACHMENT STRAP (x4)") CargoPack, DryTop, SoftTop ROOFTOP CARGO BAG Zipper Flap HOOK (x4) Grab handle ATTACHMENT STRAP (x4) (FRONT OF VEHICLE) Naked roof STRAP (2X) IMPORTANT WARNING IT IS CRITICAL THAT ALL YAKIMA RACKS AND
CargoPack, DryTop, SoftTop ROOFTOP CARGO BAG Zipper Flap HOOK (x4) Grab handle ATTACHMENT STRAP (x4) (FRONT OF VEHICLE) Naked roof STRAP (2X) IMPORTANT WARNING IT IS CRITICAL THAT ALL YAKIMA RACKS AND
Compass Home 8' x 8' No Tools Gazebo with Awning and Anchor Bags Assembly Instruction for Gazebo (no tools required)
") Compass Home 8' x 8' No Tools Gazebo with Awning and Anchor Bags Assembly Instruction for Gazebo (no tools required) CAUTION: Read all instructions before assembly. Failure to do so may result in faulty
Compass Home 8' x 8' No Tools Gazebo with Awning and Anchor Bags Assembly Instruction for Gazebo (no tools required) CAUTION: Read all instructions before assembly. Failure to do so may result in faulty
Made of durable, lightweight polyester & vinyl material - the same material used for tents. No drilling required No rafters to install.
 VACATION'R A ROOM FOR VERTICAL ARM AWNINGS 2015 & ON RV Before operating the awning, carefully review the Owner's Manual. The manual contains important safety information, detailed operating instructions,
Owner s Manual Truck Bed Tent
 Owner s Manual Truck Bed Tent Important! For safe and proper assembly, use, and care, read and follow all instructions. Everyone who uses this tent should first read this manual. 120810 www.kodiakcanvas.com
Wall Tent Set Up & Care Instructions
 Wall Tent Set Up & Care Instructions Congratulations on the purchase of your new Colorado Tent! Your Wall Tent frame includes color coded poles for easy set up. Wall (Side) Poles: Red Roof / Rafter Poles:
FEATHER-LITE ROOF TOP TENT SET-UP GUIDE
 FEATHER-LITE ROOF TOP TENT SET-UP GUIDE TENT031 INSTALL TIME: 30 minutes 0 GET ORGANIZED you will need: D Your Tent D The Ladder (in a separate box) D A Power Drill w/ Phillips screw bit D A solid, scratch
Roller Bar End Cap (w/round Drive Shaft) Replacement Instructions for Vista and Motorized Awnings * Helpers needed *
 Replacement Instructions for Vista and Motorized Awnings * Helpers needed *") RETRACTABLE AWNINGS For Technical Support visit us at www.sunsetter.com/ownerscorner or Call Toll Free 800-670-7071 Fax 877-224-4944 Roller Bar End Cap (w/round Drive Shaft) Replacement Instructions for
RETRACTABLE AWNINGS For Technical Support visit us at www.sunsetter.com/ownerscorner or Call Toll Free 800-670-7071 Fax 877-224-4944 Roller Bar End Cap (w/round Drive Shaft) Replacement Instructions for
PARTS INCLUDED IN YOUR KIT. You may want to lay them out in this manner for accessibility. Foam has NO adhesive to touch truck finish.
 -'07 Ford Sport Trac Tarp Assembly with Cab Rail, Tail Rail and Support Bows attached. Left and Right Side Rail Assemblies Sport Trac Brackets (x4) Clamp Bolts Allen Wrench PARTS INCLUDED IN YOUR KIT.
DO NOT USE WITH CROSSBAR SPREAD LESS THAN 24.
 TM Please read all instructions carefully before assembly, installation and/or use of this product. DO NOT USE WITH CROSSBAR SPREAD LESS THAN 24. WARNING: Do not exceed the weight limit of your vehicle