HEXAGON PAVILION SETUP INSTRUCTIONS
|
|
|
- Ariel Lambert
- 5 years ago
- Views:
Transcription
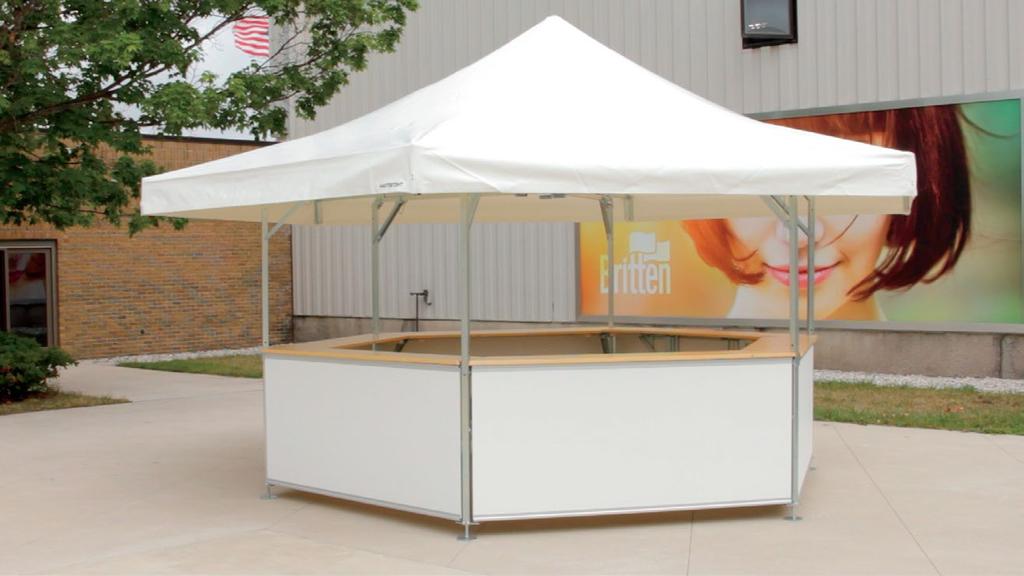
1 SETUP INSTRUCTIONS
2 THANK YOU FOR YOUR PURCHASE! If you have questions about installation, maintenance, or take down, please call us at (800) Our goal is that you are completely satisfied with our products. Please read this installation manual carefully and follow all instructions contained herein. Please note that the installer is responsible for the site selection, installation and use. Do not erect during inclement weather and follow all safety procedures during the installation and take down process. Please contact all utility companies for underground services. In many states, the utilities work together and have formed a Utility Locating Service. It is your responsibility to locate all the underground services, including speaking to the owner about irrigation, pool and other special services that they may have installed. Also, please note that special precautions should be taken such that any overhead powerlines are duly noted and avoided during the tent erection process. TentCraft Inc in no way represents the estimated holding power to be true in all cases. It is an estimate, and as such, does not imply that the figures are sufficient to hold any tent securely in windy or adverse weather conditions. The tent installer accepts sole responsibility for the safe installation, teardown, and maintenance of any tent. TentCraft does not represent in any way that the materials provided with the purchase of the tent are sufficient enough to hold it up in windy or adverse weather conditions. There is no way for TentCraft to know the site conditions or the weather conditions at the event. This leaves us unable to recommend the adequate amount of holding power needed to hold the tent safely in position. Furthermore, we are not responsible for the methods which the installer uses to erect the tent or anchor it in position. Installers MUST be empowered to deem the tent unsafe for occupancy if/when the weather becomes unstable. 2


3 Step 1 The hexagon pavilion is packaged into five metal shipping containers. Two contain metal legs and shoulder pieces, two contain counters and 1 contains wall panels. Remove all pieces from these containers and set them aside. Step 2 Start by opening the leg so it forms a 90-degree angle. Step 3 Lock this angle into place by rotating the angle bracket up and lining its holes up with the holes in the shoulder piece. Insert the pin into the holes to secure it. Repeat steps 2 and 3 for the remaining five leg pieces. Step 4 Locate the middle star bracket. Install the grey peak liner into the top of the peak pole (the peak pole extends out of the top of the star bracket). 3


4 Step 5 With the star bracket lying on its side, attach two opposite legs to by sliding them over the star bracket and pressing the push button in until it locks into place. **Be sure to install two legs opposite from one another not next to each other.** Step 6 Lift the star bracket/two leg structure up so that it is standing on the two footplates at the bottom of the legs. Have someone hold it in place. Step 7 A second person will pick up remaining legs and install them one at a time using the process explained in step 5. Once all legs are installed, the structure will be self-standing. Step 8 Next, assemble the counter supports on each leg. Do this by lifting up on the support arm until it is parallel to the ground, rotating the angle bracket up and lining its holes up with the holes in the counter support. Insert the pin into the holes to secure it. Repeat this step for the remaining five legs. 4


5 Step 9 With two people (one on each end), lift a wall panel and walk it in between two legs. Locate the pin that faces downward on the inside edge of the wall panel and insert it into the hole found on the counter support. Repeat this step for the opposite side of the wall panel. Step 10 After attaching the top of the wall panel, attach the bottom by inserting the pin found on the bottom of the leg into the hole found on the inside edge of the wall panel. Repeat this step for the opposite side of the wall panel. Step 11 Attach the remaining five wall panels using steps 9 and 10. **It may be necessary to adjust the legs left or right for the panels to reach each leg.** Step 12 Locate the counter pieces and install the first section by placing it on top of the counter supports on the inside of the structure. The widest edge of the counter should be flush with the outside of the wall panel and the shorter edge angling in towards the inside of the structure. 5


6 Step 13 The metal tabs on the bottom of the counters are inserted down into the slits in the counter supports. Step 14 Repeat steps 12 and 13 to install the remaining five counter sections. Step 15 From underneath the counters, at each leg, take the remaining pin and slide it through the counter support and metal counter tabs to secure both counters to the counter support. Repeat this step at the remaining five legs. Step 16 Place the ladder inside the pavilion so that the top of the peak pole can be reached. Unfold the roof into a long strip and drape it over three shoulder pieces. 6


7 Step 17 Climb the ladder and unfold the roof so that it covers the majority of the shoulder pieces. Locate the grommet in the middle of the roof and place it on the top of the peak pole. Insert the peak cap through the grommet and into the grey peak liner to hold the roof in place. Step 18 Next, it may be necessary to rotate the canopy so that the seams in the roof line up with the shoulder pieces and legs. At the outside end of each shoulder piece, pull the pocket on the inside of the roof over the small metal tab on the shoulder piece. This attaches the roof to all six shoulder pieces. Step 19 Extend the arms of each shoulder piece to pull the canopy out to its full size. Once the arm has been extended all the way, insert the remaining pin into the hole in the arm to secure it into place. Repeat this step for the remaining five arms/shoulder pieces. **It may be necessary to use a step ladder to reach the extension arms.** Step 20 Enter the pavilion by lifting the counter up and opening the door. Once inside the tent, push the peak pole up from the middle of the tent, fully extending the roof. 7

8 Step 21 While holding the peak pole in place, insert the remaining pin through the hole in the pole to secure it in the extended position. 8
POP-UP TENT CANOPY INSTALLATION & REMOVAL
 POP-UP TENT CANOPY INSTALLATION & REMOVAL SETUP INSTRUCTIONS THANK YOU FOR YOUR PURCHASE! If you have questions about installation, maintenance, or take down, please call us at (800)426-9496. Our goal
X-SERIES 10x10 SETUP INSTRUCTIONS
 SETUP INSTRUCTIONS THANK YOU FOR PURCHASING A 10x10 X-SERIES TENT! If you have questions about installation, maintenance, or take down, please call us at (800)426-9496. Our goal is that you are completely
S-SERIES 10x10 SETUP INSTRUCTIONS
 S-SERIES 10x10 SETUP INSTRUCTIONS THANK YOU FOR PURCHASING A 10x10 S-SERIES TENT! If you have questions about installation, maintenance, or take down, please call us at (800)426-9496. Our goal is that
10x10 LogoTent SETUP INSTRUCTIONS. The Triple Threat
 10x10 LogoTent SETUP INSTRUCTIONS The Triple Threat THANK YOU FOR YOUR PURCHASE! INCLUDING: 1 10x10 Canopy 1 10x10 LogoTent Frame 1 Back Full Wall 1 Right Half Wall 1 Left Half Wall 2 Half Wall Bars LogoTent
Installation Instructions
 Installation Instructions 15' 10' 10' 65' 15' 15' 15' 10' 10' 15' 50' FUTURE TRAC 50' Wide Hip End TopTec Products, LLC 7601 Highway 221 Moore, SC 29369 Phone: (800) 845-2830 Fax: (800) 921-7750 e-mail:
OPERATOR INSTRUCTION MANUAL INCLUDING REPAIR PARTS FOR MODULAR GENERAL PURPOSE TENT SYSTEM (MGPTS) TYPE I
 TYPE I") OPERATOR INSTRUCTION MANUAL INCLUDING REPAIR PARTS FOR MODULAR GENERAL PURPOSE TENT SYSTEM (MGPTS) TYPE I Johnson Outdoors Gear, Inc. Eureka! branded tent products 625 Conklin Road Binghamton, NY 13903
OPERATOR INSTRUCTION MANUAL INCLUDING REPAIR PARTS FOR MODULAR GENERAL PURPOSE TENT SYSTEM (MGPTS) TYPE I Johnson Outdoors Gear, Inc. Eureka! branded tent products 625 Conklin Road Binghamton, NY 13903
features and benefits: dimensions: Hardware Zoom Tent Assembled Unit: 115 w x h (per side) 2921mm(w) x mm(h)
 2921mm(w) x mm(h)") 10ft Outdoor Kit 04 TK-ODK-04 The Zoom 10ft square tent with custom printed canopy & two printed half-walls creates a semi-enclosed space. Two 13ft Zoom straight banners with ground spikes & double-sided
10ft Outdoor Kit 04 TK-ODK-04 The Zoom 10ft square tent with custom printed canopy & two printed half-walls creates a semi-enclosed space. Two 13ft Zoom straight banners with ground spikes & double-sided
TECHNICAL INSTRUCTION MANUAL: TRADITIONAL PARTY CANOPIES
 1. Inspect the site and make sure the area is level, free of underground utilities and any overhead obstructions. Unload poles and tent bundles. Assembly (20'x20' Shown) 2. Lay the canopy out, on a ground
OHENRY 1-PIECE TENT INSTALLATION INSTRUCTIONS INSTRUCTIONS. Instructions for Ohenry one piece top Traditional Pole Tents & High Peak Pole Tents
 OHENRY 1-PIECE INSTRUCTIONS Please follow the steps in these instructions carefully to ensure your new Ohenry tent is installed correctly. TENT INSTALLATION INSTRUCTIONS Instructions for Ohenry one piece
Compass Home 8' x 8' No Tools Gazebo with Awning and Anchor Bags Assembly Instruction for Gazebo (no tools required)
") Compass Home 8' x 8' No Tools Gazebo with Awning and Anchor Bags Assembly Instruction for Gazebo (no tools required) CAUTION: Read all instructions before assembly. Failure to do so may result in faulty
Compass Home 8' x 8' No Tools Gazebo with Awning and Anchor Bags Assembly Instruction for Gazebo (no tools required) CAUTION: Read all instructions before assembly. Failure to do so may result in faulty
INSTALLATION INSTRUCTIONS
 INSTALLATION INSTRUCTIONS Accessory HATCH KIT Application 2014 CR-V Publications No. AII 50018 Issue Date JULY 2013 Put this information in the glove box with the vehicle owner s manual PARTS LIST 4 Guide
3x3 Pop Up Gazebo with Side Panels
 '-,- 3x3 Pop Up Gazebo with Side Panels Assembly Instructions - Please keep for future reference 650/1974 Width - 3m Depth - 3m Height - 270cm ~ Important: Make sure all the guy ropes and ~ pegs are used,
INSTALLATION INSTRUCTIONS
 INSTALLATION INSTRUCTIONS Accessory HATCH KIT Application 2009 ELEMENT Publications No. AII 41008 Issue Date DEC 2008 PARTS LIST Tent bag 13 Stakes 4 Guide ropes Tent 2 Awning pole caps Gear loft 2 Tie
Hercules Snow Load 10ft X 20ft 10ft8in Wide x 20ft Deep x 6ft8in Side Height / 9ft6in Center Height
 Hercules Snow Load 10ft X 20ft 10ft8in Wide x 20ft Deep x 6ft8in Side Height / 9ft6in Center Height King Canopy Item #: HC1020PCSL With 8 Legs, Cable Truss System, Cover, 4 Piece Zippered Side-Wall Kit
Item # BJ2PC With 8 Leg Frame, Cover, and Enclosure Kit with Windows Size: 10 8 Wide x 20 Long (Side Height 6 8 ) (Center Peak Height 9 9 )
 (Center Peak Height 9 9 )") Item # BJ2PC With 8 Leg Frame, Cover, and Enclosure Kit with Windows Size: 10 8 Wide x 20 Long (Side Height 6 8 ) (Center Peak Height 9 9 ) Powell & Powell Supply Company, L.L.C. Manufactured by: 1730
Item # BJ2PC With 8 Leg Frame, Cover, and Enclosure Kit with Windows Size: 10 8 Wide x 20 Long (Side Height 6 8 ) (Center Peak Height 9 9 ) Powell & Powell Supply Company, L.L.C. Manufactured by: 1730
Assembly Instructions
 ShadeLogic Quick Clamp Canopy Tilt-Mount Table Top Pop Up Assembly Instructions Fits Any Table up to 10' Table Not Included Description Model # 7'4" x 10' Quick Clamp Canopy 14553 Please read instructions
INSTALLATION INSTRUCTIONS
 INSTALLATION INSTRUCTIONS Accessory HATCH KIT Application 201 PILOT Publications No. VERSION 1 Issue Date 201 PARTS LIST Stake bag Tent bag 13 Stakes 4 Guide ropes Tent 2 Awning pole caps 2 Tie straps
Operating Instructions
 A) ORIENTATION View capsule filling video online at www.profiller.com Cam Lever 1. Place Caps Tray onto Filler with Position I and II markings in front. Check that Cam Lever is set to 3 o clock. 2. Pour
DURA WHEEL CHAIR LOCKER ASSEMBLY INSTRUCTIONS
 DURA WHEEL CHAIR LOCKER ASSEMBLY INSTRUCTIONS 1. Locate a Frame and Door: Start by locating a frame and door. 2. Front Frame: Now stand up the frame and door in the desired assembly area. 3. Exterior Wall:
MYRIAD Banner Stand is a trademark of Skyline Exhibits. Patent Pending PN32294-B. MYRIAD Banner Stand
 is a trademark of Skyline Exhibits Patent Pending 1.1 1. Banner Stand Setup 1.1 Remove banner stand from standard case or Arrive Portable Display & Workstation and assemble pole. 1.2 Insert pole into base
Kontrol Kube Advanced Owners Manual
 Mobile Containment. Simplified. TM Kontrol Kube Advanced Owners Manual KONTROL KUBE www.kontrolkube.com 800.343755 1 IMPORTANT SAFETY INFORMATION SAVE THESE INSTRUCTIONS. CAREFULLY READ AND FOLLOW THESE
Thanks for shopping with Improvements! 10 Solar Lighted Gazebo Item #531753
 Thanks for shopping with Improvements! 10 Solar Lighted Gazebo Item #531753 Parts List: A. Frame Qty: 1 B. Canopy Qty: 1 C. Stake Qty: 8 D. Brace Qty: 4 E. Cap Qty: 1 F. Battery Qty: 2 G. Rope Qty: 4 H.
Poly Shelters. Instruction Manual. Sunblocker Shade House 10' Wide x 30' Long SKU #1030SPC. Note: Photo may be of a different but similar model
 Poly Shelters Note: Photo may be of a different but similar model Instruction Manual Sunblocker Shade House 10' Wide x 30' Long SKU #1030SPC 2004 ClearSpan TM All rights reserved. Reproduction prohibited
CAPRI PLUS. Instruction Manual. 28' x 38' Including sidewall and connector instructions.
 CAPRI PLUS Instruction Manual 28' x 38' Including sidewall and connector instructions STOP Prior to installing any tent, always make sure you check for overhead and underground obstructions! For safe assembly,
INSTALLATION INSTRUCTIONS AND OWNER'S MANUAL AWNINGS. For trailers & motor homes with straight sides TOOLS REQUIRED
 AWNINGS INSTALLATION INSTRUCTIONS AND OWNER'S MANUAL For trailers & motor homes with straight sides TOOLS REQUIRED 1/4" electric drill Ratchet handle kit 3/8" & 7/16" socket No. 1 and No. 2 screwdriver
10ft X 20ft Titan Cable Truss System 10ft8in Wide x 20ft Deep x 6ft8in/9ft6in High
 10ft X 20ft Titan Cable Truss System 10ft8in Wide x 20ft Deep x 6ft8in/9ft6in High King Canopy Item #: TITAN1020 With 8 Legs, Woven Steel Cable Truss System (8pc anchors and 8pc 10ft sections of rope and
functionality with the necessary maintenance tools stored in a convenient built in tool box, as well as parallel handles for
 GuilloMax User Manual The Guillomax has distinct features such as its unique structure and ease of cutting. It combines symmetry with functionality with the necessary maintenance tools stored in a convenient
* * 4023 KR. Step 1 Prepare the Keyed Removable Unit. Not for use on electric or fire rated removable mullions
 condition. *64009-00* 64009-00 Keyed Removable Mullions 403 KR Installation Instructions Not for use on electric or fire rated removable mullions This kit includes the following parts: (Not to scale) 5/6
General Purpose Shelter
 General Purpose Shelter 0' x 0' x ' ( x x. m) ASSEMBLY MANUAL Model NO.: - Tools required for assembly (not included) TM TABLE OF CONTENTS Important safety instructions... Intended use... Parts list......
Garden Party 13ft X 13ft 12ft 9in Wide x 12ft 9in Deep x 6ft3in Side Height / 10ft4in Center Height
 Garden Party 13ft X 13ft 12ft 9in Wide x 12ft 9in Deep x 6ft3in Side Height / 10ft4in Center Height King Canopy Item #: GP1313 With 4 Legs, Foot Pads, Cover & Screens. Distributed by: PIC America, LTD.
quick and easy installation guide
 www.directdriveopener.com quick and easy installation guide Back 2 Front. Motor Carriage 2. C-rail. Chain. Limit stops. Slide in part (tensioner) Rail assembly Insert C-rail parts () into the connecting
AND LOAD CANOPY RACK SPECIFICATIONS
 8MAY15 INSTRUCTIONS for the LOCK AND LOAD CANOPY RACK SPECIFICATIONS and SAFE LOADING REQUIREMENTS The Lock and Load ladder carrier for Truck Caps is a rack designed to mount to the top of a pickup truck
OHENRY SECTIONAL TENT INSTRUCTIONS
 INSTRUCTIONS Please follow these instructions carefully so your new Ohenry tent will be installed correctly. The pictures are based on installing a Traditional Pole Type Tent, but also apply to High Peak
WARNING USING AND CARING. for use in extreme or varied soil conditions. For optional sand pegs Oztent recomends use of a Bluescrew Oztent Edition.
 OWNER S MANUAL WARNING Never use any fuel-burning products (stoves, lanterns, heaters, etc.) inside or within proximity of this tent. Use of fuel-burning products inside or within proximity of this tent
PD Series Ram-Air Reserve Parachute Owner s Manual Addendum. PRO Packing Instructions
 PD Series Ram-Air Reserve Parachute Owner s Manual Addendum PRO Packing Instructions This document is a supplement to the PD Series Ram-Air Reserve Parachute Owner s Manual, Third Edition. It contains
Emergency Parachute Manual
 National Parachute Industries, Inc. PO Box 245 - Palenville, NY 12463 - USA PH 908-782-1646 FAX 908-782-5638 E-mail info@nationalparachute.com Emergency Parachute Manual Seat Supplement National 360-S,
INSTANT GARAGE MODEL NO: CIG81224 ASSEMBLY INSTRUCTIONS PART NO: ORIGINAL INSTRUCTIONS
 INSTANT GARAGE MODEL NO: CIG81224 PART NO: 3503578 ASSEMBLY INSTRUCTIONS ORIGINAL INSTRUCTIONS GC1117 INTRODUCTION Thank you for purchasing this CLARKE Instant Garage. When erected, the CIG81224 garage
SOFT TOP ROOF TENT INSTRUCTION MANUAL
 SOFT TOP ROOF TENT INSTRUCTION MANUAL CONTENTS SET UP INSTRUCTIONS: 1. INSTALLING YOUR ROOF TOP TENT P2-3 2. SETTING UP YOUR ROOF TOP TENT P4 3. PACKING DOWN YOUR ROOF TOP TENT P5-6 4. TIPS & TRICKS P7
DO NOT USE WITH CROSSBAR SPREAD LESS THAN 24.
 TM Please read all instructions carefully before assembly, installation and/or use of this product. DO NOT USE WITH CROSSBAR SPREAD LESS THAN 24. WARNING: Do not exceed the weight limit of your vehicle
Enclosed Hercules 10ft X 20ft 10ft8in Wide x 20ft Deep x 6ft8in Side Height / 9ft9in Center Height
 Enclosed Hercules 10ft X 20ft 10ft8in Wide x 20ft Deep x 6ft8in Side Height / 9ft9in Center Height King Canopy Item #: HC1020PCF With 8 Legs, White Cover, 2 Side Walls, 2 End Walls, Elastic Ball Straps
Hercules Enclosed Snow Load 10ft X 20ft 10ft 8in Wide x 20ft Deep x 6ft 8in Side / 9ft 6in Center Height
 Hercules Enclosed Snow Load 10ft X 20ft 10ft 8in Wide x 20ft Deep x 6ft 8in Side / 9ft 6in Center Height King Canopy Item #: HC1020PCSL With 8 Legs, King Truss Roof Cable System, Cover, and 4 Piece- Side-Wall
Elite Party Canopy: Stylish backyard canopies with a distinctive peaked roof and optional color band.
 Elite Party Canopy: Stylish backyard canopies with a distinctive peaked roof and optional color band. Elite Party Canopy Construction Features: 13-14 oz.vinyl laminate tent fabric Anodized sectional aluminum
SAFETY GUIDELINES FOR DIY TENTS
 SAFETY GUIDELINES FOR DIY TENTS Please read carefully and fully before starting assembly of the tent 1. The installer is solely responsible for evaluating the site and proper securing method determined.
COMPASSION UK EVENTS
 COMPASSION UK EVENTS setting up the stand Here, you will find step-by-step instructions for the various stands and other equipment. These will differ depending on the event. SETTING UP A PULL-UP BANNER
MAINTENANCE CARE & SAFETY INSTRUCTIONS
 ASSEMBLY MANUAL MAINTENANCE CARE & SAFETY INSTRUCTIONS The Vuly trampoline tent is designed neither as a weather cover, nor to extend the life of the trampoline. It is intended for recreational use only
10 Economy Popup Tent
 10 Economy Popup Tent ZM-TNT-ECO-3MX3M The Zoom Tent is great for outdoor fairs, exhibitions, sporting events and arenas, concerts, festivals and more. Strong, solid, stable, wind-resistant & durable.
Solar Power Shade INSTRUCTION MANUAL
 INSTRUCTION MANUAL 20 June 2006, Revision Initial Release 26 September 2006, version 2 Powerfilm, Inc. 2337 230th Street Ames, IA 50014 (515) 292-7606 Web Site: www.powerfilmsolar.com Table of Contents
Installation Guide: Round Trampoline
 Trampolines & trampoline parts designed to survive in the harsh Oz climate. www.oztrampolines.com.au Installation Guide: Round Trampoline Safety Tips Here at Oz Trampolines we are passionate about your
Hercules 18ft X 20ft 17ft9in Wide x 20ft Deep x 6ft8in Side Height / 11ft6in Center Height
 Hercules 18ft X 20ft 17ft9in Wide x 20ft Deep x 6ft8in Side Height / 11ft6in Center Height King Canopy Item #: HC1820PC With 8 Legs, White Drawstring Cover, Elastic Ball Straps & Foot Pads. Distributed
Otter Pro X-Over Lodge Installation and Set-Up Instructions
 Otter Pro X-Over Lodge Installation and Set-Up Instructions Otter Pro X-Over Lodge Fits Magnum Otter II & Pro Sled Only Parts Identification and Check List MODEL NUMBERS: Complete Pkg Pro X-Over Lodge
INSTALLATION INSTRUCTIONS
 INSTALLATION INSTRUCTIONS KR54, KR1654, & KR4954 Keyed Removable Mullion NOT FOR USE ON ELECTRIC OR FIRE RATED MULLIONS. This kit includes the following parts: (Not to scale) WARNING Remove key, reinstall,
Pond & Garden Protector Assembly Instructions. Instrucciones de Ensamblaje del Protector de Estanques y Huertos
 Pond & Garden Protector Assembly Instructions Instrucciones de Ensamblaje del Protector de Estanques y Huertos Instructions d assemblage du protecteur de bassin et de jardin Part No. / Pieza No. / Réf
Otter Pro XT Cabin Installation and Set-Up Instructions
 Otter Pro XT Cabin Installation and Set-Up Instructions Otter Pro XT Cabin Fits Medium Otter Pro and Otter II Sled Only Parts Identification and Check List MODEL NUMBERS: Complete Pkg Pro XT Thermal Cabin
User s Manual Trampoline 8
 User s Manual Trampoline 8 Model! WARNING Read all precautions and instructions in this manual before using this equipment. Save this manual for future reference. Maximum user weight 17 lbs. ASSEMBLY IMPORTANT
ASSEMBLY & CARE INSTRUCTIONS
 ASSEMBLY & CARE INSTRUCTIONS 7 x TRAILER TENT SERIES 3 9 Part No. FT3711 - on road FT3923 - off road OPTIONAL SUNROOM Wall and floor kit Part No. FT3723 - on road FT39 - off road OPTIONAL SPARE ROOM Roof,
10 X 20 X 8 Dome Canopy
 10 X 20 X 8 Dome Canopy Warning Keep all flame and heat sources away from this tent fabric. Refer to labels for flamability specification. It is not fire proof. The tent fabric will burn if left in continuous
'u se. Step-by-Step Instruction Leaflet, Conway Products Limited Skull House Lane, Appley Bridge, Wigan WN6 9DW ! ~-- ',I,
 'u se Step-by-Step Instruction Leaflet,! ~-- ',I, Conway Products Limited Skull House Lane, Appley Bridge, Wigan WN6 9DW Due to a proces s of ever-contmumq product Improvement. some details contained In
Assembly. Step 3. Attach the safety bracket (7) to the Pivot ARM (6).
 to the Pivot ARM (6).") Assembly Step 1. A. Stand the base of the machine by separating the U-frames (1,2). Pull the Front and Rear U-Frames (1,2) as far apart from each other as possible. Then push down on the middle of the
Assembly Step 1. A. Stand the base of the machine by separating the U-frames (1,2). Pull the Front and Rear U-Frames (1,2) as far apart from each other as possible. Then push down on the middle of the
ASSEMBLY & CARE INSTRUCTIONS. 7 x4 TRAILER TENT SERIES 4 9. OPTIONAL SUNROOM Wall and floor kit. OPTIONAL SPARE ROOM Roof, wall and floor kit
 ASSEMBLY & CARE INSTRUCTIONS 7 x TRAILER TENT SERIES 9 Part No. TM709 OPTIONAL SUNROOM Wall and floor kit Part No. TM723 OPTIONAL SPARE ROOM Roof, wall and floor kit Part No. TM76 Please keep these instructions
INSTRUCTION MANUAL ALEKO RETRACTABLE AWNING
 INSTRUCTION MANUAL for ALEKO RETRACTABLE AWNING www.alekoproducts.com FAILURE TO FOLLOW THESE INSTRUCTIONS MAY RESULT IN PERSONAL INJURY! 1 Important Safety Precautions WARNING NOTE: FOR PERSONAL SAFETY,
THANK YOU. Thank you for purchasing your E-Z UP Instant Shelter Product!
 THANK YOU Thank you for purchasing your E-Z UP Instant Shelter Product! With proper care, this shelter will deliver years of trouble-free use. Please take a few minutes to read the use and care instructions
, & Series Nested Hardware
 RECORD THIS INFORMATION FOR FUTURE REFERENCE BEFORE INSTALLING THE UNIT: Model Number Serial Number Date Purchased Place of Purchase USA SERVICE OFFICE Dometic Corp. 509 So. Poplar St. LaGrange, IN 46761
14' x 32' x 12' Round Top Round Style Shelter Assembly Instructions
 14' x 32' x 12' Round Top Round Style Shelter Assembly Instructions Description Model # 14' x 32' x 12' RoundTop Garage - Gray 62669 Recommended Tools Please read instructions COMPLETELY before assembly.
Roller Bar End Cap (w/round Drive Shaft) Replacement Instructions for Vista and Motorized Awnings * Helpers needed *
 Replacement Instructions for Vista and Motorized Awnings * Helpers needed *") RETRACTABLE AWNINGS For Technical Support visit us at www.sunsetter.com/ownerscorner or Call Toll Free 800-670-7071 Fax 877-224-4944 Roller Bar End Cap (w/round Drive Shaft) Replacement Instructions for
RETRACTABLE AWNINGS For Technical Support visit us at www.sunsetter.com/ownerscorner or Call Toll Free 800-670-7071 Fax 877-224-4944 Roller Bar End Cap (w/round Drive Shaft) Replacement Instructions for
π H-3505 GARAGE CANOPY PARTS SAFETY uline.com TOOLS NEEDED 10' X 20' X 8'
 π H-3505 GARAGE CANOPY 10' X 20' X 8' 1-800-295-5510 uline.com TOOLS NEEDED Safety Glasses Wrench or Socket 9/16" or 14mm Tape Measure Phillips Screwdriver Rubber Mallet PARTS Cables x 5 2-way Corner Foot
Shut off combine and remove key before installing the hopper extension. Make sure the combine is on a level surface. Engage parking brake.
 ASSEMBLY INSTRUCTIONS CASE IH 5088, 6088/7088, 7010/8010 & 7120/8120/9120 Series NEW HOLLAND CR STD Series Combines (Large) big top 26301(service only), 29976 (service only), 53408, 53543 & 54274 The Crary
Assembly Instructions & User s Manual Grand Ponderosa 10P Cabin Tent
 Assembly Instructions & User s Manual Grand Ponderosa 10P Cabin Tent FSMGCT2010 Please keep this instruction manual for future reference Customer Service: (888) 922-2336 7:00 am to 12:00 am CST (daily)
LM601 Landmark Permanent Blind
 LM601 Landmark Permanent Blind Get parts online at www.huntriversedge.com P/N: 26742 REV1: 01/13/17 2017 RETI All Rights Reserved INTRODUCTION Landmark Permanent Blinds are engineered with you the hunter
10 ft / 3m 10 ft / 3m INSTANT CANOPY ITM. /ART ASSEMBLY INSTRUCTIONS IMPORTANT, RETAIN FOR FUTURE REFERENCE: READ CAREFULLY
 10 ft / 3m 10 ft / 3m INSTANT CANOPY ITM. /ART. 966761 ASSEMBLY INSTRUCTIONS IMPORTANT, RETAIN FOR FUTURE REFERENCE: READ CAREFULLY Please check with your local regulations prior to purchasing this item.
Assembly instructions for Eurotramp trampolines Series: Ultimate, Grand Master Exclusiv, Grand Master, Master
 Assembly instructions for Eurotramp trampolines Series: Ultimate, Grand Master Exclusiv, Grand Master, Master 1. Assembly instructions 2. Attaching the plastic coated steel cables on the Ultimate frame
Otter XT Cabin Installation and Set-Up Instructions
 Otter XT Cabin Installation and Set-Up Instructions Otter XT Cabin Fits Medium Otter Wild Sled Only Parts Identification and Check List MODEL NUMBERS: Complete Pkg Otter XT Cabin 200962 2 1 PARTS LIST
Instruction Manual. Mag Mission 8P Tent Style# Please keep this instruction manual for future reference. Customer Service: (877)
") Instruction Manual Mag Mission 8P Tent Style# 153640 Please keep this instruction manual for future reference Customer Service: (877) 579-1550 Business Hours: Monday thru Friday 8:30am to 5:30pm, EST (Made
Instruction Manual Mag Mission 8P Tent Style# 153640 Please keep this instruction manual for future reference Customer Service: (877) 579-1550 Business Hours: Monday thru Friday 8:30am to 5:30pm, EST (Made
2-N-1 Expandable 12ft X 20ft / 20ft x 20ft 19ft7in Wide x 20ft Deep x 10ft3in Center Height (12x20) / 11ft7in Center Height (20x20)
 / 11ft7in Center Height (20x20)") 2-N-1 Expandable 12ft X 20ft / 20ft x 20ft 19ft7in Wide x 20ft Deep x 10ft3in Center Height (12x20) / 11ft7in Center Height (20x20) King Canopy Item #: EX1220 With 8 Legs, Cover with Leg Skirts (12x20
2-N-1 Expandable 12ft X 20ft / 20ft x 20ft 19ft7in Wide x 20ft Deep x 10ft3in Center Height (12x20) / 11ft7in Center Height (20x20) King Canopy Item #: EX1220 With 8 Legs, Cover with Leg Skirts (12x20
NEWMAR SERVICE SCHOOL
 NEWMAR SERVICE SCHOOL TRAINING INFORMATION GUIDELINE FOR FEBRUARY 2013 OUR PRODUCTS: NOVA DUAL PITCH AWNING G-2000/ G-1500 2 P a g e G-2085 G-5000 3 P a g e G-LINKS 4 P a g e NOVA/ G-2000/ G-1500 BASIC
Universal 10 x 27 Canopy
 Universal 10 x 27 Canopy C81027PC Size: 10 8 x 27 x 6 8 (side) x 9 9 (center) With 10 Legs, Frame, and Cover Powell & Powell Supply Company Distributed by: 1730 Five Points Lane Fuquay-Varina, North Carolina
Garden Party 10ft X 10ft 10ft Wide x 10ft Deep x 6ft3in Side Height / 9ft7in Center Height
 Garden Party 10ft X 10ft 10ft Wide x 10ft Deep x 6ft3in Side Height / 9ft7in Center Height King Canopy Item #: GP1010 With 4 Legs, Foot Pads, Cover & Screens. Distributed by: PIC America, LTD. 1730 Five
Cabinet Mount Assist Lift n Lock Instructions
 Cabinet Mount Assist Lift n Lock Instructions PART LIST 2 @ Gas Cylinder 1 @ Lock Bar 2 @ Rubber Sleeve (preset) 4 @ Stopper Pin (2pcs preset) 4 @ Saddle Block 8 @ 19mm Black PVC Cap 5 @ 14mm Black PVC
Assembly TOOLS REQUIRED: 17mm and 14mm or equivalent wrenches.
 Instructions for 3 Trimmer Rack, 3TR* *Patents Pending Assembly TOOLS REQUIRED: 17mm and mm or equivalent wrenches. 15 26 26 16 15 16 Attach the lower mounting brackets to the Trimmer Rack poles as shown
10' x 20' MAX AP CANOPY EXTENSION KIT Assembly Instructions
 10' x 20' MAX AP CANOPY EXTENSION KIT Assembly Instructions Frame Not Included Description Model # 10' x 20' MAX AP Canopy - Extension Kit - White 35730 Recommended Tools Please read instructions COMPLETELY
Rhino-Rack Sunseeker II Base Tent (32119)
") Important: Please read these instructions carefully prior to installation. Please refer to your fitting instruction to ensure that the roof racks are installed in the correct locations. Check the contents
Important: Please read these instructions carefully prior to installation. Please refer to your fitting instruction to ensure that the roof racks are installed in the correct locations. Check the contents
10' x 20' MAX AP CANOPY Assembly Instructions
 10' x 20' MAX AP CANOPY Assembly Instructions Description Model # 10' x 20' MAX AP Canopy - 8 Leg - White 30522 Recommended Tools Please read instructions COMPLETELY before assembly. This shelter MUST
4.2 Assembly Instructions
 4.2 Assembly Instructions 4.2.1 Assembly of Reserve Canopy. Assembly of Reserve Canopy using Rapide Links. After inspecting the Parachute and the Wings Harness/Container System, hang or lay the parachute
Zoom 10 Standard Popup Tent
 Zoom 10 Standard Popup Tent ZM-TNT-STD-3MX3M The Zoom Tent is great for outdoor fairs, exhibitions, sporting events and arenas, concerts, festivals and more. Strong, solid, stable, wind-resistant & durable.
INSTRUCTIONS INSTALLATION UNIVERSAL SERIES PATIO AWNING HARDWARE , , ,
 RECORD THIS INFORMATION FOR FUTURE REFERENCE: Model Number Serial Number Hardware Model Number Hardware Serial Number Date Purchased Retailer / Qualified Installer INSTALLATION INSTRUCTIONS UNIVERSAL SERIES
Come rain or shine its fine out with ScooterPac. Take a quick read of this manual to get the most out of your folding canopy.
 YOUR USER MANUAL Come rain or shine its fine out with ScooterPac. Take a quick read of this manual to get the most out of your folding canopy. Contents 1 Quick start guide 5 Fitting your canopy 9 Detailed
Installation Guide. LPKPDR - Universal LP Conversion Kit for Professional & Designer Ranges/Rangetops. Viking Range, LLC.
 Installation Guide Viking Range, LLC 111 Front Street Greenwood, Mississippi 38930 USA (662) 455-1200 For product information, call 1-888-845-4641 LPKPDR - Universal LP Conversion Kit for Professional
Enclosed Universal 10ft X 20ft 10ft8in Wide x 20ft Deep x 6ft8in Side Height / 9ft9in Center Height
 Enclosed Universal 10ft X 20ft 10ft8in Wide x 20ft Deep x 6ft8in Side Height / 9ft9in Center Height King Canopy Item #: BJ2PC With 8 Legs, Cover, Side Wall kit with Windows, Elastic Ball Straps & Foot
Solera Power Awning OEM INSTALLATION MANUAL
 Solera Power Awning OEM INSTALLATION MANUAL TABLE OF CONTENTS System Information 2 Safety 2 Prior To Installation 2 Resources Required 2 Awning Rail Installation (If Needed) 3 Installation 3 Awning Installation
Wenger Corporation 2014 Printed in USA 05/14 Part #049B015-09
 Assembly Instructions Tuba Tamer Contents Important User Information...........................2 Replacemant Parts List..............................3 Assembly.........................................4
10 X20 Dome Garage ITEM #: G Dimensions: 10ft. Wide x 20ft. Deep x 8ft. Center Height
 10 X20 Dome Garage ITEM #: G10208 Dimensions: 10ft. Wide x 20ft. Deep x 8ft. Center Height WARNING: Keep all flame and heat sources away from this tent fabric. It is not fire proof The fabric will burn
Tabletop Kit 01. features and benefits: dimensions: additional information:
 Tabletop Kit 01 TK-TTK-01 Make a statement with an easy-to-assemble tension fabric Hopup tabletop display with spotlights. A custom-printed stretch table throw that fits standard 6ft tables & a single-sided,
Rooftop Tent Owners Manual
 WWW.SMITTYBILT.COM Installation Instructions Part # 2783 Overlander Tent Rooftop Tent Owners Manual Read instruction manual entirely before assembling and installing this product. The Smittybilt Overlander
Otter XT 650 Cabin Installation and Set-Up Instructions
 Otter XT 650 Cabin Installation and Set-Up Instructions Otter XT 650 Cabin Fits Medium Otter Wild Sled Only Parts Identification and Check List MODEL NUMBERS: Complete Pkg Otter XT 650 Cabin 200891 2 1
Installation Instructions for the Rolltec Bravo Awning
 Installation Instructions for the Rolltec Bravo Awning Questions? Call Rolltec at 1-800-667-0474 Table of Contents Available installation brackets Side dimensions of various installations Determining installation
ERECTION INSTRUCTIONS DRIVEAWAY XC
 ERECTION INSTRUCTIONS DRIVEAWAY XC BEFORE USE PLEASE TAKE TIME TO READ AND UNDERSTAND THE ERECTION INSTRUCTIONS. FAILURE TO ERECT THE TENT IN ACCORDANCE WITH THE INSTRUCTIONS MAY RESULT IN DAMAGE TO BOTH
ABS Model Background Stand
 ABS Model Background Stand Product Overview: The completely redesigned Ravelli ABS model background stand is 10' tall by 12.3' wide. It is comprised of two tripod stands and four 3 cross bar sections and
Greenhouse 10ft X 10ft 9ft4in Wide x 10ft3in Deep x 5ft4in Side Height / 7ft10in Center Height
 Greenhouse 10ft X 10ft 9ft4in Wide x 10ft3in Deep x 5ft4in Side Height / 7ft10in Center Height These Tools Are Recommended: King Canopy Item #: GH1010 With 6 Legs, Cover, Elastic Ball Straps & Foot Pads.
USER MANUAL BMU WORKCAGE. CONFORM TO THE MACHINE DIRECTIVE 2006/42/EC and to EN1808 (1999)
") USER MANUAL BMU WORKCAGE CONFORM TO THE MACHINE DIRECTIVE 2006/42/EC and to EN1808 (1999) All persons operating this equipment must read and completely understand this manual. Any operation in violation
USER MANUAL BMU WORKCAGE CONFORM TO THE MACHINE DIRECTIVE 2006/42/EC and to EN1808 (1999) All persons operating this equipment must read and completely understand this manual. Any operation in violation
Assembly and Installation Instructions
 U.S. patent number 8,708,369 part number 4750 for Blue Ox tow bars with Blue Ox brackets, Demco tow bars with Demco brackets, and all motorhome-mounted ROADMASTER tow bars Assembly and Installation Instructions
TOYOTA TUNDRA BEDRUG Preparation
 TOYOTA TUNDRA 2007 - BEDRUG Preparation Part Number(s): PTS12-34070 (5.5 bed) PTS12-34071 (6.5 bed) PTS12-34072 (8.1 bed) NOTE: Part number of this accessory may not be the same as the part number shown.