Basic, Comfort and Trophy System Instruction Booklet
|
|
|
- Branden Cole
- 5 years ago
- Views:
Transcription
1 Basic, Comfort and Trophy System Instruction Booklet You MUST also view the enclosed DVD BEFORE using your new treestand!! Weight Limit 260 total. Tree Size: all models. READ ME FIRST!!! Please read carefully BEFORE using your new Summit Hang-On Treestand. Congratulations! You have purchased the finest commercially available treestand on the market today. Summit Hang-On Treestands are designed and built to provide years of trouble-free, successful hunting with a minimum of maintenance and care. They are certified to meet the requirements of the Treestand Manufacturers Association (TMA) Standards. This booklet is provided to you to outline the recommended use, care and maintenance of your Summit Hang-On Treestand. Warnings and Precautions YOU MUST FULLY READ, UNDERSTAND AND FOLLOW THESE INSTRUCTIONS! YOU MUST USE A LINEMAN S STYLE CLIMBING BELT TO INSTALL THIS TREE STAND. NEVER DISCONNECT FROM YOUR LINEMAN S BELT UNTIL YOU ARE HOOKED INTO YOUR SAFETY LINE! DO NOT USE THIS OR ANY OTHER TREESTAND IF YOU HAVE BEEN USING DRUGS OR ALCOHOL OR ARE PHYSICALLY IMPAIRED IN ANY WAY! FOR YOUR SAFETY, DO NOT USE ANY TREESTAND DURING STORMS, WHEN TREES ARE WET OR ICY, OR ON TREES THAT ARE LEANING OR THAT APPEAR DEAD OR DISEASED! DO NOT USE ANY TREESTAND IF YOU HAVE NOT FOLLOWED THE MANUFACTURERS CARE AND MAINTENANCE GUIDELINES! NEVER ALLOW THE SAFETY HARNESS TETHER TO GET UNDER OR AROUND YOUR NECK! IT IS IMPORTANT THAT YOU REMEMBER TO BE PREPARED IF YOU HAPPEN TO FALL AND EMPLOY YOUR SAFETY HARNESS WHILE IN A TREESTAND. STAY CALM AND DO NOT PANIC. YOU MUST BE PREPARED TO RECOVER FROM YOUR FALL BY EITHER CLIMBING BACK ONTO YOUR TREESTAND OR USING A DEVICE SUCH AS THE TREE DESCENDER (AVAILABLE FROM SUMMIT, ). PRIOR TO HUNTING: YOU MUST NOTIFY SOMEONE OF YOUR HUNTING LOCATION AND WHEN YOU WILL RETURN! DO NOT USE ANY TREESTAND UNLESS YOU ARE IN GOOD PHYSICAL SHAPE. THE ABILITY TO DO SEVERAL PUSH-UPS, CHIN-UPS, SIT-UPS, ETC. IS REQUIRED FOR YOUR SAFETY! ALWAYS USE A HAUL LINE TO RAISE AND LOWER UNLOADED FIREARMS AND BOWS! NEVER CLIMB WITH ANYTHING IN YOUR HANDS OR ON YOUR BACK - USE A HAUL LINE! PRACTICE USING YOUR TREESTAND AND SAFETY HARNESS AT A LOW LEVEL (5 FEET) UNTIL YOU MASTER ITS USE. BE WELL RESTED AND NEVER GET IN A HURRY. HURRYING CAUSES ACCIDENTS!! IF YOU LOAN OR SELL THIS TREESTAND, IT IS YOUR RESPONSIBILITY TO FURNISH THE BUYER A COPY OF THESE INSTRUCTIONS AND THE VIDEO THAT CAME WITH THE TREESTAND. MAKE SURE THEY WATCH THE VIDEO AND READ / UNDERSTAND THE INSTRUCTIONS! FAILURE TO FOLLOW THESE INSTRUCTIONS MAY CAUSE SERIOUS INJURY OR DEATH!! Warning Before each use of your Summit Treestand, ALWAYS inspect the treestand for any structural damage, cracks, cable wear or abrasion that may have occurred in transporting your treestand. DO NOT USE IF ANY DAMAGE IS FOUND! DO NOT leave your treestand outdoors when it is not being used. Any tubing that is allowed to fill with rainwater and freeze WILL rupture or burst. DO NOT use your treestand if this happens , 82018, / Basic, Comfort, Trophy System / 2006
. Step 2.")


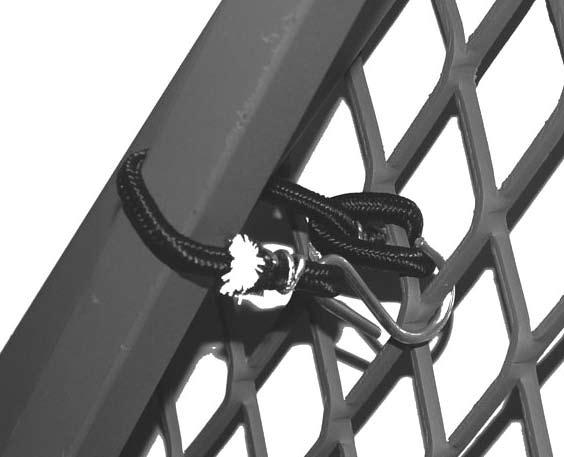
2 Section 1. Assembling your new Treestand Part 1. Platform Assembly (All Models). Step 1. Place two short shank bushings on the outside of each U- Bracket welded to the bottom of the platform (See Figure 1). Step 2. Place two long shank bushings into the pre-punched holes in the end of the V-shaped Platform Leveler Bar (See Figure 1). Repeat for other side. Step 3. Position the platform leveler into the U-Brackets and line up the holes. Secure with two 1 3/4 bolts and lock nuts as shown in Figure 2. Note the correct orientation of the Leveler Bar. The flat edge should face up as shown in the circle. Part 2. Comfort System Seat Assembly Step 1. Place two short shank bushings on the inside of the L-Shaped bracket on the Platform as shown in Figure 3. Step 2. Place two long shank bushings into the pre-punched holes in the end of the seat tubing as shown in Figure 3. Step 3. Position each end of the seat tube to the outside of the L- Shaped brackets and secure using two 1 1/2 bolts with lock nuts (See Figure 4). Figure 1 Part 3. Trophy Chair Assembly Step 1. Place two short shank bushings on the outside of the bracket on the Arm Support Assembly as shown in Figure 5. Step 2. Place two short shank bushings on the outside of the middle bracket on the Seat Post as shown in Figure 5. Step 3. Place two short shank bushings on the outside of the lower bracket on the Seat Post as shown in Figure 5. Step 4. Position the Arm Support and Seat Post as shown in Figure 6. Secure with two 3/4 bolts and lock nuts. Wrench tighten. Step 5. Position the Support rod as shown in Figure 6. Secure each side using one 3/4 bolt with lock nuts. Do not overtighten as this connection is designed to pivot. Seat Frame should slide and pivot. If it does not, slightly loosen bolt. Step 7. Position seat then slide it down onto the Arm Support Bar as shown in Figure 7. Step 8. Use two self tapping screws to secure the seat webbing to the Arm Support bar. Run the screws in through the webbing from the side as shown in Figure 8. A powered screw driver works best for this step. Step 9. Position the arm rest pads as shown in Figure 9. The cable ties for attaching the pads are in-line cable ties: Note the correct and incorrect ways of attaching. To attach - pull the cable ties snug, cut off the excess, and rotate the clasp to the underside of the pad. Use two cable ties per pad. Step 10. Push the looped end of the cam buckle strap through the welded wire loop on the top of the Seat Post. Loop the strap and buckle back through the sewn loop to create a cinch knot as shown in Figure /2 Bolt with Lock Nut Figure 4 Part 4. Carrying your Basic / Comfort / Trophy System The System platform comes with a small bungee to keep the Leveler Bar in place while you are transporting the stand. To use this bungee, loop it around the platform to create a cinch knot as shown in Figure 11. Loop it around the Leveler bar and clip it off to secure it. Figure 7 Figure 8


3 Figure 2 1 3/4 Bolt with Lock Nut Figure 3 3/4 Bolt with Lock Nut On backside of Seat Post Figure 5 Figure 6 3/4 Bolt with Lock Nut Figure 9 Figure 10 Figure 11
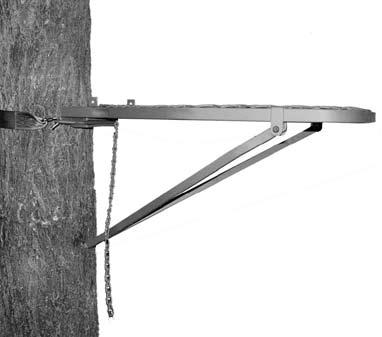
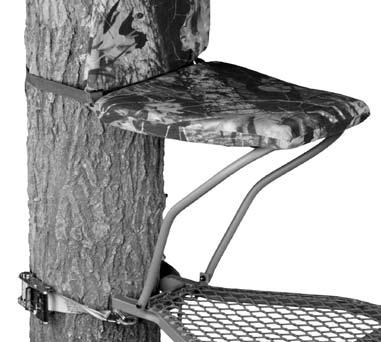
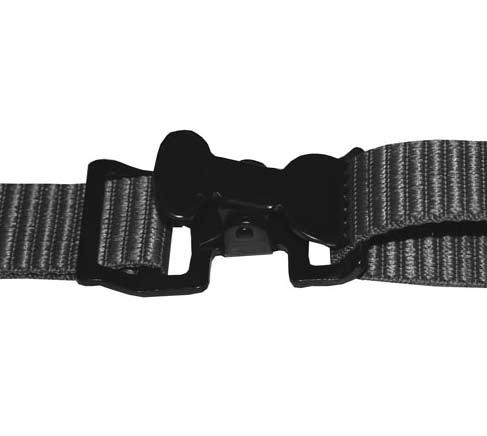
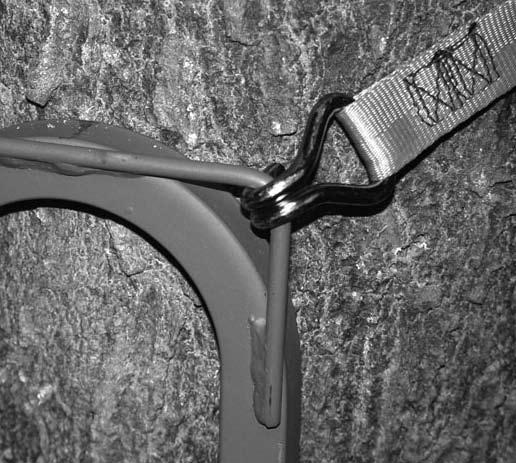
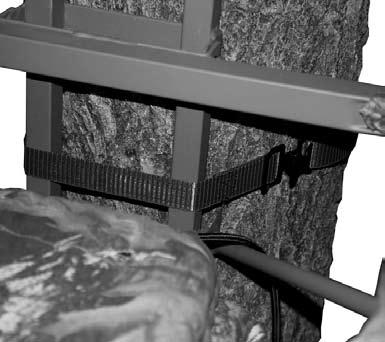
4 To carry the Trophy Chair, first fold it flat. Next, take the supplied green tourniquet buckle strap and wrap it around the frame to secure it as shown in Figure 12. Take the long cam buckle tree strap and bring it over your shoulder. Clip the double J-Hook into the Support Rod slide to secure as shown in Figure 13. Section 2. Use of the Basic, Comfort or Trophy System. WARNING: A LINEMAN S STYLE HOOK UP IS MANDA- TORY WHEN HANGING YOUR PLATFORM OR SEAT. SEE THE HARNESS INSTRUCTIONS FOR INFORMATION ON USING THE SUPPLIED LINEMAN S BELT! Part 1. Attaching your Platform to the Tree. Step 1. USING YOUR CLIMBING BELT, Climb to your desired hunting height. Wrap the ratchet strap around the tree and hook the double J-Hook into the sewn-in metal bracket as shown in Figure 14. Step 2. Ratchet tight enough so that the strap does not slip down the tree but DO NOT OVERTIGHTEN AT THIS POINT. The strap ONLY needs to be tight enough so that it does not slip down the tree. Step 3. Using a pull-up rope, haul your platform up to the ratchet strap. WARNING: ALWAYS USE A PULL-UP ROPE! Step 4. Angle the platform down and hook the metal bracket over the ratchet strap bar as shown in Figure 15. WARNING: MAKE SURE THE ENTIRE LENGTH OF BAR IS SECURE IN THE CHANNEL ON THE PLATFORM AS SHOWN IN FIGURE 16. Step 5. Rotate the front of the platform up to cam it into the tree. Step 6. Once the platform is level, bring the V-Shaped Leveling bar up and secure it into the tree as shown in Figure 17. Step 7. Attach the adjustment chain to the Leveling bar as shown in Figure 18. NOTE: This chain does not need to be tight - it is designed to limit the downward movement of the Leveling bar if it were to be come dislodged. Step 8. Once the platform has been positioned correctly and it is level, tighten the ratchet strap. WITH YOUR CLIMBING BELT STILL ATTACHED - pull down on the front of the platform to seat it into the tree. Step 9 (Comfort System Only). Fold the seat bar up and off of the platform. Position the seat so that the sitting pad is parallel with the platform as shown in Figure 19. Wrap the top strap around the tree and cinch it tight. Once the top strap has been secured, wrap the bottom strap around the tree and tighten. This lower strap can be let out or pulled tight to adjust seat comfort. WARNING: MAKE SURE BOTH STRAPS ARE THREADED COMPLETELY THROUGH THE BUCKLES BEFORE SITTING (SEE FIGURE 20). Step 10 (Trophy System Only). Position the Trophy Chair at the desired height off of the platform. Wrap the cam buckle strap around the tree and hook the double J-Hook into the seat frame as shown in Figure 21. Pull the free end of the strap until tight. Wrap the supplied green tourniquet buckle strap around the frame and the tree to secure (See Figure 22). Push down on the chair to seat it into the tree. Secure the seat by wrapping the bungee cord around the tree and clipping it off. Step 11. Attach your safety rope above your platform or seat. REFER TO THE TREESTAND HARNESS INSTRUCTIONS FOR PROPER PLACEMENT AND USE. Connect your harness tether to your safety rope. Once you are properly connected, THEN AND ONLY THEN should you remove your lineman s hookup. NOTE: Summit recommends the use of the SOP Climbing System Accessory with all ladder and hang-on treestands. More information on this product can be found on our website or by calling Part 2. Detaching From The Tree Step 1. Once you are securely back on your ladder or climbing sticks, and once you have your lineman s belt back on - lift up on the front of the stand to unseat the Leveling bar. Remove the chain. Step 2. Rotate the entire platform down to un-cam it from the tree. Lift up on the platform to remove it from the ratchet strap. Step 3. Lower the platform back to the ground. Step 4. Loosen the ratchet strap and remove it. Section 3. Maintenance and Care of Your Treestand. Because of the quality construction techniques used in manufacturing, your Summit Treestand is very durable under normal hunting conditions. However, since all hunting equipment that is exposed to the elements requires some maintenance and care, the following guidelines for caring for your treestand should be used. DO NOT leave your treestand outdoors when it is not being used. Any tubing that is allowed to fill with rainwater and freeze WILL rupture or burst. DO NOT use your treestand if this happens. If your treestand is exposed to the elements, it will be necessary to cover the seat to prevent rain and moisture from saturating the material. This will extend the life of the seat material as well as make it more comfortable the next time it is used. The powder coat finish that is applied at the factory is very durable and should need touch ups only in areas of heavy wear or accidental impact. Should you damage any part of your Summit Treestand, contact your nearest authorized Summit dealer or the factory to obtain the proper corrective action procedure and/or replacement parts for the treestand. Unauthorized repairs, modifications, or alterations will void the warranty and could degrade the integrity of the treestand. You must perform periodic inspections of the treestand for damage. WARNING: DO NOT use the treestand if ANY obvious or suspected damage is observed. CAUTION: Look for nicks, gouges, cuts, cracks, bends, corrosion or similar damage that can be the result of improper user or accidental damage. For instance, this could occur if someone else used the treestand without knowledge of its proper use, or if the treestand were dropped, hit by a motor vehicle or subject to corrosive conditions, etc. Summit Treestands have the highest structural integrity by design, material selection and manufacturing techniques, but as its owner, only your continued care will assure trouble free performance. When the above-mentioned guidelines are followed, your Summit Treestand will provide years of successful hunting. WARNING: ALWAYS STEP DOWN TO YOUR PLATFORM FROM YOUR CLIMBING STICKS OR LADDER. NEVER CLIMB UP ON TO THE PLATFORM!


5 Figure 12 Figure 14 Figure 13 Figure 15 Figure 16 Figure 17 Figure 18 Figure 19 Figure 20 Figure 21 Figure 22
6 Tips You will easily learn how to use your Summit treestand more efficiently and make it more effective for your hunting. Changing your sitting position can relieve muscle stress and reduce fatigue. This will allow a longer hunt and perhaps an opportunity for a shot. Although it must be done slowly and quietly, repositioning and changing the height of your seat by raising or lowing the seat frame just a couple of inches could make a difference. This changes the hip to knee angle. Moving the seat straps, again slowly and quietly, forward or backward on their support bar will alter the sitting position also. Being comfortable will result in no movement and reduce being detected by game either from sight or from sound. Harness Suspension It is necessary and very important that someone knows your hunting location and time of return. It is also very important that you carry (on your person) emergency communication devices such as a cell phone, two-way radio, whistle, signal flare or preferably a PLD (Personal Locator Device - FCC approved July, 03). When triggered, a PLD will transmit an emergency signal to local rescue teams identifying your location via satellite GPS coordinates. Wilderness outfitters and the internet are sources for these PLD s. Suspension trauma or blood pooling can occur when suspended motionless in a harness for periods of time. This can lead to unconsciousness. WARNING: IF YOU HAVE TO HANG IN THE TREE BEFORE HELP ARRIVES, YOU NEED TO EXERCISE YOUR LEGS BY PUSHING OFF FROM THE TREE OR BY USING THE ENCLOSED SUSPENSION RELIEF STRAP. SEE THE TREESTAND HARNESS INSTRUCTIONS AND THE EN- CLOSED INSTRUCTIONS FOR MORE INFORMATION. Self extraction may be necessary in the unfortunate situation that A) No one knows your location, B) Your communication efforts are exhausted, and C) You re confident that you have the strength, dexterity and ability to perform self-extraction and D) You decide this is your absolute last resort. It is necessary to carry a device to assist with this self-extraction. Simple devices such as screw-in steps or a rope Tree Descender (available from Summit) will allow you to remove the weight from your harness. This may enable you to return to the treestand/ladder/climbing steps or slowly descend the tree. Good Hunting and Hunt Safe! HUNT TOMORROW......USE YOUR SAFETY HARNESS TODAY! (STLLC 2006) Limited Warranty (A) Warranty Summit Treestands, LLC (Summit) warrants to the original retail purchaser that all products manufactured by it are free from defects in material and manufacture at the time of shipment for sixty (60) months from the date of purchase. Summit will repair or replace any part found defective if the unit claimed to be defective shall be returned to Summit, postage prepaid, within the warranty period. This warranty shall not apply to any product which has been subjected to misuse; misapplication; neglect (including but not limited to improper maintenance); accident; improper installation; modification (including but not limited to use of unauthorized parts or attachments); adjustment or repair. THE FOREGOING IS IN LIEU OF ALL OTHER WARRANTIES, WHETHER EXPRESS OR IMPLIED (INCLUDING THOSE OF MERCHANTABILITY AND FITNESS OF ANY PRODUCT FOR A PARTICULAR PURPOSE), AND OF ANY OTHER OBLIGATION OF LIABILITY ON THE PART OF THE COMPANY. (B) Limitation of Liability It is expressly understood that Summit s liability for its products, whether due to breach of warranty, negligence, strict liability, or otherwise, is limited to the repair of the product, as stated above, and Summit will not be liable for any other injury, loss, damage, or expense, whether direct or consequential, including but not limited to loss of use, income, profit, or damage to material, arising in connection with the sale, installation, use of, inability to use, or the repair or replacement of Summit s products. Summit reserves the right to make alterations or modifications in its products at any time, which in its opinion, may improve the performance and efficiency of the product. It shall not be obligated to make such alterations or modifications to products already in service. Please fill out the warranty card and return to: SUMMIT Treestands, LLC. 715 Summit Dr. Decatur, AL You can also register your warranty card on line at: Summit products are manufactured under one or more of the following US patents: 4,991,690 ; 5,226,505 ; 5,413,192 ; 5,937,969 ; 5,971,104 ; 5,975,242 ; 6,182,792 ; 5,979,603 ; 6,397,973 and Des. 417,011 ; 420,147. Summit MegaSampson, Bucksteps, Seat-O-The-Pants Safety Line and Rapid Climb Stirrups are patent pending. Cut Along Line Cut Along Line Warranty Card for Summit Treestand Treestand Purchased: Basic System (PN 82017) Comfort System (PN 82018) Trophy System (PN 82019) Owners Name: Street Address: City: State: ZIP: Phone: ( ) Date Purchased: Purchased From (Dealer Name): Price $: Your heard about us through: Magazine Advertisement Video Friend Summit Catalog Other Please Explain:
7 Parts List BOX CONTENTS BASIC SYSTEM Platform (Chain Attached) V-Shaped Leveling Bar Basic System Packet BASIC SYSTEM ACCESSORY PACKET CONTENTS Ratchet Strap with Metal Bar Summit 4 Point Safety Harness Safety line with Prussic Hitch Locking Clip for safety line / harness Suspension Relief Strap with instructions Lineman s strap Short platform bungee with hook Instructional DVD 1 Written instructions for this stand Written instructions for Summit Harness Hardware Packet BASIC SYSTEM HARDWARE PACKET CONTENTS /4 Bolt (1/4-20) Centerlock Nut (1/4-20) Short Shank Bushing Long Shank Bushing 4 BOX CONTENTS COMFORT SYSTEM Platform (Chain Attached) V-Shaped Leveling Bar Comfort System Packet Comfort System Foam Seat with Frame COMFORT SYSTEM ACCESSORY PACKET CONTENTS Ratchet Strap with Metal Bar Summit 4 Point Safety Harness Safety line with Prussic Hitch Locking Clip for safety line / harness Suspension Relief Strap with instructions Lineman s strap Short platform bungee with hook Instructional DVD 1 Written instructions for this stand Written instructions for Summit Harness Hardware Packet COMFORT SYSTEM HARDWARE PACKET CONTENTS /4 Bolt (1/4-20) /2 Bolt (1/4-20) Centerlock Nut (1/4-20) Short Shank Bushing Long Shank Bushing 8 BOX CONTENTS TROPHY SYSTEM Platform (Chain Attached) V-Shaped Leveling Bar Trophy Chair Seat Post Assy Trophy Chair Support Assy Trophy Chair Foam Seat Trophy System Packet TROPHY SYSTEM ACCESSORY PACKET CONTENTS Ratchet Strap with Metal Bar Summit 4 Point Safety Harness Safety line with Prussic Hitch Locking Clip for safety line / harness Suspension Relief Strap with instructions Lineman s strap Arm Pad In-Line Cable ties Cam buckle strap Short platform bungee with hook Instructional DVD 1 Written instructions for this stand Written instructions for Summit Harness Hardware Packet TROPHY SYSTEM HARDWARE PACKET CONTENTS /4 Bolt (1/4-20) /4 Bolt (1/4-20) Centerlock Nut (1/4-20) Short Shank Bushing Long Shank Bushing Self Tapping Screws 2 PART QUANTITIES VARY ACCORDING TO HARDWARE PACKET CONTENTS: PN DESCRIPTION PN DESCRIPTION Short Shank Bushing Long Shank Bushing Centerlock Nut (1/4-20) /4 Bolt (1/4-20) /2 Bolt (1/4-20) Self Tapping Screw /4 Bolt (1/4-20)


8 Basic System Comfort System Trophy System
Copperhead Compact Instruction Booklet
 Copperhead Compact Instruction Booklet - 2006 You MUST also view the enclosed DVD BEFORE using your new treestand!! Weight Limit 300 lbs. total. Tree Size: 8-20 - all models. READ ME FIRST!!! Please read
Copperhead Compact Instruction Booklet
 Copperhead Compact Instruction Booklet - 2007 You MUST also view the enclosed DVD BEFORE using your new treestand!! Weight Limit 300 lbs. total. DO NOT EXCEED THIS LIMIT! Tree Size: 8-20 - Diameter READ
NOTICE: Once used, this shelter cannot be returned to the store. If you have a warranty claim, please contact Clam Corporation directly.
 Model No. - 8235 - p/n 108440 S p e c i f i c a t i o n s H e i g h t - 75 (24 packed) Width - 7 5 Depth - 144 (45 packed) W e i g h t 155 lbs. - Clam Customer Service Information - NOTICE: Once used,
DO NOT USE WITH CROSSBAR SPREAD LESS THAN 24.
 TM Please read all instructions carefully before assembly, installation and/or use of this product. DO NOT USE WITH CROSSBAR SPREAD LESS THAN 24. WARNING: Do not exceed the weight limit of your vehicle
Hang-On Stands. INCLUDES MODEL #'s: RE550, Big Foot RE514, Classic Big Foot XL with Footrest RE513, Big Foot Traveler RE552, Big Foot XL Lounger
 CLASSIC BIG FOOT XL with Footrest Model RE14 BIG FOOT Model RE0 BIG FOOT XL LOUNGER Model RE2 INCLUDES MODEL #'s: RE0, Big Foot RE14, Classic Big Foot XL with Footrest RE13, Big Foot Traveler RE2, Big
- Limitation of Liability -
 The Clam Twin Hub I M o d e l N o. 9019 S p e c i f i ca t i o n s Center Height - 6 8 i n c h e s Hub-to-Hub - 6 1 i n c h e s Footprint 60x60 inches W e i g h t 13 lbs. Part Numbers: Twin Hub I: 109019;
Alien Flier Zip Line Products Installation/Owner s Manual
 Alien Flier Zip Line Products Installation/Owner s Manual 1 Table of Contents SAFETY PLEASE READ CAREFULLY... 4 Explorer Zip Line EZ Up Cable Kit Installation... 5 Xtreme Zip Line EZ Up Cable Kit Installation...
Alien Flier Zip Line Products Installation/Owner s Manual
 Alien Flier Zip Line Products Installation/Owner s Manual 1 Table of Contents SAFETY PLEASE READ CAREFULLY... 4 Constructing your Zip Line Xtreme Models... 6 Installing your Alien Flier Trolley on an Existing
LM601 Landmark Permanent Blind
 LM601 Landmark Permanent Blind Get parts online at www.huntriversedge.com P/N: 26742 REV1: 01/13/17 2017 RETI All Rights Reserved INTRODUCTION Landmark Permanent Blinds are engineered with you the hunter
BowDown. MiniMuM Crossbar spread 24 (61CM) Steel Hook (2X) Buckle Strap (2X) Plastic Tube (2X) Plain Strap (2X) SHORT BLACK T-BOLT (2x) BOWDOWN (2x)
 Steel Hook (2X) Buckle Strap (2X) Plastic Tube (2X) Plain Strap (2X) SHORT BLACK T-BOLT (2x) BOWDOWN (2x)") BowDown MiniMuM Crossbar spread 24 (61CM) Heavy Duty strap (2x) SHORT BLACK T-BOLT (2x) BOWDOWN (2x) Bow Stern Tie Down Buckle Strap (2X) Plastic Tube (2X) Plain Strap (2X) Steel Hook (2X) IMPORTANT WARNING
BowDown MiniMuM Crossbar spread 24 (61CM) Heavy Duty strap (2x) SHORT BLACK T-BOLT (2x) BOWDOWN (2x) Bow Stern Tie Down Buckle Strap (2X) Plastic Tube (2X) Plain Strap (2X) Steel Hook (2X) IMPORTANT WARNING
DO NOT use Alien Flier Zip Line Products until you have read and fully understand the SAFETY WARNINGS below!
 SAFETY WARNING DO NOT use Alien Flier Zip Line Products until you have read and fully understand the SAFETY WARNINGS below! Assumption of Risk Zip line construction and use can be dangerous. Ensure you
Table of Contents. Safety... 2 Specifications... 4 Assembly Maintenance... 6 Parts List... 7 Warranty... 8
 Table of Contents Safety... Specifications... 4 Assembly... 4 Maintenance... 6 Parts List... 7 Warranty... 8 WARNING SYMBOLS AND DEFINITIONS This is the safety alert symbol. It is used to alert you to
Safety instructions and warnings Package contents and parts Tool requirements Product features... 4
 Door Awning : PN Series Owner s Manual For safety reasons, please carefully read and understand all written instructions and warnings in this manual prior to assembling or installing this product. Table
- L i m i t a t i o n o f L i a b i l i t y -
 M o d e l N o. 9281 S p e c i f i ca t i o n s Center Height - 9 0 i n c h e s Footprint 9 4 t o t a l s q u a r e f t. Hub-to-Hub - 1 4 0 x 1 4 0 i n c h e s W e i g h t 3 4 l b s. p / n 1 0 9 2 8 1 I
User s Manual Trampoline 8
 User s Manual Trampoline 8 Model! WARNING Read all precautions and instructions in this manual before using this equipment. Save this manual for future reference. Maximum user weight 17 lbs. ASSEMBLY IMPORTANT
Header Bikini Installation Instructions
 Header Bikini Installation Instructions For: Jeep Wrangler 1997-2002 Part Number: 52525 with or without Soundbar with or without Door Surround DO NOT INSTALL THIS PRODUCT ON ANY VEHICLE OTHER THAN THOSE
Safety instructions and warnings Package contents and parts Tool requirements Product features... 5
 Door Awning : PA Series Owner s Manual For safety reasons, please carefully read and understand all written instructions and warnings in this manual prior to assembling or installing this product. Table
HARD DOOR UPGRADE KIT
 RV Accessories OWNER'S MANUAL HARD DOOR UPGRADE KIT FOR ADD-A-ROOM & BREEZEWAY SCREEN ROOMS THIS MANUAL SUPPLEMENTS THE ADD-A-ROOM INSTRUCTIONS TABLE OF CONTENTS First Time Assembly... 2 Assembling the
Installation Instructions
 Installation Instructions For: Jeep Wrangler TJ Strapless Bikini Part Number 52521 To be used with or without Soundbar To be used with or without Door Side Rails Congratulations on your purchasing decision.
14' x 32' x 12' Round Top Round Style Shelter Assembly Instructions
 14' x 32' x 12' Round Top Round Style Shelter Assembly Instructions Description Model # 14' x 32' x 12' RoundTop Garage - Gray 62669 Recommended Tools Please read instructions COMPLETELY before assembly.
Bostonian style (DOME) Awning ASSEMBLY AND INSTALLATION INSTRUCTIONS
 Awning ASSEMBLY AND INSTALLATION INSTRUCTIONS") Bostonian style (DOME) Awning ASSEMBLY AND INSTALLATION INSTRUCTIONS CAUTION: When you are opening the box keep children away. This awning frame contains sharp metal and small hardware parts. Choking hazard:
Bostonian style (DOME) Awning ASSEMBLY AND INSTALLATION INSTRUCTIONS CAUTION: When you are opening the box keep children away. This awning frame contains sharp metal and small hardware parts. Choking hazard:
Installation Instructions Part # 2784 Awning
 Please read instructions entirely before installing this product. Parts Included Qty Parts Included Qty 1 Flat Washer (U-Bolt) 4 L Bracket 2 Nylock Nut ( U-Bolt) 4 Stake with Cord 2 6mm x 1 Bolt/Nut 10
ANY HAMMOCK CARRIES INHERENT RISK AND ACCIDENTS MAY OCCUR. USE WITH CAUTION.
 www.trailnest.com Roof Top Hammock Stand Owner s Manual WARNING! USING ANY HAMMOCK CARRIES INHERENT RISK AND ACCIDENTS MAY OCCUR. USE WITH CAUTION. MAX LOAD: 250 LBS Congratulations! Thank you for purchasing
Kontrol Kube Advanced Owners Manual
 Mobile Containment. Simplified. TM Kontrol Kube Advanced Owners Manual KONTROL KUBE www.kontrolkube.com 800.343755 1 IMPORTANT SAFETY INFORMATION SAVE THESE INSTRUCTIONS. CAREFULLY READ AND FOLLOW THESE
USER MANUAL PLEASE READ AND UNDERSTAND THIS MANUAL COMPLETELY BEFORE USE.
 Adventure Kings Roof Top Tent USER MANUAL PLEASE READ AND UNDERSTAND THIS MANUAL COMPLETELY BEFORE USE. Warning Improper installation or use of your Roof Top Tent may result in serious injury or death.
- Limitation of Liability -
 The Clam Exp edition & Exp edition FLR M o d e l N o. 8419 Expedition 8396 Expedition FLR S p e c i f i c a t i o n s H e i g h t - 72 inches Footprint - 60x72 inches Hub-to-hub - 70x90 inches W e i g
User Manual Setup and Adjustment
 www.easyrig.com User Manual Setup and Adjustment 2 Made in Sweden Congratulations on your new Easyrig! Easyrig is patented and specially designed by a photographer for professional photographers. It can
8333 S p e c i f i c a t i o n s H e i g h t - 78 inches Footprint 72x72 inches Hub-to-Hub - 90x90inches W e i g h t 27 lbs.
 M o d e l N o. 8333 S p e c i f i c a t i o n s H e i g h t - 78 inches Footprint 72x72 inches Hub-to-Hub - 90x90inches W e i g h t 27 lbs. The Clam Base Camp p/n 108333 I nstruction No. 102868 - Clam
FID WEIGHT BENCH. The contents of this package are not suitable for children under 3 years old. Contains small parts which may cause choking.
 FID WEIGHT BENCH PRODUCT MANUAL - VERSION 08.17.06 FOR AGES: 13+ WEIGHT LIMIT: 400 Lbs 181 Kgs ADULT(S) NEEDED: TOOLS NEEDED: WARNING/ADVERTENCIA CUSTOMER SERVICE Do not allow more than one person on the
RCCK. Pivot Plug 2x. Sharp Screw 2x TAKE TIME - READ AND UNDERSTAND INSTRUCTIONS COMPLETELY!
 RCCK Revolution Cargo Conversion Kit Congratulations on your purchase of the BOB Revolution Cargo Conversion Kit (RCCK). It s designed to easily convert your existing BOB Revolution stroller frame into
Item # BJ2PC With 8 Leg Frame, Cover, and Enclosure Kit with Windows Size: 10 8 Wide x 20 Long (Side Height 6 8 ) (Center Peak Height 9 9 )
 (Center Peak Height 9 9 )") Item # BJ2PC With 8 Leg Frame, Cover, and Enclosure Kit with Windows Size: 10 8 Wide x 20 Long (Side Height 6 8 ) (Center Peak Height 9 9 ) Powell & Powell Supply Company, L.L.C. Manufactured by: 1730
Item # BJ2PC With 8 Leg Frame, Cover, and Enclosure Kit with Windows Size: 10 8 Wide x 20 Long (Side Height 6 8 ) (Center Peak Height 9 9 ) Powell & Powell Supply Company, L.L.C. Manufactured by: 1730
PACKING & USER INSTRUCTIONS
 PACKING & USER INSTRUCTIONS PRESERVE V MODEL FFE-H2090(-) P.O. BOX 1419, LAKE ELSINORE, CA 92531 951-245-1734 http://www.freeflightent.com !! DISCLAIMER - NO WARRANTY!! BECAUSE OF THE UNAVOIDABLE DANGER
BigStack. Minimum Crossbar spread 24 For factory racks: Check fitlist notes, or Yakima.com for your vehicle s crossbar spread.
 BigStack Minimum Crossbar spread 24 For factory racks: Check fitlist notes, or Yakima.com for your vehicle s crossbar spread. HEAVY Duty strap (2x) PAD (4x) ADJUSTMENT KNOB (2x) T-BOLT (2x) BAIL (2x) BigStack
Cabela s/ Ice Team 6x6 Hub Shelter M o d e l N o Cust omer Serv i c e I n for m ation -
 Cabela s/ Ice Team 6x6 Hub Shelter M o d e l N o. 8432 S p e c if ica t i o n s H e i g h t - 78 inches Footprint 72x72 inches Hub-to-Hub - 90x90inches W e i g h t 27 lbs. - Cust omer Serv i c e I n for
Ultralight Series CLOUD-
 Ultralight Series CLOUD- INSTRUCTION INDEX Pack Components 2 Custom Fitting your Pack 3-6 Checking the Fit 7 Troubleshooting 8 Customizing your Pack 9-11 Packing Hints 12 KNOWING YOUR PACK The Cloud pack
ROOFBAG CAR TOP CARRIER INSTALLATION BOOKLET
 ROOFBAG CAR TOP CARRIER INSTALLATION BOOKLET RoofBag s unique and versatile design fits cars WITH Roof Rack or WITHOUT Roof Rack. Congratulations on your purchase! You can rest assured your decision was
The Charleston Style Awning Charleston Style Awning Frame must be installed on the wall as there is no connecting part between AA and TB
 The Charleston Style Awning Charleston Style Awning Frame must be installed on the wall as there is no connecting part between AA and TB ASSEMBLY AND INSTALLATION INSTRUCTIONS CAUTION: When you are opening
AND LOAD CANOPY RACK SPECIFICATIONS
 8MAY15 INSTRUCTIONS for the LOCK AND LOAD CANOPY RACK SPECIFICATIONS and SAFE LOADING REQUIREMENTS The Lock and Load ladder carrier for Truck Caps is a rack designed to mount to the top of a pickup truck
Chicago Style Awning
 Chicago Style Awning ASSEMBLY AND INSTALLATION INSTRUCTIONS CAUTION: When you are opening the box keep children away. This awning frame contains sharp metal and small hardware parts. Choking hazard: Keep
Honda Ridgeline Installation Instructions
 Honda Ridgeline Installation Instructions READ THIS... If you read these instructions from beginning to end before starting you will probably not need to look at them again during the installation, but
- Limitation of Liability -
 M o d e l N o. 9021 S p e c i f i ca t i o n s Center Height - 6 7 i n c h e s Hub-to-Hub - 75x75inches Footprint 60x60 inches W e i g h t 15 lbs. Part Numbers: Tamarack: 109021; Instruction No: 103722
Owner's Manual. Safety Instructions. This Product is Produced Exclusively by
 Product May Vary Slightly From Pictured. Owner's Manual Safety Instructions! WARNING This equipment is for home use only. Do not use in institutional or commercial applications. Failure to follow this
Factory Style Bow Kit
 Installation Instructions Factory Style Bow Kit Vehicle Application: Jeep Wrangler Unlimited 2004 2006 Part Number: 55003 www.bestop.com - We re here to help! Visit our web site and click on Ask a Question.
Urea/Adblue Hose Reel
 www.scintex.com.au sales@scintex.com.au Model: SHR3408 Urea/Adblue Hose Reel Product Manual Specifications Spring driven drum: for automatic rewind. Locking ratchet: to maintain the desired length of hose
accidents which arise due to non-observance of these instructions and the safety information herein. CAUTION:
 AUTO REWIND HOSE REEL Model: 7640 CALIFORNIA PROPOSITION 65 WARNING: You can create dust when you cut, sand, drill or grind materials such as wood, paint, metal, concrete, cement, or other masonry. This
READ ME FIRST! IMPORTANT WARNING! ENG. Roof top tent
 Roof top tent ENG TENT031 220 min READ ME FIRST! Thank you for purchasing a Front Runner Roof Top Tent. Before you start, take a moment to familiarize yourself with these Fitting Instructions and the components
CRD120SC TUBING CUTTER
 CRD120SC TUBING CUTTER OPERATIONS MANUAL 1 VERSION 2.1 LAST EDITED 05.01.2018 cleanroomdevices.com Table of Contents Table of Contents....2 1.0 General Product & Safety Information... 3 1.1 Product Information
USER S MANUAL LT EN
 TRAMPOLINE ENCLOSURE FOR 13FT TRAMPOLINE WITH 4 LEGS Assembly, Installation, Care Maintenance, and Use Instructions USER S MANUAL LT-6005-156+EN WARNING THE TRAMPOLINE ENCLOSURE IS ONLY TO BE USED AS AN
Universal 10 x 27 Canopy
 Universal 10 x 27 Canopy C81027PC Size: 10 8 x 27 x 6 8 (side) x 9 9 (center) With 10 Legs, Frame, and Cover Powell & Powell Supply Company Distributed by: 1730 Five Points Lane Fuquay-Varina, North Carolina
Required Tools: Phillips screw driver to remove original soft top. Torx sockets are required to completely remove the original soft top hardware.
 RAMPAGE P R O D U C T S Installation Instructions Part number 1098XX, Frameless Soft Top for 4 door Jeep Wrangler JK 2007- NOTE: Installation of the top in warm weather is optimal for ease of installation.
Rooftop Tent Owners Manual
 WWW.SMITTYBILT.COM Installation Instructions Part # 2783 Overlander Tent Rooftop Tent Owners Manual Read instruction manual entirely before assembling and installing this product. The Smittybilt Overlander
Retractable Awning Owner s Manual
 Retractable Awning Owner s Manual TABLE OF CONTENTS SECTION-1 2 CONGRATULATIONS ON PURCHASE 2 OPERATING YOUR SHADELINE AWNING 2 GEAR CRANK OPERATION 2 EXTENDING YOUR AWNING 2 RETRACT 2 SECTION-2 3 MOTORIZED
Solera Classic Awning
 Solera Classic Awning OWNER'S MANUAL Page 1 Table of Contents System and Safety Information 2 Operation 3 Extending the Awning 3 Optional Car Port Position 3 Retracting the Awning 3 Fabric Replacement
Hose Reel Series L701/G701
 Hose Reel Series L70/G70.0 WARNING: Read carefully and understand all INSTRUCTIONS before operating. Failure to follow the safety rules and other basic safety precautions may result in serious personal
SlimShady CONTENTS. SlimShady (1X) Tools Required: nut (4X) stake (2X) bolt (4X) wrench (1X) washer (4X) clamps (2X) stake sack (1X) key (2X)
 Tools Required: nut (4X) stake (2X) bolt (4X) wrench (1X) washer (4X) clamps (2X) stake sack (1X) key (2X)") SlimShady Tools Required: CONTENTS nut (4X) stake (2X) stake sack (1X) bolt (4X) wrench (1X) washer (4X) key (2X) SlimShady (1X) clamps (2X) 1 ASSEMBLE & INSTALL Be sure the awning is oriented correctly
SlimShady Tools Required: CONTENTS nut (4X) stake (2X) stake sack (1X) bolt (4X) wrench (1X) washer (4X) key (2X) SlimShady (1X) clamps (2X) 1 ASSEMBLE & INSTALL Be sure the awning is oriented correctly
INSTRUCTION MANUAL ALEKO RETRACTABLE AWNING
 INSTRUCTION MANUAL for ALEKO RETRACTABLE AWNING www.alekoproducts.com FAILURE TO FOLLOW THESE INSTRUCTIONS MAY RESULT IN PERSONAL INJURY! 1 Important Safety Precautions WARNING NOTE: FOR PERSONAL SAFETY,
NEWMAR SERVICE SCHOOL
 NEWMAR SERVICE SCHOOL TRAINING INFORMATION GUIDELINE FOR FEBRUARY 2013 OUR PRODUCTS: NOVA DUAL PITCH AWNING G-2000/ G-1500 2 P a g e G-2085 G-5000 3 P a g e G-LINKS 4 P a g e NOVA/ G-2000/ G-1500 BASIC
10FT. X 10FT. STRAIGHT WALL GAZEBO COMBO OWNER S MANUAL
 10FT. X 10FT. STRAIGHT WALL GAZEBO COMBO OWNER S MANUAL WARNING: Read carefully and understand all ASSEMBLY AND OPERATION INSTRUCTIONS before operating. Failure to follow the safety rules and other basic
TITAN Fuel Tanks. INSTALLATION INSTRUCTIONS G e n e r a t i o n V
 TITAN pt. no.: 02 0000 0128 Important: Please read these instructions carefully and completely before starting the installation. TITAN Fuel Tanks INSTALLATION INSTRUCTIONS G e n e r a t i o n V Extended
OPERATOR INSTRUCTION MANUAL INCLUDING REPAIR PARTS FOR MODULAR GENERAL PURPOSE TENT SYSTEM (MGPTS) TYPE I
 TYPE I") OPERATOR INSTRUCTION MANUAL INCLUDING REPAIR PARTS FOR MODULAR GENERAL PURPOSE TENT SYSTEM (MGPTS) TYPE I Johnson Outdoors Gear, Inc. Eureka! branded tent products 625 Conklin Road Binghamton, NY 13903
OPERATOR INSTRUCTION MANUAL INCLUDING REPAIR PARTS FOR MODULAR GENERAL PURPOSE TENT SYSTEM (MGPTS) TYPE I Johnson Outdoors Gear, Inc. Eureka! branded tent products 625 Conklin Road Binghamton, NY 13903
quick and easy installation guide
 www.directdriveopener.com quick and easy installation guide Back 2 Front. Motor Carriage 2. C-rail. Chain. Limit stops. Slide in part (tensioner) Rail assembly Insert C-rail parts () into the connecting
RAFTER VI. Installation and Operation CAREFREE WITH AUTOMATIC AWNING SUPPORT. RV Accessory PRODUCT OVERVIEW
 CAREFREE RAFTER VI RV Accessory WITH AUTOMATIC AWNING SUPPORT Installation and Operation PRODUCT OVERVIEW The gives the awning user the ability to easily tighten the center fabric when the awning is extended.
1946 READ AND SAVE THESE INSTRUCTIONS!
 EasyAwn Installation, Care and Maintenance Manual EasyAwn Quality, Since 1946 EasyAwn, LLC Toll Free: 877-EasyAwn http://www.easyawn.com READ AND SAVE THESE INSTRUCTIONS! EasyAwn Quarter Round Awning Installation
PARTS INCLUDED IN YOUR KIT. You may want to lay them out in this manner for accessibility. Foam has NO adhesive to touch truck finish.
 INSTALL ATION SHEET Tarp Assembly with Cab Rail, Tail Rail and Support Bows attached. Left and Right Side Rail Assemblies U Clamps (x 6) NOTICE: If your truck has a bedliner that wraps over any top edges,
85 Heart Lake Road South Brampton, Ontario, Canada L6W 3K2 Phone: Fax:
 Big Joe by Blue Giant Warranty AC Power Drive Straddle Trucks (PDS) AC Power Pallet Trucks (WPT45, D40) AC Power Rider Trucks (WRT-60) AC Power Counterbalanced Truck (CB-22) AC Power Task Support Vehicle
--- BIG LEAGUE BATTING CAGE ---
 --- BIG LEAGUE BATTING CAGE --- BGLC-7500 Call Jaypro Sports Equipment at 1-800-243-0533 during regular business hours for technical support. www.jaypro.com Rev-B Page 1 of 22 IMPORTANT NOTICE: 1. BEFORE
10 X 20 X 8 Dome Canopy
 10 X 20 X 8 Dome Canopy Warning Keep all flame and heat sources away from this tent fabric. Refer to labels for flamability specification. It is not fire proof. The tent fabric will burn if left in continuous
10' x 20' MAX AP CANOPY EXTENSION KIT Assembly Instructions
 10' x 20' MAX AP CANOPY EXTENSION KIT Assembly Instructions Frame Not Included Description Model # 10' x 20' MAX AP Canopy - Extension Kit - White 35730 Recommended Tools Please read instructions COMPLETELY
PARTS INCLUDED IN YOUR KIT. You may want to lay them out in this manner for accessibility. Foam has NO adhesive to touch truck finish.
 -'07 Ford Sport Trac Tarp Assembly with Cab Rail, Tail Rail and Support Bows attached. Left and Right Side Rail Assemblies Sport Trac Brackets (x4) Clamp Bolts Allen Wrench PARTS INCLUDED IN YOUR KIT.
SPIRAL SLICER Instruction Manual Model #5280 & 5280M. Part No Revised Feb. 2010
 SPIRAL SLICER Instruction Manual Model #5280 & 5280M Part No. 82876 Revised Feb. 2010 SAFETY PRECAUTIONS INSTALLATION INSTRUCTIONS Inspection of Shipment: 5280 & 5280M SPIRAL SLICER Unpack all cartons
READ AND SAVE THESE INSTRUCTIONS! EasyAwn Spear Awning Installation
 EasyAwn Installation, Care and Maintenance Manual EasyAwn Quality, Since 1946 EasyAwn, LLC Toll Free: 877-EasyAwn http://www.easyawn.com READ AND SAVE THESE INSTRUCTIONS! EasyAwn Spear Awning Installation
Installation Guide: Round Trampoline
 Trampolines & trampoline parts designed to survive in the harsh Oz climate. www.oztrampolines.com.au Installation Guide: Round Trampoline Safety Tips Here at Oz Trampolines we are passionate about your
Installation Instructions Safari Bikini Top
 Installation Instructions Safari Bikini Top For: 1992-1995 Wrangler Part Number 52529 Congratulations on your purchasing decision. Bestop designed this Convertible Top to give you years of dependability
User Guide. 12ft (3.66m) ZorbPOD. with 15.5ft (4.72m) wide enclosure. Got a Problem building your trampoline? Call us on and we can help
 ZorbPOD. with 15.5ft (4.72m) wide enclosure. Got a Problem building your trampoline? Call us on and we can help") User Guide 12ft (3.66m) ZorbPOD with 15.5ft (4.72m) wide enclosure Got a Problem building your trampoline? Call us on 0344 800 4060 and we can help Patent no: DE602006006495D1, EP1721640B1 and US7628731
User Guide 12ft (3.66m) ZorbPOD with 15.5ft (4.72m) wide enclosure Got a Problem building your trampoline? Call us on 0344 800 4060 and we can help Patent no: DE602006006495D1, EP1721640B1 and US7628731
OWNER S MANUAL. Gravity Model 5201
 OWNER S MANUAL Gravity 1000 Model 5201 The specifications of this product may vary from this photo and are subject to change without notice. IRONMAN, IRONMAN TRIATHLON and M-DOT are registeved trademarks
WARNING! Style Number: STQ30013 Primed 12x6L Steel Soccer Goal
 WARNING! To avoid injury during assembly, disassembly, use, adjustment and/or location of the Primed Steel Soccer Goal, please observe the following WARNINGS: Two competent adults are required to assemble,
PS-10 PS-12D PS-12. Primo Slicer Manual FOR OPERATOR-DO NOT DISCARD
 PS-10 PS-12D PS-12 Primo Slicer Manual FOR OPERATOR-DO NOT DISCARD TABLE OF CONTENTS 1. BRIEF INTRODUCTION 2. OPERATION 3. SLICING 4. MAINTENANCE AND CLEANING 5. TROUBLESHOOTING IMPORTANT The operator
ROCKING HAMMOCK GD-600. Model GD-600. Retain This Manual for Reference OWNER'S MANUAL
 NOTE: Please read all instructions carefully before using this product ROCKING HAMMOCK Table of Contents Safety Notice GD-600 Hardware Pack Assembly Instruction Parts List Warranty Ordering Parts Model
- Limitation of Liability -
 The Clam Summit Thermal & Summit Thermal FLR M o d e l N o. 8848 Summit Thermal 8845 Summit Thermal FLR S p e c i f i c a t i o n s Center Height - 8 4 i n c h e s Footprint - 72x96 inches Hub-to-Hub -
READ AND SAVE THESE INSTRUCTIONS! EasyAwn Standard Awning Installation
 EasyAwn Installation, Care and Maintenance Manual EasyAwn Quality, Since 1946 EasyAwn, LLC Toll Free: 877-EasyAwn http://www.easyawn.com READ AND SAVE THESE INSTRUCTIONS! EasyAwn Standard Awning Installation
12FT. x 12FT. Pop-Up Straight Leg Canopy. Owner s Manual
 12FT. x 12FT. Pop-Up Straight Leg Canopy Owner s Manual s WARNING: Read carefully and understand all ASSEMBLY AND OPERATION INSTRUCTIONS before operating. Failure to follow the safety rules and other basic
INSTALLATION INSTRUCTIONS for vertical awnings
 Custom made Awnings and Blinds Item No 0759 INSTALLATION INSTRUCTIONS for vertical awnings IMPORTANT INFORMATION BEFORE INSTALLING YOUR Updated 08/09/15 AN AWNING INSTALLATION IS A HOME IMPROVEMENT PROJECT
- Limitation of Liability -
 Model No. - 8398 - p/n 108884 S p e c i f i c a t i o n s H e i g h t - 65 (24 packed) Width - 5 9 Depth - 132 (41 packed) W e i g h t 95 lbs. Instructions 103146 Denali II - Clam Customer Service Information
10 X20 Dome Garage ITEM #: G Dimensions: 10ft. Wide x 20ft. Deep x 8ft. Center Height
 10 X20 Dome Garage ITEM #: G10208 Dimensions: 10ft. Wide x 20ft. Deep x 8ft. Center Height WARNING: Keep all flame and heat sources away from this tent fabric. It is not fire proof The fabric will burn
CHANGING YOUR LANDSCAPE SINCE 1945 OWNER S MANUAL. Tow Hitch Replacement Kit For Rough Cut Trailcutters. Starting Serial # L
 CHANGING YOUR LANDSCAPE SINCE 1945 OWNER S MANUAL Tow Hitch Replacement Kit For Rough Cut Trailcutters 21100 Starting Serial # L118-023001 Tools Required: Wrench/Socket Qty. Size (1) 1-1/8 (1) 1-1/16 (2)
LDR Brachytherapy Seed Sterilization and Sorting Tray
 LDR Brachytherapy Seed Sterilization and Sorting Tray Table of Contents General Precautions... 2 Customer Responsibility... 3 Description... 4 Features and Specifications... 5 Operation... 6 Changing Covers
BILLY GOAT KV HOSE KIT (P/N ) PURPOSE: To allow for vacuuming in hard to reach places.
 PURPOSE: To allow for vacuuming in hard to reach places.") BILLY GOAT KV HOSE KIT (P/N 891125) PURPOSE: To allow for vacuuming in hard to reach places. Part No 891061-1 - Form No F052209A INSTALLATION: Step 1. Attach nozzle wear guards. 1. Disconnect spark plug
BILLY GOAT KV HOSE KIT (P/N 891125) PURPOSE: To allow for vacuuming in hard to reach places. Part No 891061-1 - Form No F052209A INSTALLATION: Step 1. Attach nozzle wear guards. 1. Disconnect spark plug
USER MANUAL CONTENTS. Please read this carefully before doing anything with your new container system
 USER MANUAL CONGRATULATIONS ON YOUR PURCHASE OF A SQUIRREL CRUX ( PRODUCT ). BY PURCHASING THIS PRODUCT, YOU ACKNOWLEDGE THAT ENGAGING IN SKY-DIVING, BASE JUMPING, PARACHUTING, AND WINGSUITING IS AN INHERENTLY
S SERIES Retractable Awning
 S SERIES Retractable Awning Owner s Manual For safety reasons, please read the instructions and warnings in this manual carefully before installing the awning. TABLE OF CONTENTS Safety instructions and
Greenhouse 10ft X 10ft 9ft4in Wide x 10ft3in Deep x 5ft4in Side Height / 7ft10in Center Height
 Greenhouse 10ft X 10ft 9ft4in Wide x 10ft3in Deep x 5ft4in Side Height / 7ft10in Center Height These Tools Are Recommended: King Canopy Item #: GH1010 With 6 Legs, Cover, Elastic Ball Straps & Foot Pads.
- Limitation of Liability -
 Cabela s/ice Team 6x6 Hub Shelter M o d e l N o. 8432 S p e c if ica t i o n s H e i g h t - 72 inches Footprint 72x72 inches Instructions: 103284 Hub-to-Hub - 90x90inches W e i g h t 27 lbs. - Cust omer
Antenna Tower Positioning System
 Model 1052 Antenna Tower Positioning System User Manual (Antenna not included) ETS-Lindgren L.P. reserves the right to make changes to any product described herein in order to improve function, design,
Motorized retractable awning
 Motorized retractable awning Model 95295 Set up And Operating Instructions Diagrams within this manual may not be drawn proportionally. Due to continuing improvements, actual product may differ slightly
2-N-1 Expandable 12ft X 20ft / 20ft x 20ft 19ft7in Wide x 20ft Deep x 10ft3in Center Height (12x20) / 11ft7in Center Height (20x20)
 / 11ft7in Center Height (20x20)") 2-N-1 Expandable 12ft X 20ft / 20ft x 20ft 19ft7in Wide x 20ft Deep x 10ft3in Center Height (12x20) / 11ft7in Center Height (20x20) King Canopy Item #: EX1220 With 8 Legs, Cover with Leg Skirts (12x20
2-N-1 Expandable 12ft X 20ft / 20ft x 20ft 19ft7in Wide x 20ft Deep x 10ft3in Center Height (12x20) / 11ft7in Center Height (20x20) King Canopy Item #: EX1220 With 8 Legs, Cover with Leg Skirts (12x20
INSTANT GARAGE MODEL NO: CIG81224 ASSEMBLY INSTRUCTIONS PART NO: ORIGINAL INSTRUCTIONS
 INSTANT GARAGE MODEL NO: CIG81224 PART NO: 3503578 ASSEMBLY INSTRUCTIONS ORIGINAL INSTRUCTIONS GC1117 INTRODUCTION Thank you for purchasing this CLARKE Instant Garage. When erected, the CIG81224 garage
Shut off combine and remove key before installing the hopper extension. Make sure the combine is on a level surface. Engage parking brake.
 ASSEMBLY INSTRUCTIONS CASE IH 5088, 6088/7088, 7010/8010 & 7120/8120/9120 Series NEW HOLLAND CR STD Series Combines (Large) big top 26301(service only), 29976 (service only), 53408, 53543 & 54274 The Crary
All of these configurations are from one 2005 Blue Ultralite Trayman. Just slide the straps up and over your shoulders and they will slip into place.
 All of these configurations are from one 2005 Blue Ultralite Trayman. Just slide the straps up and over your shoulders and they will slip into place. The back edge of the Shoulder Strap has a slight bend
IMPORTANT OWNER-OPERATOR INSTALLATION INSTRUCTIONS D3109. REVISED vers10 BY: DSK 1/9/2015 TECH SUPPORT (800)
") IMPORTANT OWNER-OPERATOR INSTALLATION INSTRUCTIONS D3109 REVISED vers10 BY: DSK 1/9/2015 TECH SUPPORT (800) 246-8132 AFTER INSTALL, PLEASE GIVE THIS BOOKLET TO YOUR CUSTOMER 1 Warnings Truck Bed and Camper
IMPORTANT OWNER-OPERATOR INSTALLATION INSTRUCTIONS D3109 REVISED vers10 BY: DSK 1/9/2015 TECH SUPPORT (800) 246-8132 AFTER INSTALL, PLEASE GIVE THIS BOOKLET TO YOUR CUSTOMER 1 Warnings Truck Bed and Camper
IMPORTANT OWNER-OPERATOR INSTALLATION INSTRUCTIONS D4101. REVISED vers6 BY: JL 8/6/2015 TECH SUPPORT (800)
") IMPORTANT OWNER-OPERATOR INSTALLATION INSTRUCTIONS D4101 REVISED vers6 BY: JL 8/6/2015 TECH SUPPORT (800) 246-8132 AFTER INSTALL, PLEASE GIVE THIS BOOKLET TO YOUR CUSTOMER 1 Warnings Truck Bed and Camper
IMPORTANT OWNER-OPERATOR INSTALLATION INSTRUCTIONS D4101 REVISED vers6 BY: JL 8/6/2015 TECH SUPPORT (800) 246-8132 AFTER INSTALL, PLEASE GIVE THIS BOOKLET TO YOUR CUSTOMER 1 Warnings Truck Bed and Camper
OL MAN TREESTANDS 201 FAIRMONT PLAZA PEARL, MS PHONE: (601) FAX: (601)
 FAX: (601)") OL MAN TREESTANDS 201 FAIRMONT PLAZA PEARL, MS 39208 PHONE: (601) 932-5832 FAX: (601) 932-0068 RELAX. SUPERIOR HUNTABILITY IS IN THE BOX OL MAN is radically committed to providing you with a great hunting
OL MAN TREESTANDS 201 FAIRMONT PLAZA PEARL, MS 39208 PHONE: (601) 932-5832 FAX: (601) 932-0068 RELAX. SUPERIOR HUNTABILITY IS IN THE BOX OL MAN is radically committed to providing you with a great hunting