The Charleston Style Awning Charleston Style Awning Frame must be installed on the wall as there is no connecting part between AA and TB
|
|
|
- Roy Manning
- 5 years ago
- Views:
Transcription


1 The Charleston Style Awning Charleston Style Awning Frame must be installed on the wall as there is no connecting part between AA and TB ASSEMBLY AND INSTALLATION INSTRUCTIONS CAUTION: When you are opening the box keep children away. This awning frame contains sharp metal and small hardware parts. Choking hazard: Keep parts away from children. They may choke on hardware. Be extremely cautious around children. Models with Valance: CH22, ECH23, CH32, CH34, CH43, CH44, ECH2442, ECH12, ECH1836, ECH1230, ECH1030, ECH24, CH33 Models with-out Valance: CH22-NV, ECH23-NV, CH32-NV, CH34-NV, CH43-NV, CH44-NV, ECH2442-NV, ECH12-NV, ECH1836-NV, ECH1230-NV, ECH1030-NV, ECH24-NV, CH33-NV All the awning sizes over 9 wide come in two parts such as Top Bar (TB) consist of TB1 & TB2 and Front Bar (FB) consist of FB1 & FB2 See the chart below for the width of the awning: Awning Size Width in inches Awning Size Width in inches
2 THESE AWNINGS ARE DESIGNED 4-1/2 WIDER THAN THE OPENINGS YOU ARE COVERING. (EXAMPLE: CH22-5 is for a 5-0 wide window. It is built 64-1/2 wide, 31 tall including 7 valance and 36 projection (deep). Due to the wide variety of building surfaces, Awntech does not supply the hardware to install your awning on the wall. You will need to purchase installation hardware at your local do-it-yourself center. We will advise you on different surface applications. CONCRETE BLOCK WALLS: (1) ½ masonry bit with a 3/8 shank, (4-5) 5/16 x 3 masonry anchor bolts, 9/16 socket. You will also need a roll of weather stripping. METAL BUILDINGS: (1) 2x6x8 #2YP cut into 12 blocks for the back side of the metal, (4-5) 5/16 x 4 lag bolts, (4-5) 5/16 washers, rubber installation strips (in the shape of the metal) and a 3/8 drill bit. Bolt through the washer, the bracket and the metal into wood blocks behind the metal. Before tightening the bracket insert the rubber strips between the building and the awning. ANY TYPE OF SIDING: (4-5) ¼ x 4 toggle bolts, (4-5) ¼ washers, (1) Flat head screwdriver (1) ½ drill bit (or if you hit a stud): (5-8) 5/16 x4 lag bolts, (4-5) 5/16 washers, (1) 3/16 drill bit and a 9/16 socket. You will also need a roll of weather stripping. CONCRETE, BRICK OR STONE: (1) ½ masonry bit with a 3/8 shank, (4-5) 5/16 x 3 masonry anchor bolts, (4-5) 5/16 x1/4 bushings, 9/16 socket. You will also need a roll of weather stripping. STUCCO: (4-5) ¼ x 4 toggle bolts, (4-5) ¼ washers, (1) Flat head screwdriver (1) ½ drill bit (or if you hit a stud): (4) 5/16 x4 lag bolts, (4-5) 5/16 washers, (1) 3/16 drill bit and a 9/16 socket. You will also need a roll of weather stripping. Please read the instructions fully before assembly. This awning is designed to be assembled on the wall. Size (TB) Top Bar - C Channel (FB) Front Bar (NC) Hypotenuse / Cover Support (AA) Architectural Arms (BP) Black Projection Bar Other parts Self tapping screws, Z-brackets Tools Required: Electrical Drill, ¼ Nut Driver Bit, Full Socket Set, Full set of Steel and Masonry Bits, Tape Measure, Safety Glasses, 4 Level, A Safe Ladder, #2 Pencil YOU MAY ALSO NEED A HELPER DEPENDING ON THE SIZE, WEIGHT, LENGTH AND HEIGHT OF THE AWNING
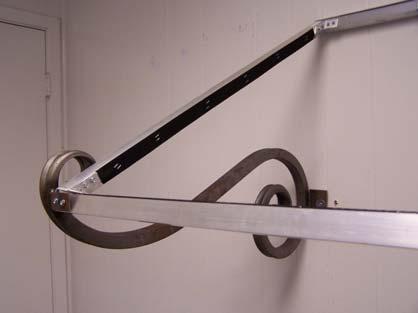
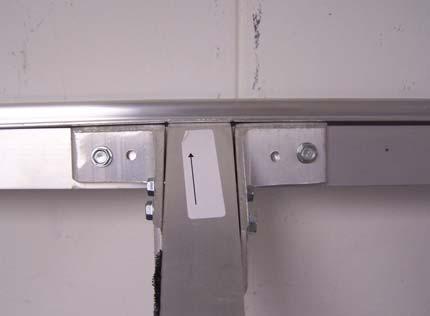
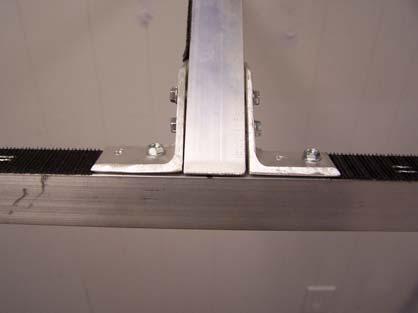
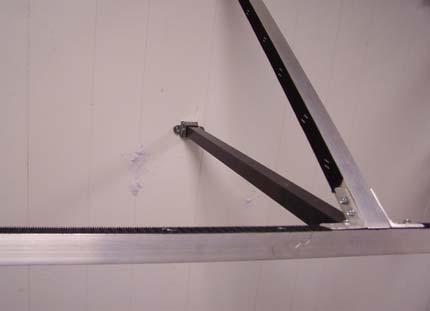
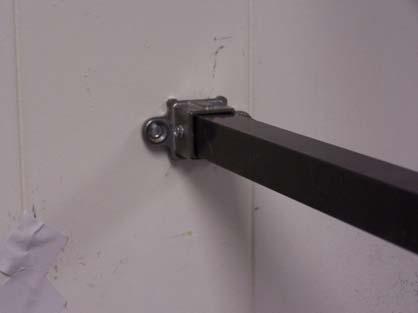
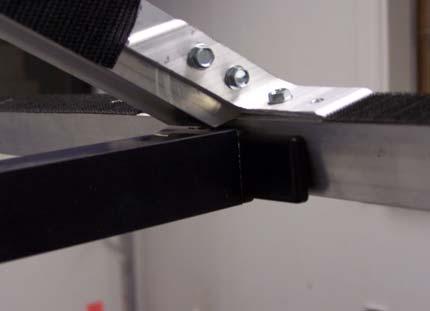
3 NOTE: YOU WILL FIND THAT THE FITTINGS HAVE BEEN PRE-INSTALLED, AS WE HAVE PRE-ASSEMBLED AND INSPECTED IT FOR YOU IN THE FACTORY. Charleston Style Awning Frame must be installed on the wall as there is no connecting part between AA and TB STEP 1: Separate all of the parts by part number so they will be easy to assemble. STEP 2: Top Bar (TB) must be installed first. C-Channel on the TB must be close to the wall. Before installing the TB you must make sure that there is enough space below the TB for the height of the awning. Example CH22 style will need 31 of the space for the height of the awning (please see the chart below for the height measurements). *** all the sizes are in inches Space Model between TB & the Scroll Arm inches Height incl valance Projection Model Space between TB and SFB in inches Height incl valance Projection CH CH22-NV CH CH32-NV CH CH33-NV CH CH34-NV CH CH43-NV CH CH44-NV ECH ECH2442-NV ECH ECH12-NV ECH ECH1836-NV ECH ECH1230-NV ECH ECH1030-NV ECH ECH23-NV ECH ECH24-NV STEP 3: Architectural Arms (AA) must be installed next. The space between Top of the (TB) and the BOTTOM OF THE SCROLL ARM must be according the chart above. STEP 4: Install the Front Bar (FB) to the projection side of the Architectural Arms (AA). The Velcro on the (FB) must face up. STEP 5: Install the NC (left and right) with arrows facing upwards. The holes on the (FB) and (FB) are pre drilled. Make sure that the Velcro on (NC) facing left and right STEP 6: If the awning is larger then 4 (52.5 ) wide then you must install additional (NC)s and (BP)s to complete the frame assembly and installation STEP 7: Once the frame is completely installed then secure all the joints where connectors are attached by driving one self tapping screw from inside the frame.
4 INSTALLING THE COVER STEP 8: Slide the bead at the top of the fabric into the C-Channel at the top of (TB). STEP 9: Pull the remainder of fabric over the frame with the valance hanging down below the (NC) and (FB) bars. STEP 10: Once you are satisfied with the position of the cover on the frame, wrap the Velcro strips on the fabric tabs around the exterior bars. Pull the tabs snugly and attach them to the pre-installed Velcro tape on the bars. WARRANTY 5-Year Limited Manufacturer's Warranty A. WHO GIVES THIS WARRANTY? Awntech Corporation B. WHO IS ENTITLED TO THIS WARRANTY? This Warranty applies only to the original purchaser who paid for the product and may not be assigned or transferred to subsequent owners. This Warranty applies only to products purchased and installed in the US. C. WHAT ARE THE RESPONSIBILITIES OF AWNTECH CORPORATION UNDER THIS WARRANTY? Subject to the terms and conditions set forth herein, Awntech Corporation will furnish replacements for parts found by Awntech Corporation to be defective in design, manufacture or assembly, under each specific component or product warranty as set forth below. D. WHAT ARE THE RESPONSIBILITIES OF THE ORIGINAL PURCHASER UNDER THE WARRANTY? 1. Before any claims may be made under this Warranty, the original purchaser must have paid in full for the product covered under the Warranty, according to the terms and conditions of the pay-plan defined in the original order. IF THE PURCHASER HAS FAILED TO MAKE FULL PAYMENT, THIS WARRANTY SHALL BE NULLIFIED AND AWNTECH CORPORATION SHALL BE RELIEVED FROM ANY RESPONSIBILITY OR LIABILITY UNDER THIS WARRANTY. The purchaser agrees and acknowledges that this Warranty agreement constitutes an executor contract. 2. The purchaser must use care in installation, maintenance, operation, use, and storage of the product in accordance with the instructions contained in the owner s manual. ANY FAILURE TO INSTALL, MAINTAIN, OPERATE, USE AND STORE THE PRODUCT IN ACCORDANCE WITH THE INSTRUCTIONS CONTAINED IN THE OWNER S MANUAL WILL NULLIFY THIS WARRANTY AND RELIEVE AWNTECH CORPORATION FROM ANY RESPONSIBILITY OR LIABILITY UNDER THIS WARRANTY. 3. Promptly notify Awntech Corporation of any claims (within 10 days of purchase). 4. The purchaser may be required to provide a photograph of any defective parts. The purchaser may also be required to pay a deposit until the defective parts are returned to Awntech Corporation for inspection. The purchaser must obtain a return authorization form from Awntech Corporation s customer service department prior to the return of any merchandise and after having received such authorization, return the part or product, freight prepaid, to Awntech Corporation. E. WHAT IS COVERED UNDER THIS WARRANTY? 1. All the frame parts and components and the fabric is covered under warranty for manufacturing defects only: (a) Should the purchaser promptly notify Awntech Corporation of such defects within one year (12 months) from the date of the original purchase, the defective component will be replaced at no charge. Awntech reserves the right to ask for the defective part to be returned and/or photos of the defective part. (b) After one year but within five years (60 months) from the date of the original purchase, a defective component will be replaced upon the purchaser's payment of 1/60 th of the full retail cost of the component for each month of use prior to the claim.
5 F. GENERAL PROVISIONS AND LIMITATIONS 1. THE WARRANTY GRANTED HEREIN IS THE EXCLUSIVE REMEDY FOR THE PURCHASER. AWNTECH CORPORATION MAKES NO OTHER WARRANTIES TO THE PURCHASER, EXPRESS, STATUTORY, IMPLIED OR OTHERWISE AND ALL IMPLIED WARRANTIES, INCLUDING WITHOUT LIMITATIONS, IMPLIED WARRANTIES OF MERCHANTABILITY AND FITNESS FOR A PARTICULAR PURPOSE, ARE HEREBY DISCLAIMED. 2. TO THE EXTENT PERMITTED BY LAW, AWNTECH CORPORATION SHALL HAVE NO LIABILITY TO THE PURCHASER OR ANY OTHER PERSON FOR INCIDENTAL, SPECIAL, CONSEQUENTIAL, INDIRECT OR SIMILAR DAMAGES OF ANY KIND OR NATURE WHATSOEVER, WHETHER ARISING OUT OF BREACH OF WARRANTY OR OTHER BREACH OF CONTRACT, NEGLIGENCE OR OTHER TORT, OR OTHERWISE, EVEN IF AWNTECH CORPORATION SHALL HAVE BEEN ADVISED OF THE POSSIBILITY OR LIKELIHOOD OF SUCH POTENTIAL LOSS OR DAMAGE. IN NO EVENT SHALL AWNTECH CORPORATION BE LIABLE FOR LOSS OF PROFITS AND/OR WAGES. 3. SOME STATES DO NOT ALLOW LIMITATIONS ON HOW LONG AN IMPLIED WARRANTY LASTS, OR DO NOT ALLOW THE EXCLUSION OR LIMITATION OF INCIDENTAL OR CONSEQUENTIAL DAMAGES, SO THE ABOVE LIMITATIONS MAY NOT APPLY TO YOU. 4. THIS WARRANTY GIVES YOU SPECIFIC RIGHTS, AND YOU MAY HAVE OTHER RIGHTS, WHICH VARY FROM STATE TO STATE. G. RETURNS, DAMAGES RETURN QUALIFICATION: You can only return a product if it is defective upon arrival. If you simply do not like the product or if you did not measure correctly, you will only be qualified for a merchandise credit and you will be required to pay for shipping the product back to Awntech in restockable condition. If DAMAGED MATERIAL: Damage occasionally occurs during shipping. Scrapes, dents, and rips in the outer packaging that could indicate possible damage should be described to the carrier at the time of delivery. If damage to the product seems apparent, the shipment should be refused. FABRIC DYE-LOT AND LIGHTING VARIATION: Fabric dyes may vary slightly from run to run. This is a normal and unavoidable. Different lighting types and lighting direction may cause the fabric you chose on the website to appear slightly different than the actual fabric does in full sunlight. TRIPLE CHECK YOUR MEASUREMENTS: In order to avoid disappointment and frustration, please triple check all measurements (see Measuring Guide, Page 6 of Awntech Catalog) to assure that your awning will fit properly in the location you intend. Please make sure that you have at least 1-2 extra wide area available to install the awning and also make sure that you have enough open space for the projection. HAZARDOUS MATERIAL QUALIFICATIONS: None RETURNS/ORDER EXCEPTION CONTACT: Customer Service: Phone , Fax , customers@awntech.com TO ACQUIRE A RETURN OR REPAIR AUTHORIZATION NUMBER YOU MUST GO THROUGH THE WARRANTY PROCESS BELOW or mail photo of damaged parts to: customers@awntech.com MAIL: Customer Support, Awntech Corporation, 3600 Bell Dr., Bdg. B-E, Hurst, TX Authorized returns should be shipped to: Returns Department Awntech Corporation, 3600 Bell Drive, Bldgs. B-E Hurst, Texas 76053


6 The Charleston Style frame must be assembled on the building. The photos below represent the sized between 5-7 size frames. heihei Height 1 Height of the frame starts from the bottom of the Scroll Arm

7
Chicago Style Awning
 Chicago Style Awning ASSEMBLY AND INSTALLATION INSTRUCTIONS CAUTION: When you are opening the box keep children away. This awning frame contains sharp metal and small hardware parts. Choking hazard: Keep
Bostonian style (DOME) Awning ASSEMBLY AND INSTALLATION INSTRUCTIONS
 Awning ASSEMBLY AND INSTALLATION INSTRUCTIONS") Bostonian style (DOME) Awning ASSEMBLY AND INSTALLATION INSTRUCTIONS CAUTION: When you are opening the box keep children away. This awning frame contains sharp metal and small hardware parts. Choking hazard:
Bostonian style (DOME) Awning ASSEMBLY AND INSTALLATION INSTRUCTIONS CAUTION: When you are opening the box keep children away. This awning frame contains sharp metal and small hardware parts. Choking hazard:
The Dallas Retro Style Awning OWNER S MANUAL & INSTALLATION INSTRUCTIONS
 The Dallas Retro Style Awning OWNER S MANUAL & INSTALLATION INSTRUCTIONS Important Installation Information: The Dallas Retro frame must be installed on the wall as there is no connecting part between
Bostonian Style Awning OWNER S MANUAL & INSTALLATION INSTRUCTIONS
 Bostonian Style Awning OWNER S MANUAL & INSTALLATION INSTRUCTIONS WARNING: Adult Assembly Required WARNING: Assembly Kit Contains Parts With Sharp Points, Sharp Edges, and Small Parts That Can Present
Savannah Style Awning
 Savannah Style Awning OWNER S MANUAL & INSTALLATION INSTRUCTIONS WARNING: Adult Assembly Required WARNING: Assembly Kit Contains Parts With Sharp Points, Sharp Edges, and Small Parts That Can Present Choking
Stainless Clip FP3011-1S Qty 4
 Plastic Storage 16'-FP3013 20'-FP3012 Groundsleeve 16'-FP033-1 20'-FP025-1 Stainless Clip FP3011-1S Qty 4 Universal Wheelstand FP9040 Locking Collar 16'-FP034-1 20'-FP026-1 Stop Nut & Bolt FP3000-1 5/64"
READ AND SAVE THESE INSTRUCTIONS! EasyAwn Spear Awning Installation
 EasyAwn Installation, Care and Maintenance Manual EasyAwn Quality, Since 1946 EasyAwn, LLC Toll Free: 877-EasyAwn http://www.easyawn.com READ AND SAVE THESE INSTRUCTIONS! EasyAwn Spear Awning Installation
READ AND SAVE THESE INSTRUCTIONS! EasyAwn Standard Awning Installation
 EasyAwn Installation, Care and Maintenance Manual EasyAwn Quality, Since 1946 EasyAwn, LLC Toll Free: 877-EasyAwn http://www.easyawn.com READ AND SAVE THESE INSTRUCTIONS! EasyAwn Standard Awning Installation
Safety instructions and warnings Package contents and parts Tool requirements Product features... 5
 Door Awning : PA Series Owner s Manual For safety reasons, please carefully read and understand all written instructions and warnings in this manual prior to assembling or installing this product. Table
1946 READ AND SAVE THESE INSTRUCTIONS!
 EasyAwn Installation, Care and Maintenance Manual EasyAwn Quality, Since 1946 EasyAwn, LLC Toll Free: 877-EasyAwn http://www.easyawn.com READ AND SAVE THESE INSTRUCTIONS! EasyAwn Quarter Round Awning Installation
HARD DOOR UPGRADE KIT
 RV Accessories OWNER'S MANUAL HARD DOOR UPGRADE KIT FOR ADD-A-ROOM & BREEZEWAY SCREEN ROOMS THIS MANUAL SUPPLEMENTS THE ADD-A-ROOM INSTRUCTIONS TABLE OF CONTENTS First Time Assembly... 2 Assembling the
Safety instructions and warnings Package contents and parts Tool requirements Product features... 4
 Door Awning : PN Series Owner s Manual For safety reasons, please carefully read and understand all written instructions and warnings in this manual prior to assembling or installing this product. Table
READ AND SAVE THESE INSTRUCTIONS! EasyAwn Dome Awning Installation
 EasyAwn Installation, Care and Maintenance Manual EasyAwn Quality, Since 1946 EasyAwn, LLC 3575 Trotters Drive, Bldg A Alpharetta, GA 30004 Toll Free: 877-EasyAwn http://www.easyawn.com READ AND SAVE THESE
S SERIES Retractable Awning
 S SERIES Retractable Awning Owner s Manual For safety reasons, please read the instructions and warnings in this manual carefully before installing the awning. TABLE OF CONTENTS Safety instructions and
Model 703 / 703-T / 703-S2 Hose Reel
 Model 703 / 703-T / 703-S2 Hose Reel Owner s Manual VISIT OUR WEBSITE: WWW.LIBERTYGARDENPRODUCTS.COM OR CALL US TOLL FREE AT 1-866-820-5805, MONDAY - FRIDAY 9 A.M. - 5 P.M. EST LIBERTY GARDEN PRODUCTS,
READ AND SAVE THESE INSTRUCTIONS! EasyAwn Dome Awning Installation
 EasyAwn Installation, Care and Maintenance Manual EasyAwn Quality, Since 1946 EasyAwn, LLC Toll Free: 877-EasyAwn http://www.easyawn.com READ AND SAVE THESE INSTRUCTIONS! EasyAwn Dome Awning Installation
INSTALLATION INSTRUCTIONS for automatic awnings
 Custom made Awnings and Blinds Item No 0756 INSTALLATION INSTRUCTIONS for automatic awnings AUTOMATIC AWNING IMPORTANT INFORMATION BEFORE INSTALLING YOUR AUTOMATIC AWNING Updated 08/09/15 AN AWNING INSTALLATION
Factory Style Bow Kit
 Installation Instructions Factory Style Bow Kit Vehicle Application: Jeep Wrangler Unlimited 2004 2006 Part Number: 55003 www.bestop.com - We re here to help! Visit our web site and click on Ask a Question.
INSTALLATION INSTRUCTIONS for vertical awnings
 Custom made Awnings and Blinds Item No 0759 INSTALLATION INSTRUCTIONS for vertical awnings IMPORTANT INFORMATION BEFORE INSTALLING YOUR Updated 08/09/15 AN AWNING INSTALLATION IS A HOME IMPROVEMENT PROJECT
LITE Spear Awning Instructions
 LITE Spear Awning Instructions IMPORTANT NOTE: Please take a few minutes to become familiar with this entire document BEFORE beginning your installation. The time you spend doing this is well spent and
accidents which arise due to non-observance of these instructions and the safety information herein. CAUTION:
 AUTO REWIND HOSE REEL Model: 7640 CALIFORNIA PROPOSITION 65 WARNING: You can create dust when you cut, sand, drill or grind materials such as wood, paint, metal, concrete, cement, or other masonry. This
CONVEX Awning Instructions
 CONVEX Awning Instructions IMPORTANT NOTE: Please take a few minutes to become familiar with this entire document BEFORE beginning your installation. The time you spend doing this is well spent and will
Installation Instructions Part # 2784 Awning
 Please read instructions entirely before installing this product. Parts Included Qty Parts Included Qty 1 Flat Washer (U-Bolt) 4 L Bracket 2 Nylock Nut ( U-Bolt) 4 Stake with Cord 2 6mm x 1 Bolt/Nut 10
INSTALLATION INSTRUCTIONS for folding arm awnings
 Custom made Awnings and Blinds Item No 0757 INSTALLATION INSTRUCTIONS for folding arm awnings IMPORTANT INFORMATION BEFORE INSTALLING YOUR Updated 08/09/15 AN AWNING INSTALLATION IS A HOME IMPROVEMENT
INSTRUCTION MANUAL ALEKO RETRACTABLE AWNING
 INSTRUCTION MANUAL for ALEKO RETRACTABLE AWNING www.alekoproducts.com FAILURE TO FOLLOW THESE INSTRUCTIONS MAY RESULT IN PERSONAL INJURY! 1 Important Safety Precautions WARNING NOTE: FOR PERSONAL SAFETY,
IMPORTANT! HAVING PROBLEMS? INSTALLATION QUESTIONS? NEED PARTS? TROUBLESHOOTING? PLEASE DON T RETURN THIS PRODUCT TO THE STORE CONTACT US FIRST
 Owners Manual For Retractable Awning SKU# 443-0875 Model# 30100 IMPORTANT! HAVING PROLEMS? INSTALLATION QUESTIONS? NEE PARTS? TROULESHOOTING? PLEASE ON T RETURN THIS PROUT TO THE STORE ONTAT US FIRST ecko
Header Bikini Installation Instructions
 Header Bikini Installation Instructions For: Jeep Wrangler 1997-2002 Part Number: 52525 with or without Soundbar with or without Door Surround DO NOT INSTALL THIS PRODUCT ON ANY VEHICLE OTHER THAN THOSE
ROCKING HAMMOCK GD-600. Model GD-600. Retain This Manual for Reference OWNER'S MANUAL
 NOTE: Please read all instructions carefully before using this product ROCKING HAMMOCK Table of Contents Safety Notice GD-600 Hardware Pack Assembly Instruction Parts List Warranty Ordering Parts Model
USER MANUAL PLEASE READ AND UNDERSTAND THIS MANUAL COMPLETELY BEFORE USE.
 Adventure Kings Roof Top Tent USER MANUAL PLEASE READ AND UNDERSTAND THIS MANUAL COMPLETELY BEFORE USE. Warning Improper installation or use of your Roof Top Tent may result in serious injury or death.
NOTICE: Once used, this shelter cannot be returned to the store. If you have a warranty claim, please contact Clam Corporation directly.
 Model No. - 8235 - p/n 108440 S p e c i f i c a t i o n s H e i g h t - 75 (24 packed) Width - 7 5 Depth - 144 (45 packed) W e i g h t 155 lbs. - Clam Customer Service Information - NOTICE: Once used,
Standard Awning Installation Instructions
 Standard Awning Installation Instructions Important Note: Please become familiar with this entire document BEFORE beginning your installation. The time you spend doing this is well spent and will make
LUXURY SERIES Retractable Awning
 LUXURY SERIES Retractable Awning Owner s Manual For safety reasons, please read the instructions and warnings in this manual carefully before installing the awning. TABLE OF CONTENTS Safety instructions
Installation Instructions Traditional Awnings in a box Classic Awnings in a Box
 Installation Instructions Traditional Awnings in a box Classic Awnings in a Box Basic Tools Required (not included) Tape Measure & Pencil Level Phillips Screwdriver Drill with ¼ bit (Cement or Masonry
Kontrol Kube Advanced Owners Manual
 Mobile Containment. Simplified. TM Kontrol Kube Advanced Owners Manual KONTROL KUBE www.kontrolkube.com 800.343755 1 IMPORTANT SAFETY INFORMATION SAVE THESE INSTRUCTIONS. CAREFULLY READ AND FOLLOW THESE
RAFTER VI. Installation and Operation CAREFREE WITH AUTOMATIC AWNING SUPPORT. RV Accessory PRODUCT OVERVIEW
 CAREFREE RAFTER VI RV Accessory WITH AUTOMATIC AWNING SUPPORT Installation and Operation PRODUCT OVERVIEW The gives the awning user the ability to easily tighten the center fabric when the awning is extended.
Installation Instructions for the Rolltec Physique XL Awning
 Installation Instructions for the Rolltec Physique XL Awning Questions? Call Rolltec at 1-800-667-0474 General Tool Requirements Table of Contents Available installation brackets Side dimensions of various
Installation Instructions for the Rolltec Bravo Awning
 Installation Instructions for the Rolltec Bravo Awning Questions? Call Rolltec at 1-800-667-0474 Table of Contents Available installation brackets Side dimensions of various installations Determining installation
PLEASE READ BEFORE USE AND SAVE THESE INSTRUCTIONS
 Sauce Flip Pan PLEASE READ BEFORE USE AND SAVE THESE INSTRUCTIONS Thank you for purchasing Cook s Companion Sauce Flip Pan. This pan is designed to be one of the most used pans in your kitchen. The Fusion
Owner's Manual. Safety Instructions. This Product is Produced Exclusively by
 Product May Vary Slightly From Pictured. Owner's Manual Safety Instructions! WARNING This equipment is for home use only. Do not use in institutional or commercial applications. Failure to follow this
CLASSIC SERIES Retractable Awning
 CLASSIC SERIES Retractable Awning Owner s Manual For safety reasons, please read the instructions and warnings in this manual carefully before installing the awning. TABLE OF CONTENTS Safety instructions
Installation Instructions for the Rolltec Adalia X3M Extenda Awning
 Installation Instructions for the Rolltec Adalia X3M Extenda Awning Questions? Call Rolltec at 1-800-667-0474 General Tool Requirements Table of Contents Available installation brackets Side dimensions
Solera Classic Awning OEM INSTALLATION MANUAL
 Solera Classic Awning OEM INSTALLATION MANUAL TABLE OF CONTENTS System and Safety Information 2 Preparation 3 Resources Required 3 Installation 3 Installing the Awning Rail (If Necessary) 3 Assembling
14ft Deluxe Universal Frame Pad Installation Instructions
 R 14ft Deluxe Universal Frame Pad Installation Instructions Retain address information for future use. JumpSport, Inc. 2055 South 7th Street, Suite A San Jose, CA 95112 U.S.A. 408-213-2551 www.jumpsport.com
INSTALLATION INSTRUCTIONS AND OWNER'S MANUAL AWNINGS. For trailers & motor homes with straight sides TOOLS REQUIRED
 AWNINGS INSTALLATION INSTRUCTIONS AND OWNER'S MANUAL For trailers & motor homes with straight sides TOOLS REQUIRED 1/4" electric drill Ratchet handle kit 3/8" & 7/16" socket No. 1 and No. 2 screwdriver
HDPE Watertight Fittings
 Macon Plastics, Inc. P R I C E L I S T HDPE Watertight Fittings Watertight fittings are available in most standard configurations. There are many variations to fittings that can be made, therefore if you
FID WEIGHT BENCH. The contents of this package are not suitable for children under 3 years old. Contains small parts which may cause choking.
 FID WEIGHT BENCH PRODUCT MANUAL - VERSION 08.17.06 FOR AGES: 13+ WEIGHT LIMIT: 400 Lbs 181 Kgs ADULT(S) NEEDED: TOOLS NEEDED: WARNING/ADVERTENCIA CUSTOMER SERVICE Do not allow more than one person on the
VISIT OUR WEBSITE: OR CALL US TOLL FREE AT
 Model #710 WATH THE VIEO Owner s Manual VISIT OUR WEBSITE: WWW.LIBERTYGARENPROUTS.OM OR ALL US TOLL FREE AT 1-866-820-5805 LIBERTY GAREN PROUTS, IN. 1161 SOUTH PARK RIVE, KERNERSVILLE N 27284 IMPORTANT:
CRD120SC TUBING CUTTER
 CRD120SC TUBING CUTTER OPERATIONS MANUAL 1 VERSION 2.1 LAST EDITED 05.01.2018 cleanroomdevices.com Table of Contents Table of Contents....2 1.0 General Product & Safety Information... 3 1.1 Product Information
Installation Instructions
 Installation Instructions For: Jeep Wrangler TJ Strapless Bikini Part Number 52521 To be used with or without Soundbar To be used with or without Door Side Rails Congratulations on your purchasing decision.
Electric 2-STAGE SHARPENING FEATURES: system allows for safe, easy knife sharpening - Non-slip feet allows sharpener to stay in place while in use
 Electric FEATURES: - 2-Stage electric sharpening system allows for safe, easy knife sharpening - Non-slip feet allows sharpener to stay in place while in use 2-STAGE SHARPENING IMPORTANT SAFEGUARDS SAVE
NORDIC PLOW TORO Time Cutter Plow PLOW KIT for TORO Time Cutter SW developed by Nordic Plow
 NORDIC PLOW TORO Time Cutter Plow PLOW KIT for TORO Time Cutter SW4200 49 developed by Nordic Plow TIME CUTTER ATTACHMENT ASSEMBLY TIPS... DANSK...1 ENGLISH... 3 NORSK... 19 FRANCAIS...12 SVENSKA...20
Door Bushing Replacement & Latch Adjustment Monaco Group Coaches
 Door Bushing Replacement & Latch Adjustment Monaco Group Coaches Contents Door Latch Adjustment & Repair... 1 Symptoms:... 1 Replacing the bushing VS. Adjusting the latch rods.... 1 How the bushing works....
Wenger Corporation 2014 Printed in USA 05/14 Part #049B015-09
 Assembly Instructions Tuba Tamer Contents Important User Information...........................2 Replacemant Parts List..............................3 Assembly.........................................4
Honda Ridgeline Installation Instructions
 Honda Ridgeline Installation Instructions READ THIS... If you read these instructions from beginning to end before starting you will probably not need to look at them again during the installation, but
LM601 Landmark Permanent Blind
 LM601 Landmark Permanent Blind Get parts online at www.huntriversedge.com P/N: 26742 REV1: 01/13/17 2017 RETI All Rights Reserved INTRODUCTION Landmark Permanent Blinds are engineered with you the hunter
Nordic Plow. Lawn Tractor Plow w / Handle (PLOW) 771 W. North Avenue, West Chicago, IL Copyright 1/1/16
 771 W. North Avenue, West Chicago, IL Copyright 1/1/16") Lawn Tractor Plow w / Handle by Nordic Plow LAWN TRACTOR ATTACHMENT ASSEMBLY TIPS... DANSK...15 ENGLISH... 3 NORSK... 16 FRANCAIS... 9 ITALINO... 10 NEDERLANDS... 11 ESPANOL... 1 SVENSKA...17 POLSKI...
Lawn Tractor Plow w / Handle by Nordic Plow LAWN TRACTOR ATTACHMENT ASSEMBLY TIPS... DANSK...15 ENGLISH... 3 NORSK... 16 FRANCAIS... 9 ITALINO... 10 NEDERLANDS... 11 ESPANOL... 1 SVENSKA...17 POLSKI...
CHANGING YOUR LANDSCAPE SINCE 1945 OWNER S MANUAL. Tow Hitch Replacement Kit For Rough Cut Trailcutters. Starting Serial # L
 CHANGING YOUR LANDSCAPE SINCE 1945 OWNER S MANUAL Tow Hitch Replacement Kit For Rough Cut Trailcutters 21100 Starting Serial # L118-023001 Tools Required: Wrench/Socket Qty. Size (1) 1-1/8 (1) 1-1/16 (2)
READ ME FIRST! IMPORTANT WARNING! ENG. Roof top tent
 Roof top tent ENG TENT031 220 min READ ME FIRST! Thank you for purchasing a Front Runner Roof Top Tent. Before you start, take a moment to familiarize yourself with these Fitting Instructions and the components
Installation manual. Awning. V480 Cannes
 Installation manual Awning V480 Cannes Installation manual awning V480 Cannes Content 1. Awning * 2. Wall supports 3. Extra support(s) (with an awning bigger than 350 cm) 4. Mounting plates (optional)
Primrose Awnings - Standard Manual Instructions
 Primrose Awnings - Standard Manual Instructions Contents Warning 1.5m - 3.0m Awnings 4 x Expansion bolts (2 per bracket)** 2 x brackets 1 x Awning 1 x Winder handle 3.5m - 4m Awnings 6 x Expansion bolts
OWNER S MANUAL: G5000 SLIDE-OUT AWNING SYSTEM
 INSTALLATION, OPERATIONS, ADJUSTMENT AND REPAIR Rev. 08/01/12 1361 Calle Avanzado San Clemente California 92673 Office: (949) 259-4000 Toll Free: (800) 382-8442 Fax: (949) 276-5500 TABLE OF CONTENTS WARRANTY
Item # BJ2PC With 8 Leg Frame, Cover, and Enclosure Kit with Windows Size: 10 8 Wide x 20 Long (Side Height 6 8 ) (Center Peak Height 9 9 )
 (Center Peak Height 9 9 )") Item # BJ2PC With 8 Leg Frame, Cover, and Enclosure Kit with Windows Size: 10 8 Wide x 20 Long (Side Height 6 8 ) (Center Peak Height 9 9 ) Powell & Powell Supply Company, L.L.C. Manufactured by: 1730
Item # BJ2PC With 8 Leg Frame, Cover, and Enclosure Kit with Windows Size: 10 8 Wide x 20 Long (Side Height 6 8 ) (Center Peak Height 9 9 ) Powell & Powell Supply Company, L.L.C. Manufactured by: 1730
Required Tools: Phillips screw driver to remove original soft top. Torx sockets are required to completely remove the original soft top hardware.
 RAMPAGE P R O D U C T S Installation Instructions Part number 1098XX, Frameless Soft Top for 4 door Jeep Wrangler JK 2007- NOTE: Installation of the top in warm weather is optimal for ease of installation.
MODEL 412-3PC, RISING DOUGH PIZZA OVEN
 PIZZA OVEN MODEL 412-3PC, RISING DOUGH PIZZA OVEN This oven was designed expressly for baking rising dough pizzas. This counter top oven has dual position elements which are designed to cook quickly and
Primrose Awnings - Full Cassette Manual & Electric Instructions
 Primrose Awnings - Full Cassette Manual & Electric Instructions Contents Warning 2.0m - 3.5m Awnings 8 x Expansion bolts ** 2 x brackets 1 x Awning 1 x Winder 4.0m - 5.0m Awnings 12 x Expansion bolts **
INDEPENDENT SLIDE-OUT ROOM COVER AND AWNING
 CAREFREE GUARDI-AWN RV INDEPENDENT SLIDE-OUT ROOM COVER AND AWNING Installation and Operation 052884-002r1 Printed in USA August, 2005 TABLE OF CONTENTS Introduction... 1 Product Overview...1 Product Specifications...1
WARNING! Style Number: STQ30013 Primed 12x6L Steel Soccer Goal
 WARNING! To avoid injury during assembly, disassembly, use, adjustment and/or location of the Primed Steel Soccer Goal, please observe the following WARNINGS: Two competent adults are required to assemble,
NORDIC PLOW TORO Time Cutter Plow PLOW KIT for TORO Time Cutter SW developed by Nordic Plow
 NORDIC PLOW TORO Time Cutter Plow PLOW KIT for TORO Time Cutter SW4200 49 developed by Nordic Plow... DANSK...18 ENGLISH... 3 NORSK... 19 FRANCAIS...12 SVENSKA...20 ITALINO... 13 NEDERLANDS... 14 ESPANOL...
FLEX KEY ASSEMBLY. ..._ o RAFTER ARM TUBE MAIN ARM TUBE CAP NUT CLAW HINGE
 ZIP DEE Inc. 96 Crossen Ave. Elk Grove Village, IL 60007(847)437-0980 (800)338-2378 HEAD CASTING AWNING RAIL FLEX KEY ASSEMBLY..._ o GM1 Installation Instruction GMC Motorhome RAFTER ARM TUBE MAIN ARM
Model 698/ and Model in 1 Hose Reel Owner s Manual
 Model 698/694 200 and Model 706 100 4 in 1 Hose Reel Owner s Manual 698/694 706 VISIT OUR WEBSITE: WWW.LIBERTYGARDENPRODUCTS.COM OR CALL US TOLL FREE AT 1-866-820-5805 LIBERTY GARDEN PRODUCTS, INC. 500
PLAYSET GLIDER INSTRUCTIONS
 2072 PLAYSET GLIDER INSTRUCTIONS This Playset Glider is only to be used with a Backyard Play System Playset, including Yardline Play Systems and Heartland Play Systems. - NOTICE - This playset product
Rooftop Tent Owners Manual
 WWW.SMITTYBILT.COM Installation Instructions Part # 2783 Overlander Tent Rooftop Tent Owners Manual Read instruction manual entirely before assembling and installing this product. The Smittybilt Overlander
LDR Brachytherapy Seed Sterilization and Sorting Tray
 LDR Brachytherapy Seed Sterilization and Sorting Tray Table of Contents General Precautions... 2 Customer Responsibility... 3 Description... 4 Features and Specifications... 5 Operation... 6 Changing Covers
* * KR54-F, KR9854 & KR9954 Installation Instructions. Read All Warnings Before Starting Installation! Index:
 *941061-00* 941061-00 Keyed Removable Mullion KR54-F, KR9854 & KR9954 Installation Instructions CLASSIFIED CLASSIFIED C Read All Warnings Before Starting Installation! Index: General Information ----------------
AND LOAD CANOPY RACK SPECIFICATIONS
 8MAY15 INSTRUCTIONS for the LOCK AND LOAD CANOPY RACK SPECIFICATIONS and SAFE LOADING REQUIREMENTS The Lock and Load ladder carrier for Truck Caps is a rack designed to mount to the top of a pickup truck
Installation Instructions Supertop NX
 Installation Instructions Supertop NX Vehicle Application: Jeep Wrangler Unlimited 2004 2006 Part Number: 54721 www.bestop.com - We re here to help! Visit our web site and click on Ask a Question. Click
CFF PRO SERIES SUPER DECLINE BENCH
 CFF PRO SERIES SUPER DECLINE BENCH Assembly & Care Instructions THANK YOU! We think you re gonna dig this decline bench (CFF ADB). Super adjustable and warrantied for life, please review these instructions
ALEKO Victoria Series Retractable Awning Instructions for Installation and Operation
 www.alekoproducts.com ALEKO Victoria Series Retractable Awning Instructions for Installation and Operation PLEASE DO NOT RETURN THIS PRODUCT TO THE STORE! The owner s manual includes assembly and operating
Contents. Awnings USA - Full Protective Hood Manual Instructions ft 11" - 11ft 6" Awnings
 Awnings USA - Full Protective Hood Manual Instructions Contents Warning We recommend that two or more people are required to lift the awning into place. 4ft 11" - 11ft 6" Awnings 8 x Expansion bolts **
2522 and 2523 Fiber Optic Splice Organizer Tray
 2522 and 2523 Fiber Optic Splice Organizer Tray Instructions February 1996 Issue 1, 34-7039-6256-2 1 Table of Contents 1. General... 3 2. Kit Contents... 3 3. Available Kits and Accessories... 4 4. Tray
Installation Instructions Header Bikini,Safari Version
 Installation Instructions Bikini,Safari Version Vehicle Application Jeep Wrangler JK (2 Door) 2007 2009 Part Number: 52585 www.bestop.com - We re here to help! Visit our web site and click on Ask a Question.
PRESCHOOL JUMPER KIDS TRAMPOLINE. Not recommended for children under 3 years of age.
 PRESCHOOL JUMPER KIDS TRAMPOLINE PRODUCT MANUAL - VERSION 03.16.02 FOR AGES: 3-7 WEIGHT LIMIT: 75 Lbs 35 Kgs ADULT(S) NEEDED: TOOLS NEEDED: WARNING/ADVERTENCIA CUSTOMER SERVICE Consult a physician before
OUTBACK AWNING AND ROOM
 OWNER'S MANUAL OUTBACK AWNING AND ROOM RV THIS BOOK CONTAINS ORIGINAL INSTALLATION AND SETUP 056500-001r1 Printed in USA May, 2007 TABLE OF CONTENTS Installing the Outback Awning... 1 Installing the Awning
85 Heart Lake Road South Brampton, Ontario, Canada L6W 3K2 Phone: Fax:
 Big Joe by Blue Giant Warranty AC Power Drive Straddle Trucks (PDS) AC Power Pallet Trucks (WPT45, D40) AC Power Rider Trucks (WRT-60) AC Power Counterbalanced Truck (CB-22) AC Power Task Support Vehicle
Installation Instructions Safari Bikini Top
 Installation Instructions Safari Bikini Top For: 1992-1995 Wrangler Part Number 52529 Congratulations on your purchasing decision. Bestop designed this Convertible Top to give you years of dependability
EEZI - AWN series 1000 / 2000 Awning bracket
 EEZI - AWN series 1000 / 2000 Awning bracket RRAC063 INSTALL TIME: 15 mins IMPORTANT WARNING! IT IS CRITICAL THAT ALL FRONT RUNNER PRODUCTS BE PROPERLY AND SECURELY ASSEMBLED AND ATTACHED TO YOUR VEHICLE.
RETRACTABLE AWNING w/ OPTIONAL HOOD ASSEMBLY INSTRUCTIONS
 Contact us @ (800)851-0865 RETRACTABLE AWNING w/ OPTIONAL HOOD ASSEMBLY INSTRUCTIONS Congratulations on your purchase of a new retractable awning. With proper installation this awning will provide years
RESIDENTIAL PATIO AWNING
 INSTALLATION & OWNER'S MANUAL RESIDENTIAL PATIO AWNING Residential A MANUAL CRANK PATIO AWNING FOR RESIDENTIAL HOMES 052592-001r1 Printed in USA April, 2013 TABLE OF CONTENTS Product Overview... 1 Component
Installation and User s Manual 12 x 10 MOTORIZED AWNING
 12 x 10 MOTORIZED AWNING Installation and User s Manual 12 x 10 MOTORIZED AWNING 088-1763-0 Stop Please read and understand this manual before any assembly or use of this product. Before beginning assembly
RESCUE SUPPORT SYSTEMS TRIPOD CONVERSION KIT PN
 RESCUE SUPPORT SYSTEMS TRIPOD CONVERSION KIT PN 22-796300 Paratech Incorporated Paratech Europe, Branch of Paratech Inc. P.O. Box 1000, Frankfort, IL 60423 USA P.O. Box 174, 5260 Odense S, Denmark Customer
Northwest RV Supply Printed From Manual Compliments of CAREFREE ONE-TOUCH WINDOW AWNING With Stop
 CAREFREE ONE-TOUCH WINDOW AWNING With Stop Installation and Operations Manual T0002 052504-001 Printed in USA November, 2003 TABLE OF CONTENTS Introduction... 1 Product Overview... 1 Safety Information...
Reference Only Manufacturer s Original Provided w/purchase. OWNER S MANUL FOR BEAUTY-MARK Retractable awnings MAUI AND DESTIN
 Version 2016-1 OWNER S MANUL FOR BEAUTY-MARK Retractable awnings MAUI AND DESTIN Manual and Motorized Awning Page 1 Table of Contents PAGE SECTION 3 Time required installing the awning 3 Parts 4 Required
Assembly Manual. OLM Retractable Canopy for 12X20 Breeze Pergola by Outdoor Living Today. Revision #11 October 5, 2017
 Assembly Manual OLM Retractable Canopy for 12X20 Breeze Pergola by Outdoor Living Today Revision #11 October 5, 2017 Care and Maintenance - Canopy should be removed in winter to reduce the chance of collapse
Thermal King Blankets and Storage Reels 7100 Spectrum Lane Missoula MT EverActive Brands
 Thermal King Blankets and Storage Reels 7100 Spectrum Lane Missoula MT 59808 800.791.8056 www.spectrumproducts.com 2012 EverActive Brands Rev 3/18/16 Contents Blanket Specifications. 1 Pool Blanket Cleaning
Primrose Awnings Full Cassette Manual & Electric Instructions
 Primrose Awnings Full Cassette Manual & Electric Instructions Contents for Full Cassette Awning 1 x Remote control receiver box 2 x Remote hand-held zappers 1 x 5 metre cable 1 x Template sticker **The
Vanagon Ladder Kit Assembly & Installation Instructions
 Rocky Mountain Westy Vanagon Ladder Kit Assembly & Installation Instructions Introduction Thank you for purchasing the Rocky Mountain Westy Vanagon Ladder Kit. We pride ourselves in the products we develop
ASSEMBLY INSTRUCTIONS
 ASSEMBLY INSTRUCTIONS NT-MG1158 58" Glass and Metal TV Stand Safety information and specifications...2 Tools needed...3 Parts...3 Hardware...4 Assembly instructions...5 Safety information and specifications
SPIRIT FX, FIESTA AND SIMPLICITY AWNINGS. Printed From
 RV INSTALLATION MANUAL MANUALLY OPERATED PATIO AWNING SPIRIT FX, FIESTA AND SIMPLICITY AWNINGS These instructions apply to all models listed. Details and procedures unique to a specific model are labeled
FIESTA & FIESTA HD PATIO AWNINGS
 INSTALLATION MANUAL FIESTA & FIESTA HD PATIO AWNINGS MANUALLY OPERATED PATIO AWNING RV Read this manual before installing or using this product. Failure to follow the instructions and safety precautions
Manual Awning. Assembly Instructions. Product No Toll-free:
 Manual Awning Product No. 088-30- Instructions Toll-free: -877-483-679 IMPORTANT: Please read this manual carefully before beginning assembly of this product. Keep this manual for future reference. 3 Table