Refrigerator-Freezer type I Frizidera-Frezer tip I Hladnjak-Zamrzivač tipa I Фрижидер Замрзнувач-тип I RDV 6200 S
|
|
|
- Nickolas Booker
- 5 years ago
- Views:
Transcription

1 Refrigerator-Freezer type I Frizidera-Frezer tip I Hladnjak-Zamrzivač tipa I Фрижидер Замрзнувач-тип I RDV 6200 S
2
3 WARNING! In order to ensure a normal operation of your refrigerating appliance, which uses a completely environmentally friendly refrigerant the R600a (flammable only under certain conditions) you must observe the following rules: Do not hinder the free circulation of the air around the appliance. Do not use mechanical devices in order to accelerate the defrosting, others than the ones recommended by the manufacturer. Do not destroy the refrigerating circuit. Do not use electric appliances inside the food keeping compartment, other than those that might have been recommended by the manufacturer. UPOZORENJE! Da biste obezbedili normalan rad Va.eg fri.idera, koji koristi ekolo.ki rashlađivač R600a (a koji je zapaljiv samo pod određenim okolnostima) morate po.tovati sledeća pravila: Nemojte ometati slobodan protok vazduha oko uređaja. Nemojte koristiti druga mehanička sredstva osim onih koje predviđa proizvođač, da biste ubrzali odmrzavanje. Nemojte uni.titi jedinicu za hlađenje. Nemojte koristiti električne uređaje u odeljku za čuvanje hrane, osim onih koje preporučuje proizvođač. UPOZORENJE! Da biste osigurali normalan rad Vašeg hladnjaka, koji koristi potpuno po okoliš neškodljivu tvar za hlađenje R600a (zapaljiv samo pod određenim uvjetima), morate se držati sljedećih pravila: Nemojte sprječavati slobodan protok zraka oko uređaja. Nemojte koristiti mehaničke uređaje da biste ubrzali odmrzavanje, osim onih koje je preporučio proizvođač. Ne uništavajte sklop za zamrzavanje. Ne koristite električne uređaje u odjeljku za hranu, osim onih koje je preporučio proizvođač. ПРЕДУПРЕДУВАЊЕ! Со цел да се обезбеди нормално функционирање на уредот, кој користи целосно еколошки разладувач (фреон) R600a (запалив само под одредени услови), морате да се придржувате кон следните правила: Немојте да ја попречувате слободната циркулација на воздухот околу уредот. Немојте да употребувате механички предмети за да го забрзате процесот на одмрзнување. Користете ги само оние кои се препорачани од произведителот. Немојте да го оштетувате разладното коло. Не употребувајте електрични апарати внатре во уредот. Користете ги само оние кои се препорачани од произведителот
4 GB Index Safety first /1 Electrical requirements /2 Transportation instructions /2 Installation instructions /2 Getting to know your appliance /3 Suggested arrangement of food in the appliance /3 Temperature control and adjustment /4 Before operating /4 Storing frozen food /4 Freezing fresh food /4 Making ice cubes /5 Defrosting /5 Replacing the interior light bulb /6 Cleaning and care /6 Repositioning the door /6 Do s and don ts /7 Trouble shooting /8 SR Sadržaj Bezbednost na prvom mestu /9 Neophodne električne instalacije /10 Uputstvo za transport /10 Uputstvo za instaliranje /10 Elementi uređaja /11 Regulacija temperature /11 Pre stavljanja aparata u upotrebu /11 Skladištenje zamrznute hrane /11 Zamrzavanje sveže hrane /11 Pravljenje leda /11 Odmrzavanje /12 Zamena sijalice u aparatu /12 Čišćenje i održavanje /12 Smer otvaranja vrata /13 Problemi /13 HR Sadržaj Sigurnost prije svega /14 Električni priključak /15 Upute za transport /15 Upute za instaliranje /15 Dijelovi hladnjaka /16 Preporučeni raspored namirnica u hladnjaku /16 Kontrola temperature i podešavanje /17 Prije rada hladnjaka /17 Spremanje zamrznutih namirnica /17 Zamrzavanje svježih namirnica /17 Priprema kockica leda /18 Odleđivanje /18 Zamjena žaruljice unutarnje rasvjete /19 Ćišćenje i njega /19 Promjena smjera otvaranja vrata /19 Korisni savjeti /20 Otklanjanje smetnji u radu /21 MK Elektri~en priklu~ok /22 Upatstvo za transport /23 Upatstvo za instalacija /23 Zapoznavawe so aparatot /24 Prepora`an raspored na hranata vo aparatot /24 Kontrola na temperaturata ipodesuvawe /25 Pred upotreba /25 Zamrznuvawe na sve`a hrana /25 Podgotovka na kocki mraz /26 Odmrznuvawe /26 Zamena na sijali~kata za vnatre{no osvetluvawe /27 ^istewe i odr`uvawe /27 Premestuvawe na vratata /27 Napravete/Nemojte da napravite /28
5 1


6
7 7
8 GB Instruction for use Congratulations on your choice of a BEKO Quality Appliance, designed to give you many years of service. Safety first! Do not connect your appliance to the electricity supply until all packing and transit protectors have been removed. Leave to stand for at least 4 hours before switching on, to allow compressor oil to settle, if transported horizontally. If you are discarding an old appliance with a lock or latch fitted to the door, ensure that it is left in a safe condition to prevent the entrapment of children. This appliance must only be used for its intended purpose. Do not dispose of the appliance on a fire. Your appliance contains non CFC substances in the insulation which are flammable. We suggest you contact your local authority for information on disposal and available facilities. We do not recommend use of this appliance in an unheated, cold room. (e.g. garage, conservatory, annex, shed, out-house etc.) To obtain the best possible performance and trouble free operation from your appliance it is very important to read these instructions carefully. Failure to observe these instructions may invalidate your right to free service during the guarantee period. Please keep these instructions in a safe place for easy reference. Original Spare parts will be provided for 10 years, following the product purchasing date. This appliance is not intended for use by person with reduced physical, sensory or mental capabilities or lack of experience and knowledge unless they have been given supervision or instruction concerning use of the appliance by a person responsible for their safety. Children should be supervised to ensure that they do not play with the appliance. 1
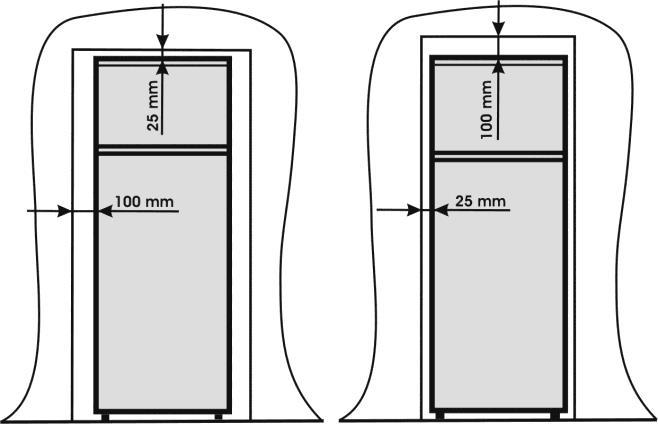
9 GB Electrical requirements Before inserting the plug into the wall socket make sure that the voltage and the frequency shown in the rating plate inside the appliance corresponds to your electricity supply. We recommend that this appliance is connected to the mains supply via a suitably switched and fused socket in a readily accessible position. Warning! This appliance must be earthed. Repairs to electrical equipment should only be performed by a qualified technician. Incorrect repairs carried out by an unqualified person are carry risks that may have critical consequences for the user of the appliance. ATTENTION! This appliance operates with R600a which is an environmental friendly but flammable gas. During the transportation and fixing of the product, care must be taken not to damage the cooling system. If the cooling system is damaged and there is a gas leakage from the system, keep the product away from open flame sources and ventilate the room for a while. WARNING - Do not use mechanical devices or other means to accelerate the defrosting process, others than those recommended by the manufacturer. WARNING - Do not damage the refrigerant circuit. WARNING - Do not use electrical appliances inside the food storage compartments of the appliance, unless they are of the type recommended by the manufacturer. WARNING - If the supply cord is damaged, it must be replaced by the manufacturer, its service agent or similarly qualified persons in order to avoid a hazard. Transportation instructions 1. The appliance should be transported only in an upright position. The packing as supplied must be intact during transportation. 2. If during the transport the appliance, has been positioned horizontally, it must not be operated for at least 4 hours, to allow the system to settle. Instruction for use 3. Failure to comply with the above instructions could result in damage to the appliance, for which the manufacturer will not be held liable. 4. The appliance must be protected against rain, moisture and other atmospheric influences. Important! Care must be taken while cleaning/carrying the appliance not to touch the bottom of the condenser metal wires at the back of the appliance, as this could cause injury to fingers and hands. Do not attempt to sit or stand on top of your appliance as it is not designed for such use. You could injure yourself or damage the appliance. Make sure that the mains cable is not caught under the appliance during and after moving, as this could damage the cable. Do not allow children to play with the appliance or tamper with the controls. Installation instructions 1. Do not keep your appliance in a room where the temperature is likely to fall below 10 degrees C (50 degrees F) at night and/or especially in winter, as it is designed to operate in ambient temperatures between +10 and +38 degrees C (50 and 100 degrees F). At lower temperatures the appliance may not operate, resulting in a reduction in the storage life of the food. 2. Do not place the appliance near cookers or radiators or in direct sunlight, as this will cause extra strain on the appliance's functions. If installed next to a source of heat or freezer, maintain the following minimum side clearances: From Cookers 30 mm From Radiators 300 mm From Freezers 25 mm 3. Make sure that sufficient room is provided around the appliance to ensure free air circulation (Item 2). Put the back airing lid to the back of your refrigerator to set the distance between the refrigerator and the wall (Item 3). 2
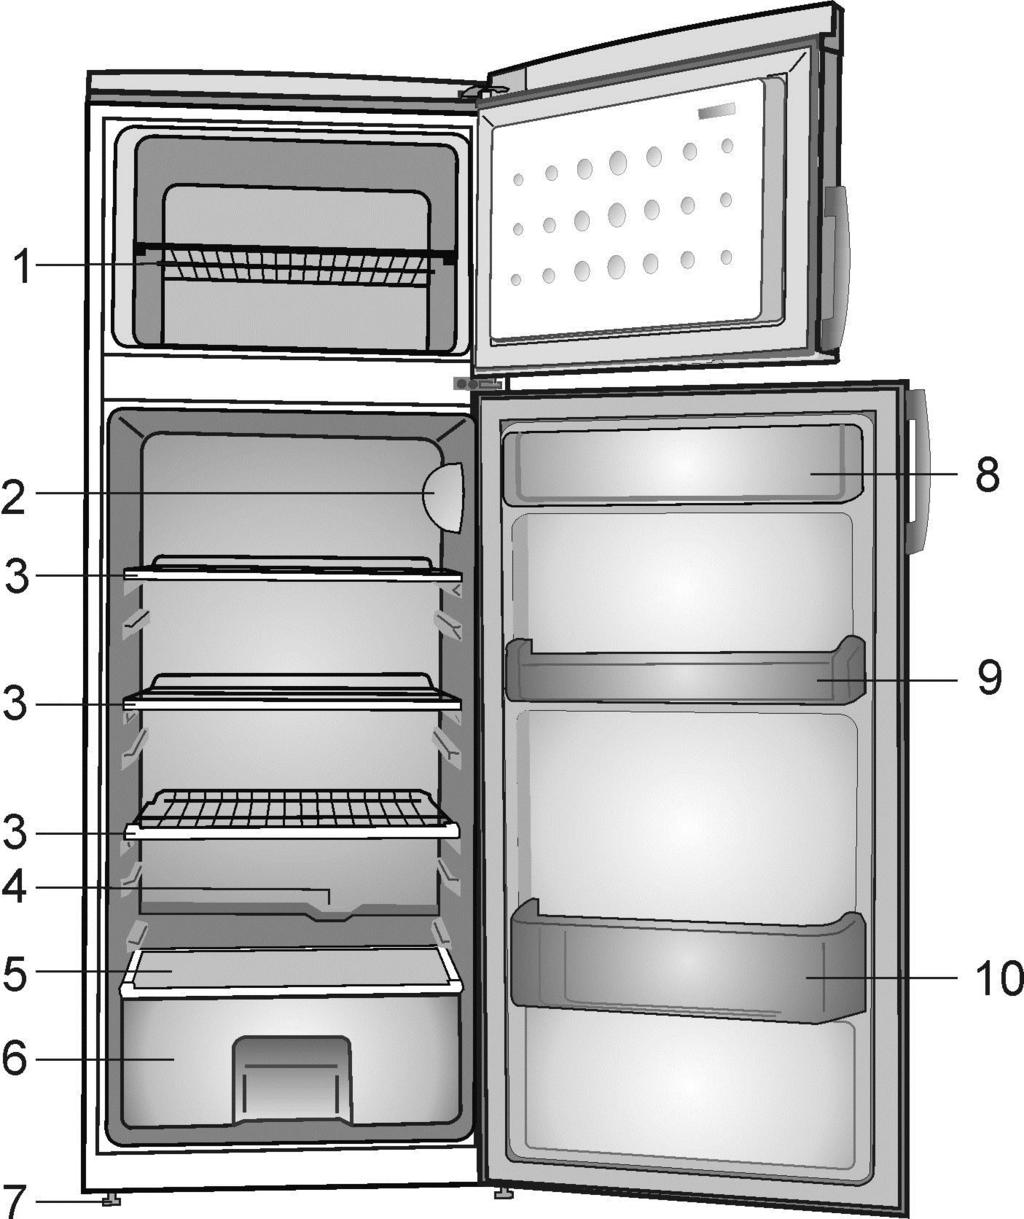
10 GB 4. The appliance should be positioned on a smooth surface. The two front feet can be adjusted as required.to ensure that your appliance is standing upright adjust the two front feet by turning clockwise or anticlockwise, until firm contact is secured with the floor. Correct adjustment of feet prevents excessive vibration and noise (Item 4). 5. Refer to "Cleaning and Care" section to prepare your appliance for use. Getting to know your appliance (Item 1) 1 - Freezer shelf 2 - Thermostat and lamp housing 3 - Adjustable Cabinet shelves 4 - Defrost water collection channel - Drain tube 5 - Crisper cover 6 - Crisper 7 - Adjustable front feet 8 - Dairy Compartment 9 - Jars shelf 10 - Bottle shelf Suggested arrangement of food in the appliance Guidelines for obtaining optimum storage and hygiene: 1. The fridge compartment is for the shortterm storage of fresh food and drinks. 2. The freezer compartment is rated and suitable for the freezing and storage of pre-frozen food. The recommendation for storage as stated on the food packaging should be observed at all times. 3. Dairy products should be stored in the special compartment provided in the door liner. In order to freeze fresh food it is recommended to pack the products in aluminium or plastic sheet, cool them in the fresh food compartment and store them on the freezer compartment shelf. It is preferable that the shelf be fixed in the upper side of the freezer compartment. Instruction for use 4. Cooked dishes should be stored in airtight containers. 5. Fresh wrapped produce can be kept on the shelf. Fresh fruit and vegetables should be cleaned and stored in the crispers. 6. Bottles can be kept in the door section. 7. To store raw meat, wrap in polythene bags and place on the lowest shelf. Do not allow to come into contact with cooked food, to avoid contamination. For safety, only store raw meat for two to three days. 8. For maximum efficiency, the removable shelves should not be covered with paper or other materials to allow free circulation of cool air. 9. Do not keep vegetable oil on door shelves. Keep the food packed, wrapped or covered. Allow hot food and beverages to cool before refrigerating. Leftover canned food should not be stored in the can. 10. Fizzy drinks should not be frozen and products such as flavoured water ices should not be consumed too cold. 11. Some fruit and vegetables suffer damage if kept at temperatures near 0 C. Therefore wrap pineapples, melons, cucumbers, tomatoes and similar produce in polythene bags. 12. High-proof alcohol must be stored upright in tightly closed containers. Never store products that contain an inflammable propellant gas (e.g. cream dispensers, spray cans, etc.) or explosive substances. These are an explosion hazard. 3
11 GB Temperature control and adjustment Operating temperatures are controlled by the thermostat knob and may be set at any position between 1 and 5 (the coldest position). If the thermostat knob is in position "0" the appliance is off. In this case neither the lamp for inside lighting will light. The average temperature inside the fridge should be around +5 C (+41 F). Therefore adjust the thermostat to obtain the desired temperature. Some sections of the fridge may be cooler or warmer (such as salad crisper and top part of the cabinet) which is quite normal. We recommend that you check the temperature periodically with a thermometer to ensure that the cabinet is kept to this temperature. Frequent door openings cause internal temperatures to rise, so it is advisable to close the door as soon as possible after use. Before operating Final Check Before you start using the appliance check that: 1. The feet have been adjusted for perfect levelling. 2. The interior is dry and air can circulate freely at the rear. 3. The interior is clean as recommended under "Cleaning and care. 4. The plug has been inserted into the wall socket and the electricity is switched on. When the door is open the interior light will come on. And note that: 5. You will hear a noise as the compressor starts up. The liquid and gases sealed within the refrigeration system may also make some (noise), whether the compressor is running or not. This is quite normal. 6. Slight undulation of the top of the cabinet is quite normal due to the manufacturing process used; it is not a defect. Instruction for use 7. We recommend setting the thermostat knob midway and monitor the temperature to ensure the appliance maintains desired storage temperatures (See section Temperature Control and Adjustment). 8. Do not load the appliance immediately it is switched on. Wait until the correct storage temperature has been reached. We recommend checking the temperature with an accurate thermometer (see; Temperature Control and Adjustment). Storing frozen food Your freezer is suitable for the long-term storage of commercially frozen foods and also can be used to freeze and store fresh food. If there is a power failure, do not open the door. Frozen food should not be affected if the failure lasts for less than 16 hrs. If the failure is longer, then the food should be checked and either eaten immediately or cooked and then re-frozen. Freezing fresh food Please observe the following instructions to obtain the best results. Do not freeze too large a quantity at any one time. The quality of the food is best preserved when it is frozen right through to the core as quickly as possible. Do not exceed the freezing capacity of your appliance in 24 h. Placing warm food into the freezer compartment causes the refrigeration machine to operate continously until the food is frozen solid. This can temporarily lead to excessive cooling of the refrigeration compartment. When freezing fresh food, keep the thermostat knob at medium position. Small quantities of food up to 1/2 kg. (1 lb) can be frozen without adjusting the temperature control knob. Take special care not to mix already frozen food and fresh food. 4
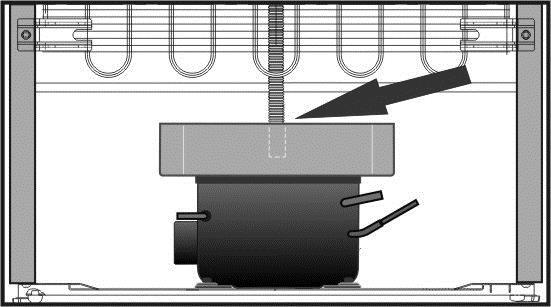
12 GB Making ice cubes Fill the ice - cube tray 3/4 full with water and place it in the freezer. Loosen frozen trays with a spoon handle or a similar implement; never use sharp-edged objects such as knives or forks. Defrosting A) Fridge compartment The fridge compartment defrosts automatically. The defrost water runs to the drain tube via a collection container at the back of the appliance (Item 5). During defrosting, water droplets may form at the back of the fridge compartment where a concealed evaporator is located. Some droplets may remain on the liner and refreeze when defrosting is completed. Do not use pointed or sharp-edged objects such as knives or forks to remove the droplets which have refrozen. If, at any time, the defrost water does not drain from the collection channel, check that no food particles have blocked the drain tube. The drain tube can be cleared with a pipecleaner or similar implement. Check that the tube is permanently placed with its end in the collecting tray on the compressor to prevent the water spilling on the electric installation or on the floor (Item 6). Instruction for use B) Freezer compartment Defrosting is very straightforward and without mess, thanks to a special defrost collection basin. Defrost twice a year or when a frost layer of around 7 (1/4") mm has formed. To start the defrosting procedure, switch off the appliance at the socket outlet and pull out the mains plug. All food should be wrapped in several layers of newspaper and stored in a cool place (e.g. fridge or larder). Containers of warm water may be placed carefully in the freezer to speed up the defrosting. Do not use pointed or sharp-edged objects, such as knives or forks to remove the frost. Never use hairdryers, electrical heaters or other such electrical appliances for defrosting. Sponge out the defrost water collected in the bottom of the freezer compartment. After defrosting, dry the interior thoroughly. Insert the plug into the wall socket and switch on the electricity supply. 5
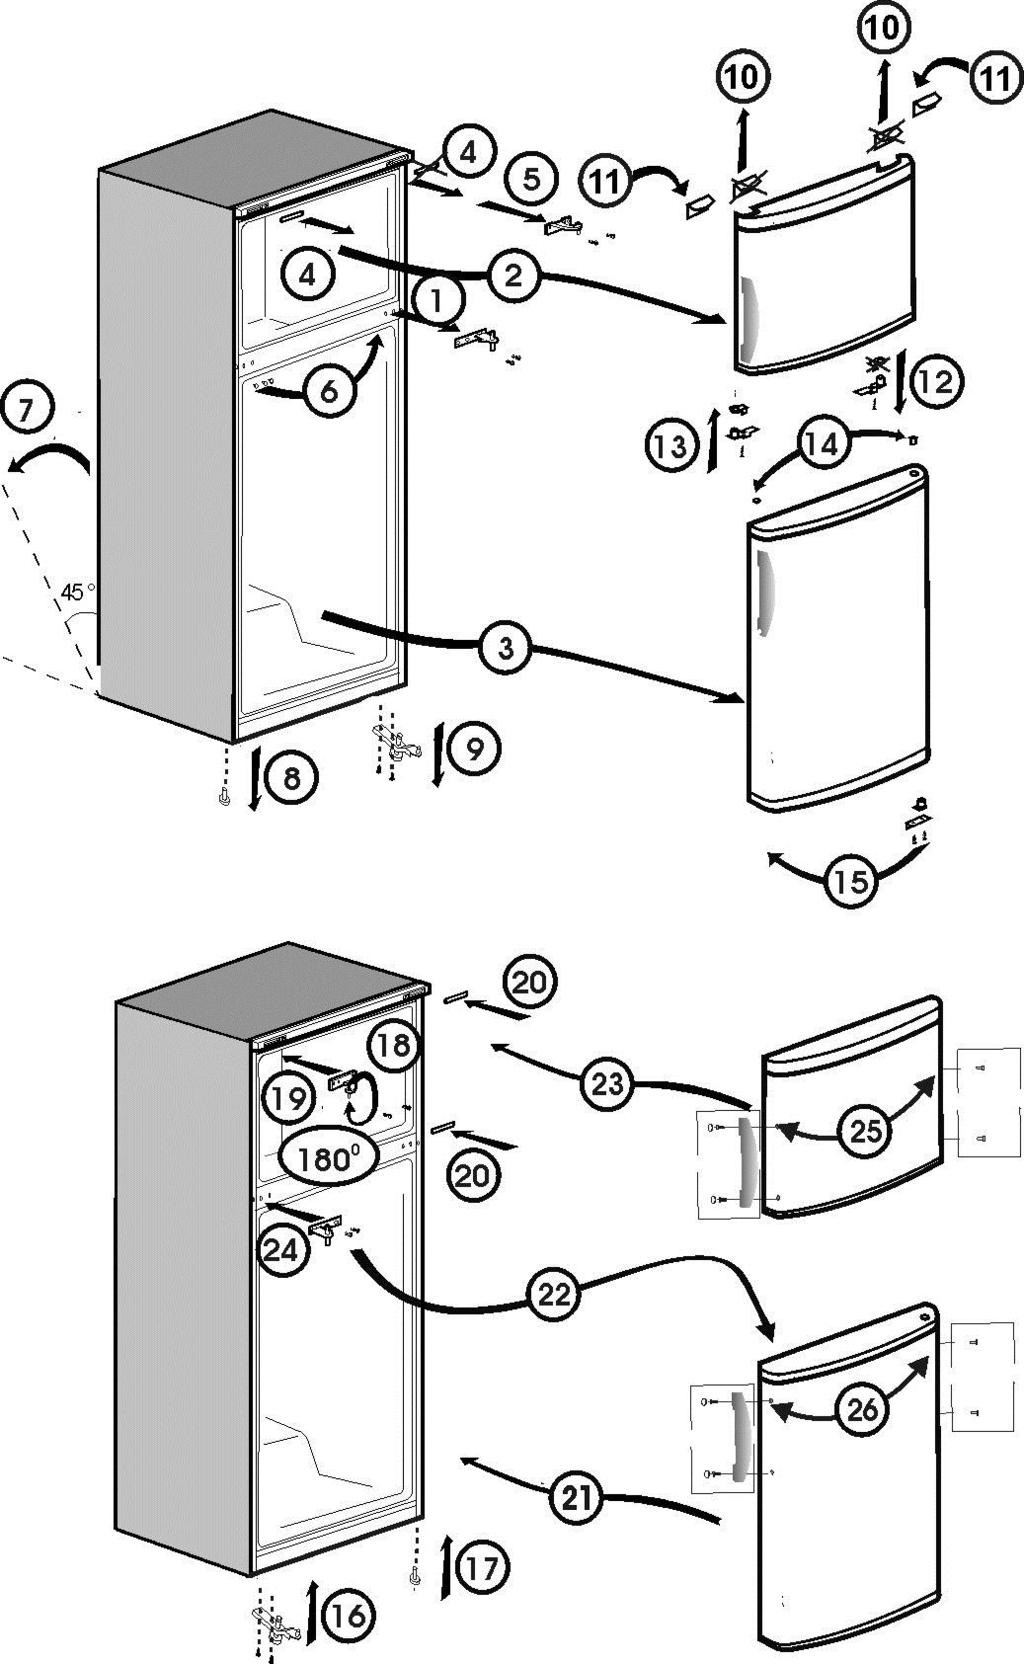
13 GB Replacing the interior light bulb To change the Bulb/LED used for illumination of your refrigerator, call your AuthorisedService. The lamp(s) used in this appliance is not suitable for household room illumination. The intended purpose of this lamp is to assist the user to place foodstuffs in the refrigerator/freezer in a safe and comfortable way. The lamps used in this appliance have to withstand extreme physical conditions such as temperatures below -20 C. Cleaning and care 1. We recommend that you switch off the appliance at the socket outlet and pull out the mains plug before cleaning. 2. Never use any sharp instruments or abrasive substances, soap, household cleaner, detergent or wax polish for cleaning. 3. Use luke warm water to clean the cabinet of the appliance and wipe it dry. 4. Use a damp cloth wrung out in a solution of one teaspoon of bicarbonate of soda to one pint of water to clean the interior and wipe it dry. 5. Make sure that no water enters the temperature control box. 6. If the appliance is not going to be used for a long period of time, switch it off, remove all food, clean it and leave the door ajar. 7. We recommend that you polish the metal parts of the product (i.e. door exterior, cabinet sides) with a silicone wax (car polish) to protect the high quality paint finish. 8. Any dust that gathers on the condenser, which is located at the back of the appliance, should be removed once a year with a vacuum cleaner. 9. Check door seals regularly to ensure they areclean and free from food particles. Instruction for use 10. Never: Clean the appliance with unsuitable material; eg petroleum based products. Subject it to high temperatures in any way, Scour, rub etc., with abrasive material. 11. Removal of dairy cover and door tray : To remove the dairy cover, first lift the cover up by about an inch and pull it off from the side where there is an opening on the cover. To remove a door tray, remove all the contents and then simply push the door tray upwards from the base. 12. Make sure that the special plastic container at the back of the appliance which collects defrost water is clean at all times. If you want to remove the tray to clean it, follow the instructions below: Switch off at the socket outlet and pull out the mains plug Gently uncrimp the stud on the compressor, using a pair of pliers, so that the tray can be removed Lift it up. Clean and wipe it dry Reassemble, reversing the sequence and operations 13. Large accumulation of ice will impair the performance of the freezer. Repositioning the door Proceed in numerical order (Item 7). 6
14 GB Do s and don ts Do- Clean and defrost your appliance regularly (See "Defrosting") Do- Keep raw meat and poultry below cooked food and dairy products. Do- Take off any unusable leaves on vegetables and wipe off any soil. Do- Leave lettuce, cabbage, parsley and cauliflower on the stem. Do- Wrap cheese firstly in greaseproof paper and then in a polythene bag, excluding as much air as possible. For best results, take out of the fridge compartment an hour before eating. Do- Wrap raw meat and poultry loosely in polythene or aluminium foil. This prevents drying. Do- Wrap fish and offal in polythene bags. Do- Wrap food with a strong odour or which may dry out, in polythene bags, or aluminium foil or place in airtight container. Do- Wrap bread well to keep it fresh. Do- Chill white wines, beer, lager and mineral water before serving. Do- Check contents of the freezer every so often. Do- Keep food for as short a time as possible and adhere to "Best Before" and "Use by" etc. dates. Do- Store commercially frozen food in accordance with the instructions given on the packets. Do- Always choose high quality fresh food and be sure it is thoroughly clean before you freeze it. Do- Prepare fresh food for freezing in small portions to ensure rapid freezing. Do- Wrap all food in aluminium foil or freezer quality polythene bags and make sure any air is excluded. Do- Wrap frozen food immediately after purchasing and put it in to the freezer as soon as possible. Do- Defrost food in the fridge compartment. Instruction for use Don t- Store bananas in your fridge compartment. Don t- Store melon in your fridge. It can be chilled for short periods as long as it is wrapped to prevent it flavouring other food. Don t- Cover the shelves with any protective materials which may obstruct air circulation. Don t- Store poisonous or any dangerous substances in your appliance. It has been designed for the storage of edible foodstuffs only. Don t- Consume food which has been refrigerated for an excessive length of time. Don t- Store cooked and fresh food together in the same container. They should be packaged and stored separately. Don t- Let defrosting food or food juices drip onto food. Don t- Leave the door open for long periods, as this will make the appliance more costly to run and cause excessive ice formation. Don t- Use sharp edged objects such as knives or forks to remove the ice. Don t- Put hot food into the appliance. Let it cool down first. Don t- Put liquid-filled bottles or sealed cans containing carbonated liquids into the freezer, as they may burst. Don t- Exceed the maximum freezing loads when freezing fresh food. Don t- Give children ice-cream and water ices direct from the freezer. The low temperature may cause 'freezer burns' on lips. Don t- Freeze fizzy drinks. Don t- Try to keep frozen food which has thawed; it should be eaten within 24 hours or cooked and refrozen. Don t- Remove items from the freezer with wet hands. 7
15 GB Trouble - shooting If the appliance does not operate when switched on, check; That the plug is inserted properly in the socket and that the power supply is on. (To check the power supply to the socket, plug in another appliance). Whether the fuse has blown/circuit breaker has tripped/main distribution switch has been turned off. That the temperature control has been set correctly. Instruction for use That the new plug is wired correctly, if you have changed the fitted, moulded plug. If the appliance is still not operating at all after above checks, contact the dealer from whom you purchased the unit. Please ensure that above checks have been done, as a charge will be made if no fault is found. The symbol on the product or on packaging indicates that this product may not be treated as household waste. Instead it shall be handed over to the applicable collection point for the recycling of electrical and electronic equipment. By ensuring this product is disposed of correctly, you will help prevent potential negative consequences for the environment and human health, which could otherwise be otherwise be caused by inappropriate waste handling of this product. For more detailed information about recycling of this product, please contact your local city office, you household waste disposal service or the shop where you purchased the product. 8
16 SR Uputstvo za upotrebu Bezbednost na prvom mestu Ne uključujte uređaj u struju pre nego skinete ambalažu i transpornu zaštitu! Ako je uređaj transportovan u horizontalnom položaju, sačekati najmanje 4 sata pre uključivanja uređaja, kako bi se tečnost u kompresoru slegla. Ovaj uređaj može biti korišćen samo u njemu namenjenu svrhe. Ne izlagati uređaj uticaju otvorenog plamena. Ne preporučuje se upotreba ovog uređaja u negrejanim, hladnim prostorijama. (npr. garaža, šupa itd. ) Kako bi Vaš uređaj radio u najboljem redu i bez ikakvih problema, važno je da pažljivo pročitate ova uputstva. Nepridržavanje ovih uputstava može dovesti i do mogućnosti gubitka prava na servisiranje u garantnom roku. Originalni rezervni delovi će biti obezbeđeni za 10 godina od dana kupovine proizvoda. U slučaju da ovaj uredjaj koriste nestručne osobe, ili osobe sa umanjenim psiho-fizičkim sposobnostima, obavezno je da to bude u prisustvu ili po instrukcijama staratelja, odgovornih za njihovu bezbednost. Deci ne treba biti dozvoljen pristup i igra sa uredjajem. 9
17 SR Neophodne električne instalacije Pre uključivanja uređaja proveriti da li napon u vašoj mreži odgovara naponu navedenom na uređaju. Preporučuje se da uređaj bude priključen na utičnicu opremljenu prekidačem i osiguračem odgovarajuće jačine. UPOZORENJE! Uređaj mora biti uzemljen. Eventualne popravke na uređaju mora vršiti stručno lice. Nestručne intervencije mogu dovesti do kritičnih posledica po uređaj. PAŽNJA! Uređaj radi na R600a ekološki gas, koji je zapaljiv. Tokom transporta voditi računa da se ne ošteti sistem hlađenja. Ukoliko dođe do oštećenja i do curenja gasa, držati uređaj dalje od izvora otvorenog plamena i ventilirati prostoriju u kojoj se uređaj nalazi. UPOZORENJE! Ne koristiti mehaničku silu kako bi ubrzali proces odmrzavanja. UPOZORENJE! Ne oštećivati sistem za hlađenje. UPOZORENJE! Ne koristiti električne uređaje unutar odeljaka za hranu u uređaju, osim onih koje je odobrio proizvođač. UPOZORENJE! Ako je električni kabl oštećen, mora da ga zameni proizvođač, njegov serviser ili slično kvalifikovano lice kako bi se izbegla opasnost. Uputstvo za transport 1. Uređaj treba transportovati isključivo u uspravnom položaju. Proizvođačka ambalaža mora biti neoštećena tokom transporta 2. Ako je uređaj transportovan u horizontalnom položaju, sačekati najmanje 4 sata pre uključivanja uređaja, kako bi se tečnost u kompresoru slegla. 3. Neispunjavanje gore navedenih uputstava može dovesti do oštećenja uređaja, za koje proizvođač ne može biti odgovoran. 4. Uređaj mora biti zaštićen od kiše, vlage i drugih atmosfeskih uticaja. VAŽNO! Mora se voditi računa da prilikom čišćenja/prenosa uređaja ne dođe do povrede ruku preko metalnih žica na kondenzatoru. Uputstvo za upotrebu Ne sedeti ili stajati na uređaju jer za to nije predviđen. Može doći do povrede i oštećenja aparata. Voditi računa na se naponski kabl ne nađe ispod uređaja nakon prenosa, jer to može rezultirati u oštećenju kabla. Ne dozvoliti da se deca igraju sa uređajem ili da poremete kontrolnu dugmad. Za zamrzavanje sveže hrane se preporučuje da se hrana upakuje u aluminijumsku ili plastičnu foliju, da se hladi u odeljku za hlađenje sveže hrane i da se čuva na polici u odeljku za zamrzavanje. Preporučuje se da se polica postavi u gornji deo odeljka za zamrzavanje. Uputstvo za instaliranje 1. Ne držati uređaj u prostorijama gde temperature mogu pasti ispod 10 C naročito zimi, jer je uređaj dizajniran da radi u uslovima gde je temperatura između +10 i +38 C. Na nižim temperaturama uređaj neće raditi, rezultirajući u kraćem veku trajanja hrane u njemu. 2. Ne smeštati uređaj u neposrednoj blizini šporeta, radijatora ili direktnog sunčevog zračenja, jer to može dovesti do većeg napora u radu uređaja. Ako je uređaj pozicioniran u blizini izvora toplote ili zamrzivača, voditi računa o minimalnoj udaljenosti: Od šporeta 30 mm Od radijatora 300 mm Od zamrzivača 25 mm 3. Voditi računa da postoji dovoljno prostora za cirkulaciju vazduha oko uređaja (slika 2). Postaviti odstojnik na zadnji deo frižidera kako bi odredili razdaljinu od zida (slika 3). 4. Uređaj treba postaviti na ravnu površinu. Dve prednje nožice se mogu podešavati po potrebi. Kako bi obezbedili da Vaš uređaj ispravno stoji, okretanjem podešavati prednje nožice. Ispravno podešavanje nožica obezbeđuje da ne dođe do pojave preteranih vibracija i buke. (slika 4) 5. Pogledati deo ''Čišćenje i održavanje'' kako bi pripremili Vaš uređaj za upotrebu. 10
18 SR Elementi uređaja (slika 1) 1 - Rešetka u komori za zamrzavanje 2 - Kućište sijalice i termostata 3 - Podesive police 4 - Odvod vode kod odmrzavanja 5 - Poklopac fijoke 6 - Fijoka 7 - Podesive nožice 8 - Polica za mlečne proizvode 9 - Polica za tegle 10 - Polica za boce Regulacija temperature Radne temperature se kontrolišu rotacionim dugmetom na termostatu koji se može podesiti između 1 i 5 (najhladnije). Prosečna temperatura u frižideru kreće se oko +5 0 C. Podesiti termostat na željenu temperaturu. Neki delovi frižidera mogu biti hladniji ili topliji (kao što je kod fijoke za salatu na dnu i police na vrhu), što je sasvim normalno. Preporučuje se povremena provera termometrom, kako bi se osiguralo da je temperatura u uređaju na željenom nivou. Često otvaranje vrata uzrokuje povećanje temperature u aparatu te se preporučuje da se vrata brzo zatvaraju nakon upotrebe. Pre stavljanja aparata u upotrebu Finalna provera Pre uključivanja uređaja proveriti: 1. Da su nožice prilagođene tako da aparat stoji potpuno ravno. 2. Da je unutrašnjost suva i da vazduh može slobodno cirkulisati iza uređaja. 3. Da je unutrašnjost čista kako je preporučeno u delu ''Čišćenje i održavanje''. 4. Da je utikač uključen u utičnicu. Kada se vrata otvore sijalica unutra će se upaliti. Obratiti pažnju na sledeće: 5. Kada se kompresor uključi, čuće se zvuk. Tečnost i gasovi unutar sistema mogu takođe proizvesti određeni zvuk, bez obzira da li kompresor radi ili ne. To je sasvim normalno. Uputstvo za upotrebu 6. Preporučuje se podešavanje termostata na srednju vrednost i praćenje da li se održava odgovarajuća temperatura. 7. Ne puniti uređaj hranom odmah nakon uključivanja. Treba sačekati da se postigne odgovarajuća temperatura. Skladištenje zamrznute hrane Deo zamrzivača u ovom uređaju je namenjen dugotrajnom čuvanju već smrznute hrane kao i zamrzavanju sveže hrane. Ukoliko dođe do nestanka struje, ne otvarati vrata zamrzivača. Smrznuta hrana će ostati u istom stanju ukoliko nestanak struje ne potraje duže od 16 časova. Ako je u pitanju duži period, proveriti hranu i odmah je pojesti ili skuvati i nakon toga je ponovo zamrznuti. Zamrzavanje sveže hrane Obratiti pažnju na sledeća uputstva kako bi postupak bio urađen na najbolji način. Ne zamrzavati prevelike količine hrane odjednom. Kvalitet hrane se najbolje može očuvati ako se hrana dubinski smrzne u najkraćem mogućem periodu. Voditi računa da se ne prekorači kapacitet zamrzavanja uređaja u toku 24 h Stavljajući vruću hranu u zamrzivać utičete na to da mtor zamrzivača radi neprekidno sve dok se hrana ne smrzne. To može dovesti do preteranog hlađenja u frižiderskom delu. Kada se sveža hrana zamrzava, dugme na termostatu mora biti na sredini. Male količine hrane (do 1/2 kg) mogu biti smrznute pez posebnog podešavanja temperature. Voditi računa da se već smrznuta i sveža hrana ne mešaju. Pravljenje leda Napuniti posudu za led do 3/4 max. nivoa i staviti je u komoru za zamrzavanje. Kocke leda vaditi uz pomoć drške od kašike ili sličnih oruđa; ne koristiti oštre predmete kao što su noževi i viljuške. 11
19 SR Odmrzavanje A) Fržiderskog dela Frižiderski deo se odmrzava automatski. Voda koja se stvori tokom procesa odmrzavanja odlazi kroz odvod do posude za skupljanje vode na zadnjem delu aparata (slika 5). Tokom procesa odmrzavanja, kapljice vode se mogu formirati na zadnjem delu aparata gde se nalazi skriveni isparivač. Neke kapljice mogu da ostanu i na unutrašnjim stranama aparata i da se ponovo zamrznu kada je proces odmrzavanja završen. Ne koristiti oštre predmete kao što su noževi i viljuške kako bi odstranili ove zamrznute kapljice vode. Ako voda nastala tokom procesa odmrzavanja ne odlazi kroz odvod, proveriti da li je odvod zapušen. Odvod se može očistiti oruđem za čišćenjem cevi ili nečim sličnim (slika 6). B) Zamrzivača Odmrzavanje je vrlo jednostavno i bez muke. Odmrzavanje je neophodno dva puta godišnje ili kada se stvori sloj leda debljine oko 7 mm. Proces odmrzavanja počinje se tako što se uređaj isključi iz struje. Svu hrana iz njega treba uviti u nekoliko slojeva novinskog papira i ostaviti na nekom hladnom mestu. Sudove sa vrućom vodom mogu se staviti u zamrzivač kako bi se ubrzao proces. Ne koristiti oštre predmete kao što su noževi i viljuške kako bi odstranili led. Ne koristiti fenove, električne grejalice i druge električne uređaje za odmrzavanje. Sunđerom odstraniti sa dna vodu koja je nastala tokom procesa odmrzavanja. Nakon odmrzavanja, detaljno osušiti unutrašnost i uključiti uređaj u struju. Zamena sijalice u aparatu Za promenu sijalice koja služi za osvetljenje u frižideru, pozovite ovlašćeni servis. Lampa (e) koja se koristi u ovom uređaju nije pogodna za domaćinsko osvetljenje. Namena ove lampe je da pomogne korisniku da stavi namirnice u frižider/zamrzivač na sigurno i udoban način. Lampe korišćene u ovom uređaju moraju da izdrže ekstremne fizičke uslove, kao što su temperature ispod -20 C. Uputstvo za upotrebu Čišćenje i održavanje 1. Pre čišćenja aparata preporučujemo da isključite aparat iz struje. 2. Pri procesu čišćenja ne koristiti oštre predmete i abrazivna sredstva, kao ni sapun, deterdžent, vosak za poliranje itd. 3. Za čišćenje spoljašnosti aparata koristiti samo toplu vodu. Nakon toga obrisati suvom krpom. 4. Za čišćenje unutrašnosti aparata koristiti krpu nakvašenu u rastvoru jedne kašike sodebikarbone i pola litra vode. Nakon toga obrisati suvom krpom. 5. Voditi računa da voda ne prodre u kućište termostata. 6. Ako duže vreme uređaj neće biti korišćen, isključiti ga iz struje, ukloniti svu hranu iz njega, očistiti ga i ostaviti vrata od uređaja odškrinuta. 7. Preporučujemo poliranje metalnih delova uređaja (npr. spoljašnjost vrata, stranica) silikonskim voskom (sredstvo za poliranje autmobila), kako bi zaštitili finalnu boju na uređaju. 8. Prašinu koja se skupi na kondenzatoru na zadnjem delu uređaja, trba ukloniti bar jednom godišnje uz pomoć usisivača. 9. Redovno proveravati gumu na vratima kako bi ostala čista i bez ikakvih delova hrane na njoj. 10. Nikada nemojte raditi sledeće: Čistiti uređaj neodgovarajućim supstancama kao na primer proizvodima na bazi petroleja. Izlagati ga visokim temperaturama u bilo kom smislu. Ribati abrazivnim sredstvima. 11. Skidanje poklopca sa odeljka za mlečne proizvode i posuda sa unutrašnjosti vrata Poklopac sa odeljka za mlečne proizvode skida se tako što se prvo podigne oko 2 cm i nakon toga izvuče ka onoj strani gde je njegov otvor. Kako bi skinuli posude za držanje hrane koje se nalaze na unutrašnjosti vrata, prvo ih morate isprazniti. Nakon toga jednostavno ih podići na gore i izvaditi ih iz ležišta. 12
20 SR 12. Voditi računa da je posuda koja služi za sakupljanje vode prilikom odmrzavanja i koja se nalazi na zadnjem delu uređaja, uvek čista. Postupak skidanja ove posude je sledeći: Isključiti uređaj iz struje. Koristeći klešta, lagano olabaviti držač na kompresoru kako bi posuda mogla biti izvađena. Podići posudu. Očistiti je i osušiti krpom. Na isti način vratiti posudu na njeno mesto. 13. Nagomilavanje leda može da umanji performanse uređaja. Smer otvaranja vrata Smer otvaranja vrata je moguće promeniti, prateći proceduru opisanu slikom. (slika 7) Uputstvo za upotrebu Koraci u ovoj proceduri označeni su brojevima. Problemi Ukoliko je uređaj uključen a ne radi, proveriti sledeće: Da je uređaj pravilno uključen u struju i da u utičnici ima struje. Da li je ispravan osigurač ili da li je glavni prekidač isljučen. Da li je regulator temperature podešen pravilno. Ukoliko ste menjali utikač, da li je pravilno povezan. Ukoliko uređaj i dalje ne funkcioniše, pozovite ovlašćenog servisera. Znak na proizvodu ili pakovanju označava da proizvod ne sme da se tretira kao kućni otpad. Umesto toga, treba da se preda u odgovarajućem centru za reciklažu električne i elektronske opreme. Osiguranjem pravilnog odlaganja ovog proizvoda, pomoćićete u sprečavanju mogućih negativnih posledica na sredinu i zdravlje ljudi, koji bi inače bili uzrokovani neodgovarajućim rukovanjem otpadom ovog proizvoda. Za detaljnije informacije o reciklaži ovog proizvoda, molimo javite se u kancelariju lokalne samouprave, Vašu tvrtku za odlaganje otpada ili trgovinu u kojoj ste kupili proizvod. 13
21 HR Upute za uporabu Čestitamo vam na izboru BEKO kvalitetnog hladnjaka, koji će vam pružiti mnogo godina zadovoljstva uporabe. Sigurnost prije svega! Hladnjak ne spajati na električnu mrežu sve dok se ne odstrane svi ambalažni i transportni osigurači. Ako se je hladnjak transportirao u horizontalnom položaju, ostavite ga da stoji najmanje 4 sata prije uključivanja, kako bi se sleglo ulje u kompresoru. Ako odbacujete stari hladnjak u otpad sa bravom u vratima, trebate onesposobiti bravu, kako se djeca u igri ne bi zatvorila u hladnjaku. Ovaj se hladnjak treba koristiti samo za predviđeno područje primjene. Hladnjak ne izlažite djelovanju vatre. Vaš hladnjak sadrži CFC tvari u izolaciji, koje su zapaljive. O zbrinjavanju hladnjaka u otpad treba se savjetovati sa reciklažnim dvorištem. Ne preporučujemo primjenu ovog hladnjaka u negrijanoj, hladnoj prostoriji (npr. garaži, podrumu ili izvan kuće). Kako bi se postigle najbolje moguće radne karakteristike i nesmetani rad vašeg hladnjaka, vrlo je važno da se pažljivo pročitaju ove upute. Ako se ne bi poštivale ove upute, to bi moglo rezultirati nepriznavanjem vaših jamstvenih prava. Molimo spremite ove upute na sigurno mjesto, kako bi se mogle lakše koristiti. Uređaj ne smiju koristiti osobe smanjenjih fizičkih, osjetilnih ili mentalnih sposobnosti, te osobe koje nemaju dovoljno iskustva i znanja, osim ako su pod nadzorom ili ih je uporabi proizvoda poučila osoba odgovorna za njihovu sigurnost. Djecu je potrebno nadzirati kako se ne bi igrala uređajem. 14
22 HR Električni priključak Prije nego što utaknete utikač u mrežnu utičnicu, provjerite da li se osnovni parametri električnog priključka sa natpisne pločice unutar hladnjaka podudaraju s parametrima električne mreže. Preporučujemo da se hladnjak priključi na električnu mrežu preko propisno spojene mrežne utičnice zaštićene osiguračem, koja se nalazi na mjestu dostupnom za priključak. Upozorenje! Ovaj hladnjak mora biti uzemljen. Popravke na električnim uređajima hladnjaka smiju izvoditi samo kvalificirani električari. Nepropisno provedeni popravci od strane nekvalificiranih osoba imaju za rezultat opasnosti koje mogu biti kritične za korisnika. PAŽNJA! Ovaj hladnjak radi sa rashladnim sredstvom R600a koje je ekološki prihvatljiv ali i zapaljiv plin. Tijekom transporta i pričvršćenja hladnjaka treba paziti da se ne ošteti rashladni sustav. Ako bi se rashladni sustav oštetio i ako dođe do propuštanja plina iz sustava, hladnjak treba držati dalje od otvorenog plamena i za trenutak proventilirati prostoriju. UPOZORENJE - Ne koristiti mehanička sredstva ili neka druga sredstva za ubrzvanaje procesa odleđivanja, osim onih koje preporučuje proizvođač. UPOZORENJE - Paziti da se ne ošteti krug rashladnog sredstva. UPOZORENJE - Ne koristiti električne uređaje unutar prostora hladnjaka za spremanje namirnica, koje nije preporučio proizvođač. UPOZORENJE - Ako je kabel napajanja oštećen, mora ga zamijeniti proizvođač, njegov serviser ili jednako kvalificirana osoba da bi se izbjegla opasnost. Upute za transport 1. Hladnjak treba transportirati samo u uspravnom položaju. Prije transporta ne smije se skidati njegova originalna ambalaža. 2. Ako je hladnjak bio transportiran u horizontalnom položaju, prije priključka se treba ostaviti najmanje 4 sata da stoji u uspravnom položaju, kako bi se sleglo ulje u kompresoru. 15 Upute za uporabu 3. Ako se ne bi poštivale gornje upute, to bi moglo rezultirati oštećenjem hladnjaka, za što proizvođač ne preuzima odgovornost. 4. Hladnjak se mora zaštititi od kiše, vlage i ostalih atmosferskih utjecaja. Važno! Tijekom čišćenja/prenošenja hladnjaka treba paziti da se ne dodirnu metalne žice na donjem dijelu kondenzatora, na stražnjem dijelu hladnjaka, jer to može uzrokovati ozljede prstiju i ruku. Ne sjediti niti se penjati na hladnjak, jer on za takvo nešto nije predviđen. Kod toga se možete ozlijediti ili oštetiti hladnjak. Priključni kabel se ne smije prignječiti ispod hladnjaka, tijekom i nakon premještanja, jer to može rezultirati oštećenjem kabela. Ne dopustiti djeci da se igraju sa hladnjakom ili da rukuju gumbama i tipkama. Upute za instaliranje 1. Hladnjak ne postavljati u prostoriji gdje postoji vjerojatnost da će se noću temperatura prostorije spustiti ispod 10 C i/ili posebno zimi, jer je hladnjak predviđen da radi pri temperaturama okoline od +10 do +38 C. Kod nižih temperatura hladnjak neće raditi ispravno, što može rezultirati skraćenjem vijeka trajanja namirnica. 2. Hladnjak ne postavljati blizu štednjaka ili radijatora ili na mjestu gdje će biti izložen izravnom djelovanju sunčevih zraka, jer to može negativno utjecati na funkcije hladnjaka. Ako bi se hladnjak instalirao blizu izvora topline ili zamrzivača, treba održavati slijedeće minimalne razmake: Od štednjaka 30 mm Od radijatora 300 mm Od zamrzivača 25 mm 3. Oko hladnjaka mora biti dovoljno slobodnog prostora kako bi se osigurala slobodna cirkulacija zraka (sl. 2). Treba ugraditi donji poklopac za prozračivanje koji se nalazi u hladnjaku, kako je prikazano na slici, na zatike na podnožje, na donjem dijelu vrata. Kukice i zatici trebaju držati na spoju (sl. 3).
23 HR 4. Hladnjak treba postaviti na ravnu površinu. Dva prednja stopala se mogu podesiti prema potrebi. Kako bi se osiguralo da vaš hladnjak stoji uspravno, treba podesiti dva prednja stopala, njihovim okretanjem u smjeru kazaljke na satu ili suprotno smjeru kazaljke na satu, sve dok se ne osigura čvrsti kontakt sa podom. Ispravnim podešavanjem stopala sprječavaju se prekomjerne vibracije i buka. (sl. 4). 5. Za pripremu hladnjaka za uporabu vidjeti poglavlje "Čišćenje i njega". Dijelovi hladnjaka (sl. 1) 1 - Polica zamrzivača 2 - Kućište termostata i žaruljice 3 - Podesive police 4 - Kanalić za sakupljanje vode od odleđivanja - ispusna cijev 5 - Poklopac ladice za voće i povrće 6 - Ladica za voće i povrće 7 - Podesiva prednja stopala 8 - Prostor za mliječne proizvode 9 - Polica za manje staklenke 10 - Polica za boce Preporučeni raspored namirnica u hladnjaku Smjernice za postizanje optimalnog spremanja namirnica i higijene: 1. Rashladni prostor je predviđen za kratkotrajno spremanje svježih namrinica i piča. 2. Prostor zamrzivača prikladan je za zamrzavanje i spremanje prethodno zamrznutih namirnica. Treba se pridržavati savjeta za spremanje navedenih na ambalaži namirnice. 3. Mliječne proizvode treba spremati u posebnom, za to predviđenom prostoru, u vratima hladnjaka. Da bi se zamrznula svježa hrana, preporučeno je pakirati proizvode u aluminijske ili plastične folije, ohladiti ih u pretincu za svježu hranu i spremiti ih na policu odjeljka hladnjaka. Poželjno je da je polica postavljena u gornjem dijelu odjeljka za zamrzavanje. Upute za uporabu 4. Kuhana jela treba spremiti u posudama nepropusnim za zrak. 5. Svježe umotane namirnice mogu se spremiti na policama. Svježe voće i povrće treba očistiti i spremiti u ladicu na dnu hladnjaka. 6. Boce se mogu držati u vratima. 7. Sirovo meso treba staviti u plastične vrećice i spremiti na najnižu policu. Kako bi se spriječilo njegovo zagađenje, ne dopustite da sirovo meso dođe u dodir sa kuhanim jelima. Radi sigurnosti sirovo meso treba spremiti u trajanju samo dva do tri dana. 8. Kako bi se postigla maksimalna učinkovitost hladnjaka, police u rashladnom prostoru se ne smiju pokrivati papirom ili drugim materijalima, kako bi se omogućila slobodna cirkulacija hladnog zraka. 9. Biljno ulje ne držite u policama vrata. Namirnice držite zapakirane, umotane ili pokrivene. Ostavite da se topla jela i pića ohlade prije spremanja u hladnjak. Preostali sadržaj konzerve ne smije se ostaviti u otvorenoj konzervi. 10. Gazirana pića ne smiju se stavljati u prostor zamrzivača, a kockice leda netom izvađene iz zamrzivača, ne smiju se odmah staviti u usta. 11. Neke vrste voća i povrća mogu se uništiti ako se spremaju pri temperaturama blizu 0 C. Zbog toga ananas, ljubenice, rajčicu i slične namirnice treba spremiti u plastičnim vrećicama i u ladicama za povrće. 12. Alkohol visokog postotka mora se spremiti u uspravnom položaju, u nepropusno zatvorenim bocama. U hladnjak nikada ne spremati sprej doze ili eksplozivne tvari, jer postoji opasnost od eksplozije. 16
24 HR Kontrola temperature i podešavanje Radne temperature se kontroliraju pomoću gumba termostata i mogu se namjestiti u bilo koji položaj između 1 i 5 (položaj najniže temperature Kada je gumb termostata u položaju "0", hladnjak je isključen. U tom slučaju neće svjetliti unutarnje osvjetljenje. Prosječna temperatura unutar hladnjaka treba biti cca. +5 C. Gumb termostata treba tako namjestiti da se postigne željena temperatura. Neki odjeljci hladnjaka mogu biti hladniji ili topliji (kao što je npr. ladica za voće i povrće i gornji dio hladnjaka), što je potpuno normalno. Preporučujemo da temperaturu periodično kontrolirate termometrom, kako bi bili sigurni da će hladnjak održavati željenu temperaturu. Česta otvaranja vrata uzrokuju povišenje unutarnje temperature, tako da se preporučuje odmah zatvoriti vrata nakon uzimanja i stavljanja namirnica. Prije rada hladnjaka Završna kontrola Prije početka uporabe hladnjaka treba provjeriti slijedeće: 1. Stopala su podešena i hladnjak je besprijekorno niveliran. 2. Unutrašnjost hladnjaka je osušena i zrak može slobodno cirkulirati iza hladnjaka. 3. Unutrašnjost hladnjaka je čista, kao što se preporučuje u poglavlju "Čišćenje i njega. 4. Utikač je utaknut u mrežnu utičnicu i hladnjak je uključen. Ako su vrata otvorena, upalit će se unutarnja rasvjeta. I treba napomenuti slijedeće: 5. Čuju se šumovi kada kompresor počinje raditi. Tekućina i plinovi sadržani unutar rashladnog sustava mogu također proizvoditi šumove, bez obzira da li kompresor radi ili ne. To je potpuno normalna pojava. 6. Neznatna valovitost gornje površine hladnjaka je potpuno normalna zbog samog procesa proizvodnje; to nije greška. Upute za uporabu 7. Preporučujemo namještanje gumba termostata u središnji položaj i treba kontrolirati temperaturu, kako bi se osiguralo da hladnjak zadrži željenu temperaturu spremanja (vidjeti poglavlje "Kontrola temperature i podešavanje). 8. Ne stavljati namirnice u hladnjak odmah nakon što se uključi. Treba pričekati da se postigne odgovarajuća temperatura spremanja namirnica. Preporučujemo kontrolu temperature sa točnim termometrom (vidjeti poglavlje "Kontrola temperat. i podešavanje). Spremanje zamrznutih namirnica Zamrzivač vašeg hladnjaka prikladan je za dugotrajno spremanje zamrznutih namirnica iz trgovače mreže, a može se koristiti i za zamrzavanje i spremanje svježih namirnica. Ako dođe do nestanka struje, ne otvarati vrata hladnjaka. Na zamrznute namirnice neće utjecati nestanak struje ako on traje manje od 16 sati. Ako struje nema dulje vrijeme, treba kontrolirati namirnice, te ih odmah konzumirati ili skuhati/ispeći i nakon toga ponovno zamrznuti. Zamrzavanje svježih namirnica Molimo pridržavajte se slijedećih uputa kako bi postigli najbolje rezultate. Odjednom ne zamrzavati preveliku količinu namirnica. Kvaliteta namirnica će se najbolje sačuvati ako se brzo zamrznu do srži. Ne premašiti kapacitet zamrz.hladnjaka u 24h. Stavljanje toplih namirnica u zamrzivač hladnjaka uzrokuje neprekidan rad hladnjaka, sve dok se namirnice ne zamrznu. To može povremeno dovesti do prekomjernog hlađenja rashladnog prostora. Kod zamrzavanja svježih namirnica gumb termostata treba namjestiti u srednji položaj. male količine namirnica do 1/2 kg mogu se zamrznuti bez namještanja tempertature na kontrolnom gumbu. Posebno treba paziti da se ne pomiješaju već zamrznute namirnice sa svježim namirnicama. 17
25 HR Priprema kockica leda Napuniti pliticu vodom do 3/4 visine i staviti je u zamrzivač. Zamrznute kockice leda osloboditi drškom žlice ili sličnim sredstvom. Za to nikada ne koristiti oštre predmete kao što su noževi ili vilice. Odleđivanje A) Rashladni prostor hladnjaka Rashladni prostor hladnjaka se automatski odleđuje. Voda nakon odleđivanja teče u ispusnu cijev, preko sabirnog spremnika na hladnjaku (sl. 5). Tijekom odleđivanja kapljice vode mogu nastati na stražnjem dijelu rashladnog prostora, gdje se nalazi isparivač. Neke kapljice mogu ostati na oblozi i ponovno se zamrznuti nakon završenog odleđivanja. Za skidanje kapljica koje su se ponovno zamrznule, ne koristiti oštre predmete kao što su noževi ili vilice. Ako se voda nastala odleđivanjem ne bi ispustila iz sabirnog kanalića, treba provjeriti da čestice hrane nisu začepile ispusnu cijev. Ispusna cijev se može očistiti čistačem cijevi ili sličnim sredstvom. Cijev se treba stalno nalaziti sa svojim krajem u sabirnoj plitici na kompresiru, kako bi se spriječilo proljevanje pode po električnoj instalaciji hladnjaka ili po podu (sl. 6). Upute za uporabu B) Prostor zamrzivača Odleđivanje se lako provodi zahvaljujući specijalnom bazenu za sakupljanje vode. Odleđivanje treba provesti dva puta godišnje ili ako nastane sloj inja debljine cca. 7 mm. Prije postupka odleđivanja treba isključiti hladnjak izvlačenjem utikača iz mrežne utičnice. Sve namirnice izvađene iz zamrzivača treba umotati u nekoliko slojeva novinskog papira i spremiti ih na hladno mjesto (npr. u drugi hladnjak ili u smočnicu). Za ubrzavanje odleđivanja u prostor zamrzivača se mogu staviti posude sa toplom vodom. Za skidanje inja ne koristiti oštre predmete kao što su noževi ili vilice. Kao pomoć u odleđivanju nikada ne koristiti sušila za kosu, električne grijalice ili neke slične električne uređaje za odleđivanje. Treba odstraniti zamrznutu vodu sa dna prostora zamrzivača. Nakon odleđivanja treba temeljito osušiti prostor zamrzivača. Utaknuti utikač u zidnu utičnicu i uključiti električno napajanje. 18
GB Instruction for use SB Uputstvo za upotrebu. Упатство за употреба. HR Upute za uporabu BiH Uputstvo za upotrebu
 SSA24020 GB Instruction for use SB Uputstvo za upotrebu МК Упатство за употреба HR Upute za uporabu BiH Uputstvo za upotrebu WARNING! In order to ensure a normal operation of your refrigerating appliance,
RDV 6200 A. GB SR HR MK BiH. Instruction for use. Uputstvo za upotrebu. Upute za uporabu. Upatstvo za upotreba. Uputstvo za upotrebu
 RDV 6200 A GB SR HR MK BiH Instruction for use Uputstvo za upotrebu Upute za uporabu Upatstvo za upotreba Uputstvo za upotrebu WARNING! In order to ensure a normal operation of your refrigerating appliance,
Minibar User Manual MBA 4000 W
 Minibar User Manual MBA 4000 W Read this manual prior to initial operation of the product! Dear Customer, We hope that your product, which has been manufactured in modern facilities and passed through
DS233020S БГ EL HR. Instruction for use. Инструкции за употреба. Οδηγίες χρήστη Upute za uporabu
 DS233020S GB БГ EL Instruction for use Инструкции за употреба Οδηγίες χρήστη WARNING! In order to ensure a normal operation of your refrigerating appliance, which uses a completely environmentally friendly
INSTALLER AND OWNER GUIDE
 5118237/01 Model 0581901 Chester Log Effect Electric Stove This guide is intended to help you install and care for your Baxi Fires Division electric stove. Please read carefully before installing and using
electric knife sharpener
 electric knife sharpener USER GUIDE Now that you have purchased a Kitchen Living product you can rest assured in the knowledge that as well as your year parts and labour guarantee you have the added peace
Product instruction manual Ream Cutting Systems RE3943, RE3946, RE3947, RE3971, RE3952E
 Product instruction manual Ream Cutting Systems RE3943, RE3946, RE3947, RE3971, RE3952E The Trimfast Ream Cutters are reliable, high performance cutters that will give you the results you need quickly
S E L E C T I O N. Abdominal Crunch. User manual
 and S E L E C T I O N T H E S T R E N G T H E V O L U T I O N User manual and and The identification plate of the and manufacturer, affixed along side the seat on the frame of the weight stack, gives the
Instructions for use, installation, and connection. Gas Built in Hob
 Instructions for use, installation, and connection Gas Built in Hob RB3311SGBS RB3312SGBS RB3311DGBS RB3311MGBS RB3311NGBS RB6313SGBST RB6323SGBST RB6314SGBS RB6313DGBST RB6313MGBST RB7312SGBS RB7313SGBST
1 Pan - 6 Ways to Cook! Works in the Oven & On All Stovetops! electric gas ceramic induction. Broil Bake Sauté Fry Steam Braise
 *only use non-metal utensils 1 Pan - 6 Ways to Cook! Broil Bake Sauté Fry Steam Braise Non-stick Cerami-Tech Ceramic Coating Even Heating Good for All Surfaces Easy Cleaning Durable, Stain Resistant Coating
Electric 2-STAGE SHARPENING FEATURES: system allows for safe, easy knife sharpening - Non-slip feet allows sharpener to stay in place while in use
 Electric FEATURES: - 2-Stage electric sharpening system allows for safe, easy knife sharpening - Non-slip feet allows sharpener to stay in place while in use 2-STAGE SHARPENING IMPORTANT SAFEGUARDS SAVE
AFC-50 Automatic French Fry Cutter Instruction Manual
 AFC-50 Automatic French Fry Cutter Instruction Manual Fry Factory Inc. 67 Watts Ave, Charlottetown, PEI, C1E 2B7, Canada Phone: 902-368-2900 Fax: 902-368-8645 Email: info@fryfactoryinc.com Website: www.fryfactoryinc.com
SINGLE BURNER STOVE IMPORTANT OPERATING INSTRUCTIONS COOKING & STORAGE POSITION PARTS IDENTIFICATION
 SINGLE BURNER STOVE OPERATING INSTRUCTIONS PARTS IDENTIFICATION Electronic Lighter Ignites the burner. Liquid Guard Holds liquid overflow. Windshield Prevents flame from being extinguished by wind. Ensures
Operator s Manual. Medium-Duty Electric Slicers ENGLISH. Item Model Description Drive Peak HP Voltage Amps Hz Plug
 Medium-Duty Electric Slicers 40950 40951 Item Model Description Drive Peak HP Voltage Amps Hz Plug 40950 SLM250/S 10 Knife Medium-Duty Slicer 1/3 2.5 Belt 120 60 5-15P 40951 SLM300P/S 12 Knife Medium-Duty
Meat Slicer INSTRUCTION MANUAL CAUTION! ONE YEAR LIMITED WARRANTY
 ONE YEAR LIMITED WARRANTY INSTRUCTION MANUAL The original registered owner of this product should contact SKYFOOD EQUIPMENT LLC at 305-868-16 for any warranty problems or service. SKYFOOD EQUIPMENT LLC
User Manual. 110 Cup (55 Cup Raw) Rice Cooker. Model: 177GRCLP, 177GRCNAT 10/2017. Please read and keep these instructions. Indoor use only.
 Rice Cooker. Model: 177GRCLP, 177GRCNAT 10/2017. Please read and keep these instructions. Indoor use only.") 110 Cup (55 Cup Raw) Rice Cooker Model: 177GRCLP, 177GRCNAT 10/2017 Please read and keep these instructions. Indoor use only. www.avantcoequipment.com 1 NOTE: Save these instructions for future reference.
110 Cup (55 Cup Raw) Rice Cooker Model: 177GRCLP, 177GRCNAT 10/2017 Please read and keep these instructions. Indoor use only. www.avantcoequipment.com 1 NOTE: Save these instructions for future reference.
HARVIA IRON STOVE Instructions for installation and use
 HARVIA IRON STOVE EN Instructions for installation and use Harvia 10 08012014VTT Congratulations on a good choice of fireplace and thank you for your confidence in Harvia s products. Read these instructions
Getting Started Guide
 Getting Started Guide Assembly Instructions User Guide Table Top Maintenance Warranty Information (800) 445-4559 www.designingfire.com Fax: 651-305-6347 @designingfire.com #253915-2528907 Installers: Please
Podešavanje za eduroam ios
 Copyright by AMRES Ovo uputstvo se odnosi na Apple mobilne uređaje: ipad, iphone, ipod Touch. Konfiguracija podrazumeva podešavanja koja se vrše na računaru i podešavanja na mobilnom uređaju. Podešavanja
17500 VRANJE, SRBIJA Radnička 1, Tel.: 017/ INSTRUCTIONS FOR INSTALLATION, ADJUSTMENT AND USE
 17500 VRANJE, SRBIJA Radnička 1, Tel.: 017/421-121 STOVE OF THICK METAL SHEETS PREMIJER PREMIJER K INSTRUCTIONS FOR INSTALLATION, ADJUSTMENT AND USE 1.Technical data about continuously burning stove of
Intrepid 2 Intrepid 3
 Intrepid 2 Intrepid 3 Model Nos. V 10 / V10-3 NAT GAS Model Nos. V12 / V12-3 L.P.G DECORATIVE COAL EFFECT GAS STOVE USER INSTRUCTIONS This appliance is only for use on Natural Gas (G20) at a supply pressure
ELECTRIC KNIFE SHARPENER User Guide
 BRAND ELECTRIC KNIFE SHARPENER User Guide Item: 717822 Ginnys.com 800-544-1590 Facebook.com/GinnysBrand Pinterest.com/GinnysBrand Ginnys.com/Blog Thank you for purchasing a Ginny s Brand Electric Knife
Instruction Manual please read before use
 Instruction Manual please read before use Slim Burner Insert (patent pending) 307 Tchoupitoulas Street, Suite 100 New Orleans, LA 70130 p : 888.596.6960 504.596.6960 e : office@brasafire.com www.brasafire.com
PS-10 PS-12D PS-12. Primo Slicer Manual FOR OPERATOR-DO NOT DISCARD
 PS-10 PS-12D PS-12 Primo Slicer Manual FOR OPERATOR-DO NOT DISCARD TABLE OF CONTENTS 1. BRIEF INTRODUCTION 2. OPERATION 3. SLICING 4. MAINTENANCE AND CLEANING 5. TROUBLESHOOTING IMPORTANT The operator
Instruction Manual please read before use
 Instruction Manual please read before use XL Burner (patent pending) 307 Tchoupitoulas Street, Suite 100 New Orleans, LA 70130 p : 888.596.6960 504.596.6960 e : office@brasafire.com www.brasa.co Item Identification
Cordless Electric Teakettle. Model 685
 Cordless Electric Teakettle Model 685 Important Safeguards When using electrical appliances, basic safety precautions should always be followed, including the following: 1. Read all instructions. 2. Do
INSTANT GARAGE MODEL NO: CIG81224 ASSEMBLY INSTRUCTIONS PART NO: ORIGINAL INSTRUCTIONS
 INSTANT GARAGE MODEL NO: CIG81224 PART NO: 3503578 ASSEMBLY INSTRUCTIONS ORIGINAL INSTRUCTIONS GC1117 INTRODUCTION Thank you for purchasing this CLARKE Instant Garage. When erected, the CIG81224 garage
Installation and Maintenance Manual
 Freestanding Gas Stove MODEL: PGS2005 GPEBB20R GPEBW20R Installation and Maintenance Manual Warning Maintenance products should be carried out by professional and technical personnel with relevant qualification,
USER INFORMATION For AcuTemp PX1L Carrying Case and AcuTemp PXC Coolant Packs (Formerly VaxiPac and VaxiSafe )
") USER INFORMATION For AcuTemp PX1L Carrying Case and AcuTemp PXC Coolant Packs (Formerly VaxiPac and VaxiSafe ) AcuTemp Thermal Systems 2900 Dryden Road Dayton, Ohio 45439 U.S.A. Tel: 937.312.0114 Fax:
USER INFORMATION For AcuTemp PX1L Carrying Case and AcuTemp PXC Coolant Packs (Formerly VaxiPac and VaxiSafe ) AcuTemp Thermal Systems 2900 Dryden Road Dayton, Ohio 45439 U.S.A. Tel: 937.312.0114 Fax:
THE EDGE12 SLICER. MODEL EDGE12-2 (220/50/1 voltage) FORM (July 2012) EDGE12 SLICER
 FORM (July 2012) EDGE12 SLICER") EDGE12 SLICER THE EDGE12 SLICER MODEL EDGE12-1 (120/60/1 voltage) EDGE12-2 (220/50/1 voltage) ML-136246 ML-136247 701 S. RIDGE AVENUE TROY, OHIO 45374-0001 937 332-3000 www.hobartcorp.com FORM 35283 (July
EDGE12 SLICER THE EDGE12 SLICER MODEL EDGE12-1 (120/60/1 voltage) EDGE12-2 (220/50/1 voltage) ML-136246 ML-136247 701 S. RIDGE AVENUE TROY, OHIO 45374-0001 937 332-3000 www.hobartcorp.com FORM 35283 (July
MAX Series 9514 OPERATOR S MANUAL
 MAX Series 9514 OPERATOR S MANUAL Persons under age 18 are not permitted to operate or have accessibility to operate this equipment per U.S. Dept. Of Labor Employment Standards Administration Fact Sheet
Sampling Guidelines. Multnomah County Health Department. Portland, OR 97232
 Sampling Guidelines Multnomah County Health Department 847 NE 19 th Ave. Suite 350 Portland, OR 97232 Processed Food Sampling - Processed foods include bakery items, jams, jellies, jerky, cheese, salsa,
View slicer 800-S. meat pusher. handle. thumb. screw. sharpener. table release. handle. securety. screw. knifescraper
 View slicer 800-S meat pusher handle thumb screw sharpener securety screw table release handle knifescraper control on knob off knob thickness lamp regulator knob safety guard ddddddd meat table knife
Before using your stove for the first time, we would like to give you useful instructions and security advice for the correct use of our product.
 instruction manual & security advices for decoration fire places of BFT / 01.2007 Model: Brennkammer Vario We congratulate for buying your non-smoking-stove Introduction BFT decoration fire places guarantee
CS CS S
 CS 232020 CS 232020 S EN FR БГ Instruction for use Notice d utilisation Инструкции за употреба WARNING! In order to ensure a normal operation of your refrigerating appliance, which uses a completely environmentally
RITA SLOW COOKER NSC-15 (NSC-15F) Save these instruction for future use
 Save these instruction for future use") RITA SLOW COOKER NSC-15 (NSC-15F) r INSTRUCTION MANUAL Save these instruction for future use When using electrical appliances, basic safety precautions should always be followed, including the following:
RITA SLOW COOKER NSC-15 (NSC-15F) r INSTRUCTION MANUAL Save these instruction for future use When using electrical appliances, basic safety precautions should always be followed, including the following:
Safety & Warnings. A Material Safety Data Sheet for this product is available upon request by contacting
 Safety & Warnings Warning: This kit contains materials that may be harmful if used incorrectly. Please read all instructions before beginning. Failure to follow these instructions and warnings could result
PREVENTION OF FALLS. If there is an object or spill on the floor? Immediately put up yellow caution sign & then clean up the spill
 PREVENTION OF FALLS What do you do If there is an object or spill on the floor? Immediately put up yellow caution sign & then clean up the spill If you need to reach something from a high shelf? Use a
1000M MANUAL Signature Series Slicer OPERATORS MANUAL
 1000M MANUAL Signature Series Slicer OPERATORS MANUAL Persons under age 18 are not permitted to operate or have accessibility to operate this equipment per U.S. Dept. Of Labor Employment Standards Administration
Installation & User Manual EW5000 Outdoor Cooking Fire
 Installation & User Manual EW5000 Outdoor Cooking Fire IMPORTANT: Please read this manual before installing and using the ESCEA EW5000 Cooking fire. Failure to follow these instructions may lead to a possible
Est A TRADITION OF EXCELLENCE INSTRUCTION BOOK.
 Est. 1887 A TRADITION OF EXCELLENCE INSTRUCTION BOOK www.wolseleygrooming.co.uk Stockshop (L.E.) Ltd., Lodge Trading Estate, Broadclyst, Exeter EX5 3BS Email: service@stockshop.co.uk Tel: 01392 460077
Installation and User s Manual 12 x 10 MOTORIZED AWNING
 12 x 10 MOTORIZED AWNING Installation and User s Manual 12 x 10 MOTORIZED AWNING 088-1763-0 Stop Please read and understand this manual before any assembly or use of this product. Before beginning assembly
Genius 16-Cup Salad Chopper
 Genius 16-Cup Salad Chopper Dear Genius-Customer, It generally takes quite a while from the time you start to prepare a meal to the time it is ready to serve. You have to cut, dice, grate, keep them fresh,
WARNING USING AND CARING. for use in extreme or varied soil conditions. For optional sand pegs Oztent recomends use of a Bluescrew Oztent Edition.
 OWNER S MANUAL WARNING Never use any fuel-burning products (stoves, lanterns, heaters, etc.) inside or within proximity of this tent. Use of fuel-burning products inside or within proximity of this tent
Read all instructions and warnings before using this fireplace. WARNING
 Frame User Manual 1 Operating Manual Thank you for purchasing this Signi Fires product. Signi Fires is very safety conscious, we have taken every care in designing, manufacturing and assembling your Signi
CJENIK APLIKACIJE CERAMIC PRO PROIZVODA STAKLO PLASTIKA AUTO LAK KOŽA I TEKSTIL ALU FELGE SVJETLA
 KOŽA I TEKSTIL ALU FELGE CJENIK APLIKACIJE CERAMIC PRO PROIZVODA Radovi prije aplikacije: Prije nanošenja Ceramic Pro premaza površina vozila na koju se nanosi mora bi dovedena u korektno stanje. Proces
PATRIOT INSTRUCTION MANUAL SL300C 12 MEAT SLICER 1/2 HP
 INSTRUCTION MANUAL SL300C 12 MEAT SLICER 1/2 HP This manual contains important information regarding your Patriot unit. Please read this manual thoroughly prior to equipment set-up, operation and maintenance.
Gas Conversion Kits and Instructions
 Gas Conversion Kits and Instructions INSTALLATION FORM RGM 432/433-GC (Version D.1) Obsoletes Form RGM 432/433-GC (Version D) APPLIES TO: Model FT and Model SFT All gas conversion must be done by a qualified
1612P MODEL 1612P SLICER MODEL EXECUTIVE OFFICES 701 RIDGE AVENUE TROY, OHIO FORM (4-95)
") 1612P MODEL 1612P SLICER MODEL 1612P ML-104587 EXECUTIVE OFFICES 701 RIDGE AVENUE TROY, OHIO 45374-0001 FORM 19370 (4-95) Installation, Operation, and Care of MODEL 1612P SLICER SAVE THESE INSTRUCTIONS
1612P MODEL 1612P SLICER MODEL 1612P ML-104587 EXECUTIVE OFFICES 701 RIDGE AVENUE TROY, OHIO 45374-0001 FORM 19370 (4-95) Installation, Operation, and Care of MODEL 1612P SLICER SAVE THESE INSTRUCTIONS
User Manual for Separera 40
 User Manual for Separera 40 User Manual for Separera 40 Congratulations on your purchase of a Separera 40. Before installing your new Separera 40, we recommend that you read through this instruction in
MODEL DCC DOUBLE WALL CHIMNEY CONNECTOR
 Installation & Maintenance LISTED Tested to *UL 103HT & ULC-S641 Instructions MODEL DCC DOUBLE WALL CHIMNEY CONNECTOR A MAJOR CAUSE OF CHIMNEY RELATED FIRES IS FAILURE TO MAINTAIN REQUIRED CLEARANCES (AIR
Blue Series Hot Melt Hose with RediFlext II Hanger System
 Instruction Sheet P/N 1124594_01 Blue Series Hot Melt Hose with RediFlext II Hanger System Safety WARNING! Allow only personnel with appropriate training and experience to operate or service the equipment.
Panther - Gas Stoves OWNER S GUIDE
 Panther - Gas Stoves Model No. 553 OWNER S GUIDE This appliance meets the requirements of the European Gas Directive This guide is intended to help you care for your morsø gas stove. It gives sufficient
INSTALLATION INSTRUCTIONS
 GENUINE PARTS INSTALLATION INSTRUCTIONS 1. DESCRIPTION: Hatch Tent 2. APPLICATION: See dealer application chart 3. PART NUMBER: 999T7 XR100 and 999T7 XY100 4. KIT CONTENTS: Item Qty Description A 1 Tent
INFRARED BURNER KIT INSTRUCTIONS
 6 4 3 2 INFRARED BURNER KIT INSTRUCTIONS 1 Model # 3049 (A790, A660, & A530) Model # 3051 (A540, & A430) Included parts 5 NOTE: This unit has been retrofi tted with an infrared burner. PARTS INCLUDED 1.
GLM300 Semi-auto Slicer
 Frequency: Before each days use Division: Location: User: Supervisor: Preceda Code: Article Number:
Instructions for Use Repatha (ri-path-a) (evolocumab) Single-Use Prefilled SureClick Autoinjector. Guide to parts
 (evolocumab) Single-Use Prefilled SureClick Autoinjector. Guide to parts") Instructions for Use Repatha (ri-path-a) (evolocumab) Single-Use Prefilled SureClick Autoinjector Before use Guide to parts After use Gray start button Expiration date Expiration date Window Yellow window
Instructions for Use Repatha (ri-path-a) (evolocumab) Single-Use Prefilled SureClick Autoinjector Before use Guide to parts After use Gray start button Expiration date Expiration date Window Yellow window
INSTRUCTIONS FOR INSTALLATION, USE AND MAINTENANCE YSEN
 INSTRUCTIONS FOR INSTALLATION, USE AND MAINTENANCE YSEN READ THE INSTRUCTION BOOKLET AND THESE SUPPLEMENTARY INSTRUCTIONS CAREFULLY BEFORE INSTALLATION These instructions together with those in the instruction
CONVERSION INSTRUCTIONS
 CONVERSION INSTRUCTIONS Natural Gas to Propane Gas Conversion Kit For Thermador Professional Cooktops and Ranges Model STARLPKIT Part No. 35-00-682 Contains 7mm Hex Main Orifices This kit is used to convert
Operator's Manual. Model: RY10MK-PRO MPN: RA-MLT Gallon Direct Fire Melter Kettle Burner Model with Adjustable Flame-Out Valve
 Operator's Manual Model: RY10MK-PRO MPN: RA-MLT-0009 10 Gallon Direct Fire Melter Kettle Burner Model with Adjustable Flame-Out Valve U.S. Patent No. 9,739,021 For Technical Support Please Visit www.rynoworx.com
Thank you for purchasing ANYWARE cookware by Little Griddle! ANYWARE
 A WORD FROM THE MAKER (READ ME FIRST!!!): Thank you for purchasing ANYWARE cookware by Little Griddle! ANYWARE is made from cast aluminum with an advanced ceramic coating and a hightemperature nonstick
Gavita Pro 1650 e LED ML
 Pro line Gavita Pro 1650 e LED ML 1 Introduction Thank you for purchasing the Gavita Pro 1650 e LED ML. This manual describes the mounting and installing of the product and also describes how to use the
THIS CLIPPER IS INTENDED FOR HOUSEHOLD USE ONLY.
 2. INDEX Please read all instructions carefully to familiarize yourself with the Wahl Clipper before using. THIS CLIPPER IS INTENDED FOR HOUSEHOLD USE ONLY. Save these instructions for further reference.
Harrie Leenders Fuga el - Instructions for Installation, Use and Maintenance INSTRUCTIONS FOR INSTALLATION, USE AND MAINTENANCE
 INSTRUCTIONS FOR INSTALLATION, USE AND MAINTENANCE FUGA el 1 2 1. Flue 2. Case 3. Ceramic glass 4. Aeration slide 5. Convection fins 6. Door handle 7. Base 3 4 READ THE INSTRUCTION BOOKLET AND THESE SUPPLEMENTARY
EB300. Ethanol Burner. User s Manual Installation Instructions
 EB300 Ethanol Burner User s Manual Installation Instructions EB300 Burner Burner Lid User s Manual What s in the box: 1pc 1pc 1pc Installation Instructions EB300 - User s Manual The Ignis Ethanol Burner
Air Mattress. Model No.: EAM-DQ1 & EAM DT1. Questions or Concerns? (855)
") Air Mattress Model No.: EAM-DQ1 & EAM DT1 Questions or Concerns? (855) 686-3835 support@etekcity.com Thank You. Thank you for purchasing the EAM-DQ1/EAM-DT1 Air Mattress by Etekcity. We are dedicated to
Air Mattress Model No.: EAM-DQ1 & EAM DT1 Questions or Concerns? (855) 686-3835 support@etekcity.com Thank You. Thank you for purchasing the EAM-DQ1/EAM-DT1 Air Mattress by Etekcity. We are dedicated to
instruction manual & security advices for decoration fire places of BFT (habee-feuer) /
 /") instruction manual & security advices for decoration fire places of BFT (habee-feuer) / 01.2007 Model: Vario / Pyro / Pyros We congratulate for buying your non-smoking-stove Introduction Before using your
instruction manual & security advices for decoration fire places of BFT (habee-feuer) / 01.2007 Model: Vario / Pyro / Pyros We congratulate for buying your non-smoking-stove Introduction Before using your
Alma Mons EN Owners s manual INSTALATION, ADJUSTMENT AND OPERATING INSTRUCTION
 Alma Mons Owners s manual INSTALATION, ADJUSTMENT AND OPERATING INSTRUCTION EN 12815 1 INTRODUCTION Congratulations! You have invested in energy efficient and high quality product-alma Mons wood burning
PATRIOT INSTRUCTION MANUAL SL300ES, 300ES MEAT SLICER
 PATRIOT INSTRUCTION MANUAL SL300ES, 300ES-12 12 MEAT SLICER This manual contains important information regarding your unit. Please read this manual thoroughly prior to equipment set-up, operation and maintenance.
MODEL DCC DOUBLE WALL CHIMNEY CONNECTOR
 Installation & Maintenance LISTED Tested to *UL 103HT & ULC-S641 Instructions MODEL DCC DOUBLE WALL CHIMNEY CONNECTOR A MAJOR CAUSE OF CHIMNEY RELATED FIRES IS FAILURE TO MAINTAIN REQUIRED CLEARANCES (AIR
MULTI-FUEL STOVE INSTALLATION AND USER INSTRUCTIONS
 PRIORY MULTI-FUEL STOVE INSTALLATION AND USER INSTRUCTIONS The Priory stove has a nominal heat output of 8Kw. and a weight of 80 kg. The flue gas mass flow is 5.4g/s for mineral fuel and 6.3g/s for wood
Thermostatic Griddle Field Service Kit Instructions
 Thermostatic Griddle Field Service Kit Instructions The following document provides instructions on how to install a Garland Thermostatic Griddle Field Kit and is applicable to each 2 section of a Garland
Contents. Introduction...3 Description...3. Pack Contents...4. Rada Heavy Duty EV Shower Fittings Right Angled Connector (RAC)...
...") SHOWER FITTINGS PRODUCT MANUAL IMPORTANT Installer: This manual is the property of the customer and must be retained with the product for maintenance and operational purposes. Contents Introduction...3
SHOWER FITTINGS PRODUCT MANUAL IMPORTANT Installer: This manual is the property of the customer and must be retained with the product for maintenance and operational purposes. Contents Introduction...3
ORIGO 1500, 3000 ORIGO 6000, 6100, Alcohol stoves Operating manual Spirituskocher Bedienungsanleitung... 24
 C C _Origo_5 6.book Seite Freitag,. Dezember 8 : 5 EN Alcohol stoves Operating manual............... 8 DE Spirituskocher Bedienungsanleitung............ ORIGO FR ES Cuisinières à alcool Notice d utilisation..............
Instructions for Use AIMOVIG TM (AIM-oh-vig) (erenumab-aooe) Injection, For Subcutaneous Use Single-Dose Prefilled SureClick Autoinjector
 (erenumab-aooe) Injection, For Subcutaneous Use Single-Dose Prefilled SureClick Autoinjector") Instructions for Use AIMOVIG TM (AIM-oh-vig) (erenumab-aooe) Injection, For Subcutaneous Use Single-Dose Prefilled SureClick Autoinjector Guide to parts Before use After use Purple start button Expiration
Instructions for Use AIMOVIG TM (AIM-oh-vig) (erenumab-aooe) Injection, For Subcutaneous Use Single-Dose Prefilled SureClick Autoinjector Guide to parts Before use After use Purple start button Expiration
BRANDON PIZZA OVEN INSTALLATION GUIDE AND OWNER S MANUAL
 BRANDON PIZZA OVEN INSTALLATION GUIDE AND OWNER S MANUAL TABLE OF CONTENTS COMPONENTS... 3 OVERALL DIMENSIONS.... 4 POSITIONING REFERENCE PER LAYER... 5 CONCRETE PAD PREPARATION... 5 INSTALLATION OF BLOCKS...
USER MANUAL BMU WORKCAGE. CONFORM TO THE MACHINE DIRECTIVE 2006/42/EC and to EN1808 (1999)
") USER MANUAL BMU WORKCAGE CONFORM TO THE MACHINE DIRECTIVE 2006/42/EC and to EN1808 (1999) All persons operating this equipment must read and completely understand this manual. Any operation in violation
USER MANUAL BMU WORKCAGE CONFORM TO THE MACHINE DIRECTIVE 2006/42/EC and to EN1808 (1999) All persons operating this equipment must read and completely understand this manual. Any operation in violation
UPUTSTVO ZA UPOTREBU HLADNJAK FRIŽIDER ФРИЖИДЕР REFRIGERATOR HC1A 379NF.BF HC1A 379NF.SF
 RS UPUTSTVO ZA UPOTREBU MK HLADNJAK FRIŽIDER ФРИЖИДЕР REFRIGERATOR HC1A 379NF.BF HC1A 379NF.SF EN 2 EN 3 Index BEFORE USING THE APPLIANCE... 4 General warnings... 4 Old and out-of-order fridges... 6 Safety
User Manual. 1000W Stackable 1.2 Cu. Ft. Commercial Microwave. Model: 180MW112T 05/2017. Please read and keep these instructions. Indoor use only.
 1000W Stackable 1.2 Cu. Ft. Commercial Microwave Model: 180MW112T 05/2017 Please read and keep these instructions. Indoor use only. IMPORTANT SAFETY INSTRUCTIONS When using electrical equipment, basic
LODGE 460 CABIN. Part No ASSEMBLY & CARE INSTRUCTIONS
 LODGE 460 CABIN Part No. 920645 ASSEMBLY & CARE INSTRUCTIONS SPECIFICATIONS PRE USE Size: 460L x 360W x 240H cm Material: Heavy duty polycotton blend Walls: 250g/m2 Roof: 340g/m2 Windows: 6 Side & Rear
Guida rapida di utilizzo Guía Rápida de Uso Guia Ràpido de Utilização Quick Start Guide Mode d emploi rapide FL-F60 MTL
 Guida rapida di utilizzo Guía Rápida de Uso Guia Ràpido de Utilização Quick Start Guide Mode d emploi rapide FL-F60 MTL FL-F60 MTL 1 2 3 4 5 6 7 8 9 10 11 12 13 14 15 16 17 18 19 1 Front control panel
The Enbrel SureClick autoinjector is a single-dose prefilled autoinjector. It contains one 50 mg dose of Enbrel.
 Instructions for Use Welcome! The Enbrel SureClick autoinjector is a single-dose prefilled autoinjector. It contains one 50 mg dose of Enbrel. Your healthcare provider has prescribed Enbrel SureClick autoinjector
USER MANUAL. PRESSURE COOKER Ø22cm 7.6L Ref. Number: TRAS
 BEFORE USING READ THE COOKER PRESSURE USER MANUAL PRESSURE COOKER Ø22cm 7.6L Ref. Number: TRAS 0506 www.tramontina.com.au USER MANUAL TRAMONTINA PRESSURE COOKER CONTENT IMPORTANT SAFEGUARDS INTRODUCTION
OWNER S MANUAL. IMPORTANT: This instruction manual contains important information necessary for the proper assembly and safe use of the appliance.
 Pizza Oven Workstation for use with Leg Kit FOR 6000 SERIES PORTABLE OVENS OWNER S MANUAL IMPORTANT: This instruction manual contains important information necessary for the proper assembly and safe use
Meat Slicer This manual contains important information regarding your Admiral Craft
 SL300ES Meat Slicer This manual contains important information regarding your Admiral Craft unit. Please read this manual thoroughly prior to equipment set-up, operation and maintenance. Failure to comply
SIGNATURE EDITION OWNER S MANUAL
 JV SIGNATURE EDITION OWNER S MANUAL WARNING Never use any fuel-burning products (stoves, lanterns, heaters, etc.) inside or within proximity of this tent. Use of fuel-burning products inside or within
Food waste prevention
 Publication date November 2017 Food waste prevention Labelling guidance checklist Produce of Checklists Use these checklists to help with food labelling choices. The images and on-pack wording can help
Installation Guide. LPKPDR - Universal LP Conversion Kit for Professional & Designer Ranges/Rangetops. Viking Range, LLC.
 Installation Guide Viking Range, LLC 111 Front Street Greenwood, Mississippi 38930 USA (662) 455-1200 For product information, call 1-888-845-4641 LPKPDR - Universal LP Conversion Kit for Professional
SOUDATHERM SFI 600P. Revision date: 19/06/2015 Page 1 of 6
 Revision date: 19/06/2015 Page 1 of 6 Technical data: Basis Polyurethane Foam Consistency Liquid Curing system Moisture curing Skin formation (20 C and 60% R.H.)* 8 min Curing time (20 C and 60% R.H.)*
CONGRATULATIONS OPERATIONS ANTENNA (IF APPLICABLE) Congratulations on purchasing your Frontline Campervan.
 Congratulations on purchasing your Frontline Campervan.") CONGRATULATIONS ANTENNA (IF APPLICABLE) You may have purchased a foldaway antenna for your campervan. To set this up, take it out from the packaging and join together (fig.18). Attach the pole to the clips
CONGRATULATIONS ANTENNA (IF APPLICABLE) You may have purchased a foldaway antenna for your campervan. To set this up, take it out from the packaging and join together (fig.18). Attach the pole to the clips
Leica CE/ Leica CN. Knife holder
 Leica CE/ Leica CN Knife holder Instruction Manual Leica knife holder CE/ knife holder CN V2.2 English 08/2005 Always keep this manual near the instrument. Read carefully prior to operating the knife holders.
USAGE AND MAINTENANCE MANUAL FOR A SOLID FUEL STOVE
 PREDUZEĆE ZA PROIZVODNJU, PROJEKTOVANJE I PROMET BELOŠEVAC BB, 14000 VALJEVO, SRBIJA USAGE AND MAINTENANCE MANUAL FOR A SOLID FUEL STOVE DEAR CUSTOMER, Congratulations on your purchase of BLIST solid fuel
FORM (Apr. 2006)
") 2212 Slcier MODEL 2212 SLICER MODEL 2212 ML-136132 701 S. RIDGE AVENUE TROY, OHIO 45374-0001 937 332-3000 www.hobartcorp.com FORM 35215 (Apr. 2006) Installation, Operation, and Care of MODEL 2212 Slicer
2212 Slcier MODEL 2212 SLICER MODEL 2212 ML-136132 701 S. RIDGE AVENUE TROY, OHIO 45374-0001 937 332-3000 www.hobartcorp.com FORM 35215 (Apr. 2006) Installation, Operation, and Care of MODEL 2212 Slicer
PATHFINDER CAMP SAFETY INSPECTION FORM
 PATHFINDER CAMP SAFETY INSPECTION FORM Evaluators Yes No Description Section A General 1. General layout orderly and organized (cooking area, sleeping area, eating area separated). 2. Campsite clean and
Installation and Operating. Instructions. Multifuel Stove. Salamander. Model Lighting a solid fuel fire. 6.5 De-ashing the stove
 Installation and Operating Instructions Salamander Model 0901 Multifuel Stove Section Contents Page 1 Important information about installing and 3 using the Salamander stove 2 Unpacking the Salamander
Mod. MONTANA WOOD BURNING STOVE USAGE AND MAINTENANCE INSTRUCTIONS
 Mod. MONTANA WOOD BURNING STOVE USAGE AND MAINTENANCE INSTRUCTIONS Nutrients Ashes Fertilizer Wood: an ecological fuel Wood is a renewable source of energy which answers the energy and environmental demands
Freezer Vessel Hygiene Checklist
 Freezer Vessel Hygiene Checklist This checklist has been written to assist operators of vessels subject to approval under Regulation 853/2004 to assess their vessels for compliance prior to inspection
I N ST R UC T I ON MODELS 1612E, 1712E & 1712RE SLICERS. FORM Rev. B (10-97) 1712RE 701 S. RIDGE AVENUE TROY, OHIO 45374
 1712RE 701 S. RIDGE AVENUE TROY, OHIO 45374") I N ST R UC 1712E T I ON MODELS 1612E, 1712E & 1712RE SLICERS S ML-104546 ML-104547 ML-104548 1612E 1712E 1712RE 701 S. RIDGE AVENUE TROY, OHIO 45374 FORM 19238 Rev. B (10-97) TABLE OF CONTENTS GENERAL......................................................................
I N ST R UC 1712E T I ON MODELS 1612E, 1712E & 1712RE SLICERS S ML-104546 ML-104547 ML-104548 1612E 1712E 1712RE 701 S. RIDGE AVENUE TROY, OHIO 45374 FORM 19238 Rev. B (10-97) TABLE OF CONTENTS GENERAL......................................................................
Manufactured in New Zealand Metal Fab Industries Ltd PO Box Greenmount Auckland
 Manufactured in New Zealand Metal Fab Industries Ltd PO Box 58-473 Greenmount Auckland Www.metalfab.co.nz LOGAIRE STAINLESS STEEL BBQ 2,3 & 4 Burner Models IMPORTANT Please read all instructions before
Lance Owners of America Newsletter. Presidents Report
 Winter 2004 Issue 6 The Lance Glance What s Inside: Shadetree Mechanic LOA Rally Member s Alley Lance Owners of America Newsletter Presidents Report Hello and welcome to another edition of the Lance Glance.