FINE SOLDERING IRON SET PLBS 30 A1
|
|
|
- Ruth Dean
- 5 years ago
- Views:
Transcription

1 FINE SOLDERING IRON SET PLBS 30 A1 FINE SOLDERING IRON SET Operation and Safety Notes SET ZA PRECIZNO LEMLJENJE Upute za posluživanje i za Vašu sigurnost SET CIOCAN DE LIPIT Instrucţiuni de utilizare şi de siguranţă КОМПЛЕКТ ЗА ФИНО ЗАПОЯВАНЕ Инструкции за обслужване и безопасност ΗΛΕΚΤΡΙΚΟ ΚΟΛΛΗΤΗΡΙ ΣΕΤ Υποδείξεις χειρισμού και ασφαλείας FEINLÖTKOLBEN-SET Bedienungs- und Sicherheitshinweise IAN 71603
2 Before reading, unfold the page containing the illustrations and familiarise yourself with all functions of the device. Prije nego što pročitate tekst, otvorite stranicu sa slikama i upoznajte se na osnovu toga sa svim funkcijama uređaja. Înainte de a citi instrucţiunile, priviţi imaginile şi familiarizaţi-vă cu toate funcţiile aparatului. Преди да прочетете отворете страницата с фигурите и след това се запознайте с всички функции на уреда. Πριν ξεκινήσετε την ανάγνωση, ανοίξτε τη σελίδα με τις εικόνες και εξοικειωθείτε με όλες τις λειτουργίες της συσκευής. Klappen Sie vor dem Lesen die Seite mit den Abbildungen aus und machen Sie sich anschließend mit allen Funktionen des Gerätes vertraut. GB Operation and Safety Notes Page 5 HR Upute za posluživanje i za Vašu sigurnost Stranica 21 RO Instrucţiuni de utilizare şi de siguranţă Pagina 37 BG Инструкции за обслужване и безопасност Cтраница 53 GR Υποδείξεις χειρισμού και ασφαλείας Σελίδα 69 DE / AT / CH Bedienungs- und Sicherheitshinweise Seite 87


3 A B 3 12 C D
4
5 Table of contents Introduction Proper use...page 7 Features and equipment...page 8 Included items...page 8 Technical information...page 8 Safety advice 1. Workplace safety...page 9 2. Electrical safety...page 9 3. Personal safety...page Careful handling and use of electrical power tools...page 12 Original accessories / attachments...page 13 Before first use Fitting the helical spring...page 13 Inserting / replacing soldering tips...page 13 Operation Switching on and off...page 14 Third hand...page 14 Solder sponge...page 14 Soldering...Page 15 Maintenance and cleaning...page 16 Service centre...page 17 Warranty...Page 17 Disposal...Page 18 Declaration of Conformity / Manufacturer...Page 19 GB 5
6 Introduction The following pictograms are used in these operating instructions / on the device: Read instruction manual! Observe caution and safety notes! Caution electric shock! Danger to life! Risk of explosion! Risk of fire! Warning - Hot surfaces! V ~ W Volt (AC) Watts (Effective power) Wear a breathing / dust mask, protective glasses, gloves and clothing. Keep children away from electrical devices! Check that the device, mains lead and plug are in good condition! Do not smoke! Do not eat! 6 GB
7 Introduction Do not drink! Dispose packaging and appliance in an environmentally-friendly way! Fine soldering iron set PLBS 30 A1 Introduction Please make sure you familiarise yourself fully with the way the device works before you use it for the first time and that you understand how to handle it correctly. Please read the operating instructions below. Be careful to keep these advice notes and if necessary pass them on to a third party. Proper use The appliance is intended for electronic soldering for leisure and DIY purposes. It is designed for uses such as soldering work, wood-engraving, welding and gluing plastics and the application of decorations. Use the device only as described and for the indicated purposes. The device is not intended for commercial use. Any other use or modification to the device shall be considered as improper use and could give rise to considerable dangers. The manufacturer will not accept liability for loss or damage arising from improper use. GB 7
8 Introduction Features and equipment 1 Soldering pencil 2 Soldering tip 3 Helical spring 4 Clips 5 Third hand 6 Holder for copper attachments 7 Multifunctional holder 8 Soldering sponge 9 Universal attachment 10 Pointed attachment 11 Conical attachment 12 Tin solder Included items 1 Fine soldering iron set PLBS 30 A1 1 Multifunctional holder 2 Rolls of soldering tin (10 grams each) 2 Soldering tips (1x installed) 4 Copper attachments (engraving tips) 1 Solder sponge 1 Operating instructions Technical information Electricity supply: 230 V ~ Frequency: 50 Hz Power consumption: 30 W 8 GB
9 Safety advice Safety advice CAUTION! Failure to observe the instructions and advice given below may result in electric shock, fire and/or serious injury. 1. Workplace safety a) Keep your working area clean and well lit. Untidy or poorly lit working areas can lead to accidents. b) Do not work with the device in potentially explosive environments in which there are inflammable liquids, gases or dusts. Electrical power tools create sparks, which can ignite dusts or fumes. c) Keep children and other people away while you are operating the electrical tool. Distractions can cause you to lose control of the device. 2. Electrical safety To avoid danger to life from electric shock: a) The mains plug on the device must match the mains socket. The plug must not be modified in any way. Do not use an adapter plug with devices fitted with a protective earth. Unmodified plugs and matching sockets reduce the risk of electric shock. b) Keep the device away from rain or moisture. Water entering an electrical device increases the risk of electric shock. GB 9
10 Safety advice c) Use a residual current device (RCD) for protection if operating the electrical power tool in a moist environment is unavoidable. The use of an RCD reduces the risk of electric shock. d) Do not use the mains lead for any purpose for which it was not intended, e.g. to carry the device, to hang up the device or to pull the mains plug out of the mains socket. Keep the mains lead away from heat, oil, sharp edges or moving parts of the device. Damaged or tangled mains leads increase the risk of electric shock. e) Do not operate the device if the mains lead or mains plug is damaged. A damaged mains lead presents a serious danger to life from electric shock. f) Always keep the mains lead out of the operating area and run it away from the rear of the device. g) Always pull out the mains plug if you are about to leave the device unattended or wish to carry out any tasks on the device. 3. Personal safety a) Children or persons who lack the knowledge or experience to use the device or whose physical, sensory or intellectual capacities are limited must never be allowed to use the device without supervision or instruction by a person responsible for their safety. Children must never be allowed to play with the device. b) Remain alert at all times, watch what you are doing and always proceed with caution. Do not use the device if you are tired or under the influence of 10 GB
11 Safety advice drugs, alcohol or medication. One moment of carelessness when using the device can lead to serious injury. DANGER OF BURNS! Never touch the hot soldering tip or the molten solder. You could suffer burn injuries. Always let the device cool before you replace components on the device, clean it or check its condition. After use let the soldering pencil cool down in air only. Under no circumstances quench the tip in water! CAUTION! DANGER OF FIRE! Place the soldering pencil down only in the special multifunctional holder or on a fire-resistant pad. Place the soldering pencil in the multifunctional holder during pauses in your work. Keep the device away from combustible material. Never leave the device switched on and unattended. CAUTION! DANGER OF INJURY! Keep your hands away from the hot workpiece. The heat from soldering can be conducted through the workpiece. For this reason you should use the third hand to hold small workpieces. Avoid placing the hot soldering tip in contact with the plastic parts of the multifunctional holder. Failure to observe this advice may result in damage to the device. If a dangerous situation arises, pull the mains plug immediately out of the mains socket. CAUTION! DANGER OF POISONING! Do not breathe air contaminated with soldering fumes. When working with the device for long periods do not allow the fumes from soldering to build up. They may be hazardous to health. Always provide adequate ventilation of your working area. In addition, it is recommended that you wear protective gloves, a face mask and a protective apron. GB 11
12 Safety advice Do not eat, drink or smoke in rooms where soldering is carried out. Otherwise your hands may transfer any adhering traces of lead via food or cigarettes into your body. Always wash your hands immediately after soldering. Do not dispose of soldering waste with the household rubbish. Soldering waste must disposed of as special waste. 4. Careful handling and use of electrical power tools a) When not in use always ensure that electrical power tools are kept out of reach of children. Do not let anyone use the device if he or she is not familiar with it or has not read the instructions and advice. Electrical power tools are dangerous when they are used by inexperienced people. b) Look after the device carefully. Check for broken parts or parts that are damaged to the extent they detrimentally affect the functioning of the device. Have any damaged parts repaired before you use the device. Many accidents have their origins in poorly maintained electrical tools. 12 GB
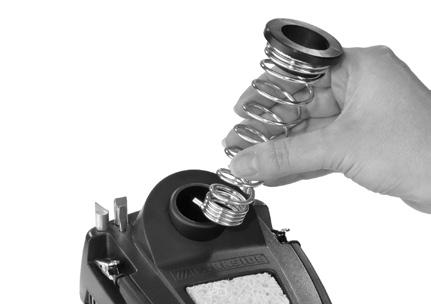
13 Safety advice / Before first use Original accessories / attachments Use only the accessories detailed in the operating instructions. The use of attachments or accessories other than those recommended here could lead to you suffering an injury. Before first use Fitting the helical spring Insert the narrower end of the helical spring 3 into the opening of the multifunctional holder 7. Ensure that the outwardly bent end of the helix points upwards and insert it into the recess provided for it in the multifunctional holder 7 (see arrow in Fig. B). Push the helical spring 3 into the opening as far as it will go. Turn the helical spring 3 clockwise to fix the multifunctional holder 7 in place. Inserting / replacing soldering tips CAUTION! DANGER OF BURNS! Allow the soldering pencil to heat up without a soldering tip. Removal of a soldering tip 2 or a copper attachment may only be done when the appliance has been switched off and the soldering tip or attachment has cooled down. All soldering tips and attachments have a screw thread and can, therefore, be easily and quickly replaced on the soldering pencil 1. Turn the soldering tip or attachment anti-clockwise to remove it. Turn the soldering tip or attachment clockwise to fix it in place. GB 13
14 Operation Operation Switching on and off Switching on: Insert the mains plug into a suitable mains socket. Switching off: Pull the plug out of the mains socket to switch off the device. Third hand CAUTION! DANGER OF BURNS! The clips on the third hand 5 can become hot while you are soldering the workpiece. 1. Fold out the third hand 5 upwards. 2. Rotate the clips 4 until they are oriented in the required direction. 3. Clamp the workpiece between the two clips 4. Solder sponge CAUTION! The hot soldering tip 2 must never be placed in contact with a dry solder sponge 8, otherwise the solder sponge may be damaged. The solder sponge 8 is used to clean soldering tips. Moisten the solder sponge 8 before you use it. 14 GB
15 Operation Soldering The soldering pencil has a rated output of 30 watts and is therefore ideal for electronics soldering. The design of the soldering pencil makes it especially suitable for use where access is difficult or for fine soldering work. To achieve the best results use electronics solder 1.0 or 1.5 mm diameter 60 % Sn, 40 % Pb. We recommend the use of soldering paste (not soldering grease or soldering fluid) as a flux. Clean the soldering tip 2 on the moist solder sponge 8. After cleaning the tip 2 it must be tinned (coated with solder). This is done by melting solder on to the hot soldering tip 2. Guide the soldering tip 2 to the intended joint site and heat the joint. Place the solder (with flux) between the joint site and the tip 2 to melt it. Continue to feed further solder until the whole joint has a covering of solder. Then quickly remove the soldering tip in order to avoid overheating the molten solder. Allow the solder to harden while not subjecting it to vibration or movement. Note: The flux is either already contained in the solder or applied separately. Ask the advice of the retailer when buying solder in order to choose the most suitable solder for your intended purpose. Attachments and applications: ATTENTION! Do not carry out any special changes or repairs to the electrics or other parts. Exceptions are permitted if the person carrying out such changes or repairs is qualified or trained to do so. GB 15
16 Operation / Maintenance and cleaning You can fashion and decorate various materials with your soldering pencil. Remove the parts of the surface or engrave design elements into it (see Fig. D). You can carry out these decorations in, for example, wood, leather, paper, papier mâché, smooth fabrics, thin plastics or candle wax. Try every application out on surplus material and see if you get the effect you wish to have. This means you will avoid damaging the item you wish to work on. Universal attachment 9 : E.g. for drawings with broad and thin lines on various materials Pointed attachment 10 : E.g. for details or shading in over large areas Conical attachment 11 : E.g. for dots, curves and handwriting, detailed work Maintenance and cleaning Risk of injury! Before you carry out any work on the device always pull the mains plug out of the mains socket and allow the device to cool. Clean the device after you have finished using it. Use a cloth and a little mild detergent for cleaning the device. In no circumstances use sharp objects, or petrol, solvents or cleaning agents that might attack plastic. Do not allow any liquids to enter the inside of the device. 16 GB
17 Service centre / Warranty Service centre Have your device repaired only by qualified specialist personnel using original manufacturer parts only. This will ensure that your device remains safe to use. If the plug or mains lead needs to be replaced, always have the replacement carried out by the manufacturer or his service centre. This will ensure that your device remains safe to use. Warranty The warranty for this appliance is for 3 years from the date of purchase. The appliance has been manufactured with care and meticulously examined before delivery. Please retain your receipt as proof of purchase. In the event of a warranty claim, please make contact by telephone with our Service Department. Only in this way can a post-free despatch for your goods be assured. The warranty covers only claims for material and maufacturing defects, but not for transport damage, for wearing parts or for damage to fragile components, e.g. buttons or batteries. This product is for private use only and is not intended for commercial use. The warranty is void in the case of abusive and improper handling, use of force and internal tampering not carried out by our authorized service branch. Your statutory rights are not restricted in any way by this warranty. GB 17
18 Warranty / Disposal The warranty period will not be extended by repairs made unter warranty. This applies also to replaced and repaired parts. Any damage and defects extant on purchase must be reported immediately after unpacking the appliance, at the latest, two days after the purchase date. Repairs made after the expiration of the warranty period are subject to payment. GB Service Great Britain Tel.: (0,10 GBP/Min.) kompernass@lidl.co.uk IAN Disposal The packaging is wholly composed of environmentally-friendly materials that can be disposed of at a local recycling centre. Do not dispose of electrical devices with the household rubbish! In accordance with European Directive 2002 / 96 / EC (covering waste electrical and electronic equipment) and its transposition into national legislation, worn out electrical devices must be collected separately and taken for environmentally compatible recycling. Contact your local refuse disposal authority for more details of how to dispose of your worn-out devices. 18 GB
19 Declaration of Conformity / Manufacturer Declaration of Conformity / Manufacturer We, Kompernaß GmbH, the person responsible for documents: Mr Semi Uguzlu, Burgstr. 21, D Bochum, Germany, hereby declare that this product complies with the following standards, normative documents and EU directives: EU Low Voltage Directive (2006 / 95 / EC) Electromagnetic Compatibility (2004 / 108 / EC) Applicable harmonized standards EN /A1:2008 EN /A13:2008 EN 62233:2008 EN /A1:2009 EN /A2:2009 EN :2008 EN /A2:2008 Type / Device description: Fine soldering iron set PLBS 30 A1 Date of manufacture (DOM): Serial number: IAN GB 19
20 Declaration of Conformity / Manufacturer Bochum, Semi Uguzlu - uality Manager - We reserve the right to make technical modifications in the course of further development. 20 GB
21 Popis sadržaja Uvod Namjenska uporaba...stranica 23 Oprema...Stranica 24 Opseg pošiljke...stranica 24 Tehnički podatci...stranica 24 Sigurnosne upute 1. Sigurnost na radnom mjestu...stranica Električna sigurnost...stranica Sigurnost osoba...stranica Pažljivo postupanje s električnim uređajima i njihovo korištenje...stranica 28 Originalni pribor / dodatni uređaji...stranica 28 Prije stavljanja u pogon Montiranje spiralnog pera...stranica 29 Postavljanje / Zamjena šiljaka lemilice...stranica 29 Stavljanje u pogon Uključivanje i isključivanje...stranica 30 Tronožac...Stranica 30 Lemna spužva...stranica 30 Lemljenje...Stranica 31 Čišćenje i njega...stranica 32 Servis...Stranica 33 Jamstveni list...stranica 33 Otklanjanje otpada...stranica 34 Objašnjenje konformnosti / Proizvođač...Stranica 35 HR 21
22 Uvod U ovim uputama za uporabu / na uređaju rabi se slijedeće prikaze: Čitati upute za rukovanje! Obratiti pažnju na upozoravajuće i sigurnosne upute! Čuvajte se strujnog udara! Opasnost po život! Opasnost od eksplozije! Opasnost od požara! Upozorenje zbog vrućih površina! V ~ W Volt (Imjenični napon) W (Efektivna snaga) Nosite masku za zaštitu od prašine, zaštitne očale, zaštitne rukavice i zaštitnu odjeću. Držite djecu podalje od električnog uređaja! Vodite računa o tome, da se ne ošteti uređaj, mrežni kabel i utikač! Ne pušiti! Ne jesti! 22 HR
23 Uvod Ne piti! Materijal ambalaže i uređaj zbrinite na način neškodljiv za okoliš! Set za precizno lemljenje PLBS 30 A1 Uvod Prije prve uporabe, upoznajte se sa funkcijama uređaja i informirajte se o pravilnom ophođenju. Pročitajte slijedeće upute za uporabu. Sačuvajte ove upute. U slučaju prosljeđivanja uređaja trećim osobama, izručite također svu pripadajuću dokumentaciju. Namjenska uporaba Uređaj je namjenjen za elektronsko lemljenje pri izvođenju hobi radova. Namjenjen je za izvođenje radova kao npr. lemljenje, paljenje drva, zavarivačko ljepljenje plastike i postavljanje ukrasa. Rabite uređaj isključivo sukladno opisu, te za navedena područja primjene. Uređaj nije namijenjen za komercijalne svrhe. Svaka druga uporaba ili promjena uređaja smatrat će se nenamijenskom i predstavlja znatnu opasnost od nezgoda. Proizvođač ne preuzima nikakvu odgovornost za štete nastale od nenamijenske uporabe. HR 23
24 Uvod Oprema 1 fino lemilo 2 šiljak lemilice 3 spiralno pero 4 opružne stezaljke 5 tronožac 6 pričvršćenje za bakrene nastavke 7 višenamjensko pričvršćenje 8 lemna spužva 9 univerzalni nastavak 10 šiljati nastavak 11 stožasti nastavak 12 lemni kositar Opseg pošiljke 1 set za precizno lemljenje PLBS 30 A1 1 višefunkcijsko pričvršćenje 2 role tinola (po 10 grama) 2 šiljci lemilice (1 x montiran) 4 bakreni nastavci (vrhovi za žarenje) 1 lemna spužva 1 uputa za uporabu Tehnički podatci Nazivni napon: 230 V ~ Frekvencija: 50 Hz Snaga: 30 W 24 HR
25 Sigurnosne upute Sigurnosne upute OPREZ! Pogreške tijekom izvođenja slijedećih uputa mogle bi prouzročiti strujni udar, požar i / ili teške ozljede. 1. Sigurnost na radnom mjestu a) Vodite uvijek računa o tome, da Vaše radno mjesto bude čisto i dobro osvjetljeno. Nered i ne osvjetljeno područje rada, može uzrokovati nezgode. b) Ne rabite stroj u području gdje prijeti opasnost od eksplozije, gdje se nalaze zapaljive tekućine, plinovi ili prašine. Električni alati proizvode iskre, koje mogu zapaliti prašinu ili pare. c) Za vrijeme uporabe elek trič nog alata, držite djecu i druge osobe izvan dohvata istoga. U slučaju nepažnje, možete izgubiti kontrolu nad strojem. 2. Električna sigurnost Ne dovodite sebe i druge u životnu opasnost uslijed električnog udara: a) Mrežni utikač uređaja mora odgovarati utičnici. Utikač se ni na kakav način ne smije mijenjati. Ne koristite adapterske utičnice zajedno s zaštitno uzemljenim uređajima. Neizmijenjeni utikači i odgovarajuće utičnice smanjuju rizik električnog udara. HR 25
26 Sigurnosne upute b) Uređaj držite podalje od kiše i vlage. Prodiranje vode u unutrašnjost uređaja povećava opasnost električnog udara. c) Ako je korištenje električnog alata u vlažnim prostorima neizbježno, rabite zaštitnu strujnu sklopku. Korištenje zaštitne strujne sklopke, smanjuje rizik strujnog udara. d) Ne koristite kabel u neke druge svrhe, npr. za nošenje uređaja, vješanje uređaja ili za izvlačenje utikača iz utičnice. Kabel držite podalje od topline, ulja, oštrih rubova i pokretnih dijelova uređaja. Oštećeni ili spetljani kabel ili utikač povećava rizik električnog udara. e) Ne rabite uređaj sa oštećenim mrežnim kabelom ili utičnicom. Oštećeni mrežni kabeli prouzrokuju opasnost po život od strujnog udara. f) Držite mrežni kabel uvijek podalje od djelokruga uređaja i vodite računa o tome da se isti uvijek nalazi iza uređaja. g) Prije izvođenja radova na uređaju ili ako isti ostaje bez nadzora, uvijek izvucite utikač iz utičnice. 3. Sigurnost osoba a) Djeci ili osobama, koje nemaju znanje o stroju ili iskustvo u ophođenju s istim, ili čije su tjelesne, senzorične ili umne sposobnosti ograničene, nije dozvoljeno koristiti stroj, bez nadzora ili upute od osobe koja je zadužena za njihovu sigurnost. Dijeca trebaju bit pod nadzorom, kako se nebi igrala sa strojem. b) Budite uvijek pozorni, vodite računa o tome što radite i razumno pristupite radu s električnim alatom. Ne rabite stroj, ako ste umorni ili pod utjecajem droga, al 26 HR
27 Sigurnosne upute kohola ili lijekova. Jedan trenutak nepažnje za vrijeme korištenja stroja, može uzrokovati teške ozljede. OPASNOST OD OPEKLINA! Ne dodirujte šiljak lemilice ili rastopljeni lem. Prijeti opasnost od opeklina. Prije zamjene dijelova uređaja, čišćenja ili ispitivanja, ostavite isti svakako da se prethodno ohladi. Nakon rada, ostavite fino lemilo da se osuši isključio na zraku. Ne rashlađujte ga ni u kojem slučaju naglo vodom! OPREZ! OPASNOST OD POŽARA! Rabite isključivo specijalno višenamjensko pričvršćenje ili drugu vatrootpornu podlogu za postavljanje vrućeg finog lemila. Za vrijeme radnih stanki, obvezno je odlagati fino lemilo u višenamjensko pričvršćenje. Držite uređaj podalje od zapaljivih materijala. Ne ostavljajte uključeni uređaj nikad bez nadzora. OPREZ! OPASNOST OD OZLJEDA! Držite ruke podalje od zagrijanog izradka. Izradak bi mogao ispuštati toplinu. Iz toga razloga, rabite tronožac za pridržavanje manjih izradaka. Izbegavajte dodir vrućeg šiljka lemilice sa plastičnim dijelovima višefunkcijskog pričvršćenja. Inače prijeti opasnost od oštećenja uređaja. U slučaju opasnosti, smjesta izvucite utikač iz utičnice. OPREZ! OPASNOST OD TROVANJA! Držite se podalje od plinova. Uvijek osigurajte dostatno prozračenje radnog mjesta, tijekom dugotrajnijih radova, pri kojima nastaju plinovi štetni za zdravlje. Nadalje, preporučuljivo je korištenje radne pregače, zaštitnih rukavica, kao i zaštite za usta. HR 27
28 Sigurnosne upute Izbjegavajte jesti, piti ili pušiti u prostorijama u kojima se lemi. Ostatci olova na rukama bi inače preko živežnih namirnica ili cigareta mogli prodrijeti u ljudski organizam. Uvijek temeljito operite ruke nakon lemljenja. Ne bacajte lemne ostatke nikad u kućni otpad. Lemne ostatke potrebno je otkloniti u posebni otpad. 4. Pažljivo postupanje s električnim uređajima i njihovo korištenje a) Čuvajte ne korišteni električni uređaj tako da nije na dohvatu djeci. Ne dopustite da uređaj koriste osobe koje s njim nisu upoznate ili koje nisu pročitale upute. Električni alati su opasni kada ih korite osobe bez iskustva. b) Brižljivo njegujte uređaj. Provjerite, dali su dijelovi polomljeni ili u tolikoj mjeri oštećeni, da smetaju funkciji uređaja. Prije korištenja uređaja, predajte oštećene dijelove na popravak. Mnoge nezgode prouzrokovane su loše održavanim električnim alatom. Originalni pribor / dodatni uređaji Rabite isključivo pribor, naveden u uputama za uporabu. Korištenje dijelova ili pribora koji nisu navedeni u ovim uputama za uporabu, znači za Vas opasnost od ozljeda. 28 HR
29 Prije stavljanja u pogon Prije stavljanja u pogon Montiranje spiralnog pera Umetnite spiralno pero 3 sa užim krajem u otvor višefunkcijskog pričvršćenja 7. Vodite računa pri tome, da prema vani izvijeni kraj spirale pokazuje prema gore i umetnite isti u za to predviđeni otvor višefunkcijskog pričvršćenja 7 (vidite strijelicu u prikazu B). Utisnite spiralno pero 3 sve do kraja u otvor. Okrećite spiralno pero 3 u smjeru vrtnje kazaljke sata, kako bi ga pričvrstili u višefunkcijskom pričvršćenju 7. Postavljanje / Zamjena šiljaka lemilice OPREZ! OPASNOST OD OPEKLINA! Ne zagrijavajte fino lemilo nikad bez šiljka lemilice. Otklanjanje lemnog šiljka 2 ili bakrenog nastavka smije se isključivo izvoditi pri isključenom uređaju i ohlađenom lemnom vrhu ili nastavku. Svi lemni šiljci i nastavci opremljeni su vijčanom osovinom i stoga se brzo i jednostavno mogu zamjeniti na finom lemilu 1. Izvijte lemni šiljak ili nastavak u suprotnom smjeru vrtnje kazaljke sata. Zavijte lemni šiljak ili nastavak u smjeru vrtnje kazaljke sata. HR 29
30 Stavljanje u pogon Stavljanje u pogon Uključivanje i isključivanje Uključivanje: Ugurajte utikač u odgovarajuću utičnicu. Isključivanje: Kako bi isključili uređaj, izvucite utikač iz utičnice. Tronožac POZOR! OPASNOST OD OPEKLINA! Opružne stezaljke na tronožcu 5 mogu se tijekom obrađivanja izradka veoma zagrijati. 1. Otklopite tronožac 5 prema gore. 2. Okrenite opružne stezaljke 4 u željeni smjer. 3. Pritegnite izradak između opružne stezaljke 4. Lemna spužva OPREZ! Vrući šiljak lemilice 2 ne smije nikad doći u dodir sa suhom spužvom lemilice 8. Inače prijeti opasnost od oštećenja lemne spužve. Lemna spužva 8 služi za čišćenje šiljka lemilice. Navlažite lemnu spužvu 8 prije korištenja. 30 HR
31 Stavljanje u pogon Lemljenje Fino lemilo opremljeno je nazivnom snagom od 30 vati i time je idealno za lemljenje elektronike. Zbog svog oblika posebno je prikladno za izvođenje finih radova lemljenja i na teško dostupnim mjestima. Najbolje rezultate postižete sa elektronskim lemom promjera 1,0 ili 1,5 mm, 60 % Sn, 40 % Pb. Kao taljivo preporučujemo lemnu pastu za kontakte (ne lemnu mast ili lemnu vodu). Čistite šiljak lemilice 2 na vlažnoj lemnoj spužvi 8. Nakon čišćenja, potrebno je kositriti šiljak lemilice 2. Kositrite vrući šiljak lemilice 2 pomoću taljenja lemnog kositra. Vodite šiljak lemilice 2 na lemno mjesto i zagrijte isto. Talite lemni kositar (sa taljivom) između lemnog mjesta i šiljka lemilice 2. Dodajite lemni kositar, sve dok je cijelo lemno mjesto navlaženo. Nakon toga smjesta otklonite šiljak lemilice, kako se taljeni lem nebi pregrijao. Pustite lem da se stvrdne i izbjegavajte vibracije. Uputa: Taljivo je ili već sadržano u lemu ili se odvojeno rabi. Informirajte se pri kupnji o vrsti primjene i prikladnom sredstvu za lemljenje. Nastavci i primjene: POZOR! Ne izvodite na elektrici ili ostalim dijelovima nikakve posebne promjene ili popravke. Iznimka: osoba koja izvodi te radove je za to kvalificirana ili izučena. S Vašim finim lemilom možete obrađivati i ukrašavati različite materijale. Odnosite dijelove površine ili palite ukrasne elemente (vidite prikaz D). HR 31
32 Stavljanje u pogon / Čišćenje i njega Takve ukrase možete na primjer izvoditi na drvu, koži, papiru, kartonu, glatkoj tkanini, tankoj plastici ili na vosku voštanice. Testirajte svaki postupak na preostalom materijalu i provjerite time željeni efekt. Na taj način izbjegavate oštećenja na izradku. Univerzalni nastavak 9 : npr. za crteže sa širokim i tankim crtama na različitim materijalima Šiljati nastavak 10 : npr. za detalje ili osjenčavanje velikih površina Stožasti nastavak 11 : npr. za točke, krivulje i rukopis, detaljne radove Čišćenje i njega OPASNOST OD OZLJEDA! Prije izvođenja radova na uređaju, izvucite utikač iz utičnice i pustite uređaj da se ohladi. Čistite uređaj nakon završetka rada. Za čišćenje kućišta rabite krpu i ako je potrebno malo sredstva za čišćenje. Ne rabite ni u kojem slučaju oštre predmete, benzin, razrjeđivače ili sredstva za čišćenje koja nagrizaju plastiku. Izbjegavajte prodiranje tekućina u unutrašnjost uređaja. 32 HR
33 Servis / Jamstveni list Servis Vaše uređaje dajtepopraviti samo od strane kvalificiranih osoba i s originalnim zamjenskim dijelovima. Time ćete zadržati sigurnost vaših uređaja. Pustite da utikač ili mrežni vod zamjeni uvijek proizvođač ili njegov servis za kupce. Time ćete zadržati sigurnost vaših uređaja. Jamstveni list Na ovaj uređaj vrijedi jamstvo u trajanju od 3 godine od datuma kupovine. Uređaj je pažljivo proizveden i prije isporuke brižljivo kontroliran. Molimo sačuvajte blagajnički račun kao dokaz o kupnji. Molimo da se u slučaju ostvarivanja prava na jamstvo telefonski povežete sa Vašom servisnom ispostavom. Samo na taj način vaša roba može biti besplatno uručena. Jamstvo vrijedi samo za greške materijala i izrade, a ne za transportne štete, potrošne dijelove ili oštećenja lomljivih dijelova, na primjer prekidača ili baterija. Proizvod je namijenjen isključivo za privatnu, a ne za gospodarstvenu uporabu. U slučaju nestručnog rukovanja, rukovanja protivnog namjeni uređaja, primjene sile i zahvata, koji nisu izvršeni od strane našeg ovlaštenog servisnog predstavništva, važenje jamstva prestaje. Vaša zakonska prava ovim jamstvom ostaju netaknuta. Jamstveni rok se ne produžava uslijed ostvarivanja prava na jamstvo. To vrijedi i za zamijenjene i popravljene dijelove. Eventualno već prili- HR 33
34 Jamstveni list / Otklanjanje otpada kom kupovine prisutna oštećenja i nedostaci moraju biti javljena neposredno nakon raspakiranja, ali najkasnije dva dana nakon datuma kupovine. Popravke vršene nakon isteka jamstvenog roka podliježu obavezi plaćanja. Proizvođač: Kompernaß GmbH Burgstraße Bochum (Germany) Njemačka HR Servis Hrvatska Tel.: kompernass@lidl.hr IAN Otklanjanje otpada Ambalaža se sastoji od okolini primjerenih materijala koju možete zbrinuti u mjesnim stanicama za reciklažu. Ne bacajte električne uređaje u kućni otpad! Sukladno europskoj smjernici 2002 / 96 / EC o istrošenim električnim i elektronskim uređajima i primjeni u nacionalnom zakonodavstvu, potrebno je istrošene elektronske uređaje posebno sabirati i predati na stručnu reciklažu, koja ne ugrožava okoliš. 34 HR
35 Otklanjanje / Objašnjenje konformnosti / Proizvođač Mogućnosti za zbrinjavanje isluženog uređaja saznati ćete kod vaše gradske ili komunalne uprave. Objašnjenje konformnosti / Proizvođač Mi, Kompernaß GmbH, odgovorni za ovu dokumentaciju: gospodin Semi Uguzlu, Burgstr. 21, D Bochum, Njemačka, ovim izjavljujemo da je ovaj proizvod u skladu sa slijedećim normama, normativnim dokumentima i EZ smjernicama: EG- niskonaponske smjernice (2006 / 95 / EC) Elektromagnetska kompatibilnost (2004 / 108/ EC) Primijenjene harmonizirane norme EN /A1:2008 EN /A13:2008 EN 62233:2008 EN /A1:2009 EN /A2:2009 EN :2008 EN /A2:2008 Tip / Naziv uređaja: Set za precizno lemljenje PLBS 30 A1 Date of manufacture (DOM): Serijski broj: IAN HR 35
36 Objašnjenje konformnosti / Proizvođač Bochum, Semi Uguzlu - Menadžer kakvoće - Izjava o sukladnosti za ovaj proizvod dostupna je na internet stranici Pridržavamo pravo tehničkih izmjena u smislu daljnjeg razvoja. 36 HR
37 Cuprins Introducere Utilizare conform scopului...pagina 39 Dotare...Pagina 40 Pachet de livrare...pagina 40 Specificaţii tehnice...pagina 40 Indicaţii de siguranţă 1. Loc de muncă...pagina Siguranţă electrică...pagina Siguranţa persoanelor...pagina Utilizarea şi deservirea uneltei electrice...pagina 44 Accesorii originale / - aparate auxiliare...pagina 45 Înainte de punerea în funcţiune Montarea arcului spiralat...pagina 45 Aplicarea / schimbarea vârfurilor de lipit...pagina 45 Punere în funcţiune Pornire şi oprire...pagina 46 Mâner trei...pagina 46 Burete pentru ciocane de lipit...pagina 46 Lipire...Pagina 47 Curăţare şi întreţinere...pagina 48 Service...Pagina 49 Garanţie...Pagina 49 Înlăturare...Pagina 50 Declaraţie de conformitate / Producător... Pagina 51 RO 37
38 Introducere În acest manual de utilizare sunt folosite / următoarele pictograme pe aparat: Citiţi manualul de utilizare! Indicaţiile de atenţionare şi siguranţă trebuie respectate! Atenţie pericol de electrocutare! Pericol de moarte! Pericol de explozie! Pericol de incendiu! Atenţie suprafeţe fierbinţi! V ~ W Volţi (tensiune alternativă) Waţi (putere) Purtaţi o mască de protecţie respiratorie-/contra prafului, ochelari de protecţie, mănuşi de protecţie, îmbrăcăminte de protecţie. Ţineţi copii la distanţă faţă de aparatul electric! Aveţi grijă la starea ireproşabilă a aparatului, cablului de reţea şi ştecărului de reţea! Nu fumaţi! Nu mâncaţi! 38 RO
39 Introducere Nu beţi! Înlăturaţi ambalajul şi aparatul în mod ecologic! Set ciocan de lipit PLBS 30 A1 Introducere Înainte de prima punere în funcţiune informaţi-vă cu privire la funcţiile aparatului şi deservirea corectă a acestuia. Citiţi următorul manual de utilizare. Păstraţi bine acest manual. În caz că, daţi aparatul mai departe la terţi, înmânaţi de asemenea şi documentaţia acestuia. Utilizare conform scopului Aparatul este prevăzut pentru lucrările de lipire în domeniul electronic pentru activităţile din timpul liber sau bricolaj. Este destinat lucrărilor de lipire, arderii lemnului, lipirii prin sudură a materialului plastic şi aplicarea elementelor decorative.folosiţi aparatul numai în modul descris şi numai în domeniile de utilizare indicate. Acest aparat nu este destinat utilizării comerciale. Orice altă utilizare sau modificare a aparatului este considerată ca o utilizare necorespunzătoare scopului şi reprezintă pericole considerabile de accidente. Pentru daunele cauzate de o utilizare necorespunzătoare scopului, producătorul nu preia nicio responsabilitate. RO 39
40 Introducere Dotare 1 Ciocan de lipit pentru lucrări fine 2 Vârf ciocan de lipit 3 Arc spiralat 4 Cleme de fixat 5 Mâner trei 6 Suport pentru vârfurile de cupru 7 Suport universal 8 Burete pentru ciocane de lipit 9 Vârf universal 10 Vârf ascuţit 11 Vârf sferic 12 Cositor Pachet de livrare 1 Set ciocan de lipit PLBS 30 A1 1 Suport universal 2 Role de cositor (câte 10 grame) 2 Vârfuri de lipit (1 x premontat) 4 Vârfuri de cupru (vârfuri de ars) 1 Burete pentru ciocane de lipit 1 Manual de utilizare Specificaţii tehnice Tensiune nominală: 230 V ~ Frecvenţă: 50 Hz Putere: 30 W 40 RO
41 Indicaţii de siguranţă Indicaţii de siguranţă ATENŢIE! Greşelile rezultate din nerespectarea indicaţiilor următoare pot cauza electrocutarea, incendiu şi / sau accidente grave. 1. Loc de muncă a) Ţineţi locul dvs. de muncă curat şi bine iluminat. Dezordinea şi zone de lucru prost iluminate pot cauza accidente. b) Nu lucraţi cu aparatul în medii cu pericol de explozie, în care se află lichide, gaze sau prafuri inflamabile. Uneltele electrice generează scântei, care pot aprinde praful sau vaporii. c) Ţineţi copii şi alte persoane la distanţă atunci când, lucraţi cu unealta electrică. Atunci când atenţia vă este distrasă puteţi pierde controlul asupra aparatului. 2. Siguranţă electrică Evitaţi pericolele de moarte prin electrocutare: a) Ştecărul de conectare al aparatului trebuie să corespundă prizei. Ştecărul nu are voie să fie modificat în niciun fel. Nu folosiţi niciun ştecăr cu adaptor împreună cu aparate împământate. Ştecărele nemodificate şi prizele corespunzătoare reduc riscul unei electrocutări. RO 41
42 Indicaţii de siguranţă b) Protejaţi aparatul contra ploii, umidităţii sau lichidelor. Pătrunderea apei într-un aparat electric măreşte riscul unei electrocutări. c) Atunci când folosirea uneltei electrice într-un mediu umed nu se poate evita, folosiţi un întrerupător de protecţie contra curentului eronat. Utilizarea unui întrerupător de protecţie contra curentului eronat reduce riscul unei electrocutări. d) Nu folosiţi cablul de reţea pentru a purta sau suspenda aparatul sau pentru a scoate ştecărul din priză. Protejaţi cablul contra căldurii, uleiului, muchiilor ascuţite sau componentelor aparatului, care se află în mişcare. Cablurile deteriorate sau răsucite măresc riscul unei electrocutări. e) Nu folosiţi aparatul cu un cablu de reţea sau ştecăr de reţea defect. Cablurile de reţea defecte reprezintă un pericol de moarte prin electrocutare. f) Menţineţi cablul de reţea întotdeauna în afara razei de acţiune a aparatului şi păstraţi-l în spatele aparatului. g) Scoateţi întotdeauna ştecărul de reţea atunci când, lăsaţi aparatul nesupravegheat sau atunci când efectuaţi lucrări la aparat. 3. Siguranţa persoanelor a) Acest aparat poate fi folosit de către persoane (inclusiv copii) cu capacităţi fizice, senzoriale sau psihice limitate sau cu lipsă de experienţă şi/sau cunoştinţe doar dacă, sunt supravegheate de către o persoană responsabilă de siguranţa acestora sau dacă, au primit instrucţiuni de folosire a aparatului. Copii trebuie supravegheaţi pentru a nu se juca cu aparatul. 42 RO
43 Indicaţii de siguranţă b) Fiţi întotdeauna atent, aveţi grijă la ceea ce faceţi şi procedaţi raţional în timpul lucrului cu unealta electrică. Nu folosiţi aparatul atunci când, sunteţi obosit, vă aflaţi sub influenţa drogurilor, alcoolului sau unui tratament medical. Un moment de neatenţie în timpul utilizării aparatului poate cauza accidente grave. PERICOL DE ARSURĂ! Nu atingeţi niciodată vârful fierbinte al pistolului de lipit sau cositorul topit. Există pericol de arsură. În mod obligatoriu lăsaţi să se răcească aparatul, înainte de a schimba componentele acestuia, de a-l curăţa sau a-l verifica. Lăsaţi pistolul de lipit pentru lucrări fine să se răcească numai la aer. În niciun un caz să nu îl răciţi cu apă! ATENŢIE! PERICOL DE INCENDIU! Folosiţi numai un suport special multifuncţional sau alt suport ignifug pentru depunerea pistolului de lipit fierbinte. În timpul pauzelor de lucru pistolul de lipit trebuie depus pe un suport multifuncţional. Menţineţi aparatul la distanţă faţă de materialul inflamabil. Nu lăsaţi niciodată aparatul pornit nesupravegheat. ATENŢIE! PERICOL DE ACCIDENTARE! Menţineţi mâinile la distanţă faţă de piesa de lucru fierbinte. Căldura poate fi transmisă prin piesa de lucru. De aceea, folosiţi pentru ţinerea pieselor mici de lucru un dispozitiv suplimentar de prindere. Evitaţi contactul vârfului fierbinte al pistolului de lipit cu componentele de plastic ale suportului multifuncţional. În caz contrar pot apărea deteriorări ale aparatului. În caz de pericol scoateţi imediat ştecărul de reţea din priză. ATENŢIE! PERICOL DE OTRĂVIRE! Menţineţi la distanţă vaporii din zona de respirare. RO 43
44 Indicaţii de siguranţă n timpul lucrărilor mai îndelungate, la care se pot forma vapori toxici, asiguraţi întotdeauna o aerisire suficientă a locului de muncă. De asemenea, se recomandă purtarea mănuşilor de protecţie, protecţiei respiratorie cât şi şorţului de lucru. Evitaţi să mâncaţi, beţi sau să fumaţi în spaţiile în care se efectuează lucrări de lipire. În caz contrar urmele de plumb de pe mâini, pot ajunge prin alimente sau ţigări în corpul uman. După efectuarea lucrărilor de lipit spălaţi-vă întotdeauna bine pe mâini. Nu aruncaţi niciodată reziduurile de lipit în gunoiul menajer. Reziduurile lipirilor trebuiesc înlăturate în gunoiul special. 4. Utilizarea şi deservirea uneltei electrice a) Nu păstraţi uneltele electrice nefolosite la îndemâna copiilor. Nu lăsaţi persoanele, care nu cunosc aparatul sau nu au citit instrucţiunile, să folosească aparatul. Uneltele electrice sunt periculoase atunci când sunt folosite de persoane neexperimentate. b) Întreţineţi aparatul cu atenţie. Verificaţi dacă, componentele sunt rupte sau deteriorate astfel încât funcţia aparatului să fie limitată. Dispuneţi repararea componentelor defecte înainte de utilizarea aparatului. Multe accidente sunt cauzate de unelte electrice necorespunzător întreţinute. 44 RO
45 Indicaţii de siguranţă / Înainte de punerea în funcţiune Accesorii originale / - aparate auxiliare Folosiţi numai accesorii, care sunt indicate în manualul de utilizare. Utilizarea altor componente decât cele indicate aici sau altor accesorii pot reprezenta pericole de accidentare pentru dvs. Înainte de punerea în funcţiune Montarea arcului spiralat Introduceţi arcul spiralat 3 cu capătul îngust în orificiul suportului universal 7. Aveţi grijă să indice în sus capătul spiralat îndoit în exterior şi puneţi-l în orificiul prevăzut pentru acesta al suportului universal 7 (vezi săgeata în fig. B). Pentru aceasta apăsaţi arcul spiralat 3 până la capăt în orificiu. Înşurubaţi arcul spiralat 3 în sensul acelor de ceasornic în suportul universal 7 pentru a-l fixa. Aplicarea / schimbarea vârfurilor de lipit ATENŢIE! PERICOL DE ARSURĂ! Nu încălziţi niciodată pistolul de lipit fără vârf. Îndepărtarea unui vârf de ciocan de lipit 2 sau unui vârf de cupru este permis numai atunci când aparatul este oprit şi vârful ciocanului de lipit sau vârful de cupru este rece. Toate vârfurile de ciocan de lipit şi vârfurile deţin un filet şi se pot schimba astfel repede şi simplu de pe pistolul de lipit 1. Deşuru- RO 45
46 Înainte de punerea în funcţiune / Punere în funcţiune baţi vârful de ciocan de lipit sau vârful ataşabil contrar sensului acelor de ceasornic. Strângeţi vârful de ciocan de lipit sau vârful ataşabil în sensul acelor de ceasornic. Punere în funcţiune Pornire şi oprire Pornire: Introduceţi ştecărul într-o priză corespunzătoare. Oprire: Scoateţi ştecărul din priză, pentru a opri aparatul. Mâner trei ATENŢIE! PERICOL DE ARSURĂ! Clemele de fixare de la mânerul al trei-lea 5 se pot încălzi foarte tare în timpul prelucrării piesei de lucru. 1. Rabataţi mânerul al trei-lea 5 în sus. 2. Întoarceţi clemele de fixare 4 în direcţia dorită. 3. Fixaţi piesa de lucru între cele două cleme de fixare 4. Burete pentru ciocane de lipit ATENŢIE! Vârful fierbinte de lipit 2 nu are voie niciodată să intre în contact cu un burete pentru ciocane de lipit uscat 8. În caz contrar buretele pentru ciocane de lipit se poate deteriora. 46 RO
47 Punere în funcţiune Buretele pentru ciocane de lipit 8 serveşte la curăţarea vârfurilor de lipit. Umeziţi buretele pentru ciocane de lipit 8 înainte de a-l utiliza. Lipire Pistolul de lipit pentru lucrări fine cu o putere nominală de 30 W este ideal pentru lucrările de lipire din domeniul electronic. Datorită formei constructive se pretează în special la lucrările de lipire în locurile greu accesibile sau pentru lucrări fine. Cele mai bune rezultate se obţin cu aliaj de lipit pentru electronică, 1,0 sau 1,5 mm diametru, 60 % Sn, 40 % Pb. Ca flux se recomandă pastă de lipit de contact ( fără grăsime de lipit sau apă de lipit). Curăţaţi vârful de lipit 2 pe buretele umed 8. După curăţare vârful de lipit 2 trebuie cositorit. Pentru aceasta cositoriţi vârful de lipit fierbinte 2 prin topirea cositorului. Aduceţi vârful de lipit 2 la punctul de lipire şi încălziţi-l. Topiţi cositorul (cu agentul de curgere) între punctul de lipire şi vârful de lipit 2. Adăugaţi alt cositor până când tot punctul de lipire este acoperit. Apoi luaţi imediat vârful de lipit pentru a nu supraîncălzi cositorul topit. Lăsaţi cositorul să se solidifice şi evitaţi şocurile. Indicaţie: Agentul de curgere este conţinut în cositor sau se foloseşte separat. Informaţi-vă la achiziţie cu privire la tipul de aplicare şi cositorul corespunzător. RO 47
48 Punere în funcţiune / Curăţare şi întreţinere Aplicaţii şi utilizări: ATENŢIE! Nu efectuaţi la sistemele electrice sau alte componente modificări speciale şi reparaţii. Excepţie: persoana este calificată pentru aceasta sau instruită. Puteţi realiza şi decora cu pistolul dvs. de lipit diferite materiale. Nivelaţi părţi ale suprafeţei sau pirogravaţi elemente de decorare (vezi fig.d). Puteţi realiza aceste decorări de exemplu în lemn, piele, hârtie, carton sau ţesături netede, materiale plastice subţiri sau ceară de lumânări. Testaţi fiecare utilizare pe material în plus şi verificaţi astfel efectul dorit. Astfel evitaţi deteriorări la piesa de lucru. Vârf universal 9 : de ex.: pentru desene cu linii late şi subţiri în diferite materiale Vârf spiralat 10 : de ex.: pentru detalii sau haşurări mari Vârf conic 11 : de ex.: pentru puncte, curbe, scris de mână, lucrări de detaliu Curăţare şi întreţinere PERICOL DE ACCIDENTARE! Înainte de a efectua lucrări la aparat scoateţi întotdeauna ştecărul de reţea din priză şi lăsaţi aparatul să se răcească. Curăţaţi aparatul după terminarea lucrărilor. Pentru curăţarea carcasei folosiţi o lavetă şi la nevoie o substanţă de curăţare. 48 RO
49 Curăţare şi întreţinere / Service / Garanţie În niciun caz nu folosiţi obiecte ascuţite, benzină, soluţii sau alte substanţe de curăţare, ce atacă materialul plastic. Împiedicaţi pătrunderea lichidelor în interiorul aparatului. Service Dispuneţi repararea aparatelor dvs. de către un punct de service sau de către un electrician şi numai cu piese de schimb originale. Astfel se asigură păstrarea siguranţei aparatului. Dispuneţi schimbarea ştecărului sau al cablului de conectare întotdeauna de către producătorul aparatului sau serviciul clienţi al acestuia. Astfel se asigură păstrarea siguranţei aparatului. Garanţie Pentru acest aparat primiţi o garanţie de 3 ani de la data achiziţiei. Aparatul a fost produs cu atenţie şi verificat înainte de livrare. Vă rugăm să păstraţi bonul de casă ca dovadă de achiziţie. În caz de o reclamaţie privind garanţia, contactaţi telefonic punctul nostru de service. Doar astfel se poate asigura o transmitere gratuită a mărfii dvs. Garanţia este valabilă numai pentru defecte de material sau de fabricare, însă nu pentru deteriorări din cauza transportului, piese de uzură sau deteriorarea pieselor sensibile, ca de ex.: întrerupătoare sau acumulatoare. Produsul este destinat numai uzului privat şi nu celui comercial. RO 49
50 Garanţie / Înlăturare În caz de utilizare necorespunzătoare, supunerea la şocuri şi alte intervenţii, care se efectuează de un punct de service neautorizat de noi, garanţia devine nulă. Drepturile dvs. legale nu sunt limitate de această garanţie. Durata de garanţie nu se prelungeşte prin acordarea acesteia. Aceasta este valabil şi pentru piesele schimbate şi reparate. Defecţiunile sau lipsurile existente deja la achiziţie trebuie anunţate imediat după despachetare, însă cel mai târziu după două zile de la data achiziţiei. Reparaţiile necesare după expirarea perioadei de garanţie se efectuează contra cost. RO Service România Tel.: kompernass@lidl.ro IAN Înlăturare Ambalajul este din materiale ecologice, care pot fi înlăturate în punctele locale de reciclare. Nu aruncaţi aparatele electrice la gunoiul menajer! Conform Directivei Europene 2002 / 96 / EC privind aparatele vechi electrice, electronice şi aplicarea dreptului naţional, aparatura electrică uzată trebuie colectată separat şi adusă la un punct ecologic de reciclare. 50 RO
51 Înlăturare / Declaraţie de conformitate / Producător Posibilităţi de înlăturare ale produsului dvs. le puteţi afla în localitatea dvs. sau la administraţia locală. Declaraţie de conformitate / Producător Noi, Kompernaß GmbH, responsabil documentaţie: Dl. Semi Uguzlu, Burgstr. 21, D Bochum, Germania, declarăm prin prezenta că, acest produs corespunde umrătoarelor norme, documentelor normative şi Directivelor CE: Directiva privind tensiunea joasă (2006 / 95 / EC) Compatibilitatea electromagnetică (2004 / 108 / EC) Norme aplicate armonizate EN /A1:2008 EN /A13:2008 EN 62233:2008 EN /A1:2009 EN /A2:2009 EN :2008 EN /A2:2008 Tip / Denumire aparat: Set ciocan de lipit PLBS 30 A1 Date of manufacture (DOM): Număr serie: IAN RO 51
52 Declaraţie de conformitate / Producător Bochum, Semi Uguzlu - Manager de calitate - Ne rezervăm dreptul la modificări în sensul dezvoltării continue. 52 RO
53 Съдържание Увод Правилна употреба...cтраница 55 Оборудване...Cтраница 56 Окомплектовка...Cтраница 56 Технически данни...cтраница 56 Инструкции за безопасност 1. Работно място...cтраница Електрическа безопасност...cтраница Безопасност на хората...cтраница Употреба и обслужване на електроуреда...cтраница 60 Оригинални принадлежности / допълнителни уреди...cтраница 61 Преди пуска Монтиране на спиралната пружина...cтраница 61 Поставяне / смяна на върховете за спояване...cтраница 62 Употреба Включване и изключване...cтраница 62 Трета ръка...cтраница 62 Гъбичка за запояване...cтраница 63 Запояване...Cтраница 63 Поддръжка и почистване...cтраница 65 Сервиз...Cтраница 65 Гаранция...Cтраница 66 Изхвърляне...Cтраница 67 Декларация за съответствие / производител...cтраница 67 BG 53
54 Увод В настоящото упътване за обслужване / върху уреда са използвани следните пиктограми: Прочетете упътването за обслужване! Спазвайте предупредителните указания и инструкциите за безопасност! Внимание за токов удар! Опасност за живота! Опасност от експлозия! Опасност от пожар! Пазете се от горещи повърхности! V ~ W V (променливо напрежение) W (мощност) Носете респиратор / противопрахова маска, защитни очила, защитни ръкавици и защитно облекло. Дръжте децата далече от електрическия уред! За целостта на изделието Захранващ кабел и щепсел Не пушете! Не яжте! 54 BG
electric knife sharpener
 electric knife sharpener USER GUIDE Now that you have purchased a Kitchen Living product you can rest assured in the knowledge that as well as your year parts and labour guarantee you have the added peace
PAINT SPRAY SYSTEM PFS 280 A1
 PAINT SPRAY SYSTEM PFS 280 A1 PAINT SPRAY SYSTEM Operation and Safety Notes Translation of original operation manual SET ZA PRSKANJE BOJE Upute za posluživanje i za Vašu sigurnost Prijevod originalnih
SAFETY AND OPERATING MANUAL
 SAFETY AND OPERATING MANUAL General Safety Rules WARNING! Read all instructions. Failure to follow all instructions listed below may result in electric shock, fire and/ or serious injury. The term power
IAN ANGLE GRINDER PWS 230 A1. ANGLE GRINDER Operation and Safety Notes Translation of original operation manual
 ANGLE GRINDER PWS 230 A1 ANGLE GRINDER Operation and Safety Notes Translation of original operation manual POLIZOR UNGHIULAR Instrucţiuni de utilizare şi de siguranţă Traducerea instrucţiunilor de utilizare
Electric 2-STAGE SHARPENING FEATURES: system allows for safe, easy knife sharpening - Non-slip feet allows sharpener to stay in place while in use
 Electric FEATURES: - 2-Stage electric sharpening system allows for safe, easy knife sharpening - Non-slip feet allows sharpener to stay in place while in use 2-STAGE SHARPENING IMPORTANT SAFEGUARDS SAVE
INSTRUCTIONS MANUAL CAST IRON STOVE
 INSTRUCTIONS MANUAL CAST IRON STOVE CA-SGB06 Warning: Use outdoors only Read the instructions before using the appliance and retain for future reference. 1 These instructions give some important information
IAN HEAT PAD SHK 100 B2. HEAT PAD Operation and Safety Notes. ELEKTRIČNI JASTUK Upute za posluživanje i za Vašu sigurnost
 HEAT PAD SHK 100 B2 HEAT PAD Operation and Safety Notes ELEKTRIČNI JASTUK Upute za posluživanje i za Vašu sigurnost PERNĂ ELECTRICĂ Instrucţiuni de utilizare şi de siguranţă ЕЛЕКТРИЧЕСКА ВЪЗГЛАВНИЦА Инструкции
Operator s Manual. Medium-Duty Electric Slicers ENGLISH. Item Model Description Drive Peak HP Voltage Amps Hz Plug
 Medium-Duty Electric Slicers 40950 40951 Item Model Description Drive Peak HP Voltage Amps Hz Plug 40950 SLM250/S 10 Knife Medium-Duty Slicer 1/3 2.5 Belt 120 60 5-15P 40951 SLM300P/S 12 Knife Medium-Duty
Installation & User Manual EW5000 Outdoor Cooking Fire
 Installation & User Manual EW5000 Outdoor Cooking Fire IMPORTANT: Please read this manual before installing and using the ESCEA EW5000 Cooking fire. Failure to follow these instructions may lead to a possible
S E L E C T I O N. Abdominal Crunch. User manual
 and S E L E C T I O N T H E S T R E N G T H E V O L U T I O N User manual and and The identification plate of the and manufacturer, affixed along side the seat on the frame of the weight stack, gives the
8-Person Tent. Assembly and safety advice Z30695-BS 6
 8-Person Tent Assembly and safety advice Z30695-BS 6 GB / IE Assembly and safety advice Page 3 Table of contents Introduction Proper use...page 4 Description of parts...page 4 Sizes and material...page
Noul sistem de sine de ghidaj pentru o precizie maxima!!!
 Noul sistem de sine de ghidaj pentru o precizie maxima!!! 1 Acestea sunt elementele care compun noul sistem FSN Sine de ghidaj Sina de ghidaj / cod comanda FSN 800 1600Z00005 FSN 1100 1600Z00006 FSN 1600
Product instruction manual Ream Cutting Systems RE3943, RE3946, RE3947, RE3971, RE3952E
 Product instruction manual Ream Cutting Systems RE3943, RE3946, RE3947, RE3971, RE3952E The Trimfast Ream Cutters are reliable, high performance cutters that will give you the results you need quickly
Contents. AFTER SALES SUPPORT / KB-8085
 Contents 02 Introduction 03 General Information and Safety Instructions 05 Assembly and Parts List 07 Getting Started 08 Other Useful Information 10 Warranty Card Introduction 1 2 Congratulations! You
4-Person Tent. Assembly and safety advice Z29743-BS
 4-Person Tent Assembly and safety advice Z29743-BS 6 GB / IE Assembly and safety advice Page 3 Table of Contents Introduction Proper use...page 4 Description of parts...page 4 Technical data...page 4 Scope
Installation and User s Manual 12 x 10 MOTORIZED AWNING
 12 x 10 MOTORIZED AWNING Installation and User s Manual 12 x 10 MOTORIZED AWNING 088-1763-0 Stop Please read and understand this manual before any assembly or use of this product. Before beginning assembly
TWO BURNER STAINLESS STEEL PROPANE STOVE
 ROTATE TO LIGHT 842-A250-0_SSCmpStove.qxd 11/26/03 2:59 PM Page 1 OWNER S MANUAL FAILURE TO FOLLOW ALL S AND INSTRUCTIONS IN THIS MANUAL COULD LEAD TO PERSONAL INJURY, INCLUDING DEATH. RETAIN THIS MANUAL
OWNER S MANUAL L-OF079PST-1
 OWNER S MANUAL L-OF079PST-1 WARNING: This outdoor fireplace is intended for outdoor use only. Do not use on wooden decks. This outdoor fireplace is intended to burn wood logs only. Do not burn coal, leaves,
HANG GLIDER (RECHARGEABLE)
") HANG GLIDER (RECHARGEABLE) 91192 ASSEMBLY AND OPERATING INSTRUCTIONS 3491 Mission Oaks Blvd., Camarillo, CA 93011 Visit our Web site at http://www.harborfreight.com IMPORTANT: If damage is caused due to
HANG GLIDER (RECHARGEABLE) 91192 ASSEMBLY AND OPERATING INSTRUCTIONS 3491 Mission Oaks Blvd., Camarillo, CA 93011 Visit our Web site at http://www.harborfreight.com IMPORTANT: If damage is caused due to
INSTANT GARAGE MODEL NO: CIG81224 ASSEMBLY INSTRUCTIONS PART NO: ORIGINAL INSTRUCTIONS
 INSTANT GARAGE MODEL NO: CIG81224 PART NO: 3503578 ASSEMBLY INSTRUCTIONS ORIGINAL INSTRUCTIONS GC1117 INTRODUCTION Thank you for purchasing this CLARKE Instant Garage. When erected, the CIG81224 garage
Lit Table Top Firepit Bio-Ethanol Fireplace. User Manual. Model: GF301650
 Lit Table Top Firepit Bio-Ethanol Fireplace User Manual Model: GF301650 1 Moda Flame Lit Table Top Firepit Bio-Ethanol Fireplace Included in delivery (Parts List): A. Fireplace body 1pc B. Glass 1pc C.
Professional Mandoline Manual. Model: 90757
 Professional Mandoline Manual Model: 90757 Introduction Your MIU France Composite Mandoline features a selection of blades with variable thickness adjustments which make it one of the most versatile kitchen
SINGLE BURNER STOVE IMPORTANT OPERATING INSTRUCTIONS COOKING & STORAGE POSITION PARTS IDENTIFICATION
 SINGLE BURNER STOVE OPERATING INSTRUCTIONS PARTS IDENTIFICATION Electronic Lighter Ignites the burner. Liquid Guard Holds liquid overflow. Windshield Prevents flame from being extinguished by wind. Ensures
Meat Slicer INSTRUCTION MANUAL CAUTION! ONE YEAR LIMITED WARRANTY
 ONE YEAR LIMITED WARRANTY INSTRUCTION MANUAL The original registered owner of this product should contact SKYFOOD EQUIPMENT LLC at 305-868-16 for any warranty problems or service. SKYFOOD EQUIPMENT LLC
LDR Brachytherapy Seed Sterilization and Sorting Tray
 LDR Brachytherapy Seed Sterilization and Sorting Tray Table of Contents General Precautions... 2 Customer Responsibility... 3 Description... 4 Features and Specifications... 5 Operation... 6 Changing Covers
IMPORTANT NOTICE. Professional Mandoline Manual
 IMPORTANT NOTICE PLEASE DO NOT RETURN TO STORE. If you have any problems with this unit, contact Consumer Relations for service. PHONE: 206-605-0555 Please read operating instructions before using this
MK3000. Operating and Calibration Instructions
 MK3000 Operating and Calibration Instructions CONTENT 1. INTRODUCTION 3 1.1. GENERAL INFORMATION. 3 1.2. WORKING PRINCIPLE. 3 1.3. SECTION THROUGH CUTTER.. 4 1.4. SPECIFICATIONS.. 5 2. INSTRUCTIONS FOR
Read all instructions and warnings before using this fireplace. WARNING
 Frame User Manual 1 Operating Manual Thank you for purchasing this Signi Fires product. Signi Fires is very safety conscious, we have taken every care in designing, manufacturing and assembling your Signi
Professional Mandoline Manual. Model: 90797
 Professional Mandoline Manual Model: 90797 Introduction Your MIU France Stainless Steel Mandoline features a selection of blades with variable thickness adjustments which make it one of the most versatile
ELECTRIC KNIFE SHARPENER User Guide
 BRAND ELECTRIC KNIFE SHARPENER User Guide Item: 717822 Ginnys.com 800-544-1590 Facebook.com/GinnysBrand Pinterest.com/GinnysBrand Ginnys.com/Blog Thank you for purchasing a Ginny s Brand Electric Knife
TELESCOPIC POLE HEDGE TRIMMER
 WHAT S IN THE BOX TELESCOPIC POLE HEDGE TRIMMER 500W 470mm INSTRUCTION MANUAL SPECIFICATIONS Power: 500W No Load Speed: 1,650/min Blade Length: 585mm Max Cutting Length: 470mm Max. Cutting Diameter: 15mm
Instructions for use, installation, and connection. Gas Built in Hob
 Instructions for use, installation, and connection Gas Built in Hob RB3311SGBS RB3312SGBS RB3311DGBS RB3311MGBS RB3311NGBS RB6313SGBST RB6323SGBST RB6314SGBS RB6313DGBST RB6313MGBST RB7312SGBS RB7313SGBST
Romania Great Britain France Italia Polska
 Romania Numai pentru tarile membre UE Nu aruncati masinile electrice in gunoiul menajer! Conform directivei europene 2002/96/CE pentru masini electrice si electronice vechi corelata cu legislatia locala,
IAN HAIR & BEARD TRIMMER SHBS 1000 B1 APARAT ZA ŠIŠANJE HAIR & BEARD TRIMMER BLOC DE LAME ACOPERITE CU TITAN ŞI CUŢITE DIN CERAMICĂ
 HAIR & BEARD TRIMMER SHBS 1000 B1 HAIR & BEARD TRIMMER Operating instructions BLOC DE LAME ACOPERITE CU TITAN ŞI CUŢITE DIN CERAMICĂ Instrucţiuni de utilizare ΚΟΥΡΕΥΤΙΚΗ ΜΗΧΑΝΗ ΓΙΑ ΜΑΛΛΙΑ ΚΑΙ ΓΕΝΙΑ Οδηүίες
ETHANOL FIREPLACES Certified as per ULC/ORD C UL Subject
 VOLCAN B12 Trident Laguna Vesuve ETHANOL FIREPLACES Certified as per ULC/ORD C627.1-2008 UL Subject 1370-2010 Fogo Kilauea Revised May 26, 2011 Taal Designed especially for fireplace hearth 490, rue de
Motorized retractable awning
 Motorized retractable awning Model 95295 Set up And Operating Instructions Diagrams within this manual may not be drawn proportionally. Due to continuing improvements, actual product may differ slightly
SMART BIO-ETHANOL ELECTRONIC BURNER
 SMART BIO-ETHANOL ELECTRONIC BURNER User s Manual What s in the box: Smart Burner Remote Control AC Adapter Filling Hose User s Manual 1pc 1pc 1pc 1pc 1pc Preparations Remove all packaging materials prior
Safety instructions and warnings Package contents and parts Tool requirements Product features... 5
 Door Awning : PA Series Owner s Manual For safety reasons, please carefully read and understand all written instructions and warnings in this manual prior to assembling or installing this product. Table
The WoodGas Campstove By: Spenton LLC
 The WoodGas Campstove By: Instruction Manual IMPORTANT Please read this manual carefully before using this stove. Store this manual for future use. If you have any questions about the operation of this
Gavita Pro 1650 e LED ML
 Pro line Gavita Pro 1650 e LED ML 1 Introduction Thank you for purchasing the Gavita Pro 1650 e LED ML. This manual describes the mounting and installing of the product and also describes how to use the
Leica CE/ Leica CN. Knife holder
 Leica CE/ Leica CN Knife holder Instruction Manual Leica knife holder CE/ knife holder CN V2.2 English 08/2005 Always keep this manual near the instrument. Read carefully prior to operating the knife holders.
30m Foot Pedal Hose Reel
 30m Foot Pedal Hose Reel MODEL NO. HRF-300 OPERATING INSTRUCTIONS 0609 SPECIFICATIONS - MODEL NO. HRF-300 Hose Length: 30m + 2 metres Hose Diameter: 12mm (1/2 ) Hose Material: PVC Working Pressure: 150psi
Safety instructions and warnings Package contents and parts Tool requirements Product features... 4
 Door Awning : PN Series Owner s Manual For safety reasons, please carefully read and understand all written instructions and warnings in this manual prior to assembling or installing this product. Table
OREON GROW LIGHT 2.2
 OREON GROW LIGHT 2.2 (GL 600 2.2 XXX) INSTALLATION MANUAL Version: 20180830US/CA IMPORTANT: READ CAREFULLY BEFORE STARTING INSTALLING THE FIXTURE. KEEP FOR FUTURE REFERENCE. MANUAL FOR INSTALLER Thank
Operator's Manual. Model: RY10MK-PRO MPN: RA-MLT Gallon Direct Fire Melter Kettle Burner Model with Adjustable Flame-Out Valve
 Operator's Manual Model: RY10MK-PRO MPN: RA-MLT-0009 10 Gallon Direct Fire Melter Kettle Burner Model with Adjustable Flame-Out Valve U.S. Patent No. 9,739,021 For Technical Support Please Visit www.rynoworx.com
EB300. Ethanol Burner. User s Manual Installation Instructions
 EB300 Ethanol Burner User s Manual Installation Instructions EB300 Burner Burner Lid User s Manual What s in the box: 1pc 1pc 1pc Installation Instructions EB300 - User s Manual The Ignis Ethanol Burner
User Manual. 110 Cup (55 Cup Raw) Rice Cooker. Model: 177GRCLP, 177GRCNAT 10/2017. Please read and keep these instructions. Indoor use only.
 Rice Cooker. Model: 177GRCLP, 177GRCNAT 10/2017. Please read and keep these instructions. Indoor use only.") 110 Cup (55 Cup Raw) Rice Cooker Model: 177GRCLP, 177GRCNAT 10/2017 Please read and keep these instructions. Indoor use only. www.avantcoequipment.com 1 NOTE: Save these instructions for future reference.
110 Cup (55 Cup Raw) Rice Cooker Model: 177GRCLP, 177GRCNAT 10/2017 Please read and keep these instructions. Indoor use only. www.avantcoequipment.com 1 NOTE: Save these instructions for future reference.
12FT. x 12FT. Pop-Up Straight Leg Canopy. Owner s Manual
 12FT. x 12FT. Pop-Up Straight Leg Canopy Owner s Manual s WARNING: Read carefully and understand all ASSEMBLY AND OPERATION INSTRUCTIONS before operating. Failure to follow the safety rules and other basic
Romania Great Britain France Italia Polska
 Romania Numai pentru tarile membre UE Nu aruncati masinile electrice in gunoiul menajer! Conform directivei europene 2002/96/CE pentru masini electrice si electronice vechi corelata cu legislatia locala,
AIRAC AIP SUPPLEMENT 01/16. WORK in progress at BACĂU/George Enescu airport Phase I
 Headquarters 10. Ion Ionescu de la Brad Blvd., PO Box 1890 013813 Bucharest, Romania phone: (+4021) 208 31 00 fax: (+4021) 230 24 42 AFTN: LRBBRTYD email: romatsa.office@romatsa.ro www.romatsa.ro AIM Unit
1. INTRODUCTION GENERAL INFORMATION WORKING PRINCIPLE CUTTING SECTION SPECIFICATIONS INSTRUCTIONS FOR USE 5
 MK2000 User Guide What s in this guide 1. INTRODUCTION 3 1.1. GENERAL INFORMATION. 3 1.2. WORKING PRINCIPLE. 3 1.3. CUTTING SECTION.. 4 1.4. SPECIFICATIONS.. 5 2. INSTRUCTIONS FOR USE 5 2.1. UNPACKING
Air Mattress. Model No.: EAM-DQ1 & EAM DT1. Questions or Concerns? (855)
") Air Mattress Model No.: EAM-DQ1 & EAM DT1 Questions or Concerns? (855) 686-3835 support@etekcity.com Thank You. Thank you for purchasing the EAM-DQ1/EAM-DT1 Air Mattress by Etekcity. We are dedicated to
Air Mattress Model No.: EAM-DQ1 & EAM DT1 Questions or Concerns? (855) 686-3835 support@etekcity.com Thank You. Thank you for purchasing the EAM-DQ1/EAM-DT1 Air Mattress by Etekcity. We are dedicated to
The ULM CASE III Emergency Case. Description and instructions for use
 The ULM CASE III Emergency Case Description and instructions for use Contents 1. Overview.............................. 3 1.1 Special symbols on the device............ 4 2. Description.............................
Camping Chef Folding Elite Camping Chef Folding Compact Camping Chef Folding
 Camping Chef Folding Elite Camping Chef Folding Compact Camping Chef Folding WARNING FAILURE TO FOLLOW ALL WARNINGS AND INSTRUCTIONS IN THIS MANUAL COULD LEAD TO PERSONAL INJURY, INCLUDING DEATH. RETAIN
Sunjoy S-AW011-G Beauty-Mark Manual Retractable Awning -Green Strip Owner s Manual IMPORTANT
 Sunjoy S-AW011-G eauty-mark Manual Retractable Awning -Green Strip Owner s Manual IMPORTANT Thank you very much for choosing Sunjoy Group. Please take time to read these instructions thoroughly and follow
Laser Multipoint Verde-50mW Rosu-80mW Nr. Ref
 Laser Multipoint Verde-50mW Rosu-80mW Nr. Ref. 152.752 Manual de instructiuni Manual de utilizare Va multumim pentru achizitionarea produsului nostru, va rugam sa cititi cu atentie acest manual inainte
13401 Brooks Drive Baldwin Park, CA p f shademakerusa.com
 13401 Brooks Drive Baldwin Park, CA 91706 p 626.338.8810 f 626.338.8816 info@shademakerusa.com shademakerusa.com 2018 Shademaker. All rights reserved. SMOM-LIBRA-0718 W A R R A N T Y : Upon receipt of
Blue Series Hot Melt Hose with RediFlext II Hanger System
 Instruction Sheet P/N 1124594_01 Blue Series Hot Melt Hose with RediFlext II Hanger System Safety WARNING! Allow only personnel with appropriate training and experience to operate or service the equipment.
PLEASE READ BEFORE USE AND SAVE THESE INSTRUCTIONS
 Sauce Flip Pan PLEASE READ BEFORE USE AND SAVE THESE INSTRUCTIONS Thank you for purchasing Cook s Companion Sauce Flip Pan. This pan is designed to be one of the most used pans in your kitchen. The Fusion
Contents. Company Background FLOWSTOPPER Plugging Device Kit and Replacement Parts Key Features & Benefits... 4
 Contents Company Background... 2 FLOWSTOPPER Plugging Device Kit and Replacement Parts... 3 Key Features & Benefits... 4 Frequently Asked Questions... 5 Step by Step Instructions... 6 FLOWSTOPPER Warranty...
Sunjoy L-GZ933PST 12 X 10 Cabin-Style Soft Top Gazebo with Mosquito Netting. Owner s Manual IMPORTANT
 Sunjoy L-GZ933PST 12 X 10 Cabin-Style Soft Top Gazebo with Mosquito Netting Owner s Manual IMPORTANT Thank you very much for choosing Sunjoy Group. Please take time to read these instructions thoroughly
Cordless Electric Teakettle. Model 685
 Cordless Electric Teakettle Model 685 Important Safeguards When using electrical appliances, basic safety precautions should always be followed, including the following: 1. Read all instructions. 2. Do
For Outdoor Use Only!
 ITEM NAME: Red Ember 4 ft. Smokestack Rubbed Bronze Fireplace with Cover SKU: ALZ655-1 For Outdoor Use Only! 1. Improper installation, adjustment, alteration, service or maintenance can cause injury or
ACCENDA Instructions for use and safety
 ACCENDA Instructions for use and safety READ CAREFULLY BEFORE USE Please store these safety warnings in a safe place for future reference. NOTICE: BUYER ASSUMES ALL RESPONSIBILITY FOR SAFETY AND USE THAT
1 Pan - 6 Ways to Cook!
 1 Pan - 6 Ways to Cook! Broil Bake Sauté Fry Steam Braise To see our entire collection of Copper Chef products and all other available accessories, please visit: CopperChef.com *Only Use Non-Metallic Utensils
1 Pan - 6 Ways to Cook!
 1 Pan - 6 Ways to Cook! Broil Bake Sauté Fry Steam Braise To see our entire collection of Copper Chef products and all other available accessories, please visit: CopperChef.com *Only Use Nonmetallic Utensils
ROOFTOP CARGO BAG (FRONT OF VEHICLE) HOOK (x4) ATTACHMENT STRAP (x4)
 HOOK (x4) ATTACHMENT STRAP (x4)") CargoPack, DryTop, SoftTop ROOFTOP CARGO BAG Zipper Flap HOOK (x4) Grab handle ATTACHMENT STRAP (x4) (FRONT OF VEHICLE) Naked roof STRAP (2X) IMPORTANT WARNING IT IS CRITICAL THAT ALL YAKIMA RACKS AND
CargoPack, DryTop, SoftTop ROOFTOP CARGO BAG Zipper Flap HOOK (x4) Grab handle ATTACHMENT STRAP (x4) (FRONT OF VEHICLE) Naked roof STRAP (2X) IMPORTANT WARNING IT IS CRITICAL THAT ALL YAKIMA RACKS AND
Power Tripper Attachment for the. Share the Spark!
 Power Tripper Attachment for the Share the Spark! Becoming a Human Electrode by Using Your Power Tripper : Become a Human Electrode and watch how sparks will literally fly between you and your partner
Est A TRADITION OF EXCELLENCE INSTRUCTION BOOK.
 Est. 1887 A TRADITION OF EXCELLENCE INSTRUCTION BOOK www.wolseleygrooming.co.uk Stockshop (L.E.) Ltd., Lodge Trading Estate, Broadclyst, Exeter EX5 3BS Email: service@stockshop.co.uk Tel: 01392 460077
Apply for further information to the manufacturer, if you ve got additional questions after studying this manual.
 The given manual guide contains information about the design, operation principles, specifications and basic requirements providing accident-free operation and secure maintenance of the item Touristic
Mod. MONTANA WOOD BURNING STOVE USAGE AND MAINTENANCE INSTRUCTIONS
 Mod. MONTANA WOOD BURNING STOVE USAGE AND MAINTENANCE INSTRUCTIONS Nutrients Ashes Fertilizer Wood: an ecological fuel Wood is a renewable source of energy which answers the energy and environmental demands
INSTALLER AND OWNER GUIDE
 5118237/01 Model 0581901 Chester Log Effect Electric Stove This guide is intended to help you install and care for your Baxi Fires Division electric stove. Please read carefully before installing and using
Sunjoy L-GZ717PST-E Mirage Gazebo. Owner s Manual IMPORTANT
 Sunjoy L-GZ717PST-E Mirage Gazebo Owner s Manual IMPORTANT Thank you very much for choosing Sunjoy Industries. Please take time to read these instructions thoroughly and follow each step carefully for
LEGAL REQUIREMENTS FOR STORING AND TRANSPORTING FLAMMABLES AND CHEMICALS
 LEGAL REQUIREMENTS FOR STORING AND TRANSPORTING FLAMMABLES AND CHEMICALS SAFE STORAGE OF PETROL AND OTHER FLAMMABLE SUBSTANCES FIXED LOCATION Small quantities of dangerous goods can be found in most workplaces.
Congratulations! On the purchase of your Black & Decker saw.
 KS890GT Congratulations! On the purchase of your Black & Decker saw. To ensure the best results from your saw please read these safety and usage instructions carefully. If you have any questions or queries
OWNER S MANUAL. Item #14103
 TRI-BALL HITCH WITH CLEVIS OWNER S MANUAL WARNING: Read carefully and understand all INSTRUCTIONS before operating. Failure to follow the safety rules and other basic safety precautions may result in serious
For Outdoor Use Only!
 ITEM NAME: Red Ember Bronze Crossweave Firebowl Fire Pit with Free Cover and Fire Tool with Optional Grill Grate SKU: ALZ109 For Outdoor Use Only! 1. Improper installation, adjustment, alteration, service
DIAMOND TECH INTERNATIONAL Innovations For Creativity DIAMOND LASER BAND SAW OPERATIONS MANUAL
 SPEEDSTER-XL INSTRUCTION MANUAL DIAMOND TECH INTERNATIONAL Innovations For Creativity SPEEDSTER-XL DIAMOND LASER BAND SAW OPERATIONS MANUAL SPEEDSTER-XL INSTRUCTION MANUAL - PAGE 1 Before You Begin Read
BERYL Service Guide. Travel Adjust OTT Change
 BERYL Service Guide Travel Adjust OTT Change SERVICE OVERVIEW This manual will guide you step by step performing a travel adjust and OTT setting change to your Beryl suspension fork. Please follow each
Table of Contents. Safety... 2 Specifications... 4 Assembly Maintenance... 6 Parts List... 7 Warranty... 8
 Table of Contents Safety... Specifications... 4 Assembly... 4 Maintenance... 6 Parts List... 7 Warranty... 8 WARNING SYMBOLS AND DEFINITIONS This is the safety alert symbol. It is used to alert you to
Bevel Buddy Instruction Manual
 Bevel Buddy Instruction Manual We at Precision Sharpening Devices Inc. believe there are two very important steps in maximizing the savings this equipment can provide your company. First, use this manual
NOTICE: Once used, this shelter cannot be returned to the store. If you have a warranty claim, please contact Clam Corporation directly.
 Model No. - 8235 - p/n 108440 S p e c i f i c a t i o n s H e i g h t - 75 (24 packed) Width - 7 5 Depth - 144 (45 packed) W e i g h t 155 lbs. - Clam Customer Service Information - NOTICE: Once used,
MAX Series 9514 OPERATOR S MANUAL
 MAX Series 9514 OPERATOR S MANUAL Persons under age 18 are not permitted to operate or have accessibility to operate this equipment per U.S. Dept. Of Labor Employment Standards Administration Fact Sheet
Header Bikini Installation Instructions
 Header Bikini Installation Instructions For: Jeep Wrangler 1997-2002 Part Number: 52525 with or without Soundbar with or without Door Surround DO NOT INSTALL THIS PRODUCT ON ANY VEHICLE OTHER THAN THOSE
RCCK. Pivot Plug 2x. Sharp Screw 2x TAKE TIME - READ AND UNDERSTAND INSTRUCTIONS COMPLETELY!
 RCCK Revolution Cargo Conversion Kit Congratulations on your purchase of the BOB Revolution Cargo Conversion Kit (RCCK). It s designed to easily convert your existing BOB Revolution stroller frame into
Natural Himalayan Salt Lamp
 Model: Elora Natural Himalayan Salt Lamp Questions or Concerns? Please contact us Monday - Friday 9:00am - 5:00pm PST at (888) 726-8520 or email support@levoit.com Thank You. Thank you for purchasing your
BR B Bike Rack Instructions
 IMPORTANT NOTE: It is common that vehicles with lids and hatches have a single rear wiper. It is important that you make yourself aware that the wiper cannot be used while the rack is attached to the vehicle.
UTILIZAREA PRODUSELOR BENDER LA NAVE
 UTILIZAREA PRODUSELOR BENDER LA NAVE NAVY + comercial project Eagle Norway EDS470 Ferry boat Stena- Line Sweden HAMS Success Australia different frigates Royal Navy England EDS1000/470 HMS Southampton/type
S420 Barbecue Assembly Manual
 TM MC S420 Barbecue Assembly Manual 85-3062-2 (G45123) Propane 85-3063-0 (G45124) Natural Gas 1 YEAR LIMITED WARRANTY READ AND SAVE MANUAL FOR FUTURE REFERENCE. Assemble your grill immediately. Missing
Sunjoy D-DNC492PST 3-Seat Striped Adjustable Tilt Canopy. Wicker Metal Swing. Owner s Manual IMPORTANT
 Sunjoy D-DNC492PST 3-Seat Striped Adjustable Tilt Canopy Wicker Metal Swing Owner s Manual IMPORTANT Thank you very much for choosing Sunjoy Group. Please take time to read these instructions thoroughly
SHADING SYSTEMS WITH BACK PULL SYSTEM
 SHADING SYSTEMS WITH BACK PULL SYSTEM 800285_EN SHADING SYSTEMS WITH BACK PULL SYSTEM TABLE OF CONTENTS 1. BASIC INFORMATION...3 2. EXPLANATION OF THE NOTICES...3 3. VALIDITY...3 4. SAFETY...3 5. INTENDED
t420 Barbecue Assembly Manual
 t20 Barbecue Assembly Manual 85-300-2 (G510) Propane 85-3005-0 (G5105) Natural Gas 1 Year limited Warranty Read and save manual for future reference. If pre-assembled, leave this manual with unit for consumer
1612P MODEL 1612P SLICER MODEL EXECUTIVE OFFICES 701 RIDGE AVENUE TROY, OHIO FORM (4-95)
") 1612P MODEL 1612P SLICER MODEL 1612P ML-104587 EXECUTIVE OFFICES 701 RIDGE AVENUE TROY, OHIO 45374-0001 FORM 19370 (4-95) Installation, Operation, and Care of MODEL 1612P SLICER SAVE THESE INSTRUCTIONS
1612P MODEL 1612P SLICER MODEL 1612P ML-104587 EXECUTIVE OFFICES 701 RIDGE AVENUE TROY, OHIO 45374-0001 FORM 19370 (4-95) Installation, Operation, and Care of MODEL 1612P SLICER SAVE THESE INSTRUCTIONS
Anchor Family Product Manual for the Rifton Anchors
 Anchor Family Product Manual for the Rifton Anchors Contents Warnings and important information 3 Check your order 4 Anchors Hand Anchor 4 Wrist Anchor 4 Grab bar 4 Elbow Anchor 5 Horizontal Anchor 5 Arm
IAN HEAT GUN PHLG 2000 C2. HEAT GUN Operation and Safety Notes. PIŠTOLJ ZA VRUĆI ZRAK Upute za posluživanje i za Vašu sigurnost
 HEAT GUN PHLG 2000 C2 HEAT GUN Operation and Safety Notes PIŠTOLJ ZA VRUĆI ZRAK Upute za posluživanje i za Vašu sigurnost SUFLANTĂ AER CALD Instrucţiuni de utilizare şi de siguranţă В ПИСТОЛЕТ ЗА ГОРЕЩ
Dry Stove Installation Guide BK545. November 2012 Rev02. EN 13240:2001+ Amd. A2:2004
 Dry Stove Installation Guide BK545 EN 13240:2001+ Amd. A2:2004 November 2012 Rev02 Please read carefully through this installation guide before proceeding with installation of the stove. Should you have
PATRIOT INSTRUCTION MANUAL SL300C 12 MEAT SLICER 1/2 HP
 INSTRUCTION MANUAL SL300C 12 MEAT SLICER 1/2 HP This manual contains important information regarding your Patriot unit. Please read this manual thoroughly prior to equipment set-up, operation and maintenance.
OWNER S MANUAL 10x10 SUN SHELTER WITH NETTING
 OWNER S MANUAL 10x10 SUN SHELTER WITH NETTING L-GZ512PST-C 299-4560-2 IMPORTANT: Please read and follow all safety statements, warnings, assembly instructions, use & care directions before attempting to
Operating Instructions
 Operating Instructions SD13035 OLP SD13050 OMP SD14005 OVP SD13050 OLP SD13000 OMP FSD13035 OLP SD13000 OLP SD13035 OVP FSD13050 OLP SD14035 OLP SD13050 OVP FSD13000 OLP SD14050 OLP SD13000 OVP FSD14035
CERO Instructions for use and safety
 CERO Instructions for use and safety READ CAREFULLY BEFORE USE Please store these safety warnings in a safe place for future reference. NOTICE: BUYER ASSUMES ALL RESPONSIBILITY FOR SAFETY AND USE THAT