Mazdaspeed6 Stage 1 Location 2 OCC Kit Install guide
|
|
|
- Kelly Hubbard
- 5 years ago
- Views:
Transcription
1 1 Mazdaspeed6 Stage 1 Location 2 OCC Kit Install guide WARNING: By installing this Product, you understand that: The buyer/user assumes all risk as to quality, performance and use of these products and agrees to hold DD2, Inc. DBA Damond Motorsports ( DM ) and its representatives not responsible for any injury, loss, or damage; including any and all incidental or consequential damages arising from the sale, installation, or use of our products. Many parts are intended for OFF ROAD and RACING applications only. It is suggested that State and Federal emission regulation be checked, to see whether or not this product complies with those laws. Read through the instruction guide thoroughly, before attempting this install. Do not install any components while the engine is running or shortly after the car has been running. Give the car some time to cool down. Failure to install this product correctly, or failure to remove/reinstall existing components correctly, could result in poor running conditions, or even component and engine failure, which the sole user of this product is responsible for. The install instructions are intended to guide you on how to install this product properly. Only an experienced mechanic should perform this install. In addition, DM, and its representatives reserve the right to modify and or discontinue parts without notice. If you the user/buyer of this product do not agree with the above, contact DM immediately, to discuss a possible return of our product for a full refund minus shipping costs, and other fees.
2 2 Here s a simple diagram of how the kit is to be installed: OCC kit contents: 1 x Damond Motorsports 5/8 ports Oil Catch Can, preassembled with drain valve and plug (VTA kit if optioned) 1 x check valve, preassembled, may be installed on hoses 3 x pre-cut 5/8 hoses 4 x hose clamps 1 x OCC mounting bracket 2 x 10mm mounting bracket bolts 1 x 13mm mounting bracket bolt 1 x plastic drain valve fitting 1 x short 3/8 drain hose 5 x zip ties Tools required/purpose: -Jack and jackstands, lift, or ramps/to lift the car -Socket wrench: -13mm socket/attach OCC bracket to transmission -10mm socket/remove undertray, attach bracket to OCC -7mm socket or flathead screw driver/tighten hose clamps -Various assortment of pliers, 15 long locking pliers recommended (Harbor Freight item#97609)/to work with the factory hose clamps

3 3 Step 1, unbox/assemble: Begin by unboxing your Damond Motorsports OCC kit, and ensure all previously listed included items are accounted for. If something is missing, please contact us via or call With the provided bracket and the 10mm bolt, attach the bracket to the Damond Motorsports OCC, as shown. Tighten to less than 100 lbs/in or 10Nm Step 2, prep the car: Safely lift the front of the car in the air, via ramps, a lift, or jack and jack stands (refer to the owner s manual for the proper jack points). Disconnect the negative lead from the battery. You ll be working around the starter, so you ll want to be sure to do this. Remove factory air box assembly, and set it aside. (If you have a Short Ram Intake, it helps to remove the filter, if you have a Cold Air Intake you do not need to touch it). Use a 10mm socket to loosen the hose clamp on the accordion hose at the air box. Next, unplug the MAF sensor. Remove the accordion tube off the air box, and pull up on the air box to release it from the rubber mounts. Use a 12mm socket to remove the lower air box mount. Remove the engine undertray bolts, if equipped, and remove the untertray.

4 4 Step 3, locate and remove factory hose: Locate the factory PCV hose, it runs from the intake manifold to the PCV valve, underneath and behind the intake manifold.

5 5 This is the tricky part, with your pliers, move the factory hose clamps off the intake manifold port and PCV valve ports, by squeezing the clamps open and sliding them towards the middle of the hose. The PCV valve clamp is a bit harder to access than the intake manifold clamp, and may take some time, but can be moved. Long locking pliers (we use a 15 long, Harbor Freight item#97609), are perfect for opening the clamps and then sliding them off the ports. Another option is squeezing the clamp open with your fingers and wiggling it off, but it can be straining to do so.


6 6 Now that the clamps are slid from the intake manifold port and PCV valve, you can remove the factory hose. First remove it from the manifold, then the PCV valve. Be careful when removing it from the PCV valve, the valve is plastic, and it could break if you re not careful. Gently twist the hose around, and wiggle it back and forth, to get it off the manifold and PCV valve. The PCV valve is the green thing you see in this pic. Step 4, prep the hose clamps: Now with the factory PCV hose off, remove the factory hose clamps from the hose. Use a couple of the provided zip ties, as to secure the factory hose clamp ends closer together, making the clamp fit loosely on the new hose. Just squeeze the very end of the clamp tabs with your pliers, and wrap the zip tie around the clamp tabs, this keeps the clamp secured open, and makes this job ten times easier.

7 7 Step 5, connect new PCV hose: Install the new pre-cut hose on the PCV valve; it is the hose WITHOUT the check valve. Turn the PCV valve so that it is aiming towards the manifold port, this way there s more clearance around the valve to get the hose on easier. Use a little bit of oil to lubricate the inside of the hose, and work it up to the PCV valve, on the left of the dip stick tube and wiring harnesses. Once at the PCV valve, work the hose onto the PCV valve with one hand, and twist the hose with the other hand. The twisting of the hose, works to further seat the hose onto the PCV valve. The best way to tell that the hose is fully seated, is to visually inspect and feel where the hose meets the PCV valve. The PCV valve itself has a 45 angle on its backside, where the hose can be felt if it has reached that point.
. With the clamp on the port, remove the zip tie to expand the clamp, securing the hose to the PCV valve.")
8 8 With the hose fully seated on the PCV valve, use one of the factory hose clamps from earlier, slide it up the hose, to where it s on the PCV valve port (about ¼ away from the end of the hose). With the clamp on the port, remove the zip tie to expand the clamp, securing the hose to the PCV valve.


9 9 With the hose now secured to the PCV valve, route the hose to the other side of the dip stick tube and above the starter wires and wiring harness. Begin with bending the other end of the hose up to where the hose will need to be routed. Follow the pictures below to see how the routing is done.


10 10 When the hose is over the wiring, reach up to the PCV valve with one hand and hold the end of the routed hose with the other hand. Turn the PCV valve so that it points forward; slightly towards the right, do this by using one hand to turn the valve by moving the hose that goes into it under the manifold and over to the right and the other hand gently pulling on the hose. Remember to not apply too much pressure on or around the PCV valve while doing this, as it is plastic and fragile.


11 11 Step 6, route and connect new intake manifold hose: Install the hoses with the check valve onto the intake manifold port; the small 2 hose length is what attaches to the manifold. With a little bit of oil, lube up the inside and loosely take one of the factory hose clamps and place it over the small hose. Work the hose up to the intake manifold by going over the engine oil cooler and filter housing, underneath the starter wires and harness, and push/twist it firmly onto the port. The hose is fully seated when it is fully covering the port. Move the factory hose clamp that it is past the manifold port barb (about ½ away from the end of the hose), and remove the zip tie to expand the clamp, securing the hose to the intake manifold.
12 12

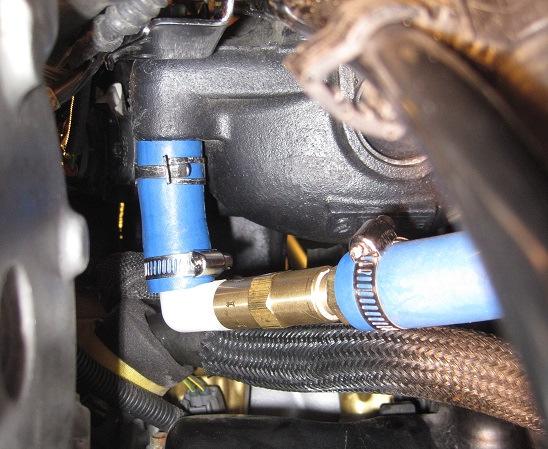
13 13 Step 7, connect hose to OCC: With the hoses are routed, near to where the OCC will be mounted, attach them to the OCC and secure them with the provided hose clamps. Apply a little bit of oil on the OCC hose ports, to make attaching the hoses easier. Begin with the PCV hose, slide the hose clamp onto the hose and attach it to the lower OCC port. The hose coming from the intake manifold then attaches to the top OCC port. The clamps should be tightened on the hoses, right behind the raised edge on the OCC ports. Note: The hoses will cross over one another when attached; be sure to follow the pictures below, for how/where the hoses cross over. Here you see the PCV hose goes on the outside and underneath of the intake manifold hose, before connecting onto the OCC.

14 14 Step 8, mount the OCC: Now with it all together, mount up the OCC to the frame with the provided bracket and bolt. Position the OCC up to the frame, and secure it using the provided 13mm bolt. Tighten to 100 lbs/in or 10Nm

15 15 Note: If you re installing with a factory intake, reinstall the lower intake bracket, over the OCC bracket, and use one of the factory bolts:

16 16 Step 9, check the system for leaks: With the OCC kit now installed, start the vehicle and check for leaks. You ll want to listen for an air hiss or whistle around the hose connections. The idle may surge if there is a leak as well. If a leak is detected, follow the previous steps to re-secure the hoses. Step 10 optional, drain barb and hose: Each MS6 Stage 1 Location 2 kit comes with a drain barb and hose, which you can decide whether or not to install, to make draining easier. Simply screw in the provided plastic hose barb connector into the OCC drain valve. Congrats on the install! You are finished! We hope you enjoy the Damond Motorsports OCC kit, and all the benefits it provides!

17 17 Draining the Damond Motorsports OCC: The DM OCC comes with an easy to operate ball valve drain valve. With the lever horizontal the valve is closed. With the lever pointed vertically down the valve is open. When it comes to draining your OCC, place a container underneath the drain and open the valve. Dispose of the fluids as you would with engine oil; it is safe to add to your used oil containers. Check with local laws for proper oil disposal. Most automotive shops and quick lube places will take used motor oil at no cost to you. Draining intervals can depend on many variables, climate, how the car is used/driven and for how long. We recommend draining the OCC and measuring its contents for 3,000 miles, at 1,000 mile intervals. Once you know how much is coming out every 1k, you should be able to gauge on how often you ll need to drain the OCC. We generally recommend 3k intervals in temps above 40F and/or if the car is driven hard or for extended periods of time, 1k intervals in temps below 40F and/or if the car is primarily used for short trips.
Mazdaspeed Version 1 Oil Catch Can Kit Install Guide
 Mazdaspeed 3 2010+ Version 1 Oil Catch Can Kit Install Guide 1 WARNING: By installing this Product, you understand that: The buyer/user assumes all risk as to quality, performance and use of these products
CP V3 Air/Oil Separator WRX / STi. S0699 Install Instructions. Parts List
 CP V3 Air/Oil Separator 2008-2014 WRX / 2008+ STi S0699 Install Instructions Parts List Item # Qty Description Sent Rcvd S0701 1 Air/Oil Separator Unit for 08-14 WRX/08+ STi H0470 40 3/8 PVC Hose: to port
TITAN Fuel Tanks. INSTALLATION INSTRUCTIONS G e n e r a t i o n V
 TITAN pt. no.: 02 0000 0128 Important: Please read these instructions carefully and completely before starting the installation. TITAN Fuel Tanks INSTALLATION INSTRUCTIONS G e n e r a t i o n V Extended
INSTRUCTION MANUAL ALEKO RETRACTABLE AWNING
 INSTRUCTION MANUAL for ALEKO RETRACTABLE AWNING www.alekoproducts.com FAILURE TO FOLLOW THESE INSTRUCTIONS MAY RESULT IN PERSONAL INJURY! 1 Important Safety Precautions WARNING NOTE: FOR PERSONAL SAFETY,
Blue Series Hot Melt Hose with RediFlext II Hanger System
 Instruction Sheet P/N 1124594_01 Blue Series Hot Melt Hose with RediFlext II Hanger System Safety WARNING! Allow only personnel with appropriate training and experience to operate or service the equipment.
Otter Pro X-Over Lodge Installation and Set-Up Instructions
 Otter Pro X-Over Lodge Installation and Set-Up Instructions Otter Pro X-Over Lodge Fits Magnum Otter II & Pro Sled Only Parts Identification and Check List MODEL NUMBERS: Complete Pkg Pro X-Over Lodge
Otter Pro XT Cabin Installation and Set-Up Instructions
 Otter Pro XT Cabin Installation and Set-Up Instructions Otter Pro XT Cabin Fits Medium Otter Pro and Otter II Sled Only Parts Identification and Check List MODEL NUMBERS: Complete Pkg Pro XT Thermal Cabin
Roller Bar End Cap (w/round Drive Shaft) Replacement Instructions for Vista and Motorized Awnings * Helpers needed *
 Replacement Instructions for Vista and Motorized Awnings * Helpers needed *") RETRACTABLE AWNINGS For Technical Support visit us at www.sunsetter.com/ownerscorner or Call Toll Free 800-670-7071 Fax 877-224-4944 Roller Bar End Cap (w/round Drive Shaft) Replacement Instructions for
RETRACTABLE AWNINGS For Technical Support visit us at www.sunsetter.com/ownerscorner or Call Toll Free 800-670-7071 Fax 877-224-4944 Roller Bar End Cap (w/round Drive Shaft) Replacement Instructions for
BERYL Service Guide. Travel Adjust OTT Change
 BERYL Service Guide Travel Adjust OTT Change SERVICE OVERVIEW This manual will guide you step by step performing a travel adjust and OTT setting change to your Beryl suspension fork. Please follow each
Installation and User s Manual 12 x 10 MOTORIZED AWNING
 12 x 10 MOTORIZED AWNING Installation and User s Manual 12 x 10 MOTORIZED AWNING 088-1763-0 Stop Please read and understand this manual before any assembly or use of this product. Before beginning assembly
Primrose Awnings - Full Cassette Manual & Electric Instructions
 Primrose Awnings - Full Cassette Manual & Electric Instructions Contents Warning 2.0m - 3.5m Awnings 8 x Expansion bolts ** 2 x brackets 1 x Awning 1 x Winder 4.0m - 5.0m Awnings 12 x Expansion bolts **
TC36 CHALET BURNER KIT INSTALLATION INSTRUCTIONS
 INSTALLER: Leave this manual with the appliance. CONSUMER: Retain this manual for future reference. These instructions are supplementary to the Installation and Operating Instructions supplied with the
INFRARED BURNER KIT INSTRUCTIONS
 6 4 3 2 INFRARED BURNER KIT INSTRUCTIONS 1 Model # 3049 (A790, A660, & A530) Model # 3051 (A540, & A430) Included parts 5 NOTE: This unit has been retrofi tted with an infrared burner. PARTS INCLUDED 1.
GoBidet Bidet Attachment
 GoBidet Bidet Attachment 151 Ruths Place #5 Sequim, WA 98382 Tel 1-800-681-0753 Fax +1 360-681-4029 www.go-bidet.com MODEL #2003C In this box: 1 User Manual 1 GoBidet Unit w/ mounting bracket, nut, rubber
Auxiliary 63.5l Fuel Tank Ford/Mazda Pick-up Truck 2012-Current READ ME! IMPORTANT WARNING!
 Auxiliary 63.5l Fuel Tank Ford/Mazda Pick-up Truck 2012-Current ENG FTFM006 90 min READ ME! Thank you for purchasing a Front Runner Ford/Mazda Pick-Up Truck 2012 - Current Fuel Tank. Before you start,
Kontrol Kube Advanced Owners Manual
 Mobile Containment. Simplified. TM Kontrol Kube Advanced Owners Manual KONTROL KUBE www.kontrolkube.com 800.343755 1 IMPORTANT SAFETY INFORMATION SAVE THESE INSTRUCTIONS. CAREFULLY READ AND FOLLOW THESE
RETRACTABLE AWNING w/ OPTIONAL HOOD ASSEMBLY INSTRUCTIONS
 Contact us @ (800)851-0865 RETRACTABLE AWNING w/ OPTIONAL HOOD ASSEMBLY INSTRUCTIONS Congratulations on your purchase of a new retractable awning. With proper installation this awning will provide years
ALEKO Victoria Series Retractable Awning Instructions for Installation and Operation
 www.alekoproducts.com ALEKO Victoria Series Retractable Awning Instructions for Installation and Operation PLEASE DO NOT RETURN THIS PRODUCT TO THE STORE! The owner s manual includes assembly and operating
TC36 CHALET II BURNER KIT INSTALLATION INSTRUCTIONS
 INSTALLER: Leave this manual with the appliance. CONSUMER: Retain this manual for future reference. These instructions are supplementary to the Installation and Operating Instructions supplied with the
Instructional Booklet
 Instructional Booklet 936-894-3292 Thank you for choosing The Bathmaster! You are on your way to creating an unmatched bathing experience both for you and the lucky animal. The Bathmaster is designed to
LP/High Altitude LP/High Altitude Natural Gas Conversion Kit For United States Installations
 LP/High Altitude LP/High Altitude Natural Gas Conversion Kit For United States Installations Installation Instructions For Model Series G Furnaces, P(G,N) Gas/Electric Appliances, and R Gas/Electric Appliances
TCWS.38NG03.C BLACK DIAMOND BURNER KIT INSTRUCTIONS
 IMPORTANT: THESE INSTRUCTIONS ARE TO REMAIN WITH THE HOMEOWNER These instructions are supplementary to the Installation and Operating Instructions supplied with the fireplace and should be kept together.
Installation Instructions
 Installation Instructions D-Series Mast Adaption Kits for Internal Reeving This sheet describes the installation of Adaption Kits to provide a high termination for Lift Tek D-Series Masts. The Kits are
Wenger Corporation 2014 Printed in USA 05/14 Part #049B015-09
 Assembly Instructions Tuba Tamer Contents Important User Information...........................2 Replacemant Parts List..............................3 Assembly.........................................4
Product instruction manual Ream Cutting Systems RE3943, RE3946, RE3947, RE3971, RE3952E
 Product instruction manual Ream Cutting Systems RE3943, RE3946, RE3947, RE3971, RE3952E The Trimfast Ream Cutters are reliable, high performance cutters that will give you the results you need quickly
Instructions for Installation and Operation
 www.alekoproducts.com ALEKO Victoria Series Retractable Awning Instructions for Installation and Operation PLEASE DO NOT RETURN THIS PRODUCT TO THE STORE! The owner s manual includes assembly and operating
Installation Guide. Single-Control Kitchen Sink Faucets
 Installation Guide Single-Control Kitchen Sink Faucets K-6352 K-6353 M product numbers are for Mexico (i.e. K-12345M) Los números de productos seguidos de M corresponden a México (Ej. K-12345M) Français,
Mishimoto Direct Fit Coolant Expansion Tank All (EcoBoost install)
") Mishimoto Direct Fit Coolant Expansion Tank 15-16 All (EcoBoost install) Note: Mishimoto has an installation video (here) that explains it in 3 minutes. While the video provides a decent overview, the
Mishimoto Direct Fit Coolant Expansion Tank 15-16 All (EcoBoost install) Note: Mishimoto has an installation video (here) that explains it in 3 minutes. While the video provides a decent overview, the
TC30 HEARTWOOD BURNER INSTALLATION INSTRUCTIONS
 INSTALLER: Leave this manual with the appliance. CONSUMER: Retain this manual for future reference. These instructions are supplementary to the Installation and Operating Instructions supplied with the
Auto Rewind Hose Reel 10M / 20M / 30M Models
 Auto Rewind Hose Reel 10M / 20M / 30M Models Instruction Manual 10M / 20M / 30M Auto Rewind Hose Reel Installation, Hose Replacement and Troubleshooting Guide Product Codes: 1110H / 1120H / 1130H Models
Optional Controls (Depends which set was purchased) Set A (Remote control kit)
 Set A (Remote control kit)") Primrose Awnings - Full Cassette Manual & Electric Instructions Contents Warning 1.5m - 3.5m Awnings 8 x Expansion bolts ** 2 x brackets 1 x Awning 1 x Winder 4.0m - 5.0m Awnings 12 x Expansion bolts **
Primrose Awnings - Full Cassette Manual & Electric Instructions Contents Warning 1.5m - 3.5m Awnings 8 x Expansion bolts ** 2 x brackets 1 x Awning 1 x Winder 4.0m - 5.0m Awnings 12 x Expansion bolts **
Contents. Awnings USA - Full Protective Hood Manual Instructions ft 11" - 11ft 6" Awnings
 Awnings USA - Full Protective Hood Manual Instructions Contents Warning We recommend that two or more people are required to lift the awning into place. 4ft 11" - 11ft 6" Awnings 8 x Expansion bolts **
Genesis. Side Burner Accessory Installation. Step 3. Step 1. Step 2. For use with Genesis Gas Barbecues Only
 Genesis Side Burner Accessory Installation For use with Genesis Gas Barbecues Only Step 1 WARNING: All gas controls and supply valves should be in the OFF position. You will need: Side burner assembly
Urea/Adblue Hose Reel
 www.scintex.com.au sales@scintex.com.au Model: SHR3408 Urea/Adblue Hose Reel Product Manual Specifications Spring driven drum: for automatic rewind. Locking ratchet: to maintain the desired length of hose
IMPORTANT OWNER-OPERATOR INSTALLATION INSTRUCTIONS C2204A
 IMPORTANT OWNER-OPERATOR INSTALLATION INSTRUCTIONS C2204A Warnings Truck Bed and Camper Protection Torklift does not recommend installing your camper on top of a plastic bed liner (or other compressible
Primrose Awnings Full Cassette Manual & Electric Instructions
 Primrose Awnings Full Cassette Manual & Electric Instructions Contents for Full Cassette Awning 1 x Remote control receiver box 2 x Remote hand-held zappers 1 x 5 metre cable 1 x Template sticker **The
300 ft. 5/8 Hose wagon
 300 ft. 5/8 Hose wagon Model 95956 Assembly And Operation Instructions Due to continuing improvements, actual product may differ slightly from the product described herein. (Garden hose is not included).
TUBULAR BURNER CONVERSION KIT AGCK-TBXX / AECK-UBXX
 TUBULAR BURNER CONVERSION KIT AGCK-TBXX / AECK-UBXX IMPORTANT - READ ALL INSTRUCTIONS BEFORE YOU BEGIN THE INSTRUCTIONS HEREIN SHOULD BE PERFORMED BY A QUALIFIED SERVICE TECHNICIAN. THE GRILL MUST BE COMPLETELY
TC42 CHALET II BURNER KIT INSTALLATION INSTRUCTIONS
 INSTALLER: Leave this manual with the appliance. CONSUMER: Retain this manual for future reference. These instructions are supplementary to the Installation and Operating Instructions supplied with the
INSTALLATION INSTRUCTIONS
 INSTALLATION INSTRUCTIONS Pictures in this manual are shown with the optional visual display indicator installed on the filter. BLUE FLAME & BLUE FLAME II MAXX LP FILTER KIT (423-375-001A) SHIVVERS SHIVVERS
Tools. For safety and easy faucet replacement, San-Ei recommends the use of the following helpful tools:
 BW-0BH INSTALLATION INSTRUCTIONS SINGLE HANDLE Kitchen Faucet Tools For safety and easy faucet replacement, San-Ei recommends the use of the following helpful tools: SAFETY GLASSES PIPE WRENCH PLIERS CHANNEL
Motorized Oasis Awning RTS Motor Cord Replacement Instructions *Helpers Needed*
 RETRACTABLE AWNINGS For Technical Support visit us at www.sunsetter.com/ownerscorner or Call Toll Free 800-670-7071 Fax 877-224-4944 Motorized Oasis Awning RTS Motor Cord Replacement Instructions *Helpers
CRD120SC TUBING CUTTER
 CRD120SC TUBING CUTTER OPERATIONS MANUAL 1 VERSION 2.1 LAST EDITED 05.01.2018 cleanroomdevices.com Table of Contents Table of Contents....2 1.0 General Product & Safety Information... 3 1.1 Product Information
TC42 CHALET BURNER KIT INSTALLATION INSTRUCTIONS
 INSTALLER: Leave this manual with the appliance. CONSUMER: Retain this manual for future reference. These instructions are supplementary to the Installation and Operating Instructions supplied with the
Service Bulletin HHXDF5 Mechanical Ride-On Trowels LPG Hose Replacement
 Service Bulletin HHXDF5 Mechanical Ride-On Trowels LPG Hose Replacement Product Group: Date Issued: Service Bulletin No. Ride-On Trowels Bulletin Type X Mandatory 2/6/6 TR20622 Models/Series Affected:
User s Manual Trampoline 8
 User s Manual Trampoline 8 Model! WARNING Read all precautions and instructions in this manual before using this equipment. Save this manual for future reference. Maximum user weight 17 lbs. ASSEMBLY IMPORTANT
COOPER FREESTANDING TUB FAUCET INSTALLATION
 SKU(s): 940972 COOPER FREESTANDING TUB FAUCET INSTALLATION BEFORE YOU BEGIN We recommend consulting a professional if you are unfamiliar with installing plumbing fixtures. Signature Hardware accepts no
Gas Conversion Kits and Instructions
 Gas Conversion Kits and Instructions INSTALLATION FORM RGM 432/433-GC (Version D.1) Obsoletes Form RGM 432/433-GC (Version D) APPLIES TO: Model FT and Model SFT All gas conversion must be done by a qualified
WIDESPREAD LAVATORY MODELS WITH HI-ARC SPOUT
 5951, 5961, 5981, 5983, 5993 SERIES MT122B INSTALLATION INSTRUCTIONS THESE INSTRUCTIONS MUST BE LEFT WITH HOMEOWNER WIDESPREAD LAVATORY MODELS WITH HI-ARC TRADITIONAL CROSS NOTE: Handle Inserts are not
Safety instructions and warnings Package contents and parts Tool requirements Product features... 5
 Door Awning : PA Series Owner s Manual For safety reasons, please carefully read and understand all written instructions and warnings in this manual prior to assembling or installing this product. Table
ASSEMBLY GUIDE. Customer Service: INCH² 2-BURNER & 864 INCH² 2-BURNER
 ASSEMBLY GUIDE 688 INCH² 2-BURNER & 864 INCH² 2-BURNER DANGER If you smell gas: 1. Shut off gas to the appliance. 2. Extinguish any open flames. 3. Open lid. 4. If odor continues, keep away from the appliance
Safety instructions and warnings Package contents and parts Tool requirements Product features... 4
 Door Awning : PN Series Owner s Manual For safety reasons, please carefully read and understand all written instructions and warnings in this manual prior to assembling or installing this product. Table
Installation Guide. LPKPDR - Universal LP Conversion Kit for Professional & Designer Ranges/Rangetops. Viking Range, LLC.
 Installation Guide Viking Range, LLC 111 Front Street Greenwood, Mississippi 38930 USA (662) 455-1200 For product information, call 1-888-845-4641 LPKPDR - Universal LP Conversion Kit for Professional
HARD DOOR UPGRADE KIT
 RV Accessories OWNER'S MANUAL HARD DOOR UPGRADE KIT FOR ADD-A-ROOM & BREEZEWAY SCREEN ROOMS THIS MANUAL SUPPLEMENTS THE ADD-A-ROOM INSTRUCTIONS TABLE OF CONTENTS First Time Assembly... 2 Assembling the
Cleaning Fireside Franklin Pilot Orifice
 Cleaning Fireside Franklin Pilot Orifice Please read all the instructions before beginning the procedure. Confirm that you have all the necessary tools and materials. If you have any questions technical
Replacement of External Pipe Assembly on PFS December 21, 2014
 Replacement of External Pipe Assembly on PFS December 21, 2014 The pipe assembly shown in Figure 1 is currently attached to the wooden shelf on PFS. It is covered with foam that acts as insulation. There
APPENDIX A LIGHT SOURCE
 APPENDIX A LIGHT SOURCE GASOLINE LANTERN One source of artificial light for the field kitchen is the gasoline lantern (NSN 6260-00-170-0430). It is a one-mantle lantern with a heat-resistant globe or globe
BowDown. MiniMuM Crossbar spread 24 (61CM) Steel Hook (2X) Buckle Strap (2X) Plastic Tube (2X) Plain Strap (2X) SHORT BLACK T-BOLT (2x) BOWDOWN (2x)
 Steel Hook (2X) Buckle Strap (2X) Plastic Tube (2X) Plain Strap (2X) SHORT BLACK T-BOLT (2x) BOWDOWN (2x)") BowDown MiniMuM Crossbar spread 24 (61CM) Heavy Duty strap (2x) SHORT BLACK T-BOLT (2x) BOWDOWN (2x) Bow Stern Tie Down Buckle Strap (2X) Plastic Tube (2X) Plain Strap (2X) Steel Hook (2X) IMPORTANT WARNING
BowDown MiniMuM Crossbar spread 24 (61CM) Heavy Duty strap (2x) SHORT BLACK T-BOLT (2x) BOWDOWN (2x) Bow Stern Tie Down Buckle Strap (2X) Plastic Tube (2X) Plain Strap (2X) Steel Hook (2X) IMPORTANT WARNING
Installation Instructions for Wall Mount, Deck Mount and Pre-rinse Faucets
 Installation Instructions for Wall Mount, Deck Mount and Pre-rinse Faucets SAVE FOR END USER ELKAY 2222 CAMDEN COURT OAK BROOK, IL 60523 USA WALL MOUNT ASSEMBLY General Instructions Turn off the water
NEWMAR SERVICE SCHOOL
 NEWMAR SERVICE SCHOOL TRAINING INFORMATION GUIDELINE FOR FEBRUARY 2013 OUR PRODUCTS: NOVA DUAL PITCH AWNING G-2000/ G-1500 2 P a g e G-2085 G-5000 3 P a g e G-LINKS 4 P a g e NOVA/ G-2000/ G-1500 BASIC
Advantage Plus TIM-3600 Series Reel
 Read the following precautions and instructions before you begin assembly or using. Failure to comply with these instructions could result in personal injury or property damage. Keep these instructions
HANDLE AND WHEEL KIT INSTALLATION
 HANDLE AND WHEEL KIT INSTALLATION Select EB and EM Series Generators Honda Power Equipment Your generator is equipped with a wheel kit and folding handle kit for easy transport and convenient storage.
Safety. BBA Compliance Kit Multi-Pro 5800 Turf Sprayer Model No Installation Instructions
 BBA Compliance Kit Multi-Pro 5800 Turf Sprayer Model No. 41617 Note: Determine the left and right sides of the machine from the normal operating position. The BBA Compliance Kit is designed to meet German
Important! Read all of these instructions before assembling or riding the glider. For questions or help please call Glide Bikes at
 Go Glider Manual Congratulations on your purchase of the Go Glider! Your glider is designed for years of nearly carefree use by your child. These instructions include how to set up your glider and maintenance
Brooks Fire Pit Table. Installation Instructions for Brooks Fire Pit Table BRK-1224
 Brooks Fire Pit Table Installation Instructions for Brooks Fire Pit Table BRK-1224 1 IMPORTANT Contents Please consult your Crystal Fire instruction manual for detailed instructions Required and important
TC36 SEE-THRU LODGEWOOD BURNER AND PANEL KIT INSTRUCTIONS
 IMPORTANT: THESE INSTRUCTIONS ARE TO REMAIN WITH THE HOMEOWNER These instructions are supplementary to the Installation and Operating Instructions supplied with the fi replace and should be kept together.
SlimShady CONTENTS. SlimShady (1X) Tools Required: nut (4X) stake (2X) bolt (4X) wrench (1X) washer (4X) clamps (2X) stake sack (1X) key (2X)
 Tools Required: nut (4X) stake (2X) bolt (4X) wrench (1X) washer (4X) clamps (2X) stake sack (1X) key (2X)") SlimShady Tools Required: CONTENTS nut (4X) stake (2X) stake sack (1X) bolt (4X) wrench (1X) washer (4X) key (2X) SlimShady (1X) clamps (2X) 1 ASSEMBLE & INSTALL Be sure the awning is oriented correctly
SlimShady Tools Required: CONTENTS nut (4X) stake (2X) stake sack (1X) bolt (4X) wrench (1X) washer (4X) key (2X) SlimShady (1X) clamps (2X) 1 ASSEMBLE & INSTALL Be sure the awning is oriented correctly
FLEX KEY ASSEMBLY. ..._ o RAFTER ARM TUBE MAIN ARM TUBE CAP NUT CLAW HINGE
 ZIP DEE Inc. 96 Crossen Ave. Elk Grove Village, IL 60007(847)437-0980 (800)338-2378 HEAD CASTING AWNING RAIL FLEX KEY ASSEMBLY..._ o GM1 Installation Instruction GMC Motorhome RAFTER ARM TUBE MAIN ARM
LBH18BPK. Instruction Sheet
 LBH18BPK Instruction Sheet Included: 1. Backpack (includes belt and pouch) 2. Bottle and Hose Attachment Assembly 3. 1 each disposable 1.5 gallon Chemical Storage Bag 4. 1 each 1.5 gallon Warm Water Cleanout
Stonefire Fire Pit Table. Installation Instructions for SF-32-K
 Stonefire Fire Pit Table Installation Instructions for SF-32-K / 1 2 IMPORTANT Please consult your Crystal Fire instruction manual for detailed instructions and important information related to the burner
DO NOT use Alien Flier Zip Line Products until you have read and fully understand the SAFETY WARNINGS below!
 SAFETY WARNING DO NOT use Alien Flier Zip Line Products until you have read and fully understand the SAFETY WARNINGS below! Assumption of Risk Zip line construction and use can be dangerous. Ensure you
D3107/ FMT09DGRO6.5 REAR TIEDOWNS W/ FACTORY INSTALLED RECEIVER APPLICATION FITS
 D3107/ FMT09DGRO6.5 REAR TIEDOWNS W/ FACTORY INSTALLED RECEIVER APPLICATION FITS Minor movement (or settling) can occur in some incidental harsh driving conditions (on or off road). A rubber bed mat is
ZL1 Camaro Intercooler Fluid Reservoir Kit
 ZL1 Camaro Intercooler Fluid Reservoir Kit PN: L300152012 Revision - 1.2 Lingenfelter Performance Engineering 1557 Winchester Road Decatur, IN 46733 (260) 724-2552 (260) 724-8761 fax www.lingenfelter.com
2008 Equalizer Industries, Inc. Revision 4/23/
 2008 Equalizer Industries, Inc. Revision 4/23/2018 www.equalizer.com All Equalizer tools are warranted for one year to be free of factory defects. Warranty does not apply to abuse, misuse, or normal wear
TC36 COUNTRY HOME BURNER KIT INSTRUCTIONS (NATURAL GAS ONLY)
") INSTALLER: Leave this manual with the appliance. CONSUMER: Retain this manual for future reference. These instructions are supplementary to the Installation and Operating Instructions supplied with the
INSTALLER: Leave this manual with the appliance. CONSUMER: Retain this manual for future reference. These instructions are supplementary to the Installation and Operating Instructions supplied with the
ASSEMBLY GUIDE. Customer Service: INCH² 3-BURNER & 545 INCH² 3-BURNER
 ASSEMBLY GUIDE 455 INCH² 3-BURNER & 545 INCH² 3-BURNER DANGER If you smell gas: 1. Shut off gas to the appliance. 2. Extinguish any open flames. 3. Open lid. 4. If odor continues, keep away from the appliance
Primrose Awnings - Standard Manual Instructions
 Primrose Awnings - Standard Manual Instructions Contents Warning 1.5m - 3.0m Awnings 4 x Expansion bolts (2 per bracket)** 2 x brackets 1 x Awning 1 x Winder handle 3.5m - 4m Awnings 6 x Expansion bolts
Primrose Awnings Half Cassette Manual & Electric Instructions
 Primrose Awnings Half Cassette Manual & Electric Instructions Contents Contents for 2m, 2.5m, 3m Awnings 2 x wall brackets 4 x expansion bolts (2 per bracket)** 1 x Awning Contents for 3.5m, 4m and 4.5m
MOTORIZED FOLDING CAMPER WINCH
 OWNER'S MANUAL MOTORIZED FOLDING CAMPER WINCH The 12 Volt Motorized Folding Camper Winch is used to raise and lower the top of folding campers with the touch of the switch, eliminating tiresome hand cranking.
Optional Controls (Depends which set was purchased) Set A (Remote control kit)
 Set A (Remote control kit)") Primrose Awnings - Half Cassette Manual & Electric Instructions Contents Warning 1.5m - 3.0m Awnings 4 x Expansion bolts (2 per bracket)** 2 x brackets 1 x Awning 1 x Winder handle 3.5m - 4.0m Awnings
Primrose Awnings - Half Cassette Manual & Electric Instructions Contents Warning 1.5m - 3.0m Awnings 4 x Expansion bolts (2 per bracket)** 2 x brackets 1 x Awning 1 x Winder handle 3.5m - 4.0m Awnings
Retractable Hose Reel
 Retractable Hose Reel installation and Operation Please read before use We recommend keeping these instructions for future reference Hose Reel must be mounted before use Keep the hose retracted when not
Otter XT Cabin Installation and Set-Up Instructions
 Otter XT Cabin Installation and Set-Up Instructions Otter XT Cabin Fits Medium Otter Wild Sled Only Parts Identification and Check List MODEL NUMBERS: Complete Pkg Otter XT Cabin 200962 2 1 PARTS LIST
Instructions for Converting Range to Operate on Liquefied Petroleum Gas
 INSTALLATION AND SERVICES MUST BE PERFORMED BY A QUALIFIED INSTALLER IMPORTANT: SAVE INSTRUCTION MANUAL FOR THE LOCAL INSPECTOR S USE. READ AND SAVE THESE INSTRUCTIONS FOR FUTURE REFERENCE This conversion
READ AND SAVE THESE INSTRUCTIONS! EasyAwn Standard Awning Installation
 EasyAwn Installation, Care and Maintenance Manual EasyAwn Quality, Since 1946 EasyAwn, LLC Toll Free: 877-EasyAwn http://www.easyawn.com READ AND SAVE THESE INSTRUCTIONS! EasyAwn Standard Awning Installation
Primrose Awnings Half Cassette Manual & Electric Instructions
 Primrose Awnings Half Cassette Manual & Electric Instructions Contents for 2.5m, 3m Awnings 4 x Expansion bolts (2 per bracket)** 2 x brackets 1 x Awning Contents for 3.5m, 4m Awnings 6 x Expansion bolts
/ Tool and Equipment Safety Tether System (T.E.S.T.S)
") 20 INSTRUCTIONS FOR USE AND PRODUCT GUIDE 799953 / 799955 Tool and Equipment Safety Tether System (T.E.S.T.S) Part # T353012 Rev 2 Reliance Industries LLC 2802 East X Street Deer Park, Texas 77536 281-930-800
20 INSTRUCTIONS FOR USE AND PRODUCT GUIDE 799953 / 799955 Tool and Equipment Safety Tether System (T.E.S.T.S) Part # T353012 Rev 2 Reliance Industries LLC 2802 East X Street Deer Park, Texas 77536 281-930-800
LP Grill and Gas Hose
 Tales from the Fox s Den Volume 1 7/2011 LP Grill and Gas Hose This seems to be a reoccurring theme on the forum and Internet about propane grills, quick disconnects, hoses, and what to do. First of all
Tidland External Element Shaft
 TIDLAND WINDING SOLUTIONS Tidland External Element Shaft User Manual EN Series 800 GL External Element MI 651853 1 U GE External Element GX Ultra-Lightweight External Element Series 850 GS Spiral External
SAFETY AND OPERATING MANUAL
 SAFETY AND OPERATING MANUAL General Safety Rules WARNING! Read all instructions. Failure to follow all instructions listed below may result in electric shock, fire and/ or serious injury. The term power
1946 READ AND SAVE THESE INSTRUCTIONS!
 EasyAwn Installation, Care and Maintenance Manual EasyAwn Quality, Since 1946 EasyAwn, LLC Toll Free: 877-EasyAwn http://www.easyawn.com READ AND SAVE THESE INSTRUCTIONS! EasyAwn Quarter Round Awning Installation
Operator's Manual. Model: RY10MK-PRO MPN: RA-MLT Gallon Direct Fire Melter Kettle Burner Model with Adjustable Flame-Out Valve
 Operator's Manual Model: RY10MK-PRO MPN: RA-MLT-0009 10 Gallon Direct Fire Melter Kettle Burner Model with Adjustable Flame-Out Valve U.S. Patent No. 9,739,021 For Technical Support Please Visit www.rynoworx.com
BILLY GOAT KV HOSE KIT (P/N ) PURPOSE: To allow for vacuuming in hard to reach places.
 PURPOSE: To allow for vacuuming in hard to reach places.") BILLY GOAT KV HOSE KIT (P/N 891125) PURPOSE: To allow for vacuuming in hard to reach places. Part No 891061-1 - Form No F052209A INSTALLATION: Step 1. Attach nozzle wear guards. 1. Disconnect spark plug
BILLY GOAT KV HOSE KIT (P/N 891125) PURPOSE: To allow for vacuuming in hard to reach places. Part No 891061-1 - Form No F052209A INSTALLATION: Step 1. Attach nozzle wear guards. 1. Disconnect spark plug
Thermostatic Griddle Field Service Kit Instructions
 Thermostatic Griddle Field Service Kit Instructions The following document provides instructions on how to install a Garland Thermostatic Griddle Field Kit and is applicable to each 2 section of a Garland
INSTALLATION INSTRUCTIONS for automatic awnings
 Custom made Awnings and Blinds Item No 0756 INSTALLATION INSTRUCTIONS for automatic awnings AUTOMATIC AWNING IMPORTANT INFORMATION BEFORE INSTALLING YOUR AUTOMATIC AWNING Updated 08/09/15 AN AWNING INSTALLATION
COMBI CRATE MODEL NO: 7000/7001/7002/7003
 COMBI CRATE MODEL NO: 7000/7001/7002/7003 Owner s Manual READ ALL INSTRUCTIONS BEFORE ASSEMBLY AND USE OF GATE KEEP INSTRUCTIONS FOR FUTURE USE. Carlson Pet Products,Inc 14305 Southcross Drive,Suite 105,
AUTO REWIND HOSE REEL USER MANUAL
 AUTO REWIND HOSE REEL USER MANUAL Models: US3025 IMPORTANT: READ BEFORE USE AND KEEP FOR FUTURE REFERENCE Welcome to trouble-free watering at its best! The Hoselink Auto Rewind Hose Reel is manufactured
kit contents installation instructions suzuki samurai silicone radiator hose kit kit ( suzuki samurai, 1.
 303732-3-kit (1986-1995 suzuki samurai, 1.3l engine) kit contents 5356 PINE AVE FRESNO, CA 93727 USA TOLL FREE: 877.4X4.TOYS WORLDWIDE: 559.252.4950 WWW.TRAIL-GEAR.COM 303731-3-INS recommended tools Engine
IMPORTANT OWNER-OPERATOR INSTALLATION INSTRUCTIONS. Part # A7006
 IMPORTANT OWNER-OPERATOR INSTALLATION INSTRUCTIONS Part # A7006 Parts List Wobble Stopper Body Wobble Stopper Shaft Camper Bracket Lower Bracket Assembly Upper Bracket Upper Bracket Clamp 3/8 SAE Flat
300 Model 870 Four Wheel Hose Cart Owner s Manual
 300 Model 870 Four Wheel Hose Cart Owner s Manual IMPORTANT: READ THE OWNER S MANUAL BEFORE ASSEMBLING TOOLS REQUIRED: TWO ADJUSTABLE WRENCHES; HAND PUMP Estimated assembly time: 30 minutes PARTS LIST
TC30 BLACK DIAMOND BURNER KIT INSTRUCTIONS
 IMPORTANT: THESE INSTRUCTIONS ARE TO REMAIN WITH THE HOMEOWNER These instructions are supplementary to the Installation and Operating Instructions supplied with the fi replace and should be kept together.