WIKING Mini 2. Installation and User Instructions /
|
|
|
- Vivian Richardson
- 5 years ago
- Views:
Transcription

1 WIKING Mini 2 GB Installation and User Instructions /

2 A B 2

3 C D1 3

4 D2 D3 4
5 Contents Figures... 2 Welcome... 6 For UK -The Clean Air Act 1993 and Smoke Control Areas... 7 Installation Instructions... 8 User Instructions Using the Air Damper Some Things Worth Knowing about Firing Lighting and Firing your WIKING Wood-Burning Stove Some Things Worth Knowing about the Smoke Pipe Some Things Worth Knowing about the Chimney Cleaning and Maintaining your Wood-Burning Stove Declaration of Performance Trouble Shooting Guarantee and Claim Conditions Guarantee Certificate
6 Welcome Dear WIKING owner, We would like to congratulate you on your new WIKING wood-burning stove and hope you will be pleased with your purchase. For more than 30 years now, WIKING has developed and produced high-quality wood-burning stoves, and we are known throughout all of Europe for our design and high technical standards. As a WIKING owner, you have assured yourself a wood-burning stove with a timeless design and a long service lifetime. Please read through this installation/user s manual before setting up your wood-burning stove so that you can avoid any potential problems and get to enjoy your WIKING wood-burning stove as soon as possible. Guarantee All WIKING wood-burning stoves are tested and approved in accordance with EN (European Standard) and NS 3058 and NS 3059 (Norwegian standards for particle emissions). We guarantee that your wood-burning stove fulfils the European norms pertaining to safety, quality and environmentally sound combustion. WIKING provides a five-year guarantee on your wood-burning stove. Advantages of Your New Wood-Burning Stove WIKING Mini is a beautiful wood-burning stove that fits in any home where pure and simple lines are desired. This stove has a large front pane, allowing the flames to be viewed from many angles. At the same time, air from the pane-flush function ensures that, with proper firing, the glass pane will not be covered in soot so that you and your family will always be able to enjoy it and the flames inside. You control the wood-burning stove s air supply with a userfriendly, one-lever system located beneath the door. The simple lever makes it easy for you to control combustion. For WIKING Mini wood-burning stoves, the air is regulated automatically through WIKING Automatic when the fire is started and when restoking. You get more warmth for the wood you add, and in turn, better heating economy. WIKING Mini is both effective and attractively designed, and will bring you great pleasure for years to come. Enjoy your new wood-burning stove! 6
7 Norsk For UK -The Clean Air Act 1993 and Smoke Control Areas Under the Clean Air Act local authorities may declare the whole or part of the district of the authority to be a smoke control area. It is an offence to emit smoke from a chimney of a building, from a furnace or from any fixed boiler if located in a designated smoke control area. It is also an offence to acquire an unauthorised fuel for use within a smoke control area unless it is used in an exempt appliance ( exempted from the controls which generally apply in the smoke control area). In England appliances are exempted by publication on a list by the Secretary of State in accordance with changes made to sections 20 and 21 of the Clean Air Act 1993 by section 15 of the Deregulation Act Similarly in Scotland appliances are exempted by publication on a list by Scottish Ministers under section 50 of the Regulatory Reform (Scotland) Act In Northern Ireland appliances are exempted by publication on a list by the Department of Agriculture, Environment and Rural Affairs under Section 16 of the Environmental Better Regulation Act (Northern Ireland) In Wales these are authorised by regulations made by Welsh Ministers. Further information on the requirements of the Clean Air Act can be found here: gov.uk/smoke-control-area-rules. Your local authority is responsible for implementing the Clean Air Act 1993 including designation and supervision of smoke control areas and you can contact them for details of Clean Air Act requirements. The WIKING Mini stoves detailed below have been recommended as suitable for use in smoke control areas when burning wood logs. The appliance has been fitted with a modified secondary air control (to prevent closure beyond the 26% open position). Appliances recommended as suitable for use in Smoke Control Areas : WIKING Mini 2 with a base WIKING Mini 2 with low legs WIKING Mini 2 with high legs Refuelling on to a low fire bed If there is insufficient burning material in the firebed to light a new fuel charge, excessive smoke emission can occur. Refuelling must be carried out onto a sufficient quantity of glowing embers and ash that the new fuel charge will ignite in a reasonable period. If there are too few embers in the fire bed, add suitable kindling to prevent excessive smoke. Fuel overloading The maximum amount of fuel specified in this manual should not be exceeded, overloading can cause excess smoke. Operation with door left open Operation with the door open can cause excess smoke. The appliance must not be operated with the appliance door left open except as directed in the instructions. Dampers left open Operation with the air controls or appliance dampers open can cause excess smoke. The appliance must not be operated with air controls, appliance dampers or door left open except as directed in the instructions. 7
8 Installation Instructions Before You Start (Figure A) Figure A is a cross-sectional view of your wood-burning stove. Here you can gain an overview of the parts of which your stove consists. 1. Steel smoke deflector. 2. Vermiculite smoke deflector. 3. Vermiculite rear plate. 4. Vermiculite corner plate. 5. Vermiculite side plate. Please note: The combustion chamber is covered with plates made of vermiculite, which is a heat-insulating material. These plates ensure that the optimal combustion temperature is quickly reached, and they must therefore remain inside in the wood-burning stove. The steel smoke deflector and the vermiculite smoke deflector ensure that the passage of smoke through the stove is as long as possible, so that the flue gasses have more time to emit their warmth within the stove and the surrounding area. In this way you get more warmth from the wood you add to the stove, as the warm smoke is not simply sent out through the chimney. Arrangement of Individual Components (Figure A) It is important to ensure that all individual components are in place and no damage was done to them during transport. Check that all insulation plates of the combustion chamber have been properly placed, i.e. that the bottom plate is horizontal and that the side plates are vertical and reach all the way up to the steel sides of the combustion chamber and down to the bottom plate. In Figure A you can see the parts that you must inspect: 1. The steel baffle plate (1) is hung from two hooks and equipped with two pins (7) that serve as protection during transportation. Remember to remove the two pins before you start using the stove. 2. The vermiculite smoke deflector (2) plate must rest on the two fittings (8) at the top and front of the combustion chamber and must be pushed as far back as possible into the combustion chamber. 3. The rear plate (3) must be pushed all the way back in the combustion chamber. 4. The cast iron bottom plate (6) should lie flat in the bottom of the combustion chamber. Only when you are confident that the individual components are in place, you may begin with the installation of the wood-burning stove. Changing the Smoke Outlet from Top Outlet to Rear Outlet Proceed as follows to change the smoke outlet from top outlet to rear outlet: 1. Lift the top plate off the stove. 2. Remove the smoke ring on the top of the stove by unscrewing the three screws and lifting it off. 3. There is a cut-out for the flue duct in the back plate. Break off the plate within this cut-out to make a hole that the flue duct can fit into. 4. Remove the cover plate on the back of the stove by unscrewing the three screws (Torx Bit no. 30) and lifting it off. 5. Install the cover plate on top of the stove with the three screws. 8
9 6. Place the smoke ring in the smoke outlet hole in the back of the stove and secure it with the three screws. 7. Replace the top plate on the stove. A top cover can be bought as an accessory to cover the hole in the top plate of the stove if the stove is connected to a rear smoke outlet. General Information When installing your WIKING wood-burning stove, you must ensure that all local regulations, including those referring to national and European standards, are observed. It is always a good idea to consult a chimney sweep before installing your stove, as it is he/she who must ultimately approve the installation. Always follow the instructions of the manual carefully and make sure that the installation is carried out by a qualified professional. WIKING packaging material should always be handled in accordance with the local rules for waste handling. Room Requirements It must always be possible to deliver fresh combustion air to the room in which the woodburning stove is to be installed. A window that can be opened or an adjustable air valve is considered to be sufficient. The adjustable air valve/air grate must not be blocked. Exhaust fans running in the same room as where the stove is installed may cause problems. Technical Data If the wood-burning stove is to be placed on a floor made of combustible material, the area around the stove must be covered with a non-combustible material. The floor construction must also be able to withstand the weight of the stove and the chimney. The chimney s weight must be calculated in relation to dimension and height. In the table below you ll find important information about your wood-burning stove. Weight Dimension (h x w x d) Distance to furniture - in front Mini 2 with a base 73 kg 60.8 x 46.8 x 35.6 cm 100 cm Mini 2 with short legs 73 kg 65.2 x 46.8 x 35.6 cm 100 cm Mini 2 with long legs 74 kg 83.2 x 51.7 x 37.1 cm 100 cm The stove is mainly made of sheet iron, with some items made of cast iron. Nominal heat output: 4.5 kw according to EN norm Flue gas temperature 236 o C EN measurement point: Flue gas temperature 283 o C measured in the outlet socket: Exhaust gas mass flow: 3,6 g/s Gross and net efficiency: 76% / 83% 9
10 Distance to Inflammable Materials In the table below you can see the minimum distance to the closest combustible and noncombustible walls. Uninsulated flue gas pipe WIKING Mini 2 with a base Distance from the Wood-burning Stove to - non-combustible wall behind the unit - non-combustible wall to the side of the unit WIKING Mini 2 with short legs WIKING Mini 2 with long legs Distance, cm Distance, cm Distance, cm combustible wall behind the unit combustible wall to the side of the unit - combustible wall to the sides, at 45 o in a corner Insulated flue gas pipe WIKING Mini 2 with a base Distance from the Wood-burning Stove to - non-combustible wall behind the unit - non-combustible wall to the side of the unit WIKING Mini 2 with short legs WIKING Mini 2 with long legs Distance, cm Distance, cm Distance, cm combustible wall behind the unit combustible wall to the side of the unit - combustible wall to the sides, at 45 o in a corner Please note that if the rear dimension is less than 10 cm it may be prudent to install the stove so it can be removed for servicing the Autopilot. Other distances are minimum distances for safety reasons. Remember to pay attention to applicable regulations concerning the required distance between the wall and smoke pipe. Please be aware that not all glass parts are heat-resistant. For this reason, a glass wall should sometimes be treated as a flammable wall, in which case we ask that you please contact your local chimney sweep or glass producer to hear at what distance the stove should be kept from glass. 10
11 IMPORTANT Combustible materials may not be placed under the stove. WIKING Mini with a base and WIKING Mini with short legs must not be mounted on combustible floors. It is still considered a combustible floor even if an ember catching, non-combustible floor plate is placed on top of the combustible floor. A non-combustible structure under WIKING Mini with a base and low legs must extend at least 400 mm in front of the stove. For UK The variant with small legs and the variant with a base must be installed on a BS non combustible/constructional hearth. The non combustible/constructional hearth must extend 300 mm in front of the appliance. Floor in front exceed 100 C demand closer than 300 mm in front of the stove with a 20 mm base. Floor directly beneath the stove with 20 mm base does not exceed 65K or 100 C Height Requirements The WIKING Mini has a smoke outlet at the top and at the back. It can be installed with an approved smoke pipe and a steel chimney, or connected to a brick chimney with a fullform smoke pipe. Connection to the Chimney The chimney must be of a proper height to ensure that the draft is sufficient and that smoke does not become bothersome. If the chimney is so high that it cannot be cleaned from the top, an easily accessible cleaning hatch must be installed. We recommend, however, that you always contact your local chimney sweep before purchasing a chimney. Make sure that the chimney is tight and that no false draft is caused around neither the cover plate, in connection with a covered smoke outlet, nor the cleanout door and pipe connections. Please note that bent and/or horizontal smoke pipes will reduce the effect of the chimney draft. Requirements for Chimney and Smoke Pipe Nominal draft: Approximately 12 Pascal/1.2 mm water gauge. Minimum clearance: Ø125 or Ø150 mm, depending on the threaded hose connection of your WIKING wood-burning stove. The clearance inside the chimney must at least be of the same diameter as the threaded hose connection. Smoke pipe and chimney must always be suitable for a stove connection. Ask your WIKING dealer for more information. 11
12 User Instructions Norsk Before Using the Wood-Burning Stove It is important that you ensure the following: That all of the wood-burning stove s individual components are in place. That the chimney has been approved by your local chimney sweep. That fresh air can be supplied to the room in which the wood-burning stove is to be installed. Some Things Worth Knowing about Fuels Permitted Fuel Types The wood-burning stove is only EN-approved for firing with wood. Using dry wood with a maximum water content of 18% is recommended. Firing with wet wood results in soot, environmental strain and poor fuel efficiency. It is recommended to purchase a hygrometer to continuously check that the firewood has the correct moisture content before using it for firing. Recommended Wood Types All types of wood, such as birch, beech, oak, elm, ash, coniferous and fruit trees can be used as fuel in your wood-burning stove. The big difference is found not in the heat value, but in the wood s weight per cubic meter. As beech weighs more per cubic meter of wood than common spruce (e.g.), more common spruce must be added to provide the same amount of warmth the beech provides. Prohibited Fuel Types Firing with the following is prohibited: Printed matter Plastic Rubber Chipboards Liquid fuels Waste, such as milk cartons and the like Lacquered, painted or impregnated wood Fossil fuels. The reason why you cannot fire with the abovementioned is that, during combustion, unhealthy and environmentally damaging substances are created. These substances can also damage your wood-burning stove, which will result in the guarantee being voided. Firing with Coal or Coke The WIKING Mini is not approved for firing with coal and coke. Storing Wood Water content of maximum 18% is achieved by storing the wood for at least one year - preferably two years - outdoors, beneath a shed roof. Wood that is stored indoors tends to become too dry and burn too quickly; though kindling is best when stored indoors a couple of days before being used. Recommended Dimensions The fuel s dimensions are important for good combustion, and should be as follows: Fuel type Length in cm Diameter in cm Kindling (finely split firewood) Split firewood
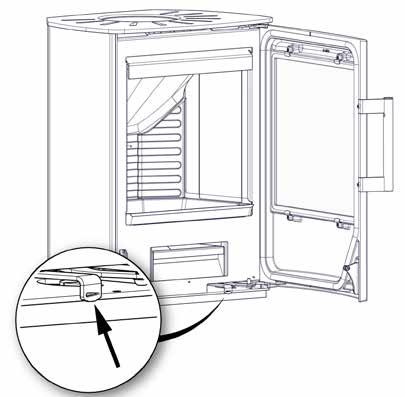
13 Using the Air Damper To achieve good combustion, which results in better heating efficiency, it is important to add the right amount of air to the fire. Air is regulated with a user-friendly, one-lever system that is located under the stove door; see Figure B. When lighting a cold stove and when fuellingwith new wood, the regulating lever must be pushed to the extreme left to give the fire maximum air supply. When the fire is burning well, the air supply can be gradually reduced by moving the regulating lever to the right. The fire will die out if the regulating lever is moved to the extreme right. This setting should only be used in the case of overheating, if there is a fire in the chimney and when the fire in the stove has been allowed to go out completely in connection with cleaning, for instance. Some Things Worth Knowing about Firing Maximum Firing Amount Fuel Wood Maximum amount per hour 2.4 kg Warning: Too much heat can destroy your wood-burning stove, the chimney and your fireplace ducts. Therefore, if you exceed the abovementioned limits, your wood-burning stove, chimney and fireplace duct will no longer be covered by the factory guarantee. Normal Firing Interval for Nominal Firing Fuel kg Normal firing interval Wood min Please note: The stove is approved for intermittent use. The EN test is performed with 2 logs, both with a length of 16 cm, cross-section approximately 7.5 x 7.5 cm placed in vermiculite back plate to door orientation. It is burned with the air control set to max (the control lever pushed all the way to the left). After three minutes, it is regulated down to 40% (control lever set slightly less than half way to the right). The Difference between Short and Long Combustion Times Short combustion time You achieve a rapid and strong heat if you burn several, smaller pieces of wood. Prolonged burning You achieve a long burning time if you burn a few, slightly larger pieces of wood (max. 1 kg per piece, and always 2 pieces). You can extend the burn time by further closing off the air when the flames are dying out. When stoking, adjust up for maximum air (control lever is moved fully to the left). When the wood is burning well, slowly adjust the air down (control lever is moved to the right). You should not regulate below the point where there are continuously large, visible flames from the wood. When the wood has burned about 20 minutes and the flames are not as active, the air intake can be adjusted further down. 13
14 Achieving the Best Possible Combustion Use Dry, Clean Wood Wet wood results in poor combustion, excess smoke and soot. In addition, more warmth will be used to dry the wood instead of heating the room. Fire a Bit at a Time You achieve the best possible combustion by firing often and a bit at a time. If you add too much firewood at once, too much time will pass before the temperature becomes high enough for you to achieve good combustion. Make Sure there is the right Amount of Air in the Combustion Chamber You should also make sure that there is an ample amount of air - especially in the beginning - so that the temperature inside the wood-burning stove quickly rises. Gases and particles released during burning are then more easily burned off. Otherwise, they gather as soot in the chimney (which increases the risk of chimney fire) or are emitted unburned into the atmosphere. The wrong amount of air supply creates inefficient combustion and a modest effect. Don t Savour the Fire during Night Time We advise against adding fire wood to your stove and reducing the air supply at night in an attempt to still have some embers left in the morning. If you do so, large amounts of hazardous smoke will be emitted, and your chimney will be exposed to unnecessarily large amounts of soot with the risk of a chimney fire. Lighting and Firing your WIKING Wood-Burning Stove The First Firing The first time you fire your wood-burning stove, you must do so carefully, as all materials need to adjust to the heat. This means that the stove must be heated slowly, until it reaches its maximum heat level. Afterwards, you should fire a few times so that the stove is thoroughly heated throughout. Be Careful of the Lacquer The lacquer used to treat the wood-burning stove will harden the first 2-3 times the stove is fired, and this can create unpleasant smoke and odours. Ensure therefore that the room is well ventilated. The door must also be carefully opened; otherwise there is a risk that the seals will stick to the lacquer. Warning: The accompanying glove may wear the surface paint off. Be careful not to touch the varnished surfaces and the handle the first two to three times you light the fire. Even after the paint has hardened, repeated use of the glove may wear the surface paint off. Lighting A successful combustion process requires that the wood is lit in the right way. A cold stove and a cold chimney challenge the combustion process. It is important to achieve a high flue gas temperature quickly. 1. Moving the regulating lever to the extreme left fully opens the air supply to the combustion chamber. 14
15 2. Place 2 pieces of firewood (4-7 cm in diameter) horizontally at the bottom of the firebox burn chamber (corresponding to a total of 0.75 to 1 kg). Place 6-10 pieces (a total of about 1 kg) kindling crisscross on top. 3. Place four firelighters between the top layer of kindling. WIKING recommends using highquality firelighters, as they do not produce smoke or odours. 4. Light up the fire-lighters and close the stove door. 5. When the fire has taken hold of the wood, move the regulating lever little by little to the right, to achieve a smooth and steady combustion. Warning: The door may only be kept open when lighting, adding firewood or cleaning the wood-burning stove; otherwise combustion becomes too powerful, which in turn increases the risk of the stove becoming overheated. Firing (Adding Firewood) When there are no more visible flames and there is a nice but not too thick layer of embers, you can stoke it again. 1. Carefully open the door to prevent smoke and embers from escaping. 2. Make sure that there is an opening in the ember layer down to the grate (preferably in the middle of the grate), so that air from the grate can easily pass through the embers to the wood. 3. Add 2-3 pieces of chopped firewood (about 1-2 kg) on the embers. The firewood should not be stacked higher than the holes in the vermiculite back plate. If the firewood is stacked up past the holes, the air from the holes in the back plate will act as the initiator, which is not the purpose of the air. 4. Shut the door again and fully open the air supply by moving the regulating lever to the extreme left. 5. When the wood has caught fire properly, the air supply can be gradually reduced by moving the regulating lever to the right until uniform, steady combustion is achieved. The further to the right the regulating lever is moved, the less heat the stove will give off. But it is important not to regulate the air supply below a level at which there are still visible flames and steady combustion. Warning: During combustion, the stove s surfaces and door become extremely hot - exercise great caution. Some Things Worth Knowing about the Smoke Pipe Description of the Smoke Pipe s Function The smoke pipe is the duct located between your wood-burning stove and chimney. Your WIK- ING wood-burning stove is fitted with a threaded hose connection with a diameter of 125mm or 150mm. If your stove is to be connected to a brick chimney, it is best to mount a curved smoke pipe to the stove s top outlet. This solution - in which the smoke pipe extends a half meter over the stove before connecting to the chimney - provides your home with 1 kw of extra warmth. The curved shape ensures minimum soot build-up in the pipe and thereby lessens the risk of chimney fires. We only recommend this solution provided that your brick chimney is completely sealed and has a sufficient draft. You can read more on the chimney in the next section. 15
16 Some Things Worth Knowing about the Chimney Description of the Chimney s Function The chimney serves as the wood-burning stove s motor, and it is crucial to the stove s proper functioning. The chimney draft creates a vacuum inside the wood-burning stove. This vacuum serves two purposes: 1. To remove smoke from inside the wood-burning stove. 2. To suck air in through the air damper during lighting and combustion, and to keep the glass pane free of soot. How to Create the Best Possible Chimney Draft Even a quality chimney can function poorly if used improperly. It is crucial that both your woodburning stove and the chimney are installed in accordance with the directions; otherwise it will not be possible to attain satisfactory combustion. Chimney draft is created by the difference in temperature between the inside and outside of the chimney. The higher the temperature inside the chimney, the better the chimney draft. This means that it is very important for the chimney to be heated thoroughly before you reduce the air supply to limit combustion in the stove, cf. the section on lighting and fuelling your WIKING stove. Please be aware that it takes longer to heat a brick chimney than a steel chimney. On days when weather and wind conditions create a poor draft in the chimney, it is especially important to heat up the chimney as quickly as possible. When lighting, use extra-finely split firewood and an extra firelighter, as flames quickly heat up the stove. After a Longer Period of Disuse If you have not used your wood-burning stove in a while (e.g. for an entire summer season), it is important to check for blockage in the chimney duct. Contact your local chimney sweep. Connecting Several Heating Sources to the Same Chimney It is possible to connect several units to some chimneys. All applicable regulations must first be consulted, in your building code and with your local chimney sweep. Chimney Fire In the event of a chimney fire: Close all dampers in the chimney and push the regulating handle on the stove to the extreme right. Contact the fire brigade. Before using the wood-burning stove again, your local chimney sweep must first inspect the chimney. 16
17 Cleaning and Maintaining your Wood-Burning Stove Warning: Cleaning and maintenance of your wood-burning stove may only be performed when it is cool. External Cleaning The outside of your stove can be dusted as needed with a soft cloth or dust brush. Do not use water, spirit or any other kind of cleaner, as this will damage the lacquer. Cleaning the Glass Door Your WIKING wood-burning stove is equipped with a pane-flush system, which reduces the build-up of soot on the glass. If soot somehow accumulates on the pane, it can be cleaned by wiping the glass with a moist paper towel dipped in ash. Afterwards, dry with a clean paper towel. When cleaning, we recommend that you use vertical strokes. You should also ensure that air gaps in the door frame are free of ash and soot particles. Also ensure that the seals on the stove are soft and fully intact; if they are not, false air can enter the stove, which makes it more difficult to control combustion and can in turn cause overheating or soot accumulation. Faulty or worn seals should therefore be replaced and can be purchased at your local woodburning stove dealer. Emptying the Ash Pan Important: Be aware that embers in the ash can remain hot for up to 24 hours after the fire in the stove has gone out! The ash pan is most easily emptied by pulling a waste bag over the pan, turning the pan upside down, and then carefully pulling it up and out of the bag again. Cleaning the Combustion Chamber In order to extend the service lifetime of the wood-burning stove, it should be thoroughly serviced once a year. First remove ash and soot from the combustion chamber. In Figure C you can see which plates are found inside the combustion chamber. Carefully remove the vermiculite plates, one after the other, in the following sequence: 1. Smoke deflector (top plate) 2. Rear plate 3. Left corner plate 4. Right corner plate 5. Left side plate 6. Right side plate After cleaning, the vermiculite plates are carefully reinserted in reverse order, starting with the right side plate. Over time, the combustion chamber s effective yet porous insulation can become worn and damaged. A crack in the back plate can cause secondary air to become incorrectly distributed in the combustion chamber, and it should therefore be replaced. Cracks in the other plates will not affect the efficiency of the wood-burning stove. They should, however, be replaced when worn down to half of their original thickness. 17
18 Automatics (Drawing D1-D3) The spring in the automatism should be controlled at least once every second year. Lift the top plate off the stove. Remove the two screws (1) in the top of both side plates. Remove both side plates. Remove the rear plate of the stove (2). On a cold stove, the starting point of the feeler is controlled. The starting point on a cold stove is about 10 0 above horizontal. It should feel easy going and bouncy when you push it, no matter if the stove is cold or hot. Mount the rear plate, the side plates and the top plate again. Surface Treatment It is normally not necessary to treat the wood-burning stove s surfaces. If the lacquer has been damaged, you can repair it by using a special senotherm spray, which can be purchased from your local wood-burning stove dealer. Chimney Sweeping In order to prevent against the risk of chimney fires, the chimney must be cleaned once a year. The smoke pipe and smoke chamber above the steel smoke deflector must be cleaned at the same time as the chimney. If the chimney s height makes cleaning from above impossible, a cleaning hatch must be installed. Service Inspection WIKING recommends a thorough service inspection every other year, so that your woodburning stove will last for many years. The service inspection must be performed by a qualified serviceman, and only original spare parts should be used. Among other things, a service inspection includes: A thorough cleaning of the stove. Greasing of the hinges with copper grease. Inspection of the heat-insulating plates (the vermiculite set). Check that the regulating lever moves smoothly. Inspection of the seals and the replacement of worn parts. If you have any questions, please consult our FAQ page at or contact your local wood-burning stove dealer. Declaration of Performance The DoP can be downloaded from our website via the following links: WIKING Mini
19 Trouble Shooting If you experience that your wood-burning stove is not functioning optimally, consult this table to find some usual problems that may arise and how to solve them. If you cannot solve them and/ or other problems occur, pleas contact your maintenance man or wood-burning stove dealer. Problem Possible Cause Try the Following I cannot make a sufficient fire in the stove. Incorrect lighting. The glass pane is covered in soot. Smoke enters the room when I open the door. The fire-proof materials in the combustion chamber are blackened after firing. Combustion is uncontrollable. Poor chimney draft. The wood is too moist. A seal in the door is loose. Insufficient supply of secondary air to the pane-flushing system. The temperature inside the stove is too low. The damper in the chimney is closed.. Poor chimney draft. The firewood is in flames. You have not fired enough, i.e., there is not enough air or firewood. A seal in the door or ash drawer is loose. Excess chimney draft. The door is not completely sealed. Further information: See the section on lighting and firing the stove. Ensure that the smoke pipe or chimney is not blocked. Ensure that the chimney height is correct in relation to its surroundings. Only fire with firewood that has dried for at least 12 months beneath a covered shed and with a maximum water content of 18%. The seals should be soft and flexible. If they are not, replace them. New seals can be purchased from your local wood-burning stove dealer. Move the regulating handle further to the left. Put more wood in the stove and move the regulating lever further to the left. Open the damper. Ensure that the smoke pipe or chimney is not blocked. Ensure that the chimney height is correct in relation to its surroundings. Never open the door if the firewood is in flames. Move the regulating handle further to the left. Moreover, igniting a larger quantity of wood might be needed. The seals should be soft and flexible. If they are not, replace them. New seals can be purchased from your local wood-burning stove dealer. Close the damper in the chimney a bit at a time until the problem is solved. At the same time, move the regulating lever further to the right. Close the door completely. If it cannot close completely, it must be replaced with an original spare part. 19
20 Guarantee and Claim Conditions - Five Years Extended Right to Invoke Lack of Conformity Congratulations on the purchase of your new WIKING wood-burning stove. All of our products are of high-quality craftsmanship, manufactured in first-class materials and subject to a thorough quality control process. That is why we are convinced that you have purchased a product that will function problem-free for many years to come. Should a problem arise, however, you are naturally guaranteed the best possible service available. In addition to the rights you have in accordance with the ordinary rules of the Sale of Goods Act, HWAM A/S provides an extended, five-year right to submit claims from the date of purchase. You must save your original receipt with purchase date as proof of the date of purchase. Extent The extended complaint entitlement covers the basic construction of the stove such as panel components, welding, etc., and includes components which must be replaced or repaired in accordance with HWAM s evaluation. Wear parts are not covered by the guarantee. The complaint entitlement is given to the first buyer of the product and cannot be transferred (except in connection with resale). The complaint entitlement is only valid in the country to which the product was originally delivered. Shipping and handling expenses incurred when sending the stove or individual parts for replacement or repair will not be covered by HWAM A/S. Limitations/loss of Guarantee Certain things are not covered by the guarantee, and the right to invoke lack conformity may lapse if the stove is not maintained and operated in accordance with the instructions. Among other things, this applies to the following: Faults or damage arising through: Incorrect fitting, installation or connection of the stove. Incorrect operation, incorrect use or misuse of the stove. Fire, accidents or similar situations. Repairs carried out by others than HWAM A/S or authorised distributors. The use of spare parts not manufactured by HWAM A/S. Lacking or inadequate service and maintenance. Changes made in the product or its accessories in relation to the original state and construction of the stove. Construction modifications made to the wood-burning stove. If the serial number of the stove has been damaged or removed. Deterioration of wearing parts and moving parts. Corrosion. Transport costs. Transport damage. Costs in connection with any dismantling and reassembling the stove. Extra costs of any kind and any consequential damage that may occur. 20
21 Surface treatment If surface treatment is lacking on the factory s behalf, this should become apparent after the first few firings. In other respects, no claims will be accepted related to the lacquer. Wear parts A number of parts of your wood-burning stove are designated as wear parts and are therefore not covered by the right to invoke a lack of conformity. Wear parts include: Heat insulating material. Either fireproof stone or special panels made of vermiculite. Smoke deflection plates. Glass. Tiles, soapstone and natural stone. Cast iron parts at the base, such as the grate. Gaskets. All moving parts. Damage to wearing parts will only be covered by the guarantee if the buyer can show that the damage was present when the stove was delivered. Service and Maintenance We recommend that you maintain the wood-burning stove and comply with the recommended inspections called for in the user instruction manual. This will help to ensure that the product functions problem-free. Claims All claims must be directed to the dealer from whom the wood-burning stove was purchased. HWAM A/S does not accept claims directly from the end-user. Always provide the serial number of your stove you will find it on the type sign on the back of the stove. Unwarranted Claims/Service Calls Before registering a claim, you should inspect your WIKING wood-burning stove for possible faults that you yourself can rectify; consult the enclosed user instruction manual as needed. Should your claim and repair demand prove to be unwarranted, you will be invoiced for the related costs. 21
22 22
23 23
24 made by Serial no. Warranty service It is important that you record your dealers name, address and telephone number on this section, as he is responsible for any ajustment which may be required during the warranty period. Model type Date of purchase Dealer Adress Tel. 24 HWAM A/S DK-8362 HØRNING
User's Manual /
 User's Manual GB 4510 4520 4530 4540 4550 4560 05.09.2017 / 97-9687 www.hwam.com 2 Table of contents, English Drawings... 4-8 For UK - The Clean Air Act 1993 and Smoke Control Areas...9 Installation......................................................
IN THE EVENT OF CHIMNEY FIRE, EVACUATE THE PROPERTY AND CALL THE EMERGENCY SERVICES.
 Ekol Clarity 12 INSTALLATION AND OPERATING INSTRUCTIONS. INTRODUCTION SAFETY Safety is the most important consideration when using and installing your stove. If not installed and used correctly, a house
IN THE EVENT OF CHIMNEY FIRE, EVACUATE THE PROPERTY AND CALL THE EMERGENCY SERVICES.
 EKOL INSET 8 INSTALLATION AND OPERATING INSTRUCTIONS INTRODUCTION. SAFETY Safety is the most important consideration when using and installing your stove. If not installed and used correctly, a house fire
Saltfire ST1 INSTALLATION AND OPERATING INSTRUCTIONS.
 Saltfire ST1 INSTALLATION AND OPERATING INSTRUCTIONS. INTRODUCTION SAFETY Safety is the most important consideration when using and installing your stove. If not installed and used correctly, a house fire
Saltfire ST4 INSTALLATION AND OPERATING INSTRUCTIONS.
 Saltfire ST4 INSTALLATION AND OPERATING INSTRUCTIONS. INTRODUCTION SAFETY Safety is the most important consideration when using and installing your stove. If not installed and used correctly, a house fire
Installation and Operating. Instructions. Multifuel Stove. Salamander. Model Lighting a solid fuel fire. 6.5 De-ashing the stove
 Installation and Operating Instructions Salamander Model 0901 Multifuel Stove Section Contents Page 1 Important information about installing and 3 using the Salamander stove 2 Unpacking the Salamander
User's Manual /
 User's Manual EN 4530 4540 4550 4560 08.11.2016 / 97-9688 www.hwam.com Table of contents, English Drawings... 4-8 HWAM Autopilot IHS TM...9 Installation........................................................
OPERATING INSTRUCTIONS
 OPERATING INSTRUCTIONS SCANDIA 6304 2015 www.heta.dk UK 1 Congratulations on your new stove. We are sure that you will be happy with your investment, especially if you follow the advice and instructions
User's Manual /
 User's Manual EN 4510 4520 4530 4540 4550 4560 05.09.2017 / 97-9688 www.hwam.com Table of contents, English Drawings... 4-8 HWAM Autopilot IHS TM...9 For UK - The Clean Air Act 1993 and Smoke Control
Norvik 5 Multi-fuel stove 80% Efficient
 Installation & Operating Instruction Norvik 5 Multi-fuel stove 80% Efficient This stove is designed for intermittent use and is tested and manufactured as a closed multi-fuel appliance. Cast Tec recommend
Asgård 3 / Asgård 4 / Asgård 6
 Asgård 3 / Asgård 4 / Asgård 6 User Manual Ecolabel - Sintef 110-0227 - EN 13240 www.aduro.dk Good luck with your new wood burning stove! In order to get the best possible pleasure and benefit from your
Asgård 7F User Manual Ecolabel - Sintef EN
 Asgård 7F User Manual Ecolabel - Sintef 110-0234 - EN 13240 www.aduro.dk Version 1 Good luck with your new wood burning stove! In order to get the best possible pleasure and benefit from your new Asgård
HARVIA IRON STOVE Instructions for installation and use
 HARVIA IRON STOVE EN Instructions for installation and use Harvia 10 08012014VTT Congratulations on a good choice of fireplace and thank you for your confidence in Harvia s products. Read these instructions
made by made by NEW UK 17/18
 NEW made by A true Viking Raw strength and strong family ties are classic symbols of the Scandinavian Vikings. These symbols also provide the foundation for our WIKING stoves, which radiate high quality
Aduro 6 / Aduro 6-5 / Aduro 6SK
 Aduro 6 / Aduro 6-5 / Aduro 6SK User Manual Ecolabel - Sintef 110-0283 - EN 13240 www.aduro.dk Good luck with your new wood burning stove! In order to get the best possible pleasure and benefit from your
Aduro 10. User Manual. Ecolabel - Sintef EN Version 2
 Aduro 10 User Manual Ecolabel - Sintef 110-0234 - EN 13240 www.aduro.dk Version 2 Congratulations with your new wood burning stove! In order to get the best possible pleasure and benefit from your new
How to use a multi fuel stove
 How to use a multi fuel stove Important!! When lighting the stove for the first time only a small fire should be lit. Too hot a fire will result in the paint emitting smoke - not necessarily bad but unpleasant.
Mounting and User Instructions. Lotus-Living-Series Stoves. Version 1,
 Mounting and User Instructions Lotus-Living-Series Stoves Version 1, 10-10-2012 Introduction Congratulations on your new Lotus Wood Stove We sincerely trust that your Lotus Wood Stove will bring many
Installation Instructions
 Installation Instructions C750 C750A www.contura.eu 50 CERTIFICATE EC Declaration of conformity www.contura.eu Manufacturer name address Place of manufacture NIBE AB/NIBE STOVES Box 134, Skulptörvägen
Installation & User Manual EW5000 Outdoor Cooking Fire
 Installation & User Manual EW5000 Outdoor Cooking Fire IMPORTANT: Please read this manual before installing and using the ESCEA EW5000 Cooking fire. Failure to follow these instructions may lead to a possible
Varde Lyon Varde Nice
 1.th version 17-05-2018 UK Varde Lyon Varde Nice Installation and User Manual Revision 1 Pottemagervej 1, 7100 Vejle, Denmark. www.vardeovne.dk 1 Congratulations on the purchase of your new wood-burning
Installation Instructions
 Installation Instructions C 710 www.contura.eu 50 CERTIFICATE Declaration of performance according to Regulation (EU) 305/2011 No. C710-CPR-160329-SE-1 PRODUCT Product type Stove lit with solid biofuels
Installation and Operating Instructions
 Installation and Operating Instructions Wood-burning Stove Model: Ottawa 7kw INTRODUCTION Wood-burning Stove Item No.: Ottawa 7kw SAFETY Safety is the most important consideration when using and installing
Installation Instructions
 Installation Instructions C 880 www.contura.eu 50 CERTIFICATE EC Declaration of conformity www.contura.eu Manufacturer name address Place of manufacture NIBE AB/NIBE STOVES Box 134, Skulptörvägen, SE-285
Mounting and User Instructions Lotus M Series Stoves
 Mounting and User Instructions Lotus M Series Stoves (Lotus M1, M2, M3, M4 and M2ST) Version 2, 31.08.2010 Introduction Congratulations on your new Lotus Wood Stove We sincerely trust that your Lotus
O P E R A T I O N AND INST A L L A T I O N M A N U A L
 O P E R A T I O N AND INST A L L A T I O N M A N U A L OPUS TEMPO FIRED BY DESIGN Contents Disposal of packaging 3 Introduction 3 1 Description 3 2 General 3 3 Installation of the Stove 4 3.1 Flue pipe
Mounting and User Instructions. Lotus-Prestige Series Stoves. (Lotus Prestige, Prestige S) Version 2, 23/
 Version 2, 23/") Mounting and User Instructions Lotus-Prestige Series Stoves (Lotus Prestige, Prestige S) Version 2, 23/08-2014 Introduction Congratulations on your new Lotus Wood Stove We sincerely trust that your Lotus
Mounting and User Instructions Lotus-Prestige Series Stoves (Lotus Prestige, Prestige S) Version 2, 23/08-2014 Introduction Congratulations on your new Lotus Wood Stove We sincerely trust that your Lotus
Installation and Operating Instructions
 Installation and Operating Instructions Wood-burning Stove Model: Ottawa 5kw INTRODUCTION Wood-burning Stove Item No.: Ottawa 5kw curve SAFETY Safety is the most important consideration when using and
Mounting and User Instructions Lotus QM Series Stoves
 Mounting and User Instructions Lotus QM Series Stoves (Lotus QM1, QM2) Version 2, 06/09-2014 Introduction Congratulations on your new Lotus Wood Stove We sincerely trust that your Lotus Wood Stove will
Installation Instructions
 Installation Instructions C810 www.contura.eu 50 CERTIFICATE Declaration of performance according to Regulation (EU) 305/2011 No. C810-CPR-130610-SE-1 PRODUCT Product type Stove lit with solid biofuels
CONTENTS. INSTALLATION INSTRUCTIONS Building regulations 4 Positioning and Clearances 4 Chimney 4 Flue connection 5 Problem solving 6 PRODUCT DATA
 PRODUCT DATA MODEL WEIGHT NOMINAL HEAT OUTPUT FB1 DS 80KG 6KWs CONTENTS OPERATING INSTRUCTIONS Lighting the fire 2 Firebox linings and baffle 2 Wood burning tips & theory 2 Running temperatures 3 Cleaning
Alma Mons EN Owners s manual INSTALATION, ADJUSTMENT AND OPERATING INSTRUCTION
 Alma Mons Owners s manual INSTALATION, ADJUSTMENT AND OPERATING INSTRUCTION EN 12815 1 INTRODUCTION Congratulations! You have invested in energy efficient and high quality product-alma Mons wood burning
Varde Fuego. Installation and User guide. Revision 02
 Varde Fuego Installation and User guide Revision 02 1 Congratulation on the purchasing your new stove Varde Ovne A/S is a Danish company specialising in functional, environmentally friendly quality stoves
MULTI-FUEL STOVE INSTALLATION AND USER INSTRUCTIONS
 PRIORY MULTI-FUEL STOVE INSTALLATION AND USER INSTRUCTIONS The Priory stove has a nominal heat output of 8Kw. and a weight of 80 kg. The flue gas mass flow is 5.4g/s for mineral fuel and 6.3g/s for wood
Mod. MONTANA WOOD BURNING STOVE USAGE AND MAINTENANCE INSTRUCTIONS
 Mod. MONTANA WOOD BURNING STOVE USAGE AND MAINTENANCE INSTRUCTIONS Nutrients Ashes Fertilizer Wood: an ecological fuel Wood is a renewable source of energy which answers the energy and environmental demands
Installation Instructions
 Installation Instructions For use in and IE only C i4 FS www.contura.eu 2 CERTIFICATE DECLARATION OF PERFORMANCE No. Ci4FS-CPR-130619-SE-1 PRODUCT Product type Type designation Manufacturing number Intended
Installation Instructions
 Installation Instructions C 780 www.contura.eu 50 CERTIFICATE PERFORMANCE DECLARATION No. C780-CPR-130612-SE-1 PRODUCT Product type Stove lit with solid biofuels Type designation Contura 780 Manufacturing
Saltfire ST-X5 INSTALLATION AND OPERATING INSTRUCTIONS
 Saltfire ST-X5 INSTALLATION AND OPERATING INSTRUCTIONS INTRODUCTION SAFETY Safety is the most important consideration when using and installing your stove. If not installed and used correctly, a house
Installation instruction
 Installation instruction C 35T-Low www.contura.eu 82 CERTIFICATE PERFORMANCE DECLARATION No. C35TL-CPR-130618-SE-1 PRODUCT Product type Type designation Manufacturing number Intended area of use Fuel Stove
Saltfire ST3 INSTALLATION AND OPERATING INSTRUCTIONS.
 Saltfire ST3 INSTALLATION AND OPERATING INSTRUCTIONS. INTRODUCTION SAFETY Safety is the most important consideration when using and installing your stove. If not installed and used correctly, a house fire
User and mounting manual. Stove models: TT10 + TT10S + TT10H + TT10HS + TT10G
 User and mounting manual Stove models: TT10 + TT10S + TT10H + TT10HS + TT10G CE approved according to: DS/EN13240 DS (Danish Standard), DIN (Deutsche Industrienorm), SINTEF (Norwegian Standard) and 15A
OPERATION AND INSTALLATION MANUAL OPUS TRIO FIRED BY DESIGN
 OPERATION AND INSTALLATION MANUAL OPUS TRIO FIRED BY DESIGN Contents Disposal of packaging 3 Introduction 4 1. Description 4 2. General 5 3. Installation of the Stove and the flue pipe connection 5 3.1.
Installation Instructions
 Installation Instructions C 556 www.contura.eu 50 CERTIFICATE PERFORMANCE DECLARATION No. C556-CPR-130601-SE-2 PRODUCT Product type Stove lit with solid biofuels Type designation Contura 556 Manufacturing
Assembly and User Instructions Fireplace Insert, Lotus H370 Petite
 Assembly and User Instructions Fireplace Insert, Lotus H370 Petite Version 3, 04/10-2017 Introduction Congratulations on your new Lotus Fireplace Insert We hope and believe that it will give you many
USAGE AND MAINTENANCE MANUAL FOR A SOLID FUEL STOVE
 PREDUZEĆE ZA PROIZVODNJU, PROJEKTOVANJE I PROMET BELOŠEVAC BB, 14000 VALJEVO, SRBIJA USAGE AND MAINTENANCE MANUAL FOR A SOLID FUEL STOVE DEAR CUSTOMER, Congratulations on your purchase of BLIST solid fuel
Mounting and User Instructions. Lotus-Liva. Lotus Liva 5, Liva 5G, Liva 6, Liva 6G, Liva 7G, Liva 8G. Version 2 02/
 Mounting and User Instructions Lotus-Liva Lotus Liva 5, Liva 5G, Liva 6, Liva 6G, Liva 7G, Liva 8G Version 2 02/08-2016 Introduction Congratulations on your new Lotus Wood Stove We sincerely trust that
Reference: Ottawa 12kw Operating Instructions Version 1 04/06/15. Installation and Operating Instructions
 Reference: Ottawa 12kw Operating Instructions Version 1 04/06/15 Installation and Operating Instructions Wood-burning Stove Model: Ottawa 12kw Size: W580XD410XH610MM 1 INTRODUCTION Wood-burning Stove Item
ECO-FRIENDLY WOOD-BURNING STOVES OF DANISH DESIGN
 2014/201 ECO-FRIENDLY WOOD-BURNING STOVES OF DANISH DESIGN THE NEW APP FROM VARDE SEE THE STOVE IN YOUR HOME BEFORE YOU BUY IT! At VARDE, we know that the right woodburning stove requires the best location
Assembly and User Instructions Fireplace Inserts, Lotus H470-H570
 Assembly and User Instructions Fireplace Inserts, Lotus H470-H570 Version 6, 3-1-2012 Introduction Congratulations on your new Lotus Fireplace Insert We hope and believe that it will give you many a warm
EKOL CRYSTAL-8 INSTALLATION AND OPERATING INSTRUCTIONS
 EKOL CRYSTAL-8 INSTALLATION AND OPERATING INSTRUCTIONS INTRODUCTION SAFETY Safety is the most important consideration when using and installing your stove. If not installed and used correctly, a house
Dear Viking-customer,
 1 Dear Viking-customer, Congratulations on your excellent choice of Viking 30, Sweden s most sold wood-burning cooker. Your new Viking 30 with its timeless design is an efficient source of heat with more
Installation instruction
 Installation instruction C 550 www.contura.eu 66 CERTIFICATE PERFORMANCE DECLARATION No. C550-CPR-130601-SE-1 PRODUCT Product type Stove lit with solid biofuels Type designation Contura 550 Manufacturing
Lighting Instructions
 SE DE NO FR GB DK FI IT NL Eldningsinstruktion 2 Heizinstruktionen 6 Fyringsinstruksjon 10 Instructions d allumage 14 Lighting Instructions 18 Fyringsvejledning 22 Lämmitysohjeet 26 Istruzioni per l accensione
Installation Instructions
 Installation Instructions For use in GB and IE only C i4 www.contura.eu 82 CERTIFICATE EC Declaration of conformity www.contura.eu Manufacturer name address Place of manufacture NIBE AB/Contura Box 134,
Installation instructions
 Installation instructions C 34T www.contura.eu 66 CERTIFICATE PERFORMANCE DECLARATION No. C34T-CPR-130618-SE-1 PRODUCT Product type Type designation Manufacturing number Intended area of use Fuel Stove
17500 VRANJE, SRBIJA Radnička 1, Tel.: 017/ INSTRUCTIONS FOR INSTALLATION, ADJUSTMENT AND USE
 17500 VRANJE, SRBIJA Radnička 1, Tel.: 017/421-121 STOVE OF THICK METAL SHEETS PREMIJER PREMIJER K INSTRUCTIONS FOR INSTALLATION, ADJUSTMENT AND USE 1.Technical data about continuously burning stove of
INSTRUCTIONS FOR INSTALLATION, USE AND MAINTENANCE YSEN
 INSTRUCTIONS FOR INSTALLATION, USE AND MAINTENANCE YSEN READ THE INSTRUCTION BOOKLET AND THESE SUPPLEMENTARY INSTRUCTIONS CAREFULLY BEFORE INSTALLATION These instructions together with those in the instruction
Installation instructions
 Installation instructions C 790T www.contura.eu 82 CERTIFICATE PERFORMANCE DECLARATION No. C790T-CPR-130612-SE-1 PRODUCT Product type Type designation Manufacturing number Intended area of use Fuel Stove
Saltfire ST2 INSTALLATION AND OPERATING INSTRUCTIONS.
 Saltfire ST2 INSTALLATION AND OPERATING INSTRUCTIONS. INTRODUCTION SAFETY Safety is the most important consideration when using and installing your stove. If not installed and used correctly, a house fire
DIANA EN Owners s manual INSTALATION, ADJUSTMENT AND OPERATING INSTRUCTION. Available in ceramic and metalsheet version.
 DIANA Owners s manual INSTALATION, ADJUSTMENT AND OPERATING INSTRUCTION Available in ceramic and metalsheet version. EN 13240 1 INTRODUCTION Congratulations! You have invested in energy efficient and high
Harrie Leenders Fuga el - Instructions for Installation, Use and Maintenance INSTRUCTIONS FOR INSTALLATION, USE AND MAINTENANCE
 INSTRUCTIONS FOR INSTALLATION, USE AND MAINTENANCE FUGA el 1 2 1. Flue 2. Case 3. Ceramic glass 4. Aeration slide 5. Convection fins 6. Door handle 7. Base 3 4 READ THE INSTRUCTION BOOKLET AND THESE SUPPLEMENTARY
Installation instruction
 Installation instruction C 560T www.contura.eu 66 CERTIFICATE EC Declaration of conformity Manufacturer name address Place of manufacture NIBE AB / Contura Box 134, Skulptörvägen 10, SE-285 23 Markaryd
SOLID FUEL STOVE ELITA and ELITA II
 17500 VRANJE, SERBIA Radnicka 1, tel.: 017 421 121 SOLID FUEL STOVE ELITA and ELITA II INSTRUCTIONS FOR INSTALLATION AND USE GENERAL DATA Generally it is necessary to adhere to the construction rules and
APPENDIX TO THE INSTALLATION AND OPERATING MANUAL OF STOVEMAN SAUNA STOVE
 APPENDIX TO THE INSTALLATION AND OPERATING MANUAL OF STOVEMAN SAUNA STOVE Technical data of the sauna stove Sauna stove type Stoveman 16 Model Stoveman 16 Nominal heat capacity, i.e. ability to 17 kw heat
Installation Instructions. Woolly Mammoth Stoves Albert Road, Braintree, Essex, CM7 3JQ
 Installation Instructions Woolly Mammoth Stoves 20-28 Albert Road, Braintree, Essex, CM7 3JQ INSTALLATION INSTRUCTIONS TO BE READ IN CONJUNCTION WITH THOSE IN THE INSTRUCTION BOOKLET These instructions
Installation instruction
 Installation instruction C 35T www.contura.eu 82 CERTIFICATE PERFORMANCE DECLARATION No. C35T-CPR-130618-SE-1 PRODUCT Product type Type designation Manufacturing number Intended area of use Fuel Stove
Installation and Operating Instructions. Ottawa 12kw
 Installation and Operating Instructions Ottawa 12kw 1 Wood-burning Stove Model: Ottawa 12kw Size: W580XD410XH610MM INTRODUCTION Wood-burning Stove Item No.: Ottawa 12.3kw Size: W580XD410XH610MM SAFETY
OPERATION AND INSTALLATION MANUA L OPUS TEMPO
 OPERATION AND INSTALLATION MANUA L OPUS TEMPO 0 FIRED BY DESIGN 1 Contents Disposal of packaging 4 Introduction 4 1 Description 4 2 General 4 3 Installation of the Stove 5 3.1 Flue pipe connection 5 3.2
ECO-FRIENDLY WOODBURNING STOVES
 ECO-FRIENDLY WOODBURNING STOVES DANISH DESIGN 2018 / 2019 VARDE NICE www.vardeovne.co.uk VARDE ALS warm moments of quality Woodburning stoves from VARDE stand on the stylistic bedrock of Scandinavian design
OPERATING INSTRUCTIONS
 OPERATING INSTRUCTIONS SCAN-LINE 550 INSET STOVE www.heta.dk UK 1 2 tended to ensure that the materials used are of good quality, that the stove does not adversely affect the environment, and hat it is
User s manual. An der Bundesstraße Haren/Ems Germany Tel. +49(0) LUNA III H
 LUNA III H") User s manual An der Bundesstraße 2 49733 Haren/Ems Germany Tel. +49(0)5932-7334784 info@globe-fire.de LUNA III H Type Capacity Tested capacity Fuel Test-Nr. Globefire Ch.Leibfried GmbH, An der Bundesstraße
User s manual An der Bundesstraße 2 49733 Haren/Ems Germany Tel. +49(0)5932-7334784 info@globe-fire.de LUNA III H Type Capacity Tested capacity Fuel Test-Nr. Globefire Ch.Leibfried GmbH, An der Bundesstraße
Bloomsbury SE SMOKE EXEMPT WOODBURNING STOVE INSTALLATION & USER INSTRUCTIONS (TO BE LEFT WITH THE CUSTOMER) UK & IRELAND GUARANTEE
 UK & IRELAND GUARANTEE") 9/11 (PP) GUARANTEE CONDITIONS OF GUARANTEE Your ACQUISITIONS stove is guaranteed against defects arising from faulty manufacture for one year subject to the following express conditions. Failure to comply
9/11 (PP) GUARANTEE CONDITIONS OF GUARANTEE Your ACQUISITIONS stove is guaranteed against defects arising from faulty manufacture for one year subject to the following express conditions. Failure to comply
Installation Instructions
 Installation Instructions For use in GB and IE only C i4 www.contura.eu 102 CERTIFICATE Declaration of performance according to Regulation (EU) 305/2011 No. Ci4-CPR-130619-SE-1 PRODUCT Product type Type
INSPIRE 40/45/55/55H
 INSPIRE 40/45/55/55H APPROVED FOR USE IN SMOKE CONTROL AREAS WHEN BURNING DRY WOOD LOGS OR AUTHORISED FUELS OPERATING INSTRUCTIONS Inspire 40 Inspire 45 Inspire 55 Inspire 55H www.heta.dk GB 1 Congratulations
Instructions for installation and use series. Design Monica Ritterband AS/NZS 4012/4013 (1999)
") Instructions for installation and use 7600 series Design Monica Ritterband AS/NZS 4012/4013 (1999) Read this entire manual before you install and use your new room heater. If this room heater is not properly
Instructions for installation and use 7600 series Design Monica Ritterband AS/NZS 4012/4013 (1999) Read this entire manual before you install and use your new room heater. If this room heater is not properly
Instructions for installation and use Designed by Monica Ritterband
 Instructions for installation and use 7300-7400 Designed by Monica Ritterband Morsø 7340, 7343, 7348, 7350, 7351, 7370, 7390 Morsø 7440, 7443, 7448, 7450, 7470, 7490 Morsø 7343 Morsø 7443 EN 13240 NS 3058-3059
K700. Installation Instructions Care and firing instructions
 K700 Installation Instructions Care and firing instructions CONTENTS GENERAL INFORMATION...3 IMPORTANT POINTS...3 PRECONDITIONS...4 Building notice Distance to flammable structural units Floor plate Outdoor
General Information. Construction of the stove. Top or rear outlet of gases
 General Information WARNING! To avoid the fire hazard, the device must be installed in accordance with the applicable standards and technical regulations, which are mentioned in the further part of the
Dean Forge Fabrication Ltd. Dean Prior, Buckfastleigh, Devon TQ11 0LS. T e l:
 Dean Stoves Dean Forge Fabrication Ltd. Dean Prior, Buckfastleigh, Devon TQ11 0LS T e l: 0 1 3 6 4 6 4 3 5 7 4 w w w.d e a n f o r g e.c o.u k e m a i l: s t o v e s @ d e a n-f o r g e.c o.u k Operating
T e l: Operating Instructions for the Dean Forge Hembury 6 & 8
 Dean Stoves Dean Forge Fabrication Ltd. Dean Prior, Buckfastleigh, Devon TQ11 0LS T e l: 0 1 3 6 4 6 4 3 5 7 4 w w w.d e a n f o r g e.c o.u k e m a i l: s t o v e s @ d e a n-f o r g e.c o.u k Operating
HEAT, LIFE AND ATMOSPHERE
 2017 HEAT, LIFE AND ATMOSPHERE A real fire is a beautiful and romantic source of heat which creates a warm, cosy atmosphere. There is nothing quite like settling down and watching the flames flickering
Chew & Sheppey Multi-fuel and SE models
 Chew & Sheppey Multi-fuel and SE models 1 Installation Manual and Operating instructions Chew 4.6 kw, Sheppey 8 kw, This manual refers to the stoves listed above, which are tested in accordance with EN
Installation instruction
 NO DK FR NL Installation instruction 2 Installasjonsanvisning 17 Monteringsvejledning 33 Guide d installation 49 Installatie instructies 65 Installation instruction C850W contura.eu 2 CERTIFICATE Declaration
Installation instruction
 Installation instruction Ci51 116 FACTS Technical specifications Model i51 Log box (option) Output 6-11 kw Nominal output 8 kw Efficiency 80 % Weight (kg) 215 50 Powerstone (option): + 100 kg Width (mm)
Aduro 15 & Brugsvejledning Bedienungsanleitung User Manual Eldningsinstruktion Mode d emploi. Ecolabel - EN 13240
 Aduro 15 & 15-1 Brugsvejledning Bedienungsanleitung User Manual Eldningsinstruktion Mode d emploi Ecolabel - EN 13240 www.aduro.dk / www.aduro.no / www.adurofire.de / www.aduro.fr Version 1 English Congratulation
Multi-fuel and SE models
 ENG OPERATION AND INSTALLATION MANUAL Multi-fuel and SE models Loxton 3 July 2016 1 Installation Manual and Operating instructions ENG Loxton 3 kw This manual refers to the stoves listed above, which are
Intrepid 2 Intrepid 3
 Intrepid 2 Intrepid 3 Model Nos. V 10 / V10-3 NAT GAS Model Nos. V12 / V12-3 L.P.G DECORATIVE COAL EFFECT GAS STOVE USER INSTRUCTIONS This appliance is only for use on Natural Gas (G20) at a supply pressure
User s manual. Titan. Ch. Leibfried GmbH An der Bundesstraße Haren/Ems Germany Tel: +49(0)
") User s manual Titan Ch. Leibfried GmbH An der Bundesstraße 2 49733 Haren/Ems Germany Tel: +49(0)5932-7334784 info@globe-fire.de - Globe fire Globefire Ch.Leibfried GmbH, An der Bundesstraße 2, D-49733
User s manual Titan Ch. Leibfried GmbH An der Bundesstraße 2 49733 Haren/Ems Germany Tel: +49(0)5932-7334784 info@globe-fire.de - Globe fire Globefire Ch.Leibfried GmbH, An der Bundesstraße 2, D-49733
WESTFIRE WF SERIES ONE & TWO
 WF series one & Two INSTALLATION MANUAL AND OPERATING INSTRUCTIONS 1 the art of danish engineering Westfire WF SERIES ONE Westfire WF SERIES TWO WF series ONE & Two This manual refers to the stove type
Installation and Operating Instructions
 Installation and Operating Instructions Multi-Fuel Stove Model - Purefire 5kw Curve Approved under (Ottawa 5kw Curve SE01) SE01, version 5, 26/02/2016 INTRODUCTION Multi-Fuel Stove Model Purefire 5kw Curve
ASSEMBLY- AND INSTRUCTIONS FOR USE. Congratulations on your new Scan wood-burning stove
 ASSEMBLY- AND INSTRUCTIONS FOR USE Scan 50-8 Congratulations on your new Scan wood-burning stove You have purchased a product by one of Europe s leading manufacturer s of wood-burning stoves, and we are
 Installation and Operating Instructions Section Contents Page The Hobbit 1 Important information about installing and 3 using the Hobbit stove 2 Unpacking the Hobbit Stove 4 3 Assembly of the Hobbit Stove
MODEL DCC DOUBLE WALL CHIMNEY CONNECTOR
 Installation & Maintenance LISTED Tested to *UL 103HT & ULC-S641 Instructions MODEL DCC DOUBLE WALL CHIMNEY CONNECTOR A MAJOR CAUSE OF CHIMNEY RELATED FIRES IS FAILURE TO MAINTAIN REQUIRED CLEARANCES (AIR
FUGA el MkII MANUAL EN
 MkII MANUAL EN Contents Foreword Guarantee Burning in Stoking Maintenance User instructions Declaration of performance 3 4 4 5 6 7 8 2 Thank you! We are delighted that you have purchased one of our stoves,
T e l:
 Dean Stoves Dean Forge Fabrication Ltd. Dean Prior, Buckfastleigh, Devon TQ11 0LS T e l: 0 1 3 6 4 6 4 3 5 7 4 w w w.d e a n f o r g e.c o.u k e m a i l: s t o v e s @ d e a n-f o r g e.c o.u k Operating
Dean Forge Fabrication Ltd. Dean Prior, Buckfastleigh, Devon TQ11 0LS. T e l:
 Dean Stoves Dean Forge Fabrication Ltd. Dean Prior, Buckfastleigh, Devon TQ11 0LS T e l: 0 1 3 6 4 6 4 3 5 7 4 w w w.d e a n f o r g e.c o.u k e m a i l: s t o v e s @ d e a n-f o r g e.c o.u k Operating
ASSEMBLY- AND INSTRUCTIONS FOR USE. Scan Congratulations on your new Scan wood-burning stove
 ASSEMBLY- AND INSTRUCTIONS FOR USE Scan 56-1 Scan 56-2 Scan 56-3 Congratulations on your new Scan wood-burning stove You have purchased a product by one of Europe s leading manufacturer s of wood-burning
T e l:
 Dean Stoves Dean Forge Fabrication Ltd. Dean Prior, Buckfastleigh, Devon TQ11 0LS T e l: 0 1 3 6 4 6 4 3 5 7 4 w w w.d e a n f o r g e.c o.u k e m a i l: s t o v e s @ d e a n-f o r g e.c o.u k Operating
WESTFIRE WF ONE SERIES
 WF one series UK: INSTALLATION MANUAL AND OPERATING INSTRUCTIONS 1 dansk ingeniørkunst WF ONE SERIES This manual refers to the stove type listed above, which has been tested in accordance with EN13240.
HEAT, LIFE AND ATMOSPHERE
 2018 HEAT, LIFE AND ATMOSPHERE A real fire is a beautiful and romantic source of heat which creates a warm, cosy atmosphere. There is nothing quite like settling down and watching the flames flickering