|
|
|
- Shannon Bradley
- 6 years ago
- Views:
Transcription
1
2
3
4

5

6
7
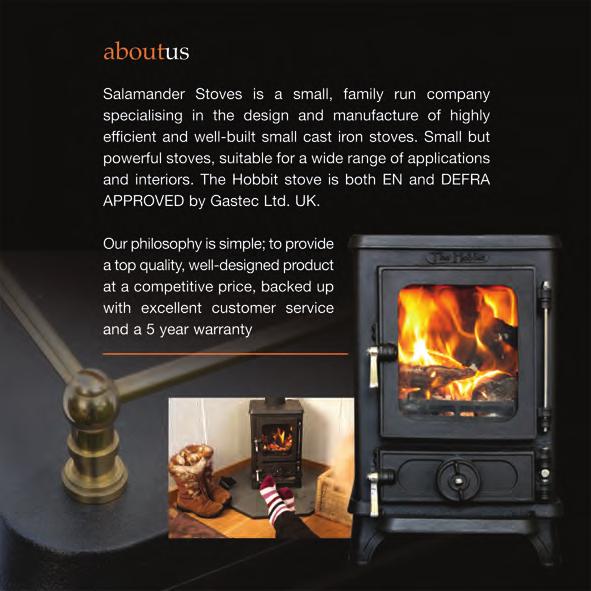
8 Installation and Operating Instructions Section Contents Page The Hobbit 1 Important information about installing and 3 using the Hobbit stove 2 Unpacking the Hobbit Stove 4 3 Assembly of the Hobbit Stove 5 The Hobbit 4 Components of the Hobbit stove 6 5 Installation of the Hobbit 7 6 Operating instructions Fuel 6.2 Before lighting 6.3 Lighting a wood fire 6.4 Lighting a solid fuel fire 6.5 De-ashing the stove 7 Guidance on safe operation 12 8 Maintenance 13 9 Fault finding Spare parts 14 Salamander Hobbit Model 0901 Multifuel Stove 11 Specification 15 2
9 2 Unpacking the Hobbit Stove PLEASE READ THESE INSTRUCTIONS CAREFULLY For your safety it is very important that your stove is correctly installed. Take care when assembling and moving the stove. It is made of cast iron and is very heavy (47kg) TAKE CARE Remember the stove is made of cast iron and is very heavy. 1 - Important information about installing and using the Hobbit stove Carefully open the firebox door and remove the packing. Inside the stove will be the following items All national and local regulations, including those referring to national and European standards need to be complied with when installing the stove. The stove must be installed by a registered installer or approved by your local building control officer. Only use for domestic heating purposes only. Burn only approved fuels (Wood or smokeless fuel). Do not use petroleum based products or use as an incinerator. This stove will become very hot whilst in operation and due care should be taken. Use only the tool provided to operate the door handles, air controls, riddling control and ash pan. Always use a fireguard in the presence of children, the elderly or the infirm. Do not place flammable objects on or near the stove. The stove must NOT be installed into a chimney that serves any other appliance and is suitable for intermittent burning. There must be a suitable air supply into the room where the stove is installed and care should be taken so it is not possible to block the front or back air inlets to the stove. There must NOT be an extractor fan in the same room as the stove as this may cause fumes to be emitted into the room. Do not make unauthorised changes or modifications to the stove and use only recommended spare parts. The stove and chimney flue must be regularly cleaned. It is especially important to check for blockages following a prolonged shutdown period. It is recommended that the stove and flue is regularly maintained by a competent engineer. Packing list for the Salamander Hobbit 1 Stove body with grate and grate centre installed. 2 Legs x 4 3 Leg bolts with washers x 4 4 Back air box 5 left Air Box 6 Right Air Box 7 Baffle Plate 8 Fire bars 9 Ash pan 10 Salamander multipurpose tool 11 Dustpan and brush 3 4
10 3 Assembly of the Hobbit Stove The stove is supplied with the flue collar fitted to the top. If the installation requires the flue to exit from the rear of the stove, swap the collar for the blanking plate on the back before assembling the firebox as described below. 4 Components of the Hobbit Stove 3.1 Lay the stove carefully on its side and attach one leg to each corner of the base using the bolts and washers. Carefully lift the stove back upright to rest on its feet. SECONDARY AIR CONTROL The Hobbit FIREBOX DOOR 3.2 Check that the grate and grate centre is located correctly and sitting horizontal in the stove. Check the riddling mechanism operates and moves freely. PRIMARY AIR CONTROL GRATE RIDDLING LEVER 3.3 Picture shows how the back and side air boxes and baffle locate together when installed in the firebox. ASHPAN DOOR 3.4 Build the firebox inside the stove by locating first the rear air box. then the baffle. then the left air box, followed by the right air box. The weight of the baffle holds the assembly together. 5 6
11 5 Installation of the Hobbit PLEASE READ THESE INSTRUCTIONS CAREFULLY For your safety it is very important that your stove is correctly installed. Salamander Stoves cannot accept any responsibility for any fault arising through incorrect installation or use. 4.1 Regulations All national and local regulations, including those referring to national and European standards need to be complied with when installing the stove. 4.2 Installation The stove must be installed by a registered installer or approved by your local building control officer. 4.3 Safety clearances The stove must be installed with the following minimum safety clearances from combustible materials. Side Rear 400mm 450mm If the stove is to be installed in a non combustible recess it is recommended that 100mm clearance is left at the back and sides for maintenance and to allow air to circulate around the stove. 4.4 Floor National and local building regulations must be complied with when considering the floor or hearth where the stove is to be installed. The floor must be capable of bearing the weight of the stove and the hearth temperature which on test was measured at 66.4 deg C on full fire. 4.4 Access for cleaning Although access to the flue can be gained by removing the stove firebox components, consideration must be given to installing extra access in the flue system to ensure all sections can be cleaned and maintained. 6.1 Fuel 6 Operating Instructions Wood Use only seasoned timber with a moisture content of less than 20%. Typically this means wood which has been cut and stored in an open dry shelter for between one and two years. DO NOT BURN wet or unseasoned wood, construction timber, painted or treated wood, driftwood or manufactured board products. Doing so will result in the wood burning inefficiently and excess smoke, soot and tar will be produced. This will coat and damage the internal components of the stove and flue and could result in a chimney fire. Solid Fuel Use only Anthracite or manufactured smokeless fuel listed as suitable for use on closed heating appliances. DO NOT BURN bituminous coal, any petroleum based products or any liquid fuels. 6.2 Before lighting If using for the first time, or following a long period out of use check that the flue is clear and unobstructed. Check that the riddling control is free to move and is pushed fully in towards the stove. Check that the ash pan is empty, in position and the ash pan door is closed WARNING During the first few times the stove is used, the heat resistant paint will be curing, and may give off small amounts of smoke and odours. This is completely normal for this type of appliance, and the room should be well ventilated. To aid this process and not damage the stove finish, the first few times a new stove is used the fire should be kept to a moderate size, and not fired vigorously. 7 8
12 6.3 Lighting a wood fire Open the primary air control approx 1cm by turning anti-clockwise. (The circular wheel in the centre of the bottom door) Open the secondary air control fully by moving the lever fully to the left (Top right back of the stove) Place 2 or 3 firelighters or screwed up newspaper onto the fire grate with about 1 kg of kindling and light the fire with a taper. When the firelighters or newspaper are burning, leave the door ajar about 1 to 2 cm to achieve a good draw and avoid condensation. Allow the burning kindling to warm up the chimney. After 2 to 5 minutes the chimney should be warm enough create a good draw and the door can be closed. Remember Wood that is smouldering and producing smoke with no flame, is burning very inefficiently and producing unburnt gases and soot that deposit on the inside of the stove and flue and the door glass. Wood burns best when lying on a bed of about 1cm of ash. Burning the stove too slowly (with the secondary air valve closed for too long) is not recommended as this is very inefficient and produces unburnt gases and deposits in the stove. It is therefore not recommended that the stove is left lit overnight. After refuelling, increase the amount of air to get the wood lit as quickly as possible. Once lit reduce the air again. It will take time to get to know your stove and how best to operate it under different conditions. The type and condition of the wood, chimney draught, weather, wind and outside temperature will all slightly change the way the wood burns and therefore how you should use the stove. When in use, burning the stove vigorously for a short period will remove any build up of unwanted deposits on the inside of the stove and glass. Once the kindling has formed a good bed of glowing embers the stove can be refuelled with 2 or 3 pieces of wood. (do not be tempted to overfill the firebox and risk fuel falling onto the glass or out the fire as the door is opened) Close the door, and once the new fuel is burning fully close the primary air control (on the ash pan door) then just slightly open about half a turn. 6.4 Lighting a solid fuel fire Use only Manufactured Smokeless fuel If required the bottom door can be opened 1cm for a short while until the new fuel is alight. When opening the door always open gently for the first 2 to 3 cm to allow the pressure to equalise and stop smoke from escaping. The stove should not be operated with either door left open for long periods. The stove door should never be left open when the stove is in use. WARNING Do not load with solid fuel above the level of the front bars. The lighting procedure is the same as for wood, but remember.. Adjust the secondary air control to achieve the desired burning rate. Under normal chimney draft conditions expect to refuel the stove every 45 to 60 minutes. As a rule of thumb. Wood requires an air supply from the top. When burning wood efficiently open and control the fire with the secondary air control at the back of the stove and just crack open the primary air control on the bottom door. Solid fuel requires an air supply from underneath. When burning solid fuel efficiently control the fire with the primary air control at the bottom of the stove and just crack the secondary air control to keep the glass clear. 9 10
13 6.5 De-ashing the stove The action of riddling the grate will allow ash to fall from bed of the fire into the ash pan underneath. To riddle the grate place the forked end of the tool in the slot in the riddling lever located between the hinges of the bottom door. Pull and push the lever backwards and forwards and ash will fall through the grate into the ash pan. Remember When burning wood it is good to maintain a bed of ash on the grate about 1cm thick. When burning solid fuel the air is being supplied through the grate therefore it should not be allowed to get completely blocked with ash. Do not be tempted to over riddle the grate, as hot or burning fuel may fall through into the ash pan. Do not let the ash level in the ash pan get higher than the sides of the pan. This will reduce airflow to the fire through the grate. 7 Guidance on safe operation Fire can be very dangerous During operation, the stove and all the fittings (door handles and controls) get very hot. Do not overfire the stove. It is possible to fire the stove to such an extent that damage may occur. Look out for parts of the stove or flue glowing red hot. If such a situation occurs adjust the air supply accordingly to reduce the burning rate. Chimney fire In the event of a chimney fire Shut all air controls immediately Raise the alarm and evacuate the building Call the fire brigade Do not re-enter the building Fumes If installed, operated and maintained correctly the stove will not emit fumes into the room other than occasionally very small amounts when re-fuelling or de-ashing. If fumes are being emitted during normal operation Ventilate the room by opening all doors and windows. Let the fire burn out Leave the room Check the stove, flue and chimney for blockages Do not re-use the stove until the cause of the problem has been identified and rectified. If required seek expert help. To remove the ash pan use the rounded end of the tool as shown. Adverse weather conditions In a small number of installations, very occasionally in specific weather conditions (direction of wind) the draw of the chimney may be affected causing a downdraught and fumes to be emitted into the room. If this is the case the stove should not be used and advice sought from a professional flue installer who would be able to advise on possible solutions such as an anti-downdraught cowl. WARNING Take great care when removing and emptying the ash pan. It may be very hot and still contain burning or smouldering embers and is a fire risk
14 8 - Maintenance Maintenance should only be carried out when the stove is cool Before use Between burns in the stove it is good practice to keep ash and debris to a minimum. Especially empty the ash pan and ash pan section. Remember that if only burning wood it is recommended to keep a bed of ash about 1cm thick on the grate. Cleaning the stove Clean the outside of the stove with a soft brush. Regularly remove and clean the baffle and back and side air boxes of soot and debris. also clean the internal surfaces of the stove. The frequency will be dependant on how vigorously the stove has been fired and what fuel has been used. Any deposits allowed to build up in this area could reduce the lifespan of the stove. Note that if required the flue can be accessed for cleaning from inside the stove. Gaskets The rope gaskets in both doors will need regular inspection to check the condition and ensure that the doors seal and full control of the air supply to the fire can be maintained. Stove glass Clean the stove glass only when cool with a specialist glass cleaner. Use of any abrasive cleaner will scratch the glass and make subsequent cleaning more difficult. Chimney It is important to have the chimney cleaned at least once a year. Regular inspection and cleaning of the internal components of the stove can indicate if the chimney requires more frequent cleaning. If the stove has been unused for an extended period (during the summer) the chimney should be checked by a competent person before use. Note All parts that are in direct contact with the fire (grate, Baffle, back and side air boxes) are considered as normal wear parts. Their life will be dependant on how vigorously the stove is operated and they must be inspected and maintained on a regular basis. If they become worn, damaged or not positioned correctly, non wear parts such as the stove top and sides will be exposed to excessive heat and may be damaged. Fire will not burn The fuel is too wet and not suitable Air inlets to the stove are blocked The flue is blocked or restricted Inadequate air supply into the room Soot build up on glass 9 Fault Finding Fuel is too wet Fuel pieces are too large and smouldering rather than burning. The stove operating temperature is too low The stove is being run too slow with not enough air Poor chimney draft Too little secondary air washing over the window Excessive wear on internal parts Stove fired too vigorously Too little air passing through the bottom grate Use of wood that is too dry (eg wood from old furniture) 10 Spare Parts A full range of products are available to maintain your stove including :- Rope Rope Glue Glass cleaner Stove paint All individual components of the hobbit are available as spares. For the complete list of available spares with prices go to Salamanderstoves.co.uk Remember If the stove is not to be used for an extended period set both air controls to half open to allow an airflow through the stove and avoid condensation

15 11 - Specification Copy of the CE plate attached to the stove Test refuelling interval Wood 1 hour Manufactured smokeless fuel 2 hours Flue mass gas flow g/s Wood 4.3 Manufactured smokeless fuel 5.1 Total net efficiency Wood 74.7% Manufactured smokeless fuel 68.7% Gross efficiency Wood 67.9% Manufactured smokeless fuel 67% Tests conducted by CRE Ltd at 12Pa flue draught 15
16 Installation and Operating Instructions Installation and operating instructions for the Hobbit SE model 0901 (Ref 0901SE March 2013) Section Contents Page 1 The Clean Air Act 1993 and Smoke 3 Control Areas The Hobbit 2 Air Control modifications to assure smokeless 3 operation 3 Important information about installing and 4 using the Hobbit SE stove The Hobbit 4 Unpacking the Hobbit Stove 5 5 Assembly of the Hobbit Stove 6 6 Components of the Hobbit stove 7 7 Installation of the Hobbit 8 8 Operating instructions Fuel 8.2 Before lighting 8.3 Lighting a wood fire 8.4 Re-fuelling 8.5 De-ashing the stove 9 Guidance on safe operation Maintenance 14 Salamander Hobbit SE Model 0901 Exempt under the Clean Air Act 1993 for use within UK Smoke Control Areas 11 Fault finding Spare parts 15 2
17 1 - The Clean Air Act 1993 and Smoke Control Areas Under the Clean Air Act local authorities may declare the whole or part of the district of the authority to be a smoke control area. It is an offence to emit smoke from a chimney of a building, from a furnace or from any fixed boiler if located in a designated smoke control area. It is also an offence to acquire an "unauthorised fuel" for use within a smoke control area unless it is used in an "exempt" appliance ("exempted" from the controls which generally apply in the smoke control area). The Secretary of State for Environment, Food and Rural Affairs has powers under the Act to authorise smokeless fuels or exempt appliances for use in smoke control areas in England. In Scotland and Wales this power rests with Ministers in the devolved administrations for those countries. Separate legislation, the Clean Air (Northern Ireland) Order 1981, applies in Northern Ireland. Therefore it is a requirement that fuels burnt or obtained for use in smoke control areas have been "authorised" in Regulations and that appliances used to burn solid fuel in those areas (other than "authorised" fuels) have been exempted by an Order made and signed by the Secretary of State or Minister in the devolved administrations. The Hobbit SE has been recommended as suitable for use in smoke control areas when burning wood. Further information on the requirements of the Clean Air Act can be found here : Your local authority is responsible for implementing the Clean Air Act 1993 including designation and supervision of smoke control areas and you can contact them for details of Clean Air Act requirements 2 - Air Control modifications to assure smokeless Operation To assure smokeless operation on the Hobbit SE, the following modifications were made to the primary and secondary air supply controls. 3 - Important information about installing and using the Hobbit stove PLEASE READ THESE INSTRUCTIONS CAREFULLY For your safety it is very important that your stove is correctly installed. Take care when assembling and moving the stove. It is made of cast iron and is very heavy (47kg) All national and local regulations, including those referring to national and European standards need to be complied with when installing the stove. The stove must be installed by a registered installer or approved by your local building control officer. Only use for domestic heating purposes only. Burn only approved fuels (Wood or smokeless fuel). Do not use petroleum based products or use as an incinerator. This stove will become very hot whilst in operation and due care should be taken. Use only the tool provided to operate the door handles, air controls, riddling control and ash pan. Always use a fireguard in the presence of children, the elderly or the infirm. Do not place flammable objects on or near the stove. The stove must NOT be installed into a chimney that serves any other appliance and is suitable for intermittent burning. Primary air Control A 1mm spacer installed behind the primary air wheel to ensure the minimum air setting is maintained. Secondary air Control Six 8mm air inlets added to the secondary air supply valve on the rear of the stove to ensure the minimum air setting is maintained. There must be a suitable air supply into the room where the stove is installed and care should be taken so it is not possible to block the front or back air inlets to the stove. There must NOT be an extractor fan in the same room as the stove as this may cause fumes to be emitted into the room. Do not make unauthorised changes or modifications to the stove and use only recommended spare parts. The stove and chimney flue must be regularly cleaned. It is especially important to check for blockages following a prolonged shutdown period. It is recommended that the stove and flue is regularly maintained by a competent engineer. 3 4


18 4 Unpacking the Hobbit Stove TAKE CARE Remember the stove is made of cast iron and is very heavy. 5 Assembly of the Hobbit Stove The stove is supplied with the flue collar fitted to the top. If the installation requires the flue to exit from the rear of the stove, swap the collar for the blanking plate on the back before assembling the firebox as described below. Carefully open the firebox door and remove the packing. Inside the stove will be the following items 5.1 Lay the stove carefully on its side and attach one leg to each corner of the base using the bolts and washers. Carefully lift the stove back upright to rest on its feet. Packing list for the Salamander Hobbit 1 Stove body with grate and grate centre installed. 2 Legs x 4 3 Leg bolts with washers x 4 4 Back air box 5 left Air Box 6 Right Air Box 7 Baffle Plate 8 Fire bars 9 Ash pan 10 Salamander multipurpose tool 11 Dustpan and brush 5.2 Check that the grate and grate centre is located correctly and sitting horizontal in the stove. Check the riddling mechanism operates and moves freely. 5.3 Build the firebox inside the stove by locating first the rear air box. then the baffle. then the left fire brick, followed by the right fire brick. The weight of the baffle holds the assembly together. 5 6
19 7 Installation of the Hobbit 6 Components of the Hobbit Stove PLEASE READ THESE INSTRUCTIONS CAREFULLY For your safety it is very important that your stove is correctly installed. Salamander Stoves cannot accept any responsibility for any fault arising through incorrect installation or use. The Hobbit SECONDARY AIR CONTROL FIREBOX DOOR 7.1 Regulations All national and local regulations, including those referring to national and European standards need to be complied with when installing the stove. 7.2 Installation The stove must be installed by a registered installer or approved by your local building control officer. 7.3 Safety clearances The stove must be installed with the following minimum safety clearances from combustible materials. Side Rear 400mm 450mm If the stove is to be installed in a non combustible recess it is recommended that 100mm clearance is left at the back and sides for maintenance and to allow air to circulate around the stove. PRIMARY AIR CONTROL GRATE RIDDLING LEVER 7.4 Floor National and local building regulations must be complied with when considering the floor or hearth where the stove is to be installed. The floor must be capable of bearing the weight of the stove and the hearth temperature which on test was measured at 66.4 deg C on full fire. 7.5 Access for cleaning Although access to the flue can be gained by removing the stove firebox components, consideration must be given to installing extra access in the flue system to ensure all sections can be cleaned and maintained. ASHPAN DOOR 7 8
20 8.1 Fuel 8 Operating Instructions Wood Use only seasoned timber with a moisture content of less than 20%. Typically this means wood which has been cut and stored in an open dry shelter for between one and two years. The maximum log size is 200mm x 100mm x 100mm (8" x 4" x 4") DO NOT BURN wet or unseasoned wood, construction timber, painted or treated wood, driftwood or manufactured board products. Doing so will result in the wood burning inefficiently and excess smoke, soot and tar will be produced. This will coat and damage the internal components of the stove and flue and could result in a chimney fire. 8.2 Before lighting If using for the first time, or following a long period out of use check that the flue is clear and unobstructed. Check that the riddling control is free to move and is pushed fully in towards the stove. Check that the ash pan is empty, in position and the ash pan door is closed WARNING During the first few times the stove is used, the heat resistant paint will be curing, and may give off small amounts of smoke and odours. This is completely normal for this type of appliance, and the room should be well ventilated. To aid this process and not damage the stove finish, the first few times a new stove is used the fire should be kept to a moderate size, and not fired vigorously. 8.3 Lighting a wood fire Open the primary air control approx 1cm by turning anti-clockwise. (The circular wheel in the centre of the bottom door) Open the secondary air control fully by moving the lever fully to the left (Top right back of the stove) Place 2 or 3 firelighters or screwed up newspaper onto the fire grate with about 1 kg of kindling and light the fire with a taper. When the firelighters or newspaper are burning, leave the door ajar about 1 to 2 cm to achieve a good draw and avoid condensation. Allow the burning kindling to warm up the chimney. After 2 to 5 minutes the chimney should be warm enough create a good draw and the door can be closed. Once the kindling has formed a good bed of glowing embers the stove can be refuelled with 2 or 3 pieces of wood. (do not be tempted to overfill the firebox and risk fuel falling onto the glass or out the fire as the door is opened OVERFUELLING CAN ALSO CAUSE EXCESS SMOKE) Close the door, and once the new fuel is burning fully close the primary air control (on the ash pan door) then just slightly open about half a turn. If required the bottom door can be opened 1cm for a short while until the new fuel is alight. When opening the door always open gently for the first 2 to 3 cm to allow the pressure to equalise and stop smoke from escaping. The stove should not be operated with either door left open for long periods as excess smoke may be generated. The stove door should never be left open when the stove is in use. Adjust the secondary air control to achieve the desired burning rate. Under normal chimney draft conditions expect to refuel the stove every 45 to 60 minutes. Operation with the air controls open can cause excess smoke. The stove must not be operated with the air controls or door left open except as directed in these instructions. 8.4 Refuelling If there is insufficient burning material in the firebed to light a new fuel charge, excessive smoke emission can occur. Refuelling must be carried out onto a sufficient quantity of glowing embers and ash that the new fuel charge will ignite in a reasonable period. If there are too few embers in the fire bed, add suitable kindling to prevent excessive smoke 9 10

21 Remember Wood that is smouldering and producing smoke with no flame, is burning very inefficiently and producing unburnt gases and soot that deposit on the inside of the stove and flue and the door glass. Wood burns best when lying on a bed of about 1cm of ash. Burning the stove too slowly (with the secondary air valve closed for too long) is not recommended as this is very inefficient and produces unburnt gases and deposits in the stove. It is therefore not recommended that the stove is left lit overnight. After refuelling, increase the amount of air to get the wood lit as quickly as possible. Once lit reduce the air again. To remove the ash pan use the rounded end of the tool as shown. It will take time to get to know your stove and how best to operate it under different conditions. The type and condition of the wood, chimney draught, weather, wind and outside temperature will all slightly change the way the wood burns and therefore how you should use the stove. When in use, burning the stove vigorously for a short period will remove any build up of unwanted deposits on the inside of the stove and glass. 8.5 De-ashing the stove WARNING Take great care when removing and emptying the ash pan. It may be very hot and still contain burning or smouldering embers and is a fire risk. The action of riddling the grate will allow ash to fall from bed of the fire into the ash pan underneath. To riddle the grate place the forked end of the tool in the slot in the riddling lever located between the hinges of the bottom door. Pull and push the lever backwards and forwards and ash will fall through the grate into the ash pan. Remember When burning wood it is good to maintain a bed of ash on the grate about 1cm thick. Do not be tempted to over riddle the grate, as hot or burning fuel may fall through into the ash pan. Do not let the ash level in the ash pan get higher than the sides of the pan. This will reduce airflow to the fire through the grate
22 9 Guidance on safe operation 10 - Maintenance Fire can be very dangerous During operation, the stove and all the fittings (door handles and controls) get very hot. Do not overfire the stove. It is possible to fire the stove to such an extent that excess smoke may be generated or damage may occur. Look out for parts of the stove or flue glowing red hot. If such a situation occurs adjust the air supply accordingly to reduce the burning rate. Chimney fire In the event of a chimney fire Shut all air controls immediately Raise the alarm and evacuate the building Call the fire brigade Do not re-enter the building Fumes If installed, operated and maintained correctly the stove will not emit fumes into the room other than occasionally very small amounts when re-fuelling or de-ashing. If fumes are being emitted during normal operation Ventilate the room by opening all doors and windows. Let the fire burn out Leave the room Check the stove, flue and chimney for blockages Do not re-use the stove until the cause of the problem has been identified and rectified. If required seek expert help. Adverse weather conditions In a small number of installations, very occasionally in specific weather conditions (direction of wind) the draw of the chimney may be affected causing a downdraught and fumes to be emitted into the room. If this is the case the stove should not be used and advice sought from a professional flue installer who would be able to advise on possible solutions such as an anti-downdraught cowl. Maintenance should only be carried out when the stove is cool Before use Between burns in the stove it is good practice to keep ash and debris to a minimum. Especially empty the ash pan and ash pan section. Remember that if only burning wood it is recommended to keep a bed of ash about 1cm thick on the grate. Cleaning the stove Clean the outside of the stove with a soft brush. Regularly remove and clean the baffle and back and side air boxes of soot and debris. also clean the internal surfaces of the stove. The frequency will be dependant on how vigorously the stove has been fired and what fuel has been used. Any deposits allowed to build up in this area could reduce the lifespan of the stove. Note that if required the flue can be accessed for cleaning from inside the stove. Gaskets The rope gaskets in both doors will need regular inspection to check the condition and ensure that the doors seal and full control of the air supply to the fire can be maintained. Stove glass Clean the stove glass only when cool with a specialist glass cleaner. Use of any abrasive cleaner will scratch the glass and make subsequent cleaning more difficult. Chimney It is important to have the chimney cleaned at least once a year. Regular inspection and cleaning of the internal components of the stove can indicate if the chimney requires more frequent cleaning. If the stove has been unused for an extended period (during the summer) the chimney should be checked by a competent person before use. Note All parts that are in direct contact with the fire (grate, Baffle, back and side air boxes) are considered as normal wear parts. Their life will be dependant on how vigorously the stove is operated and they must be inspected and maintained on a regular basis. If they become worn, damaged or not positioned correctly, non wear parts such as the stove top and sides will be exposed to excessive heat and may be damaged. Remember If the stove is not to be used for an extended period set both air controls to half open to allow an airflow through the stove and avoid condensation
23 11 Fault Finding Fire will not burn The fuel is too wet and not suitable Air inlets to the stove are blocked The flue is blocked or restricted Inadequate air supply into the room CE Plate Soot build up on glass Fuel is too wet Fuel pieces are too large and smouldering rather than burning. The stove operating temperature is too low The stove is being run too slow with not enough air Poor chimney draft Too little secondary air washing over the window Excessive wear on internal parts Stove fired too vigorously Too little air passing through the bottom grate Use of wood that is too dry (eg wood from old furniture) 12 Spare Parts A full range of products are available to maintain your stove including :- Rope Rope Glue Glass cleaner Stove paint All individual components of the hobbit are available as spares. For the complete list of available spares with prices go to Salamanderstoves.co.uk 15 16

24 Additional Information for the Installation and Use of the Hobbit in Small Craft Section Contents Page 1 Additional Information for the installation of a Hobbit Stove in a small craft 3 The Hobbit 2 Operating Instructions for the hobbit stove in a small craft 4 The Hobbit 3 Maintenance 5 4 Safe storage of fuel 6 5 Advice on the fitting of suitable alarms 6 6 General safety advice 7 Salamander Hobbit Model 0901 Multifuel Stove 2
25 These instructions should be read in conjunction with the standard installation and operating instructions supplied with the stove. They provide additional information, advice and warnings which apply if the stove is to be installed on a small craft and comply with the current standard BS 8511: Operating Instructions for the hobbit stove in a small craft Please refer to the standard operating instructions for information on the safe and efficient use of the stove including lighting procedures, method of re-fuelling including max height of fuel in the firebox, the operation of all controls and devices and advice on regular maintenance. In addition, the following warnings apply when the stove is installed on a small craft:- 1 Additional Information for the installation of a Hobbit Stove in a small craft The Hobbit Stove conforms to the construction and performance requirements of BS EN and is therefore suitable in respect of design, construction, installation and safety for use on boats. However, when installing The Hobbit in a small craft such as a canal boat or narrow boat, it should be fitted by a competent person with previous relevant experience of installation of appliances in small craft following British Standard BS 8511:2010 Code of practice for the installation of solid fuel heating and cooking appliances in small craft. BS 8511:2010 Code of practice for the installation of solid fuel heating and cooking appliances in small craft WARNINGS NEVER leave the craft unattended, or travel through tunnels when the stove is in use without checking that the appliance has not been over-fuelled and ensuring that the controls are appropriately set to prevent over-firing. NEVER refuel the stove when retiring for the night without first checking that the appliance has not been over-fuelled and ensuring that the controls are appropriately set to prevent over-firing. NEVER operate the stove with the firebox door or ashpan door open, except for refuelling and removal of ashes, as this may over-fire the appliance with consequential damage to the appliance and danger of boat fire. NEVER Block or restrict the ventilators to the cabin. NEVER fill any petrol tank on or near the craft when a solid fuel appliance is in use. This British Standard code of practice was published by BSi in Feb 2010 and came into effect in Feb The code covers appliance selection, design considerations, installation requirements (including chimney arrangements), inspection and testing, and necessary safety information concerning maintenance and the safe use of solid fuel appliances on boats. WARNING If the appliance is not installed to the recommendations a boat fire or carbon monoxide poisoning might result; however, any installation does not guarantee against such occurrences in all circumstances. 3 4
26 3 - Maintenance 2.1 Sweeping Maintenance should only be carried out when the stove is cool It is important to have the stove and flue swept at least once every 6 months when installed in a small craft as advised in BS Chemical cleaners should not be used as a substitute for sweeping. Regular inspection and cleaning of the internal components of the stove can indicate if the chimney requires more frequent cleaning. Any damaged or worn item should be replaced using original parts from the stove supplier, or compatible with the original part in compliance with BS If the stove has been unused for an extended period (during the summer) the chimney should be checked by a competent person before use. The flue should be inspected at least once per year throughout its length for dents, external damage, internal or external corrosion or obstruction and any damaged item replaced. Note All parts that are in direct contact with the fire (grate, Baffle, back and side air boxes) are considered as normal wear parts. Their life will be dependant on how vigorously the stove is operated and they must be inspected and maintained on a regular basis. If they become worn, damaged or not positioned correctly, non wear parts such as the stove top and sides will be exposed to excessive heat and may be damaged. 2.2 Cleaning the stove Clean the outside of the stove with a soft brush. Regularly remove and clean the baffle and back and side air boxes of soot and debris. also clean the internal surfaces of the stove. The frequency will be dependant on how vigorously the stove has been fired and what fuel has been used. Any deposits allowed to build up in this area could reduce the lifespan of the stove. Note that if required the flue can be accessed for cleaning from inside the stove. 2.3 Gaskets The rope gaskets in both doors will need regular inspection (at least once per year) to check the condition and ensure that the doors seal and full control of the air supply to the fire can be maintained. 2.4 Stove glass Clean the stove glass only when cool with a specialist glass cleaner. Use of any abrasive cleaner will scratch the glass and make subsequent cleaning more difficult. 2.5 Cabin Ventilation Cabin grills and vents should be regularly inspected to ensure they have not become blocked with debris such as insects, leaves or fluff. 4 Safe storage of fuel 3.1 All solid fuel should be stored dry and away from sources of heat. 3.2 Wood logs should be stowed under cover with adequate ventilation. 3.3 Under no circumstances should fuel be placed on the hearth, or near other sources of heat 3.4 Solid fuel should not be stored within 600mm of the appliance unless separated by a non combustible partition. 3.5 Flammable liquids, gas bottles, aerosols etc. should be stored in a separate area wellaway from the appliance and not within the accommodation area. Smoke Alarms 5 Advice on the fitting of suitable alarms At least one suitable and effective smoke alarm should be fitted in a suitable location. Alarms should be mounted on the deckhead or headlining, at least 300mm from the cabin sides and within 5m of each protected area of the vessel. On some craft this may mean installing more than one alarm, and it is recommended to fit units that can be linked together. The smoke alarm should be capable of waking any occupant sleeping aboard the craft. The alarm should be tested with this in mind before the final fixing is made. The smoke alarm should be of the optical or photoelectrical type since these are particularly sensitive to dense smoke such as produced from a smouldering fire. The smoke alarm should be fitted with an extra-long life battery and have a hush button to allow for temporary deactivation. It should be tested as part of a boaters normal boarding routine. (For more information ref BS and BS EN 14604) Carbon Monoxide Alarm Consideration should be given to the fitting of a carbon monoxide alarm suitable for marine use and certified to BS EN Remember If the stove is not to be used for an extended period set both air controls to half open to allow an airflow through the stove and avoid condensation. 5 6
27 6 General safety advice In addition to the safety information contained in the standard installation and operating instructions, when installing in a small craft the following advice should be followed. 4.1 Before lighting ensure the chimney is fully erected and not capped. 4.2 Do not place or hang any combustible material such as towels or clothing on the hearth or above the stove. 4.3 Ensure and combustible item such as soft furnishing, curtains, furniture, posters and ornaments are at a minimum 600mm from the appliance and cannot fall or swing nearer to the stove or flue. 4.4 Any signs of heat damage of combustible material, eg charring, singing or seepage of liquid (lignin), or of suspicious smells in the vicinity of the appliance or flue pipe should be investigated immediately. The appliance should not be used until the cause is identified and rectified. 4.5 Oil or gas lamps should not be located above or within 600mm of the appliance, or in any position where fuel spillage from the lamp, either when in position or when dislodged, could hit any surface of the stove or flue. 4.6 Do not use the appliance if any part of the casing, flue pipe or door glass is cracked or if the flue or door seals are leaking, if it is missing parts or has been modified. 4.7 consider a fireguard manufactured to BS Fume emission into the cabin is dangerous and could lead to carbon monoxide poisoning. If fume emissions persist the following immediate actions should be taken:- a) Open doors and windows to ventilate the cabin. b) Let the fire out or eject and safely dispose of fuel from the appliance. c) Check the flue for blockage and clean if required. d) Do not attempt to relight the fire until the cause of the fume emission has been identified and corrected. If necessary seek advice from a competent person. 4.9 If there is a chimney fire the following immediate actions should be taken a) Reduce the appliance burning rate by closing all air controls (if safe to do so) b) Remove furniture and rugs away from the appliance (if safe to do so) c) Place a fireguard or spark guard in front of the appliance (if safe to do so) d) If necessary raise the alarm, vacate the craft and if possible let occupants of adjacent craft and buildings know e) If necessary call the fire brigade and determine the best means for the fire brigade to access the craft and wait for their arrival well away from the craft. 7 8
Installation and Operating. Instructions. Multifuel Stove. Salamander. Model Lighting a solid fuel fire. 6.5 De-ashing the stove
 Installation and Operating Instructions Salamander Model 0901 Multifuel Stove Section Contents Page 1 Important information about installing and 3 using the Salamander stove 2 Unpacking the Salamander
Saltfire ST1 INSTALLATION AND OPERATING INSTRUCTIONS.
 Saltfire ST1 INSTALLATION AND OPERATING INSTRUCTIONS. INTRODUCTION SAFETY Safety is the most important consideration when using and installing your stove. If not installed and used correctly, a house fire
IN THE EVENT OF CHIMNEY FIRE, EVACUATE THE PROPERTY AND CALL THE EMERGENCY SERVICES.
 Ekol Clarity 12 INSTALLATION AND OPERATING INSTRUCTIONS. INTRODUCTION SAFETY Safety is the most important consideration when using and installing your stove. If not installed and used correctly, a house
Saltfire ST4 INSTALLATION AND OPERATING INSTRUCTIONS.
 Saltfire ST4 INSTALLATION AND OPERATING INSTRUCTIONS. INTRODUCTION SAFETY Safety is the most important consideration when using and installing your stove. If not installed and used correctly, a house fire
IN THE EVENT OF CHIMNEY FIRE, EVACUATE THE PROPERTY AND CALL THE EMERGENCY SERVICES.
 EKOL INSET 8 INSTALLATION AND OPERATING INSTRUCTIONS INTRODUCTION. SAFETY Safety is the most important consideration when using and installing your stove. If not installed and used correctly, a house fire
EKOL CRYSTAL-8 INSTALLATION AND OPERATING INSTRUCTIONS
 EKOL CRYSTAL-8 INSTALLATION AND OPERATING INSTRUCTIONS INTRODUCTION SAFETY Safety is the most important consideration when using and installing your stove. If not installed and used correctly, a house
INSTRUCTIONS FOR INSTALLATION, USE AND MAINTENANCE YSEN
 INSTRUCTIONS FOR INSTALLATION, USE AND MAINTENANCE YSEN READ THE INSTRUCTION BOOKLET AND THESE SUPPLEMENTARY INSTRUCTIONS CAREFULLY BEFORE INSTALLATION These instructions together with those in the instruction
Harrie Leenders Fuga el - Instructions for Installation, Use and Maintenance INSTRUCTIONS FOR INSTALLATION, USE AND MAINTENANCE
 INSTRUCTIONS FOR INSTALLATION, USE AND MAINTENANCE FUGA el 1 2 1. Flue 2. Case 3. Ceramic glass 4. Aeration slide 5. Convection fins 6. Door handle 7. Base 3 4 READ THE INSTRUCTION BOOKLET AND THESE SUPPLEMENTARY
Installation Instructions. Woolly Mammoth Stoves Albert Road, Braintree, Essex, CM7 3JQ
 Installation Instructions Woolly Mammoth Stoves 20-28 Albert Road, Braintree, Essex, CM7 3JQ INSTALLATION INSTRUCTIONS TO BE READ IN CONJUNCTION WITH THOSE IN THE INSTRUCTION BOOKLET These instructions
MULTI-FUEL STOVE INSTALLATION AND USER INSTRUCTIONS
 PRIORY MULTI-FUEL STOVE INSTALLATION AND USER INSTRUCTIONS The Priory stove has a nominal heat output of 8Kw. and a weight of 80 kg. The flue gas mass flow is 5.4g/s for mineral fuel and 6.3g/s for wood
Installation and Operating Instructions
 Installation and Operating Instructions Wood-burning Stove Model: Ottawa 7kw INTRODUCTION Wood-burning Stove Item No.: Ottawa 7kw SAFETY Safety is the most important consideration when using and installing
Saltfire ST3 INSTALLATION AND OPERATING INSTRUCTIONS.
 Saltfire ST3 INSTALLATION AND OPERATING INSTRUCTIONS. INTRODUCTION SAFETY Safety is the most important consideration when using and installing your stove. If not installed and used correctly, a house fire
INSTRUCTIONS FOR INSTALLATION, USE AND MAINTENANCE RAIS PILAR 13 L & PILAR 13 H
 INSTRUCTIONS FOR INSTALLATION, USE AND MAINTENANCE RAIS PILAR 13 L & PILAR 13 H IMPORTANT INFORMATION On first lighting the stove you must be careful not to touch the painted surfaces and it is MOST IMPORTANT
Installation and Operating Instructions
 Installation and Operating Instructions Wood-burning Stove Model: Ottawa 5kw INTRODUCTION Wood-burning Stove Item No.: Ottawa 5kw curve SAFETY Safety is the most important consideration when using and
Installation and Operating Instructions. Ottawa 12kw
 Installation and Operating Instructions Ottawa 12kw 1 Wood-burning Stove Model: Ottawa 12kw Size: W580XD410XH610MM INTRODUCTION Wood-burning Stove Item No.: Ottawa 12.3kw Size: W580XD410XH610MM SAFETY
Glás Non Boiler Insert
 Glás Non Boiler Insert Installation & Operating Instructions Table of content Page no: 1. Technical data................... 1/2 2. General Information. 3/6 3. Installation Instructions................
T e l:
 Dean Stoves Dean Forge Fabrication Ltd. Dean Prior, Buckfastleigh, Devon TQ11 0LS T e l: 0 1 3 6 4 6 4 3 5 7 4 w w w.d e a n f o r g e.c o.u k e m a i l: s t o v e s @ d e a n-f o r g e.c o.u k Operating
T e l:
 Dean Stoves Dean Forge Fabrication Ltd. Dean Prior, Buckfastleigh, Devon TQ11 0LS T e l: 0 1 3 6 4 6 4 3 5 7 4 w w w.d e a n f o r g e.c o.u k e m a i l: s t o v e s @ d e a n-f o r g e.c o.u k Operating
Dean Forge Fabrication Ltd. Dean Prior, Buckfastleigh, Devon TQ11 0LS. T e l:
 Dean Stoves Dean Forge Fabrication Ltd. Dean Prior, Buckfastleigh, Devon TQ11 0LS T e l: 0 1 3 6 4 6 4 3 5 7 4 w w w.d e a n f o r g e.c o.u k e m a i l: s t o v e s @ d e a n-f o r g e.c o.u k Operating
Reference: Ottawa 12kw Operating Instructions Version 1 04/06/15. Installation and Operating Instructions
 Reference: Ottawa 12kw Operating Instructions Version 1 04/06/15 Installation and Operating Instructions Wood-burning Stove Model: Ottawa 12kw Size: W580XD410XH610MM 1 INTRODUCTION Wood-burning Stove Item
BRANSDALE DOUBLE SIDED WOOD BURNING STOVE
 BRANSDALE DOUBLE SIDED WOOD BURNING STOVE INSTALLATION AND USER INSTRUCTIONS Read these instructions carefully before installation and use. These instructions should be retained by the user for future
Saltfire ST-X5 INSTALLATION AND OPERATING INSTRUCTIONS
 Saltfire ST-X5 INSTALLATION AND OPERATING INSTRUCTIONS INTRODUCTION SAFETY Safety is the most important consideration when using and installing your stove. If not installed and used correctly, a house
T e l: Operating Instructions for the Dean Forge Hembury 6 & 8
 Dean Stoves Dean Forge Fabrication Ltd. Dean Prior, Buckfastleigh, Devon TQ11 0LS T e l: 0 1 3 6 4 6 4 3 5 7 4 w w w.d e a n f o r g e.c o.u k e m a i l: s t o v e s @ d e a n-f o r g e.c o.u k Operating
WELBURN DOUBLE SIDED MULTI-FUEL STOVE
 WELBURN DOUBLE SIDED MULTI-FUEL STOVE INSTALLATION AND USER INSTRUCTIONS Read these instructions carefully before installation and use. These instructions should be retained by the user for future reference.
WOOD BURNING STOVES. Installation and Operating Instructions
 WOOD BURNING STOVES IOJ IOJ IOJ O IOJ IOJ IOJ IOJ IOJ IOJ O IOJ IOJ IOJ Installation and Operating Instructions IMPORTANT Installation MUST ONLY be carried out by a Gas Safe registered engineer/installer
Saltfire ST2 INSTALLATION AND OPERATING INSTRUCTIONS.
 Saltfire ST2 INSTALLATION AND OPERATING INSTRUCTIONS. INTRODUCTION SAFETY Safety is the most important consideration when using and installing your stove. If not installed and used correctly, a house fire
Norvik 5 Multi-fuel stove 80% Efficient
 Installation & Operating Instruction Norvik 5 Multi-fuel stove 80% Efficient This stove is designed for intermittent use and is tested and manufactured as a closed multi-fuel appliance. Cast Tec recommend
LITTLE THURLOW MULTI-FUEL STOVE
 LITTLE THURLOW MULTI-FUEL STOVE INSTALLATION AND USER INSTRUCTIONS Read these instructions carefully before installation and use. These instructions should be retained by the user for future reference.
SALTBURN SMOKE CONTROL / DALBY SMOKE CONTROL WOOD BURNING STOVE INSTALLATION AND USER INSTRUCTIONS
 SALTBURN SMOKE CONTROL / DALBY SMOKE CONTROL WOOD BURNING STOVE INSTALLATION AND USER INSTRUCTIONS Read these instructions carefully before installation and use. These instructions should be retained by
T e l: The Dean Stoves, 105Se inset has been recommended as suitable for use in smoke control areas when burning wood logs.
 Dean Stoves Dean Forge Fabrication Ltd. Dean Prior, Buckfastleigh, Devon TQ11 0LS w w w.d e a n f o r g e.c o.u k T e l: 0 1 3 6 4 6 4 3 5 7 4 e m a i l: s t o v e s @ d e a n-f o r g e.c o.u k Operating
INSTALLATION AND USER INSTRUCTIONS
 WELBURN MULTI-FUEL STOVE INSTALLATION AND USER INSTRUCTIONS Read these instructions carefully before installation and use. These instructions should be retained by the user for future reference. The Welburn
T e l:
 Dean Stoves Dean Forge Fabrication Ltd. Dean Prior, Buckfastleigh, Devon TQ11 0LS T e l: 0 1 3 6 4 6 4 3 5 7 4 w w w.d e a n f o r g e.c o.u k e m a i l: s t o v e s @ d e a n-f o r g e.c o.u k Operating
WoodBurningStove. Instalation&Operation Guide
 WoodBurningStove Instalation&Operation Guide Toensureyourstoveworkssafelyandeficiently,itisimportantthatthe instalationofyoursolidfuelstoveiscariedoutbyatrainedand competentinstaler. InstalationsmustcomplywithUKBuildingRegulations.
Dean Forge Fabrication Ltd. Dean Prior, Buckfastleigh, Devon TQ11 0LS. T e l:
 Dean Stoves Dean Forge Fabrication Ltd. Dean Prior, Buckfastleigh, Devon TQ11 0LS T e l: 0 1 3 6 4 6 4 3 5 7 4 w w w.d e a n f o r g e.c o.u k e m a i l: s t o v e s @ d e a n-f o r g e.c o.u k Operating
T e l: Operating Instructions for the Dean Forge Clearburn Range (Excluding Junior and Junior SE)
") Dean Stoves Dean Forge Fabrication Ltd. Dean Prior, Buckfastleigh, Devon TQ11 0LS T e l: 0 1 3 6 4 6 4 3 5 7 4 w w w.d e a n f o r g e.c o.u k e m a i l: s t o v e s @ d e a n-f o r g e.c o.u k Operating
Dean Stoves Dean Forge Fabrication Ltd. Dean Prior, Buckfastleigh, Devon TQ11 0LS T e l: 0 1 3 6 4 6 4 3 5 7 4 w w w.d e a n f o r g e.c o.u k e m a i l: s t o v e s @ d e a n-f o r g e.c o.u k Operating
Installation and Operating Instructions
 Installation and Operating Instructions Multi-Fuel Stove Model - Purefire 5kw Curve Approved under (Ottawa 5kw Curve SE01) SE01, version 5, 26/02/2016 INTRODUCTION Multi-Fuel Stove Model Purefire 5kw Curve
Intrepid 2 Intrepid 3
 Intrepid 2 Intrepid 3 Model Nos. V 10 / V10-3 NAT GAS Model Nos. V12 / V12-3 L.P.G DECORATIVE COAL EFFECT GAS STOVE USER INSTRUCTIONS This appliance is only for use on Natural Gas (G20) at a supply pressure
ROSEDALE SMOKE CONTROL STOVE INSTALLATION AND USER INSTRUCTIONS
 ROSEDALE SMOKE CONTROL STOVE INSTALLATION AND USER INSTRUCTIONS Read these instructions carefully before installation and use. These instructions should be retained by the user for future reference. The
FIREWARM INSET STOVE FW5C. Installation and Operating Instructions
 FIREWARM INSET STOVE 5kW Nominal Output FW5C Installation and Operating Instructions Please hand these instructions to the stove user when the installation is complete. Leave the stove ready for operation
Dean Forge Fabrication Ltd. Dean Prior, Buckfastleigh, Devon TQ11 0LS. T e l:
 Dean Stoves Dean Forge Fabrication Ltd. Dean Prior, Buckfastleigh, Devon TQ11 0LS T e l: 0 1 3 6 4 6 4 3 5 7 4 w w w.d e a n f o r g e.c o.u k e m a i l: s t o v e s @ d e a n-f o r g e.c o.u k Operating
AVALON 4. CleanBurn Stove Installation and Operating Instructions. JINAVA04 RevC 13/06/12
 AVALON 4 CleanBurn Stove Installation and Operating Instructions Avalon 4 Technical Specification Appliance Mass 88 kg Total Efficiency 78.0 % Nominal Heat Output 4.0 kw Mean CO Emission (@13% O 2 ) 0.44
THORNTON DALE MULTI-FUEL STOVE
 THORNTON DALE MULTI-FUEL STOVE INSTALLATION AND USER INSTRUCTIONS Read these instructions carefully before installation and use. These instructions should be retained by the user for future reference.
HERALD COMPACT 5 Wood Burning Stove. Installation and Operating Instructions. JINHHC05WB RevA 27/04/12
 HERALD COMPACT 5 Wood Burning Stove Installation and Operating Instructions Herald Compact 5 Technical Specification Appliance Mass 95 kg Total Efficiency 76.0 % Nominal Heat Output 4.5 kw Mean CO Emission
CONSORT 7. CleanBurn Stove. Installation and Operating Instructions. JINCNS07 RevF 27/04/12
 CONSORT 7 CleanBurn Stove Installation and Operating Instructions Consort 7 Technical Specification Appliance Mass 111 kg Total Efficiency 75.9 % Nominal Heat Output 5.5 kw Mean CO Emission (@13% O 2 )
CONSORT 5. CleanBurn Stove. Installation and Operating Instructions. JINCND05 RevG 14/05/14
 CONSORT 5 CleanBurn Stove Installation and Operating Instructions Consort 5 Technical Specification Appliance Mass 85 kg Total Efficiency 78.0 % Nominal Heat Output 4.0 kw Mean CO Emission (@13% O 2 )
Installation and Operating Instructions
 Heritage 5 (5kw) Woodburning Stove Installation and Operating Instructions Vesta Stoves. 197 Hesketh Lane. Tarleton. Lancashire. PR4 6AT Tel 01704 828067 1 2 Annual servicing 3 General Safety Advice Properly
CONSORT COMPACT. CleanBurn Stove Installation and Operating Instructions. JINCNC05 RevF 27/04/12
 CONSORT COMPACT 5 CleanBurn Stove Installation and Operating Instructions Consort Compact 5 Technical Specification Appliance Mass 95 kg Total Efficiency 76.0 % Nominal Heat Output 4.5 kw Mean CO Emission
HERALD 6 CE. Installation and Operating Instructions
 HERALD 6 CE M U L T I F U E L C L E A N B U R N S T O V E Installation and Operating Instructions A Hetas certified engineer must carry out the installation of this appliance; alternatively, your local
C O N S O R T 9 S L I M L I N E
 C O N S O R T 9 S L I M L I N E C L E A N B U R N S T O V E Installation and Operating Instructions An accredited competent person must carry out the installation of this appliance; alternatively, your
eco JINECO02 RevG 11/06/12 Clean Burn Stove Installation and Operating Instructions
 eco 2 Clean Burn Stove Installation and Operating Instructions eco 2 Technical Specification Appliance Mass 87 kg Total Efficiency 76.0 % Nominal Heat Output 4.5 kw Mean CO Emission (@13% O 2 ) 0.20 %
This booklet applies to following Westfire stoves WF UNIQ 4 / WF4 WF UNIQ 18 /WF 18 WF UNIQ 16 /WF16 WF UNIQ 23 /WF 23 WF UNIQ 32 /WF32
 SUPPLEMENTARY INSTALLATION INSTRUCTIONS FOR THE UK MARKET TO BE READ IN CONJUNCTION WITH THOSE IN THE WESTFIRE INSTRUCTION INDIVIDUAL INSTRUCTION BOOKLETS This booklet applies to following Westfire stoves
D O U B L E / D O U B L E H E R A L D 1 4 C E
 D O U B L E / D O U B L E H E R A L D 1 4 C E M U L T I F U E L C L E A N B U R N S T O V E Installation and Operating Instructions An accredited competent person must carry out the installation of this
Supplementary Installation & Operation instructions for UK Market
 Supplementary Installation & Operation instructions for UK Market For use Morsø UK Stoves EN 13 240 & HETAS Ltd. Distributed by: Morsø UK Valley Drive Swift Valley Rugby, Warks CV21 1TW England MORSØ JERNSTØBERI
HARROGATE WOODBURNING STOVE INSTALLATION AND USER INSTRUCTIONS
 HARROGATE WOODBURNING STOVE INSTALLATION AND USER INSTRUCTIONS Read these instructions carefully before installation and use. These instructions should be retained by the user for future reference. The
O P E R A T I O N AND INST A L L A T I O N M A N U A L
 O P E R A T I O N AND INST A L L A T I O N M A N U A L OPUS TEMPO FIRED BY DESIGN Contents Disposal of packaging 3 Introduction 3 1 Description 3 2 General 3 3 Installation of the Stove 4 3.1 Flue pipe
K E S T R E L 5 C L E A N B U R N S T O V E. Installation and Operating Instructions
 K E S T R E L 5 C L E A N B U R N S T O V E Installation and Operating Instructions An accredited competent person must carry out the installation of this appliance; alternatively, your local Building
Brunel 1A / 2CB / 3CB
 Brunel 1A / 2CB / 3CB Multi-Fuel Stoves Installation and Operating Instructions IMPORTANT Please read these instructions carefully before using the appliance. Keep them safe for future reference and when
Operating & Installation Instructions
 Operating & Installation Instructions CONTENTS QUICK GUIDE 4 OPERATING INSTRUCTIONS 5 FUEL 5 WOOD LOGS 5 MULTI GRATE 5 RIDDLING 6 LIGHTING 6 CONTROLLING THE FIRE 6 REFUELLING 7 ASH CLEARANCE 7 OPERATING
Multi-fuel and SE models
 ENG OPERATION AND INSTALLATION MANUAL Multi-fuel and SE models Loxton 3 July 2016 1 Installation Manual and Operating instructions ENG Loxton 3 kw This manual refers to the stoves listed above, which are
Bloomsbury SE SMOKE EXEMPT WOODBURNING STOVE INSTALLATION & USER INSTRUCTIONS (TO BE LEFT WITH THE CUSTOMER) UK & IRELAND GUARANTEE
 UK & IRELAND GUARANTEE") 9/11 (PP) GUARANTEE CONDITIONS OF GUARANTEE Your ACQUISITIONS stove is guaranteed against defects arising from faulty manufacture for one year subject to the following express conditions. Failure to comply
9/11 (PP) GUARANTEE CONDITIONS OF GUARANTEE Your ACQUISITIONS stove is guaranteed against defects arising from faulty manufacture for one year subject to the following express conditions. Failure to comply
FDC 5i, 5i Wide & 8i INSET STOVE RANGE. Installation and Operating Instructions
 FDC 5i, 5i Wide & 8i INSET STOVE RANGE 5, 5 & 8 kw Nominal Outputs With Patented TTi Air System Installation and Operating Instructions Please hand these instructions to the stove user when the installation
FGi, FXi & FPi 5 Taper INSET STOVE. Installation and Operating Instructions
 FGi, FXi & FPi 5 Taper INSET STOVE 5 kw Nominal Output With Patented TTi Air System Installation and Operating Instructions Please hand these instructions to the stove user when the installation is complete.
LANGDALE SMOKE CONTROL MULTI-FUEL STOVE
 LANGDALE SMOKE CONTROL MULTI-FUEL STOVE INSTALLATION AND USER INSTRUCTIONS Read these instructions carefully before installation and use. These instructions should be retained by the user for future reference.
INSTALLATION AND OPERATING INSTRUCTIONS. REF:
 Ekol Clarity 30 Boiler Woodburning Stove INSTALLATION AND OPERATING INSTRUCTIONS. REF: Ekol Claity 30 Boiler Wood Version, MANUAL Version 1.1 MANUAL PUBLICATION DATE: 22.01.2014 Recommended as suitable
How to use a multi fuel stove
 How to use a multi fuel stove Important!! When lighting the stove for the first time only a small fire should be lit. Too hot a fire will result in the paint emitting smoke - not necessarily bad but unpleasant.
125SE SMOKE EXEMPT WOODBURNING STOVE INSTALLATION & USER INSTRUCTIONS (TO BE LEFT WITH THE CUSTOMER) UK & Ireland GB IE GUARANTEE
 UK & Ireland GB IE GUARANTEE") 12/09 GUARANTEE Conditions of Guarantee Your ESSE stove is guaranteed against defects arising from faulty manufacture for one year subject to the following express conditions. Failure to comply with these
12/09 GUARANTEE Conditions of Guarantee Your ESSE stove is guaranteed against defects arising from faulty manufacture for one year subject to the following express conditions. Failure to comply with these
BLOOMSBURY SE INSTALLATION & USER INSTRUCTIONS. Smoke Exempt Multi-Fuel Stove (TO BE LEFT WITH THE CUSTOMER) UK & IRELAND
 UK & IRELAND") BLOOMSBURY SE Smoke Exempt Multi-Fuel Stove INSTALLATION & USER INSTRUCTIONS (TO BE LEFT WITH THE CUSTOMER) UK & IRELAND GB IE CONTENTS General Safety Notes Page 2 Operating Instructions Page 8 Installation
BLOOMSBURY SE Smoke Exempt Multi-Fuel Stove INSTALLATION & USER INSTRUCTIONS (TO BE LEFT WITH THE CUSTOMER) UK & IRELAND GB IE CONTENTS General Safety Notes Page 2 Operating Instructions Page 8 Installation
C O N S O R T 1 5 V. I I
 C O N S O R T 1 5 V. I I M U L T I F U E L C L E A N B U R N S T O V E Installation and Operating Instructions An accredited competent person must carry out the installation of this appliance; alternatively,
Installation & User Manual EW5000 Outdoor Cooking Fire
 Installation & User Manual EW5000 Outdoor Cooking Fire IMPORTANT: Please read this manual before installing and using the ESCEA EW5000 Cooking fire. Failure to follow these instructions may lead to a possible
Smoke Exempt Wood Burning Stove
 Smoke Exempt Wood Burning Stove GB IE CONTENTS General Safety Notes Page 2 Operating Instructions Page 12 Installation instructions Page 3 Wood Burning Page 14 Chimney & Flue Page 4 Solid Fuel Burning
OPERATION AND INSTALLATION MANUAL OPUS TRIO FIRED BY DESIGN
 OPERATION AND INSTALLATION MANUAL OPUS TRIO FIRED BY DESIGN Contents Disposal of packaging 3 Introduction 4 1. Description 4 2. General 5 3. Installation of the Stove and the flue pipe connection 5 3.1.
BLOOMSBURY SE 8kW Smoke Exempt Multi-Fuel Stove
 BLOOMSBURY SE 8kW Smoke Exempt Multi-Fuel Stove INSTALLATION & USER INSTRUCTIONS (TO BE LEFT WITH THE CUSTOMER) UK & IRELAND GB IE CONTENTS General Safety Notes Page 2 Operating Instructions Page 9 Installation
Chew & Sheppey Multi-fuel and SE models
 Chew & Sheppey Multi-fuel and SE models 1 Installation Manual and Operating instructions Chew 4.6 kw, Sheppey 8 kw, This manual refers to the stoves listed above, which are tested in accordance with EN
700-SE Multi-Fuel & Smoke Exempt Wood Burning Stove
 700-SE Multi-Fuel & Smoke Exempt Wood Burning Stove INSTALLATION & USER INSTRUCTIONS (TO BE LEFT WITH THE CUSTOMER) UK & IRELAND GB IE CONTENTS General Safety Notes Page 2 Installing the Stove Page 11
FDC 5i, 5i Wide & 8i INSET STOVE RANGE. Installation and Operating Instructions
 FDC 5i, 5i Wide & 8i INSET STOVE RANGE 5, 5 & 8 kw Nominal Outputs With Patented TTi Air System Installation and Operating Instructions Please hand these instructions to the stove user when the installation
WESTFIRE WF SERIES ONE & TWO
 WF series one & Two INSTALLATION MANUAL AND OPERATING INSTRUCTIONS 1 the art of danish engineering Westfire WF SERIES ONE Westfire WF SERIES TWO WF series ONE & Two This manual refers to the stove type
VITAE CASETTE STOVE. VIT11C Installation and Operating Instructions
 VITAE CASETTE STOVE 10.7kW Nominal Output VIT11C Installation and Operating Instructions Please fix label with serial number of stove before putting manual into stove The VIT11C stove has been exempted
OPERATION AND INSTALLATION MANUA L OPUS TEMPO
 OPERATION AND INSTALLATION MANUA L OPUS TEMPO 0 FIRED BY DESIGN 1 Contents Disposal of packaging 4 Introduction 4 1 Description 4 2 General 4 3 Installation of the Stove 5 3.1 Flue pipe connection 5 3.2
OPERATION AND INSTALLATION MANUAL. Multi-fuel Burcott Fireplace inset stove
 OPERATION AND INSTALLATION MANUAL Multi-fuel Burcott Fireplace inset stove 1 Installation Manual and Operating instructions BURCOTT fireplace inset stove This manual refers to the stoves listed above,
Firestorm Stoves 10KW MULTI-FUEL STOVE INSTALLATION & USER INSTRUCTIONS. 10Kw 6.5Kw 4.5Kw
 Firestorm Stoves 10KW MULTI-FUEL STOVE INSTALLATION & USER INSTRUCTIONS 10Kw 6.5Kw 4.5Kw Firestorm Stoves Welcome Court, Unit 2 Bracewell Avenue, Poulton Business Park Poulton-Le-Fylde, Lancashire FY6
CONTENTS. INSTALLATION INSTRUCTIONS Building regulations 4 Positioning and Clearances 4 Chimney 4 Flue connection 5 Problem solving 6 PRODUCT DATA
 PRODUCT DATA MODEL WEIGHT NOMINAL HEAT OUTPUT FB1 DS 80KG 6KWs CONTENTS OPERATING INSTRUCTIONS Lighting the fire 2 Firebox linings and baffle 2 Wood burning tips & theory 2 Running temperatures 3 Cleaning
OPERATION AND INSTALLATION MANUAL. Multi-fuel and SE models Loxton 3, 5, 6, 8 & 10 Churchill 5, 6, 8 & 10 Sqabox uno, duo
 OPERATION AND INSTALLATION MANUAL Multi-fuel and SE models Loxton 3, 5, 6, 8 & 10 Churchill 5, 6, 8 & 10 Sqabox uno, duo 1 Installation Manual and Operating instructions LOXTON 3kW LOXTON 5 kw, LOXTON
Inis Airc 6kw Room-heating Stove User and installation manual.
 Inis Airc 6kw Room-heating Stove User and installation manual. 1 Congratulations on the purchase of your new Inis Airc room-heating stove. We here at Inis Stoves truly love building high quality stoves
Inset Sønderskoven 8. Multi-Fuel Inset Stove Installation and Operating Instructions. JINCN09 RevH 22/07/14
 Inset Sønderskoven 8 Multi-Fuel Inset Stove Installation and Operating Instructions 13 Inset Sønderskoven 8 Cleanburn, Trevilla Park, Slaughterbridge, Camelford, PL32 9TT DSEN13229 Inset Wood Burning Stove
HH4SE,HH6SE & HH8SE DEFRA SMOKE EXEMPT FREESTANDING STOVE Installation and Operating Instructions
 HH4SE,HH6SE & HH8SE DEFRA SMOKE EXEMPT FREESTANDING STOVE Installation and Operating Instructions Please fix label with serial number and stove type here before putting manual into stove The HH4SE, HH6SE
H E R A L D I N S E T 5
 H E R A L D I N S E T 5 M U L T I F U E L S T O V E Installation and Operating Instructions An accredited competent person must carry out the installation of this appliance; alternatively, your local Building
Installation Instructions
 Installation Instructions For use in and IE only C i4 FS www.contura.eu 2 CERTIFICATE DECLARATION OF PERFORMANCE No. Ci4FS-CPR-130619-SE-1 PRODUCT Product type Type designation Manufacturing number Intended
D O U B L E / S I N G L E H E R A L D 6 C E
 D O U B L E / S I N G L E H E R A L D 6 C E M U L T I F U E L C L E A N B U R N S T O V E Installation and Operating Instructions An accredited competent person must carry out the installation of this
WESTFIRE WF ONE SERIES
 WF one series UK: INSTALLATION MANUAL AND OPERATING INSTRUCTIONS 1 dansk ingeniørkunst WF ONE SERIES This manual refers to the stove type listed above, which has been tested in accordance with EN13240.
How to Use and Enjoy your New Stove
 How to Use and Enjoy your New Stove Welcome to Your New Stove Now that you re the proud owner of a new stove, we felt it would be a good idea to offer some advice on how to keep safe and achieve the best
Ø-Collection. Ø4 - (81% Efficiency) Ø6 - (75% Efficiency) Ø8 - (75% Efficiency) Instructions for Installation and Use UK/EN 13240
 Ø6 - (75% Efficiency) Ø8 - (75% Efficiency) Instructions for Installation and Use UK/EN 13240") Ø-Collection Instructions for Installation and Use Ø4 - (81% Efficiency) Ø6 - (75% Efficiency) Ø8 - (75% Efficiency) UK/EN 13240 Distributed by: Morsø UK Valley Drive Swift Valley Rugby, Warks CV21 1TW
Ø-Collection Instructions for Installation and Use Ø4 - (81% Efficiency) Ø6 - (75% Efficiency) Ø8 - (75% Efficiency) UK/EN 13240 Distributed by: Morsø UK Valley Drive Swift Valley Rugby, Warks CV21 1TW
H E R A L D I N S E T 7
 H E R A L D I N S E T 7 M U L T I F U E L S T O V E Installation and Operating Instructions An accredited competent person must carry out the installation of this appliance; alternatively, your local Building
Instructions for Installation and Use 3112 & EN (78,6% Efficiency)
") Instructions for Installation and Use 3112 & 3142 EN 13240 (78,6% Efficiency) Distributed by: Morsø UK Valley Drive Swift Valley Rugby, Warks CV21 1TW England MORSØ JERNSTØBERI A/S. DK-7900 NYKØBING MORS
Instructions for Installation and Use 3112 & 3142 EN 13240 (78,6% Efficiency) Distributed by: Morsø UK Valley Drive Swift Valley Rugby, Warks CV21 1TW England MORSØ JERNSTØBERI A/S. DK-7900 NYKØBING MORS
FDC 5i Taper INSET STOVE. Installation and Operating Instructions
 FDC 5i Taper INSET STOVE 5 kw Nominal Output With Patented TTi Air System Installation and Operating Instructions Please hand these instructions to the stove user when the installation is complete. Leave
200XK, 200XK DD, & 225XK Multi-Fuel & Smoke Exempt Wood Burning Stove
 200XK, 200XK DD, & 225XK Multi-Fuel & Smoke Exempt Wood Burning Stove INSTALLATION & USER INSTRUCTIONS (TO BE LEFT WITH THE CUSTOMER) UK & IRELAND GB IE CONTENTS General Safety Notes Page 2 Installing
Langbrook 5kW Clean Burn Stove (LBK5SE)
") Langbrook 5kW Clean Burn Stove (LBK5SE) Please hand these instructions to the stove user when installation is complete. Leave the system ready for operation and instruct the user in the correct use of
Langbrook 5kW Clean Burn Stove (LBK5SE) Please hand these instructions to the stove user when installation is complete. Leave the system ready for operation and instruct the user in the correct use of
Instructions for Installation and Use
 Instructions for Installation and Use 2110 UK/EN 13240 (72% Efficiency) Distributed by: Morsø UK Valley Drive Swift Valley Rugby, Warks CV21 1TW England MORSØ JERNSTØBERI A/S. DK-7900 NYKØBING MORS E-Mail:
500 Range. Multi-Fuel & Smoke Exempt Wood Burning Stoves 550, 525, and 500 Vista models INSTALLATION & USER INSTRUCTIONS
 500 Range Multi-Fuel & Smoke Exempt Wood Burning Stoves 550, 525, and 500 Vista models INSTALLATION & USER INSTRUCTIONS (TO BE LEFT WITH THE CUSTOMER) UK & IRELAND GB IE CONTENTS General Safety Notes Page
500 MULTI - FUEL STOVE
 02/10 (PP) INSTR.ST-500MF/u GUARANTEE CONDITIONS OF GUARANTEE Your ESSE stove is guaranteed against defects arising from faulty manufacture for one year subject to the following express conditions. Failure
Dry Stove Installation Guide BK545. November 2012 Rev02. EN 13240:2001+ Amd. A2:2004
 Dry Stove Installation Guide BK545 EN 13240:2001+ Amd. A2:2004 November 2012 Rev02 Please read carefully through this installation guide before proceeding with installation of the stove. Should you have