Congratulations on your excellent choice of Smålandsspisen Model 1896, a newly manufactured wood-burning cooker, made in Sweden.
|
|
|
- Todd Wilcox
- 5 years ago
- Views:
Transcription

1 1
2 Dear Customer, Congratulations on your excellent choice of Smålandsspisen Model 1896, a newly manufactured wood-burning cooker, made in Sweden. Your new wood-burning cooker with its timeless design is an efficient source of heat with more and 100 years of experience and history to rely upon. It is equipped with the latest techniques of combustion to provide a maximum of heating capacity and a minimum of environmental impact. We rest assured that you will enjoy many warm and good days with Smålandsspisen. Please study these instructions carefully before starting the installation and before lighting a fire for the first time. Table of contents Preparations, General information 3 Air of Combustion, installation distances 4 Instructions for use, Lighting instructions 5 Baking test 6 Maintenance instructions, Good to know 7 Technical data 8 Exploded diagrams 9 List of spare parts 10 List of spare parts, Accessories 11 Other accessories 12 Environment approval certificate, Nr. E Trouble shooting for solving combustion problems 14 Guarantee certificate 15 Contact information 16 2
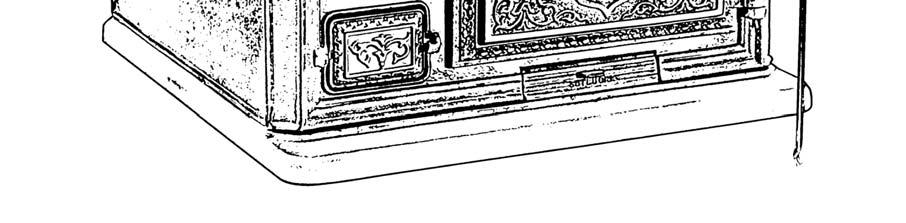
3 In order to make the most out of your stove, please see to it that it is: 1. Properly installed 2. Properly fired 3. Properly maintained Preparations Manufacturer s declaration This product has been manufactured in accordance with the documents that constitute the basis for product certification wherein the installation- and maintenance instructions are integrated. General information The SMÅLANDSSPISEN Model 1896 is manufactured of sturdy cast iron. The housing of the fireplace is protected by internal cast iron side walls. The recessed grate forms the bottom of the fireplace. The Smålandsspisen model 1896 is equipped with an oven and on the top of the stove there are 3 removable cooking plates. Thanks to the heat storing materials, the heat retention lasts for hours after the fire has gone out. The stove is tightened with soapstone cement and is being kept together by 4 threaded bars, one in each corner, fastened with a screw cap at the top and with a nut under the base plate of the stove. The fireplace door is covered with a protection against overheating. The fact that the fireplace door is tightened with a fire fast sealing strip and that preheated secondary air is being added to the fireplace through the holes in the internal side walls to speed up the combustion, a maximum of heating effect and a minimum of wood consumption are achieved. To make sure that primary air is being added to the fire, keep the fireplace door slightly open during the lighting process and make sure that the air supply control of the ash-pan is open. It may be necessary for you to apply for building permission from your local planning authority before installing a stove or erecting a chimney. Before starting installation work, make sure that you check which regulations apply. We would advise you to get in touch with your local chimney sweeper already at the planning stage of the installation. Before the stove is used, it must be inspected by an authorized chimney sweeper or relevant authority to verify that the installation is proper made according to the installation instructions and that the connection to the chimney is tight. This inspection must be carried out before using the stove disrespectable of if it refers to a connection to an existing or to a new chimney. Please, be aware that no kitchen ventilator or similar device should be used in the same room during the firing in the stove. Warning! When the stove is in use certain surfaces become very hot, more than 90 o C. Physical contact with these surfaces can cause skin burns. Please be aware that the fireplace door and the ash-pan are to be kept closed with the exception of the lighting and stoking processes. Modification of the stove is not allowed. Chimney The diameter of the chimney flue must be minimum 125mm, and have a draught of at least 0,12mbar. The shortest recommended length of the chimney flue is minimum 3,5m, measured from the connection point at the stove. There are two different designs of Smålandsspisen Model 1896, rear or top connection to the chimney flue. The stove designed for rear connection is equipped with an oval fabric mounted flue connection tube. Enclosed with the delivery there is an oval tube connection made of cast iron intended to be connected to the brick-lined chimney. Use the enclosed cement inside this connection and also inside the fabric mounted connection. The stove is now ready to be connected to the bricked chimney. The stove designed for top connection has a top with a round flue connection tube to which a flue pipe with a diameter of 125 mm is to be connected. Round flue pipes for top connection are to be ordered separately and are to be sealed with stove cement. Structural support Normally, a kitchen stove and a (light-weight) chimney can be located on standard wooden floor joists in a single-family house. Smålandsspisen Mod requires a floor plate under, in front off and at the two sides of the stove. Minimum protection in front of the stove is 0,3m and 0.1 mm at both sides. Floor plates are available as accessories. 3


4 Air of combustion The air consumed for the combustion, approximately 10-20m³ per hour, is considered to be negligible. In houses with mechanical ventilation and in good isolated houses, however, it is recommended to place the stove close to a valve placed in an external wall. The combustion air can also be supplied from outside by connecting fresh air supply under the stove. Please study these instructions carefully before starting to use your stove and remember that the installation has to be approved by the chimney sweeper before you are allowed to use the stove. The supply of air for the combustion is carried out in 4 different ways. 1. Keep the fireplace door slightly open (primary air) during the lighting and stoking processes. 2. Primary air is being supplied to the fire through the change-over damper of the ash-pan and continues up through the grate. 3, 4. Secondary (pre-warmed) air is being supplied through the holes in the side walls of the fireplace through the air inlet at the base plate. (Adjustable through the screw at the front of the base plate.) Distance to combustible material The distance to a wall made of combustible material must not be below 50 cm. If you are planning to install your stove against a wall made of combustible material, for instance wood, first leave an air gap of minimum cm and then build a separating wall made of full bricks (bricks without any holes) in half-stone size, normally with a width of 12 cm. Contact your chimney sweeper before you start the installation for further guidance and to be informed about further local regulations. Important! All local regulations, including those referring to national or European norms must be fulfilled when installing this device. 4
5 Instructions for use and Lighting instructions When lighting the fire in your new Smålandsspisen for the first couple of times, it is recommended to heat cautiously. The heat-resisting paint will be more durable (it may produce a distinctive smell at the beginning) and also the soap stone slab on top of the oven gets dry. NB! The stove must not be used as a combustion furnace. Other kind of fuel than what is recommended must not be used! Fuel The best heating value is achieved from chopped birch wood (generally from hardwood) that burns smoother than softwood. If you burn oak- or beech wood or another kind of wood with a high heating value you have to mix in some other kind of wood or you will risk to harm your fireplace. Peat pellets are also suitable. The wood must be dry, with a moisture content of about 15-20%, and have the right size with a length of about mm and a diameter of 50 80mm. For a normal fire-burning a quantity of about 2 kg/wood an hour would be appropriate. The stoking amount should not exceed 1,6kg. Lighting & Baking If the chimney is cold and the draught is poor, you can try lighting some newspapers/fire starting cubes in the flue soot door or in the soot door of the wood stove placed under the oven. How to start a fire: Stoke No.1: 1. Place 3-4 pieces of smaller wood logs at the bottom of the fireplace. Put some newspapers or preferably fire starting cubes (do not soot) on the top of the logs. Then place another 6-7 logs on top but see to it that the maximum quantity does not exceed 1.6 kg. 2. Keep the fireplace door slightly open and set the screw at the base plate in vertical position (open). Open the change-over damper of the ash-pan door and the sliding valve in the ash-pan to get the best draught. 3. After about 5-6 minutes, close the primary air supply (the ash-pan door and the fireplace door) and let it lean just 1 mm. 4. Set the screw at the base plate (secondary air supply) in the proper position to let the fire burn with a yellowish flame. Stoke No.2: 5. Use the poker to distribute the glowing embers over the grates. 6. Stoke with 3 logs weighing about 1.6 kg 7. Keep the fireplace door slightly open to let the logs catch the fire and then close the door. 8. Set the screw at the base plate in its vertical position (open). Open the change-over damper of the ash-pan and the sliding valve in the ash-pan to get the best draught. 9. After about 5-6 minutes reduce the opening of the primary air supply (the sliding air valve in the ash-pan) to about 1 mm and then after about further 2 minutes totally choke the primary air supply. 10. Set the screw at the base plate (secondary air) in the proper position to let the fire burn with a yellowish flame. Stoking the fire Open the fireplace door slowly to avoid smoke to come out in the room. Then repeat the steps 5-10 from chapter Lighting and Baking. NB! Never stoke with logs as long as there is a good fire in the wood stove. 5
6 Testing the oven heat (baking test) When testing this kitchen wood stove at the SP (Swedish Institute for Technical Approval in Construction) according to EN 12815, the following baking test recipe for shortcrust pastry was carried out and approved: Ingredients: gram Wheat flour gram margarine, taken out of the fridge 1 h before use gram Castor suger. - 1 egg (approx. 60 gr.) - 1 pinch of salt. How to do it: Mix the ingredients to a paste and put it in the fridge for 12 h. Then take it out of the fridge 20 min before moulding it into longshaped buns and place it on a baking-plate. After min it gets golden brown and is ready. 6
7 Maintenance instructions At the cleaning procedure special attention must be paid to the underside of the cooking plates. Shake and clean the grates from ashes regularly. Clean the top and the front of the stove by using a brass brush or a Scotsbrite sponge. It is to be carried out when the stove is cold. Then apply the enclosed stove blacking by using a sponge. After the blacking has dried, the stove can be polished to have a bright finish. As soon as the protection irons in the fireplace starts to crack/warp they require replacement by original spare parts. The soapstone slab on top of the oven should also be replaced as it gradually pulverizes (It can also be replaced by fireclay.) NB! Should salted water boil over, this could cause corrosion which can make the top of the stove rusty and porous. In this case the guarantee is void. Soot- and ash removal Soot removal can easily be carried out through the soot door, which is placed under the oven. Use the enclosed soot scratcher. Scrape the ashes in the fireplace (with the soot scratcher) through the grate. The ashes fall down in the ash-pan which is easy to remove and to empty. Never empty the ashes earlier than 24 hours after terminated firing. Good to know When you light a fire for the first time, a distinctive smell may be produced. This smell comes from oily coatings and from the paint. This smell will disappear once the wood stove has been used a couple of times. Check at regular intervals the sealing strip at the fireplace door. Replace when necessary. Keep the fireplace, all air intakes and flue pipes clean. If you frequently light a fire, it may be appropriate to have the chimney swept also in between the regular visits of the chimney sweeper. If deposits of soot catch fire or if there is a risk that they will do so, close the combustion air intake and the doors. If necessary, contact the fire brigade to put out the fire. After a soot or chimney fire, the chimney should always be inspected by a chimney sweeper. Dimensioned sketch (mm) 7
8 Technical data Triple values 5,7g/sec, 195 C, Pa Flue gas temp (average) C 192 Required flue gas pressure in the chimney Pa 12 Qty of flue gas flue g/s 5,7 Weight Kg 170/160* Size Height mm 360 Width mm 615 Depth mm 600/*560 Stove hob Width mm 615 Depth mm 620/*560 Fireplace dimensions Height mm 300 Width mm 190 Depth mm 390 Fireplace opening Height 175 Width mm 150 Connection options Rear & top* 188x78, ø125* See enclosed dimensioned sketches (page 6) Approved to be connected to a chimney with ½ stones thickness (350 ). Multiple allocation (at a shared chimney) is possible provided that local regulations are taken into consideration. Structure Combustion chamber Colour Cast iron Thermal black Option Cooking plate made of glass, ceramic hardened glass gives a view over the fire in the fireplace. It is placed inside an oval, sealed ring. (The cooking plate, the round ring and the half moon are to be removed.), Can be supplementary installed. 8
9 9
10 Spare Parts Lists related to Exploded diagrams Smålandsspisen Model 1896 Pos.No Description Part No. Quantity 1 Stove hob, rear connection Ring, Ø Cooking plate, Ø Half moon Ring, Ø Cooking plate, Ø Stove hob, top connection Lever, top connection Damper, top connection Front bar Threaded bar Nr.26, complete Soot scratcher Poker Smoke separator, left Smoke separator, right Interior oven top, top connection Interior oven top, rear conn Fireplace internal side wall, left Fireplace internal side wall, right Frame for grate Grate , 23 External walls, ash-pan space End piece, ash-pan space Ash-pan Oven side, left Oven side, right Internal bottom, oven Bottom plate, oven, Ø Base plate , 32 External side oven, left+right Base plate support, top conn Base plate support, rear conn ,35 Outdoor connection Rear iron Rear oven filler Back piece, rear connection Flue connection tube Cast iron connection tube Back, top connection Front piece Soot door Sign Smålandsspisen Fireplace door (Stoking door) ) Spiral knob No 1, Ø Nut, M6-51 Ash-pan door (change-over damper) Oven door Decoration, oven door Spiral knob No.2, Ø Hinge-pin door, black Oven grate (support) Oven thermometer ,59 Baking-plate, Teflon X Oval-round adapter, Ø
11 11
12 Spare Parts List Accessories Smålandsspisen Model 1896 Pos.No Description Part No. Quantity 1. Door to baking oven model 1910, Dimensions for brick lining Width: 480mm, Height (centre): 290mm, Height (sides): 220mm 2. -> Frame > Door > Hinge-pin door > Spiral knob No Heating oven, complete Dimensions for brick lining, Width: 320mm, Height 270 mm 7. -> Frame > Door, left > Door, right > Hinge-pin, black > Spiral knob No Water tank, copper, 15l, complete Length (top): 610mm, Length (base): 490mm, Width: 125mm, Height: 210mm -> Brass crane > Rubber seal > Copper washer > Chrome washer > Brass nut Stand, 4 legs > Adjustment screw > Frame for the legs > Legs Other accessories for Smålandsspisen Model 1896 Set of soapstones With 77kg placed in the oven the wood consumption can be for the oven reduced by 30 % with a heat retaining capacity of up to 10-12h. Floor plate, enamelled W: 850 mm, D: 850 mm. To be placed under the stand. W: 800 mm, D: 400 mm. To be placed in front of the base of the stove. Corner posts 7 designs available. Post of forged cast iron e.g. for a fan hood. Contact your dealer or visit Flue pipe Available in many sizes and designs. For a perfect connection. Contact your dealer or visit NEW! An oval ring replaces the half moon and the round ring 270 oking plate of glass Ø mm round cooking plate of cast iron. The glass cooking plate is to be placed in this oval ring and gives you a good view of the fire. 12

13 13
14 Trouble Shooting Problem Reason How to solve the problem Poor draught. The connection to the brick-lined Ask the chimney sweeper to check that the chimney is not properly tightened connection between stove and chimney is quite Too strong draught. Soot deposit on the cooking plate of glass Glass turns white Smoke comes out in the room when opening the door The flue tube is full of soot or the space under the oven is full of soot. The chimney is blocked, e.g. a bird nest or similar. The chimney is too short or the crosssectional area is too large. The stove was not fired up for a long time and the doors have been shut. Negative pressure in the room. Moisture content is too high in the wood or the wood is too cold. If oven dried wood is being used, it requires less air supply then normal wood fuel. The chimney is too long. The induced draft fan, if any, may be too strong. The moisture content of the wood is too high. The ash-pan door and/or the screw at the base plate are closed. - Poor combustion (too low temperature in the oven). Incorrect firing (Use of waste wood, chipboard, pressure-impregnated, laminated plastic, Plywood or similar) Pressure equalizing in the fireplace.. Poor chimney draught. tight. Clean flue tube and fireplace. Remove the soot door on the stove and scratch out the soot with the scratcher. Contact the chimney sweeper or your dealer for further guidance. When not using the stove for a long time, keep the change-over damper (ash-pan door) open. Open a window or fix an external wall valve close to the stove. Check that the ventilation is properly set. Only dry wood with a maximum moisture content of 20 % is to be used. Keep the wood indoors for 24 hours to have room temperature before lighting it. Reduce the air supply by adjusting the screw at the base plate (vertical position = open. horizontal position = closed) and also adjust the changeover damper at the ash-pan door. Contact the chimney sweeper or your dealer for further guidance. Adjust it to a lower number of revolutions or switch it off. Only dry wood with a maximum moisture content of 20% is to be used. Open the dampers to supply more air for the combustion. Follow the instructions for proper lighting in this manual. Always use clean and dry wood. First open the ash-pan door and 1 minute later the fireplace door. Avoid opening the door too quickly, but always slowly. Check that the height of the chimney is not too short relatively to required minimum draught for the stove. The door was opened when the fire is Only open the door when the wood has turned still burning in the fireplace. to glowing embers. White smoke The combustion temperature is too low. Increase the air supply by opening the ash-pan door and setting the screw at the base plate. The wood is too damp and contains Always use clean and dry wood. water vapour. Black or greyish Insufficient combustion. Increase the air supply by opening the ash-pan black smoke door and setting the screw at the base plate. Difficulties in starting the fire in most cases are the result of using wood with too high humidity content, too poor draught or untight chimney connections. 14
15 15
16 Contact us at: Telephone: (Jens Nielsen) J Davidssons Eftr. AB Phone FK-nr Swift Box (0) SE NDEASESS Reftele Fax Homepage Bank IBAN SE Sweden +46 (0) Nordea
Dear Viking-customer,
 1 Dear Viking-customer, Congratulations on your excellent choice of Viking 30, Sweden s most sold wood-burning cooker. Your new Viking 30 with its timeless design is an efficient source of heat with more
Installation Instructions
 Installation Instructions C 880 www.contura.eu 50 CERTIFICATE EC Declaration of conformity www.contura.eu Manufacturer name address Place of manufacture NIBE AB/NIBE STOVES Box 134, Skulptörvägen, SE-285
HARVIA IRON STOVE Instructions for installation and use
 HARVIA IRON STOVE EN Instructions for installation and use Harvia 10 08012014VTT Congratulations on a good choice of fireplace and thank you for your confidence in Harvia s products. Read these instructions
Installation Instructions
 Installation Instructions C750 C750A www.contura.eu 50 CERTIFICATE EC Declaration of conformity www.contura.eu Manufacturer name address Place of manufacture NIBE AB/NIBE STOVES Box 134, Skulptörvägen
Installation Instructions
 Installation Instructions For use in and IE only C i4 FS www.contura.eu 2 CERTIFICATE DECLARATION OF PERFORMANCE No. Ci4FS-CPR-130619-SE-1 PRODUCT Product type Type designation Manufacturing number Intended
Installation Instructions
 Installation Instructions C 710 www.contura.eu 50 CERTIFICATE Declaration of performance according to Regulation (EU) 305/2011 No. C710-CPR-160329-SE-1 PRODUCT Product type Stove lit with solid biofuels
Installation Instructions
 Installation Instructions C810 www.contura.eu 50 CERTIFICATE Declaration of performance according to Regulation (EU) 305/2011 No. C810-CPR-130610-SE-1 PRODUCT Product type Stove lit with solid biofuels
Installation Instructions
 Installation Instructions C 780 www.contura.eu 50 CERTIFICATE PERFORMANCE DECLARATION No. C780-CPR-130612-SE-1 PRODUCT Product type Stove lit with solid biofuels Type designation Contura 780 Manufacturing
Installation instruction
 Installation instruction C 35T-Low www.contura.eu 82 CERTIFICATE PERFORMANCE DECLARATION No. C35TL-CPR-130618-SE-1 PRODUCT Product type Type designation Manufacturing number Intended area of use Fuel Stove
Mod. MONTANA WOOD BURNING STOVE USAGE AND MAINTENANCE INSTRUCTIONS
 Mod. MONTANA WOOD BURNING STOVE USAGE AND MAINTENANCE INSTRUCTIONS Nutrients Ashes Fertilizer Wood: an ecological fuel Wood is a renewable source of energy which answers the energy and environmental demands
Installation instruction
 Installation instruction Ci51 116 FACTS Technical specifications Model i51 Log box (option) Output 6-11 kw Nominal output 8 kw Efficiency 80 % Weight (kg) 215 50 Powerstone (option): + 100 kg Width (mm)
Installation Instructions
 Installation Instructions C 556 www.contura.eu 50 CERTIFICATE PERFORMANCE DECLARATION No. C556-CPR-130601-SE-2 PRODUCT Product type Stove lit with solid biofuels Type designation Contura 556 Manufacturing
Installation instruction
 Installation instruction C 35T www.contura.eu 82 CERTIFICATE PERFORMANCE DECLARATION No. C35T-CPR-130618-SE-1 PRODUCT Product type Type designation Manufacturing number Intended area of use Fuel Stove
APPENDIX TO THE INSTALLATION AND OPERATING MANUAL OF STOVEMAN SAUNA STOVE
 APPENDIX TO THE INSTALLATION AND OPERATING MANUAL OF STOVEMAN SAUNA STOVE Technical data of the sauna stove Sauna stove type Stoveman 16 Model Stoveman 16 Nominal heat capacity, i.e. ability to 17 kw heat
SOLID FUEL STOVE ELITA and ELITA II
 17500 VRANJE, SERBIA Radnicka 1, tel.: 017 421 121 SOLID FUEL STOVE ELITA and ELITA II INSTRUCTIONS FOR INSTALLATION AND USE GENERAL DATA Generally it is necessary to adhere to the construction rules and
Installation and Operating. Instructions. Multifuel Stove. Salamander. Model Lighting a solid fuel fire. 6.5 De-ashing the stove
 Installation and Operating Instructions Salamander Model 0901 Multifuel Stove Section Contents Page 1 Important information about installing and 3 using the Salamander stove 2 Unpacking the Salamander
Installation instructions
 Installation instructions C 34T www.contura.eu 66 CERTIFICATE PERFORMANCE DECLARATION No. C34T-CPR-130618-SE-1 PRODUCT Product type Type designation Manufacturing number Intended area of use Fuel Stove
Installation instructions
 Installation instructions C 790T www.contura.eu 82 CERTIFICATE PERFORMANCE DECLARATION No. C790T-CPR-130612-SE-1 PRODUCT Product type Type designation Manufacturing number Intended area of use Fuel Stove
Inserts. Model 100, 200. Installation instructions Care and firing instructions
 Inserts Model 100, 200 Installation instructions Care and firing instructions TABLE OF CONTENTS CERTIFICATE...2 GENERAL...3 IMPORTANT POINTS...3 PREREQUISTES...4 Building notice Flue Combustion air Standard
Installation instruction
 Installation instruction C 560T www.contura.eu 66 CERTIFICATE EC Declaration of conformity Manufacturer name address Place of manufacture NIBE AB / Contura Box 134, Skulptörvägen 10, SE-285 23 Markaryd
Installation Instructions
 Installation Instructions For use in GB and IE only C i4 www.contura.eu 82 CERTIFICATE EC Declaration of conformity www.contura.eu Manufacturer name address Place of manufacture NIBE AB/Contura Box 134,
USAGE AND MAINTENANCE MANUAL FOR A SOLID FUEL STOVE
 PREDUZEĆE ZA PROIZVODNJU, PROJEKTOVANJE I PROMET BELOŠEVAC BB, 14000 VALJEVO, SRBIJA USAGE AND MAINTENANCE MANUAL FOR A SOLID FUEL STOVE DEAR CUSTOMER, Congratulations on your purchase of BLIST solid fuel
EC Declaration of conformity
 66 CERTIFICATE EC Declaration of conformity www.contura.eu Manufacturer name address Place of manufacture NIBE AB / Contura Box 134, Skulptörvägen, SE-285 23 Markaryd Markaryd, Sweden PrODuct Product type
Installation instruction
 Installation instruction C 550 www.contura.eu 66 CERTIFICATE PERFORMANCE DECLARATION No. C550-CPR-130601-SE-1 PRODUCT Product type Stove lit with solid biofuels Type designation Contura 550 Manufacturing
Varde Fuego. Installation and User guide. Revision 02
 Varde Fuego Installation and User guide Revision 02 1 Congratulation on the purchasing your new stove Varde Ovne A/S is a Danish company specialising in functional, environmentally friendly quality stoves
MULTI-FUEL STOVE INSTALLATION AND USER INSTRUCTIONS
 PRIORY MULTI-FUEL STOVE INSTALLATION AND USER INSTRUCTIONS The Priory stove has a nominal heat output of 8Kw. and a weight of 80 kg. The flue gas mass flow is 5.4g/s for mineral fuel and 6.3g/s for wood
User s manual. An der Bundesstraße Haren/Ems Germany Tel. +49(0) LUNA III H
 LUNA III H") User s manual An der Bundesstraße 2 49733 Haren/Ems Germany Tel. +49(0)5932-7334784 info@globe-fire.de LUNA III H Type Capacity Tested capacity Fuel Test-Nr. Globefire Ch.Leibfried GmbH, An der Bundesstraße
User s manual An der Bundesstraße 2 49733 Haren/Ems Germany Tel. +49(0)5932-7334784 info@globe-fire.de LUNA III H Type Capacity Tested capacity Fuel Test-Nr. Globefire Ch.Leibfried GmbH, An der Bundesstraße
OPERATING INSTRUCTIONS
 OPERATING INSTRUCTIONS SCANDIA 6304 2015 www.heta.dk UK 1 Congratulations on your new stove. We are sure that you will be happy with your investment, especially if you follow the advice and instructions
Installation instruction
 NO DK FR NL Installation instruction 2 Installasjonsanvisning 17 Monteringsvejledning 33 Guide d installation 49 Installatie instructies 65 Installation instruction C850W contura.eu 2 CERTIFICATE Declaration
17500 VRANJE, SRBIJA Radnička 1, Tel.: 017/ INSTRUCTIONS FOR INSTALLATION, ADJUSTMENT AND USE
 17500 VRANJE, SRBIJA Radnička 1, Tel.: 017/421-121 STOVE OF THICK METAL SHEETS PREMIJER PREMIJER K INSTRUCTIONS FOR INSTALLATION, ADJUSTMENT AND USE 1.Technical data about continuously burning stove of
Installation Instructions
 Installation Instructions For use in GB and IE only C i4 www.contura.eu 102 CERTIFICATE Declaration of performance according to Regulation (EU) 305/2011 No. Ci4-CPR-130619-SE-1 PRODUCT Product type Type
Installation & User Manual EW5000 Outdoor Cooking Fire
 Installation & User Manual EW5000 Outdoor Cooking Fire IMPORTANT: Please read this manual before installing and using the ESCEA EW5000 Cooking fire. Failure to follow these instructions may lead to a possible
Installation and Operating Instructions
 Installation and Operating Instructions Wood-burning Stove Model: Ottawa 7kw INTRODUCTION Wood-burning Stove Item No.: Ottawa 7kw SAFETY Safety is the most important consideration when using and installing
IN THE EVENT OF CHIMNEY FIRE, EVACUATE THE PROPERTY AND CALL THE EMERGENCY SERVICES.
 EKOL INSET 8 INSTALLATION AND OPERATING INSTRUCTIONS INTRODUCTION. SAFETY Safety is the most important consideration when using and installing your stove. If not installed and used correctly, a house fire
Varde Lyon Varde Nice
 1.th version 17-05-2018 UK Varde Lyon Varde Nice Installation and User Manual Revision 1 Pottemagervej 1, 7100 Vejle, Denmark. www.vardeovne.dk 1 Congratulations on the purchase of your new wood-burning
IN THE EVENT OF CHIMNEY FIRE, EVACUATE THE PROPERTY AND CALL THE EMERGENCY SERVICES.
 Ekol Clarity 12 INSTALLATION AND OPERATING INSTRUCTIONS. INTRODUCTION SAFETY Safety is the most important consideration when using and installing your stove. If not installed and used correctly, a house
Harrie Leenders Fuga el - Instructions for Installation, Use and Maintenance INSTRUCTIONS FOR INSTALLATION, USE AND MAINTENANCE
 INSTRUCTIONS FOR INSTALLATION, USE AND MAINTENANCE FUGA el 1 2 1. Flue 2. Case 3. Ceramic glass 4. Aeration slide 5. Convection fins 6. Door handle 7. Base 3 4 READ THE INSTRUCTION BOOKLET AND THESE SUPPLEMENTARY
Saltfire ST1 INSTALLATION AND OPERATING INSTRUCTIONS.
 Saltfire ST1 INSTALLATION AND OPERATING INSTRUCTIONS. INTRODUCTION SAFETY Safety is the most important consideration when using and installing your stove. If not installed and used correctly, a house fire
User s manual. Titan. Ch. Leibfried GmbH An der Bundesstraße Haren/Ems Germany Tel: +49(0)
") User s manual Titan Ch. Leibfried GmbH An der Bundesstraße 2 49733 Haren/Ems Germany Tel: +49(0)5932-7334784 info@globe-fire.de - Globe fire Globefire Ch.Leibfried GmbH, An der Bundesstraße 2, D-49733
User s manual Titan Ch. Leibfried GmbH An der Bundesstraße 2 49733 Haren/Ems Germany Tel: +49(0)5932-7334784 info@globe-fire.de - Globe fire Globefire Ch.Leibfried GmbH, An der Bundesstraße 2, D-49733
Alma Mons EN Owners s manual INSTALATION, ADJUSTMENT AND OPERATING INSTRUCTION
 Alma Mons Owners s manual INSTALATION, ADJUSTMENT AND OPERATING INSTRUCTION EN 12815 1 INTRODUCTION Congratulations! You have invested in energy efficient and high quality product-alma Mons wood burning
Aduro 6 / Aduro 6-5 / Aduro 6SK
 Aduro 6 / Aduro 6-5 / Aduro 6SK User Manual Ecolabel - Sintef 110-0283 - EN 13240 www.aduro.dk Good luck with your new wood burning stove! In order to get the best possible pleasure and benefit from your
Instructions for use, installation, and connection. Gas Built in Hob
 Instructions for use, installation, and connection Gas Built in Hob RB3311SGBS RB3312SGBS RB3311DGBS RB3311MGBS RB3311NGBS RB6313SGBST RB6323SGBST RB6314SGBS RB6313DGBST RB6313MGBST RB7312SGBS RB7313SGBST
Saltfire ST4 INSTALLATION AND OPERATING INSTRUCTIONS.
 Saltfire ST4 INSTALLATION AND OPERATING INSTRUCTIONS. INTRODUCTION SAFETY Safety is the most important consideration when using and installing your stove. If not installed and used correctly, a house fire
ECO-FRIENDLY WOODBURNING STOVES
 ECO-FRIENDLY WOODBURNING STOVES DANISH DESIGN 2018 / 2019 VARDE NICE www.vardeovne.co.uk VARDE ALS warm moments of quality Woodburning stoves from VARDE stand on the stylistic bedrock of Scandinavian design
Installation and Operating Instructions
 Installation and Operating Instructions Wood-burning Stove Model: Ottawa 5kw INTRODUCTION Wood-burning Stove Item No.: Ottawa 5kw curve SAFETY Safety is the most important consideration when using and
Handöl 21, 22 and 23T. Installation Instructions SE DE NO GB
 Installation Instructions 511293 IAV SE/EX 0543-2 SE DE NO GB Installationsanvisning 2 Installationsanleitung 18 Installasjonsanvisning 36 Installation Instructions 54 Handöl 21, 22 and 23T Dear Handöl
K20. Installation Instructions Care and firing instructions
 K20 Installation Instructions Care and firing instructions CONTENTS EXPLODED DIAGRAM...2 GENERAL INFORMATION...3 IMPORTANT POINTS...3 PRECONDITIONS...4 PREPARATIONS...5-6 INSTALLATION INSTRUCTIONS...6-9
OPERATING INSTRUCTIONS
 OPERATING INSTRUCTIONS SCAN-LINE 550 INSET STOVE www.heta.dk UK 1 2 tended to ensure that the materials used are of good quality, that the stove does not adversely affect the environment, and hat it is
INSTRUCTIONS FOR INSTALLATION, USE AND MAINTENANCE YSEN
 INSTRUCTIONS FOR INSTALLATION, USE AND MAINTENANCE YSEN READ THE INSTRUCTION BOOKLET AND THESE SUPPLEMENTARY INSTRUCTIONS CAREFULLY BEFORE INSTALLATION These instructions together with those in the instruction
Studio stove, Studio oven and Oh-Ah
 Studio stove, Studio oven and Oh-Ah Maintenance and Operating Instructions Visit www.warmington.co.nz for specs, DWG s and PDF uploads of fires Fire, flue system and instructions to comply with AS/NZS
Installation instructions
 Installation instructions C 26K High www.contura.eu GB 82 CERTIFICATE PERFORMANCE DECLARATION No. C26K-CPR-130617-SE-1 PRODUCT Product type Type designation Manufacturing number Intended area of use Fuel
How to use a multi fuel stove
 How to use a multi fuel stove Important!! When lighting the stove for the first time only a small fire should be lit. Too hot a fire will result in the paint emitting smoke - not necessarily bad but unpleasant.
Lighting Instructions
 SE DE NO FR GB DK FI IT NL Eldningsinstruktion 2 Heizinstruktionen 6 Fyringsinstruksjon 10 Instructions d allumage 14 Lighting Instructions 18 Fyringsvejledning 22 Lämmitysohjeet 26 Istruzioni per l accensione
Reference: Ottawa 12kw Operating Instructions Version 1 04/06/15. Installation and Operating Instructions
 Reference: Ottawa 12kw Operating Instructions Version 1 04/06/15 Installation and Operating Instructions Wood-burning Stove Model: Ottawa 12kw Size: W580XD410XH610MM 1 INTRODUCTION Wood-burning Stove Item
Asgård 7F User Manual Ecolabel - Sintef EN
 Asgård 7F User Manual Ecolabel - Sintef 110-0234 - EN 13240 www.aduro.dk Version 1 Good luck with your new wood burning stove! In order to get the best possible pleasure and benefit from your new Asgård
Aduro 10. User Manual. Ecolabel - Sintef EN Version 2
 Aduro 10 User Manual Ecolabel - Sintef 110-0234 - EN 13240 www.aduro.dk Version 2 Congratulations with your new wood burning stove! In order to get the best possible pleasure and benefit from your new
Installation instruction
 Installation instruction Ci51AN Ci51A Ci51T Ci51S www.contura.eu 114 CERTIFICATE Declaration of performance according to Regulation (EU) 305/2011 No. Ci51-CPR-150821-SE-2 PRODUCT Product type Type designation
Asgård 3 / Asgård 4 / Asgård 6
 Asgård 3 / Asgård 4 / Asgård 6 User Manual Ecolabel - Sintef 110-0227 - EN 13240 www.aduro.dk Good luck with your new wood burning stove! In order to get the best possible pleasure and benefit from your
User s manual. Eros I. An der Bundesstraße Haren/Ems Germany Tel. +49(0)
") User s manual Eros I An der Bundesstraße 2 49733 Haren/Ems Germany Tel. +49(0)5932-7334784 info@globe-fire.de Congratulations with your new Globe Fire stove Cast iron stoves have a long tradition. Our
User s manual Eros I An der Bundesstraße 2 49733 Haren/Ems Germany Tel. +49(0)5932-7334784 info@globe-fire.de Congratulations with your new Globe Fire stove Cast iron stoves have a long tradition. Our
OÜ Skamet Reg. Nr Savi 9, Pärnu, Estonia
 OÜ Skamet Reg. Nr 11135000 Savi 9, Pärnu, Estonia +372 440 1000 info@skamet.ee www.skamet.ee ABOUT US Our enterprise OÜ Skamet was established in January 2006, when we bought a former metal manufacturer
INSTALLATION AND OPERATIONS GUIDE FOR GRAND CANYON GAS JUMBO/JUMBO SLIMLINE LOG SYSTEMS
 Burner Systems: JUMBOSLIMBRNR-24 JUMBOSLIMBRNR-30 JUMBOBRNR-36 / JUMBOSLIMBRNR-36 JUMBOBRNR-42 / JUMBOSLIMBRNR-42 JUMBOBRNR-48 / JUMBOSLIMBRNR-48 JUMBOBRNR-60 / JUMBOSLIMBRNR-60 INSTALLATION AND OPERATIONS
Mounting and User Instructions. Lotus-Living-Series Stoves. Version 1,
 Mounting and User Instructions Lotus-Living-Series Stoves Version 1, 10-10-2012 Introduction Congratulations on your new Lotus Wood Stove We sincerely trust that your Lotus Wood Stove will bring many
ECO-FRIENDLY WOOD-BURNING STOVES OF DANISH DESIGN
 2014/201 ECO-FRIENDLY WOOD-BURNING STOVES OF DANISH DESIGN THE NEW APP FROM VARDE SEE THE STOVE IN YOUR HOME BEFORE YOU BUY IT! At VARDE, we know that the right woodburning stove requires the best location
ECO-FRIENDLY WOOD-BURNING STOVES
 ECO-FRIENDLY WOOD-BURNING STOVES DANISH DESIGN 2017 / 2018 VARDE ALS www.vardeovne.co.uk warm moments of quality VARDE UNIQ 1 Wood-burning stoves from VARDE stand on the stylistic bedrock of Scandinavian
DAYLINE SALES Trading Since 1984
 DAYLINE SALES Trading Since 1984 T o O r d e r Ca ll: (0 2 1 ) 9 3 9 2 2 2 0 Table of Contents 1. Cast Iron Pots 4 Falkirk 4 Best Duty 5 Atlas 11 Dutch Oven Pots 12 2. Cast Iron Plates, Pans and Grating
O P E R A T I O N AND INST A L L A T I O N M A N U A L
 O P E R A T I O N AND INST A L L A T I O N M A N U A L OPUS TEMPO FIRED BY DESIGN Contents Disposal of packaging 3 Introduction 3 1 Description 3 2 General 3 3 Installation of the Stove 4 3.1 Flue pipe
General Information. Construction of the stove. Top or rear outlet of gases
 General Information WARNING! To avoid the fire hazard, the device must be installed in accordance with the applicable standards and technical regulations, which are mentioned in the further part of the
Intrepid 2 Intrepid 3
 Intrepid 2 Intrepid 3 Model Nos. V 10 / V10-3 NAT GAS Model Nos. V12 / V12-3 L.P.G DECORATIVE COAL EFFECT GAS STOVE USER INSTRUCTIONS This appliance is only for use on Natural Gas (G20) at a supply pressure
made by made by NEW UK 17/18
 NEW made by A true Viking Raw strength and strong family ties are classic symbols of the Scandinavian Vikings. These symbols also provide the foundation for our WIKING stoves, which radiate high quality
Mounting and User Instructions Lotus QM Series Stoves
 Mounting and User Instructions Lotus QM Series Stoves (Lotus QM1, QM2) Version 2, 06/09-2014 Introduction Congratulations on your new Lotus Wood Stove We sincerely trust that your Lotus Wood Stove will
Assembly and User Instructions Fireplace Inserts, Lotus H470-H570
 Assembly and User Instructions Fireplace Inserts, Lotus H470-H570 Version 6, 3-1-2012 Introduction Congratulations on your new Lotus Fireplace Insert We hope and believe that it will give you many a warm
Mounting and User Instructions Lotus M Series Stoves
 Mounting and User Instructions Lotus M Series Stoves (Lotus M1, M2, M3, M4 and M2ST) Version 2, 31.08.2010 Introduction Congratulations on your new Lotus Wood Stove We sincerely trust that your Lotus
Installation instruction
 Installation instruction 51 52 52T 54 54T contura.eu 50 CERTIFICATE Declaration of performance according to Regulation (EU) 305/2011 No. C51-CPR-130620-SE-1 PRODUCT Product type Type designation Manufacturing
CONTENTS. INSTALLATION INSTRUCTIONS Building regulations 4 Positioning and Clearances 4 Chimney 4 Flue connection 5 Problem solving 6 PRODUCT DATA
 PRODUCT DATA MODEL WEIGHT NOMINAL HEAT OUTPUT FB1 DS 80KG 6KWs CONTENTS OPERATING INSTRUCTIONS Lighting the fire 2 Firebox linings and baffle 2 Wood burning tips & theory 2 Running temperatures 3 Cleaning
Installation instruction
 Installation instruction C 580 C 585 www.contura.eu 50 CERTIFICATE EC Declaration of conformity Manufacturer name address Place of manufacture NIBE AB / Contura Box 134, Skulptörvägen 10, SE-285 23 Markaryd
BRANDON PIZZA OVEN INSTALLATION GUIDE AND OWNER S MANUAL
 BRANDON PIZZA OVEN INSTALLATION GUIDE AND OWNER S MANUAL TABLE OF CONTENTS COMPONENTS... 3 OVERALL DIMENSIONS.... 4 POSITIONING REFERENCE PER LAYER... 5 CONCRETE PAD PREPARATION... 5 INSTALLATION OF BLOCKS...
DIANA EN Owners s manual INSTALATION, ADJUSTMENT AND OPERATING INSTRUCTION. Available in ceramic and metalsheet version.
 DIANA Owners s manual INSTALATION, ADJUSTMENT AND OPERATING INSTRUCTION Available in ceramic and metalsheet version. EN 13240 1 INTRODUCTION Congratulations! You have invested in energy efficient and high
OPERATION AND INSTALLATION MANUAL OPUS TRIO FIRED BY DESIGN
 OPERATION AND INSTALLATION MANUAL OPUS TRIO FIRED BY DESIGN Contents Disposal of packaging 3 Introduction 4 1. Description 4 2. General 5 3. Installation of the Stove and the flue pipe connection 5 3.1.
Instructions for installation and use S MORSØ JERNSTØBERI A/S. DK-7900 NYKØBING MORS Website:
 Instructions for installation and use S80-90 EN 13240 SINTEF 110-0352 MORSØ JERNSTØBERI A/S. DK-7900 NYKØBING MORS E-Mail: stoves@morsoe.com Website: www.morsoe.com 21 Enjoy your new Morsø stove! Morsø,
Bloomsbury SE SMOKE EXEMPT WOODBURNING STOVE INSTALLATION & USER INSTRUCTIONS (TO BE LEFT WITH THE CUSTOMER) UK & IRELAND GUARANTEE
 UK & IRELAND GUARANTEE") 9/11 (PP) GUARANTEE CONDITIONS OF GUARANTEE Your ACQUISITIONS stove is guaranteed against defects arising from faulty manufacture for one year subject to the following express conditions. Failure to comply
9/11 (PP) GUARANTEE CONDITIONS OF GUARANTEE Your ACQUISITIONS stove is guaranteed against defects arising from faulty manufacture for one year subject to the following express conditions. Failure to comply
SIMPLY SOME OF THE FINEST STOVES AVAILABLE
 Carron stoves Few things in life give such simple pleasure as the warmth and character a real burning stove brings to a home. Both classic in design and extremely practical, a Carron stove is an efficient
CBO-750 ASSEMBLY INSTRUCTIONS
 CBO-750 ASSEMBLY INSTRUCTIONS CBO-750 Ovens Should be Installed by a Professional or Suitably-Qualified Individual. Support Base The CBO-750 Oven Support Base must: be constructed of masonry or metal have
ECO-FRIENDLY WOOD-BURNING STOVES
 ECO-FRIENDLY WOOD-BURNING STOVES DANISH DESIGN 2016 / 2017 VARDE CARDIFF www.vardeovne.co.uk VARDE SAMSØ warm moments of quality DESIGN QUALITY ENVIRONMENTALLY FRIENDLY SUPPORT For us, outstanding design
SIMPLY SOME OF THE FINEST STOVES AVAILABLE
 Carron stoves Few things in life give such simple pleasure as the warmth and character a real wood burning stove brings to a home. Both classic in design and extremely practical, a Carron stove is an efficient
EKOL CRYSTAL-8 INSTALLATION AND OPERATING INSTRUCTIONS
 EKOL CRYSTAL-8 INSTALLATION AND OPERATING INSTRUCTIONS INTRODUCTION SAFETY Safety is the most important consideration when using and installing your stove. If not installed and used correctly, a house
Read all instructions and warnings before using this fireplace. WARNING
 Frame User Manual 1 Operating Manual Thank you for purchasing this Signi Fires product. Signi Fires is very safety conscious, we have taken every care in designing, manufacturing and assembling your Signi
WOOD BURNING STOVES. Installation and Operating Instructions
 WOOD BURNING STOVES IOJ IOJ IOJ O IOJ IOJ IOJ IOJ IOJ IOJ O IOJ IOJ IOJ Installation and Operating Instructions IMPORTANT Installation MUST ONLY be carried out by a Gas Safe registered engineer/installer
SIMPLY SOME OF THE FINEST STOVES AVAILABLE
 Carron stoves Few things in life give such simple pleasure as the warmth and character a real wood burning stove brings to a home. Both classic in design and extremely practical, a Carron stove is an efficient
User's Manual /
 User's Manual GB 4510 4520 4530 4540 4550 4560 05.09.2017 / 97-9687 www.hwam.com 2 Table of contents, English Drawings... 4-8 For UK - The Clean Air Act 1993 and Smoke Control Areas...9 Installation......................................................
EXCEL ULTRABlack FS 6 Clearance Connector INSTALLATION AND MAINTENANCE INSTRUCTIONS
 EXCEL ULTRABlack FS 6 Clearance Connector INSTALLATION AND MAINTENANCE INSTRUCTIONS A MAJOR CAUSE OF CHIMNEY RELATED FIRES IS FAILURE TO MAINTAIN REQUIRED CLEARANCES (AIR SPACE) TO COMBUSTIBLE MATERIALS.
solid fuel stove collection
 2013/ 2014 solid fuel t h e stove collection www. dimplex. co. uk/ stoves Multi-fuel stoves from a name you can trust As a sign of our commitment to quality, all new Dimplex solid fuel stoves are guaranteed
Installation and Operating Instructions. Ottawa 12kw
 Installation and Operating Instructions Ottawa 12kw 1 Wood-burning Stove Model: Ottawa 12kw Size: W580XD410XH610MM INTRODUCTION Wood-burning Stove Item No.: Ottawa 12.3kw Size: W580XD410XH610MM SAFETY
Dean Forge Fabrication Ltd. Dean Prior, Buckfastleigh, Devon TQ11 0LS. T e l:
 Dean Stoves Dean Forge Fabrication Ltd. Dean Prior, Buckfastleigh, Devon TQ11 0LS T e l: 0 1 3 6 4 6 4 3 5 7 4 w w w.d e a n f o r g e.c o.u k e m a i l: s t o v e s @ d e a n-f o r g e.c o.u k Operating
Assembly and User Instructions Fireplace Insert, Lotus H370 Petite
 Assembly and User Instructions Fireplace Insert, Lotus H370 Petite Version 3, 04/10-2017 Introduction Congratulations on your new Lotus Fireplace Insert We hope and believe that it will give you many
User's Manual /
 User's Manual EN 4530 4540 4550 4560 08.11.2016 / 97-9688 www.hwam.com Table of contents, English Drawings... 4-8 HWAM Autopilot IHS TM...9 Installation........................................................
Installation Instructions. Woolly Mammoth Stoves Albert Road, Braintree, Essex, CM7 3JQ
 Installation Instructions Woolly Mammoth Stoves 20-28 Albert Road, Braintree, Essex, CM7 3JQ INSTALLATION INSTRUCTIONS TO BE READ IN CONJUNCTION WITH THOSE IN THE INSTRUCTION BOOKLET These instructions
ASSEMBLY- AND INSTRUCTIONS FOR USE. Congratulations on your new Scan wood-burning stove
 ASSEMBLY- AND INSTRUCTIONS FOR USE Scan 50-8 Congratulations on your new Scan wood-burning stove You have purchased a product by one of Europe s leading manufacturer s of wood-burning stoves, and we are
H0W TO OPERATE AN EFFICIENT WOOD BURNING STOVE HOW TO OPERATE AN EFFICIENT WOOD BURNING STOVE ( SUPPLEMENT 3 )
") HOW TO OPERATE AN EFFICIENT WOOD BURNING STOVE ( SUPPLEMENT 3 ) STOVE BUILT IN USA USING REFERENCE DOCUMENT REFERENCE: HOW TO BUILD AN EFFICIENT WOOD BURNING STOVE REVISION (A) 07/16/2013 ED KEANE 08/09/2013
HOW TO OPERATE AN EFFICIENT WOOD BURNING STOVE ( SUPPLEMENT 3 ) STOVE BUILT IN USA USING REFERENCE DOCUMENT REFERENCE: HOW TO BUILD AN EFFICIENT WOOD BURNING STOVE REVISION (A) 07/16/2013 ED KEANE 08/09/2013
Brunel 1A / 2CB / 3CB
 Brunel 1A / 2CB / 3CB Multi-Fuel Stoves Installation and Operating Instructions IMPORTANT Please read these instructions carefully before using the appliance. Keep them safe for future reference and when
Ø-Collection. Ø4 - (81% Efficiency) Ø6 - (75% Efficiency) Ø8 - (75% Efficiency) Instructions for Installation and Use UK/EN 13240
 Ø6 - (75% Efficiency) Ø8 - (75% Efficiency) Instructions for Installation and Use UK/EN 13240") Ø-Collection Instructions for Installation and Use Ø4 - (81% Efficiency) Ø6 - (75% Efficiency) Ø8 - (75% Efficiency) UK/EN 13240 Distributed by: Morsø UK Valley Drive Swift Valley Rugby, Warks CV21 1TW
Ø-Collection Instructions for Installation and Use Ø4 - (81% Efficiency) Ø6 - (75% Efficiency) Ø8 - (75% Efficiency) UK/EN 13240 Distributed by: Morsø UK Valley Drive Swift Valley Rugby, Warks CV21 1TW