1055 N 625 W SHIPSHEWANA, IN PHONE: FAX:
|
|
|
- Lester Willis
- 5 years ago
- Views:
Transcription
1 TRUST THE BUILD, ENJOY THE EXPERIENCE OWNER S MANUAL ALL MAKES AND MODELS 1055 N 625 W SHIPSHEWANA, IN PHONE: FAX:
2 Welcome to The Sunset Family! Thank you for purchasing a Sunset Park recreational vehicle and choosing the RV lifestyle as a family friendly form of leisure, recreation and fun. It is the intent of the Sunset Park RV Family to do our best to assure that you enjoy a positive ownership experience. Your new Sunset Park RV has been designed and built to our personal high standards as well as those of the Recreational Vehicle Industry Association. Please thoroughly read and understand the contents of this Owner s Manual and the various component manufacturer manuals that came with your RV. It is imperative for your personal safety that you become familiar with and learn how to properly operate the various systems, appliances and components included in your RV. Read all cautions, warnings and notices very carefully. Familiarize yourself and your family with the safety features built into your RV, and what actions and steps are necessary to assure safe camping. Always place the safety of you and your family first. Please carefully read the Limited Structural Warranty that comes with your new RV. Be sure to understand the extent of your coverage and duration as well as the various exclusions and limitations that may apply. In addition, please understand the ongoing maintenance and upkeep requirements that need to be performed for your warranty to remain in effect. Failure to perform required maintenance could void your warranty. Your new RV may have additional warranties provided by the various component suppliers that extend beyond the Limited Warranty. Please be sure to read all component warranty information found in your Owner s Packet and submit any required registration forms. Again, thank you from Sunset Park RV and your Sunset Park RV Dealer for your purchase. We wish you many safe and enjoyable journeys in your new RV and a lifetime of memories. 1
3 TABLE OF CONTENTS Owner's Manual INTRODUCTION REPORTING SAFETY DEFECTS..6 SERVICE & WARRANTY....7 SUNSET PARK RV, ONE YEAR LIMITED WARRANTY COMPONENT MANUFACTURER CONTACT INFORMATION.. 20 COMPONENT MANUFACTURER WARRANTY INFORMATION. 21 OCCUPANT SAFETY.. 22 PRE-TRAVEL INFORMATION.. 36 TOWING & LEVELING.. 49 ELECTRICAL SYSTEMS PLUMBING SYSTEMS.. 65 WATER HEATER BYPASS WINTERIZING & SANITIZING PROPANE SYSTEM APPLIANCES ELECTRONICS...84 HEATING & COOLING SLIDEOUT SYSTEMS INTERIOR CONVERT SOFA INTO A BED 96 CONVERT DINETTE INTO A BED..96 EXTERIOR REQUIRED MAINTENANCE SCHEDULE. 103 BASIC TROUBLESHOOTING GLOSSARY CUSTOMER NOTES
4 INTRODUCTION ABOUT THIS MANUAL The purpose of this manual is to serve as guide to describe normal operation, safety, care, and maintenance of your recreation vehicle (RV). Information in this manual is subject to change without notice and represents information relevant at the time of publication. The photographs, drawings, components, and systems described may not represent what is actually in your RV due to ongoing upgrades and improvements. There is nothing in this manual that creates any warranty, express or implied. Information in this manual is not meant in any way to supplement, modify, or alter the terms and conditions of your Limited Structural Warranties, or any component manufacturer warranties. Procedures outlined in this guide are typical for normal operating conditions. You are responsible for the safe operation and use of your RV, and we have tried to include information to assist you. There are occasional tips to help you enjoy the recreational lifestyle; however, this guide is not intended to teach you how to camp, or where. If you have any questions, concerns, or require assistance regarding any aspect of your RV, please contact your dealer or Sunset Park RV. Corporate Office 1055 N 625 W. Shipshewana, IN Phone: (260) Fax: (574) Website: Customer Service service@allrvmfg.com Phone: (260) OWNER S INFORMATION PACKAGE Your new RV includes an Owner s Information Package containing various component manufacturer manuals, and registrations. Some component manufacturers offer warranties beyond that offered through the Limited Structural Warranties. Some components are excluded from the Limited Bumper to Bumper Warranties and are warranted separately and exclusively by the individual component manufacturer. Activation of each component warranty is critical, and it is important you register within the prescribed time limits to avoid loss of warranty coverage. This manual and the Owner s Information Package should be considered a permanent part of the RV. If the RV is sold, they should remain with the RV for the next owner. INTRODUCTION 3

5 INTRODUCTION MANUFACTURING CERTIFICATION Sunset Park RV is subject to frequent and random audits to ensure our RVs are constructed to the thorough safety and manufacturing codes, standards and regulations established by T.R. Arnold. THE VEHICLE IDENTIFICATION NUMBER The unique 17-digit vehicle identification number (VIN) for your RV is listed on the Federal Certification label and is stamped on the RV A-frame. A breakdown of a typical Sunset Park RV VIN is shown in the example below: NHTSA DOT Identifier: 7J3 Sunset Park RV Make / Model: U Sun-Lite S SUNRAY R Rush L Liberty Length: The number listed falls within a pre-determined, specified grouping that does not indicate the actual measured length of your RV. Model Year: E 2014 F 2015 G 2016 H 2017 J 2018 K

6 INTRODUCTION SAFETY PRECAUTIONS Nothing is more important than the personal safety of you, your family and others. Safety encompasses several areas related to the RV experience. This includes driving/towing safety, occupant safety, operational safety, environmental safety, and more. Any time you are dealing with carbon monoxide producing appliances, propane gas, electricity and other hazards it is critical that safety become your number one priority in and around your recreational vehicle. [Customer Supplied] This denotes aftermarket items not installed or included by Sunset Park RV. Items noted as customer supplied are not covered by the Warranties. The inclusion of items noted as customer supplied does not imply or suggest the availability, application sustainability, or inclusion for any specific unit. [If so equipped] This denotes items that may be installed by Sunset Park on particular RVs. Additionally, some items noted as if so equipped can only be included during the manufacturing phase and cannot be added at a later date. The inclusion of items noted as if so equipped does not imply or suggest the availability, application sustainability, or inclusion for any specific unit. [Optional] This denotes items that may be an option on all or particular models. Additionally, some optional items can only be included during the manufacturing phase and cannot be added at a later date. The inclusion of optional items does not imply or suggest the availability, application sustainability or inclusion for any specific unit. 5
7 REPORTING SAFETY DEFECTS United States If you believe that your vehicle has a defect, which could cause a crash or could cause injury or death, you should immediately inform the National Highway Traffic Safety Administration (NHTSA) in addition to notifying Sunset Park RV. If NHTSA receives similar complaints, it may open an investigation, and if it finds that a safety defect exists in a group of vehicles, it may order a recall and remedy campaign. However, NHTSA cannot become involved in individual problems between you, your dealer, or Sunset Park RV. To contact NHTSA, you may either call the Vehicle Safety Hotline toll-free at (TTY: ); go to or write to: NHTSA Headquarters Attn: Administrator 1200 New Jersey Avenue, SE Washington DC You can also obtain other information about motor vehicle safety from Canada If you believe that your vehicle has a defect, which could cause a crash or could cause injury or death, you should immediately contact the Transport Canada's Defect Investigations and Recalls Division, and Sunset Park RV. To contact Transport Canada, call toll-free in Canada (or call if calling from the Gatineau-Ottawa area or internationally); go to or write to: Transport Canada Defect Investigations and Recalls Division 330 Sparks Street Ottawa ON K1A 0N5 Canada 6
8 SERVICE & WARRANTY DEALER S RESPONSIBILITIES At the time of sale of the new RV, your dealer is expected to: 1. Deliver your RV in the best condition possible. Your RV must pass the dealer s Pre-Delivery Inspection (PDI), which includes all system tests. 2. Provide orientation and familiarize you, the retail owner, with the operation of all systems and components of the new RV. 3. Explain and review the provisions of the Limited bumper to Bumper Warranty to you. 4. Ensure you receive instructions on downloading a complete Owner Information Package and assist you in completing all necessary warranty registrations (including locating model and serial numbers as needed). 5. Instruct you on how to receive local and out of town service for your RV and its separately warranted components, whether in or out of warranty. 6. Service all Sunset Park RV products. 7. Complete and return your Warranty Registration and New Vehicle Pre-Delivery Inspection Check List form within thirty (30) days from the date of delivery to Sunset Park RV to activate your applicable warranty coverage. OWNER S RESPONSIBILITIES As the owner, you are responsible for the regular care and proper maintenance of your RV. Proper maintenance will help avoid situations where the Limited Bumper to Bumper Warranty will not cover items due to neglect. You need to perform maintenance services in accordance with this manual and the corresponding manufacturer instructions for the components included in your RV. As the owner, it is your responsibility and obligation to return the RV to an authorized dealer for any warranty repairs and service that may be required. Your dealer is responsible for proper service prior to delivery and has a continued interest in your satisfaction. Therefore, we recommend warranty and maintenance services be performed by your Sunset Park RV dealer. As with your other personal belongings, it is important to protect yourself and others with insurance coverage. Your insurance agent can assist you in obtaining the appropriate insurance coverage for personal liability, theft, collision, property damage, etc. 7
9 Service & Warranty OBTAINING WARRANTY SERVICE Service must be obtained within a reasonable time after discovery of the defect and prior to the applicable warranty expiration period. To help ensure your dealer provides the level of service you expect, here are some suggestions: Call ahead Do not wait until you are ready to use your RV, as your dealer may not be able to schedule it in immediately. Generally, the service department is busiest on Mondays, Fridays and before the holidays. Be prepared Have your warranty paperwork available and provide the service center with any past repair history as it may assist the dealer technician in diagnosing the current issue. Make a list Provide a written list of repairs needed in specific order of priority and be reasonable with repair expectations. If you need your RV returned by a specific time, discuss the situation with the dealer s service management as a second appointment may be necessary for work not completed or parts that may need ordered. While waiting Drop your RV off if possible. Do not be surprised if told you cannot watch work being done. Some insurance requirements forbid admission of customers to the service area. Inspect the work performed After a repair is performed inspect it thoroughly. Notify the dealer s service management immediately of any dissatisfaction. If you cannot return your RV immediately for repair, make an appointment as soon as possible. In the event the issue should re-occur after you have left the dealership, contact the repair center and Sunset Park RV Customer Support as soon as possible, so the situation can be resolved expediently. 8
10 Service & Warranty OBTAINING EMERGENCY WARRANTY REPAIR A roadside emergency can happen at any time, whether your RV is new or old. If you are traveling, using the following guidelines can help get you back on the road faster. 1. Use our website Dealer Locator located at www. sunsettrailers.com to find the nearest authorized repair center. 2. If you cannot locate an authorized dealer near you, ask the campground staff for referrals or check the local telephone yellow pages. Or contact Sunset Park RV Customer Support or your selling dealer for assistance in locating a repair facility. a. Contact the RV repair facility to discuss your situation and make an appointment. Ask how their billing will be handled. They may choose to bill Sunset Park RV directly; otherwise, you are expected to pay them. b. Have the RV repair facility inspect your RV. Either they or you must call Sunset Park RV Customer Support to discuss applicable warranty coverage prior to any repair work being performed. c. Sunset Park RV Customer Support will issue an authorization number upon warranty repair approval and advise if any original parts must be returned. d. After the authorization number has been issued, the repair center may begin actual repair on your RV. e. For reimbursement, either you or the RV repair facility must send a copy of your itemized repair bill and all requested return parts by UPS (regular ground, freight prepaid) to Sunset Park RV within 60-days of the completed repair date. To expedite processing your warranty claim, include your name, address, phone number, RV 17-digit VIN and authorization number. If returning parts, include a copy of your freight bill. 3. Inspect the completed repair work thoroughly. If you are not satisfied, communicate that to the RV repair facility management. Make sure you are satisfied with the repair before you pay or leave the premises. Obtaining weekend or after business hours emergency repair assistance If an authorized Sunset Park RV dealer is not located nearby, contact your selling dealer for assistance. If your dealer is closed, check with the campground staff or telephone yellow pages for an RV repair facility. Have the item repaired and contact Sunset Park RV Customer Support immediately the following business day. 9
11 Service & Warranty REPLACEMENT PARTS Replacement warranty parts are distributed exclusively by authorized Sunset Park RV dealers or service centers. If an original part is no longer available, Sunset Park RV or your dealer will try to provide an appropriate substitute. AFTERMARKET INSTALLATIONS & ALTERATIONS Aftermarket installations or alterations to the original equipment vehicle as distributed by Sunset Park RV are not covered by the Limited Structural Warranty. The special body company, assembler, equipment installer, or up-fitter is solely responsible for warranties on the body or equipment and any alterations (or any effect of the alterations) to any of the parts, components, systems, or assemblies installed by Sunset Park RV. Sunset Park RV is not responsible for the safety or quality of design features, materials, or workmanship of any alterations by such suppliers. UPDATING YOUR CONTACT INFORMATION Federal record keeping laws require that we maintain a file of owners of our RVs. Please help us keep your contact information updated so that, in the event of a recall or customer notification letter, you are notified. Please let us know (in writing) in the event of a change of address or ownership, or if your RV is stolen, totaled or destroyed. your updated contact information request to service@allrvmfg.com or mail to: Sunset Park RV 1055 N 625 W. Shipshewana, IN If you have any questions, please contact Sunset Park RV Customer Support at (260)
12 This page is intentionally blank. 11
13 This page is intentionally blank. 12
14 TOWABLE NON-TRANSFERABLE LIMITED WARRANTY SUNSET PARK RV MANUFACTURING, Inc 1055 N 625 W Shipshewana, IN Year Bumper to Bumper Limited Warranty Summary of Warranty: Sunset RV warrants the structure of every towable recreational vehicle purchased from an authorized SUNSET RV dealer to the first consumer for the period of one (1) year, to be free from substantial defects in materials and workmanship when used for its intended purpose. The warranty period begins on the date of the purchase or the date the unit is first placed in service, whichever is earlier. For the purpose of this warranty (TNTLW) the term structure includes the interior and exterior sidewalls, floor, roof, and frame. Exclusions from Warranty: Excluded from coverage under the TNTLW are: (1) items added, changed, or modified after the unit left the possession of SUNSET RV; (2) units used for any commercial purpose; (3) units used for full time residential use; (4) wear and tear caused by normal usage by the consumer, including but not limited to fading or discoloration of soft goods (e.g. upholstery, drapes, carpet, vinyl, screens, cushions, and mattresses), fading or discoloration of exterior or fiberglass components, tears, punctures, soiling, mildew, mold, and the effects of moisture condensation acts of God or nature, or corrosive atmospheres that promote rusting, oxidation, or pitting; (6) minor imperfections that do not interfere or affect the suitability of the unit for its intended use; (7) the effects of the consumer s failure to perform normal and routine maintenance (e.g. inspections, lubrication, adjustments, tightening of screws, nuts, and bolts, tightening of lug nuts and wheels, sealing, rotating, cleaning, or other damages; (8) damages resulting from misalignment or adjustments to axles or spindle caused by improper maintenance, modification, loading, unloading, road hazards, road defects, off road travel, or tire failure; (9) damages caused by the negligent or intentional or unintentional misuse of the unit by the consumer including but not limited to occurrences while towing the unit; (10) loss or damage caused by a person or business as a result of transporting the unit after the sale to the consumer, delivering the unit or parking the unit; (11) loss or damage to the plumbing system caused by freezing; (12) claims for personal injuries of any types; (13) cost of the transportation of the unit for repairs; (14) components that are warranted separately by another manufacturer (the warranty provided by a component manufacturer is the sole responsibility of the respective manufacturer and not SUNSET RV). To obtain Warrant Service: Warranty service may be performed only at SUNSET RV or at any authorized SUNSET RV dealers and service centers. Consumers may contact SUNSET RV for a list of authorized dealers and service centers. (Repairs or replacements by unauthorized dealers or service centers will void this TNTLW.) If the consumer believes that a claimed defect is covered by this TNTLW then contact must be made with an authorized dealer or service center within the warranty period. Sufficient information must be given to attempt resolution of the claimed problem. If SUNSET RV determines the repair or replacement appropriate then the consumer must deliver the unit to the dealer or service center as directed. Delivery shall occur no later than thirty (30) days after the authorization for repair or replacement. The unit should not be delivered to SUNSET RV or an authorized dealer or service center without prior authorization. All cost incurred by the consumer for transportation for warranty service shall be the sole responsibility of the consumer. The dealer or service center shall repair or replace any warranted defect within a reasonable time, but no later than ninety (90) days after the delivery by the consumer. Should the unit not be repaired within said period of time, then the consumer must contact SUNSET RV by certified mail with a written description of the claimed warranted defects and the efforts made to remedy it. Failure to notify SUNSET RV in this regard shall render this TNTLW void as to the claimed defects. After receipt of such notice, SUNSET RV shall repair or replace such warranted defect within a reasonable time not later than ninety (90) days after delivery by the consumer. The scheduling of the warranty at an authorized dealer or service center is not controlled by SUNSET RV, and delays may be experienced. SUNSET RV is not responsible for loss of use of the unit, expenses for fuel, communication, food, lodging, travel, loss of time and or income, or loss of damage to personal property. Disclaimer and limitations: Neither SUNSET RV nor its dealers shall be liable for incidental, consequential, indirect, special, or punitive damages of any kind or any other financial loss arising out of or in connection with the sale or use of this product, whether based in contract tort, strict liability equity, or any other theory, even if SUNSET RV has been advised of the possibility of such damages. The entire liability of SUNSET RV shall be limited to repair or replacement. The United Nations Convention on the contracts for international sale of goods is hereby excluded in its entirety from application to this TNTLW. The foregoing TNTLW and the remedies there under are exclusive and in lieu of all other warranties, expressed or implied, including warranties of merchantability, all of which are expressively disclaimed by SUNSET RV. This TNTLW grants consumers specific legal rights including those of which may be offered by local law. Some states limit or prohibit limitations of warranties. Consult a competent attorney for legal advice. Miscellaneous: No repair or replacement effected shall cause any extension or renewal of the warranty period. SUNSET RV may make parts or design changes without notice, and repairs or replacements may be made with new or different parts. SUNSET RV reserves the right to make changes in the design or material of its products without incurring any obligation to incorporate such changes in any products previously manufactured. SUNSET RV has the option in any dispute concerning any warranted defect to seek resolution through mediation or arbitration. In case of arbitration, an arbitrator from the American Arbitration Association (AAA) shall be selected. This TNTLW shall be governed by the laws of the State of Indiana, and any legal action shall be brought only in circuit or superior court of Elkhart Count, Indiana. 13
15 Service & Warranty The sole remedy for a breach of the warranty is as follows. Defective parts and workmanship will be replaced by the Warrantor, or the Warrantor s authorized agent, provided that the following terms are met: 1. The Warrantor s authorized agent must be notified of the covered defect within the warranty period and within Twenty (20) days of when the defect was discovered or should have been discovered by a reasonable person exercising reasonable care according to the terms of this Limited Warranty. 2. The person seeking the replacement of the defective part or labor must be the original retail consumer purchaser. 3. The defective material or workmanship for which the warranty work and/or part is sought must be to the RECREATIONAL VEHICLE itself only. 4. The other terms and conditions of this Limited Warranty must be satisfied. What types of things are excluded from the Warranty? This Warranty does not cover: a. Defects in any component parts or labor of the recreational vehicle which are not considered the RECREATIONAL VEHICLE or which were not manufactured by Warrantor; b. Defects in any items or labor which are covered by a separate warranty from the original manufacturer of any part that is used by Warrantor in the RECREATIONAL VEHICLE; c. Deterioration due to normal wear, tear, and exposure; d. Repairs or replacements made necessary by negligence, negligent use of, misuse of, abuse of, loading the unit beyond its gross weight limitations, accidents, acts of God, modifications or alterations in or to the RECREATIONAL VEHICLE by anyone, and failure to maintain or care for the RECREATIONAL VEHICLE, and any and all matters which were not within the control of the Warrantor; e. Neglect of the recreational vehicle or any part of it; f. Repairs or replacements made necessary by reason of a failure of the original retail consumer purchaser or others to follow ordinary maintenance procedures as recommended by the Warrantor or the manufacturer or dealer of the recreational vehicle; g. Any defect caused in-transit to or from a dealer or to or from the consumer or by the consumer or another; h. Any defects in work, labor, materials or parts not actually manufactured by, performed by or made by Warrantor; i. Tires; Batteries; Optional Generators and certain Appliances & Electronic Entertainment Equipment which is warranted separately by the respective component manufacturer. 14
16 Service & Warranty J. Recreational vehicles purchased anywhere other than from an authorized Warrantor dealer; k. Alterations, modifications or changes to the original design and build of the recreational vehicle; l. Vehicles used for rental, business or disaster relief purposes; m. Routine maintenance and adjustments; n. Vehicles registered and used outside the U.S. and Canada; o. Consequential/incidental expenses (damages) such as service calls, transportation, lodging, food, fuel, etc. NOTE: Some states do not allow the exclusion of incidental or consequential damages, so this exclusion may not apply to you; p. Fading, yellowing or aging of exterior materials due to UV or sunlight or weather exposure; q. Damage that has occurred as a result of misuse, abuse, neglect, or lack of maintenance; r. Damage caused by unregulated water pressure, tank over-fill or plumbing system modifications resulting in flooding of the vehicle; s. Damage caused by unprotected electrical hook-ups (home or campground), power surges, lightning, circuit overload or electrical system modifications; t. Damage caused by overloading or improper weight distribution; u. Damage caused by improper ventilation resulting in excessive condensation which results in water damage and/or mold or mildew; v. Damage, fading or deterioration caused by prolonged exposure to natural elements; w. Damage caused by infestation by insects or other animals; x. Damage caused by the tow vehicle hitch, equalizer, stabilizer, electrical or brake controller system; y. Damage caused by the environment or weather, including, but not limited to, flooding, high winds, acid rain, hail, lightning, high heat, extreme cold, etc. z. Damage caused by road surface conditions, applications of salt or de-icing chemicals, gravel/ sand, ruts, holes, etc.; aa. Exterior paint or finish which is warranted independently by the paint manufacturer and/or independent applicator; bb. DEFACING: scratches, dents, and rust on any surface of the RECREATIONAL VEHICLE; and cc. EXCESS weight on the RECREATIONAL VEHICLE. 15
17 Service & Warranty WARRANTOR S OBLIGATIONS - HOW TO GET WARRANTY SERVICES How Do You Get Service? In no event shall repair or replacement for a defect be covered under this Warranty unless the repair or replacement occurs at Warrantor s facilities, or Warrantor s designated repair shop or dealer. Upon discovery of any defect covered by this Warranty, you must notify the authorized dealer from whom you purchased the recreational vehicle. Following notification, the recreational vehicle must be taken to the authorized dealer from whom you purchased it for inspection or another authorized dealer, if authorized by Warrantor, or authorized repair shop as directed by Warrantor. Either that dealer or repair shop or Warrantor will undertake appropriate corrective repairs in instances where the defect is covered by this Warranty. Warrantor reserves the right to use or cause the use of alternative parts or components having substantially equal or greater quality. Warrantor will remedy defects in materials and workmanship covered under this Limited Warranty under normal use and service caused by Warrantor in the RECREATIONAL VEHICLE ONLY of the recreational vehicle. Warranty performance can only be obtained at Warrantor s authorized dealers and service representatives. All costs incurred in transporting this recreational vehicle for warranty service shall be borne by purchaser unless otherwise approved in advance by Warrantor. What are purchaser s obligations? The purchaser shall give notice to the Warrantor s agent or dealer within Thirty (30) days after it is or should have been discovered, and any action to enforce it shall be commenced not more than three (3) months thereafter; otherwise the Purchaser will have waived any such defect and claim, and any and all damages arising as a result thereof. The purchaser must perform reasonable and necessary maintenance upon the recreational vehicle and use the recreational vehicle in accordance with the manufacturer of the recreational vehicle s and Warrantor s directions and recommendations. Among the other requirements under this Warranty, the Purchaser must also: Maintain the recreational vehicle in accordance with the maintenance requirements contained in the Owner s Manual; Make minor adjustments including (but limited to) doors, drawers, latches, regulators, controls, mechanisms, etc. after 90 days of ownership; Maintain all exterior seals and sealant, which must be inspected every 6 months to assure there are no gaps or voids, and correcting as necessary; and Return their vehicle to an authorized dealer for repairs. If you believe that you have a claim under this Warranty, locate and contact your nearest authorized Warrantor dealer to schedule an appointment. Be prepared to provide your vehicle serial number (VIN), date of purchase, and a description of the issue or concern. If you cannot locate a dealer, please go to the Warrantor s web site or contact Warrantor directly for immediate assistance. 16
18 Service & Warranty What are the Dealer s Responsibilities? Perform a walk-through to assure that the customer understands the operation, use and safety requirements of the vehicle; Review vehicle warranties, operating manuals and instruction guides; and Inform the customer on how to obtain service, locally or while in transit; Warrantor is not responsible or liable for any failures, breaches, negligence, inattention or problems on the part of the Dealer. What events discharge Warrantor from the obligations under this Warranty? Misuse or negligent use, abuse, or accident, neglect, unauthorized alteration, failure to provide reasonable and necessary maintenance including reasonable periodic inspections of the recreational vehicle and/or use of the recreational vehicle for rental, business or commercial use or any other use other than to use the recreational vehicle only for personal and occasional use, shall each discharge the Warrantor from any obligation under this Warranty. The recreational vehicle is designed for recreational and personal use. What do I do to activate warranties of other manufacturers of component parts and goods? COMPONENT WARRANTIES As stated above, some components, accessories or equipment are not covered by this Limited Warranty. Examples include tires, batteries, optional generators, and some appliance & electronic entertainment equipment. However, those items may have coverage provided by the component manufacturer. These warranties are completely separate from this Limited Warranty, and in some cases may be longer and/or have specific coverage provisions and requirements. In order to activate these warranties, you may have to complete registration forms, post cards or some other form of notification to the component manufacturer within a specific time period. These forms and documents will be located with the Owner s Materials provided with your new vehicle. You must complete and submit them to the respective manufacturer as quickly as possible, and within the time periods required by those warranties. DISCLAIMER OF CONSEQUENTIAL, PUNITIVE AND INCIDENTAL DAMAGES What other conditions or limitations apply to this Warranty? The original retail purchaser of the recreational vehicle and any person who is an intended or unintended user or beneficiary of this Limited Warranty, shall not be entitled to recover from Warrantor any consequential, punitive or incidental damages resulting from any defect in the recreational vehicle, or loss of use, time or revenues. This warranty also excludes costs of transportation to any authorized dealer or service representative or to the Warrantor to get warranty service, loss of use of the recreational vehicle, loss of time, loss of revenues, inconvenience, or other incidental or consequential damage and any punitive damages, with respect to business or property, whether as a result of breach of warranty, negligence, or otherwise. 17
19 Service & Warranty Some states do not allow the exclusion or limitation or the exclusion may not apply to you. TO THE EXTENT NOT EXCLUDED IN THIS LIMITED WARRANTY, THE IMPLIED WARRANTY OF MERCHANTABILITY, AN UNWRITTEN WARRANTY THAT THE PRODUCT IS FIT FOR ORDINARY USE, IS LIMITED TO THE WARRANTY PERIOD OF THIS WRITTEN WARRANTY, AND ANY OTHER IMPLIED WARRANTY ARISING BY OPERATION OF LAW ARE SPECIFICALLY LIMITED TO THE WARRANTY PERIOD OF THIS WRITTEN WARRANTY TO THE EXTENT NOT ACTUALLY EXCLUDED IN THIS LIMITED WARRANTY. IF ANY MODEL OR SAMPLE IS SHOWN TO THE PURCHASER PRIOR TO THE PURCHASE OF THE RECREATIONAL VEHICLE, SUCH SAMPLE OR MODEL WAS MERELY TO ILLUSTRATE A GENERAL TYPE OF QUALITY AND NOT TO REPRESENT THAT THE RECREATIONAL VEHICLE WOULD NECESSARILY CONFORM TO A SAMPLE OR MODEL AND SHALL NOT BE DEEMED TO BE PART OF THE BASIS OF THE BARGAIN OR CREATE ANY EXPRESSED WARRANTIES OR AFFIRMATIONS OR PROMISES. DISCLAIMER OF EXPRESSED AND IMPLIED WARRANTIES THE WARRANTOR EXPRESSLY DISCLAIMS ALL IMPLIED WARRANTIES OF MERCHANTABILITY AND FITNESS FOR A PARTICULAR PURPOSE AND ANY OTHER IMPLIED WARRANTIES. THERE IS NO EXPRESS OR IMPLIED WARRANTY MADE BY WARRANTOR BEYOND THAT CONTAINED IN THE LIMITED WARRANTY ABOVE. THE ABOVE REFERENCED LIMITED WARRANTY IS IN LIEU OF ANY AND ALL OTHER WARRANTIES. TO ACTIVATE THE LIMITED WARRANTY, THE RECREATIONAL VEHICLE MUST BE REGISTERED WITHIN THIRTY (30) DAYS OF THE DATE OF PURCHASE; OTHERWISE, THIS LIMITED WARRANTY WILL NOT BE EFFECTIVE. NO PERSON HAS THE AUTHORITY TO ENLARGE, AMEND, OR MODIFY THIS WARRANTY. Some states do not allow limitations on how long an implied warranty lasts, so the above limitations may not apply to you. DESIGN CHANGES Warrantor reserves the right to change the design of its RECREATIONAL VEHICLE from time to time without notice and without obligation to make corresponding changes in its products previously manufactured. ATTORNEYS FEES Any warranty claim asserted or brought in violation of this Limited Warranty, or any claim brought against WARRANTOR, directly or indirectly, under which the Purchaser or any other person or entity seeks to broaden the terms of the Limited Warranty or under which the Purchaser or any other person fails to successfully prevail on any issue or matter of any type or nature, shall entitle Warrantor to recover its costs, damages, and reasonable attorney s fees in connection with the same. 18
20 Service & Warranty How Does State Law Relate to This Warranty? This Warranty gives you specific legal rights, and you may also have other rights which vary from state to state. By registering or having your recreational vehicle registered in your name, or by asserting a claim under this Limited Warranty, Purchaser (and all assigns) is agreeing on behalf of the purchaser and all assigns to be bound by the terms and conditions of this Limited Warranty. 19
21 Component Manufacturer Contact Information COMPONENT MANUFACTURER CONTACT INFORMATION All components listed are correct at the time of printing. Sunset Park RV may change components mid-model year at their discretion. Please contact Sunset Park Customer Support for any questions Component Manufacturer Website Phone Number Air Conditioner K Dometic Air Conditioner -5K In-House Awning Dometic Axle Lippert Components Axle (109) Dexter Axle Convertor Power Max Convertor-109 WFCO Cooktop Suburban Entry Door Lippert Components Entry Steps Lippert Components Frame In-House Furnace Suburban LP/ CO Detector Dometic Microwave Way Interglobal Range Hood Way Interglobal Range Top/ Oven Combo Dometic Rear Door Lippert Components Rear Door Solid Colors/Camo Challenger Rear Door - Rush Lippert Components Refrigerator 110 Way Interglobal Refrigerator 2 Door Dometic Refrigerator 2 Way Dometic Refrigerator 3 Way Dometic Roof Membrane Dicor Roof Vents Heng's Industries Slideouts Lippert Components Speakers Way Interglobal Solar Prep Furrion Stereo Furrion Thermostat Dometic Tires Americana Tires- Roadside Assistance Americana Toilet Dometic Water Heater Dometic Water Pump Lippert Components Windows Statewide Windows Lippert Components
22 Component Manufacturer Warranty Information 21
23 Component Manufacturer Manufacturer Warranty Air Conditioner K Dometic Two Year parts and service warranty. Original Owner Only Air Conditioner -5K In-House Full one year warranty from date of purchase. Original owner only Awning Dometic Two Year parts and service warranty. Original Owner Only Axle Lippert Components Six year limited warranty. Applies only to axle beams. Axle (109) Dexter Axle Five Year limited warranty. Convertor Power Max Two Year parts and service warranty. Original Owner Only Convertor-109 WFCO Two Year limited warranty. Cooktop Suburban Two Year limited warranty. Entry Door Lippert Components Full one year warranty from date of purchase. Original owner only Entry Steps Lippert Components Full one year warranty from date of purchase. Original owner only Frame In-House Full one year warranty from date of purchase. Original owner only Furnace Suburban Two Year limited warranty. LP/CO Detector Dometic Two Year parts and service warranty. Original Owner Only Microwave Way Interglobal Full one year warranty from date of purchase. Original owner only Range Hood Way Interglobal Full one year warranty from date of purchase. Original owner only Range Top/ Oven Combo Dometic Two Year parts and service warranty. Original Owner Only Rear Door Lippert Components Full one year warranty from date of purchase. Original owner only Rear Door Solid Colors/Camo Challenger Full one year warranty from date of purchase. 3 Years from date of manufacture. Original owner only Rear Door - Rush Lippert Components Full one year warranty from date of purchase. Original owner only Refrigerator 110 Way Interglobal Full one year warranty from date of purchase. Original owner only Refrigerator 2 Door Dometic Two Year parts and service warranty. Original Owner Only Refrigerator 2 Way Dometic Two Year parts and service warranty. Original Owner Only Refrigerator 3 Way Dometic Two Year parts and service warranty. Original Owner Only Roof Membrane Dicor 12 year limited warranty. Roof Vents Heng's Industries Full one year warranty from date of purchase. Original owner only Slideouts Lippert Components Full one year warranty from date of purchase. Original owner only Speakers Way Interglobal Full one year warranty from date of purchase. Original owner only Solar Prep Furrion One Year Limited Warranty Stereo Furrion One Year Limited Warranty Thermostat Dometic Two Year parts and service warranty. Original Owner Only Tires Americana 12 Month Full Warranty from Date of Purchase. 5 year Limited from date of manufacture. Rires- Roadside Assistance Americana One Year Limited Toilet Dometic Two Year parts and service warranty. Original Owner Only Water Heater Dometic Two Year parts and service warranty. Original Owner Only Water Pump Lippert Components Full one year warranty from date of purchase. Original owner only Windows Statewide One year warranty from date of purchase. Origanal owner only. Windows Lippert Components Full one year warranty from date of purchase. Original owner only 22
24 Occupant Safety OCCUPANT SAFETY Your RV is designed with comfort and safety as a priority. It complies with applicable codes and safety standards in effect at the time it was built. A number of required safety items are installed for your safety and the safety of other occupants of the RV. Before camping, please review and understand the locations of all safety equipment inside the RV and all emergency exit windows as well as doors. We encourage you to develop a family safety plan in case of an emergency or severe weather condition, and practice it with your entire family, especially children. Ask an out-of-state relative or friend to serve as the "family contact." Make sure everyone knows the name, address, phone number and of the contact person. Draw a floor plan of your RV and find two ways to exit. There should be at least one way to get out of your RV without opening the door. Teach everyone what the RV safety alarm signals mean and how to be prepared to leave the RV by themselves if necessary. Teach how to check doors and not to open them if the doors are hot. Also teach everyone to stay low to try to avoid breathing smoke, fumes or gases. In case family members are separated from one another, have a plan for getting back together. Decide on a meeting place a safe distance from your RV and make sure everyone understands to wait there. Make sure everyone knows where to go to call 911 from outside the RV. Conduct safety drills at least every six months to make sure everyone, including guests, knows what to do to escape safely. Consult your local fire department for additional safety precautions. Pets may not be allowed into shelters for health and space reasons. Prepare an emergency plan for pets that includes at least a 3-day supply of dry food and a large container of water. The survival of a beloved pet often depends on the plans its owner has made in advance. 23
25 Occupant Safety EMERGENCY WEATHER PLANNING One of the more serious conditions you need to take into account when camping is that of the weather, which is subject to change with little or no warning. Earthquakes, hail, flooding, hurricanes, wintry weather, tornadoes - these and other extreme weather conditions can threaten your safety and damage your tow vehicle or RV. Local radio and TV stations normally broadcast weather conditions and warnings as they occur. Research other methods of learning about severe weather conditions and how to deal with them. You may want to consider investing in a weather radio. Weather radios offer 24 hour-a-day VHF broadcasts of weather observations and forecasts directly from the US National Weather Service (NWS). The frequencies used by the US National Oceanic and Atmospheric Administration (NOAA) weather radio stations are , , , , , or megahertz or visit their website at Repairing severe weather damage If your tow vehicle or RV is damaged due to severe weather damage, you will most likely need repair work. Call your insurance company as soon as you can to report your claim. EMERGENCY EGRESS WINDOW The emergency egress window (or exit window ) is designed to allow a secondary means of quick exit if access to the main entrance door is not available. All egress windows are distinguishable by red operational handles or levers. Depending upon the window type, an egress window may be a large section or an entire window. Know how to open and operate the egress window before an emergency occurs: When pulling into your campsite, make sure the ground below the egress window is solid and there is a clear escape path directly outside all egress windows. Make sure the egress is not blocked by trees or other obstacles. Review the locations and operational instructions on the egress window label with all people staying in the RV. Plan fire escape routes. Decide who will exit through the emergency escape windows first, and in what position. 24
26 Place a blanket or heavy coat over the window frame to cushion the exit. If there is a fire, the last person to exit the RV should be prepared to assist those in front. Arrange for a meeting place safely away from the RV. Maintenance Occasionally open the windows to prevent the seals from sticking. The egress window must be locked during transit. Occupant Safety FIRE SAFETY If a fire starts, execute your family safety plan. Make sure everyone knows to stop, drop to the ground and roll back and forth, shielding their face from the fire with their hands, if their clothes catch fire. Learn and teach safe fire practices. Build campfires away from nearby trees or bushes. Maintain at least a three-foot clear area free of leaves, dry grass, pine needles, etc., around grills, campfires and/or tents. Supervise children at all times when campfires are burning or grills are in use. Always have a way to extinguish the campfire quickly and completely. Never leave a fire - even a cigarette - burning unattended. Teach family members how to use the fire extinguisher and replace it as recommended. Do not store combustible materials in closed areas or near a heat source. Do not attempt to use water to put out a grease fire. Water can spread some types of fire and create an electrocution hazard during an electrical fire. Always call the Fire Department, no matter how small the fire. However, be aware that if a fire threatens your RV, you should not place the call to your emergency services from inside the RV. It is better to get out first and place the call from somewhere else. More information on firefighting can be found at the National Fire Protection Association website ( org). FIRE EXTINGUISHER A portable fire extinguisher can save lives and property by putting out a small fire or containing it until the fire department arrives; but portable extinguishers have limitations. It is important to recognize when to leave the RV. Because fire grows and spreads so rapidly, the number one priority is to get out safely. The Underwriter Laboratories (UL) classify household fire extinguishers into four types: Rating Intended Use Type A For use on fires involving combustible materials such as wood, cloth and paper Type B For use on flammable liquid fires, including kitchen grease. Never use water on this type of fire. Type C For use on fires involving energized electrical equipment. Type ABC Works on all three types of fires listed above. The factory-installed dry chemical fire extinguisher, suitable for extinguishing small fires of the Class B and Class C type, is located near the entry door. 25
27 Occupant Safety Operation Keep your back to a clear exit when you use the fire extinguisher so you can make an easy escape if the fire cannot be controlled. If the room fills with smoke, leave immediately. Know when to leave. Fire extinguishers are one element of a fire response plan, but the primary element is safe escape. There are different types and sizes of fire extinguishers, but for the most part they all work the same way. To operate a fire extinguisher, remember the word PASS. Disposal Pull the pin. Hold the extinguisher with the nozzle pointing away from you and release the locking mechanism. Aim low. Point the extinguisher at the base of the fire. Squeeze the lever slowly and evenly. Sweep the nozzle from side-to-side until the fire is out. Contact your local fire department, sanitation department or environmental protection department to find out what your local laws stipulate before disposing of your used (non-refillable) factory-installed dry chemical fire extinguisher. SMOKE ALARM Three of the most common fire safety issues are smoking in bed, leaving children unattended and cleaning with flammable fluids. There is no way to guarantee against injury or loss of life in a fire; however, the smoke alarm is intended to help reduce those risks. Individuals with medical problems, or who are hard of hearing, should consider using warning devices that provide both audible and visual signals. Proper use and care of your smoke alarm may save your life. Smoke alarms can only work if they are properly located, installed, operational and maintained and if smoke reaches them. They are not foolproof. Operation The factory-installed ceiling mounted smoke alarm is operational once the 9-volt battery is correctly connected. The LED will flash to show the battery is supplying power to the alarm. When the product of combustion is sensed, the smoke alarm sounds a loud alarm that continues until the air is cleared. If this alarm sounds During an alarm, you will hear a loud, repeating horn pattern and the red LED will flash rapidly. If the alarm sounds and you are not testing the smoke alarm, it is warning you of a potentially dangerous 26
28 situation that requires your immediate attention. Never ignore any alarm. Ignoring the alarm may result in injury or death. If the alarm sounds get everyone out of the RV immediately. Occupant Safety How to test It is important to test the smoke alarm at least once every week to make sure it is working properly. Stand at arm's length from the alarm when testing. The alarm horn is loud and may be harmful to your hearing. Battery 1. Press and hold the test button on the smoke alarm cover until the alarm sounds (the smoke alarm may continue to alarm for a few seconds after you release the button). 2. If it does not alarm, make sure the smoke alarm is receiving power and test it again. 3. If it still does not alarm, replace it immediately. The smoke alarm will not function if the battery is missing, disconnected, dead, the wrong type of battery is used or the battery is installed incorrectly. When the 9-volt battery becomes weak, the smoke alarm will "chirp (the low battery warning). If the low battery warning sounds, the battery MUST be replaced. Never disconnect the battery to silence the smoke alarm. Maintenance Clean the smoke alarm at least once a month by gently vacuuming the outside cover. Do not paint over the smoke alarm. Paint may clog the openings to the sensing chambers and prevent it from operating properly. CARBON MONOXIDE Carbon monoxide (CO) is an insidious poison. It is a colorless, odorless and tasteless gas. It can endanger lives even at low levels of concentration. Many cases of reported carbon monoxide poisoning indicate while victims are aware they are not well, they become so disoriented they are unable to save themselves by either exiting or calling for assistance. Young children and household pets may be the first affected. The following symptoms may be related to CO POISONING. Discuss these symptoms with ALL household members and RV guests: Mild exposure: headaches, running nose, sore or watery eyes, often described as flu-like symptoms. 27
29 Medium exposure: dizziness, drowsiness, vomiting. Extreme exposure: unconsciousness, brain damage and death. CO gas is produced when any type of fuel is incompletely burned. Potential sources of CO in and around your RV can include gas or diesel engine exhaust, portable space heaters, gas stoves and ovens, furnaces, defective engine exhaust systems, portable grills, other nearby RVs, portable generators, generator exhaust, and other propane-powered appliances. Occupant Safety CARBON MONOXIDE ALARM The CO alarm is designed to detect the toxic carbon monoxide fumes that result from incomplete combustion, such as those emitted from appliances, furnaces, fireplaces and auto exhaust. A CO alarm is NOT A SUBSTITUTE for other combustible gas, fire or smoke alarms. There are hazards against which carbon monoxide detection may not be effective, such as natural gas leaks or explosions. Individuals with medical problems, or who are hard of hearing, should consider using warning devices that provide both audible and visual signals. What you should do if the alarm sounds The CO alarm will automatically sense when the level of carbon monoxide in the air reaches dangerous levels. You should stay outside the RV in fresh air until the CO alarm is silenced. When the CO alarm sounds, do not stand too close to it. The sound produced by the CO alarm is loud because it is designed to wake a person in an emergency. Prolonged exposure to the CO alarm at a close distance may be harmful to your hearing. Batteries 1. Immediately move to fresh air (outdoors or by an open door or window) and execute your family safety plan. 2. Do not re-enter the premises. If you are unable to exit the premises do not move away from the open door or window until the emergency service responders have arrived, the premises have been aired out and your CO alarm remains in its normal condition. 3. If your CO alarm reactivates within a 24-hour period, repeat steps 1-2 and call a qualified appliance technician to investigate for sources of carbon monoxide from fuel burning equipment and appliances, and inspect for proper operation of this equipment (if problems are identified during this inspection, have the CO alarm replaced immediately). 4. Note any combustion equipment not inspected by the technician. Make sure that any motor vehicle is not and has not been operating in an attached garage or adjacent to your RV. The CO alarm will not function if the batteries are missing, disconnected, dead, the wrong type of battery is used or the batteries are installed incorrectly. When the batteries become weak, the CO alarm 28
30 will "beep" (the low battery warning). If the low battery warning sounds, the batteries MUST be replaced. Never disconnect the batteries to silence the CO alarm. Testing the CO alarm Press and hold the test/reset button on the front of the CO alarm for several seconds. If the CO alarm does not test properly, replace it immediately. Occupant Safety Maintenance The CO alarm is pre-calibrated at the OEM factory and requires no maintenance other than to clean the outside casing occasionally with a cloth. Ensure that the holes on the front of the CO alarm are not blocked with dirt and dust. DO NOT USE CLEANING AGENTS, BLEACH OR POLISH. PROPANE GAS ALARM For your safety, a new RV that contains a propane gas system with propane consuming appliances must have a propane leak detection device. Because the chemical composition of propane is heavier than air, the propane alarm is located near the floor of the RV (leaking propane tends to flow to and pocket in low areas). A lit green LED indicates when the factory-installed alarm is active. Individuals with medical problems, or who are hard of hearing, should consider using warning devices that provide both audible and visual signals. This alarm is designed to sense the presence of propane gas; however, there are other combustible fumes or vapors that may be detected by the sensor including (but not limited to) acetone, alcohol, butane and gasoline. These chemicals can be found in commonly used items such as deodorants, colognes, perfumes, adhesives, lacquer, kerosene, glues, wine, liquor, most cleaning agents and the propellants of aerosol cans. High temperatures can activate glue and adhesive vapors. If you close up your RV on a hot day, the chemicals used in its construction may be detected for months after the vehicle was constructed (see Formaldehyde). If the alarm sounds 1. Turn off all propane gas appliances (i.e., stove, water heater, furnace, etc.). 2. Open all windows and roof vents and execute your family safety plan. 3. Turn OFF the propane tank valve. 4. Do not touch any electrical switch or use any phone or radio in the RV. 5. Do not start any vehicle engine or generator. 6. Determine and repair the source of the leak. 7. Do not re-enter the RV until the problem is corrected. If the propane alarm keeps sounding at regular intervals, a propane leak may be present. Contact your dealer or propane gas service to have the problem corrected before using the propane system again. 29
31 Testing the propane leak alarm The propane alarm should be tested after each storage period, before each trip, and at least once a week while camping. If the propane alarm does not test properly, replace it immediately. Occupant Safety Battery or converter power source The propane alarm is powered by 12-volt DC through the converter or from an auxiliary battery. This propane alarm is continuously drawing a small amount of 12-volt current; although this current draw is slight, it could drain your auxiliary battery during extended storage periods. If the auxiliary battery becomes extremely drained, the LED light on the face of the alarm will not light or the alarm may begin to sound on its own. This condition is not likely to occur except during storage situations. INDOOR AIR QUALITY Good indoor air quality is essential for long-term enjoyment of your RV. To maintain good air quality, you need to be attentive to proper ventilation of y our RV, keeping the RV clean, and avoiding unnecessary air pollutants. Common indoor air pollution sources include molds, pollen, dander from pet fur, secondhand smoke, carbon monoxide from burning propane and other fuels (and charcoal), and household cleaners. Inadequate ventilation can increase indoor pollutant levels by not bringing enough outdoor air to dilute emissions from indoor sources and by not carrying indoor air pollutants outside. High temperatures and humidity levels can also increase concentrations of some air pollutants. Those people most at risk for poor indoor air quality include: people with asthma, people with allergies, people who have chronic lung diseases such as bronchitis and emphysema, people with pre-existing heart disease, children, and the elderly. 1. Breathe fresh air by opening windows 2. Spend as much time outside as you can, in fresh air. 3. Control mold Clean your bathroom and kitchen often to fight mold. Fix any water leaks. Clean up any mold you see or smell with a mix of no more than 1 cup of bleach mixed with 1 gallon of water. Never mix bleach with ammonia. 4. Close windows and run your air conditioner (AC) or your dehumidifier to help control mold. Other ways to improve air quality: Clean often to get rid of dust and pet fur which can irritate your nose and throat. Try not to use bug spray inside your trailer. 30
32 DO NOT SMOKE INSIDE YOUR RV. In addition to causing damage to your RV, tobacco smoke releases formaldehyde and other air pollutants. Occupant Safety EPA recommendations There are three basic strategies recommended by the Environmental Protection Agency (EPA) to improve indoor air quality: Remove sources. The most effective way to improve indoor air quality is to eliminate sources of pollution or reduce their emissions. Pollutants that this strategy can have an impact upon are: (i) Biological contaminants such as bacteria, molds, mildew, viruses, animal dander, and pollen, (ii) Household products such as paints, varnishes, cleaning and disinfecting solutions, cosmetics and hobby products, and (iii) Pesticides. Ventilation. To reduce or lessen exposure to chemicals from off-gassing it is of utmost importance that you ventilate your RV. Ventilation should occur frequently after purchase and at times when the temperatures and humidity are elevated. Remember off-gassing is accelerated by heat and humidity. Open windows, exhaust vents, and doors. Operate ceiling and/or other fans, roof air conditioners, and furnaces and use a fan to force stale air out and bring fresh air in. Decreasing the flow of air by sealing RV increases the presence of indoor air pollutants. Please also follow the recommendations contained in this manual regarding tips to avoid condensation problems. Many of the recommendations contained in the manual will assist in avoiding exposure to chemicals that off-gas. Air Cleaners. Air cleaners are designed to remove particles from the air. There are many types and sizes of air cleaners on the market. However, air cleaners are not generally designed to remove gaseous pollutants. The effectiveness of an air cleaner depends on how well it collects pollutants from indoor air and how much air it draws through the cleaning or filtering element. CHEMICAL SENSITIVITY After you first purchase your new RV, and sometimes after it has been closed up for an extended period of time, you may notice a strong odor and chemical sensitivity. This is not a defect in your RV. Like your home, there are many different products used in the construction of RVs such as carpet, linoleum, plywood, insulation, upholstery, etc. Formaldehyde is also the by-product of combustion and numerous household products, such as some paints, coatings and cosmetics. However, RVs are much smaller than your home and therefore the exchange of air inside a RV is less than a home. These products, when new or when exposed to elevated temperatures and/or humidity may off-gas different chemicals, including formaldehyde. This off-gassing, in combination with the 31
33 minimal air exchange, may cause you to experience irritation of the eyes, nose, and throat and sometimes headache, nausea, and a variety of asthma-like symptoms. Elderly persons and young children, as well as anyone with a history of asthma, allergies or lung problems, may be more susceptible to the effects of off-gassing. Occupant Safety FORMALDEHYDE Most of the attention regarding chemical off-gassing surrounds formaldehyde. Formaldehyde is a naturally occurring substance. It is also a key industrial chemical used in the manufacture of the numerous consumer products that we referred to previously and used in the construction of RVs. Trace levels of formaldehyde are also released from smoking, cooking, use of soaps and detergents such as carpet shampoos, cosmetics, and many other household products. Some people are very sensitive to formaldehyde while others may not have any reaction to the same levels of formaldehyde. Amounts released decrease over time. California Air Resource Board (CARB) Notice Formaldehyde is used widely in building materials such as pressed wood products, particleboard, hardwood plywood paneling, medium density fiberboard (MDF), and plywood which are commonly used throughout the Recreational Vehicle Industry. As mandated by the RV Industry, Sunset Park RV recreation vehicles contain composite wood products (hardwood plywood, particle board, and MDF) that comply with the California Air Resource Board (CARB) formaldehyde emission standards under California Code of Regulations (a) Phase 2 (P2). EFFECTS OF PROLONGED OCCUPANCY Your RV was designed primarily for recreational use and extended stay use. If you expect to occupy your RV for an extended period, be prepared to deal with condensation and the humid conditions that may be encountered. The relatively small volume and tight compact construction of modern RVs mean that normal living activities of even a few occupants will lead to rapid moisture saturation of the air contained in the RV and the appearance of visible moisture, especially in cold weather. CONDENSATION Just as moisture collects outside of a glass of cold water during humid weather, moisture can condense on the inside surfaces of the RV during cold weather when relative humidity of the interior air is high. This condition is increased because the insulated walls of a RV are much thinner than house walls. Estimates indicate a family of four can vaporize up to three gallons of water daily through breathing, cooking, bathing and washing. 32
34 Unless the water vapor is carried outside by ventilation, or condensed by a dehumidifier, it will condense on the inside of windows and walls as moisture, or in cold weather as frost or ice. It may also condense out of sight within the walls or the ceiling where it will manifest itself as warped or stained panels. Appearance of these conditions may indicate a serious condensation problem. When using your RV, you should at all times take necessary action to minimize the effects of excessive moisture and condensation. Occupant Safety Tips to controlling condensation To avoid condensation problems, try to follow these tips to help alleviate excess moisture. Allow excess moisture to escape to the outside when bathing, washing dishes, hair drying, laundering and using appliances and non-vented gas burners. Keep the bathroom door closed and roof vent opened (if equipped, exhaust fan on) when bathing/showering and for a period of time after you have finished. When cooking, always operate the range hood fan. Cooking releases heat and moisture that can quickly result in condensation in your RV; operating the range hood fan can be effective in removing both. Do not hang wet clothes in the RV to dry. In hot weather, start the air conditioner early as it removes excess humidity from the air while lowering the temperature. Manage the inside temperature during cold weather. The higher inside temperature along with colder outside temperatures will cause condensation to form on areas that are not insulated as well as others (windows, vents, wall studs, etc.). Use a fan to keep air circulating inside the vehicle so condensation and mildew cannot form in dead air spaces. Allow air to circulate inside closets and cabinets (leave doors partially open) so the temperature inside the cabinets the same as in the rest of the unit. Please keep in mind that a closed cabinet full of stored goods prevents circulation and can cause condensation. The natural tendency would be to close the RV tightly during cold weather. This will actually compound the problem. Simply put, you need to get the moisture in the air that is created from normal use outside. The most effective way is utilizing your vents and vent fans. Where there is moisture, there may be mold Molds are microscopic organisms that naturally occur in virtually every environment, indoors and out. Outdoors, mold growth is important in the decomposition of plants. Left unchecked, molds break down natural materials such as wood products and fabrics. 33
35 According to the Center for Disease Control, exposure to damp and moldy environments may cause a variety of health defects, or none at all. Some people are sensitive to molds. For these people, molds can cause nasal stuffiness, throat irritation, coughing or wheezing, eye irritation or, in some cases, skin irritation. People with mold allergies may have more severe reactions. Immune-compromised people and those with chronic lung illnesses, such as obstructive lung disease, may get serious infections in their lungs when they are exposed to mold. Occupant Safety For mold growth to occur temperatures must be between 40 degrees and 100 degrees Fahrenheit, and there must be a source of moisture such as humidity, standing water, damp materials, etc. Indoors, the most rapid growth occurs with warm and humid conditions. By controlling relative humidity, the growth of mold and mildew can be inhibited. In warm climates, use of the air conditioner will reduce the relative humidity. Vents are located in the bathing and cooking areas and constant use is advised during food preparation and bathing, even during colder weather. Additionally, opening a window during these activities will assist in ventilation. In extremely humid conditions, the use of a dehumidifier can be helpful. Frequent use of your RV or cleaning regularly is an important preventative measure. Further, any spills should be wiped up quickly and dried as soon as possible. Avoid leaving damp items lying about. On safe surfaces, use mold or mildew killing cleaning products. Check sealants regularly, and reseal when necessary to avoid water leaks. Proper preventative maintenance to the RV and its accessories, as described both in this manual and in accompanying literature, will provide the best protection to the RV. COLD WEATHER USAGE Proper care should be taken when planning to use your RV in cold weather. Please keep in mind that your RV was not designed for use during sub-freezing weather. When used in freezing or below freezing temperatures, the following precautions need to be taken: More protection will be needed to protect the fresh water and drainage systems to avoid freezing problems. Propane and sufficient power is needed for protection from possible freeze-ups on the propane regulator. Keep in mind that more frequent furnace operation will substantially increase battery draw and propane use. During cool weather usage, ventilation or the addition of a dehumidifier may be required to reduce condensation. Check outside extrusions on compartment doors, locks, slide outs, windows, vents, etc., for frozen moisture before operating to avoid damage to parts. 34
36 Occupant Safety WEBSITES OF INTEREST We also recommend that you visit the following websites that maintain information about indoor air pollutants, including molds and formaldehyde, along with ways to improve indoor air quality: WEBSITE USAGE DISCLAIMERS Sunset Park RV hereby disclaims and sets forth as follows: Website disclaimer of warranty The services, information and materials on websites listed in this manual are provided 'AS IS' and Sunset Park RV shall have absolutely no liability whatsoever in connection with these website services, information, external links or third-party links on these websites. Your use of these websites is at your own risk. Sunset Park RV shall have no liability whatsoever for any errors, omissions or inaccuracies in the information regardless of how caused or for delays or interruptions in delivery of the information: or any decision made or action taken or not taken in reliance upon the information furnished. Sunset Park RV accepts no responsibility or liability whatsoever with regard to information on these websites as the information is meant to be of a general nature only and is not intended to address the specific circumstances of any particular individual or entity. The information provided is not necessarily comprehensive, complete, accurate or up to date; the information is sometimes linked to external sites over which Sunset Park RV has no control and for which Sunset Park RV assumes no responsibility: Sunset Park RV shall have no liability for any loss or injury caused, in whole or in part, by its actions, omissions or negligence, or for any contingencies beyond its control in procuring, compiling or delivering any information. The information is not professional nor does it comprise legal advice (if you need specific advice, you should always consult a suitably qualified professional). Disclaimer of endorsement 35
37 Any reference within external or third-party links to any specific commercial products, process or service by trade name, trademark, manufacturer or otherwise, does not constitute or imply its endorsement, recommendation or favoring by Sunset Park RV. The appearance of external or third-party links does not constitute endorsement by Sunset Park RV of the linked web sites or the information, products or services contained therein. Sunset Park RV does not exercise any editorial control over the information you may find at these locations. External or third-party links may be provided for the convenience of the users of that website. Sunset Park RV is not responsible for the availability or content of these external or third-party sites and does not endorse, warrant or guarantee any products, services, information, centers or schools described or offered at these links. Occupant Safety ADDITIONAL SAFETY PRECAUTIONS Tire Pressure Tire pressure should be checked before departing on any trip, regardless of how short it may be. Always refer to the Tire Information Label attached to your vehicle for proper tire inflation pressures. Wheel Torque Lug nut torque at every wheel should be checked before departing on any trip, regardless of how short it may be. Refer to the Tire & Wheel section of this manual for lug nut torque specifications and patterns. Always use a calibrated torque wrench to confirm proper torque. Propane Appliances & Equipment Be sure all propane equipment & appliance (including the tanks) are turned off before departing on a trip. Understand all propane safety warnings and follow component manufacturer recommended operating procedures. Because propane is flammable improper use may result in a fire or explosion. Passenger Safety Passengers should never be allowed to travel inside your recreational vehicle while in transit. Several states have very specific laws prohibiting this practice. Loading & Weight Distribution Distribute weight evenly throughout your vehicle. Heavier items should be located close to the floor in the center of your vehicle. Be sure to balance loads front to rear and side to side. Never exceed the Cargo Carrying Capacity and/or Gross Vehicle Weight Rating of your trailer. Towing Follow posted speed limits and adjust for road conditions, weather and the environment. Pay close attention to passing vehicles and the effect they can have on your tow vehicle & trailer, especially large trucks which create external forces on both as they pass. Slow down and use caution in high cross winds which also create external forces that can impact the stability of your tow vehicle & trailer. Any of the above can cause swaying or fishtailing which can lead to a loss of control resulting in serious injury or death. Generator Operation Always make sure generators (customer supplied) are operated in open outdoor areas where the exhaust can properly dissipate and not create a carbon monoxide danger. Windows and any other openings near the generator exhaust should be closed and sealed to prevent the permeation of exhaust gas. 36
38 Air Quality Air quality can be managed through the proper ventilation of your vehicle at all times. Condensation formation is an indication that proper ventilation is not occurring. Normal activities like cooking, bathing, cleaning and even breathing all add moisture to the air that will convert to condensation if not removed through proper ventilation. Condensation build up over time can lead to mold formation. In addition, proper ventilation allows for the escape of formaldehyde which is contained in some building materials as well as a by-product of combustion. Pre-Travel Information PRE-TRAVEL INFORMATION To help ensure your traveling enjoyment, call ahead for tourist information in each area that you will be visiting or traveling through. To help eliminate frustration, make sure you obtain the most current road maps. Research and make sure there are no federal, state or local regulations that may prohibit you from fully enjoying your camping adventure. Arrange for someone to check your house periodically while you are away. Stop mail or newspaper delivery. If you intend to be away for more than two weeks, you may want to consider requesting police surveillance for your house. Carry an extra set of vehicle and house keys with you on a separate key ring. Be sure to renew your license if it has expired or will expire during your trip. If you are planning to visit other countries, contact the consulate nearest the point at which you plan to enter that country for the specific and most current information (including rules for re-entering the United States). Always carry your vehicle registration, insurance policy card(s) and warranty registration. TOW VEHICLE DISCLAIMER If you plan to tow your RV with a tow vehicle you already own, contact your automotive dealer to find out your vehicle towing capacity. If you plan to purchase a new tow vehicle, be certain to tell your automotive dealer the GVWR, size and type of RV that you will be towing (some tow vehicles can be purchased with an optional tow package). As a minimum requirement, the Gross Vehicle Weight Rating (GVWR) of your RV must not exceed your tow vehicle s towing rating. 37
39 Some automotive manufacturers publish brochures that discuss towing considerations. Ask your automotive dealer how to obtain a copy of this information. If applicable, verify if the brochure ratings are listed with or without an optional tow package. VEHICLE LABELS Decals and data plates used throughout the RV aid in its safe and efficient operation; others give service instructions. Read all decals, data and instruction plates before operating your RV. If any decal, data or instruction plate is painted over, damaged or removed, it should be replaced. WEIGHT RATINGS & DEFINITIONS Ratings are limits established by Sunset Park RV and our component manufacturers which are not to be exceeded. Exceeding a rating may result in unsafe conditions, potential damage, may void a warranty, may complicate an insurance claim, and in some cases, may violate a law. Pre-Travel Information GVWR (Gross Vehicle Weight Rating) The maximum permissible weight of this trailer when fully loaded. It includes the maximum allowable weight at the trailer axle(s) plus the hitch (tongue/pin) weight. UVW (Unloaded Vehicle Weight) The weight of this trailer as manufactured at the factory. It includes all weight at the trailer s axle(s) and hitch. If applicable, it also includes full generator fluids, fuel, engine oil and coolants. CCC (Cargo Carrying Capacity) U.S.: Equal to GVWR minus the UVW and LP gas weight. (Water is considered a component of cargo.) Canada: Equal to GVWR minus the UVW, full fresh (potable) water weight (including the water heater) and full LP gas weight. GAWR (Gross Axle Weight Rating) The maximum permissible weight on an axle(s) when fully loaded. Hitch (Tongue/Pin) Weight - The weight of the trailer that is transferred to the hitch of the tow vehicle when hooked up. For additional definitions, refer to the Glossary of Terms. WEIGHT LABELS Vehicle weight labels are affixed to your RV to help you make an informed decision before your purchase. Do not remove these labels. If the labels are missing, contact your dealer or Sunset Park RV Customer Service for replacements. Federal certification label This label specifies maximum capacities for GVWR, GAWR and tires. It is located on exterior left front of the vehicle. In our Camo Units, it is located on the door frame. 38


40 Tire and loading information label This label specifies the maximum amount of cargo that can be safely added to the RV. It is located on the exterior front left of the vehicle. Cargo carrying capacity (CCC) label 39
41 This label supplies the CCC information for the customer. Pre-Travel Information CARGO CAPACITIES Cargo can be added to the vehicle, up to the maximum weight specified on the placard. The combined weight of the cargo is provided as a single number. In any case, remember the total weight of a fully loaded RV cannot exceed the stated GVWR. Water and propane also need to be considered: The weight of fully filled propane containers is considered part of the weight of the RV before it is loaded with cargo and is not considered part of the disposable cargo load. Water however, is a cargo weight and is treated as such. If there is a fresh water storage tank of 100 gallons, this tank when filled would weigh about 800 pounds. If more cargo is being transported, water can be off-loaded to keep the total amount of cargo added to the vehicle within the limits of the GVWR so as not to overload the RV. Understanding this flexibility will allow you, the owner, to make choices that fit your travel and camping needs. You may question the total weight capacity of the tires on your RV being less than the GVWR; this is correct. In order to calculate the actual weight on the RV tires, it is necessary to include the tongue weight. The tongue weight is actually being carried by your tow vehicle, not the RV tires. For example: If the tires are rated at 2,000 lbs. each x 4 tires = 8,000 lbs. and the RV has a GVWR of 9,000 lbs. with a tongue weight of 1,200 lbs. The actual weight on the RV tires is 7,800 lbs., which is within the weight rating of the tires. If you have further questions, please contact your dealer or Sunset Park RV Customer Service. LOADING YOUR RV 40
42 Store and secure all loose items inside the RV before traveling. Overlooked items such as canned goods, or small appliances on the countertop, cooking pans on the range or free-standing furniture items can become dangerous projectiles during a sudden stop. Distribute cargo side-to-side so the weight on each tire does not exceed one-half of the GAWR for either axle. For traveling safety, it is important to make sure any tie down straps (if so equipped) on appliances or furniture are secured. WEIGHING YOUR TOW VEHICLE & RV There are two important factors when loading your RV, total weight and balance. It is imperative that you verify compliance within all applicable weight ratings. Overloading your RV will void the Limited Bumper to Bumper Warranty, and the warranties of many component part manufacturers. Have your RV weighed periodically at a public scale to determine the proper load distribution. Keep in mind that individual scales will operate differently. The surroundings of the scale need to be adequate to accommodate weighing each side of your RV. Pre-Travel Information To weigh your tow vehicle and RV Read through all the weighing instructions before you begin. If you have further questions, consult with your dealer or the scale operator. Your RV must be weighed fully loaded (that is with food, clothing, fuel, water, propane, supplies, etc.). 1. Weigh the RV including the tongue weight, while detached from the tow vehicle. This actual overall weight must be less than or equal to the GVWR for safe operation. If the overall weight is greater than the GVWR, some contents must be removed until the actual overall weight is less than or equal to GVWR. 2. Hitch the RV to your tow vehicle. Weigh the RV and the tow vehicle to determine the Gross Combined Weight (GCW). Make sure that this rating is less than or equal to the GCWR as specified by the manufacturer of your tow vehicle. If this overall weight is greater than the Gross Combined Weight Rating (GCWR), some contents must be removed to bring the combination into compliance with the listed ratings. 3. Weigh the RV while attached to but excluding the tow vehicle. This will result in the actual weight that is exerted on all of the RV tires. This weight may be subtracted from the overall RV GVWR to determine the actual tongue weight. 4. With the RV still attached to the tow vehicle, weigh each wheel position separately to ensure each tire is not overloaded. To determine the wheel position weight 1. Pull the RV onto the scale so only one tire is on the scale. Record the weight. Your RV must remain as level as possible on the scale (even though an axle or side is not physically on the scale). Obviously, to obtain the side-to-side weights, there must be enough space on either side of the scale to accommodate the RV being partially off the scale. 41
43 2. To calculate the opposite side of the RV wheel position weight, subtract the first side s weight from the weight determined in step #3. If there is a difference in the weights on one side of the vehicle as compared to weights on the other side, components (tires, wheels, brakes, springs, etc.) on the heavier side could be overloaded, even though the total axle load is within the GAWR. It is important to redistribute the load to avoid component failure, improve the handling characteristics of the tow vehicle and not void the Limited Bumper to Bumper Warranty. With these actual weights, it is now possible to compare them against the Trailer Weight Information label weight ratings to ensure you are below the posted minimum ratings. Pre-Travel Information TIRE SAFETY INFORMATION This portion of the Owner s Manual contains tire safety information as required by 49 CFR 575.6(4) and is based in part on the National Highway Traffic Safety Administration s (NHTSA) brochure titled Tire Safety, Everything Rides on It. It can be obtained from NHTSA or downloaded, free of charge, at Studies of tire safety show that maintaining proper tire pressure, observing tire and vehicle load limits (not carrying more weight in your vehicle than your tires or vehicle can safely handle), avoiding road hazards, driving within the designated tire speed ratings, and inspecting tires for cuts, slashes, and other irregularities are the most important things you can do to avoid tire failure, such as tread separation or blowout and flat tires. These actions, along with other care and maintenance activities, can also: Improve vehicle handling. Help protect you and others from avoidable breakdowns and accidents. Improve fuel economy. Increase the life of your tires. Use this information to make tire safety a regular part of your vehicle maintenance routine. Recognize that the time you spend is minimal compared with the inconvenience and safety consequences of a flat tire or other tire failure. SAFETY FIRST BASIC TIRE MAINTENANCE Properly maintained tires improve the steering, stopping, traction, and load-carrying capability of your vehicle. Under-inflated tires and overloaded vehicles are a major cause of tire failure. Therefore, as mentioned above, to avoid flat tires and other types of tire failure, you should maintain proper tire pressure, observe tire and vehicle load limits, avoid road hazards, and regularly inspect your tires. 42
44 RECOMMENDED TIRE PRESSURE & LOAD LIMITS Tire information placards and vehicle certification labels contain information on tires and load limits. These labels indicate the vehicle manufacturer s information including: Recommended tire size Recommended tire inflation pressure Cargo weight (the maximum cargo weight a vehicle is designed to carry) Front and rear gross axle weight ratings (GAWR the maximum weight the axle systems are designed to carry). Both placards and certification labels are permanently attached to the trailer. See the Weight Ratings Labels in this section for location and detailed information. Pre-Travel Information UNDERSTANDING TIRE PRESSURE & LOAD LIMITS Tire inflation pressure is the level of air in the tire that provides it with load-carrying capacity and affects the overall performance of the vehicle. The tire inflation pressure is a number that indicates the amount of air pressure, measured in pounds per square inch (psi), a tire requires to be properly inflated. (You will also find this number on the vehicle information placard expressed in kilopascals (kpa), which is the metric measure used internationally.) Vehicle manufacturers determine this number based on the vehicle s design load limit, that is, the greatest amount of weight a vehicle can safely carry and the vehicle s tire size. The proper tire pressure for your vehicle is referred to as the recommended cold inflation pressure. (As you will read below, it is difficult to obtain the recommended tire pressure if your tires are not cold.) Checking tire pressure It is important to check your vehicle s tire pressure at least once a month for the following reasons: Most tires may naturally lose air over time. Tires can lose air suddenly if you drive over a pothole or other object or if you strike the curb when parking. With radial tires, it is usually not possible to determine under-inflation by visual inspection. For convenience, purchase a tire pressure gauge to keep in your vehicle. Gauges can be purchased at tire dealerships, auto supply stores and other retail outlets. Steps for maintaining proper tire pressure 1. Locate the recommended tire pressure on the vehicle s Tire and Loading Information label located on the exterior front left side wall. 43
45 2. Record the tire pressure of all tires. a. If the tire pressure is too high in any of the tires, slowly release air by gently pressing on the tire valve stem with the edge of your tire gauge until you get to the correct pressure. b. If the tire pressure is too low, note the difference between the measured tire pressure and the correct tire pressure. These missing pounds of pressure are what you will need to add. 3. At a service station or using an air compressor, add the missing pounds of air pressure to each tire that is under-inflated. 4. Check all the tires to make sure they have the same air pressure. Pre-Travel Information If you have been driving your vehicle and think that a tire is under-inflated, fill it to the recommended cold inflation pressure indicated on your vehicle s Tire and Loading Information label. While your tire may still be slightly under-inflated due to the extra pounds of pressure in the warm tire, it is safer to drive with air pressure that is slightly lower than the vehicle manufacturer s recommended cold inflation pressure than to drive with a significantly under-inflated tire. Since this is a temporary fix, do not forget to recheck and adjust the tire s pressure when you can obtain a cold reading. TIRE SAFETY TIPS Preventing tire damage Slow down if you have to go over a pothole or other object in the road. Do not run over curbs or other foreign objects in the roadway or when parking. Tire safety checklist TIRE SIZE Check tire pressure regularly (at least once a month), including the spare. Inspect tires for uneven wear patterns on the tread, cracks, foreign objects, or other signs of wear or trauma. Remove bits of glass and foreign objects wedged in the tread. Make sure your tire valves have valve caps. Check tire pressure before going on a long trip. Do not overload your vehicle. Check the Tire Information and Loading Label. To maintain tire safety, purchase new tires that are the same size as the vehicle s original tires or another size recommended by the manufacturer. Look at the Tire and Loading Information label, or the 44
46 sidewall of the tire you are replacing to find this information. If you have any doubt about the correct size to choose, consult with the tire dealer TIRE LABELING Federal law requires tire manufacturers to place standardized information on the sidewall of all tires. This information identifies and describes the fundamental characteristics of the tire and also provides a tire identification number for safety standard certification and in case of a recall. TIRE SIZE & TYPE DESIGNATION For example, the tires on your unit may be marked with a designation of standard trailer (ST) 225/75R15 or light truck (LT) 135/85R16. The designation breakdown is as follows: The first three-digit number gives the width in millimeters of the tire from sidewall edge to sidewall edge. In general, the larger the number, the wider the tire. The next two-digit number after the slash mark, known as the aspect ratio, gives the tire s ratio of height to width. Pre-Travel Information TIRE TREAD R - The R stands for radial. The last two-digit number is the wheel or rim diameter in inches. The tire tread provides the gripping action and traction that prevent your vehicle from slipping or sliding, especially when the road is wet or icy. In general, tires are not safe and should be replaced when the tread is worn down to 1/16 of an inch. Tires have built-in tread-wear indicators that let you know when it is time to replace your tires. These indicators are raised sections spaced intermittently in the bottom of the tread grooves. When they appear even with the outside of the tread, it is time to replace your tires. Another method for checking tread depth is to place a penny in the tread with Lincoln s head upside down and facing you. If you can see the top of Lincoln s head, you are ready for new tires. 45

47 Pre-Travel Information US DOT TIRE IDENTIFICATION NUMBER (TIN) This begins with the letters DOT and indicates that the tire meets all federal standards. The next two numbers or letters are the plant code where it was manufactured, and the last four numbers represent the week and year the tire was built. For example, the numbers 3197 means the 31st week of The other numbers are marketing codes used at the manufacturer s discretion. This information is used to contact consumers if a tire defect requires a recall. TIRE PLY COMPOSITION & MATERIALS USED The number of plies indicates the number of layers of rubber-coated fabric in the tire. In general, the greater the number of plies, the more weight a tire can support. Tire manufacturers also must indicate the materials in the tire, which include steel, nylon, polyester, and others. MAXIMUM LOAD RATING This number indicates the maximum load in kilograms and pounds that can be carried by the tire. 46
48 MAXIMUM PERMISSIBLE INFLATION PRESSURE This number is the greatest amount of air pressure that should ever be put in the tire under normal driving conditions. SPEED RATING Typically tires with a ST designation are speed restricted to 75 mph under normal inflation and load conditions. Typically tires with a LT designation are speed restricted to 75 mph under normal inflation and load conditions. Do not exceed these speed ratings regardless of the posted maximum speed limit. Tires are warranted by the tire manufacturer and not by Sunset Park RV. In the event that you need tire warranty assistance, please contact your dealer or refer to the tire warranty pamphlets provided with your RV for details. HOW OVERLOADING AFFECTS YOUR RV & TIRES The results of overloading can have serious consequences for passenger safety. Too much weight on your vehicle s suspension system can cause spring, shock absorber, or brake failure, handling or steering problems, irregular tire wear, tire failure or other damage. An overloaded vehicle is hard to drive and hard to stop. In cases of serious overloading, brakes can fail completely, particularly on steep hills. The load a tire will carry safely is a combination of the size of tire, its load range, and corresponding inflation pressure. Excessive loads and/or under-inflation cause tire overloading and, as a result, abnormal tire flexing occurs. This situation can generate an excessive amount of heat within the tire. Excessive heat may lead to tire failure. Pre-Travel Information It is the air pressure that enables a tire to support the load, so proper inflation is critical. Since RVs can be configured and loaded in many ways, air pressures must be determined from actual loads (determined by weighing) and taken from the load and inflation tables provided by the tire manufacturer. These air pressures may differ from those found on the certification label. However, they should never exceed the tire limitation for load or air pressure. If you discover that your tires cannot support the actual weights, the load will need to be lightened. Steps for determining correct load limit 1. Locate the statement The weight of cargo should never exceed XXX KG or XXX LBS on your RV s Cargo Carrying Capacity label. 2. This figure equals the available amount of cargo and luggage load capacity. Determine the combined weight of luggage and cargo being loaded on the RV. That weight may not safely exceed the available cargo and luggage load capacity. 47
49 SPARE TIRE If equipped, the spare tire can be utilized in an emergency if a trailer tire loses air pressure or goes flat. Certain Sunset Park RV brands may use different spare wheels than original with the intent for the spare to be temporary. Tire changing basics 1. Use emergency flares when near a road or highway. 2. Block the wheels on the opposite side from the tire you wish to change to prevent accidental movement. 3. Position a hydraulic jack on the frame close to the spring hanger. (Never attempt to use a stabilizer jack to lift the RV.) 4. Raise the trailer until the tire clears the ground. 5. Set a jack stand under the frame just to the rear of the tire being changed. 6. Follow the Wheel Nut Torque and Wheel Reinstallation instructions provided below. WHEEL NUT TORQUE Torque is the amount of rotating force applied to a fastener, such as a lug nut. The axle and wheel assemblies of your RV are designed differently than those on your car. The overall size, weight and center of gravity of a RV subject the wheels to pressures unique to trailering. During normal cornering, the tires and wheels experience a considerable amount of stress called sideload. Therefore, the lug nuts on your RV require periodic torque maintenance. Pre-Travel Information Lug nut torque at every wheel should be checked before departing on any trip, regardless of how short it may be. Always use a properly calibrated torque wrench to confirm proper torque. Do not allow under or over torque on any wheel. If your RV has Lippert Axles, match the chart below to the wheel size installed on the RV to determine the correct torque for each stage. Tightening the fasteners should be done in stages, using the sequence shown. 48

50 Pre-Travel Information EMERGENCY STOPPING Always carry road flares or reflective warning signs to display if necessary. Pull off the roadway as far as possible for emergency stopping or tire changing. Turn ON your RV hazard warning flashers. If traveling at night, use three red warning indicators such as flares, reflectors or lanterns, as follows: 1. Place the first warning indictor on the traffic side of the RV, directed at the nearest approaching traffic. 49
51 2. Place the second warning indicator 100 feet behind the RV in the center of the lane and toward approaching traffic. 3. Place the third warning indicator 100 feet in front of the RV in the center of the lane and away from the traffic approaching from behind. The hazard-warning flasher provides additional safety if the RV is stopped on the side of the roadway and presents a possible hazard to other motorists. When the flasher is on, it serves as a warning to others to approach and overtake your vehicle with caution. For personal safety, always stand off the road and out of the way of traffic. Curves and/or hills may affect the safe placement of warning indicators EMERGENCY TOWING If your RV needs to be towed, please contact an emergency road service provider or a qualified service facility for assistance. Towing & Leveling TOWING & LEVELING Driving safety and protection against injury cannot be fully ensured; however, we recommend you pay special attention to the following: The use of daytime running lights can increase other motorists' awareness of the RV to all traffic. 50
52 Keep the tires inflated to the specified levels. Replace the tires before they are excessively worn. Before changing lanes, check the outside rearview mirrors for other vehicles and activate the appropriate turn signal to alert other drivers. While driving, watch the behavior of other drivers, bicyclists and pedestrians. Always follow all traffic laws and regulations. Pay attention to traffic and road conditions. Be a courteous and alert driver. Always leave room for unexpected events, such as sudden braking. Never drive when you are sleepy or tired. Never drive when alcohol, drugs or medication have affected your judgment, reflexes or alertness. Obey all traffic laws and use your seatbelts at all times. Many states have lower speed limit requirements for tow vehicle/rv combinations. We recommend that you do not exceed the posted speed limit when towing an RV. Driving with the propane system on can add to the danger if you are involved in an accident or have a fire. Most refrigerators will keep food cold or frozen for eight hours without running while you travel. Shut the propane system off at the propane cylinder. Adverse weather conditions and extremes in terrain may affect the performance and handling of your tow vehicle. Do not operate the tow vehicle cruise control on icy or extremely wet roads, winding roads, in heavy traffic or in any other traffic situation where a constant speed cannot be maintained. RV DRIVING SCHOOLS & SEMINARS If you have any concerns about driving while towing a RV, consult an expert for specific RV driver education. There are private RV schools and some RV owner's organizations that offer driving seminars. The schedules and locations of the various RV driver education seminars and schools can be researched through RV-related publications and internet sites. Use caution when using the internet as a resource tool. Verify the information is from a credited and reliable source in the RV industry, and it pertains to your RV. If in doubt, contact your dealer for assistance. Towing & Leveling RV BRAKING SYSTEM The RV brakes are designed to work with your tow vehicle brakes. To maintain proper braking performance, both the RV and tow vehicle brakes must be used together. Separate use of the braking systems will cause accelerated wear and damage. When your RV is new, it is impossible to adjust the brake shoes precisely. It takes approximately 1,000 miles and/or 50 medium to heavy stops to burnish fit or seat the shoes to the brake drum. After the initial break-in period, your brake shoes must be adjusted accurately for best performance and increased durability. 51
53 Braking system components include: Tow vehicle battery Brake controller Wire harness/connector plug Auxiliary batteries (see Electrical System) Breakaway switch TOW VEHICLE BATTERY The tow vehicle battery is the primary source of power for your RV s brake operation. To ensure available power when needed, keep your tow vehicle battery and charging system working properly. BATTERY ISOLATOR (CUSTOMER SUPPLIED) You may want to consider the installation of a battery isolator on your tow vehicle as a convenience feature: It receives current from the tow vehicle alternator and controls distribution of energy to both the RV auxiliary battery and the tow vehicle battery. It serves as a check valve to prevent energy from being drawn from your tow vehicle chassis battery (so you can start your tow vehicle engine). Your dealer can assist you with the selection, purchase and installation of this aftermarket part. BRAKE CONTROLLER (CUSTOMER SUPPLIED) The brake controller should be installed in the tow vehicle to work in conjunction with the RV electric brakes. Consult with your dealer or the brake controller OEM to decide what is right for your towing combination. 7-WAY WIRE HARNESS/CONNECTOR PLUG A 7-way wire harness/connector plug is wired into your FW to connect electrical power from the tow vehicle for travel. This supplies power to the RV brakes, tail lights, clearance lights, turn signals, brake lights, etc. Wiring to operate your brakes must be the same size in both the tow vehicle and RV. Towing & Leveling Maintenance The connector plug may build up corrosion with extended use and should be cleaned periodically to insure good electrical contact. Make sure the connector plug is kept clean and protected from road elements as you travel. 52

54 BREAKAWAY SWITCH The breakaway switch is a crucial part of the RV braking system. Located by the FW pin box, this switch will apply the trailer brakes if the trailer becomes detached from the tow vehicle. Attach the breakaway switch lanyard to a permanent part of the tow vehicle when hitching the RV. If the RV becomes detached from the tow vehicle, the pull pin will be pulled from the switch., which automatically causes the switch to close and activate the RV brakes. An auxiliary battery (customer supplied) must be installed to activate the breakaway switch. SAFETY CHAINS Safety chain requirements vary from state to state. Your RV is equipped with chains to meet SAE standard requirements for maximum gross trailer weight. Always have the safety chains attached when towing. Hook them to the safety chain loops provided on the tow vehicle s hitch, crossing them under the trailer tongue. Inspect the length of the chains once attached to the tow vehicle frame. They should be long enough to allow for sharp turns, but short enough so they do not drag on the ground. Slack for each length should be the same but not more than necessary to permit the vehicle to turn at its minimum radius. Towing & Leveling TOW VEHICLE HITCH (CUSTOMER SUPPLIED) Hitch selection is important because it will affect your RV towing and handling characteristics. There are many types of hitches available, and ensuring the correct hitch is installed on your tow vehicle is critical to a safe towing experience. 53
55 Ask your dealer which class and type of hitch you must purchase for your tow vehicle/travel trailer towing combination. A travel trailer requires a tow vehicle frame mounted hitch. The hitch manufacturer assigns a hitch class rating based on the capacity the hitch has for towing, and its weight classification. The weight classification is determined from the hitch s weight carrying capacity (also known as the tongue weight). Before selecting a hitch, you must know your RV s GVWR and tongue weight. The rating of the hitch package purchased should be equal to or greater than your RV GVWR and hitch weight. Equipment that sometimes gives autos, trucks and sport utility vehicles a softer ride can accentuate swaying when pulling a RV; conversely, suspension that is too stiff will increase vibration, bounce and accelerate wear of your tow vehicle and RV combination. There are a variety of tow vehicle suspension systems available that will affect the ball height, stability and levelness of a hooked-up RV. Your dealer can best assist you with purchasing a compatible hookup. HITCH WEIGHT Maintain the proper tongue weight of the trailer. Stay within the target range of 10 15% of the overall gross weight (travel trailer weight plus contents). HITCH HEIGHT & HITCH BALL To determine your RV hitch height, make sure the RV is level. When the loaded trailer is hitched to the tow vehicle, check the hitch ball height by measuring the distance from the center of the hitch ball to the ground. Record your RV hitch height measurement in the box for future reference. Towing & Leveling Adjust the equalizing bars of the hitch assembly so that the tow vehicle and the RV are essentially level. A high hitch will transfer weight behind the axles and cause the RV to fishtail. A low hitch will transfer additional weight to the hitch. Depending on your floor plan, your required travel trailer hitch ball diameter is either 2 or 2-5/16. Single Axle trailers have a 2 Ball, where the dual axle trailers have the 2-5/16. 54
56 Refer to the hitch manufacturer instructions to adjust the weight-distributing hitch to the proper height. If you have additional questions, consult with your dealer. SWAY CONTROL (CUSTOMER SUPPLIED) Aftermarket sway control devices are available to reduce the sway produced by crosswinds, air displacement caused by other vehicles passing you in transit, incorrect weight distribution, excessive speed, the RV tires dropping onto the shoulder of the road, etc. The use of a sway control device will help to control the side-to-side movement and keep sway in check. Suggestions for sway situations: Slowly ease your foot off the accelerator. Turn the steering wheel as little as possible. Natural lag time reaction when counter-steering to correct sway could possibly make it worse. If the trailer is equipped with electric brakes, using the hand control will help to keep the vehicles aligned. As soon as possible, stop to determine the cause of the sway. Check all equipment and load distribution. If the problem cannot be solved immediately, contact your dealer for a service appointment (travel at a much-reduced speed on your way there). WEIGHT DISTRIBUTING SYSTEM (CUSTOMER SUPPLIED) An aftermarket weight distributing hitch system provides a more stable tow vehicle/travel trailer towing combination. This system will spread the weight evenly to distribute it to the tow vehicle front and rear axles and the trailer axle. Consult with your dealer to familiarize yourself with the operation and requirements of the weight distributing hitch system. Be certain your tow vehicle can carry the hitch weight. STABILIZER JACKS The stabilizer jacks, located under the RV, are permanently attached and can be operated from a standing position. These jacks are for stabilizing only to give the RV a firm setting and to keep it from bouncing as you move around inside. Manually crank the stabilizer jacks downwards, using the supplied crank handle, until they contact the ground firmly. Place wooden blocks under the foot pads if necessary. Towing & Leveling TRAVEL TRAILER HITCHING PROCEDURE The following procedure will help to assist you in securely hooking up your RV to your tow vehicle: 1. Make sure the RV wheels are blocked. 55
57 2. Make sure the power tongue jack is hooked to 12-volt power and turned ON, then use the tongue jack RET/ EXT control button to raise the travel trailer tongue above the hitch ball. 3. Open the coupler latch on the travel trailer hitch. 4. Back the tow vehicle into the proper position. 5. Use the tongue jack RET/EXT button to lower the power tongue jack coupler onto the tow vehicle hitch ball. 6. Close the coupler latch after it is completely seated and install the safety pin. 7. Install the (customer supplied) weight distributing bars (also referred to as equalizers ) as directed by the OEM. 8. Remove the tongue jack foot and retract the tongue jack to its maximum height. 9. Attach the breakaway switch cable to the tow vehicle. 10. Attach the safety chains. 11. Plug your trailer 7-way wire harness/connector plug to the tow vehicle and secure in the travel position Walk around the RV to verify the exterior lights are working correctly, 13. Ensure the stabilizer jacks are retracted. 14. Remove the trailer wheel blocks. TOWING THE RV You will find that your RV will travel safely and comfortably at most posted trailer highway speed limits. However, it will take longer than a passenger automobile to reach that speed. Keep this in mind when overtaking and passing another vehicle. Allow more time to go around the vehicle you are passing. You cannot cut back into the traffic lane as quickly due to the longer length of your tow vehicle/rv combination. Drive with caution to avoid situations that might require quick momentum changes. Even though your RV is equipped with brakes designed for GVWR, we suggest practicing stopping away from traffic until you become accustomed to your RV s stopping distance. A good way to practice is at a large parking lot (where it is permissible). Easing to a stop and starting smoothly saves wear and tear on your tow vehicle/rv combination. Towing & Leveling Be aware of road surface conditions. Slow down well in advance of dips and bumps to reduce the jolting to your tow vehicle/rv combination. Drive over them slowly and let the trailer tires pass over them before accelerating. Cross railroad tracks slowly (always release your brakes before crossing). When descending a long hill, drop down into a lower gear (or lower range if you have automatic transmission). Avoid conditions that require excessive and prolonged use of your brakes. 56
58 Apply and release brakes at short intervals to give them chance to cool. The tow vehicle transmission and engine will help in controlling downhill speed and can lengthen brake life. The distance required to stop the RV is greater than an automobile s. Use care when accelerating or decelerating on a slippery surface. Abrupt speed changes can cause skidding and loss of control. Driving through water deep enough to wet the brakes may affect stopping distance or cause the vehicle to pull to one side. Check the RV s brake operation in a safe area to be sure they have not been affected. Never operate any vehicle if a difference in braking efficiency is noticeable. Passenger safety Passengers should NEVER be allowed to travel inside your RV while in transit. Several states have very specific laws prohibiting this practice. Vehicle clearance Remember some bridges, older ones in particular, may not support the weight of your tow vehicle/rv combination. Know the weight and size of your towing combination and observe any posted weight and clearance limits. The added height of roof air conditioners, TV antennas or floodlights may cause clearance problems around some tunnels, canopies and hanging signs. Turning corners When turning, the tires do not follow the path of your tow vehicle tires. The RV will make a tighter turn than the tow vehicle. You must compensate for this action by carefully pulling the tow vehicle out into the intersection further than you would normally so that the RV clears the curb (or any parked vehicles along the curb). Backing up If your camping destination does not have pull through sites, pick a level site and back in carefully. We suggest you stop near the site, get out of the RV and observe the surrounding area: Check to ensure there are no obstacles in your path and that you have plenty of vehicle clearance. Check for low-hanging tree limbs, posts, large rocks or other obstacles. Try to choose a site that is on the driver s side, so you can see what the rear of the RV is doing. With the site on the passenger side, you would be backing into the site on your blind side, which is more difficult. Towing & Leveling When you determine the site conditions are satisfactory, maneuver the RV into position for backing up into the site space. Back the RV up slowly using your tow vehicle mirrors as a guide. Have another person outside the RV assist you until the RV is parked in the desired position. 57
59 Parking After the RV is in the desired location, set the tow vehicle parking brake and place the transmission in park. Turn OFF the ignition switch. Go outside the RV and block all wheels securely with wheel chocks. The wheel chocks can be wood blocks or purchased items as long as they prevent the RV from rolling. LEVELING THE RV Now that you have parked your RV, you need to ensure it is level. Leveling is very important. A level RV is more comfortable for sleeping and walking inside. The refrigerator is designed to operate when level for best performance due to the absorption system. The water drainage systems are designed with proper slope and must be level for proper operation. The appliances perform best when level. Before operating the leveling system make sure: 1. The RV is parked on a reasonably level surface. 2. The towing vehicle is disengaged from the RV. 3. Make sure all persons, pets and property are clear of the RV while leveling checking is in progress. 4. Use a small level in the refrigerator, on a counter top or floor of the trailer to make sure it is level. TRAVEL TRAILER SET UP 1. Position the RV as desired. 2. Block the wheels securely to prevent the RV from moving. 3. Level the RV (side-to-side). 4. Unhook the 7-way wire harness/connector plug, safety chains and breakaway switch lanyard. 5. Install the tongue jack foot. 6. Release the weight distributing bars (customer supplied). 7. Open the tongue jack coupler latch. 8. Make sure the power tongue jack is hooked to 12-volt power and turned ON, then use the tongue jack RET/ EXT control button to raise the travel trailer tongue above the hitch ball. 9. Level the RV (front-to-back) with the power tongue jack. Towing & Leveling 10. Lower the stabilizing jacks onto blocks until they firmly engage. Be sure all 4 jacks have about the same pressure on them as to not put the unit in a twist. Doing so can cause slide-outs, doors, etc. to bind and/or operate intermittently. 11. Pull the tow vehicle away, as desired. 58
60 Once the RV is stabilized, continue setting up the RV by connecting to the site facilities, extending the slide outs, etc., according to your personal preferences and needs. There is no particular order to set up procedures, and with practice you will find the order that is the most efficient for your needs. Electrical Systems ELECTRICAL SYSTEMS The RV electrical system is comprised of two independent electrical systems. One operates off 12-volt DC power, and the other off 120-volt 60hz AC power. All installations have been made in compliance with industry standards applicable on the date of manufacture. Because the electrical equipment and 59
61 associated circuitry are engineered into a dedicated system specific to your RV, we recommend you do not make unauthorized changes or add fixed appliances to it. Changes or additions made after delivery may result in a hazardous condition. Service and/or modification of the RV electrical system should only be performed by qualified electrical technicians using approved materials, components, and methods meeting current safety and code requirements. Please consult your dealer s service department for assistance. To read more about the various components incorporated into the RV electrical system, please refer to the information contained in your Owner s Information Package. ELECTRICAL SYSTEM MAINTENANCE Always disconnect the shore line power cord and disconnect the negative 12-volt DC battery terminal before working on the electrical system. Always make sure the power converter is turned off before disconnecting the battery. 120-VOLT AC SYSTEM The following electrical components (if so equipped) will only operate when your RV is connected to shore power: 120-volt to 12-volt power converter, air conditioner, 120-volt refrigerator, microwave oven, television(s), fireplace, and other appliances that plug into convenience electrical receptacles. Your RV is equipped with either a 30 amp or 50 amp (select models) electrical system. Be sure you know which electrical system (30 amp or 50 amp) is equipped on your RV. The 30-amp 120-volt 60hz AC electrical system is designed to operate on 1 leg of 120-volt power at a maximum current flow of 30 amperes. The 50-amp 120-volt 60hz AC electrical system (select models) is designed to operate on 2 legs of 120volt power at a maximum current flow of 50 amperes per leg. Exposure to voltages higher or lower than a nominal 120-volts will damage or shorten the service life of the electrical system and appliances. 120-VOLT CIRCUIT BREAKERS The 120-volt AC circuit breakers located inside the main load center protect all 120-volt wiring and components in the RV from circuit overloads and short circuits. Should a circuit overload or short circuit occur the circuit breaker protecting the affected circuit will trip preventing the flow of electricity through that circuit. Electrical Systems If a circuit breaker trips, shut off the appliance on that circuit (i.e., power converter etc.) and allow the circuit breaker to cool down for a brief period of time. After the cooling down period, reset the circuit breaker by moving its lever off and then back to the on position. If the circuit breaker re-trips or frequently trips, contact your dealer to have the electrical problem diagnosed and repaired. 60
62 Maintenance and replacement A circuit breaker identification label is permanently attached to the inside surface of the 120-volt load center. At the beginning of camping season, inspect the circuit breakers and replace as needed. Test by turning each circuit breaker off and back on. Circuit breakers are wearable parts and must be replaced as needed as part of your RV maintenance. If you have any questions, consult your dealer. SHORE LINE POWER CORD The shore line power cord ( power cord ) is designed to ground the RV electrical system through the external power source receptacle. It is also designed to carry the voltage and current output from campground power receptacles. Occasionally the electrical service provided by a campground may experience low or high voltage (i.e., surges or spikes). Any prolonged exposure will shorten the life of the electrical system and appliances. Consult your dealer for recommendations on power surge protection. Connecting the power cord Always test the external power source (i.e., the campsite power receptacle or electrical box) with a ground monitor before connecting your power cord to it. If the ground monitor indicates 'reverse polarity' or an 'open ground' DO NOT connect the power cord. 1. Turn off the load center main 120-volt circuit breaker. 2. Carefully extend the entire length of the power cord from the electric cable hatch to the external power source. 3. Plug the power cord into the receptacle. Be sure all the power cord prongs are properly plugged into the receptacle. 4. Return to your RV and turn on the load center main circuit breaker. 5. To help prevent power surges from damaging the connected loads, please follow these instructions when hooking up to the external power source. The shore line power cord should be unplugged when the RV is left unattended. If something would happen to the electrical system, this may help limit potential damage. When you are ready to leave, reverse the power cord connection process. Use care to prevent damaging the power cord electrical connection pins when connecting or disconnecting the power cord. Grasp the plug to remove the power cord from the outlet; do not unplug it by pulling on the cord. Electrical Systems Maintenance Inspect the power cord for cuts, cracks, and worn insulation. Have the power cord replaced immediately if these symptoms are noticed. 61
63 CONVERTER The power converter converts 120-volt AC power to useable 12-volt DC power when the shore line power cord is connected to an external power source. The converter has a built-in protective thermal breaker that will shut it down should overheating occur. Overheating can be caused by operating the converter above its maximum power output for an extended period of time, or by an obstruction to its ventilation air flow. To reduce converter heat build, keep unnecessary 12-volt lights and motors turned off. Keep the converter cooling fins and fan clear of obstructions. Inspection and maintenance If the 12-volt power converter is not working (auxiliary battery not being charged) check the reverse polarity fuses (dual 40amp or 35-amp fuses) in the converter fuse panel. There are no customer serviceable parts inside the converter case and the manufacturer s warranty will be void if the case has been removed. If you have further concerns contact your dealer. GFCI RECEPTACLE Grounding is your personal protection from electrical shock. Each RV has a ground fault current interrupter (GFCI) engineered into the electrical system. This device has been designed to reduce the possible injury caused by electric shock. The GFCI will not protect against short circuits or circuit overloads. Test all GFCI receptacles monthly Push in the GFCI TEST button. The GFCI RESET button should pop out indicating the GFCI receptacle has been tripped and interrupted 120-volt power. Push in the GFCI RESET button to restore 120-volt power. Contact your dealer for assistance if the GFCI RESET button does not restore 120-volt power and pops back out. A tripped GFCI receptacle indicates that abnormally high 120-volt current flow (a ground fault) was detected through the electrical system grounding circuit. A fault condition can be caused by faulty wire insulation, wet wiring inside an appliance, or faulty electrical equipment connected to the circuit, etc. All ground faults must be repaired before use of the RV. CALCULATING ELECTRICAL LOAD When connecting appliances to the electrical system, remember that 120-volt power usage is limited. Be mindful of the fact that each operating appliance collectively places an added load on your 120-volt electrical system. An unintentional trip of a circuit breaker may occur if you overload the RV and/or campground electrical system. Electrical Systems The amperage rating of individual appliances can be calculated by dividing appliance wattage consumed (normally listed on the appliance) by nominal design voltage (120 for a 120volt appliance). For example: 1200 watts divided by 120-volts equals 10 amps. 62
64 12-VOLT DC SYSTEM The majority of your RV lighting is powered by 12-volt electricity. The 12-volt DC system is composed of components that will operate when the following conditions are met: Power is supplied by the tow vehicle alternator when the engine is running and the 7-way trailer plug is connected. This powers the RV s running lights, brake lights, turn signals and brakes. In addition, the 7-way trailer plug provides a common ground and a 12-volt charge line to charge the auxiliary battery. The converter will supply interior 12-volt DC power when the power cord is plugged into campground power. The converter will also charge the RV battery in most situations. The auxiliary battery powers many interior 12-volt components including the lighting fixtures, water pump, 12-volt motors, 12-volt appliances, etc. It also powers the breakaway switch. BATTERY DISCONNECT SWITCH (CUSTOMER SUPPLIED) When the RV is not in use or storage, shut the battery disconnect switch off and disconnect on of the battery cables from the auxiliary battery terminal. Remember to reconnect the battery cable and turn the battery disconnect switch on when you are ready to use the RV or perform periodic maintenance checkups. AUXILIARY BATTERY Your RV has many 12-volt DC loads. When combined, their total is more than the converter can produce. High demands for 12-volt power can be met by an auxiliary battery for limited periods of time. The 12- volt DC electrical system is designed for usage with a Group 24 or Group 27 deep cycle battery. Dry camping Consider the charge condition of the auxiliary battery when dry camping. If the auxiliary battery is not being recharged and power is being drawn from it, it will eventually discharge. A battery will discharge at a faster rate as its energy level becomes depleted. It is recommended you plan your electrical usage accordingly. For accuracy, test the auxiliary battery voltage using a voltohm meter. A fully charged auxiliary battery will read 12.7 volts DC and specific gravity at 80 F (32 C). The auxiliary battery is considered discharged at 11.8 volts, and dead at volts. When voltage drops below those levels, permanent damage may occur. Typically, a deep cycle battery has an amp-hour rating of amps. If the furnace and refrigerator are operating simultaneously, approximately ( ) 15.0 amps per hour are used. This does not include any 12-volt lights, water pump or any other 12- volt component. Electrical Systems If the furnace and refrigerator in the above example operated constantly, a 75 amp-hour battery would become fully discharged in 5 hours (75ah /15a = 5h). 63
65 The auxiliary battery should be installed in parallel with the battery in your tow vehicle. When the 7- way trailer plug is connected, both batteries power the RV so it is important not to discharge your tow vehicle battery below the level required to start the engine. To prevent this from occurring, disconnect the 7-way trailer plug or install a battery isolator. When the tow vehicle engine is operating with the RV connected, the tow vehicle charging system will charge both batteries. Replacement and maintenance Some equipment in your RV will draw small amounts of current even when turned OFF. To prevent the auxiliary battery from being discharged when your RV is not connected to shore line power, disconnect the auxiliary battery negative cable at the battery. During storage, it is important to check the voltage monthly and recharge the auxiliary battery as needed. If you remove the auxiliary battery from your RV, store it in a dry, cool area per the manufacturer s instructions. When it is time to replace the auxiliary battery, replace it with a Group 24 or Group 27 deep cycle battery only. Contact the battery manufacturer for further information. Do not reverse the positive and negative battery cables (doing so will blow the reverse polarity fuse(s) that protect the converter). 12-VOLT FUSE PANEL The 12-volt fuse panel is labeled to indicate fuse sizes, positions and the components powered. At the beginning of camping season, inspect all the 12-volt fuses and replace as needed. Replacing a fuse Before replacing a fuse, always turn off the electrical component(s) protected by it. 1. Disconnect the shore power cord. 2. Disconnect the RV auxiliary battery main negative battery cable. 3. Remove the fuse panel cover to check fuses. 4. Pull the fuse straight out of the fuse block. If the fuse is not blown, something else must be causing the problem. Please contact your dealer for further assistance. 5. Insert a new fuse of the same specified voltage, amperage rating and type in the original location. Never use a higher rated replacement fuse. The fuse panel label should be kept permanently affixed to your RV. The fuses will not offer complete protection of the RV electrical system in the event of a power surge or spike. Electrical Systems 12-VOLT DC OUTLET (IF SO EQUIPPED) 64
66 There may be a 12-volt DC outlet (not applicable on all models) in your RV. When the 12-volt DC outlet is used as a power source for an electric appliance, make sure that the appliance operates on 12-volt DC power and that it consumes less than 60 watts (5 amps) of 12-volt power. To prevent short circuits do not allow metallic foreign matter to get into the 12-volt DC outlet. SOLAR PORT (IF SO EQUIPPED) The Furrion quick connect solar charging inlet is designed for use with the (customer supplied) Furrion 95W portable solar power charging system (FSPP10SA-BL). REPLACING LIGHT BULBS Before replacing a bulb, be sure the light is off. Do not touch the glass part of the new bulb with your bare fingers. The skin oil left on the glass will evaporate when the bulb gets hot, the vapor will condense on the reflector and it will dim the surface. Replacement light bulbs must be of the type, voltage and wattage listed on the lamp fixture. Use of incorrectly sized bulbs can overload lam circuits and may create a fire hazard by overheating the fixture. Electrical Systems APPROXIMATE ELECTRICAL LOAD RATINGS Use actual amperage (or wattage divided by 120) of appliance being used whenever possible. See Next Page 65
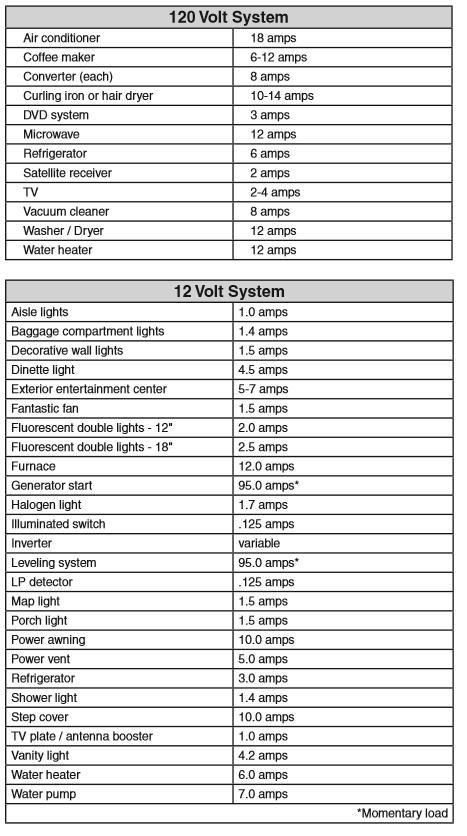
67 66
68 Plumbing Systems PLUMBING SYSTEMS There are two different water systems in your RV: the fresh water system and the waste water system. The fresh water system consists of the fresh water holding tank, fresh water connections, water pump, outside shower assembly (if so equipped), water heater, faucets, shower or tub. The waste water system consists of the waste water holding tank, sewage holding tank, drains and toilet. Check all fittings, pressure and waste, for leaks before each trip or before vehicle storage as part of your normal maintenance. Inspect all faucets and sink connections (including drain baskets or filters). Inspect connections at the water pump and water heater. At the end of every trip, you should drain any unused water from the fresh water system. FRESH WATER SYSTEM All water contains contaminant and mineral particles that can cause fresh water system odors. Untreated well water is a major source of water system odors. The fresh water (or potable water) system needs periodic sanitization and winterization to take care of all the components within the plumbing system and help discourage the growth of bacteria and other organisms that can contaminate the water supply. MONITOR PANEL The interior wall-mounted monitor panel (if so equipped) allows you to monitor the fresh water, grey water, black water and auxiliary battery levels. These functions are controlled using the switches located on the monitor panel faceplate. The monitor panel operates on 12-volt DC power supplied by either the converter or auxiliary battery. Sensors installed in the holding tanks connect to a resistor assembly (relaying an electronic message to the display board). No power is drawn from the battery unless a switch is pushed or turned ON. Fuses for the monitor panel are located in the load center. Operation Press only one switch at a time: 1. As you push either the FRESH, BLCK, GRY1 or GRY2 switch, one or more LED lights will illuminate indicating that holding tank content level. 2. When pushing the BAT switch, the highest LED light illuminated indicates the estimated auxiliary battery condition. Water pump switch When the water pump switch is ON the water pump runs until 45 pounds of pressure has been achieved. The red light will stay ON. Turn the water pump switch OFF when it is not in use. 67
69 Plumbing Systems Water heater switch The "GAS" water heater switch enables propane operation of the water heater. The "ELECTRIC" water heater switch enables electric operation of the water heater. FRESH WATER HOLDING TANK The fresh water tank can be pressure filled using the fresh water inlet or gravity filled using the gravity fill inlet. Plastic overflow tubes are plumbed into the fresh water holding tank to allow water to flow out of the water tank. Occasionally, you may see water coming from the overflow tubes (located underneath the RV) when the fresh water holding tank is filled. This is normal, and is caused by external circumstances, including the RV being parked on an incline, or the motion caused by starting or stopping the RV during travel. Do not cap, block or modify the fresh water tank overflow tubes in any way. Enough water pressure can build up during the filling process to damage the plumbing system if the overflow tubes are obstructed. WATER PRESSURE REGULATOR (CUSTOMER SUPPLIED) Excessive pressure from water supply systems may be encountered in some parks, especially in mountain regions. Water pressure regulators can protect your system against such high pressure. Water pressure regulators are available for purchase from your RV dealer to protect the plumbing system against such high pressure. FRESH WATER CONNECTIONS There are two types of direct exterior fresh water connections in your RV: The city water fill is typically used at a campground when there is access to an external, pressurized potable water source. The gravity water fill is generally used to fill the fresh water tank when dry-camping. How to use the city water fill 1. If needed, sanitize the RV water system (see Sanitization) 2. Attach a non-toxic drinking water hose to the city water inlet. 3. Turn ON the water at the water source. 4. Enter the RV and open the cold-water supply faucets to bleed air from the water lines. When the water lines are nearly full, you may experience some "air pockets." Allow them to escape before closing the cold-water supply faucets. 5. The supply lines and faucets will fill, followed by the water heater. 68
70 Plumbing Systems To disconnect the city water fill 1. Shut OFF the water at the water source. 2. Disconnect the non-toxic drinking water hose. Filling the fresh water tank (gravity fill only) Follow these directions to fill the fresh water tank if you are not at a campground or other facility where the RV can be hooked up to an external, pressurized water source. Dry camping 1. If needed, sanitize the RV water system (see Sanitization). 2. Insert a non-toxic drinking water hose in the gravity water fill inlet. 3. Turn ON the water at the water source. 4. Shut OFF the water source when the fresh water tank is full or water comes out of the fresh water tank overflow tubes (whichever comes first). 5. Keep the fresh water tank drain closed while camping, stored with the RV NOT connected to a water source, or stored with NO water in the tank. 6. Open the fresh water tank drain valve to drain the fresh water tank. If you are camping with a filled fresh water tank, to use the water system turn ON the water pump switch. 12-VOLT WATER PUMP Once activated, the water pump (also known as the on-demand pump) will self-prime and provide water. The water pump continues to run until approximately 45 lbs. of pressure is achieved and shut off. The water pump will automatically restart when pressure drops. Some cycling may occur, depending on the volume of water being released. The water pump has a built-in check valve to prevent water from back flowing. Water pump filter (if so equipped) The water pump incorporates a screen filter on the inlet side. This reusable screen must be cleaned periodically. WATER HEATER The water heater is designed to heat water quickly and efficiently. The water heater manufacturer has preset the sensing limit to maintain the water temperature when the water heater is activated. Read the safety and operating information provided in the manufacturer s manual before attempting to activate the water heater. 69
71 Plumbing Systems Operating instructions Make sure the water heater is filled with water before use; even momentary operation of the water heater without water in it may result in damage to the tank and/or controls. Always open both the hot and cold-water faucets when filling the fresh water tank to allow air pockets to be forced out of the water heater. Draining and winterization If the RV is to be stored over the winter months, the water heater must be drained to prevent damage from freezing. It is recommended the water heater be drained and bypassed during the winterization process particularly if introducing RV antifreeze into the plumbing system. Odor from the hot water system Many water supplies contain sufficient amounts of sulfur to produce an odor, often called sulfur water. Sulfur water can be caused by a chemical action or by bacteria. Generally, sulfur water is not harmful, only unpleasant to smell. Refer to the water heater manufacturer owner manual for details on eliminating the odor from sulfur water. Odor from sulfur water is not a service problem. High altitude deration Operation of the water heater at high altitudes may require de-rating. If the water heater is not properly de-rated, lack of sufficient oxygen for combustion may produce improper burner operation. Pilot outage caused by burner lift-off or sooting from a yellow burner may occur, indicating the possibility of carbon monoxide. You may also notice a lack of efficiency in heating the water because of incomplete combustion of the burner at these higher altitudes. Consult with a local propane company, your dealer or the water heater manufacturer for proper de-rating of the water heater. Change out of the orifice (de-rating) should be done by the dealer or a qualified service agency. It is important that once the RV has returned to lower elevation (below 4500 feet) any high altitude deration or other adjustments be reversed for proper operation of the water heater. Pressure and temperature relief valve When cold water is heated in the water heater tank, the water pressure will rise. For this reason, a pressure and temperature (P&T) relief valve is required for safety in all water heaters. It is normal for the P&T relief valve to release a small quantity of water during the heating cycle and does not indicate a defective P&T relief valve. One way to reduce the frequency of the water weeping or dripping from the P&T relief valve is to maintain an air pocket at the top of the water heater. This air pocket will form in the tank by design; however, it will be reduced over time by the everyday use of your water heater (refer to the manufacturer s manual); If the weeping persists, consult your dealer or a service agency authorized by the water heater manufacturer. 70
72 Plumbing Systems Water heater bypass The water heater bypass is comprised of three valves, located at the back of the water heater: one hot water line bypass valve, one cold water line bypass valve, and one mixer (middle) valve. During normal camping use, turn the water heater bypass valves to the normal use positions shown below: During winterization/sanitization, turn the water heater bypass valves to the bypass position shown below: SPRAY PORT (if so equipped) A quick connect spray port is available for washing or rinsing outside the RV. To use, attach one end of the quick connect hose to the spray port and attach a sprayer nozzle (customer supplied) to the other end of the quick connect hose. When the spray port is not in use, disconnect the quick connect hose and any drain excess water from the hose and sprayer nozzle. FAUCETS The faucets inside your RV operate much the same way as the faucets in your home. Make sure there is sufficient water available and, if dry camping, the 12-volt water pump is turned ON before operating. To open the faucets, turn the hot and cold knobs ON and adjust the temperature to your comfort level. Close the faucets when a sufficient amount of water is released. 71
73 Plumbing Systems BATHROOM SHOWER The shower faucet requires a vacuum breaker when the shower hose and head are used to prevent siphoning water through the hose from another fixture, and to prevent water from being contained in the hose. The showerhead DOES NOT have a complete shut-off valve (the complete shut-off is at the faucet). The showerhead may drip slightly in the OFF position after use; this is normal and does not indicate a leak or defect. There may be air in the plumbing lines that will need to be bled out before a steady stream of water comes from the faucet. The bathing facilities in your RV function similar to those in your home. Keep the water heater and holding tank capacities in mind when using the fresh water system. The used water will drain through the plumbing pipes into the grey water holding tank. Maintenance 1. Be sure the water heater is ON and had sufficient time to heat the water. 2. If dry camping, be sure your 12-volt water pump is ON. 3. Adjust the hot and cold faucets to the desired temperature before bathing. 4. To conserve water while showering, wet down and turn the water OFF while you use soap, then rinse. 5. When you are finished, shut the water faucets OFF. Unlike your home, the RV does not contain a water pressure balance valve. If someone is using the shower, it is recommended that the fresh water system NOT BE USED until they are finished. Refer to the manufacturer s operator manual. DRAINING THE FRESH WATER SYSTEM The low-point drains valves release water in the supply lines by opening the valves and all faucets. The water heater has its own drain plug. To drain the permanent fresh water holding tank and supply lines: 1. Open all faucets. 2. Open the fresh water holding drain valve. 3. Remove the caps from the low point drains. 4. Drain the sink by removing the drain cap. 5. Turn ON the water pump and allow it to run as needed. 72

74 Plumbing Systems 6. Position the water heater bypass valves as shown below: 7. Relieve the water pressure using the water heater P&T valve BEFORE removing the water heater drain plug. Otherwise, if there is any water pressure present the water will spray out of the opening when the drain plug is removed. 8. Remove the water heater drain plug. When you are finished draining the fresh water system reverse these steps, turn the water heater bypass valves back to the normal camping use positions, and dump the grey and black water holding tanks at an appropriate facility or according to local public codes. It is normal for some liquid to remain in the fresh water tank after drainage procedure. SANITIZING THE POTABLE WATER SYSTEM To assure complete sanitation of your potable water system, the following procedures are recommended for a new system, for one that has not been used for a period of time, and for one which may have become contaminated: Prepare a chlorine solution using one (1) gallon of water and one-quarter (1/4) cup of household bleach (5% sodium hypochlorite solution). Prepare approximately one (1) gallon of solution for each fifteen (15) gallons of holding tank capacity. Note: as an option, several commercial solutions are available, and should be used as directed on the package. To sanitize the fresh water system, including the fresh water tank: 1. Pour the chlorine/water mixture into the gravity water fill inlet. 2. Turn the water pump ON. 3. Open all faucet fixtures, allowing all of the mixture to pass through. 4. Allow the mixture to stand for three (3) hours. Drain the mixture and flush the fresh water system with fresh potable water. Be sure to run plenty of water through the entire system before using. To remove excessive chlorine taste or odor which may remain 73
75 Plumbing Systems 5. Prepare a solution of one (1) quart vinegar to five (5) gallons water and pour mixture into the gravity water fill inlet. 6. Continue filling the fresh water tank with potable water until it is full. 7. Repeat steps 2-5 above. WINTERIZING THE PLUMBING SYSTEM Preparing your RV for colder weather or storage is very important for most states and Canada. Failure to prepare your RV may cause water supply lines and the water heater to freeze. No commodity or product should be added to the fresh water system to ensure freeze protection other than RV antifreeze. The RV should be winterized at the end of the camping season or when the RV will be exposed to temperatures that will fall at or below 32 F (0 C). Repairs due to freezing are not covered under warranty. 1. Level the RV and drain the fresh water plumbing system. 2. Make sure the water heater 12-volt and 120-volt interior control switches are OFF. 3. Turn the water heater bypass valves to the bypass positions shown previously. 4. Make sure the fresh tank drain is open, and the low point drains are closed. 5. Depending on your model, to access the winterization hose and winterization valve(s): a. Remove the access panel to locate your water pump 6. Remove the re-usable cap (if so equipped) from the winterization hose 7. Insert the winterization hose into a container of RV antifreeze (this quantity should be enough to winterize the RV) 8. Open the winterization valve(s) as shown on the previous pages. 9. Turn the water pump ON. 10. Open the hot water line on all the faucets (kitchen, lavatory, shower and outside shower) until RV antifreeze begins to flow continuously. 11. Close the faucet hot water lines and repeat with the cold-water lines on all the faucets. Do not forget to run RV antifreeze through the toilet, sink and shower drains. When you are done adding RV antifreeze 12. Remove the winterization hose from the container of RV antifreeze. 13. Reinstall the reusable cap (if so equipped) on the winterization hose. 14. Clean up any RV antifreeze that may have spilled. 15. To prevent staining, wipe the RV antifreeze out of the sinks, shower (or tub), sink and toilet using a soft, dry cloth. 74
76 Plumbing Systems BLACK/GREY WATER SYSTEM Water from the sinks and shower flow into the grey water (or waste water) holding tank. Water from the toilet will flow into the sewage (or black water) holding tank. The weight of the holding tank contents is not calculated into the RV cargo carrying capacity (this extra weight would reduce your available cargo capacity). Traveling with full holding tank(s) could possibly cause you to exceed the individual tire ratings and/or the GAWR or GVWR. Potential damage to suspension components, such as springs, tires and axles, could result. If your RV holding tank(s) are located behind the axles, the weight of the full tank(s) will reduce the hitch weight. Trailer sway and other handling difficulties can be the result of the hitch weight being too light. Dump the grey and black water holding tanks before traveling to avoid carrying unnecessary weight. If you are dry camping and cannot immediately empty your holding tanks, reduce your vehicle speed until you reach a dumping station. Before using the RV or after dumping the grey and black water holding tanks, always add the proper amount of deodorant to the black water tank to prevent malodors and help break down holding tank contents (unless winterizing). Follow the deodorant bottle or package instructions. Driving to a disposal site will normally loosen any accumulated waste debris or solids from the sides of the holding tanks. DRAIN PIPES WITH P-TRAPS The drain pipes may be equipped with a P-trap installed to help prevent odors from escaping into the RV. During travel, water from the P-traps may spill and permit odors into the RV. By adding water and using a RV approved deodorizing agent you will dissolve the contents faster and will keep the drain lines and tanks clean and free flowing. These chemicals are available at an RV supply store or your dealer. DRAIN PIPES WITH DRY SEALING VALVE Your RV may be equipped with a dry sealing valve that prevents the escape of odors from your waste system and eliminates the need for P-traps. Should the RV drain piping system become clogged and a mechanical cleanout tool is used to open the drain pipe, it is important that the dry valve be removed before passing the cleanout tool through the piping. Passing a mechanical cleanout tool through the waterless valve may cause damage to the internal seal that may potentially allow sewer gases to escape to the RV interior. VENTS & VENT PIPES Another important part of this system is the vent pipes and vents that release air from the grey and black water holding tanks. The exterior vent cap is attached to the roof and must be kept clear of obstructions to perform as intended. On some models, the vent pipe may be part of the drainage system referred to as a "wet vent" (water flows downward as air flows upward in the same pipe). 75
77 Plumbing Systems BLACK/GREY WATER HOLDING TANKS When connected to the sewer drain line at a campground, keep the black tank drain valve closed until the holding tank is at least ¾ full. This should provide sufficient water to assist in complete draining of the black water holding tank. Repeat as needed. Never leave the black tank drain in the open position continuously when connected to the campground sewer system. EMPTYING THE BLACK & GREY WATER TANKS The two grey tank drain valves and one black tank drain valve (also called dump valves) are located in the docking station. Always drain the black water holding tank first so the following grey tank waste water can help rinse any solids or debris from the dump outlet and sewer hose. 1. To make drainage easier, level the RV. 2. Locate the Sewer Outlet Connection and remove the sewer hose housing dust cap and attach your sewer hose (customer supplied). 3. Place the other end of the sewer hose into the approved dump station. 4. Open the black tank dump valve by carefully pulling it out towards you (close it by pushing it shut when the black water holding tank is emptied). 5. Similarly, open the grey tank dump valve and close it after each grey holding tank is emptied). 6. Remove, clean and store the sewer hose. 7. Close the sewer hose housing dust cap. You can locate many dump stations throughout the United States and Canada in Woodall s, Rand McNally Camp Guide, Good Sam Camp Guide, KOA Kampgrounds Camp Guide and various other publications. Some fuel stations also have dump stations. Please contact your dealer for assistance in the purchase and installation of a sewer hose or sewer hose extension (if needed). BLACK TANK FLUSHER (if so equipped) The black tank flusher is designed to rinse the interior of the black tank. A separate water hookup is located in the docking station. Flush the tank after dumping by: 1. Connecting the sewer hose and attaching a garden hose not your fresh water hose to the sewer tank inlet (see photo). Be sure the black tank gate valve is in the OPEN position! 2. Open the water supply to full pressure to flush tank. 3. When the water runs clear from the sewer hose, shut off the water supply and disconnect the garden hose from the water source. Do not disconnect hose from flush inlet until water has drained from system. Do not leave any hose connected when not in use and do not add any check valves to this system. 76
78 Plumbing Systems TOILET The toilet is efficient and easy to operate. Generally, more water is required only when flushing solids. Prior to using the sanitation system, it is strongly recommended to flush the toilet several times to release sufficient water into the holding tank. If there is not a sufficient amount of water used during flushing, the waste materials may not evacuate properly from the drain line to the tank. Clogged tanks and pipes could eventually occur. The toilet system will perform better when water is run for ten to fifteen seconds after flushing to ensure that the waste will proceed to the bottom of the tank. Unlike a toilet in a home, which uses four to seven gallons (18-32 liters) of water per flush, the average recreation vehicle system uses one to three quarts (1-3 liters). For added convenience and better sanitation system performance, it is advisable to always have four to six inches (10-15 cm) of water in the toilet. To prevent help toilet blockage, always use RV grade single-ply toilet paper. Do not flush paper towels, diapers, sanitary napkins or other foreign objects down the RV toilet. Sewage (black) tank preparation 1. Release one to two quarts (1 or 2 liters) of water into the toilet bowl. 2. Follow the directions on your toilet chemical bottle (customer supplied), by placing the recommended quantity of holding tank chemical into the toilet bowl. 3. Flush the toilet and allow at least two gallons (8 liters) of water to flow into the holding tank. Waste (grey) holding tank preparation No special preparation is required, however, placing a small quantity of chemicals into this tank, such as baking soda or an approved RV chemical, will reduce odors from food particles in the system. Cleaning and maintenance The toilet should be cleaned regularly for maximum sanitation and operational efficiency. Do not use chlorine (undiluted) or caustic chemicals, such as laundry bleach or drain opening types, in the toilet system. These products damage the seals in toilets and dump valves. For a sticky toilet ball valve, apply petroleum jelly; this provides waterproof lubrication and will not damage the seals. 77


 gas is a clean and efficient form of energy when proper handling and safety precautions are observed.")
79 Propane Systems PROPANE SYSTEM PROPANE GAS Propane is a colorless and odorless gas that, in the liquefied state, resembles water. Mercaptan, an odorant described by many people as having an odor similar to rotten eggs, is added as a warning agent. When a propane container is low, occasionally there may be a concentration of an onion or garlic-like odor, which can be mistaken for a propane gas leak. After the propane container has been refueled, the odor will usually disappear. If not, turn off the valve(s) and have the propane system inspected by your dealer or qualified propane service representative. Propane or LP (liquefied petroleum) gas is a clean and efficient form of energy when proper handling and safety precautions are observed. The propane system in your RV furnishes the fuel for cooking, heating and hot water. Propane can also be used as an alternative energy source for refrigeration. The propane fuel system is comprised of numerous components such as the propane container, hoses, the propane gas regulator, piping and copper tubing lines to each appliance. Propane is heavier than air; the gas tends to flow to lower areas and will sometimes pocket in these low areas, such as the floor. Maintenance Although both Sunset Park RV and your selling dealer carefully test for leakage, travel vibrations can loosen fittings. Have the propane system checked at all connections soon after the purchase of your RV, and after the initial filling of the propane tanks. Continued periodic checks of the propane system at 5,000 miles of travel (or at least once a year), by a qualified propane service representative as part of your normal maintenance is recommended. 78
80 Propane Systems PROPANE LEAK TEST Leaks may be found with a soapy water solution. Do not use a solution containing ammonia or chlorine when locating leaks. These products are corrosive to copper gas lines and brass fittings, which could result in deterioration of the copper and brass components. Apply the soapy solution to the outside of the gas piping fittings. If a leak is present, the soapy solution will bubble at the leak point. If a leak is indicated, shut off the propane system valve(s) and contact your dealer or a qualified propane service representative immediately. PROPANE ALARM Please refer to the Occupant Safety section for information on this alarm; also read and follow the component manufacturer instructions supplied in your Owner Information Package. PROPANE GAS CONTAINER Propane container is a general all-inclusive term used to describe a vessel that is used for storage and delivery of propane gas. The most common of these are DOT (Department of Transportation) cylinders that are transportable and commonly used on RV trailers. The capacity of DOT propane cylinders (also referred to as an LP bottle) is expressed in pounds. DOT propane cylinders are required to be removed from the RV for filling and must be filled by weight by a qualified propane facility. The cylinders are equipped with an OPD or over fill protection device designed to reduce the potential of overfilling. They are also equipped with an ACME service valve that is for connection of the TYPE 1 ACME pigtail hose assembly to the RV two-stage regulator. The TYPE 1 ACME pigtail hose assembly is a wrench-less, user friendly, right hand threaded connector that features a thermally sensitive sleeve and excess flow device. Max output is 200,000 BTU/hr. It is used to connect propane cylinders to regulators, hoses and other fittings. It is not for use on gas grills and other low-pressure devices. DOT cylinders equipped with an OPD and ACME type 1 service valve are identified by the triangular service valve knob. DOT cylinders are typically marked with top or an arrow to indicate the correct orientation of the cylinder(s). Do not mount, store or transport any cylinder other than the in proper position indicated. Be sure to securely re-install DOT cylinder(s) to the RV after they have been removed for filling or replacement. Always close the service valve and install a dust cap or plug when transporting or storing disconnected containers whether full or empty. Propane is a true gas compressed into a liquid form. As the fuel is released from the container, it changes to vapor which is then used for the operation of the appliances. Propane will not run through the appliances in the liquid state. Propane expands 1½ percent for every ten degrees of increase in temperature. It is imperative to leave sufficient space inside the container to allow for natural expansion of gas during warmer weather. 79
81 Propane Systems The main shut off valve must be kept closed at all times unless you are using the propane system or filling the propane cylinder. When the cylinder is disconnected from the hose, install the valve cover that is attached to the container. Close the propane cylinder main shut off valve by hand tightening only. Use of tools creates a potential to over tighten the valve (damaging the interior seals on the cylinder valve seat). If this type of damage occurs, the cylinder will not close properly. Servicing or filling Have the RV checked for leaks at the connections on the propane system soon after the purchase and the initial filling of each propane cylinder. When you have a new cylinder filled for the first time, make sure your propane supplier purges your new cylinder of trapped air. Otherwise, an improper mixture of gas and air will make it impossible to light your propane appliances. No one should be inside and only the qualified propane service technician should be near the RV while the propane tank is being filled. The new propane container must be carefully purged for best performance and must NEVER BE OVERFILLED. The position of the propane container(s) and the hoses are critical to proper operation and propane flow. Follow these instructions to make sure your propane container(s) are connected properly. LP gas container overfill Never allow your propane cylinder to be filled above the maximum safe level. Overfilling the propane container above the liquid capacity indicated on the container, could allow liquid propane to enter the system that is designed for vapor only creating a hazardous condition. Installing the propane cylinders 1. Make sure all the RV appliances are shut off. 2. Make sure each LP cylinder shut-off valve is closed. 3. Place the LP cylinders on the LP cylinder brackets or LP tray (if so equipped) located on the trailer a-frame and secure them. 4. The two (if so equipped) 3/8 low-pressure pigtail hoses should be attached - one to each side of the auto changeover regulator. 5. Check to make sure the LP regulator is mounted on the housing so the vent is pointed downward. The LP regulator vent must be unobstructed at all times. Be sure to check the vent opening after a freezing rain, sleet storm, or snow to make sure ice has not formed in the vent. 6. Attach the TYPE I end of each pigtail hose to each LP cylinder. 7. Attach the main supply hose from the regulator to the brass manifold fitting in the frame of the trailer. The swivel brass nut on the main hose will be your final attachment. 80
82 Propane Systems Several things to remember each time the propane container is removed: Check that ALL fittings are tight. Check that ALL connections are tested with a propane leak detector (or soapy water) solution. Open the main shut-off valve on the LP cylinder slowly to avoid a fast rush of propane to the excess flow valve causing propane freeze up. If you experience a propane freeze-up, close the main valve and wait at least fifteen (15) minutes before trying again. Refer to the regulator manufacturer s operator manual. Listen carefully - a hissing sound longer than one second may indicate a propane leak. If you feel there may be a leak present, close the shut-off valve and contact your dealer or qualified propane technician for repair assistance. Replace all protective covers and caps on the propane system after filling. Make sure the valve is closed. Install the LP bottle cover and use the bungee cord at the bottom to secure it in place for travel or storage purposes. PROPANE REGULATOR The two-stage regulator has the only moving components in the propane system. Its sole function is to reduce the pressure from the propane containers to a safe and consistent low operating pressure. The first stage reduces the container pressure to lbs. The second stage reduces the lbs. of pressure further to an operating pressure of 11 W.C. (water column) or 6.35 oz. of outlet pressure to your appliances. The second stage is adjustable and will need to be adjusted by your dealer or qualified propane service technician for optimum performance (this adjustment should always be made with a properly calibrated manometer). If the pressure is too high, it affects performance and safety; if the pressure is too low, your appliances will not operate correctly. If your RV is equipped with the automatic two-stage regulator, with both cylinders full of propane, turn the lever on the regulator towards the cylinder you wish to use first. This will now be the supply cylinder and the other the reserve. Slowly open both cylinder valves. The indicator on top of the regulator will change to green. When the cylinder becomes empty, the indicator will change to a red. Now turn the regulator lever to the side of the reserve cylinder and the green signal should return. You may now remove the empty cylinder to have it refilled without interrupting the flow from the full bottle. After filling the cylinder, connect the pigtail hose and slowly open the bottle valve. 81
83 Propane Systems PROPANE SYSTEM HOSES, TUBES, PIPES & FITTINGS The hoses, pipes, tubes and fittings used in your propane system are designed to withstand pressures exceeding those of the propane system. However, because environment and time can both contribute to the deterioration of these components, they must be inspected for wear at regular intervals. Be sure to inspect the hose before each season and when having the tank refilled. Look for signs of deterioration such as cracks or loss of flexibility. When replacing the hose or other propane components, always replace them with components of the same type and rating (check with your dealer). Fittings are used to connect the various system components to each other. The P.O.L. fitting at the end of the propane supply hose is made of brass so that pipe sealants are not necessary to prevent leaking. It also has a left-handed thread, which means that it is turned clockwise to remove, and counterclockwise to tighten. The P.O.L. fitting has been designed to help restrict the flow of LP gas in the event of a regulator failure or hose malfunction. USING THE PROPANE SYSTEM After the RV is completely set up and you are prepared for camping enjoyment, use the following steps for propane operation: 1. Close ALL burner valves, controls and pilot light valves. 2. Open the main valve in the propane container slowly to avoid a fast rush of propane vapor through the excess flow valve causing propane freeze-up. Should you experience propane freeze-up, close the main valve and wait 15 minutes before trying again. 3. Listen carefully as propane begins to flow. If a hissing noise is heard for more than one or two seconds, close the main valve and contact your dealer to have the propane system tested. 4. Light the appliances as needed and directed in the appropriate appliance manufacturer s owner manual located in the Owner Information Package. Make sure that you read and fully understand ALL safety requirements for handling and operation of the propane system. The Owner Information Package contains operator s manuals for the various appliances hooked to your propane system. The propane system provides added benefits to your camping enjoyment; however, it must be handled with care. If you have any questions or concerns, consult with your dealer and/or the specific manufacturer. COOKING WITH PROPANE Unlike homes, the amount of oxygen supply is limited due to the size of the RV. Proper ventilation when using the cooking appliance(s) will help you avoid the danger of asphyxiation. 82


84 Propane Systems CALCULATING PROPANE USAGE It is important to remember that (if applicable) your furnace, refrigerator, water heater and range all may use propane to operate. Each has a different BTU rating, and you will need to consider them to determine how long your propane supply will last. Most RV gas appliances are operated intermittently. Propane consumption depends on individual use of appliances and the length of time operated. Unless there is heavy use of hot water, the water heater consumption of propane is minimal. During cool temperature or high wind conditions, furnace consumption can be extremely high. To calculate your propane supply, take the BTU ratings for your propane appliances and divide that into the BTU availability. Each gallon of propane (3.86 liters) produces about 91,500 BTU s (46,514 kilojoules) of heat energy. The following chart provides average propane consumption information: TRAVELING WITH PROPANE Make certain your propane container is properly fastened in place. Turn the LP gas OFF at the LP bottle when the RV is in motion. This disables all gas appliances and pilot lights. Do not operate the propane system when the RV is in motion. In addition, some states prohibit propane appliances to be operated during travel (especially in underground tunnels). Make sure you know the laws for the areas where you travel. 83
85 Appliances APPLIANCES (if so equipped) The following contains quick highlights of the RV appliances and equipment, written for original factoryinstalled equipment usage. If there have been modifications or replacements made to your RV then these instructions may not apply (please contact the service center or technician who performed the modifications or substitutions if assistance is required). Refer to the manufacturer s user guides included in your Owner Information Package for detailed operating instructions for each specific component or visit that manufacturer s website. REFRIGERATOR The refrigerator is not intended for quick freezing or cooling. We recommend stocking it with pre-frozen or pre-cooled food when possible. The shelves should not be covered with paper or plastic and the food items should be arranged so air can circulate freely. Keep the area at the back of the refrigerator clean and free of debris. Check for obstructions in the exterior refrigerator vent area (i.e., spider webs, bird nests, etc.). Use a soft cloth to dust off the debris. For optimum efficiency and performance, it is recommended the refrigerator be checked at least twice a year as part of the routine maintenance. MICROWAVE Make sure there is sufficient 120-volt power available before operating the microwave. To prevent damage, ensure the microwave turntable is secured prior to traveling. COOKING WITH PROPANE See the Propane System section in this manual for important safety instructions. IN CASE OF A GREASE FIRE Grease is flammable. Never allow grease to collect around top burners or on the cook top surface. Wipe spills immediately. If a fire does start, follow these basic safety rules: 1. Have everyone evacuate the RV immediately. 2. After everyone is clear and accounted for, check the fire to see if you can attempt to put it out. If it is large or the fire is fuel-fed, get clear of the RV and have the Fire Department handle the emergency. 3. Try to smother a flaming pan with a tight-fitting lid or cookie sheet. 4. Never pick up a flaming pan. 5. Flaming grease outside of the pan can be extinguished with baking soda or a multipurpose dry chemical or foam-type fire extinguisher. 84
86 Appliances RANGE HOOD The range hood has a both a light and fan control switch on the front panel. The 8 x 8 aluminum mesh grease filter (located on the underside range hood) can be gently handwashed using mild soap and water. RANGE TOP WITH OVEN To prevent damage, always use the manufacturer recommended size flat bottom pan(s). Generally, the pan should be large enough to cover the range top burner, but not be more than one inch larger than the burner grate. Do not use a broiler pan, griddle, or any other large utensil that covers more than one range top burner at a time. This will create excessive heat that may cause melting, sooting, or discoloration. In addition, the use of undersized pans could expose a portion of the heating element to direct contact and may result in ignition of clothing. Proper relationship of pans to burner will improve efficiency. OVEN The propane gas oven ignites using a pilot light. If you have any questions contact your dealer or our customer service department. Do not use the oven as a storage area. For additional information, refer to the manufacturer s owner s manual included in the warranty packet. 85
87 Electronics ELECTRONICS AUDIO/VISUAL SYSTEM GUIDE The following is a basic overview of the audio/visual (A/V) electronics operation. The information in this section is written for original factory-installed equipment usage. If there have been modifications or replacements made to your electronics system then these instructions may not apply (please contact the service center or technician who performed the modifications or substitutions if assistance is required). Refer to the manufacturer s user guides included in your Owner Information Package for detailed operating instructions for each specific component or visit that manufacturer s website. Radio operation: 1. Turn ON the radio. 2. Select speaker output using the control. CD operation (if so equipped) 1. Turn ON the radio. 2. Select speaker output using the control. 3. Insert CD to play. TV operation (customer supplied) 1. Turn on the TV power supply. 2. Crank the TV antenna up. (if so equipped) 3. Turn on the TV and select your signal input using the source button. DVD operation (if so equipped) 1. Turn off the TV power supply. 2. Turn ON the radio (the TV speakers are not used). 3. Insert DVD to play. 4. Turn on the TV and select your signal input using the source button. 5. Select speaker output using the controls on the radio face (the TV speakers are not used). 86
88 Electronics TV RECEPTION BASICS Television stations broadcast their signal "over the air" to surrounding areas. TV antennas are designed to receive the signal broadcasted by the transmitters. Picture quality depends on the type of the antenna and the distance from the transmitter. The further you are from the transmitter, the worse the picture becomes. TV broadcasting is a point-to-point communication. Any obstructions between the transmitter and the antenna will degrade the signal strength, affecting the picture quality. TV SIGNAL BOOSTER For good station reception, the TV signal booster must be turned ON to view local television stations. Turning the TV signal booster ON sends 12-volt DC through the cable to the TV roof antenna. The voltage energizes the transistors in the antenna head amplifier. Turn the TV signal booster OFF to view cable or satellite television, or to use a DVD. TV ROOF ANTENNA To view local stations at either (or both) the front or bedroom television sets using the television antenna, make sure the TV power supply is ON and the TV roof antenna is raised to the operating position. The following is an overview of the antenna operation. Refer to the manufacturer s user guide included in your Owner Information Package for detailed operating instructions or visit the manufacturer s website. To ensure proper reception, when using digital TV: 1. Raise your antenna (if so equipped) and point it towards the signal transmitter. You may find the exact location of the transmitting towers at 2. Turn the switch on the TV signal booster ON, and then turn the power to your TV ON. On the TV menu, set the input of the TV to antenna, broadcast, or OFF Air. 3. Scan for channels. If you are not satisfied with the quantity of channels you have received, rotate the antenna 90 degrees and rescan for channels. If your TV has the signal strength option, use it to fine-tune the antenna for maximum signal strength. To raise and rotate the TV Antenna (if so equipped) 1. Rotate elevation handle clockwise. A clicking sound will occur when the antenna is completely extended. 2. Switch ON the main power supply (amplified models only, the red LED indicator illuminates indicating amplified reception). 3. Switch ON the television and tune in a suitable station. Pull rotation handle down to disengage gear from ceiling plate and rotate antenna until the picture and sound are clearest. 87
89 To lower the TV antenna 1. Pull the rotation disk down to disengage gear from ceiling plate and rotate the antenna until the pointer on the ceiling plate is aligned with the pointer on the rotation disk. Rotate elevation handle counter-clockwise until you hear the antenna touch the roof (resistance will be felt in the handle). 2. You may want to switch the TV signal booster off. Amplified reception is possible while driving if your antenna is in the full down position. CABLE/SATELLITE OUTLET There are RG-6 coax cable/satellite outlet connections in the utility center. Please refer to the (customer supplied) satellite manufacturer s instructions for setup, care and maintenance. While the cable RG6 cabling goes through in-line splitters to provide service at multiple locations, all satellite connections are directly run RG6 cables to specific locations (no splitters). This allows for clean transfer of HD signals form the satellite dish. You can select which locations receive a direct satellite signal at the connection plate (located in the outside utility center). 88
90 Heating & Cooling HEATING & COOLING The following contains quick highlights of the RV heating and cooling components. It is written for original factory-installed equipment usage. If there have been modifications or replacements made to your RV then these instructions may not apply (please contact the service center or technician who performed the modifications or substitutions if assistance is required). Refer to the manufacturer s user guides included in your Owner Information Package for detailed operating instructions for each specific component or visit that manufacturer s website. DUCTING & RETURN AIR All heat discharges, registers, and return air openings must be free and clear of obstructions. This includes all closeable registers that are intended to reduce airflow, not shut it off completely. ROOF VENT Your RV may have 12-volt DC powered and/or non-powered roof vents installed. Roof vents allow fresh air to circulate through the RV. Make sure the roof vent is shut securely when traveling, or to prevent unexpected weather damage if you will be away from the RV for an extended period of time. THERMOSTAT Use the 12-volt DC thermostat in your RV to set the temperature to your desired comfort setting. AIR CONDITIONER Your RV has a roof or wall mounted air conditioning system (if so equipped) that is controlled by a thermostat or a dial on the air conditioner. Make sure you have sufficient power available before operating the air conditioner. Capability vs. Environment At best, a properly functioning roof air conditioner will cool the intake air it receives by 20 degrees F. The capability of the air conditioner to maintain the desired inside temperature is directly affected by the heat gain of the RV. During extreme high outdoor temperatures, the heat gain of the vehicle may be reduced by the following: 1. Parking the RV in a shaded area 2. Keep the blinds down or drapes shut. 3. Operating the air conditioner on High Fan/Cooling mode will provide the maximum efficiency in high humidity or high temperatures. 4. Use awnings to block direct sunlight exposure on the RV. 5. Avoiding use of heat producing appliances. 89


91 Heating & Cooling 6. Giving the air conditioner a head start by turning it on early in the morning. Air conditioner gasket A special foam gasket is placed between the roof material and the sub-frame of the air conditioner to guard against water leakage. The air conditioner is subjected to wind pressures along with motor vibration during normal operation. Inspect the mounting bolts for tightness to ensure there is no leakage or looseness at least annually. Re-tighten bolts when they are loose. DO NOT over tighten these bolts as it may damage this gasket. The air conditioner gasket is a wearable part that eventually will need to be replaced as normal maintenance. To gain access to the bolts, remove the filtered panel cover on central air systems or the entire air box on non-central air conditioners from inside the RV. FURNACE The RV furnace installed in the RV is controlled by a thermostat. The furnace requires both 12-volt power and propane gas for full operation. Make sure you have sufficient power available before operating your furnace. If you have any questions contact your dealer or Sunset Park RV Customer Service. A qualified RV technician should perform all furnace maintenance at least once a year (more often depending on furnace usage). Never attempt to repair the furnace yourself. FIREPLACE (IF SO EQUPPED) Refer to the OEM manual for operation, service and maintenance information. If you have further questions, please contact your dealer. PATIO AWNING Please refer to the awning manufacturer operator s manual. Keep your awning in good condition to prevent costly repairs. It is very important to keep the awning clean. If weather conditions are windy or stormy, close the awning into the travel mode position. Shut the awning in the travel position if you will be away from the RV for an extended period of time. 90
92 Slideout Systems SLIDEOUT SYSTEMS Slideouts are designed to provide additional living space during stationary camping. Make sure you have sufficient power available before operating your slideout system, then level and stabilize the RV. If the RV is not level, the slideout rooms and/or mechanisms may become damaged as leveling helps keep the RV square so the slideouts extend/retract and seal correctly. Adding additional support is not necessary under the slideout rooms. Non-warranty damage can occur to your slideout system from improper use of aftermarket support jacks. OPERATION The slide rooms will make slight creaking or squeaking noises during operation. These noises are normal especially during the break-in period while the components are seating properly. This will decrease after a few extend/retract cycles. Note that there will always be some noticeable noises when operating the slideout. 1. Level and stabilize the RV. 2. Be sure the auxiliary battery is fully charged or the RV is connected to shore power. Turn off all unnecessary lights to maximize available power. 3. Close all cabinet doors and drawers. 4. Before extending, be sure the area outside each slide room is free of obstacles such as trees, boulders, fences, etc. 5. Before extending or retracting, be sure the interior is clear of people, pets, furniture, clothing, etc. Move any furniture or other items that may be in the path of the slideout room. 6. Inspect the sides, top, and bottom of the extended slide out room. If the outside of the slideout room is wet, wipe it dry before retracting it. Clean any water puddles or debris brought inside your RV from slideout operation immediately. 7. Press and hold the appropriate slide room switch to either IN or OUT, until the room is completely extended or retracted. Each slideout must be completely extended or retracted for the room weather seals to be effective. occur. Review the additional important safety alerts on the next pages before operating either the slide systems. If a slide out system stalls out before reaching end of stroke OR if the slide room does not close and seal tightly, call your dealer or Sunset Park RV Customer Service for trouble shooting and/ or repair assistance. 91
93 Slideout Systems MAINTENANCE When a slideout room is extended snow, ice, blowing dirt and dust, and other debris may cling to the outside surfaces of the room and mechanism. When the slideout is retracted, whatever is on the outside will be brought inside the RV. Before retracting the slideout, check the outside surfaces. Wipe them dry or clean as much as possible. If the slideout is extended for a long period, be sure to check for branches, etc. before retracting. Check for standing water on the slideout topper awning (if so equipped). Remember that the slideout seals are not designed to remove all the water or debris that may accumulate on the outside surfaces. You must wipe it off before retracting the slideout. SCHWINTEK INWALL SLIDEOUT SYSTEM If the Schwintek InWall slideout does not extend or retract, follow these steps to override the system. Electronic manual override (for board revision C1 and newer): 1. Locate the circuit board. 2. Press the mode button six (6) times quickly, press a seventh (7th) time and hold for approximately five (5) seconds. 3. The RED and GREEN LED lights will begin to flash, confirming the override mode. 4. Release the mode button. 5. Back inside the RV, press and hold the Slide Room 2 switch IN button until the room comes completely in (if equipped with dual slides). Manually push the slide room in override 1. Locate the circuit board. 2. Unplug both motors from circuit board (this releases the motor brake). 3. Push or pull slide room in as desired; a. Larger rooms may require several people to push. b. Keep both sides of room relatively even. 4. When the bedroom slide is completely in, plug both the motors back in to the control board (this applies the motor brake for road travel). 92
 time for motor 1, and two (2) times for motor 2.")
94 Slideout Systems TROUBLESHOOTING THE SCHWINTEK IN-WALL SYSTEM Error codes During operation, when an error occurs the board will use the LED s to indicate where the problem exists. For motor specific faults, the GREEN LED will blink one (1) time for motor 1, and two (2) times for motor 2. The RED LED will blink from two (2) to nine (9) times depending on the error code, the error codes are as follows: When an error code is present, the board needs to be reset. Energizing the extend/retract switch resets the board. Energize the extend/retract switch again for normal operation. Checking fuses The Schwintek InWall slide system utilizes a 30-amp auto-reset breaker in the wiring to the controller/monitor. Also check the fuse box (located in the command center) for blown fuses and replace as necessary. If the fuse blows immediately upon replacement there may be a problem with the wiring to the control box (contact your dealer for assistance). Low voltage The Schwintek InWall slide controller is capable of operating the bedroom slide room with as little as 8- volts. But at these lower voltages the amperage requirement is greater. Check the voltage at the battery; if the voltage is lower than 11-volts, it is recommended that the auxiliary battery be placed on a charger until it is fully charged. 93
95 Slideout Systems Only one (1) side moving The Schwintek InWall slide system has a separate motor to operate each side of the room. If only 1 side of the room moves a short distance (2 to 4 inches) and stops: Will nonmoving side move with help? If only one (1) side of the room is moving, then with someone s assistance press the switch to extend or retract the room while pushing the nonmoving side in the appropriate direction. On larger rooms it may be necessary to have two (2) or more people pushing the room. Nonmoving side moved manually. Try to push the nonmoving side in and out. If a motor shaft has broken then it will be possible to move that side of the room several inches by hand. Larger rooms may require several people to push. Schwintek InWall slide system maintenance Check all four (4) gear racks installed on the exterior sidewalls of the slide room for debris (if found, remove debris immediately). 94
96 Interior INTERIOR CLEANING THE INTERIOR To keep the value of your RV, perform regular maintenance using the proper materials and procedures. Using the wrong cleaner may result in damage to the surfaces in your RV. Check the component manufacturer s information for the recommended cleaning agent. If in doubt, check to see if the cleaner will cause damage by testing a small area out of sight or contact your dealer for assistance. Do not use flammable liquids or sprays to clean your RV. RECLINER SOFA OR LOVESEAT Like a residential recliner, the recliner sofa or loveseat sections have controls allowing you to recline the individual sections. To revert each recliner section back to the upright position, gently apply pressure to the recliner leg rest. Refer to the furniture manufacturer s care instructions for this product. FREE-STANDING TABLE & CHAIRS The extendable free-standing dinette table can be positioned to seat up to four people. To prevent damage, the standard free-standing dinette table should be closed in the travel position and the freestanding chairs fastened down securely when you are traveling. FURNITURE UPHOLSTERY To retain the value of your RV, maintain the furniture upholstery carefully and keep the interior clean. Vacuum the furniture regularly using a soft brush attachment to remove any loose dirt or debris. FABRIC UPHOLSTERY It is recommended the fabric be professionally cleaned if it becomes stained or soiled. For more information, refer to the specific furniture manufacturer s care instructions. SUEDE UPHOLSTERY It is recommended the suede be professionally cleaned if it becomes stained or soiled. VINYL UPHOLSTERY Do not dry clean vinyl components. If they are dry cleaned, the vinyl on the reverse side will shrink, become hard and crack. If a spill does occur water base cleaners are recommended (solvents are not recommended as they may have an adverse reaction to the specific backing of your upholstery fabric). Blot up the spot, but do not rub it in or saturate the area. Use a professional furniture cleaning service for an overall cleaning. Clean the suede or vinyl upholstery only as recommended. Using other processes than those listed may produce undesired results and possibly damage the upholstery. This type of damage is not warrantable. 95
97 Interior DECOR ITEMS Window treatments, curtains, blinds and shades Dust occasionally with a vacuum and soft brush attachment. Professionally clean only. DECOR GLASS Use a glass cleaner to remove smudges, smears and spots. If there is any decorative etching on the décor glass, use care when cleaning around that area. PANTRY Use the pantry to store items you wish to take with you as you travel and camp. Ensure items stored in the pantry are secured so they do not shift during travel. The cabinetry has been designed to accommodate the normal camping items (i.e., paper plates, flatware, cookware, etc.) which are bulky but not necessarily heavy. Remember your RV s load capacity is designed by weight, not volume, so you cannot necessarily use all available space. PANELING To clean, use a mild solution of soap and lukewarm water with a soft sponge or cloth. Do not use abrasive cleaners as they could cause the vinyl to scratch and turn dull. Grease spots and stubborn dirt can be cleaned off with an all-purpose spray cleaner. Harsh cleaners and organic solvents can attack the printed vinyl; they are not recommended. CABINETRY & TABLES To keep hardwood doors, cabinet fronts and hardwood tables looking like new regularly dust with a soft cloth dampened with a cleaning polish or mild detergent solution. Avoid using ammonia-based products or silicone oils as they may cause damage if used over a long period of time. The finish is durable and resistant to most household spills. However, spills should be wiped up promptly to avoid potential problems. Excessive prolonged exposure to direct sunlight, high temperatures and high humidity can cause damage to both the finish and the wood itself. These should be avoided. COUNTERTOPS To prevent permanent damage: Always use hot pads or trivets under hot pans, dishes, or heat producing appliances such as frying pans. Always use a cutting board; never use a knife on the countertop. Avoid harsh chemicals such as drain cleaners, oven cleaners, etc. Do not let cleaners with bleach set on the top. Wipe them off promptly. 96
98 Interior Laminate countertops Glass rings, food spills, water spots and smudges usually wipe off with a damp sponge. Stubborn stains can be removed with a general-purpose spray cleaner. Some stains can be removed by squeezing fresh lemon juice over the stain and allowing the juice to soak for approximately forty-five minutes. After 45 minutes, sprinkle baking soda over the lemon juice and rub with a soft cloth. Solid surface countertops Solid surface materials are easy to care for. Soapy water, ammonia-based cleaners (not window cleaners as they can leave a waxy build up that may dull the surface) or commercially available solid surface cleaners will remove most dirt and residue from all types of finishes. A damp cloth followed by a dry towel will remove watermarks. Disinfect the surface periodically with diluted household bleach (onepart water to one-part bleach). For additional information on the removal of difficult stains or surface damage repair, refer to the countertop manufacturer s user guide. FLOORING Always test a cleaning agent in an inconspicuous area for colorfastness. Carpet Vacuum regularly with a vacuum cleaner with a revolving brush or beater bar. Be sure the vacuum does not have teeth, combs or rough edges as they may damage the carpet. It is important to remove loose soil and debris while it is on the surface. Heavily traveled areas (i.e., walkways, areas in front of the furniture) may be protected with small throw rugs to prolong the life of the carpet. Some spills contain chemicals that will destroy carpet fibers and dyes. If you have doubts about what caused the spot, contact a professional carpet cleaner. Because of the additional dirt typically associated with camping, we recommend that you vacuum the carpet frequently. Have tough and deep stains professionally steam cleaned. Use spot removers for minor spills. Always test the carpet for color fastness in an inconspicuous area before using any product. Vinyl flooring Periodically vacuum or sweep to remove dirt and gritty particles. Although most common spills will not permanently stain the vinyl floors, they are usually easier to remove if wiped up before they set. Simply blot with a paper towel and wipe clean with a damp cloth. As part of a regular maintenance program, sponge mop the entire floor. Do not use dish detergents or vinegar and water because they will dull your floor. To care for the vinyl floor covering, use a damp mop with water and a mild cleaner. DO NOT SOAK THE FLOORING. Use care to avoid wetting the carpet edges. To avoid problems of yellowing linoleum, avoid cleaners that contain oil-based solvents (i.e. cleaners containing lemon oil, Murphy s Oil Soap, etc.). 97
99 Interior ABS PLASTIC ABS plastic components will retain their original beauty with reasonable care. Dust and wipe clean with soft, damp cloth or chamois, wiping gently. Do not use gritty or abrasive particle soaps or scouring compound to clean ABS plastic. Avoid using Citrus or biodegradable cleaners which contain D- Limonene as they may damage plastic materials. SHOWER WALLS & BASE Use a mild detergent soap and warm water to clean the shower wall and base. DO NOT use gritty or abrasive particle soaps or scouring compound. SINK & SHOWER FIXTURES Use mild dish soap and water to clean these fixtures. Do not use harsh chemicals or sprays. A mild solution of vinegar and water works well to remove hard water spots and stains from the sink or shower fixture. CONVERT SOFA INTO A BED (if so equipped) 1. Remove the seat back cushions. 2. Lift the front of the sofa up, uncovering the legs. 3. Extend the legs to the outmost position. 4. Pull the front end of the sofa toward yourself until it is fully extended and place the extended legs on the ground. 5. Place the cushions back on the sofa CONVERT DINETTE INTO A BED 1. Remove back cushions from the dinette. 2. Remove the leg bases and secure them in the dinette seating 3. Place the table in between the dinette seating into the slot provided. 4. Place the two matching cushions on the table and your dinette is converted to a bed. 98
100 Exterior EXTERIOR CLEANING THE EXTERIOR To protect your RV's exterior finish, wash it often and thoroughly. Regular cleaning and waxing (fiberglass units) will help protect the exterior. If chalking occurs in the fiberglass units, wash and try to wax a small area to see if the luster returns. If the exterior becomes scratched, nicked or cracked have your dealer inspect the RV. Your RV is exposed to many environmental conditions that have an adverse effect on the paint finish: Road Salt and Sodium Chloride Road Tar / Bugs Bird Droppings / Tree Sap Industrial Fallout / Acid Rain /Pollution UV Exposure and Moisture The most common problems resulting from these conditions are corrosion, staining, and chemical spotting. Generally, the longer the foreign material remains in contact with the exterior finish, the more extensive the damage. These problems can be minimized by regularly scheduled washing and polishing. The RV exterior is constructed of plastics, glass, sealant, aluminum and/or fiberglass. Refer to the general instructions that follow for care information Washing Chemicals contained in dirt and dust picked up from the road surface can cause damage if left on the RV for a long time. Frequent washing and waxing (fiberglass units) is the best way to protect your RV from this damage. Frequent washings also protect your RV from environmental elements, such as rain, snow and salt air. Wash your RV as soon as possible if it becomes contaminated with foreign material. Avoid parking under trees or near ocean sea salt. Do not scrape ice or snow from the painted surface, brush the affected area off! If anti-freeze, gasoline or washer solvents get spilled on the painted surface, rinse the area off with water immediately. Bugs and bird droppings should be rinsed off daily. We recommend that you do not take your RV through automatic car washes. Extreme caution should be used if utilizing any type of pressure sprayer around all attachments, doors, windows, appliance vents, etc. Avoid forcing water inside the RV, which could possibly damage component parts. Do not wash the RV when it is in direct sunlight. Park the RV in the shade and spray it with water to remove dust. Next, using an ample amount of clean water and a car-washing mitt or sponge, wash the RV from top to bottom. Use a mild car-washing soap if necessary. Rinse thoroughly and wipe dry with a chamois or soft cloth. Carefully clean the joints and flanges of the slideout, doors, hood, etc., where dirt is likely to remain. 99
101 Exterior Some types of hot water washing equipment apply high pressure and heat to the RV. They may cause heat distortion and damage to the resin parts and may flood the RV's interior. Therefore, be sure to observe the following: 1. Keep the washing nozzle about 16 inches (40 cm) or more away from the RV body. 2. When washing around the door, vent and glass areas, hold the nozzle at right angles to the surface. During cold weather Salt and other chemicals that are spread on winter roads in some geographical areas can have a detrimental effect on the RV's underbody. If your RV is exposed to these conditions, spray the underbody with a high-pressure hose every time you wash the exterior of your RV. Take special care to remove mud or other debris that could trap and hold salt or moisture. After washing your RV, wipe off all water drops from the rubber parts around the slideout and doors. If the slideout or door is frozen, opening it by force may tear off or crack the rubber gasket that is installed around the slideout or door. Pour warm water on the gasket to melt the ice (wipe off the water thoroughly after opening the slideout or door). To prevent the weather stripping from freezing, treat it with a silicone spray. Waxing your RV (Fiberglass Unit) Wax your RV once or twice a year, or when painted surfaces do not shed water well. Use a soft cloth to apply a small amount of wax to the painted surfaces. After the wax has dried, polish the RV with a dry, soft cloth. Do not wax your RV in direct sunlight. Wax it after the surfaces have cooled. Do not apply wax to any area having a flat black finish as it can cause discoloration. If the finish has been stained with wax, wipe off the area with a soft cloth and warm water. When waxing the area around the various openings, do not apply any wax on the weather strip. If it is stained with wax, the weather strip cannot maintain a weatherproof seal around the opening. Cleaning plastic parts Use a sponge or chamois to clean plastic parts. Use warm water and a soft cloth or chamois to remove any white residue from dark colored plastic surfaces. Do not use a scrubbing brush or other hard tools as they may damage the plastic surface. Do not use wax containing abrasives that may damage the plastic surface. Chrome parts To prevent chrome parts from spotting or corroding, wash with water, dry thoroughly, and apply a nonabrasive automotive wax. If the chrome is severely damaged or pitted, use a commercially available chrome polish product. 100
102 Exterior EXTERIOR ROOF & SIDEWALL VENTS During routine cleaning (3-4 times a year), all rubber roof sealants should be inspected for any voids or cracking. If the roof sealant shows signs of cracking, remove any loose sealant. If the loose sealant cannot be pulled off by hand, it still has adhesion to the rubber roof membrane and should be left alone. Do not use sharp tools (putty knife) that could puncture the rubber roof membrane. Clean all areas to be resealed with a non-abrasive household cleaner, such as Top Job or Spic-N-Span, using a medium-bristled scrub brush. This area must be dry before continuing. Solvents should not be used during cleaning. Solvents can damage existing sealants and may weaken plastic roof components. Apply a generous amount of Alpha Systems 1010 Non-Sag Sealant over top of any existing sealant needing resealed. Please note ONLY ALPHA SUPPLIED SEALANTS SHOULD COME IN CONTACT WITH THE RUBBER ROOF MEMBRANE. While you are cleaning the exterior roof, also inspect the roof vents (including sealants) for cracks and keep them clean. Inspect the refrigerator and holding tank vents for blockages from bird nests, spider webs, leaves, etc. Water heater, furnace and refrigerator exterior doors need to be kept clean and free of obstructions (i.e., insect nests, mud daubers, etc.) while the appliances (if so equipped) are in use. WINDOWS Any ventilating window may permit water inside, especially during heavy rainstorms. Condensation will also cause water to accumulate on windows and in the tracks. The window glass can cleaned normally with a sponge and water. Use glass cleaner to remove wax, oil, grease, dead insects, etc. After washing the glass, wipe it dry with a clean, soft cloth. TRAILER FRAME Sand, pebbles, objects on the highway, climate (salt air exposure) or ice inhibiting chemicals used during the winter months will damage the paint, inviting rust and other deterioration. Periodically inspect the exterior exposed areas, clean and repaint the frame members occasionally and whenever you notice rust or paint chipped away, to insure protection. ROOF LADDER READY Your RV may be equipped backer to support the installation of a (customer supplied) ladder. The RV roof has decking under the rubber roof membrane to allow you to walk on the roof (with caution) to do maintenance. 101
103 Exterior SEALANT Sealants perform a very important function and should be inspected closely and regularly maintained. We incorporate many different types of sealants, including butyl/putty, black butyl-encapsulated foam, silicone (clear and colored), roof sealant and foam. In general, sealants do not have "set" lifetimes. Varying environmental factors affect the pliability and adhesiveness of sealants. You or your dealer must: Inspect all sealants, a minimum of every six months. Make sure to check the roof and all four sides of the RV including al moldings, doors, vents and exterior attachments. A quick walk around the RV before leaving may help prevent potential problems during trips and vacations. Have the sealant replaced if you notice any cracks, peeling, voids, gaps, breaks, looseness or any sign of physical deterioration. Reseal at least one time each year as preventative maintenance. Always use the same type of sealant that was removed. Your dealer service or parts manager can help you obtain the correct sealant(s). The sealants may become damaged due to ultraviolet exposure, air pollution, freezing temperatures and exposure to other elements. If deteriorated, repair immediately to prevent damage. If you notice water inside the RV, immediately have the dealer check for the source of the leak. Failure to correct the leak may result in serious damage to your RV; this damage may not be warrantable. If you have questions and/or need assistance with sealing your RV, consult with your RV dealer. RV STORAGE Properly preparing your RV for storage during periods of non-usage will prevent problems from arising. It will also make it easier to get started again for the following camping trip or season. To prevent costly freeze-ups, winterize the plumbing system when it will not be in use for an extended period of time, especially if it is stored in colder climates. Periodically inspect your RV for damage during storage, and seal off any area that can offer an entry point for rodents, birds or insects. When storing your RV, it is recommended that the auxiliary battery (customer supplied) be disconnected to avoid battery discharge. Prior to storage if storing for the winter, be sure the RV is winterized. Check your roof and other surfaces to ensure there is no damage and potential leakage that might otherwise go unnoticed until it is too late. Close all windows and roof vents. Turn off 12-volt DC/120-volt AC/propane to the refrigerator; defrost and clean. Use crumpled newspaper or open boxes of baking soda in the refrigerator to eliminate odors during storage. Close the propane cylinder valve(s). 102
104 Exterior Cover all external outlets, such as furnace, exhaust, etc. to prevent mice or other rodents from entering. Cover the roof air conditioner (if so equipped). Disconnect 120-volt AC power to the RV. Do not use the leveling legs during storage. Drain all water lines. Drain and flush all holding tanks (fresh water, gray water, black water and/or hot water tanks). Remove all (customer supplied) batteries from the RV and store in a place where they will not freeze. Batteries that have been frozen will never hold a proper charge. Thoroughly wash the interior and the exterior of your RV. Store your RV indoors, under a roof or purchase a breathable cover for use during storage. To prevent weather checking and other UV damage, cover tires that are exposed to sunlight. During storage period Remove snow from the top of your RV to prevent damage to the unit s structure. SUGGESTED MAINTENANCE CHECKLIST This list is a quick reference sheet for suggested areas of regular maintenance. Review all manufacturer s operator s manuals supplied with your RV to perform these listed maintenance items. Prior to first trip Inspect and reseal as needed. Have the propane system checked for leaks by your dealer. Check wheel lug nuts at specified intervals to listed torque specifications, re- torque as needed. Sanitize the fresh water system. Test the safety alarms. First two hundred miles Check wheel nuts at specified intervals to listed torque values. Re-torque as needed. Have brakes adjusted by a qualified service technician. 103
105 Exterior Each trip Inspect and reseal as needed. Check the auxiliary battery. Have the propane system checked for leaks by your dealer. Check running lights. Check tire pressure and wear, including spare. Make sure the tires are cold when checking the tire pressure. Check wheel nuts at specified intervals to listed torque values. Re-torque as needed. Flush out water heater tank. Test brakes. Test safety alarms. 104

106 REQUIRED MAINTENANCE SCHEDULE 105

107 REQUIRED MAINTENANCE SCHEDULE 106
REFLECTION TRAVEL TRAILER OWNER S MANUAL
 REFLECTION TRAVEL TRAILER OWNER S MANUAL Welcome to Our Family! Thank you for purchasing a quality built Grand Design recreational vehicle and choosing the RV lifestyle as a family friendly form of leisure,
A Celebration of Luxury, Value and Towability
 A Celebration of Luxury, Value and Towability Owner s Manual 11333 Count y Road 2 Middlebury, IN 46540 (574) 825-8000 w w w.granddesignrv.com Part #960233 Rev0913 Owner s Manual Welcome to Our Family!
2013 TRAVEL STAR TOWABLES
 2013 TRAVEL STAR TOWABLES 0221643.2013 TRAVEL STAR TRAVEL TRAILERS & FIFTH WHEELS TABLE OF CONTENTS : READ ALL INSTRUCTIONS IN THIS MANUAL AND COMPONENT MANUFACTURER SUPPLIED INFORMATION BEFORE USING
85 Heart Lake Road South Brampton, Ontario, Canada L6W 3K2 Phone: Fax:
 Big Joe by Blue Giant Warranty AC Power Drive Straddle Trucks (PDS) AC Power Pallet Trucks (WPT45, D40) AC Power Rider Trucks (WRT-60) AC Power Counterbalanced Truck (CB-22) AC Power Task Support Vehicle
2015 AUTUMN RIDGE TOWABLES PRINTED ON RECYCLED PAPER
 2015 AUTUMN RIDGE TOWABLES 0197946.2015 PRINTED ON RECYCLED PAPER THE STARCRAFT ECOADVANTAGE IS OUR COMPANY'S COMMITMENT TO PROTECTING THE ENVIRONMENT. Through Starcraft s company-wide sustainability
2014 JAY FEATHER TOWABLES PRINTED ON RECYCLED PAPER
 2014 JAY FEATHER TOWABLES 0195624.2014 PRINTED ON RECYCLED PAPER THE JAYCO ECOADVANTAGE IS OUR COMPANY S COMMITMENT TO PROTECTING THE ENVIRONMENT. Through Jayco s company-wide sustainability program,
FIFTH WHEEL PRINTED ON RECYCLED PAPER
 2018 OWNER S MANUAL FIFTH WHEEL 0276624.2018 PRINTED ON RECYCLED PAPER Table of Contents Warranty & Service Options & Equipment 3 Dealer Responsibility 3 Customer Relations 3 Obtaining Emergency Warranty
2016 JAY FEATHER TOWABLES. Generations of family fun. PRINTED ON RECYCLED PAPER
 2016 JAY FEATHER TOWABLES Generations of family fun. 0195624.2016 PRINTED ON RECYCLED PAPER THE JAYCO ECOADVANTAGE IS OUR COMPANY'S COMMITMENT TO PROTECTING THE ENVIRONMENT. Through Jayco's company-wide
Generations of family fun REDHAWK CLASS C MOTORHOMES PRINTED ON RECYCLED PAPER
 Generations of family fun. 2015 REDHAWK CLASS C MOTORHOMES 0227491.2015 PRINTED ON RECYCLED PAPER THE JAYCO ECOADVANTAGE IS OUR COMPANY'S COMMITMENT TO PROTECTING THE ENVIRONMENT. Through Jayco's company-wide
OWNER S MANUAL TRAVEL TRAILERS JAY FEATHER PRODUCTS P/N
 2012 OWNER S MANUAL JAY FEATHER PRODUCTS TRAVEL TRAILERS P/N 0195624.2012 WARNING: Read all instructions in this manual and component manufacturer supplied information before using your RV. This manual
Safety instructions and warnings Package contents and parts Tool requirements Product features... 5
 Door Awning : PA Series Owner s Manual For safety reasons, please carefully read and understand all written instructions and warnings in this manual prior to assembling or installing this product. Table
WARNING: Read all instructions in this manual and component manufacturer supplied information before using your RV.
 OWNER S MANUAL JAY FLIGHT BUNGALOW TRAVEL TRAILERS P/N 0190626.2012 2012 WARNING: Read all instructions in this manual and component manufacturer supplied information before using your RV. This manual
CAMPING TRAILERS. Owner s Manual PRINTED ON RECYCLED PAPER
 2018 CAMPING TRAILERS Owner s Manual PRINTED ON RECYCLED PAPER 0181064.2018 THE JAYCO ECOADVANTAGE IS OUR COMPANY S COMMITMENT TO PROTECTING THE ENVIRONMENT. Through Jayco s company-wide sustainability
2016 CAMPING TRAILERS
 2016 CAMPING TRAILERS Generations of family fun. 0181064.2016 PRINTED ON RECYCLED PAPER THE JAYCO ECOADVANTAGE IS OUR COMPANY'S COMMITMENT TO PROTECTING THE ENVIRONMENT. Through Jayco's company-wide sustainability
Owner s Manual Model Year 2011 Includes Jay Flight / Jay Flight G2 Models
 TRAVEL TRAILERS www.jayco.com Owner s Manual Model Year 2011 Includes Jay Flight / Jay Flight G2 Models P/N 0500695.2011 WARNING: Read all instructions in this manual and component manufacturer supplied
Safety instructions and warnings Package contents and parts Tool requirements Product features... 4
 Door Awning : PN Series Owner s Manual For safety reasons, please carefully read and understand all written instructions and warnings in this manual prior to assembling or installing this product. Table
2014 CAMPING TRAILERS
 2014 CAMPING TRAILERS JAY SERIES JAY SERIES SPORT BAJA 0181064.2014 PRINTED ON RECYCLED PAPER THE JAYCO ECOADVANTAGE IS OUR COMPANY S COMMITMENT TO PROTECTING THE ENVIRONMENT. Through Jayco s company-wide
Owner s Manual Model Year 2011
 CAMPING TRAILERS www.jayco.com Owner s Manual Model Year 2011 P/N 0181064.2011 WARNING: Read all instructions in this manual and component manufacturer supplied information before using your RV. This manual
Generations of family fun OCTANE SPORT UTILITY TOWABLES PRINTED ON RECYCLED PAPER
 Generations of family fun. 2015 OCTANE SPORT UTILITY TOWABLES 0187099.2015 PRINTED ON RECYCLED PAPER THE JAYCO ECOADVANTAGE IS OUR COMPANY'S COMMITMENT TO PROTECTING THE ENVIRONMENT. Through Jayco's company-wide
WARNING: Read all instructions in this manual and component manufacturer supplied information before using your RV.
 OWNER S MANUAL JAY FLIGHT JAY FLIGHT SWIFT JAY FLIGHT SWIFT SLX TRAVEL TRAILERS P/N 0500695.2012 2012 WARNING: Read all instructions in this manual and component manufacturer supplied information before
TWO BURNER STAINLESS STEEL PROPANE STOVE
 ROTATE TO LIGHT 842-A250-0_SSCmpStove.qxd 11/26/03 2:59 PM Page 1 OWNER S MANUAL FAILURE TO FOLLOW ALL S AND INSTRUCTIONS IN THIS MANUAL COULD LEAD TO PERSONAL INJURY, INCLUDING DEATH. RETAIN THIS MANUAL
2016 LAUNCH 2016 CAMPING TOWABLES TRAILERS PRINTED ON RECYCLED PAPER
 2016 LAUNCH 2016 CAMPING TOWABLES TRAILERS PRINTED ON RECYCLED PAPER 0221866.2016 THE STARCRAFT ECOADVANTAGE IS OUR COMPANY S COMMITMENT TO PROTECTING THE ENVIRONMENT. Through Starcraft s company-wide
CAMPING TRAILERS. Owner s Manual PRINTED ON RECYCLED PAPER
 2017 CAMPING TRAILERS Owner s Manual PRINTED ON RECYCLED PAPER 0181064.2017 THE ENEGRA ECOADVANTAGE IS OUR COMPANY S COMMITMENT TO PROTECTING THE ENVIRONMENT. Through Entegra s companywide sustainability
Owner s Manual Questions? Call (208)
") Owner s Manual Questions? Call (208) 678-9042 Questions? Call (208) 678-9042 Table of Contents Introduction & Set Up 1-2 Lighting Your Crazy Kettle 3 Seasoning Your Crazy Kettle 4 Quick Start Directions
Owner s Manual Questions? Call (208) 678-9042 Questions? Call (208) 678-9042 Table of Contents Introduction & Set Up 1-2 Lighting Your Crazy Kettle 3 Seasoning Your Crazy Kettle 4 Quick Start Directions
Owner's Manual. Safety Instructions. This Product is Produced Exclusively by
 Product May Vary Slightly From Pictured. Owner's Manual Safety Instructions! WARNING This equipment is for home use only. Do not use in institutional or commercial applications. Failure to follow this
Assembly Instructions & User s Manual Academy USA Flag 10x10 Straight Canopy
 Assembly Instructions & User s Manual Academy USA Flag 10x10 Straight Canopy FSAAPT0301 Please keep this instruction manual for future reference Customer Service: (888) 922-2336, 7:00am to 12:00am Everyday
2019 OWNER S MANUAL TRAVEL TRAILERS PRINTED ON RECYCLED PAPER
 2019 OWNER S MANUAL TRAVEL TRAILERS 0276623.2019 PRINTED ON RECYCLED PAPER Table of Contents Section 1: Warranty & Service Options and Equipment 3 Dealer Responsibility 3 Customer Relations 3 Obtaining
USER MANUAL PLEASE READ AND UNDERSTAND THIS MANUAL COMPLETELY BEFORE USE.
 Adventure Kings Roof Top Tent USER MANUAL PLEASE READ AND UNDERSTAND THIS MANUAL COMPLETELY BEFORE USE. Warning Improper installation or use of your Roof Top Tent may result in serious injury or death.
1946 READ AND SAVE THESE INSTRUCTIONS!
 EasyAwn Installation, Care and Maintenance Manual EasyAwn Quality, Since 1946 EasyAwn, LLC Toll Free: 877-EasyAwn http://www.easyawn.com READ AND SAVE THESE INSTRUCTIONS! EasyAwn Quarter Round Awning Installation
Eco-Stove L.E. Hiking Eco-stove L.E. Plus Hiking/Camping Eco-Stove X.L. Camping Eco-Stove X.X.L. Backyard Grill and Survival. Instruction Manual
 Eco-Stove L.E. Hiking Eco-stove L.E. Plus Hiking/Camping Eco-Stove X.L. Camping Eco-Stove X.X.L. Backyard Grill and Survival Instruction Manual IMPORTANT Before using your new stove please be sure to read
Cast Iron Cookware Ustensiles de cuisson en fonte Utensilios de cocina de hierro fundido INSTRUCTIONS INSTRUCTIONS INSTRUCCIONES
 Cast Iron Cookware Ustensiles de cuisson en fonte Utensilios de cocina de hierro fundido INSTRUCTIONS INSTRUCTIONS INSTRUCCIONES WELCOME TO THE WORLD OF KITCHENAID. We re committed to helping you create
LDR Brachytherapy Seed Sterilization and Sorting Tray
 LDR Brachytherapy Seed Sterilization and Sorting Tray Table of Contents General Precautions... 2 Customer Responsibility... 3 Description... 4 Features and Specifications... 5 Operation... 6 Changing Covers
CERO Instructions for use and safety
 CERO Instructions for use and safety READ CAREFULLY BEFORE USE Please store these safety warnings in a safe place for future reference. NOTICE: BUYER ASSUMES ALL RESPONSIBILITY FOR SAFETY AND USE THAT
PLEASE READ BEFORE USE AND SAVE THESE INSTRUCTIONS
 Sauce Flip Pan PLEASE READ BEFORE USE AND SAVE THESE INSTRUCTIONS Thank you for purchasing Cook s Companion Sauce Flip Pan. This pan is designed to be one of the most used pans in your kitchen. The Fusion
Assembly Instructions & User s Manual 26 Florence Folding Leg Fire Pit
 Assembly Instructions & User s Manual 26 Florence Folding Leg Fire Pit FSMVPT6022 Please keep this instruction manual for future reference Customer Service: (888) 922-2336 7:00 am to 2:00 am CST (daily)
Affordable Motorhome Rentals Terms & Conditions
 Affordable Motorhome Rentals Terms & Conditions Please make sure that you read through our terms and conditions carefully. 1. Your contract with Affordable Motorhome Rentals Please read these booking conditions
Towables. Owner s Manual PRINTED ON RECYCLED PAPER
 2019 Towables Owner s Manual PRINTED ON RECYCLED PAPER 0195624.2019 THE JAYCO ECOADVANTAGE IS OUR COMPANY S COMMITMENT TO PROTECTING THE ENVIRONMENT. Through Jayco s company-wide sustainability program,
2016 CAMPING TRAILERS
 2016 CAMPING TRAILERS 2017 TOWABLES Owner s Manual PRINTED ON RECYCLED PAPER 0288858.2017 THE STARCRAFT ECOADVANTAGE IS OUR COMPANY S COMMITMENT TO PROTECTING THE ENVIRONMENT. Through Starcraft s company-wide
READ AND SAVE THESE INSTRUCTIONS! EasyAwn Spear Awning Installation
 EasyAwn Installation, Care and Maintenance Manual EasyAwn Quality, Since 1946 EasyAwn, LLC Toll Free: 877-EasyAwn http://www.easyawn.com READ AND SAVE THESE INSTRUCTIONS! EasyAwn Spear Awning Installation
FID WEIGHT BENCH. The contents of this package are not suitable for children under 3 years old. Contains small parts which may cause choking.
 FID WEIGHT BENCH PRODUCT MANUAL - VERSION 08.17.06 FOR AGES: 13+ WEIGHT LIMIT: 400 Lbs 181 Kgs ADULT(S) NEEDED: TOOLS NEEDED: WARNING/ADVERTENCIA CUSTOMER SERVICE Do not allow more than one person on the
READ AND SAVE THESE INSTRUCTIONS! EasyAwn Standard Awning Installation
 EasyAwn Installation, Care and Maintenance Manual EasyAwn Quality, Since 1946 EasyAwn, LLC Toll Free: 877-EasyAwn http://www.easyawn.com READ AND SAVE THESE INSTRUCTIONS! EasyAwn Standard Awning Installation
ACCENDA Instructions for use and safety
 ACCENDA Instructions for use and safety READ CAREFULLY BEFORE USE Please store these safety warnings in a safe place for future reference. NOTICE: BUYER ASSUMES ALL RESPONSIBILITY FOR SAFETY AND USE THAT
LIBERTY OUTDOORS TRAVEL TRAILER MANUAL
 LIBERTY OUTDOORS TRAVEL TRAILER MANUAL 2018 First, let us start off by expressing our gratitude. We sincerely appreciate your business and Liberty Outdoors, LLC (Liberty Outdoors) is committed to offering
PS-10 PS-12D PS-12. Primo Slicer Manual FOR OPERATOR-DO NOT DISCARD
 PS-10 PS-12D PS-12 Primo Slicer Manual FOR OPERATOR-DO NOT DISCARD TABLE OF CONTENTS 1. BRIEF INTRODUCTION 2. OPERATION 3. SLICING 4. MAINTENANCE AND CLEANING 5. TROUBLESHOOTING IMPORTANT The operator
WARNING USING AND CARING
 OWNER S MANUAL WARNING Never use any fuel-burning products (stoves, lanterns, heaters, etc.) inside or within proximity of this tent. Use of fuel-burning products inside or within proximity of this tent
SlimShady CONTENTS. SlimShady (1X) Tools Required: nut (4X) stake (2X) bolt (4X) wrench (1X) washer (4X) clamps (2X) stake sack (1X) key (2X)
 Tools Required: nut (4X) stake (2X) bolt (4X) wrench (1X) washer (4X) clamps (2X) stake sack (1X) key (2X)") SlimShady Tools Required: CONTENTS nut (4X) stake (2X) stake sack (1X) bolt (4X) wrench (1X) washer (4X) key (2X) SlimShady (1X) clamps (2X) 1 ASSEMBLE & INSTALL Be sure the awning is oriented correctly
SlimShady Tools Required: CONTENTS nut (4X) stake (2X) stake sack (1X) bolt (4X) wrench (1X) washer (4X) key (2X) SlimShady (1X) clamps (2X) 1 ASSEMBLE & INSTALL Be sure the awning is oriented correctly
12FT. x 12FT. Pop-Up Straight Leg Canopy. Owner s Manual
 12FT. x 12FT. Pop-Up Straight Leg Canopy Owner s Manual s WARNING: Read carefully and understand all ASSEMBLY AND OPERATION INSTRUCTIONS before operating. Failure to follow the safety rules and other basic
Electric 2-STAGE SHARPENING FEATURES: system allows for safe, easy knife sharpening - Non-slip feet allows sharpener to stay in place while in use
 Electric FEATURES: - 2-Stage electric sharpening system allows for safe, easy knife sharpening - Non-slip feet allows sharpener to stay in place while in use 2-STAGE SHARPENING IMPORTANT SAFEGUARDS SAVE
Installation Instructions Part # 2784 Awning
 Please read instructions entirely before installing this product. Parts Included Qty Parts Included Qty 1 Flat Washer (U-Bolt) 4 L Bracket 2 Nylock Nut ( U-Bolt) 4 Stake with Cord 2 6mm x 1 Bolt/Nut 10
WARNING! Style Number: STQ30013 Primed 12x6L Steel Soccer Goal
 WARNING! To avoid injury during assembly, disassembly, use, adjustment and/or location of the Primed Steel Soccer Goal, please observe the following WARNINGS: Two competent adults are required to assemble,
Towables. Owner s Manual PRINTED ON RECYCLED PAPER
 2017 Towables Owner s Manual PRINTED ON RECYCLED PAPER 0195624.2017 THE ENEGRA ECOADVANTAGE IS OUR COMPANY S COMMITMENT TO PROTECTING THE ENVIRONMENT. Through Entegra s companywide sustainability program,
RV RENTAL AGREEMENT Initials 1. Definitions. "Agreement" means all terms and conditions found in this form, any addenda and any additional materials
 RV RENTAL AGREEMENT Initials 1. Definitions. "Agreement" means all terms and conditions found in this form, any addenda and any additional materials we provide at the time of rental. "You" or "your" means
Sterling/Parkline Hardside Mattress Installation Instructions
 Sterling/Parkline Hardside Mattress Installation Instructions 1. Set up the frame, deck, and riser according to their respective manufacturer's instructions, in the location you are going to put the bed.
HARD DOOR UPGRADE KIT
 RV Accessories OWNER'S MANUAL HARD DOOR UPGRADE KIT FOR ADD-A-ROOM & BREEZEWAY SCREEN ROOMS THIS MANUAL SUPPLEMENTS THE ADD-A-ROOM INSTRUCTIONS TABLE OF CONTENTS First Time Assembly... 2 Assembling the
Terms of Hire TERMS AND CONDITIONS OF AGREEMENT FOR HIRE OF CAMPER TRAILER FROM BEATS WORKING CAMPER HIRE 1. INTRODUCTION 2. RENTAL OF CAMPER TRAILER
 Terms of Hire TERMS AND CONDITIONS OF AGREEMENT FOR HIRE OF CAMPER TRAILER FROM BEATS WORKING CAMPER HIRE The Hirer or nominated 2nd Driver name in Annexure A to this Agreement ( the Hirer ) by agreeing
10FT. X 10FT. STRAIGHT WALL GAZEBO COMBO OWNER S MANUAL
 10FT. X 10FT. STRAIGHT WALL GAZEBO COMBO OWNER S MANUAL WARNING: Read carefully and understand all ASSEMBLY AND OPERATION INSTRUCTIONS before operating. Failure to follow the safety rules and other basic
Owner s Manual Model Year 2011
 TRAVEL TRAILERS www.jayco.com Owner s Manual Model Year 2011 P/N 0205996.2011 SKYLARK TABLE OF CONTENTS SECT. 1: WARRANTY & SERVICE ABOUT THIS MANUAL...1 CHANGE OF OWNERSHIP/ADDRESS FORM..5 CUSTOMER RELATIONS...3
HellFire. Floor Standing Dual Mode Burner. Operation, Assembly & Maintenance Manual
 HellFire Floor Standing Dual Mode Burner Operation, Assembly & Maintenance Manual Congratulations on your purchase, and thank you for selecting the Hellfire TM burner from Blichmann Engineering. We are
The WoodGas Campstove By: Spenton LLC
 The WoodGas Campstove By: Instruction Manual IMPORTANT Please read this manual carefully before using this stove. Store this manual for future use. If you have any questions about the operation of this
OWNER S MANUAL TRAVEL TRAILERS SKYLARK P/N
 2012 OWNER S MANUAL SKYLARK TRAVEL TRAILERS P/N 0205996.2012 WARNING: Read all instructions in this manual and component manufacturer supplied information before using your RV. This manual has been provided
LM601 Landmark Permanent Blind
 LM601 Landmark Permanent Blind Get parts online at www.huntriversedge.com P/N: 26742 REV1: 01/13/17 2017 RETI All Rights Reserved INTRODUCTION Landmark Permanent Blinds are engineered with you the hunter
Sunjoy L-GZ120PST-2L Franklin Bay Window
 Sunjoy L-GZ120PST-2L Franklin Bay Window Gazebo Owner s Manual IMPORTANT Thank you very much for choosing Sunjoy Industries. Please take time to read these instructions thoroughly and follow each step
Model 703 / 703-T / 703-S2 Hose Reel
 Model 703 / 703-T / 703-S2 Hose Reel Owner s Manual VISIT OUR WEBSITE: WWW.LIBERTYGARDENPRODUCTS.COM OR CALL US TOLL FREE AT 1-866-820-5805, MONDAY - FRIDAY 9 A.M. - 5 P.M. EST LIBERTY GARDEN PRODUCTS,
accidents which arise due to non-observance of these instructions and the safety information herein. CAUTION:
 AUTO REWIND HOSE REEL Model: 7640 CALIFORNIA PROPOSITION 65 WARNING: You can create dust when you cut, sand, drill or grind materials such as wood, paint, metal, concrete, cement, or other masonry. This
FT054 BearMountain OWNER'S MANUAL
 FT054 BearMountain 10'x10'x84"(H) OWNER'S MANUAL PAT PENDING o 145 145 PENDING PAT o PAT PENDING 145 o 145 PENDING PAT o 145 o PENDING PAT 12 11 10 155 PAT PENDING o Assembly instructions IMPORTANT We
Table of Contents. Safety... 2 Specifications... 4 Assembly Maintenance... 6 Parts List... 7 Warranty... 8
 Table of Contents Safety... Specifications... 4 Assembly... 4 Maintenance... 6 Parts List... 7 Warranty... 8 WARNING SYMBOLS AND DEFINITIONS This is the safety alert symbol. It is used to alert you to
# For 500 ml Aging Cells # For 260 ml Aging Cells. Instruction Manual. Updated 6/20/2016 Ver. 4.0
 Teflon Liner for Aging Cells #175-60 - For 500 ml Aging Cells #175-60-6 - For 260 ml Aging Cells Instruction Manual Updated 6/20/2016 Ver. 4.0 OFI Testing Equipment, Inc. 11302 Steeplecrest Dr. Houston,
Teflon Liner for Aging Cells
 Teflon Liner for Aging Cells DRILLING FLUIDS EQUIPMENT For over 30 years OFI Testing Equipment (OFITE) has provided instruments and reagents for testing drilling fluids, well cements, completion fluids,
Owner s Manual Model Year 2010
 FIFTH WHEEL L E G A C Y www.jayco.com Owner s Manual Model Year 2010 P/N 0198163.2010 WARNING: Read all instructions in this manual and component manufacturer supplied information before using your RV.
READ AND SAVE THESE INSTRUCTIONS! EasyAwn Dome Awning Installation
 EasyAwn Installation, Care and Maintenance Manual EasyAwn Quality, Since 1946 EasyAwn, LLC Toll Free: 877-EasyAwn http://www.easyawn.com READ AND SAVE THESE INSTRUCTIONS! EasyAwn Dome Awning Installation
IRRADIA Instructions for use and safety
 IRRADIA Instructions for use and safety READ CAREFULLY BEFORE USE Please store these safety warnings in a safe place for future reference. NOTICE: BUYER ASSUMES ALL RESPONSIBILITY FOR SAFETY AND USE THAT
Outdoor Hearth Products United States Price List April 1, 2018
 Outdoor Hearth Products United States Price List April 1, 2018 2340 Logan Avenue, Winnipeg, MB, Canada Phone 204-632-1962 Fax 204-632-1960 Table of Contents Outdoor Linear Product Page Number Linear Burner
Sunjoy L-GZ933PST 12 X 10 Cabin-Style Soft Top Gazebo with Mosquito Netting. Owner s Manual IMPORTANT
 Sunjoy L-GZ933PST 12 X 10 Cabin-Style Soft Top Gazebo with Mosquito Netting Owner s Manual IMPORTANT Thank you very much for choosing Sunjoy Group. Please take time to read these instructions thoroughly
Owner s Manual Model Year 2011
 S P O RT UTILITY FIFTH WHEEL www.jayco.com Owner s Manual Model Year 2011 P/N 0188484.2011 WARNING: Read all instructions in this manual and component manufacturer supplied information before using your
Tri-Glide Instruction Manual
 Tri-Glide Instruction Manual 12 Timber Lane Marlboro NJ 07746 09/09/2011 tel: 732.462.6277 fax:732.462.6355 email: sales@hilmanrollers.com CONTENTS Contents Page Warnings 3 Operating Instructions 4 General
For Outdoor Use Only!
 ITEM NAME: Red Ember Bronze Crossweave Firebowl Fire Pit with Free Cover and Fire Tool with Optional Grill Grate SKU: ALZ109 For Outdoor Use Only! 1. Improper installation, adjustment, alteration, service
13ft x10ft Roof Style Gazebo
 13ft x10ft Roof Style Gazebo SKU # 2720648 Model # 5LGZ6526-V5 Rev:072314 Warning: It is very important to read and follow these Safety Precautions before assembly and during the use of this product. 1)
Lit Table Top Firepit Bio-Ethanol Fireplace. User Manual. Model: GF301650
 Lit Table Top Firepit Bio-Ethanol Fireplace User Manual Model: GF301650 1 Moda Flame Lit Table Top Firepit Bio-Ethanol Fireplace Included in delivery (Parts List): A. Fireplace body 1pc B. Glass 1pc C.
YELLOWSTONE YELLOWSTONE INSTRUCTIONS INSTRUCTION INDEX YOUR KELTY TENT SHOULD INCLUDE:
 YELLOWSTONE YELLOWSTONE INSTRUCTIONS INSTRUCTION INDEX Before you Start 2-4 Pitching your Tent 5-7 Notes and Warranty 8 YOUR KELTY TENT SHOULD INCLUDE: 1 TENT BODY 1 TENT FLY 2 LONG FIBERGLASS POLES 1
BURNER MANUAL Read and understand the entire Burner Manual prior to use. Please store these safety warnings in a safe place for future reference.
 BURNER MANUAL Read and understand the entire Burner Manual prior to use. Please store these safety warnings in a safe place for future reference. BURNER PARTS LIST A. Burner Tray B. Stainless Outer Burner
Seasonal Camping Agreement Beavermead Family Campground 2018
 Seasonal Camping Agreement Beavermead Family Campground 2018 No person shall occupy or make use of a seasonal campsite until all camping fees have been paid in full, and the seasonal camping permit has
14ft Deluxe Universal Frame Pad Installation Instructions
 R 14ft Deluxe Universal Frame Pad Installation Instructions Retain address information for future use. JumpSport, Inc. 2055 South 7th Street, Suite A San Jose, CA 95112 U.S.A. 408-213-2551 www.jumpsport.com
READ AND SAVE THESE INSTRUCTIONS! EasyAwn Dome Awning Installation
 EasyAwn Installation, Care and Maintenance Manual EasyAwn Quality, Since 1946 EasyAwn, LLC 3575 Trotters Drive, Bldg A Alpharetta, GA 30004 Toll Free: 877-EasyAwn http://www.easyawn.com READ AND SAVE THESE
Buying a recreational vehicle
 Buying a recreational vehicle Recreational vehicles (RVs) can give you the freedom to travel in comfort. They are surging in popularity and come in a wide range of options. But how can you figure out which
Baja. Model Year 2005 Folding Camping Trailer Owner s Manual
 Baja Model Year 2005 Folding Camping Trailer Owner s Manual WARNING: Read all instructions in this manual and component manufacturer supplied information before using your RV. This manual has been provided
Thermal King Blankets and Storage Reels 7100 Spectrum Lane Missoula MT EverActive Brands
 Thermal King Blankets and Storage Reels 7100 Spectrum Lane Missoula MT 59808 800.791.8056 www.spectrumproducts.com 2012 EverActive Brands Rev 3/18/16 Contents Blanket Specifications. 1 Pool Blanket Cleaning
FIERO Instructions for use and safety
 FIERO Instructions for use and safety READ CAREFULLY BEFORE USE Please store these safety warnings in a safe place for future reference. NOTICE: BUYER ASSUMES ALL RESPONSIBILITY FOR SAFETY AND USE THAT
Sunjoy L-GZ717PST-E Mirage Gazebo. Owner s Manual IMPORTANT
 Sunjoy L-GZ717PST-E Mirage Gazebo Owner s Manual IMPORTANT Thank you very much for choosing Sunjoy Industries. Please take time to read these instructions thoroughly and follow each step carefully for
CARTARP CARTARP INSTRUCTIONS INSTRUCTION INDEX YOUR KELTY CARTARP SHOULD INCLUDE: Before you Start 2-5 Pitching your CarTarp 6-11 Notes 11 Warranty 12
 CARTARP CARTARP INSTRUCTIONS INSTRUCTION INDEX Before you Start 2-5 Pitching your CarTarp 6-11 Notes 11 Warranty 12 YOUR KELTY CARTARP SHOULD INCLUDE: 1 CARPORT BODY 2 STAFF POLES 1 STRAIGHT FIBERGLASS
Read all instructions and warnings before using this fireplace. WARNING
 Frame User Manual 1 Operating Manual Thank you for purchasing this Signi Fires product. Signi Fires is very safety conscious, we have taken every care in designing, manufacturing and assembling your Signi
CRD120SC TUBING CUTTER
 CRD120SC TUBING CUTTER OPERATIONS MANUAL 1 VERSION 2.1 LAST EDITED 05.01.2018 cleanroomdevices.com Table of Contents Table of Contents....2 1.0 General Product & Safety Information... 3 1.1 Product Information
Chicago Style Awning
 Chicago Style Awning ASSEMBLY AND INSTALLATION INSTRUCTIONS CAUTION: When you are opening the box keep children away. This awning frame contains sharp metal and small hardware parts. Choking hazard: Keep
SEASONAL CAMPGROUND ADMISSION AGREEMENT
 1SEASONAL CAMPER AGREEMENT FOR 2012 (Final) 2 1 SEASONAL CAMPGROUND ADMISSION AGREEMENT 2 3 THIS AGREEMENT IS BETWEEN THE CAMPGROUND,, AND 4THE FOLLOWING PERSONS: 5ADULTS:. 6MINORS:. 7ONLY THE PERSONS
TANK MONITOR MODEL # (12V DC) (24V DC) (32V DC) OPERATION AND INSTALLATION INSTRUCTIONS
 (24V DC) (32V DC) OPERATION AND INSTALLATION INSTRUCTIONS") TANK MONITOR MODEL # 1510012 (12V DC) - 1510024 (24V DC) - 1510032 (32V DC) OPERATION AND INSTALLATION INSTRUCTIONS WARNING: Raritan Engineering Company,Inc.recommends that a qualified person install this
TANK MONITOR MODEL # 1510012 (12V DC) - 1510024 (24V DC) - 1510032 (32V DC) OPERATION AND INSTALLATION INSTRUCTIONS WARNING: Raritan Engineering Company,Inc.recommends that a qualified person install this
Rooftop Tent Owners Manual
 WWW.SMITTYBILT.COM Installation Instructions Part # 2783 Overlander Tent Rooftop Tent Owners Manual Read instruction manual entirely before assembling and installing this product. The Smittybilt Overlander
ROCKING HAMMOCK GD-600. Model GD-600. Retain This Manual for Reference OWNER'S MANUAL
 NOTE: Please read all instructions carefully before using this product ROCKING HAMMOCK Table of Contents Safety Notice GD-600 Hardware Pack Assembly Instruction Parts List Warranty Ordering Parts Model
BEGIN THE JOURNEY! BEGIN THE JOURNEY! BEGIN THE JOURNEY! Camping Trailer. Camping Trailer. Camping Trailer Owner s Manual.
 Owner s Manual Forest River Interactive Mobile Manuals Download your Forest River mobile app or visit our dynamic online manual to enhance your ownership experience. These interactive options provide incredible
Installation Instructions Safari Bikini Top
 Installation Instructions Safari Bikini Top For: 1992-1995 Wrangler Part Number 52529 Congratulations on your purchasing decision. Bestop designed this Convertible Top to give you years of dependability
LA STRADA Instructions for use and safety
 LA STRADA Instructions for use and safety READ CAREFULLY BEFORE USE Please store these safety warnings in a safe place for future reference. NOTICE: BUYER ASSUMES ALL RESPONSIBILITY FOR SAFETY AND USE
SINGLE BURNER STOVE IMPORTANT OPERATING INSTRUCTIONS COOKING & STORAGE POSITION PARTS IDENTIFICATION
 SINGLE BURNER STOVE OPERATING INSTRUCTIONS PARTS IDENTIFICATION Electronic Lighter Ignites the burner. Liquid Guard Holds liquid overflow. Windshield Prevents flame from being extinguished by wind. Ensures