Assembly instructions for Eurotramp trampolines Series: Ultimate, Grand Master Exclusiv, Grand Master, Master
|
|
|
- Esther Carr
- 6 years ago
- Views:
Transcription

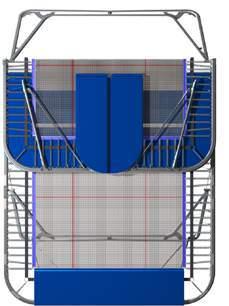
1 Assembly instructions for Eurotramp trampolines Series: Ultimate, Grand Master Exclusiv, Grand Master, Master 1. Assembly instructions 2. Attaching the plastic coated steel cables on the Ultimate frame 2. Assembly instructions for coverall frame pads 4. Stowage 50 mm frame padding 5. Attaching the safety platforms on the Ultimate frame


2 1. Assembly instructions for Eurotramp trampolines Only qualified and experienced personnel should fold and unfold this equipment.before unfolding and folding the trampoline study the instructions and illustrations provided carefully. Before use always inspect the trampoline for loose fittings or damage. Replace any worn, defective or missing part. The trampoline should only be used under the supervision of a qualified instructor and with the necessary safety precautions in place. Any use without proper supervision could be dangerous and should not be undertaken or permitted. Figure 1 The space where the trampoline is to be erected should be free from any obstructions around or above the trampoline. A minimum height of 5 m for recreational trampolining and 8 m for competitive trampolining is recommended (this may change to 10 m). The trampoline must be sited away from any projectiles such as balls, shuttlecocks, etc. and in such a position that light from windows or lights does not dazzle the performer or spotters. When moving the trampoline on its wheels pull or push the trampoline using the frame only and not the roller stands (Fig. 1) as this can cause the roller stands to come away from the frame. The wheels must move freely and nothing should impede their free movement. Unfolding and folding the trampoline should be undertaken by two trained persons as it is a very heavy piece of equipment. If your trampoline is fitted with conventional lifting roller stands and has been stored in the low position raise the trampoline by rotating the lifting roller stand arm 180 degrees. This is achieved by holding the T bar, pulling out the red knob and rotating the upper bar to vertical and re-locating the red knob assembly (Fig. 2 3). Figure 2 21


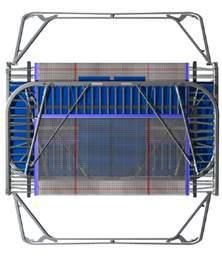
3 Figure 3 If the trampoline is equipped with the new lifting roller stands Safe & Comfort you can easily pump it up to the height you need it to be. If you later want to lower the trampoline again just push the foot pedal heavily and the trampoline will go down to the height you need it to be. If the trampoline has standard roller stands it will already be in the correct position for unfolding. Unfold the legs and rotate the trampoline until the bed is horizontal and the leg sections are on the floor. Ensure the chains are not slack (Grandmaster and Master models). For the Exclusiv models attach the chain ensuring the chain is not twisted (exception:, pull the chain out straight and ensure all the links are aligned before clipping it into place, as this will cause the bottle screw to unwind causing the legs to splay out (Fig. 4 9). Figure 4 Figure 5 Figure 6 22


4 Figure 7 Figure 8 Figure 9 Plastic coated steel cables for the Ultimate Lower the trampoline. Rotate the lifting roller stand arm 180 degrees by holding the T bar, pulling out the red knob and rotating the upper bar to vertical fig and re locating the red knob assembly (Fig. 10 and 11). Figure 10 23


5 If your trampoline is equipped with the new lifting roller stands Safe & Comfort, you can easily lower it by pushing the foot pedal heavily. Figure 11 Should the trampoline have standard roller stands, take the weight of the trampoline at one end ensure that you lift with a flat back lifting with the legs and remove the roller stand. Remove the (lifting) roller stands to a safe place away from the trampoline area so as not to cause an obstruction preferably in a store cupboard and laid down, not stood against a wall. Unfold one end of the trampoline at a time. Lift the end to vertical, step round and lower it slowly. Do not allow it to build up momentum (Fig ). Figure 12 Figure 13 Figure 14 24

.")


6 Ensure that the leg braces are put into place. On a Premium trampoline the larger braces are inserted first followed by the smaller ones (Fig. 15). Exception Ultimate: set the pan on the ball. It can be clicked into place with pressure (Easy-Lock-System). Figure 15 Easy-Lock-System for the Ultimate The second end of the trampoline to be unfolded is under tension. Lift to vertical, whilst keeping hold of it step around and slowly pull down against the tension until the end is level, excess force pressing down when the end is level can cause damage to the hinge section. Insert leg braces as previously (Fig. 16 and 17). Figure 16 Figure 17 25


7 To prevent damage to the frame pads, Eurotramp provides a removal pad section over the hinges, this must now be folded into place (only version 32mm foldable, Fig. 18). Check the coverall pads are in good order and secured in place and that there are no rips and tears, all pads should be supported across the corners of the frame. Figure 18 Ensure all the springs are in good condition and that the hooks are pointing downwards both on the bed and on the frame. Check that the stitching on the bed is intact, the fabric is not frayed or broken and the anchor bars are all in place and not damaged. The outer frame should be straight and no bowing, this can be caused by dropping the ends of the trampoline. Periodically check and tighten all Allen screws use the Allen key supplied with your trampoline. Eurotramp trampolines are fitted with a grease nipple which allows the user to put a small amount of grease on the hinge every 6 months or so thus lengthening the amount of time between servicing. Figure 19 Suitable end safety platforms should now be attached and appropriate safety matting placed on top and secured. When folding away the trampoline remember that when removing the leg braces from the first end of the trampoline it is under tension, therefore as the end is lifted hold tightly until this is vertical. Step around and lower the end ensuring the elbows are kept clear of the frame and no other person is likely to be crushed by the end coming over (Fig. 19 and 20). Figure 20 26


8 The second end has no tension. After removing the leg braces the end has to be lifted to vertical. Step around and lower down without getting the elbows trapped (Fig. 21). Figure 21 Insert the lifting roller stands ensuring that the safety-retaining bar is in place. Pull out the red knob and rotate the T bar through 180 degrees, relocate the red knob (the same as for raising the trampoline from its lowered position above) (Fig. 22). If the trampoline is equipped with the new lifting roller stands Safe & Comfort you just have to pump the roller stands to the height you need in order to fix them at the trampoline frame. Figure 22 Repeat on the other side. The trampoline is now ready to be rotated to the completely folded position. If the trampoline has standard roller stands insert the roller stand at angle. Hold the end of the trampoline where no metal can be felt and lift the trampoline correctly keeping the back flat and lifting with the legs. This should be done slowly so that the roller stands do not swing through past the vertical position but take the weight of the trampoline on the wheels. The trampoline should be folded by pushing it away from the body, never pull it towards you (Fig 23 24). Figure 23 27
. Lifting roller stands allow the trampoline to be lowered when folded for it pass through a normal 2m door.")
9 Figure 24 The trampoline can now be rotated to the vertical position; the lower legs should be lifted up against the trampoline with the upper leg folded in on top to prevent the lower leg from falling out (Fig 25). Lifting roller stands allow the trampoline to be lowered when folded for it pass through a normal 2m door. Figure 25 28


10 2. Attaching the plastic coated steel cables on the Ultimate frame 1. Let the cable hang loose and make sure it is not twisted. 2. Take the carabiner on the loose end and attach it to the chain link on the leg without twisting the steel cable. If any of the cables is twisted the wing of the trampoline will end up crooked! 29

11 30 3. Continue the setup of the trampoline.
 Stick white Velcro on the flat surface of the frame (s.")
12 3. Assembly instructions for coverall frame pads Set up the trampoline. Hook in springs, black belt and jumping bed. Mount the spring clips at upper frame (s. figure 2) Stick white Velcro on the flat surface of the frame (s. figure 1) Figure 1: red marked area to show where Velcro needs to be sticked on 31

13 Mounting of the spring clip at upper frame Figure 2 32

14 Order: front pieces (2 & 3) corner pieces (4 & 5) centre pieces (6 & 7) Sequence: Attach the first front piece (fleece on Velcro) onto the frame, IMPORTANT: Please make sure that it is exactly in the middle of the side! Then connect the bottom of the coverall frame pad with the black belt by using the straps Go on like this with the second front piece, then corner pieces and finally centre pieces Connect all cover sections with each other (partially accessible from below)


15 4. Stowage 50 mm frame padding


16 5. Attaching the safety platforms on the Ultimate frame
User s Manual Trampoline 8
 User s Manual Trampoline 8 Model! WARNING Read all precautions and instructions in this manual before using this equipment. Save this manual for future reference. Maximum user weight 17 lbs. ASSEMBLY IMPORTANT
BR B Bike Rack Instructions
 IMPORTANT NOTE: It is common that vehicles with lids and hatches have a single rear wiper. It is important that you make yourself aware that the wiper cannot be used while the rack is attached to the vehicle.
BowDown. MiniMuM Crossbar spread 24 (61CM) Steel Hook (2X) Buckle Strap (2X) Plastic Tube (2X) Plain Strap (2X) SHORT BLACK T-BOLT (2x) BOWDOWN (2x)
 Steel Hook (2X) Buckle Strap (2X) Plastic Tube (2X) Plain Strap (2X) SHORT BLACK T-BOLT (2x) BOWDOWN (2x)") BowDown MiniMuM Crossbar spread 24 (61CM) Heavy Duty strap (2x) SHORT BLACK T-BOLT (2x) BOWDOWN (2x) Bow Stern Tie Down Buckle Strap (2X) Plastic Tube (2X) Plain Strap (2X) Steel Hook (2X) IMPORTANT WARNING
BowDown MiniMuM Crossbar spread 24 (61CM) Heavy Duty strap (2x) SHORT BLACK T-BOLT (2x) BOWDOWN (2x) Bow Stern Tie Down Buckle Strap (2X) Plastic Tube (2X) Plain Strap (2X) Steel Hook (2X) IMPORTANT WARNING
Assembly. Step 3. Attach the safety bracket (7) to the Pivot ARM (6).
 to the Pivot ARM (6).") Assembly Step 1. A. Stand the base of the machine by separating the U-frames (1,2). Pull the Front and Rear U-Frames (1,2) as far apart from each other as possible. Then push down on the middle of the
Assembly Step 1. A. Stand the base of the machine by separating the U-frames (1,2). Pull the Front and Rear U-Frames (1,2) as far apart from each other as possible. Then push down on the middle of the
When moving the frame don t force anything! Move the leg to allow the brace to go over the rod.
 THE IDLER Assembly and Care Instructions General notes Please read these instructions in their entirety before constructing your Idler Construction Before you begin constructing your Idler consider where
BigStack. Minimum Crossbar spread 24 For factory racks: Check fitlist notes, or Yakima.com for your vehicle s crossbar spread.
 BigStack Minimum Crossbar spread 24 For factory racks: Check fitlist notes, or Yakima.com for your vehicle s crossbar spread. HEAVY Duty strap (2x) PAD (4x) ADJUSTMENT KNOB (2x) T-BOLT (2x) BAIL (2x) BigStack
Installation Guide: Round Trampoline
 Trampolines & trampoline parts designed to survive in the harsh Oz climate. www.oztrampolines.com.au Installation Guide: Round Trampoline Safety Tips Here at Oz Trampolines we are passionate about your
User Guide. 12ft (3.66m) ZorbPOD. with 15.5ft (4.72m) wide enclosure. Got a Problem building your trampoline? Call us on and we can help
 ZorbPOD. with 15.5ft (4.72m) wide enclosure. Got a Problem building your trampoline? Call us on and we can help") User Guide 12ft (3.66m) ZorbPOD with 15.5ft (4.72m) wide enclosure Got a Problem building your trampoline? Call us on 0344 800 4060 and we can help Patent no: DE602006006495D1, EP1721640B1 and US7628731
User Guide 12ft (3.66m) ZorbPOD with 15.5ft (4.72m) wide enclosure Got a Problem building your trampoline? Call us on 0344 800 4060 and we can help Patent no: DE602006006495D1, EP1721640B1 and US7628731
functionality with the necessary maintenance tools stored in a convenient built in tool box, as well as parallel handles for
 GuilloMax User Manual The Guillomax has distinct features such as its unique structure and ease of cutting. It combines symmetry with functionality with the necessary maintenance tools stored in a convenient
IMPORTANT OWNER-OPERATOR INSTALLATION INSTRUCTIONS. Part # A7006
 IMPORTANT OWNER-OPERATOR INSTALLATION INSTRUCTIONS Part # A7006 Parts List Wobble Stopper Body Wobble Stopper Shaft Camper Bracket Lower Bracket Assembly Upper Bracket Upper Bracket Clamp 3/8 SAE Flat
RAFTER VI. Installation and Operation CAREFREE WITH AUTOMATIC AWNING SUPPORT. RV Accessory PRODUCT OVERVIEW
 CAREFREE RAFTER VI RV Accessory WITH AUTOMATIC AWNING SUPPORT Installation and Operation PRODUCT OVERVIEW The gives the awning user the ability to easily tighten the center fabric when the awning is extended.
RUPHIS Blade Clamp. Instruction Manual
 RUPHIS Blade Clamp P/N 1006800 NSN 1615-01-562-8156 Instruction Manual AH-64D UH-60A/L UH-60M S-70i S-92 REVISION AUTHORIZATION / RECORD These instructions are primarily for inspection of the RUPHIS Blade
WARNING: Read these materials prior to assembling and using this trampoline and enclosure
 All Weather Cover Assembly, Installation, Care, Maintenance & Use Instructions VERSION 1.2 WARNING: Read these materials prior to assembling and using this trampoline and enclosure * O92 Model Shown Do
ABS Model Background Stand
 ABS Model Background Stand Product Overview: The completely redesigned Ravelli ABS model background stand is 10' tall by 12.3' wide. It is comprised of two tripod stands and four 3 cross bar sections and
COMBI CRATE MODEL NO: 7000/7001/7002/7003
 COMBI CRATE MODEL NO: 7000/7001/7002/7003 Owner s Manual READ ALL INSTRUCTIONS BEFORE ASSEMBLY AND USE OF GATE KEEP INSTRUCTIONS FOR FUTURE USE. Carlson Pet Products,Inc 14305 Southcross Drive,Suite 105,
DO NOT USE WITH CROSSBAR SPREAD LESS THAN 24.
 TM Please read all instructions carefully before assembly, installation and/or use of this product. DO NOT USE WITH CROSSBAR SPREAD LESS THAN 24. WARNING: Do not exceed the weight limit of your vehicle
Tabletop Kit 01. features and benefits: dimensions: additional information:
 Tabletop Kit 01 TK-TTK-01 Make a statement with an easy-to-assemble tension fabric Hopup tabletop display with spotlights. A custom-printed stretch table throw that fits standard 6ft tables & a single-sided,
Setup. Assembling. Attaching the sharpening stone
 Kit 1. Sharpener base. 2. Vertical rod. 3. Fixing ring. 4. Horizontal rod with pivot unit. 5. Sharpening stones set. 6. Black marker. 7. User Guide. Technical specs Knife sharpener dimensions (ready to
12 Cage Installation Instructions
 Important Notes 12 Cage Installation Instructions 1) The long pipes are the for vertical sections only. The cage is 10 tall. 2) The cross fittings should be oriented with the slide through running front
NEWMAR SERVICE SCHOOL
 NEWMAR SERVICE SCHOOL TRAINING INFORMATION GUIDELINE FOR FEBRUARY 2013 OUR PRODUCTS: NOVA DUAL PITCH AWNING G-2000/ G-1500 2 P a g e G-2085 G-5000 3 P a g e G-LINKS 4 P a g e NOVA/ G-2000/ G-1500 BASIC
ASSEMBLY & CARE INSTRUCTIONS
 ASSEMBLY & CARE INSTRUCTIONS 7 x TRAILER TENT SERIES 3 9 Part No. FT3711 - on road FT3923 - off road OPTIONAL SUNROOM Wall and floor kit Part No. FT3723 - on road FT39 - off road OPTIONAL SPARE ROOM Roof,
π H-3505 GARAGE CANOPY PARTS SAFETY uline.com TOOLS NEEDED 10' X 20' X 8'
 π H-3505 GARAGE CANOPY 10' X 20' X 8' 1-800-295-5510 uline.com TOOLS NEEDED Safety Glasses Wrench or Socket 9/16" or 14mm Tape Measure Phillips Screwdriver Rubber Mallet PARTS Cables x 5 2-way Corner Foot
ASSEMBLY & CARE INSTRUCTIONS. 7 x4 TRAILER TENT SERIES 4 9. OPTIONAL SUNROOM Wall and floor kit. OPTIONAL SPARE ROOM Roof, wall and floor kit
 ASSEMBLY & CARE INSTRUCTIONS 7 x TRAILER TENT SERIES 9 Part No. TM709 OPTIONAL SUNROOM Wall and floor kit Part No. TM723 OPTIONAL SPARE ROOM Roof, wall and floor kit Part No. TM76 Please keep these instructions
VEPR Round Drum Disassembly and Assembly
 VEPR 12 25 Round Drum Disassembly and Assembly Required Tools ¼ Allen Wrench Flat Head Screwdriver Drum Parts List Drum Body Carousel Center Bolt Dummy Rounds Carousel Lock Spring Clear Drum Cover Step
Motorized Oasis Awning RTS Motor Cord Replacement Instructions *Helpers Needed*
 RETRACTABLE AWNINGS For Technical Support visit us at www.sunsetter.com/ownerscorner or Call Toll Free 800-670-7071 Fax 877-224-4944 Motorized Oasis Awning RTS Motor Cord Replacement Instructions *Helpers
PEAK 1 GENERAL INFORMATION 1.1 THE CONCEPT 1.2 SAFETY 1.3 THE SPEED SYSTEM 2 THE EMERGENCY PARACHUTE 2.1 EMERGENCY PARACHUTE ASSEMBLY
 PEAK 1 GENERAL INFORMATION 1.1 THE CONCEPT 1.2 SAFETY 1.3 THE SPEED SYSTEM 2 THE EMERGENCY PARACHUTE 2.1 EMERGENCY PARACHUTE ASSEMBLY 3 ADJUSTING YOUR PEAK 3.1 ADJUSTING THE SITTING POSITION 3.2 ADJUSTING
10 X 20 X 8 Dome Canopy
 10 X 20 X 8 Dome Canopy Warning Keep all flame and heat sources away from this tent fabric. Refer to labels for flamability specification. It is not fire proof. The tent fabric will burn if left in continuous
OHENRY SECTIONAL TENT INSTRUCTIONS
 INSTRUCTIONS Please follow these instructions carefully so your new Ohenry tent will be installed correctly. The pictures are based on installing a Traditional Pole Type Tent, but also apply to High Peak
Safety Tips. Welcome. Contents. Care & Maintenance
 Safety Tips Welcome At Oz Trampolines, we are passionate about your family s safety when using our trampolines and accessories. We have put together a list of safety tips and advice which will help ensure
Installation and User s Manual 12 x 10 MOTORIZED AWNING
 12 x 10 MOTORIZED AWNING Installation and User s Manual 12 x 10 MOTORIZED AWNING 088-1763-0 Stop Please read and understand this manual before any assembly or use of this product. Before beginning assembly
AND LOAD CANOPY RACK SPECIFICATIONS
 8MAY15 INSTRUCTIONS for the LOCK AND LOAD CANOPY RACK SPECIFICATIONS and SAFE LOADING REQUIREMENTS The Lock and Load ladder carrier for Truck Caps is a rack designed to mount to the top of a pickup truck
Manual Awning. Assembly Instructions. Product No Toll-free:
 Manual Awning Product No. 088-30- Instructions Toll-free: -877-483-679 IMPORTANT: Please read this manual carefully before beginning assembly of this product. Keep this manual for future reference. 3 Table
Solera Classic Awning
 Solera Classic Awning OWNER'S MANUAL Page 1 Table of Contents System and Safety Information 2 Operation 3 Extending the Awning 3 Optional Car Port Position 3 Retracting the Awning 3 Fabric Replacement
4A1-114/114KR & 4A1-2 MANUAL TENSIONERS
 M L. C O O N AL TO 4A1-114/114KR & 4A1-2 W W W.T R AD IT IO MANUAL TENSIONERS READ THESE INSTRUCTIONS CAREFULLY. FAILURE TO FOLLOW THESE INSTRUCTIONS CAN RESULT IN SEVERE PERSONAL INJURY. GENERAL SAFETY
Mandolin Slicer Quite possibly the safest mandolin in the world
 Mandolin Slicer Quite possibly the safest mandolin in the world MANDOLIN & COMPONENTS Handle Upper Plate Safe Hands Food Holder Non-Slip Retractable Leg Julianne Blades (3 sizes) Waffle / Crinkle Cut Blade
TITAN Fuel Tanks. INSTALLATION INSTRUCTIONS G e n e r a t i o n V
 TITAN pt. no.: 02 0000 0128 Important: Please read these instructions carefully and completely before starting the installation. TITAN Fuel Tanks INSTALLATION INSTRUCTIONS G e n e r a t i o n V Extended
Product instruction manual Ream Cutting Systems RE3943, RE3946, RE3947, RE3971, RE3952E
 Product instruction manual Ream Cutting Systems RE3943, RE3946, RE3947, RE3971, RE3952E The Trimfast Ream Cutters are reliable, high performance cutters that will give you the results you need quickly
OPERATOR INSTRUCTION MANUAL INCLUDING REPAIR PARTS FOR MODULAR GENERAL PURPOSE TENT SYSTEM (MGPTS) TYPE I
 TYPE I") OPERATOR INSTRUCTION MANUAL INCLUDING REPAIR PARTS FOR MODULAR GENERAL PURPOSE TENT SYSTEM (MGPTS) TYPE I Johnson Outdoors Gear, Inc. Eureka! branded tent products 625 Conklin Road Binghamton, NY 13903
OPERATOR INSTRUCTION MANUAL INCLUDING REPAIR PARTS FOR MODULAR GENERAL PURPOSE TENT SYSTEM (MGPTS) TYPE I Johnson Outdoors Gear, Inc. Eureka! branded tent products 625 Conklin Road Binghamton, NY 13903
Ski Sheet. Ski Pad. The Ski Sheet allows non-ambulant patients to be quickly and safely evacuated in the event of an emergency.
 Ski Sheet The Ski Sheet allows non-ambulant patients to be quickly and safely evacuated in the event of an emergency. The sheet remains in place under the individuals mattress at all times, allowing it
Operation, Cleaning & Maintenance. For Aluminium Secondary
 , Cleaning & Maintenance For Aluminium Secondary Contents Horizontal Sliders 3 Vertical Sliders - Non-Balanced 4 Vertical Sliders - Balanced 5 Vertical Sliders - Tilt Back 6-7 Lift Outs 8 Hinged Units
S-SERIES 10x10 SETUP INSTRUCTIONS
 S-SERIES 10x10 SETUP INSTRUCTIONS THANK YOU FOR PURCHASING A 10x10 S-SERIES TENT! If you have questions about installation, maintenance, or take down, please call us at (800)426-9496. Our goal is that
MYRIAD Banner Stand is a trademark of Skyline Exhibits. Patent Pending PN32294-B. MYRIAD Banner Stand
 is a trademark of Skyline Exhibits Patent Pending 1.1 1. Banner Stand Setup 1.1 Remove banner stand from standard case or Arrive Portable Display & Workstation and assemble pole. 1.2 Insert pole into base
10 X20 Dome Garage ITEM #: G Dimensions: 10ft. Wide x 20ft. Deep x 8ft. Center Height
 10 X20 Dome Garage ITEM #: G10208 Dimensions: 10ft. Wide x 20ft. Deep x 8ft. Center Height WARNING: Keep all flame and heat sources away from this tent fabric. It is not fire proof The fabric will burn
ReTurn7600. SWL: 205kg/450lbs. SystemRoMedic TM. User manual English. Manual no: 721 Ver
 ReTurn7600 User manual English 7600 SWL: 205kg/450lbs Manual no: 721 Ver. 13 150819 ReTurn7600 English ReTurn7600 are used indoors for shorter transfers between wheelchair and bed, wheelchair and toilet/portable
Assembling & Fitting Instruction August 2015
 Assembling & Fitting Instruction August 2015 Wave Curtain Heading System Silent Gliss 6010, 6020, 6100, 6103, 6290, 6380, 6465 Silent Gliss 3840, 6120 Silent Gliss 5090, 5200, 5400 Silent Gliss 5100, 5600
Ultralight Series CLOUD-
 Ultralight Series CLOUD- INSTRUCTION INDEX Pack Components 2 Custom Fitting your Pack 3-6 Checking the Fit 7 Troubleshooting 8 Customizing your Pack 9-11 Packing Hints 12 KNOWING YOUR PACK The Cloud pack
Contents. Awnings USA - Full Protective Hood Manual Instructions ft 11" - 11ft 6" Awnings
 Awnings USA - Full Protective Hood Manual Instructions Contents Warning We recommend that two or more people are required to lift the awning into place. 4ft 11" - 11ft 6" Awnings 8 x Expansion bolts **
ANY HAMMOCK CARRIES INHERENT RISK AND ACCIDENTS MAY OCCUR. USE WITH CAUTION.
 www.trailnest.com Roof Top Hammock Stand Owner s Manual WARNING! USING ANY HAMMOCK CARRIES INHERENT RISK AND ACCIDENTS MAY OCCUR. USE WITH CAUTION. MAX LOAD: 250 LBS Congratulations! Thank you for purchasing
Trampolines. Call the Sales Team on +44 (0)
") Trampolines All UNITRAMP trampolines are constructed to the same high standards. Frames are manufactured from extra heavy gauge steel tube, are zinc plated to provide scratch resistant hardwearing and
Trampolines All UNITRAMP trampolines are constructed to the same high standards. Frames are manufactured from extra heavy gauge steel tube, are zinc plated to provide scratch resistant hardwearing and
KITFOX WING FOLDING INSTRUCTIONS
 Kitfox KITFOX WING FOLDING INSTRUCTIONS 1 AIRCRAFT CORPORATION These instructions describe the procedures for folding the wings of the Kitfox family of aircraft. Although the instructions apply to all
33100 LH - Batwing Awning RH - Batwing Awning
 33100 LH - Batwing Awning 33200 RH - Batwing Awning 1. Check Part No./Kit is correct 3. Fit roof rack accessory 2. Read through instruction before installing 4. Check and recheck all fasteners are secure
Nova. Rollator OWNERS HANDBOOK. Product Code: WA01063
 Nova Rollator OWNERS HANDBOOK Product Code: WA01063 Your Tuni Nova Rollator Product Features 1. Easily removable bag attached. 2. Easy to fold, easy to store and transport. 3. Easy to adjust handle to
HUNTCO SITE FURNISHINGS. Double Bike Locker Assembly Instructions HUNTCO SITE FURNISHINGS
 Double Bike Locker Assembly Instructions Includes instructions for both handle styles. Padlock Handle with U Lock Box and Keyed Pop Out T Handle SITE FURNISHINGS SITE FURNISHINGS and architectural site
Garden Party 13ft X 13ft 12ft 9in Wide x 12ft 9in Deep x 6ft3in Side Height / 10ft4in Center Height
 Garden Party 13ft X 13ft 12ft 9in Wide x 12ft 9in Deep x 6ft3in Side Height / 10ft4in Center Height King Canopy Item #: GP1313 With 4 Legs, Foot Pads, Cover & Screens. Distributed by: PIC America, LTD.
Installation manual. Drop-arm awning. V124 Calpe
 Installation manual Drop-arm awning V124 Calpe Installation manual Drop-arm awning V124 Calpe Content 1. Drop-arm awning * 2. Wall supports 3. Control a. Manual control: crank handle b. Electrical control:
TWISTLOCK VEHICLE STABILIZER (TVS) SYSTEM INSTRUCTIONS
 SYSTEM INSTRUCTIONS") TWISTLOCK VEHICLE STABILIZER (TVS) SYSTEM 22-797010, 22-797020, 22-796161 INSTRUCTIONS COMPONENTS: 1. TVS-100, PN 22-797010: 47 60 (119 cm 152 cm) stroke TwistLock Vehicle Stabilizer. Component weight,
TWISTLOCK VEHICLE STABILIZER (TVS) SYSTEM 22-797010, 22-797020, 22-796161 INSTRUCTIONS COMPONENTS: 1. TVS-100, PN 22-797010: 47 60 (119 cm 152 cm) stroke TwistLock Vehicle Stabilizer. Component weight,
KNIFE SHARPENING TECHNIQUE
 SharpX A Information on Sharpening Technique Including Sharpening Instructions Sharpening is one of mans oldest skills and has laid the foundation for the development and survival of mankind. From the
USER MANUAL BMU WORKCAGE. CONFORM TO THE MACHINE DIRECTIVE 2006/42/EC and to EN1808 (1999)
") USER MANUAL BMU WORKCAGE CONFORM TO THE MACHINE DIRECTIVE 2006/42/EC and to EN1808 (1999) All persons operating this equipment must read and completely understand this manual. Any operation in violation
USER MANUAL BMU WORKCAGE CONFORM TO THE MACHINE DIRECTIVE 2006/42/EC and to EN1808 (1999) All persons operating this equipment must read and completely understand this manual. Any operation in violation
Item # BJ2PC With 8 Leg Frame, Cover, and Enclosure Kit with Windows Size: 10 8 Wide x 20 Long (Side Height 6 8 ) (Center Peak Height 9 9 )
 (Center Peak Height 9 9 )") Item # BJ2PC With 8 Leg Frame, Cover, and Enclosure Kit with Windows Size: 10 8 Wide x 20 Long (Side Height 6 8 ) (Center Peak Height 9 9 ) Powell & Powell Supply Company, L.L.C. Manufactured by: 1730
Item # BJ2PC With 8 Leg Frame, Cover, and Enclosure Kit with Windows Size: 10 8 Wide x 20 Long (Side Height 6 8 ) (Center Peak Height 9 9 ) Powell & Powell Supply Company, L.L.C. Manufactured by: 1730
Hercules Enclosed Snow Load 10ft X 20ft 10ft 8in Wide x 20ft Deep x 6ft 8in Side / 9ft 6in Center Height
 Hercules Enclosed Snow Load 10ft X 20ft 10ft 8in Wide x 20ft Deep x 6ft 8in Side / 9ft 6in Center Height King Canopy Item #: HC1020PCSL With 8 Legs, King Truss Roof Cable System, Cover, and 4 Piece- Side-Wall
F a l l P r o t e c t i o n E x p e r t s. Subject: Buckle Specifications and Operations
 Technical Bulletin Subject: Buckle Specifications and Operations DBI/SALA uses four types of buckles in full body harnesses, body belts and other fall protection equipment: parachute buckles, pass through
55 INCH MY FIRST TRAMPOLINE Assembly, Installation, Care, Maintenance, and Use Instructions USER S MANUAL
 TM 55 INCH MY FIRST TRAMPOLINE Assembly, Installation, Care, Maintenance, and Use Instructions USER S MANUAL O NOT ALLOW MORE THAN ONE PERSON ON THE TRAMPOLINE AT A TIME.! WARNING YOU MUST THOROUGHLY REA
INSTRUCTION MANUAL ALEKO RETRACTABLE AWNING
 INSTRUCTION MANUAL for ALEKO RETRACTABLE AWNING www.alekoproducts.com FAILURE TO FOLLOW THESE INSTRUCTIONS MAY RESULT IN PERSONAL INJURY! 1 Important Safety Precautions WARNING NOTE: FOR PERSONAL SAFETY,
Sun awning V225 Porto
 Installation manual Sun awning V225 Porto semi-cassette Content package 1. Sun awning * 2. Control a. Manual control: crank handle b. Electrical: switch + plug c. Remote controlled: remote control + plug
10ft X 20ft Titan Cable Truss System 10ft8in Wide x 20ft Deep x 6ft8in/9ft6in High
 10ft X 20ft Titan Cable Truss System 10ft8in Wide x 20ft Deep x 6ft8in/9ft6in High King Canopy Item #: TITAN1020 With 8 Legs, Woven Steel Cable Truss System (8pc anchors and 8pc 10ft sections of rope and
INSTALLATION SHEET. PARTS INCLUDED IN YOUR KIT. You may want to lay them out in this manner for accessibility.
 INSTALLATION SHEET Gas Struts (x2) Lower Hinge Rail Side Rails (L and R) Spring Bows (x2-short Bed) (x3-long Bed) L Bars (L and R) with clamps included L Channel w/seal MISSING PARTS??? Call Extang at
PR-429BF-600M. Bell 429 Blade Fold Kit Operations Manual
 Table of Contents Table of Contents... 1 Record of Revisions... 2 References... 3 Introduction... 4 Contact Information... 4 Prerequisites... 5 First Time Use... 6 Blade Clamp Placement... 6 Blade Clamp
Kontrol Kube Advanced Owners Manual
 Mobile Containment. Simplified. TM Kontrol Kube Advanced Owners Manual KONTROL KUBE www.kontrolkube.com 800.343755 1 IMPORTANT SAFETY INFORMATION SAVE THESE INSTRUCTIONS. CAREFULLY READ AND FOLLOW THESE
INSTALLATION INSTRUCTIONS AND OWNER'S MANUAL AWNINGS. For trailers & motor homes with straight sides TOOLS REQUIRED
 AWNINGS INSTALLATION INSTRUCTIONS AND OWNER'S MANUAL For trailers & motor homes with straight sides TOOLS REQUIRED 1/4" electric drill Ratchet handle kit 3/8" & 7/16" socket No. 1 and No. 2 screwdriver
Item #: BTOT Assembly Instructions
 Item #: BTOT Assembly Instructions For our most current instructions, to request missing, lost or broken parts, or for any other Customer Service issues, please visit our website at www.walkeredison.com
4.2 Assembly Instructions
 4.2 Assembly Instructions 4.2.1 Assembly of Reserve Canopy. Assembly of Reserve Canopy using Rapide Links. After inspecting the Parachute and the Wings Harness/Container System, hang or lay the parachute
Hercules 18ft X 20ft 17ft9in Wide x 20ft Deep x 6ft8in Side Height / 11ft6in Center Height
 Hercules 18ft X 20ft 17ft9in Wide x 20ft Deep x 6ft8in Side Height / 11ft6in Center Height King Canopy Item #: HC1820PC With 8 Legs, White Drawstring Cover, Elastic Ball Straps & Foot Pads. Distributed
Installation Guide Cable
 Installation Guide Cable Thank you for selecting a DuctSox System. This guide will be helpful for the installation of a Cable System. Sections of fabric will be labeled, assembled, bagged, and boxed for
Factory Style Bow Kit
 Installation Instructions Factory Style Bow Kit Vehicle Application: Jeep Wrangler Unlimited 2004 2006 Part Number: 55003 www.bestop.com - We re here to help! Visit our web site and click on Ask a Question.
X-SERIES 10x10 SETUP INSTRUCTIONS
 SETUP INSTRUCTIONS THANK YOU FOR PURCHASING A 10x10 X-SERIES TENT! If you have questions about installation, maintenance, or take down, please call us at (800)426-9496. Our goal is that you are completely
Hercules Snow Load 10ft X 20ft 10ft8in Wide x 20ft Deep x 6ft8in Side Height / 9ft6in Center Height
 Hercules Snow Load 10ft X 20ft 10ft8in Wide x 20ft Deep x 6ft8in Side Height / 9ft6in Center Height King Canopy Item #: HC1020PCSL With 8 Legs, Cable Truss System, Cover, 4 Piece Zippered Side-Wall Kit
P3000 UNIVERSAL Clamp-On
 IHI INSTRUCTION MANUAL Required Tools P3000 UNIVERSAL Clamp-On Wrench Allen Key P3001 65 ENDCAPS P3011 65 BLACK P300 7 ENDCAPS P301 7 WHITE P3003 ENDCAPS P3013 SILVER PART# DESCRIPTION ENDCAPS SIDE SUPPORTS
quick and easy installation guide
 www.directdriveopener.com quick and easy installation guide Back 2 Front. Motor Carriage 2. C-rail. Chain. Limit stops. Slide in part (tensioner) Rail assembly Insert C-rail parts () into the connecting
Enclosed Hercules 10ft X 20ft 10ft8in Wide x 20ft Deep x 6ft8in Side Height / 9ft9in Center Height
 Enclosed Hercules 10ft X 20ft 10ft8in Wide x 20ft Deep x 6ft8in Side Height / 9ft9in Center Height King Canopy Item #: HC1020PCF With 8 Legs, White Cover, 2 Side Walls, 2 End Walls, Elastic Ball Straps
06/17. CHAILEY Toilet Seat INSTRUCTIONS FOR USE. Codes
 06/17 CHAILEY Toilet Seat INSTRUCTIONS FOR USE Codes 8301-8309 CONTENTS PAGE 1.0 INTRODUCTION 1 2.0 ILLUSTRATION & TECHNICAL DATA 2 3.0 FOR YOUR SAFETY 3 4.0 UNPACKING YOUR SEAT 4 5.0 PREPARATIONS FOR
Ratchet Strap Operation
 The TeleCrib Strut system comes with special Rescue 42 red 10,000 Lb. rescue straps. Hook clusters and cinch rings are also provided to increase system versatility. Straps are supplied in 27 lengths. If
LM601 Landmark Permanent Blind
 LM601 Landmark Permanent Blind Get parts online at www.huntriversedge.com P/N: 26742 REV1: 01/13/17 2017 RETI All Rights Reserved INTRODUCTION Landmark Permanent Blinds are engineered with you the hunter
Maintenance Instructions and Directions for Use Wind Support
 Maintenance Instructions and Directions for Use Wind Support Attention Important guidelines for end users Please read carefully and bear in mind before using! These instructions must be kept by the end
DO NOT use Alien Flier Zip Line Products until you have read and fully understand the SAFETY WARNINGS below!
 SAFETY WARNING DO NOT use Alien Flier Zip Line Products until you have read and fully understand the SAFETY WARNINGS below! Assumption of Risk Zip line construction and use can be dangerous. Ensure you
02 Storage. Roller cabinet. Magnetic tray 25 Modular storage 28 Fixed storage 30. Metal trolley. Plastic box. Aluminium case.
 02 Storage Roller cabinet 21 Magnetic tray 25 Modular storage 28 Fixed storage 30 Metal Wall board 32 Metal box 33 36 trolley Plastic box 38 Aluminium Organiser 39 41 Tool bag 42 case Nylon bag 44 Reinforced
RCCK. Pivot Plug 2x. Sharp Screw 2x TAKE TIME - READ AND UNDERSTAND INSTRUCTIONS COMPLETELY!
 RCCK Revolution Cargo Conversion Kit Congratulations on your purchase of the BOB Revolution Cargo Conversion Kit (RCCK). It s designed to easily convert your existing BOB Revolution stroller frame into
Primrose Awnings - Full Cassette Manual & Electric Instructions
 Primrose Awnings - Full Cassette Manual & Electric Instructions Contents Warning 2.0m - 3.5m Awnings 8 x Expansion bolts ** 2 x brackets 1 x Awning 1 x Winder 4.0m - 5.0m Awnings 12 x Expansion bolts **
PL500A Platform Extension
 PL500A Platform Extension Operator Manual Copyright 2009 ServerLift Corporation 821 N 2nd Street Phoenix, AZ 85004 VOICE: 602.254.1557 FAX: 602.412.4479 821 N 2nd Street Phoenix, AZ 85004 VOICE: 602.254.1557
Rhino-Rack SUNSEEKER Awning Black
 Rhino-Rack SUNSEEKER Awning Black 1. Check Part No./Kit is correct 3. Fit roof rack accessory 2. Read through instruction before installing 4. Check and recheck all fasteners are secure Layout 2.0m - 32132
Enclosed Universal 10ft X 20ft 10ft8in Wide x 20ft Deep x 6ft8in Side Height / 9ft9in Center Height
 Enclosed Universal 10ft X 20ft 10ft8in Wide x 20ft Deep x 6ft8in Side Height / 9ft9in Center Height King Canopy Item #: BJ2PC With 8 Legs, Cover, Side Wall kit with Windows, Elastic Ball Straps & Foot
Otter Pro X-Over Lodge Installation and Set-Up Instructions
 Otter Pro X-Over Lodge Installation and Set-Up Instructions Otter Pro X-Over Lodge Fits Magnum Otter II & Pro Sled Only Parts Identification and Check List MODEL NUMBERS: Complete Pkg Pro X-Over Lodge
10x10 LogoTent SETUP INSTRUCTIONS. The Triple Threat
 10x10 LogoTent SETUP INSTRUCTIONS The Triple Threat THANK YOU FOR YOUR PURCHASE! INCLUDING: 1 10x10 Canopy 1 10x10 LogoTent Frame 1 Back Full Wall 1 Right Half Wall 1 Left Half Wall 2 Half Wall Bars LogoTent
Instruction for edge trimming knife sharpening of M-Type shoe sewing machines
 Instruction for edge trimming knife sharpening of M-Type shoe sewing machines 1. Introduction This instruction is a supplement to the instruction for use of electric table sharpener; thus the scope of
Garden Party 10ft X 10ft 10ft Wide x 10ft Deep x 6ft3in Side Height / 9ft7in Center Height
 Garden Party 10ft X 10ft 10ft Wide x 10ft Deep x 6ft3in Side Height / 9ft7in Center Height King Canopy Item #: GP1010 With 4 Legs, Foot Pads, Cover & Screens. Distributed by: PIC America, LTD. 1730 Five
Step by Step Set Up Guide
 lite Step by Step Set Up Guide 1 lifting lug Secure lifting lugs to a certified lifting sling. Stand and stabilize escape system under work platform. Position module with round lunette ring facing work
DURA WHEEL CHAIR LOCKER ASSEMBLY INSTRUCTIONS
 DURA WHEEL CHAIR LOCKER ASSEMBLY INSTRUCTIONS 1. Locate a Frame and Door: Start by locating a frame and door. 2. Front Frame: Now stand up the frame and door in the desired assembly area. 3. Exterior Wall:
WARNING USING AND CARING. for use in extreme or varied soil conditions. For optional sand pegs Oztent recomends use of a Bluescrew Oztent Edition.
 OWNER S MANUAL WARNING Never use any fuel-burning products (stoves, lanterns, heaters, etc.) inside or within proximity of this tent. Use of fuel-burning products inside or within proximity of this tent
7. Do not dispose of the packaging immediately.the package insert contains a template for mounting the slide bar A/Rev01 G1/2" G1/2" G1/2"
 INSTALLATION INSTRUCTIONS Magnetic Slide Shower 550 552 BEFORE YOU BEGIN MAGNETIC SLIDE SHOWER All information is based on the latest product information available at the time of publication. Kohler Co.
RETRACTABLE AWNING w/ OPTIONAL HOOD ASSEMBLY INSTRUCTIONS
 Contact us @ (800)851-0865 RETRACTABLE AWNING w/ OPTIONAL HOOD ASSEMBLY INSTRUCTIONS Congratulations on your purchase of a new retractable awning. With proper installation this awning will provide years
Primrose Awnings Full Cassette Manual & Electric Instructions
 Primrose Awnings Full Cassette Manual & Electric Instructions Contents for Full Cassette Awning 1 x Remote control receiver box 2 x Remote hand-held zappers 1 x 5 metre cable 1 x Template sticker **The