SOLHARO ASSEMBLY & INSTALLATION INSTRUCT IONS
|
|
|
- Gordon Carter
- 5 years ago
- Views:
Transcription
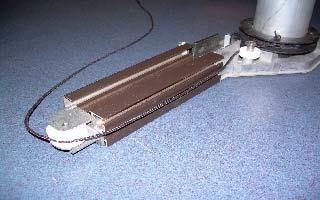
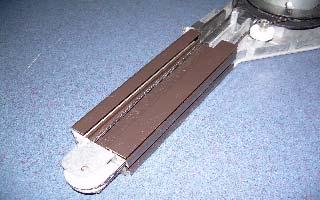
1 A. Introduction: SOLHARO ASSEMBLY & INSTALLATION INSTRUCT IONS Rev. 01/30/2012 The Solharo is an external, retractable, tensioned sun shading system designed to fit over a sunroom or wood pergola. The special brackets allow the Solharo to be fitted to almost any type of sunroom or wood structure. The Solharo is motorized with either a standard hardwire motor, or Altus motor and remote. The motor will not come with a plug, so wiring is necessary. The Solharo is shipped to you with a minimum of assembly required. The following instructions pertain to a type one Solharo, meaning that there is only one section. For type two or type three units refer Figs of these instructions. Your carton(s) will contain the following: 1- The pre-assembled cassette (box) complete with roll tube, motor and fabric with the front bar (end profile) and carriages attached. The high-tech rope is attached to the roll tube pulleys with the excess stored in the cassette. 2- Two guide rails (lateral guides) for a type one unit. 3- Standard (or type A or type B) support brackets. The number of support brackets depends on the projection. (See section C-2). The bolts to connect the guide rails to the supports are shipped in the supports. 4- Two cover guides, one left-one right, for the pulley ends of the guide rails. The screws for the covers are shipped in the pulleys. B. Tools required: Tape measure ( Metric and U.S ) Cordless drill w/ 5/16 nut driver 13 MM wrench Phillips screwdriver Motor test kit (If motor is hard wire). C. Final assembly/installation: 1- CHECK YOUR MEASUREMENTS. Center to center of the outside Mounting brackets will be 2 less than the overall width of the cassette and outside of track to outside of track (1 less on each side). Small deviations can be adjusted with the slots in the brackets. 2- Divide the track brackets among the number of guide rails. Slide the bolt heads into the ½ X ¼ channel on the underside of the guide rails. Position the brackets evenly on the mullions supporting the front, back and middle of the guide rail evenly. Attach the guide rails to all the brackets, but only tighten down the bottom or front bracket so the guide rail does not move leaving in the back to insert the cassette into the guide rails.
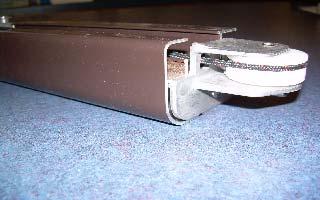
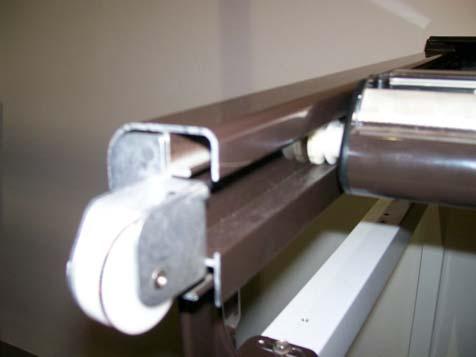
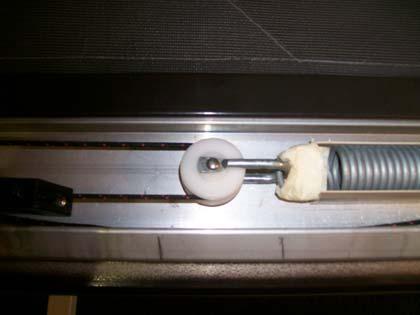
2 3- If you have not already removed the cassette hood cover and front bar cover, do so at this point. Removing the hoods before attaching cassette to guide rails make the system / unit lighter to handle. The springs are taped inside the front bar and can also be removed. After attaching the cassette, loosen the two bottom brackets so that you can slide the entire unit into position against the wall, roof, etc. to close off the gap in the back. Now you are ready to start running the cable. 4- Pull rope from under spool and run cable going over the 1 st white small wheel on the cassette end plate (Make sure you maintain 3 wraps on the roller spool). Now run the rope along the underside channel of the guide rail. Wrap the rope around the front end wheel of the guide rail and run the rope back up in the center channel to the front bar. Thread the rope through the horizontal flat wheel at the end of the front bar. Then thread through the wheel that is connected to the spring. Now run the rope through the hole of the black jam cleat. Go under the Silver round pin on opposite side. Now repeat process for every guide rail on unit the same way. 5- Now you are ready to put tension on the system. Pull the rope tight under the guide pin on the jam cleat and putting tension on the system until you pull the spring to the marked position, NOT to exceed or go under the max or minimum pre-tension marked on front bar (See separate tension sheet figure #13). 6- Hook up the electric with electric or use test kit to hook up color code wires. Make sure the rope is correctly fed over all wheels before operating. Now proceed to extend / open the system a few feet a t a time, until you get to the desired open position. Once at the desired position set the mechanical limits on motor (Hardwire motors), or electronic limits using the remote on Altus RTS remote motors. As you project the fabric it may begin to loosen. If so, put more tension n the spring by pulling the rope tighter. Make sure the maximum and minimum expansion and retraction of the spring is within specs. Now run the system up and set up limit. 7- Now you are ready to lower / open the system again to make sure the limit is set properly. If the unit extend and retracts smoothly, you can leave the system in the open position and tighten down all the guide rail brackets so that all guide rails are tight and square.. Setting limits on hardwire motors: If you have a standard, NON-RTS motor the limit switches are the white and yellow buttons located on the motor. (When the button is depressed, it will stay IN. When it is depressed a second time, it will pop out). If the motor is on the RIGHT end of the unit, the YELLOW button is the IN stop, the WHITE button is the OUT stop. If the motor is on the left end, the opposite will apply. Attach your test unit and set the limits as follows: (See SOMFY limit switch directions) a- Be sure both of the buttons are IN. b- Run the fabric OUT and stop it at full projection.
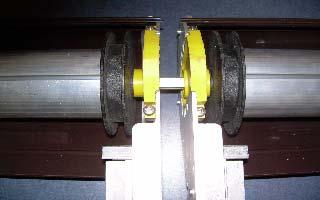
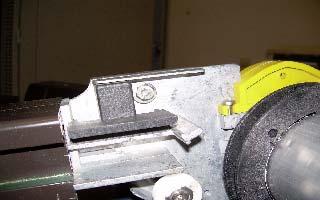
3 c- Pop OUT the button that controls the OUT stop. d- Run the fabric IN and stop it at full retraction. e- Pop OUT the button that controls the IN stop. The limit switches are now set. Setting limits on RTS Altus motors: (Follow Somfy Altus limit switch instructions). Now you can replace the cassette cover and screws. Replace the front bar cover and snap it into place. Install the cover guides over the pulleys in the ends of the guide rails (one left, one right). The installation of your Solharo type one is complete.. D. Type two & type three Solharo s. 1- Type two and type three Solharos are those that are comprised of two or three separate units that are joined together, share a single motor and operate in unison. The abutting ends do not have a solid side frame on the cassettes but instead have a coupling frame (left or right see Fig 7). Each section is basically assembled and installed the same as a type one with several additional steps. a. The middle guide (Double guide) is wider to accept a bay on each side. This guide must be installed on the mullion where the abutting ends will meet. b. One of the coupling frames will have a bolt and nut attached. Remove this and put it aside (See Figure 7). There will also be a square coupling axle taped to one of the coupling frames. Leave the tape in place until you are ready to join the units. c. When the units have been placed where they will be installed, Remove the tape from the axle pin and push the units together. (See Figs.# 8 thru 10). BE CERTAIN THE FRONT BARS ARE EVEN SINCE THE UNITS OPERATE BY THE SAME MOTOR. Use the bolt and nut referred to above to secure the coupling frames (See Fig. #11). d. REFER TO SECTION C TO COMPLETE THE INSTALLATION. NOTE: If the unit is being used in a windy location, it is recommended to add a wind sensor. Do not leave out in the rain unless a mesh fabric is being used.
4 IF ADDITIONAL ASSISTANCE IS REQUIRED CALL Use & Maintenance The awning will have to be inspected and serviced on an annual basis. Suitable use and maintenance greatly increase the life of the awning. - Do not use the awning as a rain or wind awning. - Do NOT operate the awning in heavy wind - Regular maintenance of the awning prevents unnecessary wear or problems with the function. FRAME & CABLES: - Cleaning of the frame: Use tepid water instead of aggressive substances that can affect the paint and protective layers. - Lubricate the rollers, wheels, and Tedlar rope/cables once a year. Use a silicone or Teflon spray. Pay particular attention to lubricating the wheels at the end of the track. They take more strain because of the heavy tension in the front bar. When lubricating the wheels it is best to unhook the spring so that the lubricant can go through the wheels and the small axle. - Also lubricate the bearing / bushing at the opposite side of the motor. - Check tension in cable / springs. - Units operating with a Sun & Wind Control will experience a higher rate of wear on the cables. FABRIC: - Cleaning of the fabric: Use dry brush. - Stubborn stains: a tepid water and mild soap solution, rinse with clean water. - See each manufacturers warranty and cleaning instructions of each type of fabric. Let the awning dry fully before rolling it up (even after an unforeseen rain shower). Warranty: ( see separate warranty sheet) - Frame is warranted for Five (5) years. - The fabric and motors are warranted for Five (5) years by the manufacturer of the Fabrics and motors: (See separate warranty sheets for fabric and motors from the manufacturers). - The cable is warranted for 2 years. SUNAIR AWNINGS & SCREENS 2012 AWNINGS UNLIMITED INC. P.O. Box Rt. 175, Jessup, MD JESSUP, MD PHOENIX, AZ
5


6 Fig. 7 Fig. 8 Fig. 9 Fig. 10 Fig. 11 Fig. 12


7 CHART FOR DETERMINING PROPER MAXIMUM AND MINIMUM EXPANSION ON THE SPRING Figure 13 R = Maximum and Minimum Range the spring should be allowed to expand and retract Projection
8 MAKE SURE THE EXPANSION AND RETRACTION OF THE SOLHARO SPRING IS CORRECT It is very important that the spring is tensioned properly and that you are using the correct spring for the particular unit. The springs and the measurements are in metric, so you will need a metric measuring tape. The springs are available in two sizes 840mm and 615mm. The smaller 275 mm spring is only used for special sizes. The 840mm spring will be used as much as possible. The 615mm spring will only be used when the 850mm spring is too long. SPRING TYPE NEEDED: Acrylic Fabric: When projection is less than 4000 mm or 13 ft. always use 840mm single loop spring. When projection is more always use double loop springs Soltis Ferrari: Always 840 mm Double loop spring See Figure 13: Chart Here is an example of how to read the chart: EXAMPLE: If you are using an 840mm spring on a 5 meter projection unit (5000mm), the minimum size at all times that the spring should be is 1425 mm. The maximum the spring should ever expand is 1600 mm. Please do not hesitate to call our office with any questions HOW TO MEASURE: 1) Make a mark in the center of the front bar on each section (Type 1 or Type 2 etc. ) 2) Mark the minimum on each side which would be 1425mm / 2 = 712.5mm. Measure this distance from center both to the left and right. 3) Mark the maximum on each side which would be 16mm / 2 = 800mm on each side. Measure this distance from center both to the left and right. 4) These markers represents the maximum allowable expansion and contraction of the springs in each section as measured from CENTER. Mark the maximum on both sides Mark the minimum on both sides Mark the Center


9 ROPE DIRECTIONS Make sure rope does not cross over itself as it winds up on the spool Ties a knot here in the rope
Solharo Solar protection for glass Conservatories and for Sun Rooms
 Solharo Solar protection for glass onservatories and for Sun Rooms The Solharo is the ideal solar protection solution for sunrooms and conservatories. With a simple flick of a switch, the motorized shade
SC2000 MASTERSHADE Exterior retractable solar screen systems
 SC2000 MASTERSHADE Exterior retractable solar screen systems The SC2000 Mastershade is an exterior vertical rolling screen system which can be rolled up and down as needed. The fabric runs inside vertical
RETRACTABLE AWNING w/ OPTIONAL HOOD ASSEMBLY INSTRUCTIONS
 Contact us @ (800)851-0865 RETRACTABLE AWNING w/ OPTIONAL HOOD ASSEMBLY INSTRUCTIONS Congratulations on your purchase of a new retractable awning. With proper installation this awning will provide years
Roller Bar End Cap (w/round Drive Shaft) Replacement Instructions for Vista and Motorized Awnings * Helpers needed *
 Replacement Instructions for Vista and Motorized Awnings * Helpers needed *") RETRACTABLE AWNINGS For Technical Support visit us at www.sunsetter.com/ownerscorner or Call Toll Free 800-670-7071 Fax 877-224-4944 Roller Bar End Cap (w/round Drive Shaft) Replacement Instructions for
RETRACTABLE AWNINGS For Technical Support visit us at www.sunsetter.com/ownerscorner or Call Toll Free 800-670-7071 Fax 877-224-4944 Roller Bar End Cap (w/round Drive Shaft) Replacement Instructions for
Installation Instructions Traditional Awnings in a box Classic Awnings in a Box
 Installation Instructions Traditional Awnings in a box Classic Awnings in a Box Basic Tools Required (not included) Tape Measure & Pencil Level Phillips Screwdriver Drill with ¼ bit (Cement or Masonry
ASSEMBLY & CARE INSTRUCTIONS
 ASSEMBLY & CARE INSTRUCTIONS 7 x TRAILER TENT SERIES 3 9 Part No. FT3711 - on road FT3923 - off road OPTIONAL SUNROOM Wall and floor kit Part No. FT3723 - on road FT39 - off road OPTIONAL SPARE ROOM Roof,
Solera Classic Awning OEM INSTALLATION MANUAL
 Solera Classic Awning OEM INSTALLATION MANUAL TABLE OF CONTENTS System and Safety Information 2 Preparation 3 Resources Required 3 Installation 3 Installing the Awning Rail (If Necessary) 3 Assembling
Solera Power Awning OEM INSTALLATION MANUAL
 Solera Power Awning OEM INSTALLATION MANUAL TABLE OF CONTENTS System Information 2 Safety 2 Prior To Installation 2 Resources Required 2 Awning Rail Installation (If Needed) 3 Installation 3 Awning Installation
Urea/Adblue Hose Reel
 www.scintex.com.au sales@scintex.com.au Model: SHR3408 Urea/Adblue Hose Reel Product Manual Specifications Spring driven drum: for automatic rewind. Locking ratchet: to maintain the desired length of hose
NEWMAR SERVICE SCHOOL
 NEWMAR SERVICE SCHOOL TRAINING INFORMATION GUIDELINE FOR FEBRUARY 2013 OUR PRODUCTS: NOVA DUAL PITCH AWNING G-2000/ G-1500 2 P a g e G-2085 G-5000 3 P a g e G-LINKS 4 P a g e NOVA/ G-2000/ G-1500 BASIC
Installation Instructions for the Rolltec Adalia X3M Extenda Awning
 Installation Instructions for the Rolltec Adalia X3M Extenda Awning Questions? Call Rolltec at 1-800-667-0474 General Tool Requirements Table of Contents Available installation brackets Side dimensions
Installation Instructions for the Rolltec Physique XL Awning
 Installation Instructions for the Rolltec Physique XL Awning Questions? Call Rolltec at 1-800-667-0474 General Tool Requirements Table of Contents Available installation brackets Side dimensions of various
ASSEMBLY & CARE INSTRUCTIONS. 7 x4 TRAILER TENT SERIES 4 9. OPTIONAL SUNROOM Wall and floor kit. OPTIONAL SPARE ROOM Roof, wall and floor kit
 ASSEMBLY & CARE INSTRUCTIONS 7 x TRAILER TENT SERIES 9 Part No. TM709 OPTIONAL SUNROOM Wall and floor kit Part No. TM723 OPTIONAL SPARE ROOM Roof, wall and floor kit Part No. TM76 Please keep these instructions
Pergola Model: NOMO & RIALTO Self Supporting & Wall Mounted Retractable Pergola Awning
 Pergola Model: NOMO & RIALTO Self Supporting & Wall Mounted Retractable Pergola Awning PRODUCT FEATURES: Free standing or wall mounted. Arched fabric with allows for a compact rain gutter design. Nomo
Albatros/Albatros Plus
 Albatros/Albatros Plus Albatros SINGLE MODULE Albatros DUAL MODULE Albatros PLUS Assembly manual Assembly manual Albatros/Albatros Plus SUMMARY 1 Introduction...4 1.1 Symbols used in the manual...4 1.2
Contents. Awnings USA - Full Protective Hood Manual Instructions ft 11" - 11ft 6" Awnings
 Awnings USA - Full Protective Hood Manual Instructions Contents Warning We recommend that two or more people are required to lift the awning into place. 4ft 11" - 11ft 6" Awnings 8 x Expansion bolts **
Installation Instructions for the Rolltec Bravo Awning
 Installation Instructions for the Rolltec Bravo Awning Questions? Call Rolltec at 1-800-667-0474 Table of Contents Available installation brackets Side dimensions of various installations Determining installation
INSTALLATION INSTRUCTIONS
 INSTALLATION INSTRUCTIONS Accessory FABRIC ROOF/ REAR PANEL (5P) P/N 0SR85-HL4-222A (Black) 0SR85-HL4-221C (Camo) Application SXS1000M5P/M5D Honda Dealer: Please give a copy of these instructions to your
INSTRUCTION MANUAL ALEKO RETRACTABLE AWNING
 INSTRUCTION MANUAL for ALEKO RETRACTABLE AWNING www.alekoproducts.com FAILURE TO FOLLOW THESE INSTRUCTIONS MAY RESULT IN PERSONAL INJURY! 1 Important Safety Precautions WARNING NOTE: FOR PERSONAL SAFETY,
Primrose Awnings Full Cassette Manual & Electric Instructions
 Primrose Awnings Full Cassette Manual & Electric Instructions Contents for Full Cassette Awning 1 x Remote control receiver box 2 x Remote hand-held zappers 1 x 5 metre cable 1 x Template sticker **The
INSTALLATION INSTRUCTIONS for vertical awnings
 Custom made Awnings and Blinds Item No 0759 INSTALLATION INSTRUCTIONS for vertical awnings IMPORTANT INFORMATION BEFORE INSTALLING YOUR Updated 08/09/15 AN AWNING INSTALLATION IS A HOME IMPROVEMENT PROJECT
Retractable Awning Owner s Manual
 Retractable Awning Owner s Manual TABLE OF CONTENTS SECTION-1 2 CONGRATULATIONS ON PURCHASE 2 OPERATING YOUR SHADELINE AWNING 2 GEAR CRANK OPERATION 2 EXTENDING YOUR AWNING 2 RETRACT 2 SECTION-2 3 MOTORIZED
Installation and User s Manual 12 x 10 MOTORIZED AWNING
 12 x 10 MOTORIZED AWNING Installation and User s Manual 12 x 10 MOTORIZED AWNING 088-1763-0 Stop Please read and understand this manual before any assembly or use of this product. Before beginning assembly
INSTALLATION INSTRUCTIONS AND OWNER'S MANUAL AWNINGS. For trailers & motor homes with straight sides TOOLS REQUIRED
 AWNINGS INSTALLATION INSTRUCTIONS AND OWNER'S MANUAL For trailers & motor homes with straight sides TOOLS REQUIRED 1/4" electric drill Ratchet handle kit 3/8" & 7/16" socket No. 1 and No. 2 screwdriver
ORDER FORM B B2100
 Date: ORDER FORM B2085 - B2100 Delivery address: Name: Address: Ref. customer: Tel. n : Quantity:... Type of awning: o Brustor B2085 o Brustor B2100 B2085: H = U + 120 mm B2100: H = U + 137 mm Total width:...mm
Honda Ridgeline Installation Instructions
 Honda Ridgeline Installation Instructions READ THIS... If you read these instructions from beginning to end before starting you will probably not need to look at them again during the installation, but
DO NOT use Alien Flier Zip Line Products until you have read and fully understand the SAFETY WARNINGS below!
 SAFETY WARNING DO NOT use Alien Flier Zip Line Products until you have read and fully understand the SAFETY WARNINGS below! Assumption of Risk Zip line construction and use can be dangerous. Ensure you
Assembly Manual. OLM Retractable Canopy for 12X20 Breeze Pergola by Outdoor Living Today. Revision #11 October 5, 2017
 Assembly Manual OLM Retractable Canopy for 12X20 Breeze Pergola by Outdoor Living Today Revision #11 October 5, 2017 Care and Maintenance - Canopy should be removed in winter to reduce the chance of collapse
Optional Controls (Depends which set was purchased) Set A (Remote control kit)
 Set A (Remote control kit)") Primrose Awnings - Full Cassette Manual & Electric Instructions Contents Warning 1.5m - 3.5m Awnings 8 x Expansion bolts ** 2 x brackets 1 x Awning 1 x Winder 4.0m - 5.0m Awnings 12 x Expansion bolts **
Primrose Awnings - Full Cassette Manual & Electric Instructions Contents Warning 1.5m - 3.5m Awnings 8 x Expansion bolts ** 2 x brackets 1 x Awning 1 x Winder 4.0m - 5.0m Awnings 12 x Expansion bolts **
Advantage Plus TIM-3600 Series Reel
 Read the following precautions and instructions before you begin assembly or using. Failure to comply with these instructions could result in personal injury or property damage. Keep these instructions
Assembly Manual. OLM Retractable Canopy for 10X12 Breeze Pergola by Outdoor Living Today. Revision 13 October 3rd /2017
 Assembly Manual OLM Retractable Canopy for 10X12 Breeze Pergola by Outdoor Living Today Revision 13 October 3rd /2017 Care and Maintenance - Canopy should be removed in winter to reduce the chance of collapse
Primrose Awnings Half Cassette Manual & Electric Instructions
 Primrose Awnings Half Cassette Manual & Electric Instructions Contents Contents for 2m, 2.5m, 3m Awnings 2 x wall brackets 4 x expansion bolts (2 per bracket)** 1 x Awning Contents for 3.5m, 4m and 4.5m
Primrose Awnings - Full Cassette Manual & Electric Instructions
 Primrose Awnings - Full Cassette Manual & Electric Instructions Contents Warning 2.0m - 3.5m Awnings 8 x Expansion bolts ** 2 x brackets 1 x Awning 1 x Winder 4.0m - 5.0m Awnings 12 x Expansion bolts **
Solera Power Awning. Resources Required. Installation and Owner s Manual (For Aftermarket Application)
") Solera Power Awning Solera Power Awning Installation and Owner s Manual (For Aftermarket Applications) Table of Contents Troubleshooting Manual Override Solera Power Awning Troubleshooting Solera Power
Solera Power Awning Solera Power Awning Installation and Owner s Manual (For Aftermarket Applications) Table of Contents Troubleshooting Manual Override Solera Power Awning Troubleshooting Solera Power
Primrose Awnings Half Cassette Manual & Electric Instructions
 Primrose Awnings Half Cassette Manual & Electric Instructions Contents for 2.5m, 3m Awnings 4 x Expansion bolts (2 per bracket)** 2 x brackets 1 x Awning Contents for 3.5m, 4m Awnings 6 x Expansion bolts
Tarp Return. Questions? Contact Customer Or Parts Diagrams see Parts and Diagrams section on web at
 Roll Rite, LLC and its entire staff would like to not only Thank You but congratulate you on your purchase of one of what we feel to be the finest line of tarping systems in the industry. Tarp Return RR
Optional Controls (Depends which set was purchased) Set A (Remote control kit)
 Set A (Remote control kit)") Primrose Awnings - Half Cassette Manual & Electric Instructions Contents Warning 1.5m - 3.0m Awnings 4 x Expansion bolts (2 per bracket)** 2 x brackets 1 x Awning 1 x Winder handle 3.5m - 4.0m Awnings
Primrose Awnings - Half Cassette Manual & Electric Instructions Contents Warning 1.5m - 3.0m Awnings 4 x Expansion bolts (2 per bracket)** 2 x brackets 1 x Awning 1 x Winder handle 3.5m - 4.0m Awnings
* * 4023 KR. Step 1 Prepare the Keyed Removable Unit. Not for use on electric or fire rated removable mullions
 condition. *64009-00* 64009-00 Keyed Removable Mullions 403 KR Installation Instructions Not for use on electric or fire rated removable mullions This kit includes the following parts: (Not to scale) 5/6
INSTALLATION INSTRUCTIONS for folding arm awnings
 Custom made Awnings and Blinds Item No 0757 INSTALLATION INSTRUCTIONS for folding arm awnings IMPORTANT INFORMATION BEFORE INSTALLING YOUR Updated 08/09/15 AN AWNING INSTALLATION IS A HOME IMPROVEMENT
LITE Spear Awning Instructions
 LITE Spear Awning Instructions IMPORTANT NOTE: Please take a few minutes to become familiar with this entire document BEFORE beginning your installation. The time you spend doing this is well spent and
INSTANT GARAGE MODEL NO: CIG81224 ASSEMBLY INSTRUCTIONS PART NO: ORIGINAL INSTRUCTIONS
 INSTANT GARAGE MODEL NO: CIG81224 PART NO: 3503578 ASSEMBLY INSTRUCTIONS ORIGINAL INSTRUCTIONS GC1117 INTRODUCTION Thank you for purchasing this CLARKE Instant Garage. When erected, the CIG81224 garage
Assembly TOOLS REQUIRED: 17mm and 14mm or equivalent wrenches.
 Instructions for 3 Trimmer Rack, 3TR* *Patents Pending Assembly TOOLS REQUIRED: 17mm and mm or equivalent wrenches. 15 26 26 16 15 16 Attach the lower mounting brackets to the Trimmer Rack poles as shown
Solera Classic Awning
 Solera Classic Awning OWNER'S MANUAL Page 1 Table of Contents System and Safety Information 2 Operation 3 Extending the Awning 3 Optional Car Port Position 3 Retracting the Awning 3 Fabric Replacement
AND LOAD CANOPY RACK SPECIFICATIONS
 8MAY15 INSTRUCTIONS for the LOCK AND LOAD CANOPY RACK SPECIFICATIONS and SAFE LOADING REQUIREMENTS The Lock and Load ladder carrier for Truck Caps is a rack designed to mount to the top of a pickup truck
Hose Reel Series L701/G701
 Hose Reel Series L70/G70.0 WARNING: Read carefully and understand all INSTRUCTIONS before operating. Failure to follow the safety rules and other basic safety precautions may result in serious personal
OWNER S MANUAL: G5000 SLIDE-OUT AWNING SYSTEM
 INSTALLATION, OPERATIONS, ADJUSTMENT AND REPAIR Rev. 08/01/12 1361 Calle Avanzado San Clemente California 92673 Office: (949) 259-4000 Toll Free: (800) 382-8442 Fax: (949) 276-5500 TABLE OF CONTENTS WARRANTY
Solera Power Awning w/ LED Lights OEM INSTALLATION MANUAL
 Solera Power wning w/ LED Lights OEM INSTLLTION MNUL TBLE OF CONTENTS Safety 2 Prior to Installation 2 Resources Required 2 wning Installation 3 wning Rail Installation (If Needed) 3 wning Support rm Installation
INSTALLATION INSTRUCTIONS for automatic awnings
 Custom made Awnings and Blinds Item No 0756 INSTALLATION INSTRUCTIONS for automatic awnings AUTOMATIC AWNING IMPORTANT INFORMATION BEFORE INSTALLING YOUR AUTOMATIC AWNING Updated 08/09/15 AN AWNING INSTALLATION
RETRACTABLE PATIO SHADE AWNING Patio Awning Guide-10ft. x12ft.(proj. X Width) Model: APR ***/APR (version: GEN2-V1)
 Model: APR ***/APR (version: GEN2-V1)") Page 1 of 14 RETRACTABLE PATIO SHADE AWNING Patio Awning Guide-10ft. x12ft.(proj. X Width) Model: APR-101012***/APR-60021012 (version: GEN2-V1) WARNING: DO NOT CUT THE PLASTIC ZIP TIES ON THE AWNING EXTENSION
Page 1 of 14 RETRACTABLE PATIO SHADE AWNING Patio Awning Guide-10ft. x12ft.(proj. X Width) Model: APR-101012***/APR-60021012 (version: GEN2-V1) WARNING: DO NOT CUT THE PLASTIC ZIP TIES ON THE AWNING EXTENSION
INSTALLATION INSTRUCTIONS
 INSTALLATION INSTRUCTIONS KR54, KR1654, & KR4954 Keyed Removable Mullion NOT FOR USE ON ELECTRIC OR FIRE RATED MULLIONS. This kit includes the following parts: (Not to scale) WARNING Remove key, reinstall,
Standard Awning Installation Instructions
 Standard Awning Installation Instructions Important Note: Please become familiar with this entire document BEFORE beginning your installation. The time you spend doing this is well spent and will make
0: ae
 USA SERVICE OFFICE The Dometic Corp. 509 So. Poplar st. LaGrange, IN 46761 CANADA Dometic Dist 866 Langs Dr. Cambridge, Ontario CANADA N3H N7 0: ae 8000,8500&9000 @ Fabric Roller Tube Assembly with Universal
Core Systems Installation Instructions
 185-3017 185-3018 185-3517 607-0149 WLH 09/17/18 TABLE OF CONTENTS ***Assembly*** Roller Tube Assembly Roller Tube Assembly... Standard Application Attaching Tarp to Roller Tube - Standard... Installing
* * KR54-F, KR9854 & KR9954 Installation Instructions. Read All Warnings Before Starting Installation! Index:
 *941061-00* 941061-00 Keyed Removable Mullion KR54-F, KR9854 & KR9954 Installation Instructions CLASSIFIED CLASSIFIED C Read All Warnings Before Starting Installation! Index: General Information ----------------
CONVEX Awning Instructions
 CONVEX Awning Instructions IMPORTANT NOTE: Please take a few minutes to become familiar with this entire document BEFORE beginning your installation. The time you spend doing this is well spent and will
, & Series Nested Hardware
 RECORD THIS INFORMATION FOR FUTURE REFERENCE BEFORE INSTALLING THE UNIT: Model Number Serial Number Date Purchased Place of Purchase USA SERVICE OFFICE Dometic Corp. 509 So. Poplar St. LaGrange, IN 46761
READ ME FIRST! IMPORTANT WARNING! ENG. Roof top tent
 Roof top tent ENG TENT031 220 min READ ME FIRST! Thank you for purchasing a Front Runner Roof Top Tent. Before you start, take a moment to familiarize yourself with these Fitting Instructions and the components
Motorized Oasis Awning RTS Motor Cord Replacement Instructions *Helpers Needed*
 RETRACTABLE AWNINGS For Technical Support visit us at www.sunsetter.com/ownerscorner or Call Toll Free 800-670-7071 Fax 877-224-4944 Motorized Oasis Awning RTS Motor Cord Replacement Instructions *Helpers
quick and easy installation guide
 www.directdriveopener.com quick and easy installation guide Back 2 Front. Motor Carriage 2. C-rail. Chain. Limit stops. Slide in part (tensioner) Rail assembly Insert C-rail parts () into the connecting
Otter Pro X-Over Lodge Installation and Set-Up Instructions
 Otter Pro X-Over Lodge Installation and Set-Up Instructions Otter Pro X-Over Lodge Fits Magnum Otter II & Pro Sled Only Parts Identification and Check List MODEL NUMBERS: Complete Pkg Pro X-Over Lodge
Model INSTALLATION INSTRUCTIONS
 RECORD THIS UNIT INFORMATION FOR FUTURE REFERENCE: Model Number Serial Number Date Purchased USA SERVICE OFFICE Dometic, LLC 2320 Industrial Parkway Elkhart, IN 46516 574-294-2511 895(X)0(X)1.400(X) Basement
Cassette-folding arm-awning markilux 990
 Cassette-folding arm-awning markilux 990 Mounting instructions 1. Overview 1 Projection profile 2 Folding arm 3 Fabric 4 Console 5 Cassette 6 Covering cap 7 Wall bracket 2. Mounting brackets 2.1 Overview
Universal 10 x 27 Canopy
 Universal 10 x 27 Canopy C81027PC Size: 10 8 x 27 x 6 8 (side) x 9 9 (center) With 10 Legs, Frame, and Cover Powell & Powell Supply Company Distributed by: 1730 Five Points Lane Fuquay-Varina, North Carolina
ORDER FORM B B B1100 windproof
 ORDER FORM B1085 - B1100 - B1100 windproof Date: Delivery address : Name: Address: Ref.customer: Tel. n : Quantity:... Type of awning: o Brustor B1085 o box 85mm o Brustor B1100 o box 105mm o Standard
Primrose Awnings - Standard Manual Instructions
 Primrose Awnings - Standard Manual Instructions Contents Warning 1.5m - 3.0m Awnings 4 x Expansion bolts (2 per bracket)** 2 x brackets 1 x Awning 1 x Winder handle 3.5m - 4m Awnings 6 x Expansion bolts
Assembly Manual. OLM Retractable Canopy for 12X16 Breeze Pergola by Outdoor Living Today. Revision 7 May 12th /2015
 Assembly Manual OLM Retractable Canopy for 12X16 Breeze Pergola by Outdoor Living Today Revision 7 May 12th /2015 Care and Maintenance - Do not leave canopy extended during heavy snow storms or any extreme
Assembly Manual. OLM Retractable Canopy for 12X12 Breeze Pergola by Outdoor Living Today. Revision 8 August 1st /2017
 Assembly Manual OLM Retractable Canopy for 12X12 Breeze Pergola by Outdoor Living Today Revision 8 August 1st /2017 Care and Maintenance - Do not leave canopy extended during heavy snow storms or any extreme
80070 TOP MOUNT CAMPER SHELL and TRANSIT CONNECT RACK TMCS_3:1
 ASSEMBLY INSTRUCTIONS for : 80070 TOP MOUNT CAMPER SHELL and TRANSIT CONNECT RACK TMCS_3:1 (916) 638-8703 (800) 343-7486 11261 Trade Center Drive Rancho Cordova, CA 95742 www.kargomaster.com Transit ASSEMBLY
Item # BJ2PC With 8 Leg Frame, Cover, and Enclosure Kit with Windows Size: 10 8 Wide x 20 Long (Side Height 6 8 ) (Center Peak Height 9 9 )
 (Center Peak Height 9 9 )") Item # BJ2PC With 8 Leg Frame, Cover, and Enclosure Kit with Windows Size: 10 8 Wide x 20 Long (Side Height 6 8 ) (Center Peak Height 9 9 ) Powell & Powell Supply Company, L.L.C. Manufactured by: 1730
Item # BJ2PC With 8 Leg Frame, Cover, and Enclosure Kit with Windows Size: 10 8 Wide x 20 Long (Side Height 6 8 ) (Center Peak Height 9 9 ) Powell & Powell Supply Company, L.L.C. Manufactured by: 1730
RAFTER VI. Installation and Operation CAREFREE WITH AUTOMATIC AWNING SUPPORT. RV Accessory PRODUCT OVERVIEW
 CAREFREE RAFTER VI RV Accessory WITH AUTOMATIC AWNING SUPPORT Installation and Operation PRODUCT OVERVIEW The gives the awning user the ability to easily tighten the center fabric when the awning is extended.
ULTRA SLIDE OUT AWNING
 ULTRA SLIDE OUT AWNING SG5000 INSTALLATION GUIDE REV.01262016 RV AWNING PRODUCTS 1361 CALLE AVANZADO, SAN CLEMENTE, CA 92673 (800) 382-8442 FAX (949)276-5500 www.girardrv.com Girard Systems awnings may
Operating Instructions
 Operating Instructions Medium and High Pressure Model Numbers: RT602- RT635- RT602- RT635- RT603- RT650- RT603- RT650- RT605- RT825- RT605- RT650-SM RT802- RT835- RT425- RT803- RT402- RT435- RT625- RT403-
Installation manual. Drop-arm awning. V124 Calpe
 Installation manual Drop-arm awning V124 Calpe Installation manual Drop-arm awning V124 Calpe Content 1. Drop-arm awning * 2. Wall supports 3. Control a. Manual control: crank handle b. Electrical control:
Otter Pro XT Cabin Installation and Set-Up Instructions
 Otter Pro XT Cabin Installation and Set-Up Instructions Otter Pro XT Cabin Fits Medium Otter Pro and Otter II Sled Only Parts Identification and Check List MODEL NUMBERS: Complete Pkg Pro XT Thermal Cabin
Technical data Folding arm awning BX260
 Technical data Folding arm awning BX260 art.nr. 34850 Inhoudsopgave 1. Generalities page 4 2. The profiles page 4 3. Other components page 5 4. Mimimum and maximum sizes page 10 5. Coupled awnings page
! NO ROPES, PULLEYS OR ZIPPERS! ROBUST GEARBOX OPERATION! EXTRA FIXING POINTS CAN BE FITTED TO ! O PTIONAL HEADBOX
 PERFECT SOLUTION FOR ENCLOSING A PATIO, COURTYARD OR BALCONY TO CREATE A ROOM CRANK HANDLE Gear operated NO SIDE Guides* A very robust external awning that is a step up from the traditional Rope & Pulley
ALEKO Victoria Series Retractable Awning Instructions for Installation and Operation
 www.alekoproducts.com ALEKO Victoria Series Retractable Awning Instructions for Installation and Operation PLEASE DO NOT RETURN THIS PRODUCT TO THE STORE! The owner s manual includes assembly and operating
FLEX KEY ASSEMBLY. ..._ o RAFTER ARM TUBE MAIN ARM TUBE CAP NUT CLAW HINGE
 ZIP DEE Inc. 96 Crossen Ave. Elk Grove Village, IL 60007(847)437-0980 (800)338-2378 HEAD CASTING AWNING RAIL FLEX KEY ASSEMBLY..._ o GM1 Installation Instruction GMC Motorhome RAFTER ARM TUBE MAIN ARM
Vanagon Ladder Kit Assembly & Installation Instructions
 Rocky Mountain Westy Vanagon Ladder Kit Assembly & Installation Instructions Introduction Thank you for purchasing the Rocky Mountain Westy Vanagon Ladder Kit. We pride ourselves in the products we develop
LM601 Landmark Permanent Blind
 LM601 Landmark Permanent Blind Get parts online at www.huntriversedge.com P/N: 26742 REV1: 01/13/17 2017 RETI All Rights Reserved INTRODUCTION Landmark Permanent Blinds are engineered with you the hunter
Aftermarket Installation Manual
 Straptek Installation Manual Table of Contents Introduction... 2 Straptek Weight Tension Technology.... 2 Disadvantages with Typical Weight Distribution Systems (WDS)... 2 Straptek Advantages:... 2 Quick
Manual Awning. Assembly Instructions. Product No Toll-free:
 Manual Awning Product No. 088-30- Instructions Toll-free: -877-483-679 IMPORTANT: Please read this manual carefully before beginning assembly of this product. Keep this manual for future reference. 3 Table
Alien Flier Zip Line Products Installation/Owner s Manual
 Alien Flier Zip Line Products Installation/Owner s Manual 1 Table of Contents SAFETY PLEASE READ CAREFULLY... 4 Explorer Zip Line EZ Up Cable Kit Installation... 5 Xtreme Zip Line EZ Up Cable Kit Installation...
Operating Instructions
 Operating Instructions Series RT Spring Driven Hose Reels Low Pressure Model Numbers: RT402-OLP RT605-OLP RT450-OLP RT835-OLP RT403-OLP RT802-OLP RT465-OLP RT850-OLP RT405-OLP RT803-OLP RT625-OLP RT450-OLPSM
Assembly Manual. OLM Retractable Canopy for 10X12 Arched Breeze Pergola by Outdoor Living Today. Revision 2 April 27th /2015
 Assembly Manual OLM Retractable Canopy for 10X12 Arched Breeze Pergola by Outdoor Living Today Revision 2 April 27th /2015 Care and Maintenance - Do not leave canopy extended during heavy snow storms or
DO NOT USE WITH CROSSBAR SPREAD LESS THAN 24.
 TM Please read all instructions carefully before assembly, installation and/or use of this product. DO NOT USE WITH CROSSBAR SPREAD LESS THAN 24. WARNING: Do not exceed the weight limit of your vehicle
RETRACTABLE PATIO SHADE AWNING Patio Awning Guide-10ft. x14ft.(proj. X Width) Model: AP (version: GEN2-V1)
 Model: AP (version: GEN2-V1)") Page 1 of 14 RETRACTABLE PATIO SHADE AWNING Patio Awning Guide-10ft. x14ft.(proj. X Width) Model: AP021014 (version: GEN2-V1) WARNING: DO NOT CUT THE PLASTIC ZIP TIES ON THE AWNING EXTENSION ARMS UNTIL
Page 1 of 14 RETRACTABLE PATIO SHADE AWNING Patio Awning Guide-10ft. x14ft.(proj. X Width) Model: AP021014 (version: GEN2-V1) WARNING: DO NOT CUT THE PLASTIC ZIP TIES ON THE AWNING EXTENSION ARMS UNTIL
ALPHA AWNING SERIES INSTALLATION GUIDELINES
 ALPHA AWNING SERIES INSTALLATION GUIDELINES 07/2012 Hunter Douglas Limited Australia PRODUCT MANUAL INFORMATION MEASURING AND INSTALLATION MANUAL ONLY. PLEASE REFER TO YOUR ONLINE PORTAL FOR THE UPDATED
R.V. AWNING INSTALLATION AND OPERATING INSTRUCTIONS FOR TRAILERS & MOTOR HOMES WITH STRAIGHT SIDES.
 R.V. AWNING INSTALLATION AND OPERATING INSTRUCTIONS FOR TRAILERS & MOTOR HOMES WITH STRAIGHT SIDES. READ ENTIRE INSTRUCTIONS BEFORE STARTING. FOLLOW ALL CAUTIONS, WARNINGS, AND NOTES TO PREVENT PERSONAL
MOTORIZED OR MANUAL LATERAL ARM BOX AWNING. Product Overview... 1 Component Checklist... 2
 INSTALLATION MANUAL FREEDOM AWNING RV MOTORIZED OR MANUAL LATERAL ARM BOX AWNING TABLE OF CONTENTS Product Overview... 1 Component Checklist... 2 Installation... 3 Attaching the Mounting Plates... 3 Mounting
PLATINUM MODEL WITH AUTO-RETRACT AND REMOTE CONTROL. Owner s Manual
 PLATINUM MODEL WITH AUTO-RETRACT AND REMOTE CONTROL Owner s Manual THIS MANUAL CONTAINS INSTRUCTIONS FOR UPGRADING BOTH THE GOLD MODEL ONE-TOUCH AND THE ONE-TOUCH MODEL WITH THE KEY SWITCH TO THE PLATINUM
Model. Oasis Automatic and Manual RV Door Awning System INSTALLATION & OPERATING INSTRUCTIONS
 Oasis Automatic and Manual RV Door Awning System USA SERVICE OFFICE Dometic Corp. 509 So. Poplar St. LaGrange, IN 46761 260-463-4858 CANADA Dometic Dist. 866 Langs Dr. Cambridge, Ontario CANADA N3H 2N7
User s Manual Trampoline 8
 User s Manual Trampoline 8 Model! WARNING Read all precautions and instructions in this manual before using this equipment. Save this manual for future reference. Maximum user weight 17 lbs. ASSEMBLY IMPORTANT
OWNER'S MANUAL AWNING EXTEND R TABLE OF CONTENTS
 OWNER'S MANUAL AWNING EXTEND R RV Before operating the awning, carefully review the Owner's Manual. The manual contains important safety information, detailed operating instructions, common maintenance
12 Cage Installation Instructions
 Important Notes 12 Cage Installation Instructions 1) The long pipes are the for vertical sections only. The cage is 10 tall. 2) The cross fittings should be oriented with the slide through running front
TUCSON PATIO AWNING INSTALLATION MANUAL
 TUCSON PATIO AWNING INSTALLATION MANUAL Toll Free 877-792-1775 Fax 877-792-0031 swsuncontrolpro.com sales@swsuncontrol.com 1 INTRODUCTION...3 1.1 Symbols used in this manual... 3 1.2 Personnel requirements...
Installation manual. Drop-arm awning. V120 Napoli
 Installation manual Drop-arm awning V120 Napoli Installation manual drop-arm awning V120 Napoli Content 1. Drop-arm awning * 2. Control a. Manual control: crank handle b. Manual control: strap coiler
Door Bushing Replacement & Latch Adjustment Monaco Group Coaches
 Door Bushing Replacement & Latch Adjustment Monaco Group Coaches Contents Door Latch Adjustment & Repair... 1 Symptoms:... 1 Replacing the bushing VS. Adjusting the latch rods.... 1 How the bushing works....
INSTALLATION INSTRUCTIONS TOWNSEND
 INSTALLATION INSTRUCTIONS TOWNSEND.00 DECK MOUNT BATH FILLER.0 Thank you for selecting American Standard... the benchmark of fine quality for over 00 years. To ensure that your installation proceeds smoothly-please
Installation manual. Awning. V480 Cannes
 Installation manual Awning V480 Cannes Installation manual awning V480 Cannes Content 1. Awning * 2. Wall supports 3. Extra support(s) (with an awning bigger than 350 cm) 4. Mounting plates (optional)