All of these configurations are from one 2005 Blue Ultralite Trayman. Just slide the straps up and over your shoulders and they will slip into place.
|
|
|
- Lester Sparks
- 5 years ago
- Views:
Transcription


1 All of these configurations are from one 2005 Blue Ultralite Trayman. Just slide the straps up and over your shoulders and they will slip into place.

2 The back edge of the Shoulder Strap has a slight bend outward That allows the Trayman to slide easily on and off. To Remove the Trayman simply tilt the unit off from your midriff with one easy motion.


3 The Right Strap,as you wear the Trayman, has the longer Safety Stop The Right Chest bar is the thicker of the two Chest Bars at it s end. Insert the Right Strap into the Right Chest Bar. Next slip on one nylon washer and then tighten the Quick Grip knob that was originally on the Strap when you opened up the Strap s Shipping Bag. After slipping the Trayman onto your shoulders hand tighten the knobs for both the right and left straps.


4 Repeat the same insert and tightening of the second Quick Grip Knob to the Left Shoulder Strap and Left Cross Bar. Remember the Left Cross Bar is thinner at it s end then the Right Cross Bar is. The Shoulder Strap Stops allow the Straps to extend from 90 to 45 degrees safely. This will allow you to adjust the Strap to the best angle for your shoulders.


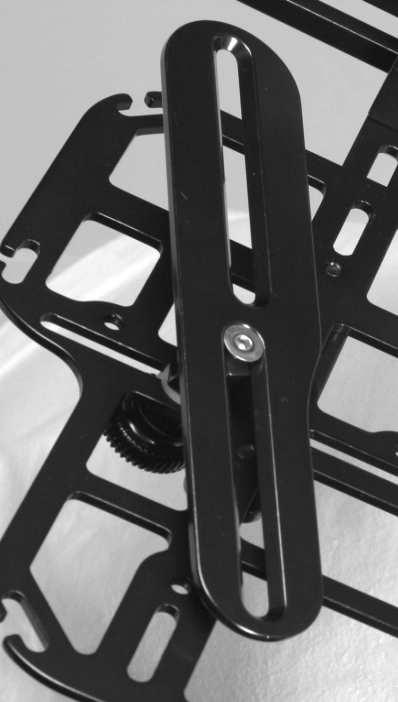
5 The Shoulder Straps are attached using hardened steel 10/32 Button Head Allen Bolts that are secured with Red Lock-Tite. The relief pattern will allow the Straps to be bent one time to shorten the strap for some women. You may wish to bend the arc of the strap slightly as well to fit yourself. First remove the Straps and adjust them a little bit at a time. Your Trayman is made from 6061 Aircraft Quality Aluminum which is very strong, however multiple adjustments of the Straps Arc is not recommended


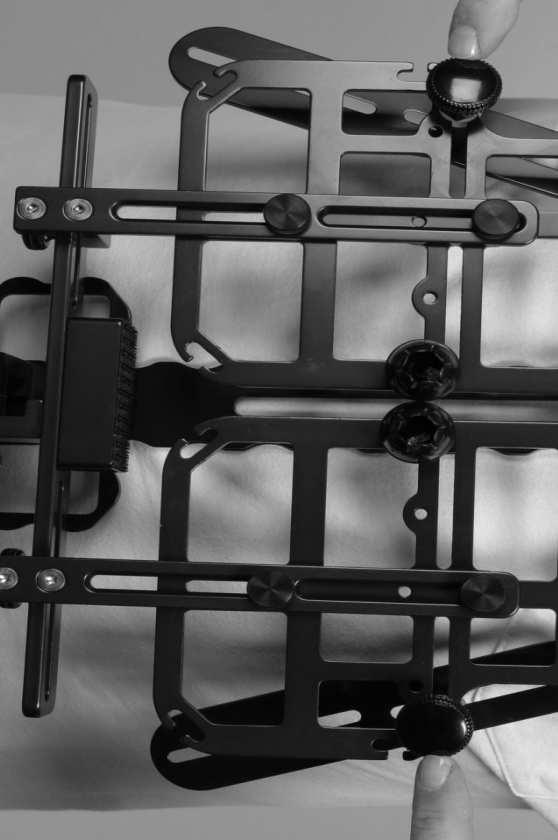
6 The Center Wave Grip is a combination of a Sure Grip Knob and 10/32 hardened steel Thread, one Nylon Washer, and The Center Wave Grip itself. This allows the Left and Right Upper Chest Bars to be quickly opened and closed as desired, and allow for a wide range of chest and shoulder sizes. The Wave Grips are cut from Billet 6061 Aluminum stock.


7 The Center Wave grip being adjusted from it's narrowest to widest positions.


8 The use of the Lower Wave Grip is similar to the Center Wave Grip in all it s operation and adjustments.


9 This is one of the reasons no accessories are needed, even if you are a very tall person, or a individual with a very long reach. The Trayman has a incredible range of adjustability crafted into it s design.


10 The Upper Spine is totally removable allowing the overall length to be even shorter then the Lower Wave Grip allows for. Simply remove the Upper Spine Bar and attach the Upper Wave Grip and Chest Bars to The Lower Spine Bar. It will help if you keep the unneeded parts assembled as shown for use later on.


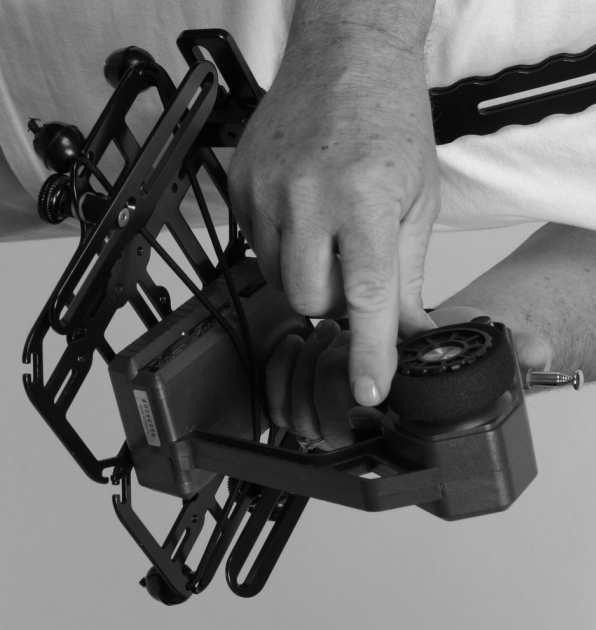
11 Machined out of 6061 Billet Aluminum the Fast Lock Tray Swivel will lock down with a sure grip supported by it s hardened steel pivot shaft also secured, as are all hard points, with Red Lock-Tite.


12 The CNC Machined Timed Wave Pattern allows you to find just the right angle of tilt for the trays. Your individual sweet spot will be exactly where you are most comfortable. The Sure Grip brass lined knob only needs to be twisted open to adjust the angle of the Trayman Tables. A Nylon release washer guards against over tightening the mechanism via a strong pair of hands or too much enthusiasm.


13 The two Tray Support Spines are made so that each Tray may touch or slide away from each other. This side to side travel extends as far as the end of each slot that has been milled into the Lower Cross Bar. The two Tray Spines allow the Trays to slide away from or towards the user.

14 The Trayman Tables have been rotated up vertically and locked into place so that you can clearly see the underside of the Tables. This exposes the two Tray Spines and the four smaller Quick Grip Knobs that both secure the Trays and allow them to be repositioned. Just loosen each pair of Knobs and slide the Tray into whatever position best fits your transmitter. Please note that the Trayman Tables maybe rotated into any position or relationship to one another. There is a great number of Tray combinations that are possible. The Bungee Cord in the center has been attached in a typical four Bungee-Bud pattern and is now ready to be slipped over any transmitter s handle. This is one of Trayman s Patent Pending two part lock down system.


15 This is the Two Part Bungee-Bud Lock Down System. The First part is our rectangular Velcro Block. This piece of Billet Aluminum has been hogged out to remove any extra weight and is bolted to the Lower Cross Bar with two Stainless Steel Bolts that are secured with Red Lock-Tite. Rip-N-Grip self-adhesive hook material is applied to the Block. The softer loop Rip-N-Grip material is placed on the underside of any transmitter, between the transmitter s legs. Slip the Bungee Cord over the trans-


16 These are the two Stainless Steel Bolts that secure the Velcro Block before it is covered. The Rip-N-Grip hook material has been pre-applied. Just peal off the matching self-sticking loop material and after removing the white protective backing, apply it to the center of the underside of your transmitter. Be sure to leave an equal space between each of the two feet. Press the Rip-N- Grip into place firmly checking that the battery door is clear. If there is a serial number copy it down and tape it to the inside of the battery cover with your name.


17 Having pressed the Hook-N-Grip into position the transmitter can now be quickly mounted on the trays by simply lining up the two parts of the material


18 Interlock the Rip-N-Grip Pads, Slip the Bungee-Bud Cord over the handle only, line up the edge of the Tray with the handle and the transmitter is locked down.


19


20


21


22

23


24 The 2005 Ultra Lite fite all transmitters and more..

25


26


27


28

29

30 This is the Bungee-Bud and Rip-N-Grip Kit that come with each tray. There is an extra Bungee Cord, a pair of Spare Nylon Washers, and more self adhesive Rip-N-Grip material.


31 The Tilt Wrist Rest has been made to fit into any of the slots or threaded openings in the Trayman Tray Table. The long 10/32 threaded bolt will slide along the slots to be adjusted exactly where it will best fit the edge of your hand.

32


33 The Belt Buckle provide a pivot point and general pad for the Tray Tables to rest upon at the users waist. The Stainless Steel bolts are set into place with Red Lock-Tite so they will not come loose with use. The actual use of a belt is not required, for the general use, of our Ultra Lite 2005 Blue Trayman.
34 Disclaimer: Please note that none of the products shown as examples of applications for the use of our 2005 Ultra Lite Blue Trayman should suggest that the brands we have shown endorse our Tray. We are not affiliated with any other manufacturer of Transmitters, Video or Computer equipment. Our product fits many other applications in Film, Sports, Theater, Inventory, Intake clipboards, Artwork, Medical Services, and as a general personal reading or writing platform. There are new applications found for our unit every day. As you discover your own please let us know about them. Your comments are always welcome. Caution: All of the fittings and hardware are of stainless steel or hardened steel and all of the end points have been treated with Red Lock-Tite. No bolt has been made to be removed except those that are made to be adjusted. Caution: Do not overload your Trayman System. Be sure that all of the Quick Grip Knobs have been hand tightened especially the Table Tilt Swivel. The Wave Grip Teeth can only hold if they are properly engaged. Remember: Common sense and an eye towards safety are your best protection. Liability: Rc Trayman USA LLC assumes no liability for the use of this system or any damages that occur from it s being used in any application whatsoever.
P3000 UNIVERSAL Clamp-On
 IHI INSTRUCTION MANUAL Required Tools P3000 UNIVERSAL Clamp-On Wrench Allen Key P3001 65 ENDCAPS P3011 65 BLACK P300 7 ENDCAPS P301 7 WHITE P3003 ENDCAPS P3013 SILVER PART# DESCRIPTION ENDCAPS SIDE SUPPORTS
READ ME FIRST! IMPORTANT WARNING! ENG. Roof top tent
 Roof top tent ENG TENT031 220 min READ ME FIRST! Thank you for purchasing a Front Runner Roof Top Tent. Before you start, take a moment to familiarize yourself with these Fitting Instructions and the components
BowDown. MiniMuM Crossbar spread 24 (61CM) Steel Hook (2X) Buckle Strap (2X) Plastic Tube (2X) Plain Strap (2X) SHORT BLACK T-BOLT (2x) BOWDOWN (2x)
 Steel Hook (2X) Buckle Strap (2X) Plastic Tube (2X) Plain Strap (2X) SHORT BLACK T-BOLT (2x) BOWDOWN (2x)") BowDown MiniMuM Crossbar spread 24 (61CM) Heavy Duty strap (2x) SHORT BLACK T-BOLT (2x) BOWDOWN (2x) Bow Stern Tie Down Buckle Strap (2X) Plastic Tube (2X) Plain Strap (2X) Steel Hook (2X) IMPORTANT WARNING
BowDown MiniMuM Crossbar spread 24 (61CM) Heavy Duty strap (2x) SHORT BLACK T-BOLT (2x) BOWDOWN (2x) Bow Stern Tie Down Buckle Strap (2X) Plastic Tube (2X) Plain Strap (2X) Steel Hook (2X) IMPORTANT WARNING
Vanagon Ladder Kit Assembly & Installation Instructions
 Rocky Mountain Westy Vanagon Ladder Kit Assembly & Installation Instructions Introduction Thank you for purchasing the Rocky Mountain Westy Vanagon Ladder Kit. We pride ourselves in the products we develop
Assembly. Step 3. Attach the safety bracket (7) to the Pivot ARM (6).
 to the Pivot ARM (6).") Assembly Step 1. A. Stand the base of the machine by separating the U-frames (1,2). Pull the Front and Rear U-Frames (1,2) as far apart from each other as possible. Then push down on the middle of the
Assembly Step 1. A. Stand the base of the machine by separating the U-frames (1,2). Pull the Front and Rear U-Frames (1,2) as far apart from each other as possible. Then push down on the middle of the
/ Tool and Equipment Safety Tether System (T.E.S.T.S)
") 20 INSTRUCTIONS FOR USE AND PRODUCT GUIDE 799953 / 799955 Tool and Equipment Safety Tether System (T.E.S.T.S) Part # T353012 Rev 2 Reliance Industries LLC 2802 East X Street Deer Park, Texas 77536 281-930-800
20 INSTRUCTIONS FOR USE AND PRODUCT GUIDE 799953 / 799955 Tool and Equipment Safety Tether System (T.E.S.T.S) Part # T353012 Rev 2 Reliance Industries LLC 2802 East X Street Deer Park, Texas 77536 281-930-800
DO NOT use Alien Flier Zip Line Products until you have read and fully understand the SAFETY WARNINGS below!
 SAFETY WARNING DO NOT use Alien Flier Zip Line Products until you have read and fully understand the SAFETY WARNINGS below! Assumption of Risk Zip line construction and use can be dangerous. Ensure you
BigStack. Minimum Crossbar spread 24 For factory racks: Check fitlist notes, or Yakima.com for your vehicle s crossbar spread.
 BigStack Minimum Crossbar spread 24 For factory racks: Check fitlist notes, or Yakima.com for your vehicle s crossbar spread. HEAVY Duty strap (2x) PAD (4x) ADJUSTMENT KNOB (2x) T-BOLT (2x) BAIL (2x) BigStack
IMPORTANT OWNER-OPERATOR INSTALLATION INSTRUCTIONS. Part # A7006
 IMPORTANT OWNER-OPERATOR INSTALLATION INSTRUCTIONS Part # A7006 Parts List Wobble Stopper Body Wobble Stopper Shaft Camper Bracket Lower Bracket Assembly Upper Bracket Upper Bracket Clamp 3/8 SAE Flat
 www.kathmandu.co.nz www.kathmandu.com.au www.kathmandu.co.uk If you have questions or concerns regarding your pack, please consult our in-store Pack Fitting Specialists for assistance. Using the selection
Alien Flier Zip Line Products Installation/Owner s Manual
 Alien Flier Zip Line Products Installation/Owner s Manual 1 Table of Contents SAFETY PLEASE READ CAREFULLY... 4 Explorer Zip Line EZ Up Cable Kit Installation... 5 Xtreme Zip Line EZ Up Cable Kit Installation...
Step by Step Set Up Guide
 lite Step by Step Set Up Guide 1 lifting lug Secure lifting lugs to a certified lifting sling. Stand and stabilize escape system under work platform. Position module with round lunette ring facing work
functionality with the necessary maintenance tools stored in a convenient built in tool box, as well as parallel handles for
 GuilloMax User Manual The Guillomax has distinct features such as its unique structure and ease of cutting. It combines symmetry with functionality with the necessary maintenance tools stored in a convenient
MYRIAD Banner Stand is a trademark of Skyline Exhibits. Patent Pending PN32294-B. MYRIAD Banner Stand
 is a trademark of Skyline Exhibits Patent Pending 1.1 1. Banner Stand Setup 1.1 Remove banner stand from standard case or Arrive Portable Display & Workstation and assemble pole. 1.2 Insert pole into base
PARTS INCLUDED IN YOUR KIT. You may want to lay them out in this manner for accessibility. Foam has NO adhesive to touch truck finish.
 -'07 Ford Sport Trac Tarp Assembly with Cab Rail, Tail Rail and Support Bows attached. Left and Right Side Rail Assemblies Sport Trac Brackets (x4) Clamp Bolts Allen Wrench PARTS INCLUDED IN YOUR KIT.
all information is copyright 2005, Kifaru International KIFARU, INTERNATIONAL
 Kifaru LongHunter Handbook Pack Anatomy...1-2 Pocket Placements...3 Installing Pockets...4-5 Turn Your Top Hood into a Lumbar...6 Add a GunBearer...7-9 Add a CargoChair...10-11 Convert your LongHunter
AND LOAD CANOPY RACK SPECIFICATIONS
 8MAY15 INSTRUCTIONS for the LOCK AND LOAD CANOPY RACK SPECIFICATIONS and SAFE LOADING REQUIREMENTS The Lock and Load ladder carrier for Truck Caps is a rack designed to mount to the top of a pickup truck
Alien Flier Zip Line Products Installation/Owner s Manual
 Alien Flier Zip Line Products Installation/Owner s Manual 1 Table of Contents SAFETY PLEASE READ CAREFULLY... 4 Constructing your Zip Line Xtreme Models... 6 Installing your Alien Flier Trolley on an Existing
APEX CLIMB 2 OVERVIEW APEX CLIMB 25
 OVERVIEW Congratulations on your purchase of a SALEWA Pack. We want to besure that you understand and utilize your new SALEWA pack in the best way. Following you will find a description of all functions
USER MANUAL CONTENTS. Please read this carefully before doing anything with your new container system
 USER MANUAL CONGRATULATIONS ON YOUR PURCHASE OF A SQUIRREL CRUX ( PRODUCT ). BY PURCHASING THIS PRODUCT, YOU ACKNOWLEDGE THAT ENGAGING IN SKY-DIVING, BASE JUMPING, PARACHUTING, AND WINGSUITING IS AN INHERENTLY
Gas Go Anywhere /23/01
 Gas Go Anywhere 55014 02/23/01 FOR OUTDOOR USE ONLY This grill does not include an LP fuel tank. Check Package Contents You should have received the parts listed below. While we give much attention to
User s Manual Trampoline 8
 User s Manual Trampoline 8 Model! WARNING Read all precautions and instructions in this manual before using this equipment. Save this manual for future reference. Maximum user weight 17 lbs. ASSEMBLY IMPORTANT
PEUTEREY 40 PEUTEREY 30
 OVERVIEW Congratulations on your purchase of a SALEWA Pack. We want to besure that you understand and utilize your new SALEWA pack in the best way. Following you will find a description of all functions
DIY Suspension Trainer - Take Your Gym Anywhere - Inspired by Monkii Bars 2
 instructables DIY Suspension Trainer - Take Your Gym Anywhere - Inspired by Monkii Bars 2 by Jake_Of_All_Trades Body weight training, also known as calisthenics, is a tremendous way to improve your flexibility,
Active standing technology in the Glider enhances. the many health benefits of a passive stander. The Glider
 Glider medium, large 4-5 6 200 lbs medium 5-6 2 280 lbs large Active standing technology in the Glider enhances the many health benefits of a passive stander. The Glider is the only stander that combines
PARTS INCLUDED IN YOUR KIT. You may want to lay them out in this manner for accessibility. Foam has NO adhesive to touch truck finish.
 INSTALL ATION SHEET Tarp Assembly with Cab Rail, Tail Rail and Support Bows attached. Left and Right Side Rail Assemblies U Clamps (x 6) NOTICE: If your truck has a bedliner that wraps over any top edges,
User Manual Walkin Wheels Mini
 User Manual Walkin Wheels Mini Walkin Wheels is a registered trademark of Wheels for Pets, LLC US Patent 7,549,398. European Patent 2050418 Manual Revision August 2012 Wheels For Pets, LLC 3 Bud Way, #25
Leather Pouches and Belts
 Leather Pouches and Belts Suede (split leather) and saddle leather construction. The look of top grain moccasin without the price. Two Bag Apron Heavy duty two bag golden tan suede and saddle leather construction,
ABS Model Background Stand
 ABS Model Background Stand Product Overview: The completely redesigned Ravelli ABS model background stand is 10' tall by 12.3' wide. It is comprised of two tripod stands and four 3 cross bar sections and
FORM (Apr. 2006)
") 2212 Slcier MODEL 2212 SLICER MODEL 2212 ML-136132 701 S. RIDGE AVENUE TROY, OHIO 45374-0001 937 332-3000 www.hobartcorp.com FORM 35215 (Apr. 2006) Installation, Operation, and Care of MODEL 2212 Slicer
2212 Slcier MODEL 2212 SLICER MODEL 2212 ML-136132 701 S. RIDGE AVENUE TROY, OHIO 45374-0001 937 332-3000 www.hobartcorp.com FORM 35215 (Apr. 2006) Installation, Operation, and Care of MODEL 2212 Slicer
Installation Guide: Round Trampoline
 Trampolines & trampoline parts designed to survive in the harsh Oz climate. www.oztrampolines.com.au Installation Guide: Round Trampoline Safety Tips Here at Oz Trampolines we are passionate about your
1612P MODEL 1612P SLICER MODEL EXECUTIVE OFFICES 701 RIDGE AVENUE TROY, OHIO FORM (4-95)
") 1612P MODEL 1612P SLICER MODEL 1612P ML-104587 EXECUTIVE OFFICES 701 RIDGE AVENUE TROY, OHIO 45374-0001 FORM 19370 (4-95) Installation, Operation, and Care of MODEL 1612P SLICER SAVE THESE INSTRUCTIONS
1612P MODEL 1612P SLICER MODEL 1612P ML-104587 EXECUTIVE OFFICES 701 RIDGE AVENUE TROY, OHIO 45374-0001 FORM 19370 (4-95) Installation, Operation, and Care of MODEL 1612P SLICER SAVE THESE INSTRUCTIONS
FEATURES & BENEFITS OF THE TOW PRO LITE :
 To Protect & Preserve PRODUCT MANUAL & FITTING GUIDE tow pro lite TYPE: SEMI - FIT EACH TOW PRO LITE COMES WITH THE FOLLOWING : 16 side securing straps & buckles (8 either side) 1 HITCH STRAP & buckles
INSTRUCTION SHEET DETHATCHER KIT. STS-422LX LPSTS-42JD Assembly Installation Operation Repair Parts L-1660-D. Visit us on the web!
 INSTRUCTION SHEET DETHATCHER KIT MODEL: DK-422LX FOR USE WITH SWEEPER MODEL: STS-422LX LPSTS-42JD Assembly Installation Operation Repair Parts For use with Riders and Lawn/Garden Tractors For the latest
INSTALLATION SHEET. PARTS INCLUDED IN YOUR KIT. You may want to lay them out in this manner for accessibility.
 INSTALLATION SHEET Gas Struts (x2) Lower Hinge Rail Side Rails (L and R) Spring Bows (x2-short Bed) (x3-long Bed) L Bars (L and R) with clamps included L Channel w/seal MISSING PARTS??? Call Extang at
Squeeze ballistic protection and carry system -17 MANUAL
 Squeeze ballistic protection and carry system -17 MANUAL The Snigel system CLOTHING Our garments have good freedom of movement, ventilation and give good protection. They are designed to work with the
CHANGING YOUR LANDSCAPE SINCE 1945 OWNER S MANUAL. Tow Hitch Replacement Kit For Rough Cut Trailcutters. Starting Serial # L
 CHANGING YOUR LANDSCAPE SINCE 1945 OWNER S MANUAL Tow Hitch Replacement Kit For Rough Cut Trailcutters 21100 Starting Serial # L118-023001 Tools Required: Wrench/Socket Qty. Size (1) 1-1/8 (1) 1-1/16 (2)
L&W ENGINEERING INC.
 L&W ENGINEERING INC. 2012-2013 107 INDUSTRIAL PARKWAY MIDDLEBURY, IN 46540 PHONE (574) 825-5351 FAX (574) 825-1006 WWW.LW-ENG.COM Pipe Hangers Welcome to L&W Engineering. Your quality source for fabricated
MALCO S MOST POPULAR. Pouches. LEATHER POUCH! TP3 ELECTRICIAN'S Heavy Chrome Tanned, Brushed Leather
 Pouches MALCO S MOST POPULAR LEATHER POUCH! TP3 ELECTRICIAN'S Heavy Chrome Tanned, Brushed Leather NINE COMPARTMENT ELECTRICIAN S POUCH: Heavy chrome tanned, brushed leather, 2 large flared inside pockets
RANDONEE 36 RANDONEE 30
 OVERVIEW Congratulations on your purchase of a SALEWA Pack. We want to besure that you understand and utilize your new SALEWA pack in the best way. Following you will find a description of all functions
Instructions for turning a pair of 2012 Large Rolie Bags into Tank Panniers. This is a "Do it yourself " Kit.
 Instructions for turning a pair of 2012 Large Rolie Bags into Tank Panniers. This is a "Do it yourself " Kit. ***The Large Rolie bags function best when full as they have no stiffeners****************
OWNER S MANUAL. Gravity Model 5201
 OWNER S MANUAL Gravity 1000 Model 5201 The specifications of this product may vary from this photo and are subject to change without notice. IRONMAN, IRONMAN TRIATHLON and M-DOT are registeved trademarks
OVERVIEW PEUTEREY PEUTEREY 40 / PEUTEREY 30
 BACKPACK MANUAL OVERVIEW PEUTEREY PEUTEREY 40 / PEUTEREY 30 Congratulations on your purchase of a SALEWA Pack. We want to be sure that you understand and utilize your new SALEWA pack in the best way. Following
Assembly instructions for Eurotramp trampolines Series: Ultimate, Grand Master Exclusiv, Grand Master, Master
 Assembly instructions for Eurotramp trampolines Series: Ultimate, Grand Master Exclusiv, Grand Master, Master 1. Assembly instructions 2. Attaching the plastic coated steel cables on the Ultimate frame
ALP TRAINER 25 2 OVERVIEW ALP TRAINER 25
 OVERVIEW Congratulations on your purchase of a SALEWA Pack. We want to besure that you understand and utilize your new SALEWA pack in the best way. Following you will find a description of all functions
OVERVIEW GUIDE GUIDE 45 / GUIDE 35
 BACKPACK MANUAL OVERVIEW GUIDE GUIDE 45 / GUIDE 35 Congratulations on your purchase of a SALEWA Pack. We want to be sure that you understand and utilize your new SALEWA pack in the best way. Following
100% MADE IN THE USA TRIPOD & MONOPOD MANUAL
 100% MADE IN THE USA TRIPOD & MONOPOD MANUAL WELCOME Thank you for purchasing a Really Right Stuff tripod or monopod. Many years ago, we set out to create tripods that would exemplify the best in craftsmanship
02 Storage. Roller cabinet. Magnetic tray 25 Modular storage 28 Fixed storage 30. Metal trolley. Plastic box. Aluminium case.
 02 Storage Roller cabinet 21 Magnetic tray 25 Modular storage 28 Fixed storage 30 Metal Wall board 32 Metal box 33 36 trolley Plastic box 38 Aluminium Organiser 39 41 Tool bag 42 case Nylon bag 44 Reinforced
ALPTREK 50+5 ALPTREK 45+5
 OVERVIEW Congratulations on your purchase of a SALEWA Pack. We want to besure that you understand and utilize your new SALEWA pack in the best way. Following you will find a description of all functions
10' Background Support System TAKBS10
 10' Background Support System TAKBS10 BACKGROUND SUPPORT SYSTEM INSTRUCTIONS INTRODUCTION Thank you! Here at Takama we appreciate your business, especially your recent purchase of the Takama Background
Installation Instructions for the Rolltec Physique XL Awning
 Installation Instructions for the Rolltec Physique XL Awning Questions? Call Rolltec at 1-800-667-0474 General Tool Requirements Table of Contents Available installation brackets Side dimensions of various
Ultralight Series CLOUD-
 Ultralight Series CLOUD- INSTRUCTION INDEX Pack Components 2 Custom Fitting your Pack 3-6 Checking the Fit 7 Troubleshooting 8 Customizing your Pack 9-11 Packing Hints 12 KNOWING YOUR PACK The Cloud pack
RUPHIS Blade Clamp. Instruction Manual
 RUPHIS Blade Clamp P/N 1006800 NSN 1615-01-562-8156 Instruction Manual AH-64D UH-60A/L UH-60M S-70i S-92 REVISION AUTHORIZATION / RECORD These instructions are primarily for inspection of the RUPHIS Blade
Alternative Designs Report Joshua s Jumper
 Alternative Designs Report Joshua s Jumper By Elyssa Polomski, Michael Ballintyn, and Tianyi Xu Team # 21 Client: Joshua Bouchard Client Contact: Sue and Ron Bouchard, soupanony@aol.com, (508) 823-6113
TWISTLOCK VEHICLE STABILIZER (TVS) SYSTEM INSTRUCTIONS
 SYSTEM INSTRUCTIONS") TWISTLOCK VEHICLE STABILIZER (TVS) SYSTEM 22-797010, 22-797020, 22-796161 INSTRUCTIONS COMPONENTS: 1. TVS-100, PN 22-797010: 47 60 (119 cm 152 cm) stroke TwistLock Vehicle Stabilizer. Component weight,
TWISTLOCK VEHICLE STABILIZER (TVS) SYSTEM 22-797010, 22-797020, 22-796161 INSTRUCTIONS COMPONENTS: 1. TVS-100, PN 22-797010: 47 60 (119 cm 152 cm) stroke TwistLock Vehicle Stabilizer. Component weight,
OVERVIEW ULTRA TRAIN ULTRA TRAIN 18
 BACKPACK MANUAL OVERVIEW ULTRA TRAIN ULTRA TRAIN 18 Congratulations on your purchase of a SALEWA Pack. We want to be sure that you understand and utilize your new SALEWA pack in the best way. Following
IMPORTANT OWNER-OPERATOR INSTALLATION INSTRUCTIONS C2213 / C2220
 IMPORTANT OWNER-OPERATOR INSTALLATION INSTRUCTIONS C2213 / C2220 Minor movement (or settling) can occur in some incidental harsh driving conditions (On or off road). A rubber bed mat is not a requirement
ANY HAMMOCK CARRIES INHERENT RISK AND ACCIDENTS MAY OCCUR. USE WITH CAUTION.
 www.trailnest.com Roof Top Hammock Stand Owner s Manual WARNING! USING ANY HAMMOCK CARRIES INHERENT RISK AND ACCIDENTS MAY OCCUR. USE WITH CAUTION. MAX LOAD: 250 LBS Congratulations! Thank you for purchasing
Installation Instructions for the Rolltec Adalia X3M Extenda Awning
 Installation Instructions for the Rolltec Adalia X3M Extenda Awning Questions? Call Rolltec at 1-800-667-0474 General Tool Requirements Table of Contents Available installation brackets Side dimensions
SteadiCam Parts List*
 SteadiCam Parts List* A. 1 Bogen 3232 Monopod Swivel Tilt Head B. 1 1/2 internal to 1/2 external brass bushing flare adapter (part 9402249 at osh.com¹) C. 2 3/8 internal to 1/2 external brass bushing flare
FREEDOM BUTTON KIT INSTALLATION GUIDE STEP 1
 FREEDOM BUTTON KIT INSTALLATION GUIDE Installation of the Freedom Button kit is very simple and similar to the installation of a standard rear takedown pin and bolt catch latch. Before installing your
DIAMOND TECH INTERNATIONAL Innovations For Creativity DIAMOND LASER BAND SAW OPERATIONS MANUAL
 SPEEDSTER-XL INSTRUCTION MANUAL DIAMOND TECH INTERNATIONAL Innovations For Creativity SPEEDSTER-XL DIAMOND LASER BAND SAW OPERATIONS MANUAL SPEEDSTER-XL INSTRUCTION MANUAL - PAGE 1 Before You Begin Read
Section 4.0 Rigger Information
 Section 4.0 Rigger Information page 28 Parachute Assembly Inspection Form! Note: Count all Tools Before Starting Assembly Qty: A Harness and Container manufacturer: model: date of manufacture: serial no:
Retractable Awning Owner s Manual
 Retractable Awning Owner s Manual TABLE OF CONTENTS SECTION-1 2 CONGRATULATIONS ON PURCHASE 2 OPERATING YOUR SHADELINE AWNING 2 GEAR CRANK OPERATION 2 EXTENDING YOUR AWNING 2 RETRACT 2 SECTION-2 3 MOTORIZED
SPIRAL SLICER Instruction Manual Model #5280 & 5280M. Part No Revised Feb. 2010
 SPIRAL SLICER Instruction Manual Model #5280 & 5280M Part No. 82876 Revised Feb. 2010 SAFETY PRECAUTIONS INSTALLATION INSTRUCTIONS Inspection of Shipment: 5280 & 5280M SPIRAL SLICER Unpack all cartons
80070 TOP MOUNT CAMPER SHELL and TRANSIT CONNECT RACK TMCS_3:1
 ASSEMBLY INSTRUCTIONS for : 80070 TOP MOUNT CAMPER SHELL and TRANSIT CONNECT RACK TMCS_3:1 (916) 638-8703 (800) 343-7486 11261 Trade Center Drive Rancho Cordova, CA 95742 www.kargomaster.com Transit ASSEMBLY
FEATHER-LITE ROOF TOP TENT SET-UP GUIDE
 FEATHER-LITE ROOF TOP TENT SET-UP GUIDE TENT031 INSTALL TIME: 30 minutes 0 GET ORGANIZED you will need: D Your Tent D The Ladder (in a separate box) D A Power Drill w/ Phillips screw bit D A solid, scratch
100% MADE IN THE USA TRIPOD AND MONOPOD MANUAL
 your camera support experts 100% MADE IN THE USA TRIPOD AND MONOPOD MANUAL WELCOME Thank you for purchasing a Really Right Stuff tripod or monopod. Many years ago, we set out to create tripods that would
Setup. Assembling. Attaching the sharpening stone
 Kit 1. Sharpener base. 2. Vertical rod. 3. Fixing ring. 4. Horizontal rod with pivot unit. 5. Sharpening stones set. 6. Black marker. 7. User Guide. Technical specs Knife sharpener dimensions (ready to
Cabinet Mount Assist Lift n Lock Instructions
 Cabinet Mount Assist Lift n Lock Instructions PART LIST 2 @ Gas Cylinder 1 @ Lock Bar 2 @ Rubber Sleeve (preset) 4 @ Stopper Pin (2pcs preset) 4 @ Saddle Block 8 @ 19mm Black PVC Cap 5 @ 14mm Black PVC
INSTRUCTION SHEET TWISTLOCK VEHICLE STABILIZER (TVS) SYSTEM PN S: , ,
 SYSTEM PN S: , ,") INSTRUCTION SHEET TWISTLOCK VEHICLE STABILIZER (TVS) SYSTEM PN S: 22-797010, 22-797020, 22-796161 COMPONENTS: 1. TVS-100, PN 22-797010: 47 60 (119 cm 152 cm) stroke TwistLock Vehicle Stabilizer. Component
INSTRUCTION SHEET TWISTLOCK VEHICLE STABILIZER (TVS) SYSTEM PN S: 22-797010, 22-797020, 22-796161 COMPONENTS: 1. TVS-100, PN 22-797010: 47 60 (119 cm 152 cm) stroke TwistLock Vehicle Stabilizer. Component
Assembly TOOLS REQUIRED: 17mm and 14mm or equivalent wrenches.
 Instructions for 3 Trimmer Rack, 3TR* *Patents Pending Assembly TOOLS REQUIRED: 17mm and mm or equivalent wrenches. 15 26 26 16 15 16 Attach the lower mounting brackets to the Trimmer Rack poles as shown
10' x 20' MAX AP CANOPY EXTENSION KIT Assembly Instructions
 10' x 20' MAX AP CANOPY EXTENSION KIT Assembly Instructions Frame Not Included Description Model # 10' x 20' MAX AP Canopy - Extension Kit - White 35730 Recommended Tools Please read instructions COMPLETELY
Insruction manual Dukki
 Insruction manual Dukki Introduction Pg. 1 Product description Pg. 2 3 Assembly and disassembly Pg. 4 Installation and adjustment Pg. 5 12 Maintenance Pg. 13 Parts Pg. 14-17 INDEX 1. Introduction 1 2.
FISH CAT SCOUT OWNER S MANUAL
 FISH CAT SCOUT OWNER S MANUAL ALWAYS WEAR A COAST GUARD APPROVED FLOTATION DEVICE WHEN OPERATING THE FISH CAT SCOUT. Know the limits of your abilities and the limits of your equipment. Changes in air temperature
Installation & Operation Manual VHM Variable Height Series Arms with Fixed Angle Front End
 3875 Cypress Drive Petaluma, CA 94954 800.228.2555 707.773.1100 Fax 707.773.1180 www.gcx.com Installation & Operation Manual VHM Variable Height Series Arms with Fixed Angle Front End Products covered
DO NOT USE WITH CROSSBAR SPREAD LESS THAN 24.
 TM Please read all instructions carefully before assembly, installation and/or use of this product. DO NOT USE WITH CROSSBAR SPREAD LESS THAN 24. WARNING: Do not exceed the weight limit of your vehicle
OVERVIEW ALPTREK ALPTREK 40+5 / ALPTREK 35+5
 BACKPACK MANUAL OVERVIEW ALPTREK ALPTREK 40+5 / ALPTREK 35+5 Congratulations on your purchase of a SALEWA Pack. We want to be sure that you understand and utilize your new SALEWA pack in the best way.
300 Model 870 Four Wheel Hose Cart Owner s Manual
 300 Model 870 Four Wheel Hose Cart Owner s Manual IMPORTANT: READ THE OWNER S MANUAL BEFORE ASSEMBLING TOOLS REQUIRED: TWO ADJUSTABLE WRENCHES; HAND PUMP Estimated assembly time: 30 minutes PARTS LIST
4A1-114/114KR & 4A1-2 MANUAL TENSIONERS
 M L. C O O N AL TO 4A1-114/114KR & 4A1-2 W W W.T R AD IT IO MANUAL TENSIONERS READ THESE INSTRUCTIONS CAREFULLY. FAILURE TO FOLLOW THESE INSTRUCTIONS CAN RESULT IN SEVERE PERSONAL INJURY. GENERAL SAFETY
WIDESPREAD LAVATORY MODELS WITH HI-ARC SPOUT
 5951, 5961, 5981, 5983, 5993 SERIES MT122B INSTALLATION INSTRUCTIONS THESE INSTRUCTIONS MUST BE LEFT WITH HOMEOWNER WIDESPREAD LAVATORY MODELS WITH HI-ARC TRADITIONAL CROSS NOTE: Handle Inserts are not
Product instruction manual Ream Cutting Systems RE3943, RE3946, RE3947, RE3971, RE3952E
 Product instruction manual Ream Cutting Systems RE3943, RE3946, RE3947, RE3971, RE3952E The Trimfast Ream Cutters are reliable, high performance cutters that will give you the results you need quickly
PARTS LIST eforce Burnisher
 PARTS LIST eforce Burnisher HEAD ASSEMBLY ITEM PART NO. DESCRIPTION QTY 101 6496721 MOTOR 36 VOLT, 2100 RPM, 3.6HP [see pages 16,17] 1 102 9121410 5/16 EXTERNAL STAR LOCK WASHER PACK OF 10 2 103 6492051
OVERVIEW LITE TRAIN LITE TRAIN 14 BP
 BACKPACK MANUAL OVERVIEW LITE TRAIN LITE TRAIN 14 BP Congratulations on your purchase of a SALEWA Pack. We want to be sure that you understand and utilize your new SALEWA pack in the best way. Following
ExoFit NEX Full Body Harness
 ExoFit NEX Full Body Harness Description: The ExoFit NEX is the next generation premium harness from DBI-SALA; every component is an innovation and improvement on current designs. The ExoFit NEX wraps
FORM Rev. A (Feb. 2004)
") 2812B SLICER MODEL 2912B SLICER MODEL 2912B SLICER MODEL 2912B ML-134251 ML-134252 Previous models covered by this manual: 2912B ML-134123 701 S. RIDGE AVENUE TROY, OHIO 45374-0001 937 332-3000 www.hobartcorp.com
2812B SLICER MODEL 2912B SLICER MODEL 2912B SLICER MODEL 2912B ML-134251 ML-134252 Previous models covered by this manual: 2912B ML-134123 701 S. RIDGE AVENUE TROY, OHIO 45374-0001 937 332-3000 www.hobartcorp.com
Mystery Ranch System Fitting Directions
 Mystery Ranch System Fitting Directions Bigfoot 5200, Yeti 4300 & Roswell 2300 Multiple packbags mate with the same custom-fit suspension. Wrapframe Two adjustable torso lengths: Short Torso fits torsos
PR-429BF-600M. Bell 429 Blade Fold Kit Operations Manual
 Table of Contents Table of Contents... 1 Record of Revisions... 2 References... 3 Introduction... 4 Contact Information... 4 Prerequisites... 5 First Time Use... 6 Blade Clamp Placement... 6 Blade Clamp
User Manual Setup and Adjustment
 www.easyrig.com User Manual Setup and Adjustment 2 Made in Sweden Congratulations on your new Easyrig! Easyrig is patented and specially designed by a photographer for professional photographers. It can
Roller Bar End Cap (w/round Drive Shaft) Replacement Instructions for Vista and Motorized Awnings * Helpers needed *
 Replacement Instructions for Vista and Motorized Awnings * Helpers needed *") RETRACTABLE AWNINGS For Technical Support visit us at www.sunsetter.com/ownerscorner or Call Toll Free 800-670-7071 Fax 877-224-4944 Roller Bar End Cap (w/round Drive Shaft) Replacement Instructions for
RETRACTABLE AWNINGS For Technical Support visit us at www.sunsetter.com/ownerscorner or Call Toll Free 800-670-7071 Fax 877-224-4944 Roller Bar End Cap (w/round Drive Shaft) Replacement Instructions for
DIY Pocket Monkii Suspension Trainer - the Most Portable Gym Ever
 instructables DIY Pocket Monkii Suspension Trainer - the Most Portable Gym Ever by Jake_Of_All_Trades In my opinion, calisthenics are the best way to get a good workout and improve one's fitness. It's
INSTALLATION SHEET. extang.com Item No RH Pri nted i n U.S.A.
 INSTALLATION SHEET Gas Struts (x2) Lower Hinge Rail Spring Bows (x3-short Bed) (x4-long Bed) L Bars (L and R) with clamps included Side Rails (L and R) MISSING PARTS??? Call Extang at 1-800-877-2588 Any
RAFTER VI. Installation and Operation CAREFREE WITH AUTOMATIC AWNING SUPPORT. RV Accessory PRODUCT OVERVIEW
 CAREFREE RAFTER VI RV Accessory WITH AUTOMATIC AWNING SUPPORT Installation and Operation PRODUCT OVERVIEW The gives the awning user the ability to easily tighten the center fabric when the awning is extended.
When moving the frame don t force anything! Move the leg to allow the brace to go over the rod.
 THE IDLER Assembly and Care Instructions General notes Please read these instructions in their entirety before constructing your Idler Construction Before you begin constructing your Idler consider where
www Littleton, 9861.horn Titan Park Circle CO etoutdoors.com BEYOND COMPARE
 9861 Titan Park Circle Littleton, CO 80125 303.408.0250 www.hornetoutdoors.com BEYOND COMPARE Cargo Bed Rack RZR 2015 RZR-900, 900-S, 900-4 Rack with removable bottom $399.95 Hornet Roof Rack Spare Tire
Pacer Gait Trainer K509 & K501 Product Manual
 K509 & K501 Pacer Gait Trainer K509 & K501 Product Manual K509 Mini Pacer K501 Small Pacer Contents Important information 3 Safety messages 3-4 Recommended use and item dimensions 5 Check your order 6
Honda Ridgeline Installation Instructions
 Honda Ridgeline Installation Instructions READ THIS... If you read these instructions from beginning to end before starting you will probably not need to look at them again during the installation, but
SAFETY GUIDELINES FOR DIY TENTS
 SAFETY GUIDELINES FOR DIY TENTS Please read carefully and fully before starting assembly of the tent 1. The installer is solely responsible for evaluating the site and proper securing method determined.
Lucky Line. C-Clip rings, plastic key clips & KEY BAK. Plastic Key Clips. Key Bak. Super 48 Key Bak
 C-Clip Rings ucky ine C-Clip rings, plastic key clips & KEY BAK Spring-loaded gate makes it easy to open and close with one hand Clips to belt or purse Made of anodized aluminum 460 has a 7/8 nickel-plated
CUSTOM CYLINDERS INTERNATIONAL, INC. SOCKET JENIE PRODUCTS
 CUSTOM CYLINDERS INTERNATIONAL, INC. SOCKET JENIE PRODUCTS The SOCKET JENIE product line was developed for use with a 110V or battery operated drill motor to reduce the amount of time required to set up