|
|
|
- Austen Parks
- 5 years ago
- Views:
Transcription
1
2 If you have questions or concerns regarding your pack, please consult our in-store Pack Fitting Specialists for assistance.
3 Using the selection matrix, choose the pack model that best meets your needs. Each pack features the Gluon Module System. This allows you to customise each pack model for different activities. 1


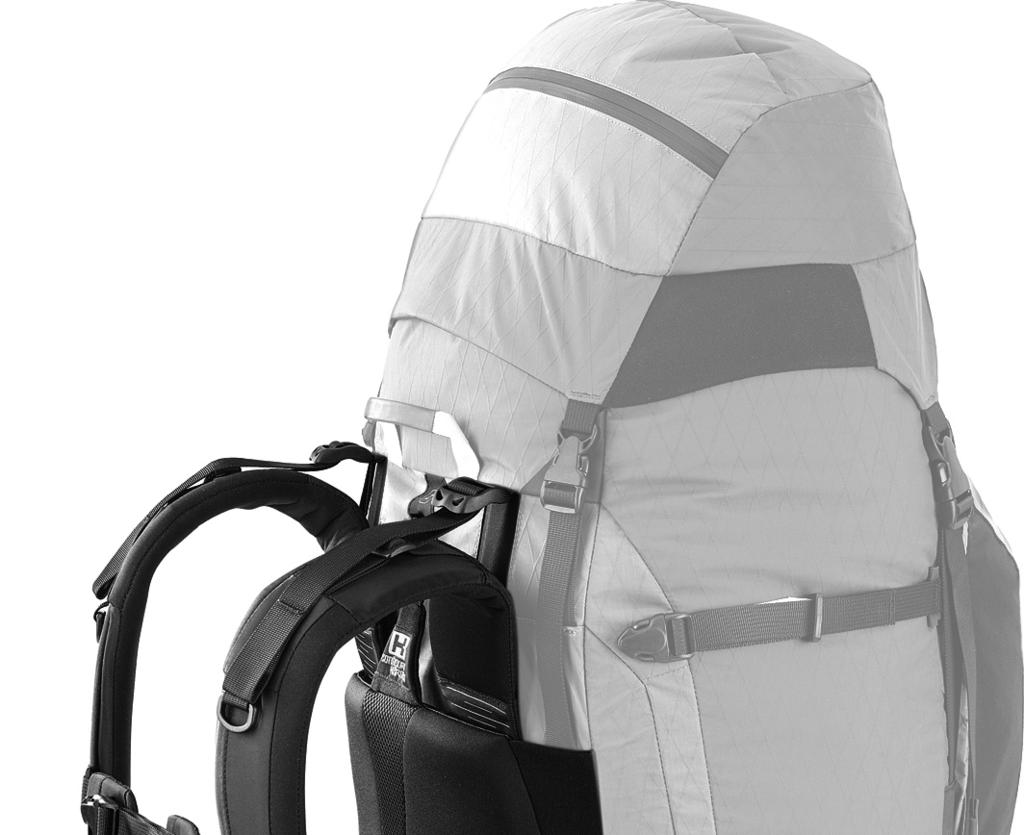
4 Shoulder stabiliser tri-glide Lumbar pad Hipbelt seam Side stabiliser webbings 2
5 Shoulder pad size and adjustment indicator Pouch buckle Shoulder stabiliser webbings Sternum range Shoulder pads Padded sternum strap Hipbelt size indicator (under top of lumbar pad) Shoulder pad tensioners Hipbelt buckle and webbings 3
6 Getting Started Establishing Pack and Hipbelt Size Pack Size Your back length will determine this. Configure 3 Harness by Kathmandu is available in 3 back lengths 1, 2 or 3. The capacity for each pack model will change slightly depending on the harness back length. To measure your back length have a friend measure your back from C7 (the prominent bone at the base of your neck) to the level of the top of your hipbones (Graphic A). Use the table below to determine your pack size. The size of each pack is indicated by the number printed on the back of the harness, near the top. The size of each hipbelt is indicated by the number printed under the lumbar pad. 4

 is most suitable, check whether your pack has this size fitted")
 that connects the pack to the hipbelt, flip the")

.")
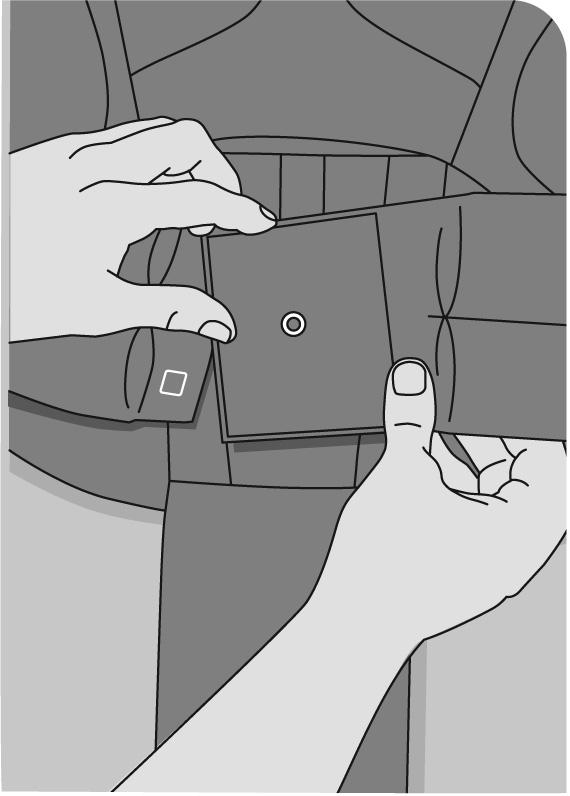
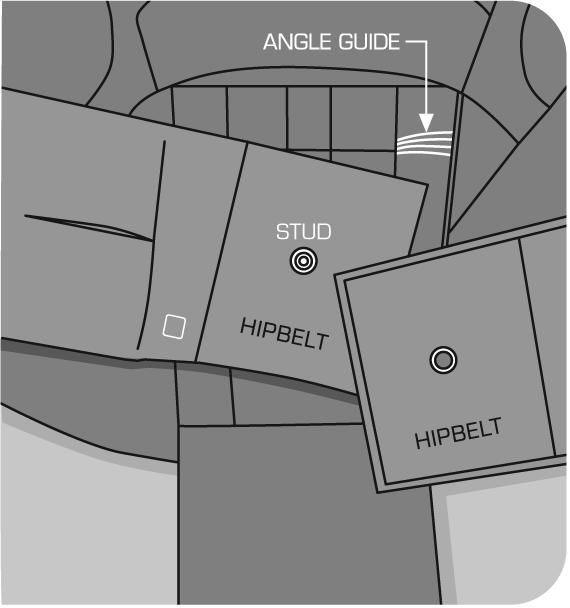
7 Hipbelt Size Measure your hip circumference rather than your waist (Graphic B). The hipbelts are also available in 3 different sizes and can easily be changed between packs to ensure the correct combination of pack size to hipbelt size. Once you have determined which hipbelt size (80, 90 or 100) is most suitable, check whether your pack has this size fitted or if you need to swap the existing hipbelt for your size. To change hipbelts unthread the side stabiliser webbing straps (Graphic 1) that connects the pack to the hipbelt, flip the lumbar pad down (Graphic 2) and pull off the hipbelt keeping the two sides joined (Graphic 3). Find your hipbelt size then ensure the two parts of the hipbelt are joined straight with the two eyelets aligned. Push the hipbelt onto the velcro area so the stud is through the eyelets. The hipbelt angle guide indicators below the back padding will help you align the hipbelt evenly (Graphic 3). Push the velcro firmly to ensure good contact. Re-thread the side stabiliser webbing straps. Fold the lumbar pad back up and over the hipbelt and insert the tongue of the lumbar pad into the pocket under the back padding (Graphic 2). Refer to pages 2 & 3 for full Configure 3 Harness diagrams 5


.")


 to the pack, put the pack on.")
.")


8 Pack Fitting Establish a neutral setting for the harness by loosening the shoulder stabiliser straps, the shoulder tensioners and the hipbelt adjustment webbings. Check the shoulder pads are half-way up the shoulder pad adjustment scale so half the adjustment scale is visible above the top edge of the back padding (Graphic 1). To adjust the shoulder pad, flip down the lumbar pad (Graphic 2). Release the BLUE webbing tension and position the shoulder pads at the halfway mark as described above then retension the webbing (Graphic 3). Fold the lumbar pad back up and over the hipbelt and insert the tongue of the lumbar pad into the pocket under the back padding (Graphic 2). sternum straps shoulder stabiliser straps / tri-glide shoulder tensioners hipbelt adjustment side stabiliser strap Add some mass (5-10kg) to the pack, put the pack on. Do up the hipbelt buckle and tighten the hipbelt webbings. Pull both of these forward simultaneously to tighten (Graphic 4). The hipbelt should cup the top of your hipbones in line with the hipbelt centre seam. It should feel very snug as it will need to carry most of your packs weight. Next tighten the shoulder tensioners to lightly load up the shoulder pads. Then using the shoulder stabiliser straps draw the top of the pack into your back. Secure the padded sternum strap and tighten. The sternum strap adjusts up and down and should be positioned between the base of the collarbone and the sternum. 6
9 Finish by tightening the side stabiliser webbing straps. These lock the base of the pack into the hipbelt and prevent unwanted sideways movement (Graphic 5). 7
10 Check for the correct back length The top of the shoulder pads should sit below the top of the harness. If the top of the shoulder pad sits too low the shoulder stabiliser webbing angle will be steeper than 30 degrees and the pack is too large. If the top of the shoulder pad sits too high the shoulder stabiliser webbing angle will be less than 30 degrees and the pack is too small. Check shoulder pad adjustment The shoulder stabiliser tri-glide should sit at the top of your shoulders and the end of the shoulder strap should terminate 5 8cm below the armpit and the webbing should not touch the body. Within each size there is a 6cm range of adjustment for changing the position of the shoulder pads on your torso. The shoulder pads are shaped to curve over your shoulder, around your neck and under your arm in an S curve. There should be no gap between your shoulder and back padding. To adjust the shoulder pad fit, see Page 12. Check hipbelt size The hipbelt should be snug and the padding should finish in front of your hipbones with 1 2 handwidths gap between the ends of the padding. 8

11 Checking the Fit Add some mass (5-10kg) to the pack this time if you hadn t done so for the first fit. Check back length, hipbelt size and shoulder pad adjustment following the previous guidelines and if required change either the adjustment or size of these to improve the fit. The shoulder pads can also be changed between pack sizes and this is described below. Shoulder Pad Size For most people the shoulder pad size will match the back size 1 = S, 2 = M, 3 = L. However, if required, these can also be changed. One scenario for this would be a person with large shoulders and chest with a shorter back length. This would require a larger size shoulder strap and will be highlighted by the end of the shoulder strap sitting too high and close to the underarm. Another possible scenario would be a slight build with a long back length. The shoulder straps will be too long and the sternum adjustment range will sit too low. Refer to pages 2 & 3 for full Configure 3 Harness diagrams 9
12 To remove and change the shoulder pads Take the pack off and unthread the shoulder stabiliser webbings and the shoulder tensioner webbings. Flip the lumbar pad down and unthread the BLUE webbing from the yoke buckle (Graphic 1). Undo the pouch buckle above the Configure 3 Harness logo (Graphic 2). Pull off the hipbelt keeping the two sides joined and undo the lower bar retainer velcro (Graphic 3). Pull the bars down enough to free the ends from the top bar pocket (Graphic 2). Pull the shoulder pads up and off the bar ends. 10
.")
.")


13 To replace the shoulder pads Push the bars up as far as possible with the top of the bars still free from the top bar pocket (Graphic 1). Thread the 2 bar ends through the sleeves on the back of the shoulder pad adjustment scale with the shoulder pads in a V configuration and the adjustment scale facing out (Graphic 2). The sleeve openings are bound with BLUE binding. Pull the yoke and shoulders down under the back padding by reaching up under the back padding (Graphic 3). Pull the top of the bars down then push back up into the top bar pockets (Graphic 1). Secure the base of the bars by reattaching the velcro at the base of each bar sleeve. Re-thread the BLUE webbing through the yoke buckle (Graphic 3). Position the shoulder pads so half the adjustment scale is visible above the top edge of the back padding. Tension the blue webbing. Reattach the hipbelts and re-thread the shoulder stabiliser webbings and the shoulder tensioner webbings. Fold the lumbar pad back up and over the hipbelt and insert the tongue of the lumbar pad into the pocket under the back padding. Do up the pouch buckle above the Configure 3 Harness logo. Refer to pages 2 & 3 for full Configure 3 Harness diagrams 11
14 Enhancing the Fit Further 12 At this point the pack should fit most people very well. There are some additional things that can be done to enhance the fit further. Changing the hipbelt angle The two part hipbelt allows the flare of the hipbelt to be customised to match individuals hip to waist angle. Angle guides are screenprinted on the pack for easy alignment. The stud allows the hipbelt to always be located centrally. Flip the lumbar pad down and loosen the side stabiliser webbing straps. Pull the hipbelt off the velcro panel then separate the two sides (Graphic 1). Reposition the left-hand side guiding the velcro together using the stud as a pivot point and the angle screenprints to set the desired flare. Do the same with the right-hand side (Graphic 2). Fold the lumbar pad back up and over the hipbelt and insert the tongue of the lumbar pad into the pocket under the back padding. To change the bar curve The bar curve has been designed to match the back shape of most users; however, it can easily be removed and shaped to fit. We recommend having one of our in-store Pack Fitting Specialists do this for you. To adjust the shoulder pad fit If the end of the shoulder strap is too high you will need to increase the exposed length of the shoulder pads. Loosen the blue webbing from the yoke buckle, slide the shoulder pads up the bars then re-tension the yoke buckle. Alternatively, if the end of the shoulder strap is too low or there is a gap between the back of your shoulders and the shoulder pad, slide the shoulder pads down the bars then re-tension the yoke buckle.
15 13
16
ROOK / RENN SERIES ROOK 65 ROOK 50 RENN 65
 ROOK / RENN SERIES ROOK 65 ROOK 50 RENN 65 RENN 50 Welcome to Osprey. We pride ourselves on creating the most functional, durable and innovative carrying products for your adventures. Please refer to this
LEVITY / LUMINA SERIES
 LEVITY / LUMINA SERIES LEVITY 60 LEVITY 45 LUMINA 60 LUMINA 45 Welcome to Osprey. We pride ourselves on creating the most functional, durable and innovative carrying product for your adventures. Please
XENITH / XENA SERIES
 XENITH / XENA SERIES XENITH 105 XENITH 88 XENITH 75 XENA 85 XENA 70 Welcome to Osprey. We pride ourselves on creating the most functional, durable and innovative carrying product for your adventures. Please
EXOS / EJA SERIES OWNER'S MANUAL
 EXOS / EJA SERIES EXOS 58 EXOS 48 EXOS 38 EJA 58 EJA 48 EJA 38 Welcome to Osprey. We pride ourselves on creating the most functional, durable and innovative carrying product for your adventures. Please
AETHER AG / ARIEL AG SERIES
 AETHER AG / ARIEL AG SERIES AETHER AG 85 AETHER AG 70 AETHER AG 60 ARIEL AG 65 ARIEL AG 55 Welcome to Osprey. We pride ourselves on creating the most functional, durable and innovative carrying product
MANTA / MIRA SERIES MANTA 34 MANTA 24 MIRA 32
 MANTA / MIRA SERIES MANTA 34 MANTA 24 MIRA 32 MIRA 22 Welcome to Osprey. We pride ourselves on creating the most functional, durable and innovative carrying products for your adventures. Please refer to
Mystery Ranch System Fitting Directions
 Mystery Ranch System Fitting Directions Bigfoot 5200, Yeti 4300 & Roswell 2300 Multiple packbags mate with the same custom-fit suspension. Wrapframe Two adjustable torso lengths: Short Torso fits torsos
KAMBER / KRESTA SERIES
 KAMBER / KRESTA SERIES KAMBER KAMBER KAMBER KRESTA 0 KRESTA 0 KRESTA 0 Welcome to Osprey. We pride ourselves on creating the most functional, durable and innovative carrying product for your adventures.
Squeeze ballistic protection and carry system -17 MANUAL
 Squeeze ballistic protection and carry system -17 MANUAL The Snigel system CLOTHING Our garments have good freedom of movement, ventilation and give good protection. They are designed to work with the
MOMENTUM SERIES OWNER'S MANUAL
 MOMENTUM SERIES MOMENTUM 32 MOMENTUM 26 Welcome to Osprey. We pride ourselves on creating the most functional, durable and innovative carrying product for your adventures. Please refer to this owner s
PEUTEREY 40 PEUTEREY 30
 OVERVIEW Congratulations on your purchase of a SALEWA Pack. We want to besure that you understand and utilize your new SALEWA pack in the best way. Following you will find a description of all functions
OVERVIEW PEUTEREY PEUTEREY 40 / PEUTEREY 30
 BACKPACK MANUAL OVERVIEW PEUTEREY PEUTEREY 40 / PEUTEREY 30 Congratulations on your purchase of a SALEWA Pack. We want to be sure that you understand and utilize your new SALEWA pack in the best way. Following
Ultralight Series CLOUD-
 Ultralight Series CLOUD- INSTRUCTION INDEX Pack Components 2 Custom Fitting your Pack 3-6 Checking the Fit 7 Troubleshooting 8 Customizing your Pack 9-11 Packing Hints 12 KNOWING YOUR PACK The Cloud pack
PK 50 TRAIL LOGIC SERIES INSTRUCTION INDEX
 PK 50 TRAIL LOGIC SERIES INSTRUCTION INDEX Overview 2 Packing Features 3 Suspension Features 4 Fine-Tuning the Fit 5 Care & Cleaning 5 Safety Information 6 Warranty and Contact Info 8 Save these instructions
OVERVIEW GUIDE GUIDE 45 / GUIDE 35
 BACKPACK MANUAL OVERVIEW GUIDE GUIDE 45 / GUIDE 35 Congratulations on your purchase of a SALEWA Pack. We want to be sure that you understand and utilize your new SALEWA pack in the best way. Following
All of these configurations are from one 2005 Blue Ultralite Trayman. Just slide the straps up and over your shoulders and they will slip into place.
 All of these configurations are from one 2005 Blue Ultralite Trayman. Just slide the straps up and over your shoulders and they will slip into place. The back edge of the Shoulder Strap has a slight bend
TRAIL SERIES LAKOTA, PAWNEE & REDWING LIGHTBEAM FIXED SUSPENSION INSTRUCTION INDEX
 TRAIL SERIES LAKOTA, PAWNEE & REDWING LIGHTBEAM FIXED SUSPENSION INSTRUCTION INDEX Suspension Features 2 Fine-Tuning the Fit 3 Packing Tips 3 Care & Cleaning 4 Safety Information 5 Warranty and Contact
ALP TRAINER 25 2 OVERVIEW ALP TRAINER 25
 OVERVIEW Congratulations on your purchase of a SALEWA Pack. We want to besure that you understand and utilize your new SALEWA pack in the best way. Following you will find a description of all functions
RANDONEE 36 RANDONEE 30
 OVERVIEW Congratulations on your purchase of a SALEWA Pack. We want to besure that you understand and utilize your new SALEWA pack in the best way. Following you will find a description of all functions
OVERVIEW ULTRA TRAIN ULTRA TRAIN 18
 BACKPACK MANUAL OVERVIEW ULTRA TRAIN ULTRA TRAIN 18 Congratulations on your purchase of a SALEWA Pack. We want to be sure that you understand and utilize your new SALEWA pack in the best way. Following
all information is copyright 2005, Kifaru International KIFARU, INTERNATIONAL
 Kifaru LongHunter Handbook Pack Anatomy...1-2 Pocket Placements...3 Installing Pockets...4-5 Turn Your Top Hood into a Lumbar...6 Add a GunBearer...7-9 Add a CargoChair...10-11 Convert your LongHunter
OVERVIEW LITE TRAIN LITE TRAIN 14 BP
 BACKPACK MANUAL OVERVIEW LITE TRAIN LITE TRAIN 14 BP Congratulations on your purchase of a SALEWA Pack. We want to be sure that you understand and utilize your new SALEWA pack in the best way. Following
RADIAL SERIES OWNER'S MANUAL
 RADIAL SERIES RADIAL 34 RADIAL 26 Welcome to Osprey. We pride ourselves on creating the most functional, durable and innovative carrying product for your adventures. Please refer to this owner s manual
OWNER'S MANUAL. ospreypacks.com CLIMBING / MOUNTAINEERING MUTANT SERIES
 OWNER'S MANUAL ospreypacks.com CLIMBING / MOUNTAINEERING Designed for fast and light alpine climbing, ice climbing and ski mountaineering, the Mutant Series is great for the vertical enthusiast looking
OWNER'S MANUAL. ospreypacks.com VERTICAL ENDEAVORS VARIANT SERIES
 OWNER'S MANUAL ospreypacks.com VERTICAL ENDEAVORS The Variant Series has long been a staple in the Osprey line with targeted design features utilizing feedback from mountain guides, professional alpinists
APEX CLIMB 2 OVERVIEW APEX CLIMB 25
 OVERVIEW Congratulations on your purchase of a SALEWA Pack. We want to besure that you understand and utilize your new SALEWA pack in the best way. Following you will find a description of all functions
ALPTREK 50+5 ALPTREK 45+5
 OVERVIEW Congratulations on your purchase of a SALEWA Pack. We want to besure that you understand and utilize your new SALEWA pack in the best way. Following you will find a description of all functions
Assembly. Step 3. Attach the safety bracket (7) to the Pivot ARM (6).
 to the Pivot ARM (6).") Assembly Step 1. A. Stand the base of the machine by separating the U-frames (1,2). Pull the Front and Rear U-Frames (1,2) as far apart from each other as possible. Then push down on the middle of the
Assembly Step 1. A. Stand the base of the machine by separating the U-frames (1,2). Pull the Front and Rear U-Frames (1,2) as far apart from each other as possible. Then push down on the middle of the
MEDICAL PRODUCTS FOLDER
 MEDICAL PRODUCTS FOLDER THE PRODUCTS 21-00576-00-000 Trauma pouch -05 21-00166-00-000 Personal trauma pouch -12 28-00100-00-000 Small Mullti-purpose bag -12 28-00427-00-000 10L All bag -12 29-00363-00-000
4.2 Assembly Instructions
 4.2 Assembly Instructions 4.2.1 Assembly of Reserve Canopy. Assembly of Reserve Canopy using Rapide Links. After inspecting the Parachute and the Wings Harness/Container System, hang or lay the parachute
Camper s Award Backpack
 Camper s Award Backpack Classification of Backpack Internal Frame Backpack External Frame Backpack Generic Types of Backpack Waist Packs / Hip Packs / Fanny Packs / Lumbar Packs Volume:up to 10 liters
OVERVIEW ALPTREK ALPTREK 40+5 / ALPTREK 35+5
 BACKPACK MANUAL OVERVIEW ALPTREK ALPTREK 40+5 / ALPTREK 35+5 Congratulations on your purchase of a SALEWA Pack. We want to be sure that you understand and utilize your new SALEWA pack in the best way.
OVERVIEW CAMMINO CAMMINO CAMMINO CAMMINO 50+10
 BACKPACK MANUAL OVERVIEW CAMMINO CAMMINO 70+10 CAMMINO 60+10 CAMMINO 50+10 Congratulations on your purchase of a SALEWA Pack. We want to be sure that you understand and utilize your new SALEWA pack in
Cabinet Mount Assist Lift n Lock Instructions
 Cabinet Mount Assist Lift n Lock Instructions PART LIST 2 @ Gas Cylinder 1 @ Lock Bar 2 @ Rubber Sleeve (preset) 4 @ Stopper Pin (2pcs preset) 4 @ Saddle Block 8 @ 19mm Black PVC Cap 5 @ 14mm Black PVC
OVERVIEW KOALA KOALA II
 BACKPACK MANUAL OVERVIEW KOALA KOALA II Congratulations on your purchase of a SALEWA Pack. We want to be sure that you understand and utilize your new SALEWA pack in the best way. Following you will find
SOJOURN SERIES OWNER'S MANUAL
 SOJOURN SERIES SOJOURN 80L/28" SOJOURN 60L/25" SOJOURN 45L/22" Welcome to Osprey. We pride ourselves on creating the most functional, durable and innovative carrying product for your adventures. Please
User Manual. Zitzi Carseat pro
 2018-08-30 EN User Manual Zitzi Carseat pro Table of contents Safety precautions... 3 Tools...4 Back strap...4 Seat adjustments...4 Leg length difference...5 Leg part lining...5 Seat slope adjustment...5
MYRIAD Banner Stand is a trademark of Skyline Exhibits. Patent Pending PN32294-B. MYRIAD Banner Stand
 is a trademark of Skyline Exhibits Patent Pending 1.1 1. Banner Stand Setup 1.1 Remove banner stand from standard case or Arrive Portable Display & Workstation and assemble pole. 1.2 Insert pole into base
MANTA AG / MIRA AG SERIES
 MANTA AG / MIRA AG SERIES MANTA AG 36 MANTA AG 8 MANTA AG 0 MIRA AG 34 MIRA AG 6 MIRA AG 8 The Manta AG / Mira AG Series is our premium day hiking backpack line, featuring our Anti-Gravity Suspension for
Quick Start Instructions
 Quick Start Instructions If you re already familiar with our packs, follow these brief instructions to make sure your new ArcFlex pack is adjusted properly and fits correctly. If you would like more details,
User s Manual Trampoline 8
 User s Manual Trampoline 8 Model! WARNING Read all precautions and instructions in this manual before using this equipment. Save this manual for future reference. Maximum user weight 17 lbs. ASSEMBLY IMPORTANT
NEWMAR SERVICE SCHOOL
 NEWMAR SERVICE SCHOOL TRAINING INFORMATION GUIDELINE FOR FEBRUARY 2013 OUR PRODUCTS: NOVA DUAL PITCH AWNING G-2000/ G-1500 2 P a g e G-2085 G-5000 3 P a g e G-LINKS 4 P a g e NOVA/ G-2000/ G-1500 BASIC
Tactical vest -10 MANUAL
 Tactical vest -10 MANUAL 18-00546-09-000 Tactical vest -10 VMT-10/VMT-M-10 Black= 18-00546-01 Grey= 18-00546-09 Material Fabric: 100% Polyamide PU coated Mesh: 100% Polyester Webbing: 100% Polyamide or
Active standing technology in the Glider enhances. the many health benefits of a passive stander. The Glider
 Glider medium, large 4-5 6 200 lbs medium 5-6 2 280 lbs large Active standing technology in the Glider enhances the many health benefits of a passive stander. The Glider is the only stander that combines
Quick Start Instructions
 Quick Start Instructions If you bought your new ArcLight pack through a dealer who fitted the pack to you, follow these brief instructions to double-check that your pack is adjusted properly. If you would
Frequently asked questions about using a booster seat
 Frequently asked questions about using a booster seat Who should use a booster seat and why? Who should use a booster seat? Children who weigh at least 18 kg (40 pounds) and who are at least 4 years old
OWNER'S MANUAL. ospreypacks.com TREKKING / BACKPACKING WAYPOINT / WAYFARER
 OWNER'S MANUAL ospreypacks.com Deluxe travel packs provide the ultimate in mobility for everything from two-week trekking vacations to year long around the world forays. The Waypoint comes in one size
Posture Chest Support
 Posture Chest Support AirLogic Chest Support: One-Piece Buckle Chest Supports enable rotation of the shoulders and a greater ability to reach forward than butterfly-style harnesses. On the left and right
Backpacks. Georgia 4-H Cotton Boll and Consumer Judging 2016
 Backpacks Georgia 4-H Cotton Boll and Consumer Judging 2016 Backpacks are used daily by people around the world. Many different types of backpacks exist, and they are offered in a wide variety of colors,
INSTANT GARAGE MODEL NO: CIG81224 ASSEMBLY INSTRUCTIONS PART NO: ORIGINAL INSTRUCTIONS
 INSTANT GARAGE MODEL NO: CIG81224 PART NO: 3503578 ASSEMBLY INSTRUCTIONS ORIGINAL INSTRUCTIONS GC1117 INTRODUCTION Thank you for purchasing this CLARKE Instant Garage. When erected, the CIG81224 garage
Trail Series -REDCLOUD & COYOTE- TRAIL SUSPENSION INSTRUCTIONS INSTRUCTION INDEX
 Trail Series -REDCLOUD & COYOTE- TRAIL SUSPENSION INSTRUCTIONS INSTRUCTION INDEX Safety Warnings p. 2-3 Care & Cleaning p. 3 Suspension Features p. 4 Custom Fitting your Pack p. 5-9 Frame Shaping p. 9-10
COMBI CRATE MODEL NO: 7000/7001/7002/7003
 COMBI CRATE MODEL NO: 7000/7001/7002/7003 Owner s Manual READ ALL INSTRUCTIONS BEFORE ASSEMBLY AND USE OF GATE KEEP INSTRUCTIONS FOR FUTURE USE. Carlson Pet Products,Inc 14305 Southcross Drive,Suite 105,
VIPER / VERVE SERIES
 VIPER / VERVE SERIES VIPER 13 VIPER 9 VIPER 3 VERVE 9 VERVE 3 The Viper / Verve Series delivers a minimalist hydration solution and storage for the day s essentials out on the trail. OWNER'S MANUAL ospreypacks.com
LBH18BPK. Instruction Sheet
 LBH18BPK Instruction Sheet Included: 1. Backpack (includes belt and pouch) 2. Bottle and Hose Attachment Assembly 3. 1 each disposable 1.5 gallon Chemical Storage Bag 4. 1 each 1.5 gallon Warm Water Cleanout
P POD SEATING SYSTEM USER S MANUAL
 P POD SEATING SYSTEM USER S MANUAL ALL USER S OF THE EQUIPMENT SHOULD BE AWARE OF THIS DOCUMENT AND ITS CONTENT CLASS 1 & CUSTOM MADE DEVICE ISSUE 8 Index CONTENTS PAGE Index 1 Safety Notes & Maintenance
Primrose Awnings - Standard Manual Instructions
 Primrose Awnings - Standard Manual Instructions Contents Warning 1.5m - 3.0m Awnings 4 x Expansion bolts (2 per bracket)** 2 x brackets 1 x Awning 1 x Winder handle 3.5m - 4m Awnings 6 x Expansion bolts
User Manual Walkin Wheels Mini
 User Manual Walkin Wheels Mini Walkin Wheels is a registered trademark of Wheels for Pets, LLC US Patent 7,549,398. European Patent 2050418 Manual Revision August 2012 Wheels For Pets, LLC 3 Bud Way, #25
Otter Pro XT Cabin Installation and Set-Up Instructions
 Otter Pro XT Cabin Installation and Set-Up Instructions Otter Pro XT Cabin Fits Medium Otter Pro and Otter II Sled Only Parts Identification and Check List MODEL NUMBERS: Complete Pkg Pro XT Thermal Cabin
Come rain or shine its fine out with ScooterPac. Take a quick read of this manual to get the most out of your folding canopy.
 YOUR USER MANUAL Come rain or shine its fine out with ScooterPac. Take a quick read of this manual to get the most out of your folding canopy. Contents 1 Quick start guide 5 Fitting your canopy 9 Detailed
Wenger Corporation 2014 Printed in USA 05/14 Part #049B015-09
 Assembly Instructions Tuba Tamer Contents Important User Information...........................2 Replacemant Parts List..............................3 Assembly.........................................4
BACKPACKS FREE RIDER 16 FREE RIDER 18. Helmet Fixation. Removable Protector. Open the velcro pocket at the backpanel and take out the protector.
 Removable Protector Open the velcro pocket at the backpanel and take out the protector. Seperate Use: You can wear the protector seperately under your clothes. For full protection without the backpack,
IMPORTANT INFORMATION DO NOT DISCARD
 KAYE Products, Inc. IMPORTANT INFORMATION DO NOT DISCARD Small Harness (Model 9820) & Medium-Slim Harness (Model 9821) Each package should contain the following: 1 Body Vest with adjustable shoulder straps
INSTRUCTION SHEET TWISTLOCK VEHICLE STABILIZER (TVS) SYSTEM PN S: , ,
 SYSTEM PN S: , ,") INSTRUCTION SHEET TWISTLOCK VEHICLE STABILIZER (TVS) SYSTEM PN S: 22-797010, 22-797020, 22-796161 COMPONENTS: 1. TVS-100, PN 22-797010: 47 60 (119 cm 152 cm) stroke TwistLock Vehicle Stabilizer. Component
INSTRUCTION SHEET TWISTLOCK VEHICLE STABILIZER (TVS) SYSTEM PN S: 22-797010, 22-797020, 22-796161 COMPONENTS: 1. TVS-100, PN 22-797010: 47 60 (119 cm 152 cm) stroke TwistLock Vehicle Stabilizer. Component
IMPORTANT INFORMATION DO NOT DISCARD
 KAYE Products, Inc. IMPORTANT INFORMATION DO NOT DISCARD Medium Harness (Model 9822) & Large Harness (9824) Each package should contain the following: The materials will come packed as pictured below:
DOWN MANUAL. Aeros Ltd. St. Post-Volinskaya, 5 Kiev, UKRAINE
 DOWN HG & PG rescue parachute system MANUAL Aeros Ltd. St. Post-Volinskaya, 5 Kiev, 03061 UKRAINE Tel. +(380 44) 455 41 20 Fax. +(380 44) 455 41 16 E-mail: aerosint@aerosint.kiev.ua http://www.aeros.com.ua
100% WATERPROOF BAGS & CASES
 0 00% WATERPROOF BAGS & CASES Cover Photo, Steven West...KEEP IT DRY Our Story... 00% waterproof bags and cases, combining form with function. High quality, technical and value for money waterproof protection
Thule takes to the Trail with their innovative Technical Backpack Collection for Backpackers and Hikers.
 Friedrichshafen, Germany, July, 2014 Thule takes to the Trail with their innovative Technical Backpack Collection for Backpackers and Hikers. Today, Thule is proud to introduce a new range of innovative
F a l l P r o t e c t i o n E x p e r t s. Subject: Buckle Specifications and Operations
 Technical Bulletin Subject: Buckle Specifications and Operations DBI/SALA uses four types of buckles in full body harnesses, body belts and other fall protection equipment: parachute buckles, pass through
Ridgeline (A) Installation Instructions
 Installation Instructions") Ridgeline (A) Installation Instructions Please read instructions thoroughly before starting installation **Remove all contents of the Softopper carefully to protect from scratches.** Windows scratch easily!
Ridgeline (A) Installation Instructions Please read instructions thoroughly before starting installation **Remove all contents of the Softopper carefully to protect from scratches.** Windows scratch easily!
ezcinema Series Portable Floor Pull-Up Screen USER S GUIDE
 ezcinema Series Portable Floor Pull-Up Screen USER S GUIDE Precautions: Warning! Screen damage can result from product mishandling if the following precautions are not followed. In accordance with practicing
BowDown. MiniMuM Crossbar spread 24 (61CM) Steel Hook (2X) Buckle Strap (2X) Plastic Tube (2X) Plain Strap (2X) SHORT BLACK T-BOLT (2x) BOWDOWN (2x)
 Steel Hook (2X) Buckle Strap (2X) Plastic Tube (2X) Plain Strap (2X) SHORT BLACK T-BOLT (2x) BOWDOWN (2x)") BowDown MiniMuM Crossbar spread 24 (61CM) Heavy Duty strap (2x) SHORT BLACK T-BOLT (2x) BOWDOWN (2x) Bow Stern Tie Down Buckle Strap (2X) Plastic Tube (2X) Plain Strap (2X) Steel Hook (2X) IMPORTANT WARNING
BowDown MiniMuM Crossbar spread 24 (61CM) Heavy Duty strap (2x) SHORT BLACK T-BOLT (2x) BOWDOWN (2x) Bow Stern Tie Down Buckle Strap (2X) Plastic Tube (2X) Plain Strap (2X) Steel Hook (2X) IMPORTANT WARNING
OZONE DUPLEX TRAVEL PACK SERIES
 OZONE DUPLEX TRAVEL PACK SERIES OZONE DUPLEX 65L OZONE DUPLEX 60L Welcome to Osprey. We pride ourselves on creating the most functional, durable and innovative carrying product for your adventures. Please
Trail Series EXTERNAL SUSPENSION INSTRUCTIONS TIOGA, TREKKER, YUKON & JR. TIOGA- INSTRUCTION INDEX TREKKER & JR. TIOGA TIOGA & YUKON
 Trail Series TIOGA, TREKKER, YUKON & JR. TIOGA- EXTERNAL SUSPENSION INSTRUCTIONS TREKKER & JR. TIOGA TIOGA & YUKON INSTRUCTION INDEX Safety Warnings p. 2-3 Care & Cleaning p. 3 Suspension Features p. 4
Ski Sheet. Ski Pad. The Ski Sheet allows non-ambulant patients to be quickly and safely evacuated in the event of an emergency.
 Ski Sheet The Ski Sheet allows non-ambulant patients to be quickly and safely evacuated in the event of an emergency. The sheet remains in place under the individuals mattress at all times, allowing it
FEATURES & BENEFITS OF THE TOW PRO LITE :
 To Protect & Preserve PRODUCT MANUAL & FITTING GUIDE tow pro lite TYPE: SEMI - FIT EACH TOW PRO LITE COMES WITH THE FOLLOWING : 16 side securing straps & buckles (8 either side) 1 HITCH STRAP & buckles
EXTERNAL DIMENSIONS. L Length Kg W Width Kg D Depth. W Width. D Depth. 0 Kg Lid lt Base EXTERNAL DIMENSIONS.
 Mod. 4412 B COPOLYMER POLYPROPYLENE WATERPROOF CASE Metric mm-kg-c INTERNAL DIMENSIONS EXTERNAL DIMENSIONS OTHER DATA L Length 445 mm L Length 474 mm Weight empty 3.40 Kg W Width 345 mm W Width 415 mm
AND LOAD CANOPY RACK SPECIFICATIONS
 8MAY15 INSTRUCTIONS for the LOCK AND LOAD CANOPY RACK SPECIFICATIONS and SAFE LOADING REQUIREMENTS The Lock and Load ladder carrier for Truck Caps is a rack designed to mount to the top of a pickup truck
/ Tool and Equipment Safety Tether System (T.E.S.T.S)
") 20 INSTRUCTIONS FOR USE AND PRODUCT GUIDE 799953 / 799955 Tool and Equipment Safety Tether System (T.E.S.T.S) Part # T353012 Rev 2 Reliance Industries LLC 2802 East X Street Deer Park, Texas 77536 281-930-800
20 INSTRUCTIONS FOR USE AND PRODUCT GUIDE 799953 / 799955 Tool and Equipment Safety Tether System (T.E.S.T.S) Part # T353012 Rev 2 Reliance Industries LLC 2802 East X Street Deer Park, Texas 77536 281-930-800
OWNER'S MANUAL. ospreypacks.com TREKKING / GEAR HAULER PORTER SERIES
 OWNER'S MANUAL ospreypacks.com The Porter Series sets the standard in deluxe duffel design offering padded sidewalls and a substantial suspension for carrying backpack style. Organization pocket for laptop,
Softopper Installation Instructions (CB)
") Softopper Installation Instructions (CB) Please read instructions thoroughly before starting installation **Remove all contents of the Softopper carefully to protect from scratches.** Windows scratch easily!
Softopper Installation Instructions (CB) Please read instructions thoroughly before starting installation **Remove all contents of the Softopper carefully to protect from scratches.** Windows scratch easily!
TWISTLOCK VEHICLE STABILIZER (TVS) SYSTEM INSTRUCTIONS
 SYSTEM INSTRUCTIONS") TWISTLOCK VEHICLE STABILIZER (TVS) SYSTEM 22-797010, 22-797020, 22-796161 INSTRUCTIONS COMPONENTS: 1. TVS-100, PN 22-797010: 47 60 (119 cm 152 cm) stroke TwistLock Vehicle Stabilizer. Component weight,
TWISTLOCK VEHICLE STABILIZER (TVS) SYSTEM 22-797010, 22-797020, 22-796161 INSTRUCTIONS COMPONENTS: 1. TVS-100, PN 22-797010: 47 60 (119 cm 152 cm) stroke TwistLock Vehicle Stabilizer. Component weight,
OPERATOR INSTRUCTION MANUAL INCLUDING REPAIR PARTS FOR MODULAR GENERAL PURPOSE TENT SYSTEM (MGPTS) TYPE I
 TYPE I") OPERATOR INSTRUCTION MANUAL INCLUDING REPAIR PARTS FOR MODULAR GENERAL PURPOSE TENT SYSTEM (MGPTS) TYPE I Johnson Outdoors Gear, Inc. Eureka! branded tent products 625 Conklin Road Binghamton, NY 13903
OPERATOR INSTRUCTION MANUAL INCLUDING REPAIR PARTS FOR MODULAR GENERAL PURPOSE TENT SYSTEM (MGPTS) TYPE I Johnson Outdoors Gear, Inc. Eureka! branded tent products 625 Conklin Road Binghamton, NY 13903
Tabletop Kit 01. features and benefits: dimensions: additional information:
 Tabletop Kit 01 TK-TTK-01 Make a statement with an easy-to-assemble tension fabric Hopup tabletop display with spotlights. A custom-printed stretch table throw that fits standard 6ft tables & a single-sided,
Otter XT Cabin Installation and Set-Up Instructions
 Otter XT Cabin Installation and Set-Up Instructions Otter XT Cabin Fits Medium Otter Wild Sled Only Parts Identification and Check List MODEL NUMBERS: Complete Pkg Otter XT Cabin 200962 2 1 PARTS LIST
POCO AG SERIES OWNER'S MANUAL
 POCO AG SERIES POCO AG PREMIUM POCO AG PLUS POCO AG The Poco AG Series channels everything we know about packs into a line of child carriers that are comfortable, supportive, light, well ventilated and
quick and easy installation guide
 www.directdriveopener.com quick and easy installation guide Back 2 Front. Motor Carriage 2. C-rail. Chain. Limit stops. Slide in part (tensioner) Rail assembly Insert C-rail parts () into the connecting
ReTurn7600. SWL: 205kg/450lbs. SystemRoMedic TM. User manual English. Manual no: 721 Ver
 ReTurn7600 User manual English 7600 SWL: 205kg/450lbs Manual no: 721 Ver. 13 150819 ReTurn7600 English ReTurn7600 are used indoors for shorter transfers between wheelchair and bed, wheelchair and toilet/portable
ELE-3COP-375 Title - Braid termination using a Band Strap Adaptor.
 Before starting work please read this document carefully and note the guidance given. 1 Purpose and Scope This COP describes the procedure to be used when carrying out the installation of a Band Strap
functionality with the necessary maintenance tools stored in a convenient built in tool box, as well as parallel handles for
 GuilloMax User Manual The Guillomax has distinct features such as its unique structure and ease of cutting. It combines symmetry with functionality with the necessary maintenance tools stored in a convenient
A.M. SERIES HYDRATION PACKS
 A.M. SERIES HYDRATION PACKS DUTHIE W S SIOUXON FEATURING THE HIGHLY BREATHABLE FLOATAIR BACK PANEL for optimum riding comfort, these rugged, versatile hydration packs are built to carry all the water and
Backcountry Series STORM & SQUALL-
 Backcountry Series STORM & SQUALL- BACKCOUNTRY SUSPENSION INSTRUCTIONS INSTRUCTION INDEX Safety Warnings p. 2-3 Care & Cleaning p. 3 Suspension Features p. 4 Custom Fitting your Pack p. 5-9 Frame Shaping
USER MANUAL CONTENTS. Please read this carefully before doing anything with your new container system
 USER MANUAL CONGRATULATIONS ON YOUR PURCHASE OF A SQUIRREL CRUX ( PRODUCT ). BY PURCHASING THIS PRODUCT, YOU ACKNOWLEDGE THAT ENGAGING IN SKY-DIVING, BASE JUMPING, PARACHUTING, AND WINGSUITING IS AN INHERENTLY
Assembly instructions for Eurotramp trampolines Series: Ultimate, Grand Master Exclusiv, Grand Master, Master
 Assembly instructions for Eurotramp trampolines Series: Ultimate, Grand Master Exclusiv, Grand Master, Master 1. Assembly instructions 2. Attaching the plastic coated steel cables on the Ultimate frame
Installation Guide: Round Trampoline
 Trampolines & trampoline parts designed to survive in the harsh Oz climate. www.oztrampolines.com.au Installation Guide: Round Trampoline Safety Tips Here at Oz Trampolines we are passionate about your
VEPR Round Drum Disassembly and Assembly
 VEPR 12 25 Round Drum Disassembly and Assembly Required Tools ¼ Allen Wrench Flat Head Screwdriver Drum Parts List Drum Body Carousel Center Bolt Dummy Rounds Carousel Lock Spring Clear Drum Cover Step
When moving the frame don t force anything! Move the leg to allow the brace to go over the rod.
 THE IDLER Assembly and Care Instructions General notes Please read these instructions in their entirety before constructing your Idler Construction Before you begin constructing your Idler consider where
Contents. Introduction Technical description Adjusting your Goya The alternative methods of emergency parachute connection ...
 GOYA Contents Introduction... 3 Technical description... 3 Adjusting your Goya... 4 The alternative methods of emergency parachute connection... 6 Speed systém... 10 Towing... 10 Tandem flying... 10 Harness
Maintenance Instructions and Directions for Use Wind Support
 Maintenance Instructions and Directions for Use Wind Support Attention Important guidelines for end users Please read carefully and bear in mind before using! These instructions must be kept by the end
COMPASSION UK EVENTS
 COMPASSION UK EVENTS setting up the stand Here, you will find step-by-step instructions for the various stands and other equipment. These will differ depending on the event. SETTING UP A PULL-UP BANNER
OWNER S MANUAL. Gravity Model 5201
 OWNER S MANUAL Gravity 1000 Model 5201 The specifications of this product may vary from this photo and are subject to change without notice. IRONMAN, IRONMAN TRIATHLON and M-DOT are registeved trademarks