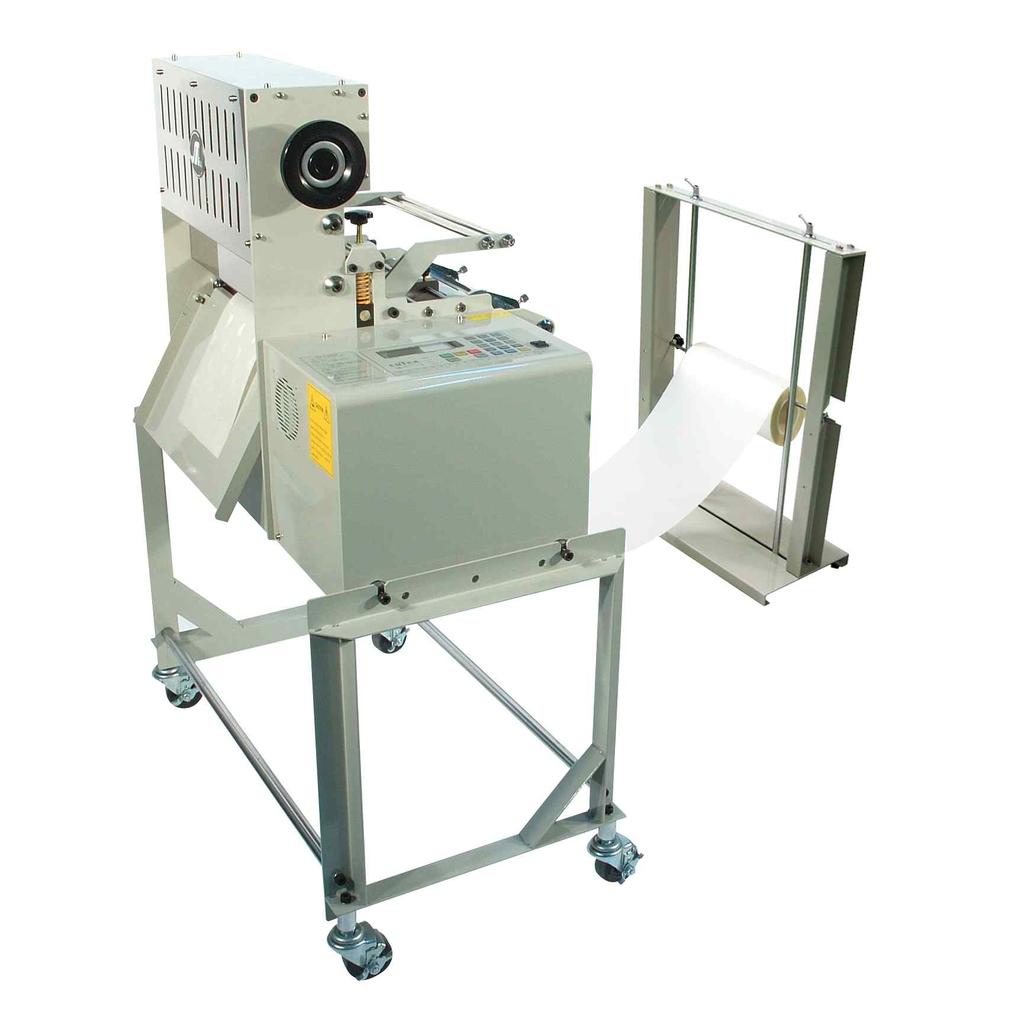
How to operate TBC-553L
|
|
|
- Bernadette Howard
- 5 years ago
- Views:
Transcription

1
 Turn on the POWER SW. Set cutting length.")
2 How to operate TBC-553L 1. An example (Cutting length : 70mm, Cutting quantity : 120 pcs) Turn on the POWER SW. Set cutting length. (Press the following buttons in order.) Set cutting quantity. Press START button
3 2. Key functions : Current length on display will be back to 0 at a stop. : All of current length and current q ty on display will be back to "0". : Moving knife only. 1 to cut the material for test. 2 to take out the material jammed between knife blades. 3 for balancing of knife blades in exchange. : Cutting additional one. : Restoring to normal condition in ERROR(red LED) and inputting parameter or program. : to move the roller manually for mounting the material on the machine or for feeding it forwards or backwards. Speed up (The current speed appears on the left-upside of LCD display with "%". Normal speed : 50%, Maximum speed : 100%) Speed up (The current speed appears on the left-upside of LCD display with "%". Normal speed : 50%, Maximum speed : 0%) * Speed up & down is possible in any time(operation or stop) and set-speed will not be changed even though you press RESET button or power off & on. : to correct wrong data. : Function for label cutting (applicable models : TBC-50S, TBC-50SH) - 2 -
4 3. Specification 4. Caution for use - Before use, please confirm the voltage and make the ground(earth) connection. - In case of cutting double or triple rolls at the same time, make materials fed oppositely( & ), to prevent slipping by roll tension. - Do not access hands or any object close to the working knife. (for safety) - When the knife blade becomes dull, please use it after grinding with the grinding machine. (Please do not let the unskilled person grind manually or install the knife blade.) - 3 -

 a little to make lower knife movable.")
5 HOW TO ADJUST KNIFE Knife of TBC-520L/530L cuts material as like scissors. If there is a gab between upper and lower knife, there will be a problem. So if you have a cutting problem due to gab between upper and lower knife, this documents can help you. As you can see, the gab can be adjusted by 5 bolts, refer to below image. Before adjusting gab, please release bolts (#B-15, clamping bolts) a little to make lower knife movable. If you turn it by CW (clock wise) the lower knife will be close to upper knife. And if you turn it by CCW (counter clock wise) the lower knife will move against upper knife

6 At first, please lay down upper knife a little, please refer to below image. And then turn no. 5 screw to make lower knife to close to upper knife. And then make lower knife close to upper knife by turning no. 1~4 screws. After doing above steps, please test with paper and check which side of paper is not cut, and make those side of knife close to upper knife by turn proper screws. Please turn it little by little, we recommend about 5 degrees a time. After finishing, please fasten all #B-15, clamping bolts. If you need further information, please contact us at any time
7 - 6 -
8 TBC-553L PART LIST A ( CUTTING PART ) Part No. Description Part No. Description A-1 CONTROL CASE A-30 SAFETY COVER A-2 FAN A-31 ANGLE NUT A-3 TERMINAL A-32 LEFT FRAME A-4 TRANSFORMER A-33 ANGLE NUT A-5 CONTROL BASE A-34 ANGLE NUT A-6 CONDENSER A-35 UPPER COVER A-7 DRIVE BOARD A-36 FRONT COVER A-8 RELAY A-37 SUPPORT A-9 DRIVE A-38 PRODUCT GUIDE A-10 WHEEL A-39 REAR COVER A-11 ANGLE FRAME A-40 CONTROL ANGLE NUT A-12 ANGLE SHAFT A-41 ROLLER BEARING HOUSING A-13 RIGHT FRAME A-42 BEARING A-14 BREAING A-43 LOWER ROLLER A-15 GUIDE ROLLER A-44 UPPER ROLLER A-16 REAR GUIDE SIX ANGLE PIN A-45 UPPER ROLLER SHAFT A-17 MOTOR A-46 FIXING RING A-18 ANGLE SHAFT A-47 LEVER A-19 FORNT COVER A-48 HANDLE BOLT A-20 REAR GUIDE SIX ANGLE PIN A-49 PRESSURE CONTROL SPRING COVER A-21 REAR GUIDE SIDE A-50 PRESSURE SPRING A-22 REAR GUIDE ROLLER BEARING HINGE A-51 UPPER ROLLER GUIDE BLOCK A-23 TIME GEAR A-52 GUIDE SHAFT A-24 ANGLE NUT A-53 GUIDE SHAFT A-25 ROLLER BEARING HOUSING (LEFT) A-54 GUIDE SHAFT A-26 TIME BELT A-55 PANEL A-27 TIME GEAR A-56 OP BOARD A-28 ROLLER TANSTION BRACKET A-57 POWER SWITCH A-29 SAFETY COVER SUPPORT A-58 CONTROL BOARD (MB) - 7 -
9 - 8 -
10 TBC-553L PART LIST B (FEEDING PART) Part No. Description Part No. Description B-1 SHAFT HANDLE B-21 B-2 UPPER KNIFE B-22 B-3 UPPER KNIFE FRAME B-23 B-4 FIXING BRACKET B-24 B-5 LOWER KNIFE BRACKET B-25 B-6 LOWER KNIFE B-26 B-7 MOTOR B-27 B-8 DECELERATE B-28 B-9 GEAR B-29 B-10 PRESSURE PLATE B-30 B-11 GEAR B-31 B-12 CRANK BEARING HOUSING B-32 B-13 LINK B-33 B-14 CRANK B-34 B-15 CRANK SHAFT B-35 B-16 PRESSURE PLATE B-36 B-17 PRESSURE PLATE B-37 B-18 B-38 B-19 B-39 B-20 B
11 REEL HANGER
12 REEL HANGER Part No. Description Part No. Description Z-1 SHAFT Z-2 HAND GRIP BOLT Z-3 ROLL HANGER FRAME Z-4 SHAFT Z-5 BASE Z-6 MATTER SHAFT
13 Trouble-shooting of TBC-50 series No Troubles Appicable model Causes & Measures 1 No power supply 2 Power is on, but no work 3 Material is not cut. Feeding roller doesn't work. Knife doesn't work. LCD display doesn't work. All functions don't work Al models Hot cutter (H, LH, SH, HX) 4 Material is cut onesidedly Cut-length is different from set-length. It cuts before the cutting line of labels. It cuts after the cutting line of labels. ERROR CODE [064] >Sensor check Er Label cutter (S, SH) Label cutter (S, SH) Label cutter (S, SH) - Check if electric cord is connected well. - Check if the fuse blows out or not. - Check if there is inserted any alien substance in roller. - If current length on display is changed, exchange drive board. - If current length on display is not changed, exchange Control board(mb). - Check if pressure plates of upper knife are too much fastened or not. - After opening the cover, check the connetion. (especially between Operation & MB board) - Check if auto-stop device lies down. If any, raise it up. - Check if temperature goes up to set-degree. - Check if knife blades are even(parallel). - Check if blades are damaged or weared. - After making both knives close each other by M/CUT button and check if they are even or not. (If they are not even, adjust them by bolts) - Test cutting after loosening material from the reel by hand or attaching feeding device. - Move the sensor towards knife side as long as the difference by pushing. - Move the sensor towards counter-knife side as long as the difference by pushing. - Trouble in Mark sensor Check if the sensor is connected well or not. Check if the sensor is adjusted well or not. (FILE NO 001) Check if it is label problem or not ERROR on LCD & LED ERROR CODE [065] >CUT I/O Error! STOP INPUT!! CHECK STOP INP! (C)ACORD CTRL-OP AMC-T3KA VER1.7D ERROR CODE[065] >CHECK CODE[003] - Trouble in cutting motor or cutting sensor Upper knife moves 1~3 sec. and ERROR on display. Check the connection of cutting sensor. If not, exchange the cutting sensor. Upper knife doesn't move and ERROR on display. Exchange the cutting motor or drive board. - Auto stop device is pressed down or shortage. raise up the device and check shortage. - Bad connected ROM Press ROM by hand or connect it again. (If not, change MB board) - Change of FILE 003 in program by noise or mis-operation Initialize the controller. How to Initialize(programs to be initial) : press SETSHIFT/ESC buttons and RESET button at the same time. (Press RESET later than other two keys.) Operator feels electric current - Connect the earth cord(green) to any bolt of in touch of machine. backside of machine. After exchange ROM, you should do initialize the controller, due to error message, if you cannot do initialization, please press "SHIFT/ESC' button to escape error message screen and then initialize the controller

14 Please contact following address for further information. Please do not disassemble / modify machine or its part without any permission. If you disassemble / modify machine or its part, you cannot receive warranty/after-sales service.
How to operate TBC-50H
 How to operate TBC-50H 1. An example (Cutting length : 70mm, Cutting quantity : 120 pcs) Turn on the POWER SW. Set the temperature.(it is normally used at 250 350 C. About 5 minutes after turn-on & set
How to operate TC-38A
 How to operate TC-38A 1. Installation 1 Support connection: Referring to the cover page of this INSTRUCTION MANUAL, fasten two small wrench bolts in backside by 6mm-wrench and fasten three large bolts
Product instruction manual Ream Cutting Systems RE3943, RE3946, RE3947, RE3971, RE3952E
 Product instruction manual Ream Cutting Systems RE3943, RE3946, RE3947, RE3971, RE3952E The Trimfast Ream Cutters are reliable, high performance cutters that will give you the results you need quickly
RETRACTABLE AWNING w/ OPTIONAL HOOD ASSEMBLY INSTRUCTIONS
 Contact us @ (800)851-0865 RETRACTABLE AWNING w/ OPTIONAL HOOD ASSEMBLY INSTRUCTIONS Congratulations on your purchase of a new retractable awning. With proper installation this awning will provide years
BR-2250/BR Burnisher. Operator and Parts Manual. Model No.: BR BR-2250 Can. Pac BR BR-2500 Can.
 BR-220/BR-200 Burnisher Model No.: 608342 BR-220 609248 BR-220 Can. Pac 608340 BR-200 609247 BR-200 Can. Pac Operator and Parts Manual NOBLES 1287 RANSOM STREET HOLLAND MI 49424 U.S.A. CUSTOMER SERVICE:
SERVICE SHEET 34" WALK-BEHIND POWER TROWEL MODEL FT34 (THIS SERVICE SHEET APPLIES TO THE TROWELS WITH SERIAL NUMBER AND AFTER) WARNING
 WARNING") 34" WALK-BEHIND POWER TROWEL (THIS APPLIES TO THE TROWELS WITH SERIAL NUMBER 0837 AND AFTER) WARNING To reduce the risk of injury, all operators and maintenance personnel must read and understand these
34" WALK-BEHIND POWER TROWEL (THIS APPLIES TO THE TROWELS WITH SERIAL NUMBER 0837 AND AFTER) WARNING To reduce the risk of injury, all operators and maintenance personnel must read and understand these
AFC-50 Automatic French Fry Cutter Instruction Manual
 AFC-50 Automatic French Fry Cutter Instruction Manual Fry Factory Inc. 67 Watts Ave, Charlottetown, PEI, C1E 2B7, Canada Phone: 902-368-2900 Fax: 902-368-8645 Email: info@fryfactoryinc.com Website: www.fryfactoryinc.com
Paperfox EVV-3 Cardboard Edge Protector Cutter. Instructions manual. Last modification: 03.MAR.2018.
 Paperfox EVV-3 Cardboard Edge Protector Cutter Instructions manual Last modification: 03.MAR.2018. Application of the EVV-3 Cardboard Edge Protector Cutter The EVV-3 Cardboard Edge Protector Cutter is
Roller Bar End Cap (w/round Drive Shaft) Replacement Instructions for Vista and Motorized Awnings * Helpers needed *
 Replacement Instructions for Vista and Motorized Awnings * Helpers needed *") RETRACTABLE AWNINGS For Technical Support visit us at www.sunsetter.com/ownerscorner or Call Toll Free 800-670-7071 Fax 877-224-4944 Roller Bar End Cap (w/round Drive Shaft) Replacement Instructions for
RETRACTABLE AWNINGS For Technical Support visit us at www.sunsetter.com/ownerscorner or Call Toll Free 800-670-7071 Fax 877-224-4944 Roller Bar End Cap (w/round Drive Shaft) Replacement Instructions for
Powerful Recycling. AZR-K single-shaft shredder and RSM granulator. economical robust powerful. Entsorgungstechnik
 Entsorgungstechnik Powerful Recycling AZR-K single-shaft shredder and RSM granulator economical robust powerful The AZR-K 800 to AZR-K 2000 series of shredders and the RSM series of granulators deliver
quick and easy installation guide
 www.directdriveopener.com quick and easy installation guide Back 2 Front. Motor Carriage 2. C-rail. Chain. Limit stops. Slide in part (tensioner) Rail assembly Insert C-rail parts () into the connecting
NORTHFIELD CORPORATION 1870 COMMERCE DR. DE PERE, WI UNITED STATES
 1 MANUFACTURER: MODEL: NORTHFIELD CORPORATION 1870 COMMERCE DR. DE PERE, WI 54115 UNITED STATES NORTHFIELD CLS SPECIFICATIONS: VOLTAGE: FREQUENCY: CURRENT: AIR: 115VAC-230VAC 50/60Hz 5 AMP 80 PSI (for
Please read this guide carefully. It tells you how to prepare your cutting plotter for production use in a few easy steps.
 OPERATING GUIDE for Secabo mini Cutting Plotter Congratulations on purchasing your Secabo mini cutting plotter! Please read this guide carefully. It tells you how to prepare your cutting plotter for production
ref no part no name of parts note
 - 1 - ref no part no name of parts note 1 SP-760001101 MACHINE FARME 2 SP-750005001 MAIN SHAFT BUSHING 3 SP-750006002 MAIN SHAFT BUSHING 4 SP-000018012 SCREW 5 SP-750013105 LOOPER SHAFT BUSHING 6 SP-750023005
Instruction for edge trimming knife sharpening of M-Type shoe sewing machines
 Instruction for edge trimming knife sharpening of M-Type shoe sewing machines 1. Introduction This instruction is a supplement to the instruction for use of electric table sharpener; thus the scope of
Exploded views meat slicer: 800S. DEKO Holland bv B Arnhem The Netherlands
 Exploded views meat slicer: 800S DEKO Holland bv. 6827 B Arnhem The Netherlands DEKO Holland bv. Recommended spare parts list Part no. Description 260-07/ 260-08/ 260-5 Switch 230 Volt / Switch 400 Volt
PATRIOT INSTRUCTION MANUAL SL300C 12 MEAT SLICER 1/2 HP
 INSTRUCTION MANUAL SL300C 12 MEAT SLICER 1/2 HP This manual contains important information regarding your Patriot unit. Please read this manual thoroughly prior to equipment set-up, operation and maintenance.
1224 Splitter and CTO combo, setup instructions using the Panelview HMI
 Knowledge Base Article Type: Instructions 1224 Splitter and CTO combo, setup instructions using the Panelview 1000+ HMI Description: Instructions on How to properly setup the 1224 Splitter and CTO/Clamp
PARTS BOOK CATALOG SIDE HD FLAIL HEADS TRACTOR MID-MOUNT
 PARTS BOOK CATALOG SIDE HD FLAIL HEADS TRACTOR MID-MOUNT DIAMOND MOWERS, Inc. 350 E 60 th St. North Sioux Falls, SD 57104 FOR WARRANTY CALL DIAMOND MOWERS DIRECT: 888-960-0364 OUR TECHNICIANS WILL DIAGNOSE
PRODUCT MANUAL - M096
 PRODUCT MANUAL - M096 MODEL 270 ELECTRIC CAN OPENER 1 I. LABELS L087--CAUTION 2 II. SPECIFICATIONS MODEL NO. 270 POWER 115 VOLT, 1.5 AMP, 50-60HZ REQUIREMENTS 230 VOLT, 0.8 AMP, 50-60 HZ NORMAL SPEED 200-250
Thomas Scientific Swedesboro, NJ U.S.A.
 Thomas Scientific Swedesboro, NJ 08085-0099 U.S.A. Wiley Laboratory Mill, Model 4 3375-E10 (115 V, 50/60 HZ) USE AND CARE OF CATALOG NUMBER: 3375-E10 Wiley Laboratory Mill, Model 4 (115 V, 50/60 HZ) UNPACKING
MBM StitchFold Trimmer
 MBM StitchFold Trimmer Operator Manual Provided By http://www.mybinding.com http://www.mybindingblog.com OPERATION MANUAL Trimmer Trimmer Trimmer CONTENTS Introduction... 3 Specifications... 3 Safety...
Advantage Plus TIM-3600 Series Reel
 Read the following precautions and instructions before you begin assembly or using. Failure to comply with these instructions could result in personal injury or property damage. Keep these instructions
Urea/Adblue Hose Reel
 www.scintex.com.au sales@scintex.com.au Model: SHR3408 Urea/Adblue Hose Reel Product Manual Specifications Spring driven drum: for automatic rewind. Locking ratchet: to maintain the desired length of hose
accidents which arise due to non-observance of these instructions and the safety information herein. CAUTION:
 AUTO REWIND HOSE REEL Model: 7640 CALIFORNIA PROPOSITION 65 WARNING: You can create dust when you cut, sand, drill or grind materials such as wood, paint, metal, concrete, cement, or other masonry. This
NEWMAR SERVICE SCHOOL
 NEWMAR SERVICE SCHOOL TRAINING INFORMATION GUIDELINE FOR FEBRUARY 2013 OUR PRODUCTS: NOVA DUAL PITCH AWNING G-2000/ G-1500 2 P a g e G-2085 G-5000 3 P a g e G-LINKS 4 P a g e NOVA/ G-2000/ G-1500 BASIC
DC 700 Series Hose Reel - September 2010
 Instructions Parts List Service Manual DC 700 Series Hose Reel - September 2010 Suitable for dispensing, transfer and evacuation of lubricants, fuels, air & other automotive & industrial products. To be
Please read this guide carefully. It tells you how to prepare your cutting plotter for production use in a few easy steps.
 OPERATING GUIDE for Secabo C30 and C40 cutting plotters Congratulations on purchasing your Secabo cutting plotter! Please read this guide carefully. It tells you how to prepare your cutting plotter for
PC1000 OPERATION MANUAL SPARE PARTS LIST
 PC000 OPERATION MANUAL SPARE PARTS LIST MM POLYCHEM CORPORATION 677 HEISLEY ROAD, MENTOR, OHIO 060 PHONE: 0.357.500, FA: 0.35.9553 WWW.POLYCHEM.COM CONTENTS PART I General Safety Instructions... A. Basic
INSTRUCTION 8512 MANUAL. MAX SERIES Slicer WE THANK YOU FOR YOUR PURCHASE OF OUR MODEL 8512 SLICER. 8512/498 EDS
 INSTRUCTION MANUAL MAX SERIES Slicer WE THANK YOU FOR YOUR PURCHASE OF OUR MODEL SLICER. /498 EDS TABLE OF CONTENTS DESCRIPTION PAGE Table of Contents 1 List of Illustrations 1 Introduction 3 Installation
Parts Lists. Parts List Index. Using the Parts Lists
 Parts Lists Parts List Index PL 1.1 Covers (1 of 2).............. 7-2 PL 9.1 Frame and Size Sensor....... 7-22 PL 1.2 Covers (2 of 2).............. 7-4 PL 10.1 Electrical................. 7-24 PL 2.1 Tray
PARTS BOOK FLAIL HEADS 90 REAR 3PT HITCH MOUNT
 PARTS BOOK FLAIL HEADS 90 REAR 3PT HITCH MOUNT 5.0.8 DIAMOND MOWERS, LLC 350 E 60 th St. North Sioux Falls, SD 5704 FOR WARRANTY CALL DIAMOND MOWERS DIRECT: 888-960-0364 OUR TECHNICIANS WILL DIAGNOSE YOUR
SPIRAL SLICER Instruction Manual Model #5280 & 5280M. Part No Revised Feb. 2010
 SPIRAL SLICER Instruction Manual Model #5280 & 5280M Part No. 82876 Revised Feb. 2010 SAFETY PRECAUTIONS INSTALLATION INSTRUCTIONS Inspection of Shipment: 5280 & 5280M SPIRAL SLICER Unpack all cartons
ORDER FORM B B B1100 windproof
 ORDER FORM B1085 - B1100 - B1100 windproof Date: Delivery address : Name: Address: Ref.customer: Tel. n : Quantity:... Type of awning: o Brustor B1085 o box 85mm o Brustor B1100 o box 105mm o Standard
ORDER FORM B B2100
 Date: ORDER FORM B2085 - B2100 Delivery address: Name: Address: Ref. customer: Tel. n : Quantity:... Type of awning: o Brustor B2085 o Brustor B2100 B2085: H = U + 120 mm B2100: H = U + 137 mm Total width:...mm
Cassette-folding arm-awning markilux 990
 Cassette-folding arm-awning markilux 990 Mounting instructions 1. Overview 1 Projection profile 2 Folding arm 3 Fabric 4 Console 5 Cassette 6 Covering cap 7 Wall bracket 2. Mounting brackets 2.1 Overview
Meat Slicer INSTRUCTION MANUAL CAUTION! ONE YEAR LIMITED WARRANTY
 ONE YEAR LIMITED WARRANTY INSTRUCTION MANUAL The original registered owner of this product should contact SKYFOOD EQUIPMENT LLC at 305-868-16 for any warranty problems or service. SKYFOOD EQUIPMENT LLC
Meat Slicer This manual contains important information regarding your Admiral Craft
 SL300ES Meat Slicer This manual contains important information regarding your Admiral Craft unit. Please read this manual thoroughly prior to equipment set-up, operation and maintenance. Failure to comply
SOLHARO ASSEMBLY & INSTALLATION INSTRUCT IONS
 A. Introduction: SOLHARO ASSEMBLY & INSTALLATION INSTRUCT IONS Rev. 01/30/2012 The Solharo is an external, retractable, tensioned sun shading system designed to fit over a sunroom or wood pergola. The
User Manual. Meat Slicer Instruction Manual. Model: 177SL612A 10/2018. Please read and keep these instructions. Indoor use only.
 Meat Slicer Instruction Manual Model: 177SL612A 10/2018 Please read and keep these instructions. Indoor use only. www.avantcoequipment.com 1 Unpacking: Unpack the product and check for any damage incurred
1000M MANUAL Signature Series Slicer OPERATORS MANUAL
 1000M MANUAL Signature Series Slicer OPERATORS MANUAL Persons under age 18 are not permitted to operate or have accessibility to operate this equipment per U.S. Dept. Of Labor Employment Standards Administration
NS 200 Series Hose Reel January 2011
 Instructions Parts List Service Manual NS 200 Series Hose Reel January 2011 Suitable for dispensing, transfer and evacuation of lubricants, fuels, air & other automotive & industrial products. To be used
TP Original Instruction
 TP-702-12 Original Instruction CONTENTS PART I 1 General Safety Instructions... A1 1.1 Basic Operation... A1 1.2 Basic Safety Precautions... A1 1.3 Safety Instructions Governing Specific Operational Phases...
Bevel Buddy Instruction Manual
 Bevel Buddy Instruction Manual We at Precision Sharpening Devices Inc. believe there are two very important steps in maximizing the savings this equipment can provide your company. First, use this manual
USER S OPERATING AND INSTRUCTION MANUAL
 Grand Rapids, Michigan, U.S.A. 49504-5298 USER S OPERATING AND INSTRUCTION MANUAL MODEL 709 MINI SUPREME BREAD SLICER 0709S20000-CV INDEX SAFETY INSTRUCTIONS... 0709S20025 DEFINITIONS... GEN 931118 INSTALLATION
EXPLOSIONADO DE PARTES. Secadora de Importación. Modelo: 7MLGR4634JT2
 EXPLOSIONADO DE PARTES Secadora de Importación Modelo: i Marca TOP AND CONSOLE Mexico S.A de C.V. 1/10 CMF R e f Marca Descripción C a n t TOP AND CONSOLE Numero de Parte 2 Screw, Grounding 1 3400859 3
www MK-Electronic de 7. Parts catalog How to use this parts catalog , -220, -230 The following legend is used in the parts catalog:
 7. Parts catalog How to use this parts catalog The following legend is used in the parts catalog: Asm- Index Part number Machine type and model mach FRU Description Asm-index: identifies the assembly and
HANDLES AND CONTROL CABLES
 Worm Drive Transmission........................ 1 Single Speed Spur/Bevel Gear Transmission............. Single Speed Bevel Gear Transmission................ Three Speed Transmission.......................
S36 230V MOTOR COVER
 S36 230V MOTOR COVER S36 230V MOTOR COVER Pos Article Number Description QTY 1 590450601 AC FOAM PACKING 1 2 590396701 MANOMETER KIT 1 3 590415301 COUNTER SET 1 4 590450201 CORD SET PACKING 1 5 590449601
PR-429BF-600M. Bell 429 Blade Fold Kit Operations Manual
 Table of Contents Table of Contents... 1 Record of Revisions... 2 References... 3 Introduction... 4 Contact Information... 4 Prerequisites... 5 First Time Use... 6 Blade Clamp Placement... 6 Blade Clamp
SOFT TOP ROOF TENT INSTRUCTION MANUAL
 SOFT TOP ROOF TENT INSTRUCTION MANUAL CONTENTS SET UP INSTRUCTIONS: 1. INSTALLING YOUR ROOF TOP TENT P2-3 2. SETTING UP YOUR ROOF TOP TENT P4 3. PACKING DOWN YOUR ROOF TOP TENT P5-6 4. TIPS & TRICKS P7
Original Instruction
 Original Instruction CONTENTS PART I 1 General Safety Instructions... A1 1.1 Basic Operation... A1 1.2 Basic Safety Precautions... A1 1.3 Safety Instructions Governing Specific Operational Phases... A2
FREEDOM BUTTON KIT INSTALLATION GUIDE STEP 1
 FREEDOM BUTTON KIT INSTALLATION GUIDE Installation of the Freedom Button kit is very simple and similar to the installation of a standard rear takedown pin and bolt catch latch. Before installing your
Blue Series Hot Melt Hose with RediFlext II Hanger System
 Instruction Sheet P/N 1124594_01 Blue Series Hot Melt Hose with RediFlext II Hanger System Safety WARNING! Allow only personnel with appropriate training and experience to operate or service the equipment.
OWNER S TECHNICAL MANUAL
 OWNER S TECHNICAL MANUAL Heavy Duty Oil Hose Reel 504200 Description Open hose reel for air, water (high or low pressure), oil or grease, depending on model. Uncoil the hose to the desired length. It can
PATRIOT INSTRUCTION MANUAL SL300ES, 300ES MEAT SLICER
 PATRIOT INSTRUCTION MANUAL SL300ES, 300ES-12 12 MEAT SLICER This manual contains important information regarding your unit. Please read this manual thoroughly prior to equipment set-up, operation and maintenance.
Shark Guard SGK1 Installation
 Shark Guard SGK1 Installation for riving knife based saws These instructions apply to numerous brand and model saws that we make guards for. This information is fairly generic and good for all those saws.
PARTS LIST CHARGER 2022 ABLT
 PARTS LIST CHARGER 2022 ABLT HEAD ASSEMBLY ITEM PART NO. DESCRIPTION QTY 101 5990731 SPRING CLIP PAD HOLDER SET INCLUDES: 1 101A 9120205 #8 X 1/2 PAN HEAD PHILLIPS SHEET METAL SCREW PACK OF 3 3 102 9121490
DO NOT use Alien Flier Zip Line Products until you have read and fully understand the SAFETY WARNINGS below!
 SAFETY WARNING DO NOT use Alien Flier Zip Line Products until you have read and fully understand the SAFETY WARNINGS below! Assumption of Risk Zip line construction and use can be dangerous. Ensure you
SERVICE MANUAL- M126
 SERVICE MANUAL- MANUAL CAN OPENER- MODEL # 2 1 Model #2 Can Opener Assembly Procedure The Model #2 can opener will be assembled according to the following procedure. I. Model #2 Handle and Arbor Assembly
Modular Cut-Wrap Facility - Retail Market
 Modular Cut-Wrap Facility - Retail Market For further processing of multi-species carcasses from Mobile Meat Processing Units (MMPU) Carcass Aging and Holding Cooler Mobile Reefer Units Adapted for specific
THE EDGE12 SLICER. MODEL EDGE12-2 (220/50/1 voltage) FORM (July 2012) EDGE12 SLICER
 FORM (July 2012) EDGE12 SLICER") EDGE12 SLICER THE EDGE12 SLICER MODEL EDGE12-1 (120/60/1 voltage) EDGE12-2 (220/50/1 voltage) ML-136246 ML-136247 701 S. RIDGE AVENUE TROY, OHIO 45374-0001 937 332-3000 www.hobartcorp.com FORM 35283 (July
EDGE12 SLICER THE EDGE12 SLICER MODEL EDGE12-1 (120/60/1 voltage) EDGE12-2 (220/50/1 voltage) ML-136246 ML-136247 701 S. RIDGE AVENUE TROY, OHIO 45374-0001 937 332-3000 www.hobartcorp.com FORM 35283 (July
NORDIC PLOW TORO Time Cutter Plow PLOW KIT for TORO Time Cutter SW developed by Nordic Plow
 NORDIC PLOW TORO Time Cutter Plow PLOW KIT for TORO Time Cutter SW4200 49 developed by Nordic Plow TIME CUTTER ATTACHMENT ASSEMBLY TIPS... DANSK...1 ENGLISH... 3 NORSK... 19 FRANCAIS...12 SVENSKA...20
Tarp Return. Questions? Contact Customer Or Parts Diagrams see Parts and Diagrams section on web at
 Roll Rite, LLC and its entire staff would like to not only Thank You but congratulate you on your purchase of one of what we feel to be the finest line of tarping systems in the industry. Tarp Return RR
Notes, Parts List & Drawings
 Biomass Chopper/Cutter Notes, Parts List & Drawings Page 1 of 16 The Easy BioChop biomass chopper/cutter was designed to cut both wet and dry biomass and to accomplish a number of goals. The objectives
GT371 HEDGETRIMMER TYPE
 GT371 HEDGETRIMMER TYPE 1 Introduction Exploded Drawing Bill Of Material Repair Instructions E13791 GT371-----A New Parts Wiring Diagram Main Menu 3 18 02-04 SEAN HOLDEN GT371 MANUFACTURING PLANT USTI
ALEKO Victoria Series Retractable Awning Instructions for Installation and Operation
 www.alekoproducts.com ALEKO Victoria Series Retractable Awning Instructions for Installation and Operation PLEASE DO NOT RETURN THIS PRODUCT TO THE STORE! The owner s manual includes assembly and operating
PARTS LIST eforce Burnisher
 PARTS LIST eforce Burnisher HEAD ASSEMBLY ITEM PART NO. DESCRIPTION QTY 101 6496721 MOTOR 36 VOLT, 2100 RPM, 3.6HP [see pages 16,17] 1 102 9121410 5/16 EXTERNAL STAR LOCK WASHER PACK OF 10 2 103 6492051
VAC N BLO CAR VAC COMMERCIAL SERIES
 VAC N BLO CAR VAC COMMERCIAL SERIES INSTRUCTION MANUAL MODEL PRO-83BA-CS Before using, check your plug to make sure it is the proper voltage for your country. UK plug 220-240 volt EURO plug 220-240 volt
Snap 700 Linear Knife
 Users Manual Snap 700 Linear Knife Addendum AVERY DENNISON Manual Edition 2.2 7 February 2014 Manual Part Number 621395 WARNING This device complies with Part 15 of the FCC Rules. Operation is subject
Contents. 8. Exploded Views and Parts List. [The keynote of Product]
![Contents. 8. Exploded Views and Parts List. [The keynote of Product]](/thumbs/75/71915729.jpg "Contents. 8. Exploded Views and Parts List. [The keynote of Product]") 8. Exploded Views and Parts List Contents 8.1 Main 8-2 8.2 Top Cover 8-5 8. Rear Cover 8-7 8..2 Rear Cover(Transfer Unit) 8-9 8.4 Front Cover 8-11 8.5 Main Driver 8-12 8.6 Main Frame 8-16 8.7 LSU Cover
8. Exploded Views and Parts List Contents 8.1 Main 8-2 8.2 Top Cover 8-5 8. Rear Cover 8-7 8..2 Rear Cover(Transfer Unit) 8-9 8.4 Front Cover 8-11 8.5 Main Driver 8-12 8.6 Main Frame 8-16 8.7 LSU Cover
Accu-Chart TM Healthcare Systems, Inc.
 Accu-Chart TM Healthcare Systems, Inc. Training Guide for DeBlister-RX 1305 Remington Rd., Suite I Schaumburg, IL 60173 847-252-7183 Fax: 630-307-5982 techsupport@accuchart.com Accu-Chart TM Healthcare
Setting the standard for
 Owners Manual Setting the standard for Caravan & Trailer Jacks WARNING THIS PRODUCT IS ONLY TO BE USED WITH THE TRAIL-A-MATE ENGAGEMENT FITTING PLEASE FAMILIARISE YOURSELF WITH THIS MANUAL BEFORE USING
Parts Catalog. S-Series Slicer Manual S13. Model:
 , 08 99506 ECN 035 Parts Catalog S-Series Slicer Manual Model: S3 S3 /3/08 Rev. M IMPORTANT! TO EXPEDITE SHIPMENT OF PARTS, ALWAYS SPECIFY MODEL, REV, PART NUMBER, AND SERIAL NUMBER OF UNIT. GLOBE FOOD
How to Build Your Own Flour Mill and Sifter
 Prototype and plans developed by Hugo Gervais Custom Fabrication, North Hero, VT Materials List: How to Build Your Own Flour Mill and Sifter Quantity Materials 4 2 X 2 X 26 3 / 16 Square tubing 1 2 X 2
Technology working for you. From the Small Hand Feed Operation to Complete Engineered Plastic Granulator Systems
 Reprocessing Plastic Scrap into Valuable Regrind From the Small Hand Feed Operation to Complete Engineered Plastic Granulator Systems Technology working for you. Screenless Granulators Low speed (27 rpm)
GT370 HEDGETRIMMER TYPE
 GT370 HEDGETRIMMER TYPE 1 Introduction Exploded Drawing Bill Of Material Repair Instructions E13791 GT370-----A New Parts Wiring Diagram Main Menu 44 18 02-04 SEAN HOLDEN GT370 MANUFACTURING PLANT USTI
* * 4023 KR. Step 1 Prepare the Keyed Removable Unit. Not for use on electric or fire rated removable mullions
 condition. *64009-00* 64009-00 Keyed Removable Mullions 403 KR Installation Instructions Not for use on electric or fire rated removable mullions This kit includes the following parts: (Not to scale) 5/6
Alien Flier Zip Line Products Installation/Owner s Manual
 Alien Flier Zip Line Products Installation/Owner s Manual 1 Table of Contents SAFETY PLEASE READ CAREFULLY... 4 Constructing your Zip Line Xtreme Models... 6 Installing your Alien Flier Trolley on an Existing
Installation Instructions for the Rolltec Physique XL Awning
 Installation Instructions for the Rolltec Physique XL Awning Questions? Call Rolltec at 1-800-667-0474 General Tool Requirements Table of Contents Available installation brackets Side dimensions of various
42" SNOW BLADE. Owner's Manual. Model No Safety Assembly Operation Maintenance Parts
 Owner's Manual 42" SNOW BLADE Model No. 486.24443 CAUTION: Before using this product, read this manual and follow all Safety Rules and Operating Instructions. Safety Assembly Operation Maintenance Parts
Installation Instructions for the Rolltec Bravo Awning
 Installation Instructions for the Rolltec Bravo Awning Questions? Call Rolltec at 1-800-667-0474 Table of Contents Available installation brackets Side dimensions of various installations Determining installation
INSTRUCTION MANUAL HYDM140
 INSTRUCTION MANUAL HYDM140 INSTRUCTION MANUAL Clean-Cuts HYDM140 Hydraulic Hose Saw Table of Contents Introduction... 3 Old Method... 3 New Clean-Cuts Method... 3 Operation... 4 Operation Procedure...
Assembly. Step 3. Attach the safety bracket (7) to the Pivot ARM (6).
 to the Pivot ARM (6).") Assembly Step 1. A. Stand the base of the machine by separating the U-frames (1,2). Pull the Front and Rear U-Frames (1,2) as far apart from each other as possible. Then push down on the middle of the
Assembly Step 1. A. Stand the base of the machine by separating the U-frames (1,2). Pull the Front and Rear U-Frames (1,2) as far apart from each other as possible. Then push down on the middle of the
NH MULTIBLOC fuse-switchdisconnector. terminal version reference no.
 NH fuse-switch-disconnector NH fuse-switchdisconnector ~ 690V screw fixing of disconnectors onto plates size rated current in A no. of poles terminal version art. group 00 160 1 screw M8 both sides F229292
RM 2125 Troubleshooting Guide
 Problems, possible causes and corrective action Problem Cause Corrective Action 1) Thick and Thin Sections. a) Partial Sections b) Shorter Sections in ribbon c) Section thickness varies from one section
I N ST R UC T I ON MODELS 1612E, 1712E & 1712RE SLICERS. FORM Rev. B (10-97) 1712RE 701 S. RIDGE AVENUE TROY, OHIO 45374
 1712RE 701 S. RIDGE AVENUE TROY, OHIO 45374") I N ST R UC 1712E T I ON MODELS 1612E, 1712E & 1712RE SLICERS S ML-104546 ML-104547 ML-104548 1612E 1712E 1712RE 701 S. RIDGE AVENUE TROY, OHIO 45374 FORM 19238 Rev. B (10-97) TABLE OF CONTENTS GENERAL......................................................................
I N ST R UC 1712E T I ON MODELS 1612E, 1712E & 1712RE SLICERS S ML-104546 ML-104547 ML-104548 1612E 1712E 1712RE 701 S. RIDGE AVENUE TROY, OHIO 45374 FORM 19238 Rev. B (10-97) TABLE OF CONTENTS GENERAL......................................................................
INSTALLATION INSTRUCTIONS
 INSTALLATION INSTRUCTIONS KR54, KR1654, & KR4954 Keyed Removable Mullion NOT FOR USE ON ELECTRIC OR FIRE RATED MULLIONS. This kit includes the following parts: (Not to scale) WARNING Remove key, reinstall,
Tank. Part B, Section 1. This section covers the following unit configurations. Pump Piston Pump (E or G)
") Part B, ection Model Voltage This section covers the following unit configurations. 3400V All Pump Piston Pump (E or G) Manifold Control 4-Port (A) Vista tandard (V) Vista Pattern (PC) Vista Temperature
Part B, ection Model Voltage This section covers the following unit configurations. 3400V All Pump Piston Pump (E or G) Manifold Control 4-Port (A) Vista tandard (V) Vista Pattern (PC) Vista Temperature
Data Sheet for Precision Potentiometer
 AL(R)17/19 soldering lugs The AL(R)17/19 potentiometers in 22 mm housing are suitable for applications where a precise and economical multiturn potentiometer is important. Economical and precise multiturn
Parts Catalog. Slicing Machine G10. Model:
 , 07 995079 ECN 96 Parts Catalog Slicing Machine G0 Model: G0 /8/7N Rev. E, Serial Number 4048 and Up IMPORTANT! TO EXPEDITE SHIPMENT OF PARTS, ALWAYS SPECIFY MODEL, REV, PART NUMBER, AND SERIAL NUMBER
Retractable Awning Owner s Manual
 Retractable Awning Owner s Manual TABLE OF CONTENTS SECTION-1 2 CONGRATULATIONS ON PURCHASE 2 OPERATING YOUR SHADELINE AWNING 2 GEAR CRANK OPERATION 2 EXTENDING YOUR AWNING 2 RETRACT 2 SECTION-2 3 MOTORIZED
FLEX KEY ASSEMBLY. ..._ o RAFTER ARM TUBE MAIN ARM TUBE CAP NUT CLAW HINGE
 ZIP DEE Inc. 96 Crossen Ave. Elk Grove Village, IL 60007(847)437-0980 (800)338-2378 HEAD CASTING AWNING RAIL FLEX KEY ASSEMBLY..._ o GM1 Installation Instruction GMC Motorhome RAFTER ARM TUBE MAIN ARM
Installation and Maintenance Manual
 Freestanding Gas Stove MODEL: PGS2005 GPEBB20R GPEBW20R Installation and Maintenance Manual Warning Maintenance products should be carried out by professional and technical personnel with relevant qualification,
USER MANUAL BMU WORKCAGE. CONFORM TO THE MACHINE DIRECTIVE 2006/42/EC and to EN1808 (1999)
") USER MANUAL BMU WORKCAGE CONFORM TO THE MACHINE DIRECTIVE 2006/42/EC and to EN1808 (1999) All persons operating this equipment must read and completely understand this manual. Any operation in violation
USER MANUAL BMU WORKCAGE CONFORM TO THE MACHINE DIRECTIVE 2006/42/EC and to EN1808 (1999) All persons operating this equipment must read and completely understand this manual. Any operation in violation
MAX Series 9514 OPERATOR S MANUAL
 MAX Series 9514 OPERATOR S MANUAL Persons under age 18 are not permitted to operate or have accessibility to operate this equipment per U.S. Dept. Of Labor Employment Standards Administration Fact Sheet
DeZURIK AM-SERIES MANUAL GEAR ACTUATOR USED ON BUTTERFLY VALVES
 AM-SERIES MANUAL GEAR ACTUATOR USED ON BUTTERFLY VALVES Instruction D10501 January 2015 Instructions These instructions provide information about AM-Series Manual Actuators used on Butterfly Valves. They
Shark Guard Installation
 Shark Guard Installation In the Package When you receive your Shark Guard, verify that nothing was damaged in shipping. Here is a current list of parts that should be included with a standard Felder and
functionality with the necessary maintenance tools stored in a convenient built in tool box, as well as parallel handles for
 GuilloMax User Manual The Guillomax has distinct features such as its unique structure and ease of cutting. It combines symmetry with functionality with the necessary maintenance tools stored in a convenient
INSTRUCTION 7510,7512 MANUAL. DURO SERIES Slicer 7510/12/1099 ED7 WE THANK YOU FOR YOUR PURCHASE OF OUR MODEL 7510, 7512 SLICER.
 INSTRUCTION 7510,7512 MANUAL DURO SERIES Slicer WE THANK YOU FOR YOUR PURCHASE OF OUR MODEL 7510, 7512 SLICER. SINCE 1948 7510/12/1099 ED7 TABLE OF CONTENTS DESCRIPTION PAGE Table of Contents 1 List of