Revised 12/18/2007 Copyright 2009 Lucky Distributing, Inc.
|
|
|
- Maria Mathews
- 5 years ago
- Views:
Transcription
1
2 TABLE OF CONTENTS INSTALLATION AND ASSEMBLY RIKA: An Overview 3 Safety Precautions 4 Labels 6 Main Control Board/Specifications 7 Parts Illustration 8 Automatic Safety Functions 12 Installation Instructions 13 Mobile Home Installation 16 A New Heating Philosophy 17 PELLETS / GENERAL What Are Pellets? 18 Storing Pellets 19 OPERATING INSTRUCTIONS / FEATURES Basic Operation 20 Starting / Programming Control 21 MAINTENANCE AND CLEANING Maintenance and Cleaning 23 Trouble Shooting 27 MISCELLANEOUS Control Flowchart 29 Key Word Abbreviations 30 User Notes 31 WARRANTY Warranty 32 Warranty Registration Card 33 SAFETY NOTICE IF THIS WOOD PELLET STOVE IS NOT PROPERLY INSTALLED, A HOUSE FIRE MAY RESULT. FOR YOUR SAFETY, FOLLOW THE INSTALLATION DIRECTIONS. CONTACT LOCAL BUILDING OR FIRE OFFICIALS ABOUT RESTRICTIONS AND INSTALLATION INSPECTION REQUIREMENTS IN YOUR AREA. PLEASE READ THIS ENTIRE MANUAL BEFORE INSTALLATION AND USE OF THIS WOOD PELLET FUEL-BURNING ROOM HEATER. FAILURE TO FOLLOW THESE INSTRUCTIONS COULD RESULT IN PROPERTY DAMAGE, BODILY INJURY OR EVEN DEATH. SAVE THESE INSTRUCTIONS FOR FUTURE REFERENCE WARNING THIS STOVE IS NOT INTENDED FOR USE IN COMMERCIAL APPLICATIONS. THIS STOVE SHOULD BE INSTALLED BY AN AUTHORIZED SERVICE TECHNICIAN. 2


3 RIKA: AN OVERVIEW Portrait Congratulations on your purchase of a quality RIKA wood pellet stove made by Rika. You are now a member of a group of more than 100,000 Rika owners. If you were not familiar with Rika before your purchase, please allow us to introduce ourselves: Rika was founded more than 50 years ago in Micheldorf, Austria by Karl Riener and his family. From a small company, specializing in hand made wrought iron products, grew a large, well known company recognized today as Rika Metallwarengesellschaft. We appreciate quality and feel that our company manufactures some of the finest pellet and wood burning stoves available in today s marketplace. Unique designs and emphasis on quality, performance and superior workmanship have made us a leading stove manufacturer in Europe. State of the art processes, such as; robotic welding, laser cutting and complete micro-processor control systems, allow us to produce a final product that we feel is unequalled. In addition to pellet stoves, we are also known for our high quality wood-burning stoves, wood-burning cook stoves, freestanding fireplaces, and water heater units. Rika also produces a large variety of other metal products for international corporations. In 1988, Rika began to introduce its products into the United States under the trade name RIKA. Rapid growth in the U.S. is directly attributed to the quality and unique design of the RIKA line of pellet stoves. Attention to detail has given us the nickname in the United States as the Mercedes of the Pellet Stove Industry. 3

4 SAFETY PRECAUTIONS READ THESE SAFETY PRECAUTIONS BEFORE INSTALLING OR USING STOVE The RIKA VISIO freestanding wood pellet stove must be properly installed in order to prevent the possibility of a house fire. For your own safety, you must adhere strictly to the installation instructions. Contact your local building officials to obtain a permit and information on any installation restrictions and inspection requirement in your area. Failure to follow these instructions could result in property damage, bodily injury or even death. Build-up of dust, soot, or creosote in the chimney connector and in the exhaust vent can cause a house fire. Although buildup will be minimal with correct operation, it is advisable to inspect the chimney connector and exhaust vent on a regular basis, and clean if necessary, at least once per heating season. The word stove, as used in this manual, means the Visio Freestanding wood pellet stove. NOTE: Disconnect power before performing any maintenance or cleaning on your stove. The stove s exhaust system works with negative combustion chamber pressure and a slightly positive chimney pressure. It s crucial that the air intake and exhaust system are air tight and installed correctly. WARNING BURN WOOD PELLET FUEL ONLY! NEVER BURN ANY OTHER FUEL SUCH AS PAPER, SOLID WOOD OR CHARCOAL! When operated properly, the stove cannot be over heated. However, continuous operation at maximum burn may shorten the life of the electrical components and is not recommended. Do not use gasoline, gasoline-type lantern fuel, kerosene, charcoal lighter fluid or similar liquids to start or freshen up a fire in this stove. Keep these flammable liquids well away from this stove when it is in use. DISPOSAL OF ASHES Ashes removed from the stove may be hot. Ash must be placed in a metal container with a tight fitting lid. The closed container of ashes should be placed on a noncombustible floor or on the ground, well away from all combustible materials, pending final disposal. If the ashes are disposed of by burial in soil or otherwise locally dispersed, they should be retained in the closed container until all cinders have been thoroughly cooled. This stove comes with a 7 to 8 grounded electrical cord. This cord should be connected to a standard, properly polarized, 110volt, 60hz electrical outlet. The approximate power requirement is 110 volt. The power supply cord must be routed to avoid contact with any of the hot or sharp exterior surface areas of the stove. In addition, all Austroflamm Visio pellet stoves installed in a mobile home, must be electrically grounded to the steel chassis of the home and bolted to the floor in compliance with and according to H.U.D. requirements. It is recommended that a good quality surge suppressor be used in conjunction with your stove. 4
5 SAFETY PRECAUTIONS HOT WHILE IN OPERATION! KEEP CHILDREN, CLOTHING AND FURNITURE AWAY FROM STOVE. CONTACT WITH STOVE MAY CAUSE SKIN BURNS. DO NOT COOK FOOD, HOT BEVERAGES, OR PLACE ANYTHING ON TOP OF STOVE. DO NOT USE CHEMICALS OR FLUIDS TO START THE FIRE. DO NOT BURN GARBAGE OR FLAMMABLE FLUIDES SUCH AS GASOLINE, NAPHTHA OR ENGINE OIL. SOOT AND FLYASH FORMATION AND NEED FOR REMOVAL The products of combustion will contain small particles of flyash. The flyash will collect in the exhaust venting system and restrict the flow of the flue gasses. Incomplete combustion, such as occurs during startup, shutdown, or incorrect operation of the stove will lead to some soot formation which will collect in the exhaust venting system. The exhaust venting system should be inspected at least once every year to determine if cleaning is necessary. DO NOT OPERATE YOUR STOVE WITH THE DOOR OPEN! Operating your stove with the door open will allow smoke to enter into the room and can cause smoke detectors to activate. Operating your stove with the door open will result in a disruption in the combustion process which may cause your stove to automatically shut down. Operating your stove with the door open can cause a fire. SAFETY TESTING The RIKA Visio Pellet Stove has been independently tested and listed with OMNI- Test Laboratories, Inc. in Beaverton, Or., an accredited testing laboratory, in accordance with the specifications and procedures outlined in ASTM E1509 Standard Specifications for Room Heaters, Pellet Fuel- Burning Type, ULC/ORD C1482, and ULC S627. (The safety listing label is on the back of the stove.) The stove is designed specifically for use with pelletized fuels only. It is tested and listed for residential installation according to current national and local building codes. The pellets burned in the stove are fed by an auger. This auger is driven by a high-torque motor. The auger is capable of causing serious injury to fingers. Keep pellets in the hopper at all times. The auger may start at any time when the stove is running! Keep hands and fingers away from auger at all times as contact with auger may cause personal injury. 5


6 OMNI SAMPLE LABEL FOR VISIO FREE-STANDING PELLET STOVE 6
7 MAIN CONTROL BOARD/SPECIFICATIONS 1 HAL-IC combustion Motor 2 User Control board 3 Optional Remote Thermostat 4 Air sensor 5 Low Limit sensor 6 High Limit sensor 7 open 8 open 9 Alarm I II III IV V VI VII 110VAC 60Hz Combustion Fan Convection Fan Ignition Element Auger Motor Open Reserved A Bus 1 B Bus 2 C Bus 3 a Fine-wire fuse b Capacitor Specifications & Capacities Height (inches) 40-5/8 Width (inches) 20-7/8 Depth (inches) 23-5/8 Weight (lbs) 320 Exhaust Outlet 3 Heating Capacity 11,000 35,600 BTU s Fuel Consumption lbs/hour Pellet Hopper Capacity 70.5 lbs Power Supply 110 V, 60 Hz Average Electrical Power Consumption < 100 W Fuse 3.15 A 7
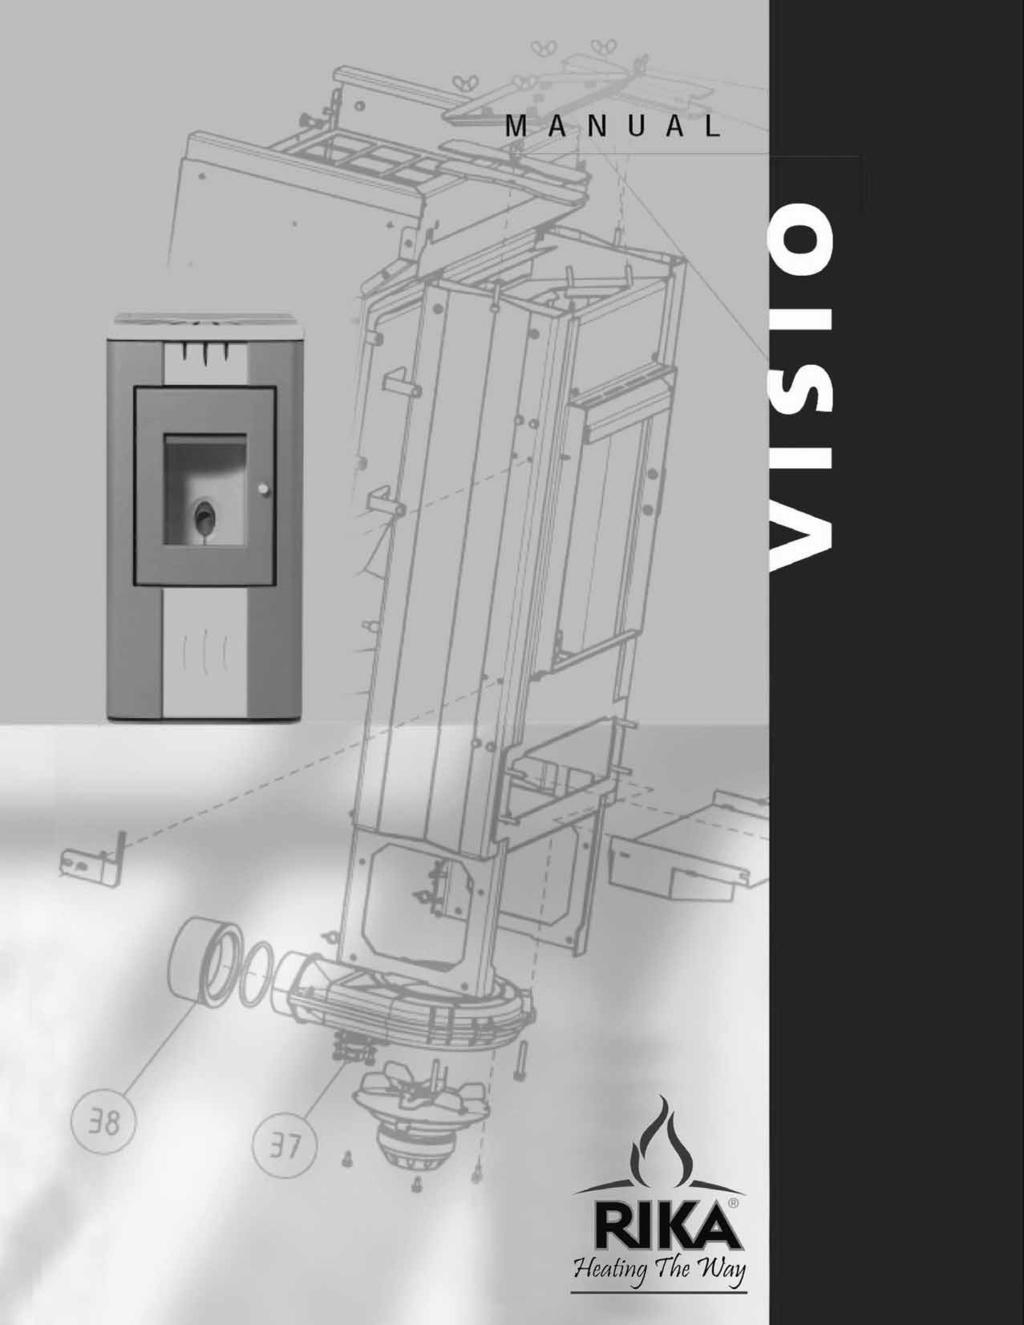
8 PARTS ILLUSTRATION 8

9 PARTS ILLUSTRATION Figure 3 01 Combustion door 02 Combustion door seal 03 Combustion door glass 04 Hi-limit switch 05 Ignition element 06 Auger shaft 07 Auger centring plate 08 Auger motor plate 09 Hexagonal bolt 10 Auger motor 11 Air sensor Fig. 3 Figure 4 20 User board 21 Main fuse 22 Main board Fig. 4 9
10 PARTS ILLUSTRATION Fig. 5 Figure 5 30 Wing nut 31 Exhaust gas shaft cleaning lid 32 Intermediate bottom 33 Top / bottom cleaning lid 34 Combustion fan housing 35 Combustion fan 36 Hexagonal screws 37 Low-limit temperature switch 38 Flue adapter 3" 39 Combustion door hinge 10
11 PARTS ILLUSTRATION Fig. 6 Figure 6 40 Hopper lid 41 Rear wall 42 Side cladding rear right complete 43 Rear wall cover 44 Power cable with grounded plug 45 Corner post front right complete 46 Front cladding bottom 47 Front cladding top 48 Corner post front left complete 49 Side cladding rear left complete 50 Lid with insert 11
12 AUTOMATIC SAFETY FUNCTIONS 1. FOLLOWING A POWER FAILURE In the case of a power failure, the stove resumes the same operating functions that were set before the power failure occurred. ON-Mode (Manual mode): If the stove was turned on in manual mode, the stove will turn itself back on when power resumes. The control display will read ST-21 (Start Phase) and then will display ON at the conclusion of the 21-minute startup cycle. TM-Mode (Automatic mode): If the stove was in the TM mode (controlled by your preset start and stop time schedule), the stove will resume the preset schedule when power resumes. The control display will read ST-21 (Start Phase) and then will display TM at the conclusion of the 21-minute startup cycle if the stove is within a scheduled heating period or if the power end heat setting is not set to off. SB-Mode (Standby mode): If the stove was off but set in the standby mode, the control switches back into SB-Mode approximately 2-seconds after the power resumes. In this setting, the stove will not turn itself back on. NOTE: In the case of power failure, a small quantity of smoke can escape from the stove. This is normal in a power outage. If this occurs, open windows and doors to alleviate the smoke. 2. OVERHEATING If the stove overheats, an excess temperature safety switch (Hi-Limit) will shut-off the pellet feed and force the stove to shut down. ATTENTION: If overheating has occurred, maintenance/cleaning and inspection must be performed by an authorized service technician. 3. LOW TEMPERATURE SWITCH OFF If the stove cools down below a minimum allowable temperature, the stove will go into automatic shut down mode. This may be caused by low pellet feed or an empty hopper. 4. AUGER MOTOR When the hopper lid is open, the auger motor will stop feeding pellets. This safety is installed to protect you from potential injury should you stick your finger or any foreign object into the auger shaft. ATTENTION: The auger will only operate when the hopper lid is closed. 12

13 INSTALLATION This stove should be installed by an authorized service technician. DO NOT CONNECT TO ANY AIR DISTRIBUTION DUCT OR SYSTEM! Before installing, contact your local building or fire officials about restrictions and installation inspection requirements in your area. Manufacturer and distributor have no control over the installation of the stove and assume no responsibility for any special, incidental or consequential damages caused by improper installation. The following installation guidelines must be followed to ensure conformity with both the safety of this stove and with local building codes. FLOOR PROTECTION The stove must be installed on a non-combustible surface. A single-layer 3/8 non-combustible floor area, or equivalent is required. Design Guidelines for the Exhaust System The stove must be connected to an approved 4 pellet vent chimney. See Installation Instructions for more information. DO NOT INSTALL A FLUE DAMPER IN THE EXHAUST VENTING OF THIS STOVE! DO NOT CONNECT THIS STOVE TO A CHIMNEY FLUE SERVING ANOTHER APPLIANCE! The exit terminal must be located no less than 40 inches from any opening through which combustion products could enter the building (i.e. windows and doors), no less than 24 inches from an adjacent building, and no less than seven feet above grade, when located adjacent to public walkways. It must be arranged so that exiting flue gasses will not be a hazard to people, overheat combustible structures, or enter into any building. Keep brush, plants, and shrubs at least 36 away from the vent termination. The total length of horizontal vent must not exceed 5 feet. The PL vent exhaust system must be installed and sealed with 3 screws per joint. The chimney manufacturer s installation procedures must be followed. In addition, pipe connections, joints, and all pipe seams within the home should be sealed with high-temperature silicone sealer, and (RTV) aluminum tape. ELECTRICAL CONNECTION The stove is supplied with a 7 to 8 power cord. This cord must be connected to a properly polarized, normal 110v, 60Hz grounded electrical outlet. The average power consumption is approximately 100 watts under normal operation. During the ignition process (duration of 12 minutes), power consumption is approximately 300 watts. The power cord must be run so that any contact with hot or sharp-edged external surfaces is avoided. COMBUSTION AIR The combustion process requires oxygen or air. As a rule, the combustion air is taken from the living area in the home. The air taken from the living area must be re-introduced. Tight fitting windows and doors means too little air flows into the house for proper combustion. This situation becomes problematic due to additional ventilation in the house such as kitchen or bathroom exhaust fans. An additional outside air source may be necessary for adequate air and optimum combustion. VENT CLEARANCES Install all vent at clearances specified by the vent manufacturer. CANADIAN INSTALLATION Where passage through a wall, or partition of combustible construction is desired, the install shall conform to CAN/CSA-B365. Clearances may only be reduced by means of approved regulatory authority. 13 1


 Optional direction 45º")

14 INSTALLATION CLEARANCES TO COMBUSTIBLES rain cap roof flashing 24 minimum Floor protection Recommended fresh air intake (required on mobile home installations) Optional direction 45º elbow Type PL vent Wall thimble 45º elbow fresh air intake (required on mobile home installations) Floor protection 14
15 INSTALLATION Additional Venting Instructions: 4-inch venting is required in all installations. Straight out horizontal venting is acceptable, however if a vertical termination is desired, minimum vertical rise (to termination point) must be no less than the total height of the stove. Each 90 angle or T-connector adds an effect of 5 additional feet of pipe length. Each 45 angle adds an effect of 3 additional feet of pipe length. The maximum length of any venting configuration should not exceed 30 feet total, including the effective lengths of any angles. Optimum combustion and burn quality cannot be achieved if these guidelines are not followed. Failure to follow these guidelines could void your warranty. 15
16 MOBILE HOME INSTALLATION In addition to standard installation instructions, the following requirements are mandatory for installation in a mobile home: 1. The unit must be permanently bolted to the floor. 2. The unit must have a permanent outside air source. 3. The unit must be permanently electrically grounded to the steel chassis of the home. WARNING: DO NOT INSTALL IN SLEEPING ROOMS. COMBUSTION AIR MUST COME FROM THE OUTSIDE OF THE MOBILE HOME. CAUTION: THE STRUCTURAL INTEGRITY OF THE MANUFACTURED HOME FLOOR, WALL AND CEILING / ROOF MUST BE MAINTAINED. 4. Use silicone to create an effective vapor barrier at the location where the chimney or other component penetrates to the exterior of the structure. For use in mobile or manufactured homes, the stove must be installed in accordance with the Manufactured Home and Safety Standard (HUD), CFR32 80, Part 24. Design guidelines for outside air connection 1. A connection to the outside is REQUIRED for mobile home installations. 2. Only metal pipe with a minimum two inch diameter is approved for use as an outside air connection (straight or flexible). PVC pipe or aluminum pipe is NOT approved and should never be used. 3. If the air inlet is connected to the outside, it must be terminated with a vertical 90 degree bend (down) or with a wind hood. Ground Wire Bolt Hearth Pad Floor Steel Chassis of Home 4. Blockage, excessive length, or bends in the air intake will starve the unit of combustion air. A 90 degree bend is equivalent in restriction to approximately 30 inches of straight pipe 90 degree bend termination Wind hood termination 3 wind hood Minimum diameter 2inches

17 A NEW HEATING PHILOSOPHY In today s world, anyone manufacturing and marketing heating appliances has more than just the responsibility of producing a quality, safe product. It is essential that wood heating appliances apply technology which is environmentally friendly and, at the same time, extremely efficient. Rika is 100% committed to this obligation, and continues to do research and development in pellet stove combustion technology. This gives you, the consumer, assurance that you are buying the most advanced product in the marketplace. WHY HEAT WITH PELLETS? Chemically speaking, burning wood is the same process as wood rotting by itself. Rotting wood, as well as burning wood, releases CO 2 that trees need to grow and, therefore, burning wood has no impact on the CO 2 cycle. Heating with pellets means that the burning process is very carefully controlled, and wood is added to the combustion process only in precise quantities. This results in the optimized and environmentally friendly incineration of wood. In the past, waste wood products were simply discarded into local landfills to rot. Heating with pellets is an economical and a distinctly advantageous alternative to dumping. It is a natural and intelligent method of recycling. Heating with your Austroflamm pellet stove is designed to be easy and user-friendly. Because of its exceptionally large hopper, low pellet consumption, and very simple control panel, your Austroflamm pellet stove is, indeed, easy and convenient to operate. 17

18 WHAT ARE PELLETS The RIKA Visio is a pellet stove designed to burn wood pellets. Pellets are made of waste material from saw mills, woodworking operations, as well as dead wood from forestry operations. The wood pellet industry is organized through the association of the Pellet Fuel Institute, and it is recommended that only wood pellets, manufactured to the standard set by the P.F.I. be used with this pellet stove. All pellets made to these standards are labeled with an official P.F.I. registration number on the bag. This guarantees the consumer that the fuel is certified as to moisture and ash content. The P.F.I. allows two grades: Standard and Premium quality pellets. The important difference in these pellet grades is their ash content. Premium quality: 1% or less ash content Standard quality: Up to 3% ash content A higher ash content in the fuel means more combustion residue which means shorter cleaning intervals. (see the Routine Maintenance & Cleaning section). Please note that use of improper fuels will void your warranty and may cause damage or seriously impact the performance of your stove. The current P.F.I. standards for residential pellet fuels are as follows: Standard Quality Premium Quality Heating Value 8,200 BTU/lb. (minimum) 8,200 BTU/lb. (minimum) Bulk Density 40lb/ft 3 (minimum) 40lb/ft 3 (minimum) Moisture Content 8% (maximum) 8% (maximum) Ash Content 3% (maximum) 1% (maximum) Size ¼ to 5/16 diameter 1-1/2 long (maximum) ¼ to 5/16 diameter 1-1/2 long (maximum) Fines 0.5% maximum through a 1/8 screen 0.5% maximum through a 1/8 screen Caution: Burning dirty or wet pellets, or pellets containing salt, can contaminate the environment, adversely affect the function of your pellet stove, and will void your warranty. ASH It is highly recommended that you use the lowest ash-content fuel available. Using fuel with 3% ash content may require that the stove be cleaned as often as every one to two days. Fuel with 1% ash content may only require cleaning once every one to two weeks. The ash produced while your stove is operating, since it is a completely natural product, makes an excellent fertilizer for all of your garden plants. However, it should be aged and mixed with water before use. Caution: Embers may be embedded and hidden in the ash. Store in metal containers only! 18


19 STORING PELLETS To guarantee that your pellets will burn without any problems, they should be stored in a dry and clean environment. CAUTION: DO NOT PLACE SUCH FUEL WITHIN THE INSTALLATION CLEARANCES OR WITHIN THE SPACE REQUIRED FOR FILLING THE HOPPER OR REMOVING THE ASH. at the bottom of the burn pot. This adversely affects the performance of the stove as it cuts off the air supply to the combustion process. The burn pot should be checked periodically for clinkers, and all hard substances should be removed to allow proper air flow through the bottom of the burn pot. It should be noted that even P.F.I. approved pellet fuels will cause some clinkering to occur. For more information about how often to clean your stove, see the Routine Maintenance & Cleaning section of this manual. If you have any further questions regarding fuel for use in your Austroflamm pellet stove, please contact your dealer or the P.F.I. There is no warranty for damage or poor performance caused by the use of inferior or improper grades of pellet fuels. The manufacturer is not responsible for the performance of the stove due to the use of non P.F.I. approved pellet fuels. Pellet Fuel Institute 1901 North Moore Street #600 Arlington, VA (703) CLINKERING Clinkering is the process that takes place in the burn pot. A clinker is a solid substance that accumulates due to heat and silica working together and forming deposits during combustion. Silica is actually sand and is present in all pellet fuels along with a variety of other impurities. When clinkering takes place, these hard substances tend to accumulate 19
 should not be used. Failure to adhere to these guidelines could void your warranty.")
20 BASIC OPERATION DO NOT start your stove until the venting installation is complete NOTE: Your pellet stove is exclusively for burning pellets made from wood of a controlled quality. Non-pelletized solid fuels (straw, corn, chopped matter, etc.) should not be used. Failure to adhere to these guidelines could void your warranty. Control Keypad All settings and functions can be regulated via this unit. Menu Key Digital Display NOTE: When operated correctly, your pellet stove will not overheat. Improper operation can, however, shorten the life expectancy of the stove and its components. ATTENTION: Your stove s automatic ignition system will not work properly if either the hopper lid or combustion door are open. Minus Key Power Key Enter Key Plus Key CONTROL UNIT PROGRAMMING AND FUNCTION Your pellet stove is equipped with a modern programmable control board and control software. The owner can set all equipment functions via the control keypad which is found on the right hand side of the unit. The control board and software should only be altered by trained specialists. Improper or unauthorized changes to your stove, unless outlined in your owner s manual or this operating guide, will void your warranty. Possible Operating Modes Pressing enter on the control panel enables the user to change between each of the three different operating modes. Manual Mode - press the power button to turn the unit on and off. Automatic or Timed Mode (TM) - runs according to the schedule that you determine. Standby Mode (SB) - waiting for you to change to one of the other two modes by pressing the Enter button on the key-pad. No function, other than programming, occurs in this mode. NOTE: It is NOT necessary to be in SB mode in order to program your stove. DISPLAY BOX Displays the operating modes in illuminated letters and numbers. MENU Used for navigation in and to the different menu and sub-menu levels. ENTER Used for navigation through the main menus (SB, ON, TM) and for confirming user entries. MINUS & PLUS Used for lowering or increasing heat output levels, and for changing program values. POWER Used for turning the unit on and off. A handle is provided for opening and closing the door. There is knob on the upper right back side of your stove for storing the handle when not in use. Your RIKA pellet stove is equipped with an electronic ignition start-up system. Starter fluids or gels are not necessary and should never be used. Simply push the power button and the unit will ignite within a 10-minute period of time. Total start-up cycle time is 21 minutes. 20
21 STARTING / PROGRAMMING THE CONTROL When the hopper is filled for the first time or if it is allowed to run empty, it can take up to two full start-up cycles for pellets to feed sufficiently into the burn pot. Under these circumstances the stove may shutdown and display ERR or ERR/CL at the end of the start-up cycle. Re-start the stove and the feed rate should return to normal. Initial Startup Verify that there are pellets in the hopper, that the burn pot is empty and seated properly, and that the unit is plugged into a 110v grounded outlet. SB Press the ON/OFF button. The display should read SB. If the display does not read SB, press enter until it does. Depending upon the current status of the stove, it may turn on at this point. You may now program your unit for your individual needs. You can set up to two start-up / shut-down cycles for each day of the week. NOTE: When in programming mode, if no change is needed on a particular setting simply press enter to advance to the next setting. MO S1 6 From the SB mode, press the MENU button. The display should read MO for Monday. Press the ENTER button. The display should read S1 for the first heating period on Monday, the number represents the start time. Change the time by pressing the + or keys. Confirm by pressing ENTER. NOTE: Start and end times are in military format (displays as 0 for midnight through 23 for 11pm). E1 8 The display should now read E1 for the ending time of the first heating period on Monday. Change the time by pressing the + or keys. Confirm by pressing ENTER. S2 16 E2 20 MO TU PS 75 PE OFF The display should now read S2 for the second heating period on Monday. Change the time by pressing the + or keys. Confirm by pressing ENTER. The display should now read E2 for the end time of the second heating period on Monday. Change the time by pressing the + or keys. Confirm by pressing ENTER. The display should now read MO. Press MENU. The display should now read TU for Tuesday. Repeat the prior steps to set the start and end times for each day of the week. WE Wednesday, TH Thursday, FR Friday, SA Saturday, SU Sunday. After entering the E2 value for Sunday, press MENU and the display should read PS. PS represents the percentage of heat output that you want your stove to operate at when it is scheduled to be on (0% to 100%). 0% maintains flame with minimal heat, 100% produces maximum heat output. Change the output setting by pressing the + or keys. Confirm by pressing ENTER. The display should now read PE for Power End. This represents the output level between the pre-programmed heating cycles that you just defined. In other words, what power level should the stove operate at between the end time of one cycle, and the start time of the next cycle. Use the + or keys to choose any level between 0% and 100%, or you can choose for your unit to turn off between cycles. Confirm your setting by pressing ENTER. 21
22 PROGRAMMING THE CONTROL PE 5 CL 60 VU 1.29 H 13 M 47 D 3 SB This corresponding figure shows that the unit will run at 5% output between cycles. After pressing enter on the PE output setting, the display should read CL with a number that represents how often in minutes the cleaning cycle should activate. Change by pressing the + or keys. Press ENTER to confirm. The factory setting is every 60 minutes but the schedule can be set to run anywhere from 0, which is never, or any frequency between every 5 and 300 minutes. The frequency of how often the cleaning cycle should run can vary depending upon pellet quality, heat output settings, availability of outside air, and the natural ventilation of your home. The display should now read VU after pressing enter on the CL cleaning cycle setting; the number represents the current version of the control software on your stove. The software version of your stove may vary depending upon purchase date. Press ENTER again and the display should read H for the current hour in military format. Set the current hour by pressing the + or keys. Press ENTER to confirm. The display should now read M for the current time in minutes. Change by pressing the + or keys. Press ENTER to confirm. The display should now read D for the current day. 1=Monday, 2=Tuesday, etc. Change by pressing the + or keys. Press ENTER to confirm. Press MENU to exit programming mode. Your stove should now be in Stand-by mode and the display should read SB. At the completion of the above steps, your stove will be programmed according to your personal preferences. You can change your programmed settings at any time by repeating the steps outlined in this manual. NOTE: Although you may have programmed an operating schedule for your stove, that schedule will not be activated until your stove is put into the Timed or Automatic Mode (TM) as described above. NOTE: It is not mandatory that you program a schedule for your stove. The option exists for your convenience. If you choose not to establish an operating schedule, your stove can be operated manually. In manual mode you turn it on/off by pressing the power button, and increase/decrease heat output by pressing the + or keys on the control keypad. If you intend to operate your stove manually, set it to either the Manual or Stand-by (SB) mode. During start-up, the stove will read ST on the first display line, and 21 on the second display line. ST stands for start-up and 21 is the remaining start-up time in minutes (the time display will decrease as the start-up progresses). During the start-up cycle, only the auger and combustion fan operate with the combustion gradually increasing in speed. The convection fan will turn on at the end of the start-up cycle. NOTE: As long as the stove is running, whether in the start-up mode, cleaning cycle, or in normal operation, you can increase or decrease the heat output level at any time by pressing the + or keys. If the stove needs to be turned off at any time, push the ON/OFF button and the stove will immediately begin the shut-down process. Complete shut-down takes a total of eight minutes. NOTE: Page 31 of this manual contains an area where you can record your personal program settings. 22

23 MAINTENANCE AND CLEANING SEE PAGE 26 FOR A CLEANING FREQUENCY SCHEDULE Turn your stove off, allow it to cool, and disconnect power before performing any cleaning or maintenance. Regular maintenance is important to the efficient operation of your stove. Cleaning and maintenance frequencies depend upon the quality and quantity of the pellets that you use. Using poor quality pellets will increase the need for more frequent cleaning. Use only premium quality pellets containing 1% or less ash, and 8% or less moisture content as defined by the Pellet Fuel Institute. Only use fuel that has a P.F.I. registration number printed on the bag. Using any other type of pellets will void your warranty. You will attain the best cleaning results by using a certified ash vacuum. An ash vacuum can be purchased from your stove dealer. Do not use a non-certified ash vacuum for cleaning your stove. Failure to follow this warning can lead to a fire. CLEANING THE BURN POT Cleaning frequencies can range from every one to 10 days, depending upon pellet quality, chimney configuration, and the availability of outside air. Clean as the flame pattern deteriorates. Do not allow the air intake holes in the burn pot to get clogged with ash and clinker. The burn pot is easy to clean by removing it from the stove, scraping the clinker loose, and vacuuming with your ash vacuum. Also vacuum the area underneath the burn pot (picture 3). CLEANING EXHAUST AIR PASSAGES The exhaust air passages are located on both sides of the burn pot (Picture 3). Use your ash vacuum to clean this area. Clean the exhaust air passages every time you clean the burn pot. CLEANING THE DOOR Clean the door glass with a damp cloth. Use a soot or paint brush to clean the metal and gasket areas of the door. Clean the door every time you clean the burn pot. BAFFLE AND HEAT EXCHANGER Remove the colored top panel. Remove all six of the wing nuts and washers on the top of the stove (see picture 4) then lift the cleaning and combustion chamber lids off. Be careful not to drop the wing nuts or washers down into the heating gas flues or combustion chambers. 23
.")


24 MAINTENANCE AND CLEANING Vacuum the exposed baffle and heat exchanger areas (see pictures 5 and 6). CLEANING THE EXHAUST AIR MANIFOLD The exhaust air manifold is located in the bottom area of the combustion chamber behind the bottom colored panel (Pictures 7 through 10). After removing the front side panels, open the door and lift out the bottom colored panel. Remove the bottom inspection opening by removing the four wing nuts. 24

 from the empty hopper using your ash vacuum.")

.")
25 MAINTENANCE AND CLEANING Using your ash vacuum, clean all of the areas (as shown in pictures 7 through 10) When finished cleaning these areas, replace the covers, re-fasten all washers and wing nuts, and replace the bottom colored panel. NOTE: Most ash accumulation in this area can be accessed using your ash vacuum, and can be cleaned during a routine burn pot cleaning. If a more in-depth cleaning is to be performed (see the following cleaning sections), do not re-attach the side panels at this time. CLEANING THE PELLET HOPPER Allow the hopper to run empty prior to cleaning. This will allow you to remove any pellet residue (dust, chips etc.) from the empty hopper using your ash vacuum. INSPECTING THE DOOR SEAL Visually inspect for a missing, damaged or loose fitting door seal. These conditions can cause your stove to burn improperly. This will lead to increased glazing of the glass, increased clinkering, increased frequency of cleaning, and can cause flue gasses to escape into the room. Only a qualified service technician should perform the following cleaning procedures CLEANING THE EXHAUST AIR FAN HOUSING Remove the right and left side rear panels to gain access to the combustion fan. Remove the four hexagonal bolts and carefully remove the combustion fan motor (there is a gasket that seals the fan to the housing; be careful not to damage the gasket as you remove the fan). Using your ash vacuum, clean out any debris or ash from the fan and the flue gas path. When finished cleaning the fan and flue gas path, re-attach the fan and ensure that all seals are tight. Note: All of the motors have sealed ball bearings. No lubrication is required. 25

26 MAINTENANCE AND CLEANING Check the condition of the seal around the door to ensure that it is not damaged or becoming detached. If the seal becomes damaged or detached, it must be replaced by a qualified technician. CLEANING THE FLUE PIPE / CHIMNEY CONNECTION Remove the clamp that connects the flue to the flue adapter housing on the back of the combustion chamber. Be careful not to remove or tear the protective foil-lined wrap that surrounds the portion of the chimney that sits inside of the stove body. The foil wrap helps reduce temperatures inside the stove body while in operation. Damage to, or removal of the foil wrap could lead to an overheat condition that could damage your stove or cause a fire. If the wrap becomes lost or damaged, it must be replaced by a qualified technician. Once the flue has been detached from the flue housing, use your ash vacuum to remove any ash or debris that may have accumulated in the flu outlet. Upon completion of cleaning, re-attach the flue, and re-attach all panels. CLEANING FREQUENCY SCHEDULE Area Frequency Page Burn Pot every one to 10 days depending upon fuel quality, 23 vent configuration, and conditions in the home Exhaust Air Passages same as burn pot 23 Combustion Door same as burn pot 23 Heating Gas Flues at least four times per heating or after every 500 lbs 24 of fuel consumed Exhaust Air Manifold same as heating gas flues 25 Inspecting the Door Seal same as burn pot 25 Pellet Hopper as needed or two times per heating season 25 Only a qualified service technician should perform the following cleaning procedures Exhaust Air Fan Housing a minimum of one time per heating season or 25 after every 1-ton of fuel consumed Flue Pipe/Chimney Connection same as exhaust air fan housing 26 26
27 TROUBLESHOOTING PROBLEM The fire is burning with a weak, orange flame. Pellets are collecting in the burn pot, the window is glazing. CAUSE: Inadequate combustion air. POSSIBLE SOLUTIONS: Make sure that the unit has been cleaned. See the Cleaning and Maintenance section of this manual. Verify that the burn pot is correctly seated in place. Remove any ash or clinker that may be blocking the air inlet openings in the burn pot. If possible, change to a better pellet quality. Verify that the flue pipe is not blocked with ash. See the Cleaning and Maintenance section of this manual. Verify that the air inlet is clean and free of debris. Dust and animal hair can collect on the air sensor and cause the sensor to send false readings to the control system. Check door seal. Verify that sufficient air flows into the home. This can be done by opening a window or door. If the flame quality improves, an outside air kit may be necessary. PROBLEM The fire goes out and the stove switches itself off automatically. CAUSE(S): Pellet hopper is empty. Thermal switch (upper temperature safety limit) was triggered. The door seal is not tight, is damaged, or the door is not closed properly. Poor pellet quality. Pellet feed rate too low. Thermal switch (lower temperature safety limit) was triggered. Cleaning openings are not close properly or components seals are not sealed properly. POSSIBLE SOLUTIONS: Fill the hopper with pellets. Perform routine maintenance and cleaning. Change the brand of pellets used and only use quality pellets. Increase the heat output level. PROBLEM Pellets are not feeding CAUSE(S): The hopper is empty The auger motor or control board is faulty. The auger is blocked (foreign objects, large pieces of wood, etc.). 27
28 TROUBLESHOOTING POSSIBLE SOLUTIONS: Fill the hopper with pellets. Have the dealer check the fault and replace parts if necessary. Clean the hopper and auger shaft of foreign debris. PROBLEM The unit runs for 21 minutes during start-up, then automatically switches off. CAUSE(S): Exhaust gas has not reached the required temperature. Lower temperature limit value switch possibly needs to be replaced. The connection to either the lower or upper limit temperature switches is loose or broken. Control board is faulty. POSSIBLE SOLUTIONS: Re-start the stove. Have a qualified service technician check the control board and low limit switch, check for loose or incorrect wiring, and replace the low temperature switch and check control. Inspect the wiring for proper termination on each component (see block diagram on page 7). Check that there is a good connection between the lines and terminal ends on both the component and control board ends of each wiring loop, and that all components are plugged into the correct location on the motherboard. 28
29 CONTROL FLOW CHART Working Range: Selection of the operating mode TM (Time Mode) Programming: Two heating periods can be set for each day of the week. A heating period is defined as start time (S1 & S2) and end time (E1 & E2) TM Mode Power Settings and Special Functions: PS Heat output level during scheduled on times. System Time: Programming of current time and weekday PE Heat output level outside of scheduled on times CL Convection Fan speed override FU Fuel Use profile selection CL Cleaning Cycle frequency selection 29
30 KEYWORD / ABBREVIATIONS LIST Key word / Abbreviation Name Description SB Standby-Mode Standby mode (fire switched off, but active for triggering via the control) CF FU Convection Fan Combustion Fan Fuel Use Type Convection fan speed increase setting over normal or reference to either the combustion or convection fan Configuration profile to facilitate the use of lower grade fuel, or for installations where additional combustion fan speed is needed. 1 (default) or 2 ON On-Mode Manual operation TM Time-Mode Automatic Operation used in conjunction with an established schedule MO, TU, WE, TH, FR, SA, SU Weekdays Monday to Sunday S1, S2 E1, E2 Start 1, Start 2 End 1, End 2 Heating start times, heating end times for automatic (TM) mode PS Power-Start Output value from the beginning of heating time in TM-Mode PE Power-End Output value from the end of heating in TM-Mode CL Clean Cleaning mode VU Version Pellet control software version (varies depending upon purchase date) H, M, D Hour, Minute, Day Hour, minute, day memory for internal clock (in military format) ST Start Pre-heating / startup program run EX Exit Exit program running MENU Menu Button Navigation in and to the different sub-menu levels. ENTER Enter Button Navigation in the main menus (SB, ON, TM) and confirming user entry +/- Plus & Minus Buttons Increases and decreases user values ON/OFF ON / OFF Button Turns the system on and off 30
31 USER NOTES This page is provided for your use to record your Time Mode (TM) schedule and other operating notes or obvservations. My Heating Schedule Day 1 st Heating Cycle (S1) 2 nd Heating Cycle (S2) Monday Start End Start End Tuesday Start End Start End Wednesday Start End Start End Thursday Start End Start End Friday Start End Start End Saturday Start End Start End Sunday Start End Start End Power Setting (PS) (output to use during above schedule heating times) Power End (PE) (output to use between above scheduled heating times) Cleaning Cycle (CL) (frequency of cleaning cycle if changed from default of every 60 minutes) Other Notes 31
32 WARRANTY There is expressly no warranty on the following components: Glass Paint Metal Plating Gasket Material Burn Pots Ceramics Natural Stone WARRANTY LIMITATIONS: MANUFACTURER, DISTRIBUTOR AND SUPPLIER MAKE NO OTHER WARRANTIES, EXPRESS OR IMPLIED, INCLUDING ANY WARRANTY OF MERCHANTABILITY OR WARRANTY OF FITNESS FOR A PARTICULAR PURPOSE. LIMITATION OF LIABILITY: MANUFACTURER, DISTRIBUTOR AND SUPPLIER SHALL NOT BE LIABLE FOR ANY INCIDENTAL OR CONSEQUENTIAL DAMAGES TO PROPERTY OR PERSONS ARISING FROM OR RELATED TO USE OF THIS PRODUCT. USER S SOLE AND EXCLUSIVE REMEDY FOR ANY NONCONFORMITY IN THE PRODUCT OR ANY CLAIM RELATED TO THE USE OF THE PRODUCT SHALL BE, AT MANUFACTURER S OPTION, REPAIR OR REPLACEMENT OF THE PRODUCT, OR RETURN OF THE PRODUCT FOR THE PURCHASE PRICE PAID FOR THE PRODUCT. The manufacturer provides a five year limited warranty on all steel parts (except the burn pot), and a two year limited warranty on all electrical components. These warranties commence on the date of the original purchase. An optional five year extended warranty on all electrical components is available. This warranty covers defects in materials and workmanship in covered components, provided the product has been installed and operated strictly in accordance with the Manufacturer s printed instructions. This warranty does not cover damage or breakage caused by improper handling, misuse, or unauthorized modification. Without limiting the foregoing, the use of fuel other than wood pellets, or improper installation voids all warranties. AUSTROFLAMM/HPG 8111 NE Columbia Blvd. Portland, OR ALL WARRANTY CLAIMS MUST INCLUDE: 1. Name, address, and telephone number of the purchaser. 2. Name, address, and telephone number of the seller, date and proof of purchase. 3. Name, address, and telephone number of installer, and date of installation. 4. Serial number of the stove. 5. Nature of defect, malfunction, or complaint. Arrangements will be made for inspection. If the inspection indicates that the failure was due to defective material or workmanship in covered components and that the other terms and conditions of this warranty have been complied with, the Manufacturer s sole duty and liability under this warranty shall be limited to the Manufacturer s replacement or repair, at the Manufacturer s option, of the defective unit or part. The purchaser assumes all costs of shipping to and from the Manufacturer or his agent and shall be responsible for all losses incurred during shipment. Removal and reinstallation costs are not covered under this warranty. Neither the Manufacturer nor the supplier to the purchaser accept responsibility, legal or otherwise, for incidental or consequential damage to property or persons resulting from the use of this product. Any warranty implied by law, including, but not limited to, implied warranties of merchantability or fitness, shall be limited to one year from the date of the original purchase. Whether a claim is made against the Manufacturer based on a breach of this warranty or any other type of warranty, expressed or implied by law, the Manufacturer shall in no event be liable for any special, indirect, consequential, or other damages of any nature whatsoever in excess of the original purchase price of this product. All warranties by the Manufacturer are set forth herein, and no claim shall be made against the Manufacturer based on any oral warranty or representation. Some states do not allow the exclusion or limitation of consequential damages or limitations of implied warranties, so the limitations or exclusions set forth in this warranty may not apply to you. WARNING Changes to the design characteristics or operating parts are not authorized by the Manufacturer and will void any and all warranties. Such changes may create hazardous conditions which can endanger the user and/or his property. This warranty gives you specific legal rights, and you may have other rights which vary from state to state.
33 33
34 34
Copyright 2008 by Lucky Distributing
 1 TABLE OF CONTENTS INSTALLATION AND ASSEMBLY RIKA: An Overview 3 Safety Precautions 4 Labels 6 Main Control Board/Specifications 7 Parts Illustration 8 Automatic Safety Functions 12 Installation Instructions
SAFETY NOTICE WARNING TABLE OF CONTENTS SAVE THESE INSTRUCTIONS FOR FUTURE REFERENCE THIS STOVE IS NOT INTENDED FOR USE IN COMMERCIAL APPLICATIONS.
 1 TABLE OF CONTENTS INSTALLATION AND ASSEMBLY RIKA: An Overview 3 Safety Precautions 4 Safety Labels 6 Clearance Minimums 7 Main Control Board 8 Specifications 9 Parts Illustrations 10 Automatic Safety
SHERWOOD INDUSTRIES IS AN ENVIRONMENTALLY RESPONSIBLE COMPANY. THIS MANUAL IS PRINTED ON RECYCLED PAPER. OWNER S MANUAL
 SHERWOOD INDUSTRIES IS AN ENVIRONMENTALLY RESPONSIBLE COMPANY. THIS MANUAL IS PRINTED ON RECYCLED PAPER. PLEASE KEEP THESE INSTRUCTIONS FOR FUTURE REFERENCE PELLET STOVE Windsor OWNER S MANUAL PLEASE READ
Fire's Edge Fire Pit/Fire Pit Inserts For (Automated) Model 100-A
 Model 100-A") Fire's Edge Fire Pit/Fire Pit Inserts For (Automated) Model 100-A OWNER S MANUAL / OPERATING AND MAINTENANCE INSTRUCTIONS For your safety: If you smell gas: 1. Shut off gas to the appliance 2. Extinguish
Fire's Edge Fire Pit/Fire Pit Inserts For (Automated) Model 100-A OWNER S MANUAL / OPERATING AND MAINTENANCE INSTRUCTIONS For your safety: If you smell gas: 1. Shut off gas to the appliance 2. Extinguish
Maintenance 45 Serie CAUTION. Before resetting your electronic card that displays an error code.
 29-10-2013 CAUTION Before resetting your electronic card that displays an error code. Error Code H Service the stove COMPLETELY as described in this manual. Check the chimney pipe. Error Code O Service
Corn Flame Energy Corn Stove Model 5000
 Corn Flame Energy Corn Stove Model 5000 Installation and Operation Guide Read thoroughly before starting installation Save this manual for future reference SAFETY NOTICE If this stove is not properly installed,
MODEL DCC DOUBLE WALL CHIMNEY CONNECTOR
 Installation & Maintenance LISTED Tested to *UL 103HT & ULC-S641 Instructions MODEL DCC DOUBLE WALL CHIMNEY CONNECTOR A MAJOR CAUSE OF CHIMNEY RELATED FIRES IS FAILURE TO MAINTAIN REQUIRED CLEARANCES (AIR
MODEL DCC DOUBLE WALL CHIMNEY CONNECTOR
 Installation & Maintenance LISTED Tested to *UL 103HT & ULC-S641 Instructions MODEL DCC DOUBLE WALL CHIMNEY CONNECTOR A MAJOR CAUSE OF CHIMNEY RELATED FIRES IS FAILURE TO MAINTAIN REQUIRED CLEARANCES (AIR
Wood Pellet Stove Guide
 Wood Pellet Stove Guide How does a wood pellet stove work? Wood pellet stoves work similar to traditional wood burning stoves but use wood pellets as the fuel source. Pellet stoves have a hopper where
Afton Bay Operation & Maintenance Manual
 Afton Bay Operation & Maintenance Manual Table of Contents ST. CROIX FEATURES...2 INSTALLATION... 3 PREVENTING CHIMNEY FIRES...3 SATISFACTORY PERFORMANCE... 3 APPROVED FUELS...3 Pellets, Cherry Pits &
MODEL DL INSTALLATION AND OPERATING INSTRUCTIONS 2100º F 1150º C
 6", 7" & 8" dia. MODEL DL DOUBLE WALL CONNECTOR INSTALLATION AND OPERATING INSTRUCTIONS THIS STOVE CONNECTOR HAS BEEN LISTED AT 2100º F 1150º C LISTED ACCORDING TO: ULC-S641 WH-PN-016 SECURITY CHIMNEYS
SHERWOOD INDUSTRIES IS AN ENVIRONMENTALLY RESPONSIBLE COMPANY. THIS MANUAL IS PRINTED ON RECYCLED PAPER. Freestanding and Fireplace Insert
 SHERWOOD INDUSTRIES IS AN ENVIRONMENTALLY RESPONSIBLE COMPANY. THIS MANUAL IS PRINTED ON RECYCLED PAPER. PLEASE KEEP THESE INSTRUCTIONS FOR FUTURE REFERENCE PELLET STOVE EF4 Freestanding and Fireplace
Mod. MONTANA WOOD BURNING STOVE USAGE AND MAINTENANCE INSTRUCTIONS
 Mod. MONTANA WOOD BURNING STOVE USAGE AND MAINTENANCE INSTRUCTIONS Nutrients Ashes Fertilizer Wood: an ecological fuel Wood is a renewable source of energy which answers the energy and environmental demands
EXCEL ULTRABlack FS 6 Clearance Connector INSTALLATION AND MAINTENANCE INSTRUCTIONS
 EXCEL ULTRABlack FS 6 Clearance Connector INSTALLATION AND MAINTENANCE INSTRUCTIONS A MAJOR CAUSE OF CHIMNEY RELATED FIRES IS FAILURE TO MAINTAIN REQUIRED CLEARANCES (AIR SPACE) TO COMBUSTIBLE MATERIALS.
Pepin Operation & Maintenance Manual
 Pepin Operation & Maintenance Manual Table of Contents St. CROIX FEATURES... 2 INSTALLATION... 3 PREVENTING CHIMNEY FIRES... 3 SATISFACTORY PERFORMANCE... 3 PELLETS... 3 OPERATING INSTRUCTIONS... 4 Pre-Lighting
Gas Conversion Kits and Instructions
 Gas Conversion Kits and Instructions INSTALLATION FORM RGM 432/433-GC (Version D.1) Obsoletes Form RGM 432/433-GC (Version D) APPLIES TO: Model FT and Model SFT All gas conversion must be done by a qualified
HTP BAY & HTP STANDARD PELLET STOVE OWNER S MANUAL
 HTP BAY & HTP STANDARD PELLET STOVE OWNER S MANUAL Installation, Operating and Maintenance Instructions for Pellet Stoves Congratulations on your purchase of a HEAT-TECH pellet stove. We at HEAT-TECH take
PS-10 PS-12D PS-12. Primo Slicer Manual FOR OPERATOR-DO NOT DISCARD
 PS-10 PS-12D PS-12 Primo Slicer Manual FOR OPERATOR-DO NOT DISCARD TABLE OF CONTENTS 1. BRIEF INTRODUCTION 2. OPERATION 3. SLICING 4. MAINTENANCE AND CLEANING 5. TROUBLESHOOTING IMPORTANT The operator
INSTALLATION & OPERATION MANUAL. Pellet Stove MODELS 25-PDVC / 55-SHP10 / 55-TRP10
 INSTALLATION & OPERATION MANUAL Pellet Stove MODELS 25-PDVC / 55-SHP10 / 55-TRP10 SAVE THESE Manufactured By: England s Stove Works, Inc. PO Box 206 Monroe, VA 24574 10/7/2013 SAVE THESE INSTRUCTIONS Introduction
Installation Instructions
 Installation Instructions C 710 www.contura.eu 50 CERTIFICATE Declaration of performance according to Regulation (EU) 305/2011 No. C710-CPR-160329-SE-1 PRODUCT Product type Stove lit with solid biofuels
INSTALLATION AND OPERATIONS GUIDE FOR GRAND CANYON GAS JUMBO/JUMBO SLIMLINE LOG SYSTEMS
 Burner Systems: JUMBOSLIMBRNR-24 JUMBOSLIMBRNR-30 JUMBOBRNR-36 / JUMBOSLIMBRNR-36 JUMBOBRNR-42 / JUMBOSLIMBRNR-42 JUMBOBRNR-48 / JUMBOSLIMBRNR-48 JUMBOBRNR-60 / JUMBOSLIMBRNR-60 INSTALLATION AND OPERATIONS
Installation, Operation, & Safety Handbook
 Installation, Operation, & Safety Handbook Model 1500 Model 2500 Obadiah's Wood Stoves 1660 Whalebone Dr. Kalispell, MT 59901 www.woodstoves.net 800-968-8604 Model 2500 and 1500 Freestanding Stove or Fireplace
Toyostove Error Code EE 2 (EE 6)
") Toyostove Error Code EE 2 (EE 6) WARNING Rural Energy Enterprises, Inc. does not accept liability for the improper use of this information. Installation, service, and maintenance of heating equipment should
Toyostove Error Code EE 2 (EE 6) WARNING Rural Energy Enterprises, Inc. does not accept liability for the improper use of this information. Installation, service, and maintenance of heating equipment should
Meat Slicer INSTRUCTION MANUAL CAUTION! ONE YEAR LIMITED WARRANTY
 ONE YEAR LIMITED WARRANTY INSTRUCTION MANUAL The original registered owner of this product should contact SKYFOOD EQUIPMENT LLC at 305-868-16 for any warranty problems or service. SKYFOOD EQUIPMENT LLC
You recognize it immediately. The shape, the name, the quality. The Harman. P-Series gives you the heat you want when you want it.
 P - S E R I E S P e l l e t S t o v e s The Smartest pellet stoves on the market Decorative plated or brushed air grilles (optional) Sealed hopper holds up to 76 pounds of pellets State-of-the-art, whisperquiet,
Copyright 2008 by Lucky Distributing
 1 TABLE OF CONTENTS INSTALLATION AND ASSEMBLY RIKA: An Overview 3 Safety Precautions 4 Labels 7 EPA Certification Information 8 Parts Illustration 9 Installation Instructions 11 Clearances 12 Chimney Configurations
USER MANUAL PLEASE READ AND UNDERSTAND THIS MANUAL COMPLETELY BEFORE USE.
 Adventure Kings Roof Top Tent USER MANUAL PLEASE READ AND UNDERSTAND THIS MANUAL COMPLETELY BEFORE USE. Warning Improper installation or use of your Roof Top Tent may result in serious injury or death.
The wall where the product will be placed must not be constructed in wood, or in any case, made of an
 Dear Client, GB We thank you for having chosen one of our products, the fruit of technological experience and of continual research for a superior quality product in terms of safety, dependability, and
Installation Instructions
 Installation Instructions C 780 www.contura.eu 50 CERTIFICATE PERFORMANCE DECLARATION No. C780-CPR-130612-SE-1 PRODUCT Product type Stove lit with solid biofuels Type designation Contura 780 Manufacturing
Copyright 2008 by Lucky Distributing
 1 TABLE OF CONTENTS INSTALLATION AND ASSEMBLY RIKA: An Overview 3 Safety Precautions 4 Labels 7 EPA Certification Information 8 Parts Illustration 9 Installation Instructions 11 Clearances 12 Chimney Configurations
SMART BIO-ETHANOL ELECTRONIC BURNER
 SMART BIO-ETHANOL ELECTRONIC BURNER User s Manual What s in the box: Smart Burner Remote Control AC Adapter Filling Hose User s Manual 1pc 1pc 1pc 1pc 1pc Preparations Remove all packaging materials prior
TANK MONITOR MODEL # (12V DC) (24V DC) (32V DC) OPERATION AND INSTALLATION INSTRUCTIONS
 (24V DC) (32V DC) OPERATION AND INSTALLATION INSTRUCTIONS") TANK MONITOR MODEL # 1510012 (12V DC) - 1510024 (24V DC) - 1510032 (32V DC) OPERATION AND INSTALLATION INSTRUCTIONS WARNING: Raritan Engineering Company,Inc.recommends that a qualified person install this
TANK MONITOR MODEL # 1510012 (12V DC) - 1510024 (24V DC) - 1510032 (32V DC) OPERATION AND INSTALLATION INSTRUCTIONS WARNING: Raritan Engineering Company,Inc.recommends that a qualified person install this
TWO BURNER STAINLESS STEEL PROPANE STOVE
 ROTATE TO LIGHT 842-A250-0_SSCmpStove.qxd 11/26/03 2:59 PM Page 1 OWNER S MANUAL FAILURE TO FOLLOW ALL S AND INSTRUCTIONS IN THIS MANUAL COULD LEAD TO PERSONAL INJURY, INCLUDING DEATH. RETAIN THIS MANUAL
ACCENDA Instructions for use and safety
 ACCENDA Instructions for use and safety READ CAREFULLY BEFORE USE Please store these safety warnings in a safe place for future reference. NOTICE: BUYER ASSUMES ALL RESPONSIBILITY FOR SAFETY AND USE THAT
TCWS54 SEE THRU DIAMOND BURNER INSTALLATION KIT INSTRUCTIONS
 INSTALLER: Leave this manual with the appliance. CONSUMER: Retain this manual for future reference. These instructions are supplementary to the Installation and Operating Instructions supplied with the
St. Croix P E L L E T S T O V ES. Save this Operation & Maintenance. Manual MODELS: PRESCOTT EX PRESCOTT EXL AFTON BAY YORK.
 St. Croix P E L L E T S T O V ES Save this Operation & Maintenance Manual MODELS: PRESCOTT EX PRESCOTT EXL AFTON BAY YORK Table of Contents St. CROIX FEATURES... 1 INSTALLATION... 4 PREVENTING CHIMNEY
The WoodGas Campstove By: Spenton LLC
 The WoodGas Campstove By: Instruction Manual IMPORTANT Please read this manual carefully before using this stove. Store this manual for future use. If you have any questions about the operation of this
INSTALLATION & OPERATING INSTRUCTIONS FOR. FIREPLACE GAS LOGS Model Numbers: MO18NG, MO24NG, SH18NG, SH24NG, CSO30NG
 INSTALLATION & OPERATING INSTRUCTIONS FOR FIREPLACE GAS LOGS Model Numbers: MO18NG, MO24NG, SH18NG, SH24NG, CSO30NG Applicable for use with all styles and sizes of Dual Burner Natural Gas Log Sets. Note:
Installation Instructions
 Installation Instructions C750 C750A www.contura.eu 50 CERTIFICATE EC Declaration of conformity www.contura.eu Manufacturer name address Place of manufacture NIBE AB/NIBE STOVES Box 134, Skulptörvägen
SOLID FUEL STOVE ELITA and ELITA II
 17500 VRANJE, SERBIA Radnicka 1, tel.: 017 421 121 SOLID FUEL STOVE ELITA and ELITA II INSTRUCTIONS FOR INSTALLATION AND USE GENERAL DATA Generally it is necessary to adhere to the construction rules and
Greenfield Operation & Maintenance Manual
 Greenfield Operation & Maintenance Manual Table of Contents ST. CROIX FEATURES...3 INSTALLATION... 4 PREVENTING CHIMNEY PROBLEMS... 4 SATISFACTORY PERFORMANCE... 4 SHELLED CORN...4 OPERATING INSTRUCTIONS...
Electric 2-STAGE SHARPENING FEATURES: system allows for safe, easy knife sharpening - Non-slip feet allows sharpener to stay in place while in use
 Electric FEATURES: - 2-Stage electric sharpening system allows for safe, easy knife sharpening - Non-slip feet allows sharpener to stay in place while in use 2-STAGE SHARPENING IMPORTANT SAFEGUARDS SAVE
Installation Instructions
 Installation Instructions C 880 www.contura.eu 50 CERTIFICATE EC Declaration of conformity www.contura.eu Manufacturer name address Place of manufacture NIBE AB/NIBE STOVES Box 134, Skulptörvägen, SE-285
PLEASE READ BEFORE USE AND SAVE THESE INSTRUCTIONS
 Sauce Flip Pan PLEASE READ BEFORE USE AND SAVE THESE INSTRUCTIONS Thank you for purchasing Cook s Companion Sauce Flip Pan. This pan is designed to be one of the most used pans in your kitchen. The Fusion
Harrie Leenders Fuga el - Instructions for Installation, Use and Maintenance INSTRUCTIONS FOR INSTALLATION, USE AND MAINTENANCE
 INSTRUCTIONS FOR INSTALLATION, USE AND MAINTENANCE FUGA el 1 2 1. Flue 2. Case 3. Ceramic glass 4. Aeration slide 5. Convection fins 6. Door handle 7. Base 3 4 READ THE INSTRUCTION BOOKLET AND THESE SUPPLEMENTARY
CERO Instructions for use and safety
 CERO Instructions for use and safety READ CAREFULLY BEFORE USE Please store these safety warnings in a safe place for future reference. NOTICE: BUYER ASSUMES ALL RESPONSIBILITY FOR SAFETY AND USE THAT
Installation Instructions
 Installation Instructions For use in and IE only C i4 FS www.contura.eu 2 CERTIFICATE DECLARATION OF PERFORMANCE No. Ci4FS-CPR-130619-SE-1 PRODUCT Product type Type designation Manufacturing number Intended
Hastings Operation & Maintenance Manual
 Hastings Operation & Maintenance Manual Table of Contents ST. CROIX FEATURES...2 INSTALLATION... 3 PREVENTING CHIMNEY FIRES...3 SATISFACTORY PERFORMANCE... 3 Pellet Fuel...3 Add Corn to the Mix...3 OPERATING
MAX Series 9514 OPERATOR S MANUAL
 MAX Series 9514 OPERATOR S MANUAL Persons under age 18 are not permitted to operate or have accessibility to operate this equipment per U.S. Dept. Of Labor Employment Standards Administration Fact Sheet
User Manual. 1000W Stackable 1.2 Cu. Ft. Commercial Microwave. Model: 180MW112T 05/2017. Please read and keep these instructions. Indoor use only.
 1000W Stackable 1.2 Cu. Ft. Commercial Microwave Model: 180MW112T 05/2017 Please read and keep these instructions. Indoor use only. IMPORTANT SAFETY INSTRUCTIONS When using electrical equipment, basic
LP/High Altitude LP/High Altitude Natural Gas Conversion Kit For United States Installations
 LP/High Altitude LP/High Altitude Natural Gas Conversion Kit For United States Installations Installation Instructions For Model Series G Furnaces, P(G,N) Gas/Electric Appliances, and R Gas/Electric Appliances
Installation Instructions
 Installation Instructions C810 www.contura.eu 50 CERTIFICATE Declaration of performance according to Regulation (EU) 305/2011 No. C810-CPR-130610-SE-1 PRODUCT Product type Stove lit with solid biofuels
Installation Instructions
 Installation Instructions C 556 www.contura.eu 50 CERTIFICATE PERFORMANCE DECLARATION No. C556-CPR-130601-SE-2 PRODUCT Product type Stove lit with solid biofuels Type designation Contura 556 Manufacturing
INSTALLATION AND OPERATIONS GUIDE FOR GRAND CANYON GAS LOG FIRE PIT SERIES ONLY
 INSTALLATION AND OPERATIONS GUIDE FOR GRAND CANYON GAS LOG FIRE PIT SERIES ONLY Installation and service must be provided by a qualified installer, service agency or gas supplier Grand Canyon Gas Logs,
Eco-Stove L.E. Hiking Eco-stove L.E. Plus Hiking/Camping Eco-Stove X.L. Camping Eco-Stove X.X.L. Backyard Grill and Survival. Instruction Manual
 Eco-Stove L.E. Hiking Eco-stove L.E. Plus Hiking/Camping Eco-Stove X.L. Camping Eco-Stove X.X.L. Backyard Grill and Survival Instruction Manual IMPORTANT Before using your new stove please be sure to read
Hastings Operation & Maintenance Manual
 Hastings Operation & Maintenance Manual Table of Contents ST. CROIX FEATURES...2 INSTALLATION... 3 PREVENTING CHIMNEY FIRES...3 SATISFACTORY PERFORMANCE... 3 APPROVED FUELS...3 Pellets, Cherry Pits & Pellet
Please read this manual before installation and use. We wish you many years of pleasure and warmth.
 Thank you for purchasing this product. This multi fuel burning stove is compliant with the EN13240 Please read this manual before installation and use. We wish you many years of pleasure and warmth. Manufactured
Table of Contents. Safety... 2 Specifications... 4 Assembly Maintenance... 6 Parts List... 7 Warranty... 8
 Table of Contents Safety... Specifications... 4 Assembly... 4 Maintenance... 6 Parts List... 7 Warranty... 8 WARNING SYMBOLS AND DEFINITIONS This is the safety alert symbol. It is used to alert you to
Clarry Pellet Stove. This product is patented under US Patent # and Canadian Patent # CA Made in the USA
 Clarry Pellet Stove This product is patented under US Patent #8020547 and Canadian Patent # CA2604313 Made in the USA Clarry is a registered trademark of Clarry Pellet Stove, LLC Report number: 0397PS001S
1000M MANUAL Signature Series Slicer OPERATORS MANUAL
 1000M MANUAL Signature Series Slicer OPERATORS MANUAL Persons under age 18 are not permitted to operate or have accessibility to operate this equipment per U.S. Dept. Of Labor Employment Standards Administration
17500 VRANJE, SRBIJA Radnička 1, Tel.: 017/ INSTRUCTIONS FOR INSTALLATION, ADJUSTMENT AND USE
 17500 VRANJE, SRBIJA Radnička 1, Tel.: 017/421-121 STOVE OF THICK METAL SHEETS PREMIJER PREMIJER K INSTRUCTIONS FOR INSTALLATION, ADJUSTMENT AND USE 1.Technical data about continuously burning stove of
Alma Mons EN Owners s manual INSTALATION, ADJUSTMENT AND OPERATING INSTRUCTION
 Alma Mons Owners s manual INSTALATION, ADJUSTMENT AND OPERATING INSTRUCTION EN 12815 1 INTRODUCTION Congratulations! You have invested in energy efficient and high quality product-alma Mons wood burning
Installation Instructions
 Installation Instructions For use in GB and IE only C i4 www.contura.eu 82 CERTIFICATE EC Declaration of conformity www.contura.eu Manufacturer name address Place of manufacture NIBE AB/Contura Box 134,
Kontrol Kube Advanced Owners Manual
 Mobile Containment. Simplified. TM Kontrol Kube Advanced Owners Manual KONTROL KUBE www.kontrolkube.com 800.343755 1 IMPORTANT SAFETY INFORMATION SAVE THESE INSTRUCTIONS. CAREFULLY READ AND FOLLOW THESE
LDR Brachytherapy Seed Sterilization and Sorting Tray
 LDR Brachytherapy Seed Sterilization and Sorting Tray Table of Contents General Precautions... 2 Customer Responsibility... 3 Description... 4 Features and Specifications... 5 Operation... 6 Changing Covers
85 Heart Lake Road South Brampton, Ontario, Canada L6W 3K2 Phone: Fax:
 Big Joe by Blue Giant Warranty AC Power Drive Straddle Trucks (PDS) AC Power Pallet Trucks (WPT45, D40) AC Power Rider Trucks (WRT-60) AC Power Counterbalanced Truck (CB-22) AC Power Task Support Vehicle
INSTALLATION INSTRUCTIONS AND OWNER S MANUAL
 INSTALLATION INSTRUCTIONS AND OWNER S MANUAL INSTALLER: Leave this manual with the appliance. CONSUMER: Retain this manual for future reference. LOG SET MODEL LS35DINF For Use With DVCT35CBN-1 Fireplace
EB300. Ethanol Burner. User s Manual Installation Instructions
 EB300 Ethanol Burner User s Manual Installation Instructions EB300 Burner Burner Lid User s Manual What s in the box: 1pc 1pc 1pc Installation Instructions EB300 - User s Manual The Ignis Ethanol Burner
SPIRAL SLICER Instruction Manual Model #5280 & 5280M. Part No Revised Feb. 2010
 SPIRAL SLICER Instruction Manual Model #5280 & 5280M Part No. 82876 Revised Feb. 2010 SAFETY PRECAUTIONS INSTALLATION INSTRUCTIONS Inspection of Shipment: 5280 & 5280M SPIRAL SLICER Unpack all cartons
GNOME PELLET STOVE Owner s Manual
 GNOME PELLET STOVE Owner s Manual Leave this manual with the owner. Please read this entire manual before installation and use of the pellet fuel-burning stove. Failure to follow these instructions could
Lit Table Top Firepit Bio-Ethanol Fireplace. User Manual. Model: GF301650
 Lit Table Top Firepit Bio-Ethanol Fireplace User Manual Model: GF301650 1 Moda Flame Lit Table Top Firepit Bio-Ethanol Fireplace Included in delivery (Parts List): A. Fireplace body 1pc B. Glass 1pc C.
MULTI-FUEL STOVE INSTALLATION AND USER INSTRUCTIONS
 PRIORY MULTI-FUEL STOVE INSTALLATION AND USER INSTRUCTIONS The Priory stove has a nominal heat output of 8Kw. and a weight of 80 kg. The flue gas mass flow is 5.4g/s for mineral fuel and 6.3g/s for wood
Operator s Manual. Medium-Duty Electric Slicers ENGLISH. Item Model Description Drive Peak HP Voltage Amps Hz Plug
 Medium-Duty Electric Slicers 40950 40951 Item Model Description Drive Peak HP Voltage Amps Hz Plug 40950 SLM250/S 10 Knife Medium-Duty Slicer 1/3 2.5 Belt 120 60 5-15P 40951 SLM300P/S 12 Knife Medium-Duty
Installation instruction
 Installation instruction C 35T-Low www.contura.eu 82 CERTIFICATE PERFORMANCE DECLARATION No. C35TL-CPR-130618-SE-1 PRODUCT Product type Type designation Manufacturing number Intended area of use Fuel Stove
INSTRUCTIONS FOR INSTALLATION, USE AND MAINTENANCE YSEN
 INSTRUCTIONS FOR INSTALLATION, USE AND MAINTENANCE YSEN READ THE INSTRUCTION BOOKLET AND THESE SUPPLEMENTARY INSTRUCTIONS CAREFULLY BEFORE INSTALLATION These instructions together with those in the instruction
Installation Instructions DVL. Double-Wall, Close Clearance Connectors
 Installation Instructions DVL Double-Wall, Close Clearance Connectors A MAJOR CAUSE OF VENT RELATED FIRES IS FAILURE TO MAINTAIN REQUIRED CLEARANCES (AIR SPACES) TO COMBUSTIBLE MATERIALS. IT IS OF THE
Installation instruction
 NO DK FR NL Installation instruction 2 Installasjonsanvisning 17 Monteringsvejledning 33 Guide d installation 49 Installatie instructies 65 Installation instruction C850W contura.eu 2 CERTIFICATE Declaration
Safety instructions and warnings Package contents and parts Tool requirements Product features... 5
 Door Awning : PA Series Owner s Manual For safety reasons, please carefully read and understand all written instructions and warnings in this manual prior to assembling or installing this product. Table
Cordless Electric Teakettle. Model 685
 Cordless Electric Teakettle Model 685 Important Safeguards When using electrical appliances, basic safety precautions should always be followed, including the following: 1. Read all instructions. 2. Do
A carbon monoxide detector has been supplied with your stove. You must plug it in. Burn Nut and Pea anthracite coal only
 70,000 & 90,000 Hand Fired Deep Box Operating instructions and maintenance enclosed Thoroughly read and understand instructions Always leave this manual with stove owner Follow the instructions within
HARVIA IRON STOVE Instructions for installation and use
 HARVIA IRON STOVE EN Instructions for installation and use Harvia 10 08012014VTT Congratulations on a good choice of fireplace and thank you for your confidence in Harvia s products. Read these instructions
INSTALLATION/OWNERS MANUAL for. Kodiak HAND FIRED GRAVITY FED COAL STOVE Columbia Blvd. Bloomsburg PA Fuel: Nut or Pea Coal
 INSTALLATION/OWNERS MANUAL for Kodiak HAND FIRED GRAVITY FED COAL STOVE 3162 Columbia Blvd. Bloomsburg PA 17815 Fuel: Nut or Pea Coal Caution Fossil fuel burning can create lethal doses of carbon monoxide
Installation & User Manual EW5000 Outdoor Cooking Fire
 Installation & User Manual EW5000 Outdoor Cooking Fire IMPORTANT: Please read this manual before installing and using the ESCEA EW5000 Cooking fire. Failure to follow these instructions may lead to a possible
IRRADIA Instructions for use and safety
 IRRADIA Instructions for use and safety READ CAREFULLY BEFORE USE Please store these safety warnings in a safe place for future reference. NOTICE: BUYER ASSUMES ALL RESPONSIBILITY FOR SAFETY AND USE THAT
Viking Use/Installation Guide
 Viking Use/Installation Guide Viking Range Corporation 111 Front Street Greenwood, Mississippi 38930 USA (662) 455-1200 For more product information, call 1-888-VIKING1 (845-4641) or visit the Viking Web
Installation Instructions. Woolly Mammoth Stoves Albert Road, Braintree, Essex, CM7 3JQ
 Installation Instructions Woolly Mammoth Stoves 20-28 Albert Road, Braintree, Essex, CM7 3JQ INSTALLATION INSTRUCTIONS TO BE READ IN CONJUNCTION WITH THOSE IN THE INSTRUCTION BOOKLET These instructions
TC30 HEARTWOOD BURNER INSTALLATION INSTRUCTIONS
 INSTALLER: Leave this manual with the appliance. CONSUMER: Retain this manual for future reference. These instructions are supplementary to the Installation and Operating Instructions supplied with the
Installation and Maintenance Manual
 Freestanding Gas Stove MODEL: PGS2005 GPEBB20R GPEBW20R Installation and Maintenance Manual Warning Maintenance products should be carried out by professional and technical personnel with relevant qualification,
INSTALLATION AND OPERATION GUIDE FOR
 INSTALLATION AND OPERATION GUIDE FOR Featuring Aquatic Glassel Tempered, Formulated Glass, 2005-2007 NATURAL GAS INSTRUCTIONS Adequate Fireplace Ventilation is Required NOTE: READ INSTRUCTIONS FULLY BEFORE
Installation instruction
 Installation instruction C 550 www.contura.eu 66 CERTIFICATE PERFORMANCE DECLARATION No. C550-CPR-130601-SE-1 PRODUCT Product type Stove lit with solid biofuels Type designation Contura 550 Manufacturing
Safety instructions and warnings Package contents and parts Tool requirements Product features... 4
 Door Awning : PN Series Owner s Manual For safety reasons, please carefully read and understand all written instructions and warnings in this manual prior to assembling or installing this product. Table
Product instruction manual Ream Cutting Systems RE3943, RE3946, RE3947, RE3971, RE3952E
 Product instruction manual Ream Cutting Systems RE3943, RE3946, RE3947, RE3971, RE3952E The Trimfast Ream Cutters are reliable, high performance cutters that will give you the results you need quickly
DVL. Installation Instructions. Double-Wall, Close Clearance Connectors. C o m p l e t e V e n t i n g S o l u t i o n s
 Installation Instructions DVL Double-Wall, Close Clearance Connectors C o m p l e t e V e n t i n g S o l u t i o n s A MAJOR CAUSE OF VENT RELATED FIRES IS FAILURE TO MAINTAIN REQUIRED CLEARANCES (AIR
EMPIRE Comfort Systems
 LS60THF-1 LOGS AND ROCKS SET This decorative media set includes an unusual assortment of logs and rocks in varying textures and colors to complement your linear fireplace - plus stainless steel coils to
How to use a multi fuel stove
 How to use a multi fuel stove Important!! When lighting the stove for the first time only a small fire should be lit. Too hot a fire will result in the paint emitting smoke - not necessarily bad but unpleasant.
INSTRUCTIONS FOR MVK-NQM PILOT KIT
 MVK-NQM IMPORTANT READ AND UNDERSTAND THESE INSTRUCTIONS BEFORE INSTALLING These instructions must be used as a supplement to the instructions supplied with your gas log set. Follow the Gas Log Set instructions
DIANA EN Owners s manual INSTALATION, ADJUSTMENT AND OPERATING INSTRUCTION. Available in ceramic and metalsheet version.
 DIANA Owners s manual INSTALATION, ADJUSTMENT AND OPERATING INSTRUCTION Available in ceramic and metalsheet version. EN 13240 1 INTRODUCTION Congratulations! You have invested in energy efficient and high
14' x 32' x 12' Round Top Round Style Shelter Assembly Instructions
 14' x 32' x 12' Round Top Round Style Shelter Assembly Instructions Description Model # 14' x 32' x 12' RoundTop Garage - Gray 62669 Recommended Tools Please read instructions COMPLETELY before assembly.
The four elements of nature: Fire, Water Earth & Air
 Why our flame is so natural... Our range of balanced flue gas stoves gives a beautiful lazy dancing flame pattern which emulates that of a traditional wood burning stove and with the added features of
The Facts About Pellet Stoves. Bobbi Anne Barnowsky Alutiiq Tribe of Old Harbor Tribal Administrator/Environmental Director
 The Facts About Pellet Stoves Bobbi Anne Barnowsky Alutiiq Tribe of Old Harbor Tribal Administrator/Environmental Director AGENDA The Beginning of the Project The Thinking Cap There are many factors needed