Varde Als Varde Birkholm Varde Falster Varde Lolland Varde Samsø Varde Tunø
|
|
|
- Meryl Cobb
- 5 years ago
- Views:
Transcription

1 2 Edition UK Varde Als Varde Birkholm Varde Falster Varde Lolland Varde Samsø Varde Tunø Installation and User guide Revision 02 Soldalen 12, 7100 Vejle, Danmark, Tel vardeovne.dk 1
2 Congratulation on purchasing your new stove Varde Ovne A/S is a Danish company specializing in functional, environmentally friendly and designed quality stoves. Index Welcome and index Page 2 Technical specifications Als Page 3 Technical specifications Birkholm Page 4 Technical specifications Falster Page 5 Technical specifications Lolland Page 6 Technical specifications Samsø Page 7 Technical specifications Tunø Page 8 Regulations and approval Page 9 Flooring and distance Page 10 Installation distances Page 11 Chimney Page 12 Air supply Page 13 How it works Page 14 How to light and stoke a fire Page 15 Operation Page 16 Vermiculite Page 17 How to choose wood Page 18 Maintenance Page 19 Troubleshooting Page 20 Spare parts Page 21 Test certificate Page 22 Test certificate Page 23 Warranty Page 24 2
3 Technical Specification Als Model Als Height (mm) 1000 Wide (mm) 456 Depth (mm) 349 Weight (kg) 80 Effect Nominal Output Heated area 3-7 kw 5,0 kw Efficient 81% EEI 108 Flue gas data 295 C at 20 C, 11Pa m² Combustion Chamber : (H x B x T): 260/380 x 200/300 x 300mm Flue outlet: Ø 15cm (Mounting height top: 99cm) Distance to non inflammable: 5-10cm (Recommended) Distance to inflammable wall and material: Rear = 20cm, Sides = 30cm, In front = 80cm 3
4 Technical Specification Birkholm Model Birkholm Height (mm) 1000 Wide (mm) 456 Depth (mm) 349 Weight (kg) 80 Effect Nominal Output Heated area 3-7 kw 5,0 kw Efficient 81% EEI 108 Flue gas data 295 C at 20 C, 11Pa m² Combustion Chamber : (H x B x T): 260/380 x 200/300 x 300mm Flue outlet: Ø 15cm (Mounting height top: 99cm) Distance to non inflammable: 5-10cm (Recommended) Distance to inflammable wall and material: Rear = 20cm, Sides = 30cm, In front = 80cm 4
5 Technical Specification Falster Model Falster Height (mm) 1000 Wide (mm) 444 Depth (mm) 349 Weight (kg) 80 Effect Nominal Output Heated area 3-7 kw 5,0 kw Efficient 81% EEI 108 Flue gas data 295 C at 20 C, 11Pa m² Combustion Chamber : (H x B x T): 260/380 x 200/300 x 300mm Flue outlet: Ø 15cm (Mounting height top: 99cm) Distance to non inflammable: 5-10cm (Recommended) Distance to inflammable wall and material: Rear = 20cm, Sides = 30cm, In front = 80cm 5
6 Technical Specification Lolland Model Lolland Height (mm) 1000 Wide (mm) 444 Depth (mm) 349 Weight (kg) 80 Effect Nominal Output Heated area 3-7 kw 5,0 kw Efficient 81% EEI 108 Flue gas data 295 C at 20 C, 11Pa m² Combustion Chamber : (H x B x T): 260/380 x 200/300 x 300mm Flue outlet: Ø 15cm (Mounting height top: 99cm) Distance to non inflammable: 5-10cm (Recommended) Distance to inflammable wall and material: Rear = 20cm, Sides = 30cm, In front = 80cm 6
7 Technical Specification Samsø Model Samsø Height (mm) 1000 Wide (mm) 487 Depth (mm) 349 Weight (kg) 80 Effect Nominal Output Heated area 3-7 kw 5,0 kw Efficient 81% EEI 108 Flue gas data 295 C at 20 C, 11Pa m² Combustion Chamber : (H x B x T): 260/380 x 200/300 x 300mm Flue outlet: Ø 15cm (Mounting height top: 99cm) Distance to non inflammable: 5-10cm (Recommended) Distance to inflammable wall and material: Rear = 20cm, Sides = 30cm, In front = 80cm 7
8 Technical Specification Tunø Model Tunø Height (mm) 1000 Wide (mm) 487 Depth (mm) 349 Weight (kg) 80 Effect Nominal Output Heated area 3-7 kw 5,0 kw Efficient 81% EEI 108 Flue gas data 295 C at 20 C, 11Pa m² Combustion Chamber : (H x B x T): 260/380 x 200/300 x 300mm Flue outlet: Ø 15cm (Mounting height top: 99cm) Distance to non inflammable: 5-10cm (Recommended) Distance to inflammable wall and material: Rear = 20cm, Sides = 30cm, In front = 80cm 8
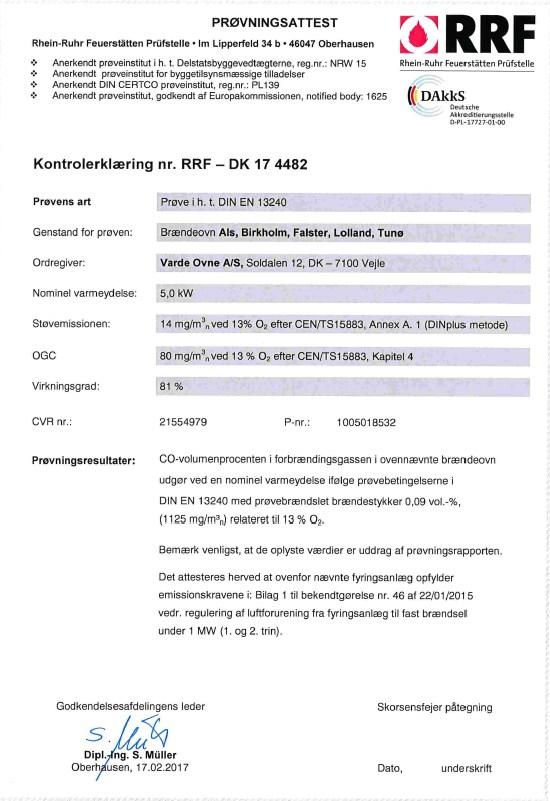
9 Important! Before igniting your Varde Stove for the first time, we recommend that you read these instructions carefully and contact your local stove vendor or building authoorities to inquires about existing regulations regarding the intallation of stoves. Please follow these regulations closely. Inspection of installation It is very important that the installation is inspected by a qualified chimney sweeper before the stove is used the first time. This Varde Stove Has passed the Danish /European Standard DS/EN Norwegian (NS) and the German (Stufe 2) test, and have thereby proved to be a environmentally friendly product. Regulations All local regulations as well as National and European, should be adhered to when installing your stove. All Varde Ovne stoves are closed fireplaces. The stove is designed for intermittent combustion and can be connected to a chimney used by other fireplaces, as long as the appropriate rules and regulations are adhered to. Proffesional installation We recommend that you consult with the dealer where you purchased the stove or an other competent installer, as there may be specific things to consider during the installation. You should also reseive the applicable rules for installing the stove and follow them. Please Note! You are by law required to register your stove at the local chimney-sweeper. Until installation keep the stove dry and not to cold. The stove cannot stand moisture. If using an existing chimney, it not necessarily effective enough for a new modern stove. Vermiculite is a very porous material, therefore handle with care. When refilling the stove, put the wood carefully, use the glove. EC declaration of confirmaty. MANUFACTURER Name: Adress Stove Inspection Name: Adress Product Product type Type code Standard Application Fuel Special conditions Varde Ovne A/S Soldalen 12, DK-7100 Vejle, Denmark RRF Im Lopperfeld 34b, Oberhausen, Germany Varde Als, Birkholm, Falster, Lolland, Samsø, Tunø Heating stove, suitable for intermittent combustion Costruction products (89/106/EC/) standard used EN Residential Heating Wood Non CE-Markning Issued 2015 Nominal Output 5,0 kw Fuel type Wood Fluegas temperature 295 C Efficiency 81 % Co-release 0,09 % Jan Meldgaard CEO Varde Ovne 9
10 Flooring: If the floor on which the stove is to be placed is inflammable, the floor must be covered with non -flammable material, such as steel or glass plate, floor tiles or artifical slate, covering an area of at least 15 cm from the sides of the stove and at least 30 cm from the front of it. Regarding the Weight Steel Stove Varde Als, Birkholm, Falster, Lolland, Samsø og Tunø 80 kg Installation distance: If walls are non-inflammable, the stove can be placed closer to them. However, we recommend a minimum distance of 5-10 cm, to allow for cleaning behind the stove. The cleanout gate must be accessible. Optimal combustion can only be obtained if fresh air is constantly admitted. It is important, therefore, to ensure that this is the case. The best way to provide a steady flow of fresh air is by installing 1-2 air vent s in the room where the stove is situated. (One in each side of the room). According to existing regulations, stoves must be placed with the following minimum distances in mm to inflammable walls and materials. The distance from the outer edge of the flue pipe to inflammable material is descriped as for horizontal Flue 300mm and the distance for vertical flue is 225mm 10
11 Installation distance The stove must in accordance with applicable rules comply with the following minimum distances from inflammable walls and materials: Sides : 30 cm Rear : 20 cm Distance to furniture : 80 cm Varde Als, Birkholm, Falster, Lolland, Samsø und Tunø A 200 mm C 300 mm B 225mm D 800 mm Als and Birkholm Falster and Lolland Samsø and Tunø 11


12 The chimney: Always use a chimney with a diameter of at least 15 cm. This corresponds to a clear of 175 cm 2. Make sure the chimney is of a sufficient height, that it draws well and that smoke does not bother your neighbours. We recommend that you fit your chimney with a damper, allowing for draft control. This may prove particularly important on windy days. Note: the damper must never shut off draught completely always allow at least 20 cm² free passage through the chimney. With nominal usage the stove has tested a flue gas flow of 5,5 g/second and with a flue gas temperature of 340 C in a room of 20 C. Varde stoves are always fitted with a smoke plate which redirects smoke to make its way to the chimney as effectively as possible. This ensures that the heat from the smoke is emitted inside your home rather than outside it. The smoke plate is moveable and placed on top of the Vermiculite fire brick side plate. You should make sure that it is pushed all the way back against the back wall of the combustion chamber. Draught conditions Consult your local stove dealer about how best to adjust the draught in your chimney. Hight of chimney If in doubt, contact your local stove dealer. He will be able to inform you of the correct hight. Connection of Flue pipe: The Stove is mounted with Flue adaptor on the top. Information about the cast iron adapter. Your stove is equipped with the cast iron adapter from Varde Ovne. The adapter is suitable for smoke pipes with inner diameter on 150 mm. If you need it, it s now possible for you to make a condensate drain-hole in the adapter. Carefully punch a chisel or the like through the adapter in the outer groove, at the arrow mark. This way you can establish a condensate drain hole in the adapter. Arrow mark for the hole. Carefully punch a hole with a chisel or the like. Now the condensate hole is ready. 12
13 Continual fresh air A continual supply of fresh air is required in the room in wich the stove is situated. This can be achieved by installing 1-2 vents, whilst also ensurring that these can not be blocked. The quantity of air used for burning, is approx. 14 m³ / h. Ignition air On Ashpan - Open Optændingsluft On Ashpan - Closed This option is only for use at lightning up. As soon as the fire has a good grip rembermber to close again. Combustion Air Throttel Push the Throttel towards right for opening. Combustion /Secondary air Pre-heated air for the combustion process, the amount of wihich can be altered according to the desired room temperature and the effectiveress of the chimney. A high level of chimney draughr requires a lesser intake of combustion air. Combustion Air Throttel Push the Throttel towards left for closing. Max height of firewood Tertiary air Is constantly added air, which makes the stove brun even cleaner, and lowers the content of tar and soor in the combustion process to an absolute minimum. At optimal combustion settings, glass and combustion chamber will be burnt completely clean, and the remaining amount of ashes will be minimal. Overheating Occors if too much wood is placed in the stove or if the combustion receives too much air. 13
14 How it works Combustion Air Throttel Push the Throttel towards right for opening. Ignition air On Ashpan - Open Bottom grate The Bottom grate is situated at the bottom of the combustions chamber. Ignition air On Ashpan - Closed 14
15 How to light and stoke a fire: The first time you light up the stove the enamel will temper, and give off some smoke and a slight smell. We recommend that you leave doors and windows open, as airing the room will make the smell disappear. This tempering softens the enamel making it susceptible to damage. Therefore exeercise caution and avoid touching the enamel. Likewise we recommend opening the door to the stove at regular intervals for the first hours to prevent the insulations rope from sticking to the enamel. Never use highly inflammable fluids such as methylated sprit and petrol for lighting up! We recommend a Top-Down lightning, where you light the wood in the upper area of the combustions chamber and not in the ground. This method is the most environmental metod to light a fire. The metod will keep the glass clean. In the combustion chamber you make a cross ( ) of 4 small pieces of wood with a small distance between each one of them. On top you of them you make another cross ( ) of 8-12 smaller sticks (0,5-1 kg.), on top of this firewood and in between use 2-3 kildning blocks. A thin layer of ashes at the bottom of the stove makes lighting up a fire easier. Before lighting up the stove, open Ignition Air on the ash-pan for access of primary air.the Throttle for the Combustion Air is drawn towards the right and hereby fully openes for combustion air. When the fire burns remember to close the the Ignition air again, or the stove and chimney might become overheated and will invalidate the warranty. Hereafter the combustion air are ajusted to the need of heat. Be aware not to close to much for the air supply, otherwise the fire will die, the fire must alway be bright and clear. In most instances, however, you will have to achieve the best combustion air settings yourself, as the height and draught of your chimney, as well as the quality of the firewood are decisive factors in determining how your particular stove is best set. If the stove nominal heat output is too large compared to the heat demand, you can reduce the output as descriped here: - use a smaller amount of wood than usual, for example. 1.2 to 1.3 kg. and preferably consistend of 3-4 smaller pieces of wood. Apply full air to ignite the wood properly, then you can reduce the combustion air, perhaps down to approx. 60%. Be aware not to close to much for the air supply, otherwise the fire will die, the fire must alway be bright and clear. With this method it, (depending on the chimney, wood quality, etc. is possible to reduce the stove heat output from a nominal 5 kw down to maybe 3 to 3.5 kw. Please be aware that it can lead to poor combustion, if you regulate too much down the combustion air, resulting in a lower efficiency and increased emission levels in the smoke. (increasing pollution). Tertiary air If you are wondering why your stove is fitted with an gap in the rear vermiculite plate in the combustion chamber, with small holes through the back steel plate, where air is running through into the combustion chamber. This is merely a consequence of our newly developed combustion system. We refer to these air ducts as the tertiary air, and will prove helpful as you install your new Varde stove. When refilling the stove with wood, we recommend opening the stove door only once embers are left in the combustion chamber. Opening the door whilst the flames are still burning and producing smoke and gas, might cause smoke to slip into the room instead of up the chimney. Should you have some issuses with the lightning or the function, see section on troubleshooting. 15
16 Operation Bottom grate 2. Wood catch 3. Vermiculit plates 4. Ash tray 5. Cast iron Door 6. Steel Top 7. Throttel for Ignition Air 8. Combustion Air Throttel 9. Storage 10. Site Panels 11. Storage Door (Only on Birkholm, Falster og Tunø) 16
17 Vermiculite The plates in the Combustion Chamber are Vermiculite plates and will aventually be worn, - as will the smoke plate. Should you accidentally breah the plate, for instance by hitting it hard with a piece of wood, this does not effect the quality of the combustion. You need not replace the plate until the gap is 5 mm wide. Vermiculite A special non-flammable material. The vermiculite fire plates both isolate and protect the stove from attrition. Vermiculite plates and deflector not covered by the warranty. Vermiculite is a very porous material, therefore handle with care. When refilling the stove, put the wood carefully, use the glove. Only use original parts from Varde Ovne A/S Vermiculit set, Item no.: Deflector plate 2. Left side plade 3. Right side plade 4. Rear cover 5. Grate Plates 3 5 How too replace the Vermiculite 1. Remove Grate plates (5) 2. Deflector, lift easily, bottom bag end are tilted forward, take down. 3. The left side plate can be easily liftes up and rotated out. 4. Right side plate can be easily lifted up and rotated out. 5. The Rear cover is liftes up and out of the stove. Mounting of new Vermiculite plates follow point 5 towards point 1. 17


18 What kind of wood to use? Generally, beech wood is considered the best type of wood for burning. It burns evenly without producing much smoke and ashes are clean and take up little space. Ash, birch and maple wood are fine alternatives. The new stove The first time you light up the stove the enamel will temper, and give off some smoke and a slight smell. We recommend that you leave doors and windows open, as airing the room will make the smell disappear. This tempering softens the enamel making it susceptible to damage. Therefore exercise caution and avoid touching the enamel. Likewise we recommend opening the door to the stove at regular intervals for the first hours to prevent the insulations rope from sticking to the enamel. How big the firewood? Split firewood with a diameter larger than 10 cm. Use firewood with a length on cm. The use of larger quantities of fuel than recommended in the tabel belove will overtax the stove and resulte in increased temperatures in the chimney as well as a lowered efficiency. This may cause damage to both chimney and stove, and the annulment of the warranty. Also, never use toxic materials such as chipboard, painted or impregnated wood. Lightnings sticks Length: cm Wide 3x3 cm Normal amounth: sticks (approx. 1 kg) What to burn. This Varde Stove is tested and approved for the burning of wood. Only dry wood with a moisture content of maximum 21 percent and the size to fit into the combustion chamber should be used. The burning of moist wood will result in an increased amount of tarry soot, pollution and uneconomic fuel consumption. Newly chopped wood contains about percent moisture, which makes it completely unsuitable as fuel. Allow newly chooped firewood to dry in a open shed for a couple of years before using it in the stove. Do not use! - Consider the environment Also, never use toxic materials such as chipboard, painted or impregnated wood. The use of larger quantities of fuel than recommended in the tabel belove will overtax the stove and resulte in increased temperatures in the chimney as well as a lowered efficiency. This may cause damage to both chimney and stove, and the annulment of the warranty. Topdown Lightning of the fire Firewood Length: cm Diameter: max. 10 cm Normal amounth: 3-4 firwood (approx. 2 kg) The following optimal register and fuel quanitty settings are recommended(in case of similar chimney draught): Fuel Quantity [kg] Primary Air open [%] Combustion Air open [%] Nominal Output [kw] Chimney Draught [PA] Efficiency [ i %] Refill interval at nominal output [minuts] 1,2 0 (closed) ca. 80 (almost open) 5, ca
19 Maintenance Like any piece of equipment in daily use, your stove needs maintenance. The stove should only be cleaned when cold. Use a dry cloth for cleaning the exterior of the stove. Clean the interior regularly by removing ashes, soot and tar from the combustion chamber. The smoke deflector plate should be removed for cleaning, as the reverse side will be covered in dirt and soot. Finally check that the smoke pathway through the flue pipe and chimney is completely clear. You should also inspect the rope seals in the door and ash pan for signs of wear. Replace them if they no longer seal properly. Also, remember to lubricate the door hinges as required. Glass pane The glass pane should be cleaned using Varde Glas Cleaner, which is available at all DIY centres selling Varde Ovne stoves. Empty the Ash pan regularly. It can be emptied into your dustbin, as long as you make sure it does not contain any hot embers. If in doubt about how to clean your stove, contact the dealer where you bought your stove, or your chimney sweeper. It is especially important to check the stove and the chimney for blockages after a long period of non-use. The enamelled surface of the stove may wear down in certain places if the stove is overheated. Worn surfaces can, however, be repaired with a special Senotherm spray paint, available from your local dealer. The plates in the combustion chamber are vermiculite plates and will eventually become worn, as will the smoke deflector plate. Accidental breakage of a plate, for instance by hitting it hard with a piece of wood, will not affect the quality of the combustion. You do not need to replace the plate until the gap is 5 mm wide. Only use original parts from Varde Ovne A/S The door is equipped with a spring, which pulls the gate closed. This is a legal requirement in many countries. The spring is fitted to the hinged side of the door but can be removed if you prefer the door not to be spring-loaded. Do not make any unauthorised changes to the stove. All external parts of the stove become hot during use, and you should therefore exercise due caution. IMPORTANT!! Chimney fires Should your chimney catch fire, cut off the air supply to the stove s combustion chamber and contact the emergency service. (The majority of fires die out after the oxygen supply is cut off.) You should subsequently contact your chimney sweeper, who will check your stove and chimney for damage 19
 plate. Make sure the hight of the chimney is correct.")
20 Troubleshooting. Smoke enters the room: Not enough draugh in the chimney. Inspect the smoke pipe or the chimney for blockage. Clean the inside of the stove removing soot from the upper vermiculite / smoke (Deflector) plate. Make sure the hight of the chimney is correct. The glass or the chimney soot up: The wood is too moist. Not enough secondary air is applied to the combustion process. You may have shut off the supply of ignition air too aerly when lightning up the stove. There always have to be clear flames in the combustion chamber. The heat is emitted from the stove: The wood is too moist (all energy goes into drying it) or of a poor quality. Inspect the position of the smoke plate and make sure there is free passage for the smoke. The amount of combustion(secondary air) air is not enough. Combustion is too intense: Gaskets in the door or the ash-pan are no longer tight and need replacement. The chimney draugh is too strong apply a valve in the chimney. Inspect that the ignition air is closed. The Shake grate is stuck: Inspect the grate for jammed wood, nails or the like. Make sure the lever is placed correctly. Recycling Packing The packing is 100% recycleable. Ceramic Glass Ceramic glass tobe deposited at the local recycling center and sorted together with pottery and porcelain. Vermiculite Vermiculite plates from the stove must be returned to the local recycling center. 20
21 Spare Parts If Spare parts at any time should be needed, please chech the list below. Log retainer, Artikel nr.: Top Cover steel Ø165 VO-Logo, Artikel nr.: Door Complete Cast Iron Artikel nr.: Glass, Artikel nr.: Handle Complete, Artikel nr.: Ashpan Complete Black, Artikel nr.: Vermiculite Set, Artikel nr.: Sealing Rope 3 x 8 mm/2,0m, Artikel nr.: Sealing Rope Ø10/2,5 with glue 50 ml, Artikel nr.:
22 22
23 23
24 Warranty All Varde stoves go through a close quality inspection, and we take pride in always delivering products of a consistent quality. This being so, manufacturing faults may still occur, and on these we offer a 5 year warranty. Typos may appear The warranty does not include: wearing parts, such as the Vermiculite plates in the combustions chamber, the smoke plate, glass, gaskets, cast iron bottom and shacking grate. Damages whichs occur as a consequence of misuse, such as overheating, incorrect installation, missing or wrong maintenance etc. (see instructions earlier) Damages caused by external influence of a physical character. Cost of transportation in connection with warranty repairs. Assembling/reassembling in connection with warranty repairs. Compensation for following damages, including damage on other objects. Warranty conditions: These instructions for use are also your proff of warranty. The warranty will not take effect until vendor s stamp, information about model, registration numer and date of purchase (invoice if possible)have been applid below. In case of claims, please bring this proof of warranty to your local vendor. Model: Vendor s stamp and signature Reg.no.: Date of purchase: 24
Varde Fuego. Installation and User guide. Revision 02
 Varde Fuego Installation and User guide Revision 02 1 Congratulation on the purchasing your new stove Varde Ovne A/S is a Danish company specialising in functional, environmentally friendly quality stoves
Varde Uniq. Installation and User guide. Revision 4
 Varde Uniq Installation and User guide Revision 4 1 Congratulation on purchasing your new stove Varde Ovne A/S is a Danish company specializing in functional, environmentally friendly and designed quality
Varde Lyon Varde Nice
 1.th version 17-05-2018 UK Varde Lyon Varde Nice Installation and User Manual Revision 1 Pottemagervej 1, 7100 Vejle, Denmark. www.vardeovne.dk 1 Congratulations on the purchase of your new wood-burning
OPERATING INSTRUCTIONS
 OPERATING INSTRUCTIONS SCANDIA 6304 2015 www.heta.dk UK 1 Congratulations on your new stove. We are sure that you will be happy with your investment, especially if you follow the advice and instructions
ECO-FRIENDLY WOODBURNING STOVES
 ECO-FRIENDLY WOODBURNING STOVES DANISH DESIGN 2018 / 2019 VARDE NICE www.vardeovne.co.uk VARDE ALS warm moments of quality Woodburning stoves from VARDE stand on the stylistic bedrock of Scandinavian design
Installation Instructions
 Installation Instructions C750 C750A www.contura.eu 50 CERTIFICATE EC Declaration of conformity www.contura.eu Manufacturer name address Place of manufacture NIBE AB/NIBE STOVES Box 134, Skulptörvägen
Installation Instructions
 Installation Instructions C 710 www.contura.eu 50 CERTIFICATE Declaration of performance according to Regulation (EU) 305/2011 No. C710-CPR-160329-SE-1 PRODUCT Product type Stove lit with solid biofuels
Mod. MONTANA WOOD BURNING STOVE USAGE AND MAINTENANCE INSTRUCTIONS
 Mod. MONTANA WOOD BURNING STOVE USAGE AND MAINTENANCE INSTRUCTIONS Nutrients Ashes Fertilizer Wood: an ecological fuel Wood is a renewable source of energy which answers the energy and environmental demands
Aduro 6 / Aduro 6-5 / Aduro 6SK
 Aduro 6 / Aduro 6-5 / Aduro 6SK User Manual Ecolabel - Sintef 110-0283 - EN 13240 www.aduro.dk Good luck with your new wood burning stove! In order to get the best possible pleasure and benefit from your
Installation Instructions
 Installation Instructions C 880 www.contura.eu 50 CERTIFICATE EC Declaration of conformity www.contura.eu Manufacturer name address Place of manufacture NIBE AB/NIBE STOVES Box 134, Skulptörvägen, SE-285
ECO-FRIENDLY WOOD-BURNING STOVES
 ECO-FRIENDLY WOOD-BURNING STOVES DANISH DESIGN 2017 / 2018 VARDE ALS www.vardeovne.co.uk warm moments of quality VARDE UNIQ 1 Wood-burning stoves from VARDE stand on the stylistic bedrock of Scandinavian
Asgård 3 / Asgård 4 / Asgård 6
 Asgård 3 / Asgård 4 / Asgård 6 User Manual Ecolabel - Sintef 110-0227 - EN 13240 www.aduro.dk Good luck with your new wood burning stove! In order to get the best possible pleasure and benefit from your
Installation Instructions
 Installation Instructions C810 www.contura.eu 50 CERTIFICATE Declaration of performance according to Regulation (EU) 305/2011 No. C810-CPR-130610-SE-1 PRODUCT Product type Stove lit with solid biofuels
Installation Instructions
 Installation Instructions C 780 www.contura.eu 50 CERTIFICATE PERFORMANCE DECLARATION No. C780-CPR-130612-SE-1 PRODUCT Product type Stove lit with solid biofuels Type designation Contura 780 Manufacturing
Aduro 10. User Manual. Ecolabel - Sintef EN Version 2
 Aduro 10 User Manual Ecolabel - Sintef 110-0234 - EN 13240 www.aduro.dk Version 2 Congratulations with your new wood burning stove! In order to get the best possible pleasure and benefit from your new
Asgård 7F User Manual Ecolabel - Sintef EN
 Asgård 7F User Manual Ecolabel - Sintef 110-0234 - EN 13240 www.aduro.dk Version 1 Good luck with your new wood burning stove! In order to get the best possible pleasure and benefit from your new Asgård
HARVIA IRON STOVE Instructions for installation and use
 HARVIA IRON STOVE EN Instructions for installation and use Harvia 10 08012014VTT Congratulations on a good choice of fireplace and thank you for your confidence in Harvia s products. Read these instructions
Installation Instructions
 Installation Instructions C 556 www.contura.eu 50 CERTIFICATE PERFORMANCE DECLARATION No. C556-CPR-130601-SE-2 PRODUCT Product type Stove lit with solid biofuels Type designation Contura 556 Manufacturing
ECO-FRIENDLY WOOD-BURNING STOVES OF DANISH DESIGN
 2014/201 ECO-FRIENDLY WOOD-BURNING STOVES OF DANISH DESIGN THE NEW APP FROM VARDE SEE THE STOVE IN YOUR HOME BEFORE YOU BUY IT! At VARDE, we know that the right woodburning stove requires the best location
Mounting and User Instructions. Lotus-Living-Series Stoves. Version 1,
 Mounting and User Instructions Lotus-Living-Series Stoves Version 1, 10-10-2012 Introduction Congratulations on your new Lotus Wood Stove We sincerely trust that your Lotus Wood Stove will bring many
ECO-FRIENDLY WOOD-BURNING STOVES
 ECO-FRIENDLY WOOD-BURNING STOVES DANISH DESIGN 2016 / 2017 VARDE CARDIFF www.vardeovne.co.uk VARDE SAMSØ warm moments of quality DESIGN QUALITY ENVIRONMENTALLY FRIENDLY SUPPORT For us, outstanding design
Installation Instructions
 Installation Instructions For use in and IE only C i4 FS www.contura.eu 2 CERTIFICATE DECLARATION OF PERFORMANCE No. Ci4FS-CPR-130619-SE-1 PRODUCT Product type Type designation Manufacturing number Intended
Installation and Operating. Instructions. Multifuel Stove. Salamander. Model Lighting a solid fuel fire. 6.5 De-ashing the stove
 Installation and Operating Instructions Salamander Model 0901 Multifuel Stove Section Contents Page 1 Important information about installing and 3 using the Salamander stove 2 Unpacking the Salamander
Saltfire ST1 INSTALLATION AND OPERATING INSTRUCTIONS.
 Saltfire ST1 INSTALLATION AND OPERATING INSTRUCTIONS. INTRODUCTION SAFETY Safety is the most important consideration when using and installing your stove. If not installed and used correctly, a house fire
Installation instruction
 Installation instruction C 35T-Low www.contura.eu 82 CERTIFICATE PERFORMANCE DECLARATION No. C35TL-CPR-130618-SE-1 PRODUCT Product type Type designation Manufacturing number Intended area of use Fuel Stove
Mounting and User Instructions Lotus M Series Stoves
 Mounting and User Instructions Lotus M Series Stoves (Lotus M1, M2, M3, M4 and M2ST) Version 2, 31.08.2010 Introduction Congratulations on your new Lotus Wood Stove We sincerely trust that your Lotus
Installation instruction
 Installation instruction C 550 www.contura.eu 66 CERTIFICATE PERFORMANCE DECLARATION No. C550-CPR-130601-SE-1 PRODUCT Product type Stove lit with solid biofuels Type designation Contura 550 Manufacturing
17500 VRANJE, SRBIJA Radnička 1, Tel.: 017/ INSTRUCTIONS FOR INSTALLATION, ADJUSTMENT AND USE
 17500 VRANJE, SRBIJA Radnička 1, Tel.: 017/421-121 STOVE OF THICK METAL SHEETS PREMIJER PREMIJER K INSTRUCTIONS FOR INSTALLATION, ADJUSTMENT AND USE 1.Technical data about continuously burning stove of
made by made by NEW UK 17/18
 NEW made by A true Viking Raw strength and strong family ties are classic symbols of the Scandinavian Vikings. These symbols also provide the foundation for our WIKING stoves, which radiate high quality
Installation instruction
 Installation instruction C 560T www.contura.eu 66 CERTIFICATE EC Declaration of conformity Manufacturer name address Place of manufacture NIBE AB / Contura Box 134, Skulptörvägen 10, SE-285 23 Markaryd
Saltfire ST4 INSTALLATION AND OPERATING INSTRUCTIONS.
 Saltfire ST4 INSTALLATION AND OPERATING INSTRUCTIONS. INTRODUCTION SAFETY Safety is the most important consideration when using and installing your stove. If not installed and used correctly, a house fire
Mounting and User Instructions. Lotus-Prestige Series Stoves. (Lotus Prestige, Prestige S) Version 2, 23/
 Version 2, 23/") Mounting and User Instructions Lotus-Prestige Series Stoves (Lotus Prestige, Prestige S) Version 2, 23/08-2014 Introduction Congratulations on your new Lotus Wood Stove We sincerely trust that your Lotus
Mounting and User Instructions Lotus-Prestige Series Stoves (Lotus Prestige, Prestige S) Version 2, 23/08-2014 Introduction Congratulations on your new Lotus Wood Stove We sincerely trust that your Lotus
How to use a multi fuel stove
 How to use a multi fuel stove Important!! When lighting the stove for the first time only a small fire should be lit. Too hot a fire will result in the paint emitting smoke - not necessarily bad but unpleasant.
Installation instruction
 Installation instruction Ci51 116 FACTS Technical specifications Model i51 Log box (option) Output 6-11 kw Nominal output 8 kw Efficiency 80 % Weight (kg) 215 50 Powerstone (option): + 100 kg Width (mm)
Installation and Operating Instructions
 Installation and Operating Instructions Wood-burning Stove Model: Ottawa 5kw INTRODUCTION Wood-burning Stove Item No.: Ottawa 5kw curve SAFETY Safety is the most important consideration when using and
Mounting and User Instructions Lotus QM Series Stoves
 Mounting and User Instructions Lotus QM Series Stoves (Lotus QM1, QM2) Version 2, 06/09-2014 Introduction Congratulations on your new Lotus Wood Stove We sincerely trust that your Lotus Wood Stove will
USAGE AND MAINTENANCE MANUAL FOR A SOLID FUEL STOVE
 PREDUZEĆE ZA PROIZVODNJU, PROJEKTOVANJE I PROMET BELOŠEVAC BB, 14000 VALJEVO, SRBIJA USAGE AND MAINTENANCE MANUAL FOR A SOLID FUEL STOVE DEAR CUSTOMER, Congratulations on your purchase of BLIST solid fuel
Dear Viking-customer,
 1 Dear Viking-customer, Congratulations on your excellent choice of Viking 30, Sweden s most sold wood-burning cooker. Your new Viking 30 with its timeless design is an efficient source of heat with more
OPERATING INSTRUCTIONS
 OPERATING INSTRUCTIONS SCAN-LINE 550 INSET STOVE www.heta.dk UK 1 2 tended to ensure that the materials used are of good quality, that the stove does not adversely affect the environment, and hat it is
Installation instructions
 Installation instructions C 790T www.contura.eu 82 CERTIFICATE PERFORMANCE DECLARATION No. C790T-CPR-130612-SE-1 PRODUCT Product type Type designation Manufacturing number Intended area of use Fuel Stove
SOLID FUEL STOVE ELITA and ELITA II
 17500 VRANJE, SERBIA Radnicka 1, tel.: 017 421 121 SOLID FUEL STOVE ELITA and ELITA II INSTRUCTIONS FOR INSTALLATION AND USE GENERAL DATA Generally it is necessary to adhere to the construction rules and
Installation and Operating Instructions
 Installation and Operating Instructions Wood-burning Stove Model: Ottawa 7kw INTRODUCTION Wood-burning Stove Item No.: Ottawa 7kw SAFETY Safety is the most important consideration when using and installing
Installation instruction
 NO DK FR NL Installation instruction 2 Installasjonsanvisning 17 Monteringsvejledning 33 Guide d installation 49 Installatie instructies 65 Installation instruction C850W contura.eu 2 CERTIFICATE Declaration
Installation Instructions
 Installation Instructions For use in GB and IE only C i4 www.contura.eu 82 CERTIFICATE EC Declaration of conformity www.contura.eu Manufacturer name address Place of manufacture NIBE AB/Contura Box 134,
Installation instruction
 Installation instruction C 35T www.contura.eu 82 CERTIFICATE PERFORMANCE DECLARATION No. C35T-CPR-130618-SE-1 PRODUCT Product type Type designation Manufacturing number Intended area of use Fuel Stove
Reference: Ottawa 12kw Operating Instructions Version 1 04/06/15. Installation and Operating Instructions
 Reference: Ottawa 12kw Operating Instructions Version 1 04/06/15 Installation and Operating Instructions Wood-burning Stove Model: Ottawa 12kw Size: W580XD410XH610MM 1 INTRODUCTION Wood-burning Stove Item
Installation instructions
 Installation instructions C 34T www.contura.eu 66 CERTIFICATE PERFORMANCE DECLARATION No. C34T-CPR-130618-SE-1 PRODUCT Product type Type designation Manufacturing number Intended area of use Fuel Stove
IN THE EVENT OF CHIMNEY FIRE, EVACUATE THE PROPERTY AND CALL THE EMERGENCY SERVICES.
 Ekol Clarity 12 INSTALLATION AND OPERATING INSTRUCTIONS. INTRODUCTION SAFETY Safety is the most important consideration when using and installing your stove. If not installed and used correctly, a house
User and mounting manual. Stove models: TT10 + TT10S + TT10H + TT10HS + TT10G
 User and mounting manual Stove models: TT10 + TT10S + TT10H + TT10HS + TT10G CE approved according to: DS/EN13240 DS (Danish Standard), DIN (Deutsche Industrienorm), SINTEF (Norwegian Standard) and 15A
ASSEMBLY- AND INSTRUCTIONS FOR USE. Scan Congratulations on your new Scan wood-burning stove
 ASSEMBLY- AND INSTRUCTIONS FOR USE Scan 56-1 Scan 56-2 Scan 56-3 Congratulations on your new Scan wood-burning stove You have purchased a product by one of Europe s leading manufacturer s of wood-burning
User s manual. Titan. Ch. Leibfried GmbH An der Bundesstraße Haren/Ems Germany Tel: +49(0)
") User s manual Titan Ch. Leibfried GmbH An der Bundesstraße 2 49733 Haren/Ems Germany Tel: +49(0)5932-7334784 info@globe-fire.de - Globe fire Globefire Ch.Leibfried GmbH, An der Bundesstraße 2, D-49733
User s manual Titan Ch. Leibfried GmbH An der Bundesstraße 2 49733 Haren/Ems Germany Tel: +49(0)5932-7334784 info@globe-fire.de - Globe fire Globefire Ch.Leibfried GmbH, An der Bundesstraße 2, D-49733
IN THE EVENT OF CHIMNEY FIRE, EVACUATE THE PROPERTY AND CALL THE EMERGENCY SERVICES.
 EKOL INSET 8 INSTALLATION AND OPERATING INSTRUCTIONS INTRODUCTION. SAFETY Safety is the most important consideration when using and installing your stove. If not installed and used correctly, a house fire
Mounting and User Instructions. Lotus-Liva. Lotus Liva 5, Liva 5G, Liva 6, Liva 6G, Liva 7G, Liva 8G. Version 2 02/
 Mounting and User Instructions Lotus-Liva Lotus Liva 5, Liva 5G, Liva 6, Liva 6G, Liva 7G, Liva 8G Version 2 02/08-2016 Introduction Congratulations on your new Lotus Wood Stove We sincerely trust that
General Information. Construction of the stove. Top or rear outlet of gases
 General Information WARNING! To avoid the fire hazard, the device must be installed in accordance with the applicable standards and technical regulations, which are mentioned in the further part of the
ASSEMBLY- AND INSTRUCTIONS FOR USE. Congratulations on your new Scan wood-burning stove
 ASSEMBLY- AND INSTRUCTIONS FOR USE Scan 50-8 Congratulations on your new Scan wood-burning stove You have purchased a product by one of Europe s leading manufacturer s of wood-burning stoves, and we are
MULTI-FUEL STOVE INSTALLATION AND USER INSTRUCTIONS
 PRIORY MULTI-FUEL STOVE INSTALLATION AND USER INSTRUCTIONS The Priory stove has a nominal heat output of 8Kw. and a weight of 80 kg. The flue gas mass flow is 5.4g/s for mineral fuel and 6.3g/s for wood
Alma Mons EN Owners s manual INSTALATION, ADJUSTMENT AND OPERATING INSTRUCTION
 Alma Mons Owners s manual INSTALATION, ADJUSTMENT AND OPERATING INSTRUCTION EN 12815 1 INTRODUCTION Congratulations! You have invested in energy efficient and high quality product-alma Mons wood burning
User s manual. An der Bundesstraße Haren/Ems Germany Tel. +49(0) LUNA III H
 LUNA III H") User s manual An der Bundesstraße 2 49733 Haren/Ems Germany Tel. +49(0)5932-7334784 info@globe-fire.de LUNA III H Type Capacity Tested capacity Fuel Test-Nr. Globefire Ch.Leibfried GmbH, An der Bundesstraße
User s manual An der Bundesstraße 2 49733 Haren/Ems Germany Tel. +49(0)5932-7334784 info@globe-fire.de LUNA III H Type Capacity Tested capacity Fuel Test-Nr. Globefire Ch.Leibfried GmbH, An der Bundesstraße
Aduro 15 & Brugsvejledning Bedienungsanleitung User Manual Eldningsinstruktion Mode d emploi. Ecolabel - EN 13240
 Aduro 15 & 15-1 Brugsvejledning Bedienungsanleitung User Manual Eldningsinstruktion Mode d emploi Ecolabel - EN 13240 www.aduro.dk / www.aduro.no / www.adurofire.de / www.aduro.fr Version 1 English Congratulation
O P E R A T I O N AND INST A L L A T I O N M A N U A L
 O P E R A T I O N AND INST A L L A T I O N M A N U A L OPUS TEMPO FIRED BY DESIGN Contents Disposal of packaging 3 Introduction 3 1 Description 3 2 General 3 3 Installation of the Stove 4 3.1 Flue pipe
EC Declaration of conformity
 66 CERTIFICATE EC Declaration of conformity www.contura.eu Manufacturer name address Place of manufacture NIBE AB / Contura Box 134, Skulptörvägen, SE-285 23 Markaryd Markaryd, Sweden PrODuct Product type
WIKING Mini 2. Installation and User Instructions /
 WIKING Mini 2 GB Installation and User Instructions...8 20.11.2017 / 53-0772 A B 2 C D1 3 D2 D3 4 Contents Figures... 2 Welcome... 6 For UK -The Clean Air Act 1993 and Smoke Control Areas... 7 Installation
WESTFIRE WF SERIES ONE & TWO
 WF series one & Two INSTALLATION MANUAL AND OPERATING INSTRUCTIONS 1 the art of danish engineering Westfire WF SERIES ONE Westfire WF SERIES TWO WF series ONE & Two This manual refers to the stove type
Bloomsbury SE SMOKE EXEMPT WOODBURNING STOVE INSTALLATION & USER INSTRUCTIONS (TO BE LEFT WITH THE CUSTOMER) UK & IRELAND GUARANTEE
 UK & IRELAND GUARANTEE") 9/11 (PP) GUARANTEE CONDITIONS OF GUARANTEE Your ACQUISITIONS stove is guaranteed against defects arising from faulty manufacture for one year subject to the following express conditions. Failure to comply
9/11 (PP) GUARANTEE CONDITIONS OF GUARANTEE Your ACQUISITIONS stove is guaranteed against defects arising from faulty manufacture for one year subject to the following express conditions. Failure to comply
Inserts. Model 100, 200. Installation instructions Care and firing instructions
 Inserts Model 100, 200 Installation instructions Care and firing instructions TABLE OF CONTENTS CERTIFICATE...2 GENERAL...3 IMPORTANT POINTS...3 PREREQUISTES...4 Building notice Flue Combustion air Standard
DIANA EN Owners s manual INSTALATION, ADJUSTMENT AND OPERATING INSTRUCTION. Available in ceramic and metalsheet version.
 DIANA Owners s manual INSTALATION, ADJUSTMENT AND OPERATING INSTRUCTION Available in ceramic and metalsheet version. EN 13240 1 INTRODUCTION Congratulations! You have invested in energy efficient and high
APPENDIX TO THE INSTALLATION AND OPERATING MANUAL OF STOVEMAN SAUNA STOVE
 APPENDIX TO THE INSTALLATION AND OPERATING MANUAL OF STOVEMAN SAUNA STOVE Technical data of the sauna stove Sauna stove type Stoveman 16 Model Stoveman 16 Nominal heat capacity, i.e. ability to 17 kw heat
User s manual. Eros I. An der Bundesstraße Haren/Ems Germany Tel. +49(0)
") User s manual Eros I An der Bundesstraße 2 49733 Haren/Ems Germany Tel. +49(0)5932-7334784 info@globe-fire.de Congratulations with your new Globe Fire stove Cast iron stoves have a long tradition. Our
User s manual Eros I An der Bundesstraße 2 49733 Haren/Ems Germany Tel. +49(0)5932-7334784 info@globe-fire.de Congratulations with your new Globe Fire stove Cast iron stoves have a long tradition. Our
Installation Instructions
 Installation Instructions For use in GB and IE only C i4 www.contura.eu 102 CERTIFICATE Declaration of performance according to Regulation (EU) 305/2011 No. Ci4-CPR-130619-SE-1 PRODUCT Product type Type
SIMPLY SOME OF THE FINEST STOVES AVAILABLE
 Carron stoves Few things in life give such simple pleasure as the warmth and character a real burning stove brings to a home. Both classic in design and extremely practical, a Carron stove is an efficient
Norvik 5 Multi-fuel stove 80% Efficient
 Installation & Operating Instruction Norvik 5 Multi-fuel stove 80% Efficient This stove is designed for intermittent use and is tested and manufactured as a closed multi-fuel appliance. Cast Tec recommend
User's Manual /
 User's Manual GB 4510 4520 4530 4540 4550 4560 05.09.2017 / 97-9687 www.hwam.com 2 Table of contents, English Drawings... 4-8 For UK - The Clean Air Act 1993 and Smoke Control Areas...9 Installation......................................................
Installation and Operating Instructions. Ottawa 12kw
 Installation and Operating Instructions Ottawa 12kw 1 Wood-burning Stove Model: Ottawa 12kw Size: W580XD410XH610MM INTRODUCTION Wood-burning Stove Item No.: Ottawa 12.3kw Size: W580XD410XH610MM SAFETY
Installation instruction
 Installation instruction C 580 C 585 www.contura.eu 50 CERTIFICATE EC Declaration of conformity Manufacturer name address Place of manufacture NIBE AB / Contura Box 134, Skulptörvägen 10, SE-285 23 Markaryd
HEAT, LIFE AND ATMOSPHERE
 2017 HEAT, LIFE AND ATMOSPHERE A real fire is a beautiful and romantic source of heat which creates a warm, cosy atmosphere. There is nothing quite like settling down and watching the flames flickering
Installation Instructions. Woolly Mammoth Stoves Albert Road, Braintree, Essex, CM7 3JQ
 Installation Instructions Woolly Mammoth Stoves 20-28 Albert Road, Braintree, Essex, CM7 3JQ INSTALLATION INSTRUCTIONS TO BE READ IN CONJUNCTION WITH THOSE IN THE INSTRUCTION BOOKLET These instructions
Saltfire ST-X5 INSTALLATION AND OPERATING INSTRUCTIONS
 Saltfire ST-X5 INSTALLATION AND OPERATING INSTRUCTIONS INTRODUCTION SAFETY Safety is the most important consideration when using and installing your stove. If not installed and used correctly, a house
OPERATION AND INSTALLATION MANUA L OPUS TEMPO
 OPERATION AND INSTALLATION MANUA L OPUS TEMPO 0 FIRED BY DESIGN 1 Contents Disposal of packaging 4 Introduction 4 1 Description 4 2 General 4 3 Installation of the Stove 5 3.1 Flue pipe connection 5 3.2
Saltfire ST2 INSTALLATION AND OPERATING INSTRUCTIONS.
 Saltfire ST2 INSTALLATION AND OPERATING INSTRUCTIONS. INTRODUCTION SAFETY Safety is the most important consideration when using and installing your stove. If not installed and used correctly, a house fire
Installation and Operating Instructions
 Installation and Operating Instructions Multi-Fuel Stove Model - Purefire 5kw Curve Approved under (Ottawa 5kw Curve SE01) SE01, version 5, 26/02/2016 INTRODUCTION Multi-Fuel Stove Model Purefire 5kw Curve
Installation & User Manual EW5000 Outdoor Cooking Fire
 Installation & User Manual EW5000 Outdoor Cooking Fire IMPORTANT: Please read this manual before installing and using the ESCEA EW5000 Cooking fire. Failure to follow these instructions may lead to a possible
CONTENTS. INSTALLATION INSTRUCTIONS Building regulations 4 Positioning and Clearances 4 Chimney 4 Flue connection 5 Problem solving 6 PRODUCT DATA
 PRODUCT DATA MODEL WEIGHT NOMINAL HEAT OUTPUT FB1 DS 80KG 6KWs CONTENTS OPERATING INSTRUCTIONS Lighting the fire 2 Firebox linings and baffle 2 Wood burning tips & theory 2 Running temperatures 3 Cleaning
WESTFIRE WF ONE SERIES
 WF one series UK: INSTALLATION MANUAL AND OPERATING INSTRUCTIONS 1 dansk ingeniørkunst WF ONE SERIES This manual refers to the stove type listed above, which has been tested in accordance with EN13240.
Saltfire ST3 INSTALLATION AND OPERATING INSTRUCTIONS.
 Saltfire ST3 INSTALLATION AND OPERATING INSTRUCTIONS. INTRODUCTION SAFETY Safety is the most important consideration when using and installing your stove. If not installed and used correctly, a house fire
OPERATION AND INSTALLATION MANUAL OPUS TRIO FIRED BY DESIGN
 OPERATION AND INSTALLATION MANUAL OPUS TRIO FIRED BY DESIGN Contents Disposal of packaging 3 Introduction 4 1. Description 4 2. General 5 3. Installation of the Stove and the flue pipe connection 5 3.1.
User's Manual /
 User's Manual EN 4530 4540 4550 4560 08.11.2016 / 97-9688 www.hwam.com Table of contents, English Drawings... 4-8 HWAM Autopilot IHS TM...9 Installation........................................................
NOTHING WARMS BETTER THAN A VARDE STOVE
 NOTHING WARMS BETTER THAN A VARDE STOVE 2011-2012 We have a burning passion... For the people who work here, Varde Ovne is first and foremost a good workplace, where we strive to create a warm focus for
ASSEMBLY- AND INSTRUCTIONS MANUAL. Scan Congratulations on your new Scan wood-burning stove
 ASSEMBLY- AND INSTRUCTIONS MANUAL Scan 56-1 Scan 56-2 Scan 56-3 Congratulations on your new Scan wood-burning stove You have purchased a product by one of Europe s leading manufacturer s of wood-burning
Instructions for installation and use series. Design Monica Ritterband AS/NZS 4012/4013 (1999)
") Instructions for installation and use 7600 series Design Monica Ritterband AS/NZS 4012/4013 (1999) Read this entire manual before you install and use your new room heater. If this room heater is not properly
Instructions for installation and use 7600 series Design Monica Ritterband AS/NZS 4012/4013 (1999) Read this entire manual before you install and use your new room heater. If this room heater is not properly
Instructions for installation and use S MORSØ JERNSTØBERI A/S. DK-7900 NYKØBING MORS Website:
 Instructions for installation and use S80-90 EN 13240 SINTEF 110-0352 MORSØ JERNSTØBERI A/S. DK-7900 NYKØBING MORS E-Mail: stoves@morsoe.com Website: www.morsoe.com 21 Enjoy your new Morsø stove! Morsø,
PS Model INSTALLATION AND OPERATION MANUAL FOR WOOD-BURNING SAUNA STOVES
 PS Model INSTALLATION AND OPERATION MANUAL FOR WOOD-BURNING SAUNA STOVES EN 15821:2011 GBGB Please carefully consider the capacity of the sauna stove. Low heating efficiency results in having to heat the
This booklet applies to following Westfire stoves WF UNIQ 4 / WF4 WF UNIQ 18 /WF 18 WF UNIQ 16 /WF16 WF UNIQ 23 /WF 23 WF UNIQ 32 /WF32
 SUPPLEMENTARY INSTALLATION INSTRUCTIONS FOR THE UK MARKET TO BE READ IN CONJUNCTION WITH THOSE IN THE WESTFIRE INSTRUCTION INDIVIDUAL INSTRUCTION BOOKLETS This booklet applies to following Westfire stoves
HEAT, LIFE AND ATMOSPHERE
 2018 HEAT, LIFE AND ATMOSPHERE A real fire is a beautiful and romantic source of heat which creates a warm, cosy atmosphere. There is nothing quite like settling down and watching the flames flickering
INSTRUCTIONS FOR INSTALLATION, USE AND MAINTENANCE YSEN
 INSTRUCTIONS FOR INSTALLATION, USE AND MAINTENANCE YSEN READ THE INSTRUCTION BOOKLET AND THESE SUPPLEMENTARY INSTRUCTIONS CAREFULLY BEFORE INSTALLATION These instructions together with those in the instruction
Harrie Leenders Fuga el - Instructions for Installation, Use and Maintenance INSTRUCTIONS FOR INSTALLATION, USE AND MAINTENANCE
 INSTRUCTIONS FOR INSTALLATION, USE AND MAINTENANCE FUGA el 1 2 1. Flue 2. Case 3. Ceramic glass 4. Aeration slide 5. Convection fins 6. Door handle 7. Base 3 4 READ THE INSTRUCTION BOOKLET AND THESE SUPPLEMENTARY
125SE SMOKE EXEMPT WOODBURNING STOVE INSTALLATION & USER INSTRUCTIONS (TO BE LEFT WITH THE CUSTOMER) UK & Ireland GB IE GUARANTEE
 UK & Ireland GB IE GUARANTEE") 12/09 GUARANTEE Conditions of Guarantee Your ESSE stove is guaranteed against defects arising from faulty manufacture for one year subject to the following express conditions. Failure to comply with these
12/09 GUARANTEE Conditions of Guarantee Your ESSE stove is guaranteed against defects arising from faulty manufacture for one year subject to the following express conditions. Failure to comply with these
Assembly and User Instructions Fireplace Inserts, Lotus H470-H570
 Assembly and User Instructions Fireplace Inserts, Lotus H470-H570 Version 6, 3-1-2012 Introduction Congratulations on your new Lotus Fireplace Insert We hope and believe that it will give you many a warm
Lighting Instructions
 SE DE NO FR GB DK FI IT NL Eldningsinstruktion 2 Heizinstruktionen 6 Fyringsinstruksjon 10 Instructions d allumage 14 Lighting Instructions 18 Fyringsvejledning 22 Lämmitysohjeet 26 Istruzioni per l accensione
EKOL CRYSTAL-8 INSTALLATION AND OPERATING INSTRUCTIONS
 EKOL CRYSTAL-8 INSTALLATION AND OPERATING INSTRUCTIONS INTRODUCTION SAFETY Safety is the most important consideration when using and installing your stove. If not installed and used correctly, a house
SIMPLY SOME OF THE FINEST STOVES AVAILABLE
 Carron stoves Few things in life give such simple pleasure as the warmth and character a real wood burning stove brings to a home. Both classic in design and extremely practical, a Carron stove is an efficient