Glammbox Crea7ion.E. GlammFire. Crea7ion by GlammFire. GlammFire
|
|
|
- Godwin Johnathan Weaver
- 5 years ago
- Views:
Transcription

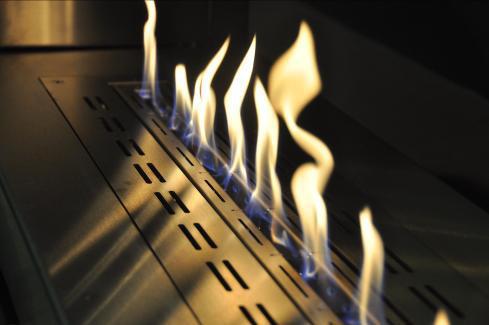
1 Crea7ion by Wall Mounted Fireplaces// Glammbox 420 Glammbox 420 DF Glammbox 450 Glammbox 450 DF Glammbox 770 Glammbox 770 DF Glammbox 1150 Glammbox 1150 DF Glammbox 1600 Glammbox 1600 DF Glammbox 2150 Glammbox 2150 DF Ignition Mode// Electronic Remote Control OP. Finishings// Painted Black - Black Mirror Crea7ion By The line of perfection It is designed to emphasize the unique and continuous expressions of the flame. Crea7ion is an electronic system with an innovative technology, which stand out its simple design, practical functionality and low consumption. Its structure and solidity ensure a perfectly safe and linear flame, while its ecological character keeps a respecting commitment to the environment, contributing to a pleasant comfort and well-being. Crea7ion can be integrated into virtually any environment or directly in different types of structures (eg.: furniture or masonry). A system totally safe for projects led by architects, decorators and interior designers. Control the pleasure of your fire.


2

3 Options 420/Stainless Steel OP. Finishings// Painted Black - Black Mirror 420 DF/Stainless Steel OP. Finishings// Painted Black 450/Stainless Steel OP. Finishings// Painted Black - Black Mirror 450 DF/Stainless Steel OP. Finishings// Painted Black


4 770/Stainless Steel OP. Finishings// Painted Black - Black Mirror 770 DF/Stainless Steel OP. Finishings// Painted Black 1150/Stainless Steel OP. Finishings// Painted Black - Black Mirror 1150 DF/Stainless Steel OP. Finishings// Painted Black

5 1600/Stainless Steel OP. Finishings// Painted Black - Black Mirror 1600 DF/Stainless Steel OP. Finishings// Painted Black 2150/Stainless Steel OP. Finishings// Painted Black - Black Mirror 2150 DF/Stainless Steel OP. Finishings// Painted Black

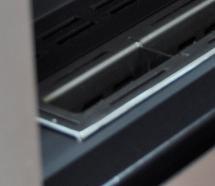
6 Material Supplied 1. Model «GlammBox CREA7ION.E» 2. Mug; 3. Funnel; 4. Lighter; 5. Hex Key; 6. CO Detector; 7. Protective rim for finishing Wall Components Fireplace; 2. Tank access door; 3. Combustion fire line; 4. Protection glass; 5. Control valve access door; 6. Lateral part 7. Tank; 8. Control valve
7 Installation In order to ensure a safety margin with respect to the ground, it is recommended a minimum distance of 400 mm between the floor and the top of the combustion fire line; The surface on you want to install the burner should be as level as possible. Dimensions: Ensure the hole where you want to place the burner has the following minimum dimensions, as shown in the figure below: GlammBox X Y Z GlammBox X Y Z DF DF DF DF DF DF
8 Flammable materials Do not place flammable materials near the fireplace, within 1m; Racks or shelves should be distant: From fireplaces: 500 mm; From combustion fire lines: 1000 mm; Materials: stone/metal/ceramics A mm; B mm; C mm; Other non-flammable materials A mm; B mm; C mm;
9 Installation Procedures Very Important: We recommend extreme caution when unpacking your fireplace. Carefully remove the glass from the box Fireplace; 2. Control valve access door; 3. Protection glass; 4. Side cover access control valve; 5. Tank access door; 2 3 The fireplace allow you to choose the side by which you want to access to the valve. Thus and by default, the access door is located on the front of the fireplace, however you have the possibility of removing the cover (4) and put the door (2) according to the desired configuration.
, accessing to the tank access door(5).")

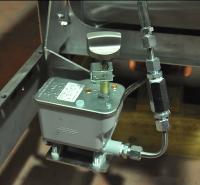
10 Insert the supplied batteries into the remote control and electronic controller located on the left side of the fireplace (A), accessing to the tank access door(5). A Very Important: Before starting the assembly of your fireplace, do not forget to put first the base of the supports for the glass. Screw C in B using the key D. B C D
11 Place the fireplace into the hole previously made (E). Ensure that the fireplace is perfectly level and balanced. If necessary use the fireplace tab holes to get the perfect wall mounting. Make sure your fireplace is level. Choose the type of fastener suitable for the wall material and proceed to the drilling. Tighten the fireplace to the wall properly. Check the stability and levelling. Make adjustments if necessary. E Then apply the plasterboard (F). Do not forget to leave a hole to the control valve access door. F
12 To make the fixing of glass you should: Place (H) in (I) and screw (J) in order to fix the glass (K). To screw (J), use the supplied key (hex key) (L) G I H J K L
13 Place the control valve access door. The depth of the door is adjustable depending on the thickness of the wall finishing (M). M If you need to remove the combustion fire line unscrew the 4 screws(n). N
14 Then unscrew the nut (O). O
15 Installation Procedures for fireplace with "Protective rim for finishing wall" accessorie If your fireplace has the option of "Protective rim for finishing wall" accessorie, before make the installation step, described on page 10, screwing the rim (N) on fireplace, point the screw (O), put the washer (Q) and tighten the nut (P). Q P O
16 Ensure that there are 15 mm available for application of Plasterboard/ Wall finishing (S) after place your fireplace on wall (R). R
17 S
18 Put the wall finishing (e.g.: plasterboard) (T). T


19 After the placement of wall finish the mounting gets the aspect that can be seen in (U)(V). After this step return to page 12 and make the assembly step described. U V
20 Operation Instructions Filling the tank To make the filling of the tank open the tank access door (W) that turns inside the fireplace. Y Z X W AA Attention!!! Before moving the tank to make the filling, unlock it, turning the handle (X) as shown in the figure (AA). Then turn the tank to the outside of the fireplace, using the handle. Open the tank and fill it using the funnel and mug provided. Control the filling thought the fuel sight level. Important Note: Never make the filling when the combustion fire line is burning, nor even if it is warm. If the combustion fire line of fire is hot, please wait for 20 to 30 minutes.
 and close the tank access door (W).")
21 After completing the filling, close the tank, turning it to the inside of the fireplace and leaving it in its initial position. Lock the handle as shown in the figure (BB) and close the tank access door (W). Y Z X W BB
22 Ignition Light the fireplace: Press A1 + B1 simultaneously After a few seconds will be issue multiple beeps and then it will happen a discharge that will cause the deflagration of the flame. If the deflagration does not occur, make another attempt. If bioethanol is too cold it will be necessary to light using the lighter supplied. For security reasons it is not possible to light the fireplace when combustion fire line is hot, you will need to wait about 20 to 30 minutes. Flame regulation: A1 to increase, C1 to decrease. Switch off: Press B1 After cutting flame may remain small residual flames at the point of fuel inlet for approximately 2 to 10 minutes. At the end of that time the flame becomes extinct completely. A1 B1 C1
23 Ignition in case of electronic part failure Ignite the fire: Rotate knob D1 counter clockwise (+), after a few seconds ignite with the lighter supplied, once you verify that there is bio-ethanol in the combustion fire line. Flame regulation: (-) to decrease, (+) to increase Switch off: Rotate knob D1 clockwise. Once switched off residual flame near the fuel inlets may remain for approximately 2 to 10 minutes. Afterwards the flame becomes completely extinct. D E1 F1 - +
24 Levelling of combustion fire line If the flame does not occupy the entire opening will be necessary to level the combustion fire line. Lack of flame on the left: Turn the screw (E) clockwise to clockwise. Parallel turn the screw (E) counter clockwise. Lack of flame on the right side: Turn the screw (E) clockwise to clockwise. Parallel turn the right screw (E) counter clockwise. Repeat the procedure described till to get a uniform flame. Use the key (H1) to perform the entire procedure. E H1
25 Specifications GlammBox Combustion Fireline(mm) Capacity (litres) Autonomy (hours) Thermal Output (Kw) Area Heating (m²) DF :30 1, DF DF DF DF DF , , :20 6, : Please consider the information provided above as indicative and that it may vary depending on model, installation, bioethanol used and weather conditions.
26 Overall dimensions Dimensions (mm) GlammBox A B C D E F G DF DF DF DF DF DF 365 *dimension in millimetres PT04606-A
Fogly. GlammFire. GlammFire. Materials// Rusted Corten Steel. Options// Finishings// Lacquered Steel. Accessories// Black Glass Mirror
 Materials// Rusted Corten Steel Options// Finishings// Lacquered Steel Accessories// Black Glass Mirror Crea7ion By The line of perfection It is designed to emphasize the unique and continuous expressions
Read all instructions and warnings before using this fireplace. WARNING
 Frame User Manual 1 Operating Manual Thank you for purchasing this Signi Fires product. Signi Fires is very safety conscious, we have taken every care in designing, manufacturing and assembling your Signi
Colonial and Grand Colonial Fire Pit Tables. Installation Instructions for
 Colonial and Grand Colonial Fire Pit Tables Installation Instructions for Colonial-48-M-K, Col-48-MNB-K, Grand-Colonial-48-K, CM-48-DIN-K, MNB-48-DIN-K, GC-48-DIN-K, CM-48-PUB-K, MNB-48-PUB-K, GC-48-PUB-K
Installation and operation instructions for KINEMAX burners
 -. - Installation and operation instructions for KINEMAX burners Application requirements View port A view port to observe burner flame is essential to inspect the flame aspect. Locate the view port downstream
Operator's Manual. Model: RY10MK-PRO MPN: RA-MLT Gallon Direct Fire Melter Kettle Burner Model with Adjustable Flame-Out Valve
 Operator's Manual Model: RY10MK-PRO MPN: RA-MLT-0009 10 Gallon Direct Fire Melter Kettle Burner Model with Adjustable Flame-Out Valve U.S. Patent No. 9,739,021 For Technical Support Please Visit www.rynoworx.com
Napa Valley Fire Pit Table
 Napa Valley Fire Pit Table 48 x48 Model Installation Instructions For Models: NAPA-VALLEY-2424-K, NV-2424-BRN-K, NV-2424-BLK-K, NV-2424-GRY-K, NV-2424-BLK-W-K 1 P a g e Contents Contents..2 Required Tools..3
Key Largo Fire Pit. Installation Instructions. 1 P a g e. NorthlineExpress.com. Toll-Free
 Key Largo Fire Pit Installation Instructions 1 P a g e Contents Contents..2 Required Tools..3 Placing and assembling the Table. 4 Gas Connection..5 Igniter Installation....6 Locating Propane tank 8 Finishing
COOPER FREESTANDING TUB FAUCET INSTALLATION
 SKU(s): 940972 COOPER FREESTANDING TUB FAUCET INSTALLATION BEFORE YOU BEGIN We recommend consulting a professional if you are unfamiliar with installing plumbing fixtures. Signature Hardware accepts no
ETHANOL FIREPLACES Certified as per ULC/ORD C UL Subject
 VOLCAN B12 Trident Laguna Vesuve ETHANOL FIREPLACES Certified as per ULC/ORD C627.1-2008 UL Subject 1370-2010 Fogo Kilauea Revised May 26, 2011 Taal Designed especially for fireplace hearth 490, rue de
INSTRUCTION MANUAL ALEKO RETRACTABLE AWNING
 INSTRUCTION MANUAL for ALEKO RETRACTABLE AWNING www.alekoproducts.com FAILURE TO FOLLOW THESE INSTRUCTIONS MAY RESULT IN PERSONAL INJURY! 1 Important Safety Precautions WARNING NOTE: FOR PERSONAL SAFETY,
Key Largo Fire Pit. Installation Instructions for Key Largo, all base materials and top styles. 1 P a g e
 Key Largo Fire Pit Installation Instructions for Key Largo, all base materials and top styles 1 P a g e Contents Contents 2 Required Tools...3 Placing and assembling the Table. 4 Gas Connection..5 Igniter
BK5 BIOETHANOL BURNERS
 BK5 BIOETHNOL S BK SERIES This sophisticated burner design is the most independently tested of the range and has special safety features that eliminate many of the hazards common with most other brands
RMC1E - Variable Flame Height EASY Control
 Owner s Manual RMC1E - Variable Flame Height EASY Control General Assembly, Installation, and Operation Instructions for use with Natural Gas Burners; F, FX, CS, CXF, TNA or Propane Gas Burners: FA, FAX,
NATURAL GAS CONVERSION KIT
 Model #: 85-2261-4 / G501-0057-03 NATURAL GAS CONVERSION KIT ONLY Compatible with barbecues that bear this SYMBOL: 04-14-17 FOR YOUR SAFETY CAUTION: Read and follow all safety statements, assembly instructions,
XL900 BIOETHANOL BURNERS
 XL900 BIOETHNOL S XL SERIES Elongating a naked flame may seem straightforward, but it s quite complex when you consider the way stainless steel contracts and expands at various temperatures. The Fire Company
SINGLE BURNER STOVE IMPORTANT OPERATING INSTRUCTIONS COOKING & STORAGE POSITION PARTS IDENTIFICATION
 SINGLE BURNER STOVE OPERATING INSTRUCTIONS PARTS IDENTIFICATION Electronic Lighter Ignites the burner. Liquid Guard Holds liquid overflow. Windshield Prevents flame from being extinguished by wind. Ensures
Capacity kw. Thermal turndown from specified maximum capacity 8:1 8:1
 3-18.3-5 Specifications of OXY-THERM TITAN burners Typical burner data Fuel: natural gas at 15 C with 10.9 kwh/nm 3 HHV - sg = 0.6 Oxygen: 90-100% purity Stated pressures are indicative. Actual pressures
Uptown Fire Pit Table
 Uptown Fire Pit Table Installation Instructions 1 P a g e Contents Contents..2 Required Tools..3 Placing and assembling the Table. 4 Gas Connection..5 Igniter Installation....6 Locating Propane tank 8
r e - p a r t s. c o m
 Owner s Manual SPK3E - Manual EASY Control General Assembly, Installation, and Operation Instructions for use with Natural Gas Burners; F, FX, CS, CXF, TNA or Propane Gas Burners: FA, FAX, CA, CXFA, TNA/LP
ASSEMBLY GUIDE. Customer Service: INCH² 2-BURNER & 864 INCH² 2-BURNER
 ASSEMBLY GUIDE 688 INCH² 2-BURNER & 864 INCH² 2-BURNER DANGER If you smell gas: 1. Shut off gas to the appliance. 2. Extinguish any open flames. 3. Open lid. 4. If odor continues, keep away from the appliance
SPK3E - Manual EASY Control
 SPK3E - Manual EASY Control General Assembly, Installation, and Operation Instructions for use with Natural Gas Burners; F, FX, CS, CXF, TNA or Propane Gas Burners: FA, FAX, CA, CXFA, TNA/LP LISTED BY
REPLACEMENT PROCEDURE: ROTISSERIE ORIFICE: TOOLS REQUIRED TO INSTALL THIS KIT: ITEM DESCRIPTION: E C
 TOOLS REQUIRED TO INSTALL THIS KIT: ITEM DESCRIPTION: A SCREWDRIVER - PHILIPS SIZE # 2 B SCREWDRIVER - FLAT 1/8 WIDE TIP C 1/2 WRENCH - OPEN TYPE D 7/16 WRENCH - OPEN TYPE E RATCHETING SOCKET WRENCH -
INSTALLATION INSTRUCTIONS for automatic awnings
 Custom made Awnings and Blinds Item No 0756 INSTALLATION INSTRUCTIONS for automatic awnings AUTOMATIC AWNING IMPORTANT INFORMATION BEFORE INSTALLING YOUR AUTOMATIC AWNING Updated 08/09/15 AN AWNING INSTALLATION
Stone Arch Fireplace
 Stone Arch Fireplace Setup Instructions Stone-Arch-FP-1224-K 1 P a g e Congratulations on your purchase of a new outdoor gas fireplace! These instructions will help you get your new fireplace set up in
BURNER RANGE XL900 XL700
 INSTLLTION, OPERTION ND MINTENNCE MNUL Please read these instructions completely before operating the EcoSmart Fire. The Collection Burner Range Grate Range Outdoor Range Renovator Range Designer Range
S420 Barbecue Assembly Manual
 TM MC S420 Barbecue Assembly Manual 85-3062-2 (G45123) Propane 85-3063-0 (G45124) Natural Gas 1 YEAR LIMITED WARRANTY READ AND SAVE MANUAL FOR FUTURE REFERENCE. Assemble your grill immediately. Missing
Installation and User s Manual 12 x 10 MOTORIZED AWNING
 12 x 10 MOTORIZED AWNING Installation and User s Manual 12 x 10 MOTORIZED AWNING 088-1763-0 Stop Please read and understand this manual before any assembly or use of this product. Before beginning assembly
Gas Go Anywhere /23/01
 Gas Go Anywhere 55014 02/23/01 FOR OUTDOOR USE ONLY This grill does not include an LP fuel tank. Check Package Contents You should have received the parts listed below. While we give much attention to
IRRADIA Instructions for use and safety
 IRRADIA Instructions for use and safety READ CAREFULLY BEFORE USE Please store these safety warnings in a safe place for future reference. NOTICE: BUYER ASSUMES ALL RESPONSIBILITY FOR SAFETY AND USE THAT
Lit Table Top Firepit Bio-Ethanol Fireplace. User Manual. Model: GF301650
 Lit Table Top Firepit Bio-Ethanol Fireplace User Manual Model: GF301650 1 Moda Flame Lit Table Top Firepit Bio-Ethanol Fireplace Included in delivery (Parts List): A. Fireplace body 1pc B. Glass 1pc C.
Genesis. Side Burner Accessory Installation. Step 3. Step 1. Step 2. For use with Genesis Gas Barbecues Only
 Genesis Side Burner Accessory Installation For use with Genesis Gas Barbecues Only Step 1 WARNING: All gas controls and supply valves should be in the OFF position. You will need: Side burner assembly
Ceramic Probe Replacement Instructions Accessory G
 Ceramic Probe Replacement Instructions Accessory G6600-60035 Purpose The Stainless Burner has two ceramic combustion tubes, which require periodic replacement: an inner and an outer tube. Scope This procedure
INSTALLATION INSTRUCTIONS
 INSTALLATION INSTRUCTIONS KR54, KR1654, & KR4954 Keyed Removable Mullion NOT FOR USE ON ELECTRIC OR FIRE RATED MULLIONS. This kit includes the following parts: (Not to scale) WARNING Remove key, reinstall,
t420 Barbecue Assembly Manual
 t20 Barbecue Assembly Manual 85-300-2 (G510) Propane 85-3005-0 (G5105) Natural Gas 1 Year limited Warranty Read and save manual for future reference. If pre-assembled, leave this manual with unit for consumer
280 Propane Barbecue Assembly Manual
 280 Propane Barbecue Assembly Manual 85-3001-8 (G20718) Propane 1 Year limited Warranty Read and save manual for future reference. Assemble your grill immediately. Missing or damaged parts claims must
Gas Conversion Kits and Instructions
 Gas Conversion Kits and Instructions INSTALLATION FORM RGM 432/433-GC (Version D.1) Obsoletes Form RGM 432/433-GC (Version D) APPLIES TO: Model FT and Model SFT All gas conversion must be done by a qualified
Installation GUIDE. NKVGR Natural Conversion Kit for 7 Series Ranges/Rangetops
 Installation GUIDE NKVGR Natural Conversion Kit for 7 Series Ranges/Rangetops Table of Contents Warnings... 3 Kit Contents... 3 Regulator Conversion... 4 Infrared Broiler Conversion... 5 Surface Burner
Your passion in fire. Dancing flames with bio-ethanol. Contents. Design and atmosphere for your home.
 Solitaire + Inserts Dancing flames with bio-ethanol Design and atmosphere for your home. ebios-fire stands for quality, individuality, design and aesthetics. Enjoy fireplace culture in your own home even
COCOON TERRA STAINLESS STEEL
 COCOON TERRA STAINLESS STEEL Main Body: Diameter 60 cm (23.7 in) Height 38 cm (15 in) Combustion Chamber: 1.5 litre Capacity (Burns Up to 6 hours) Leg length: 45cm (18 in) Overall height: 76 cm (29.9 in)
Thermostatic Griddle Field Service Kit Instructions
 Thermostatic Griddle Field Service Kit Instructions The following document provides instructions on how to install a Garland Thermostatic Griddle Field Kit and is applicable to each 2 section of a Garland
INSTRUCTIONS MANUAL CAST IRON STOVE
 INSTRUCTIONS MANUAL CAST IRON STOVE CA-SGB06 Warning: Use outdoors only Read the instructions before using the appliance and retain for future reference. 1 These instructions give some important information
How to Set up Your Configurable (Home and Camping) Stir Fry Stove
 Stir Fry Stove") How to Set up Your Configurable (Home and Camping) Stir Fry Stove Setting up the outdoor stir fry stove is quick and easy. However, EXERCISE EXTREME CAUTION and apply common sense -- you are dealing with
How to Set up Your Configurable (Home and Camping) Stir Fry Stove Setting up the outdoor stir fry stove is quick and easy. However, EXERCISE EXTREME CAUTION and apply common sense -- you are dealing with
CONVERSION INSTRUCTIONS
 CONVERSION INSTRUCTIONS Natural Gas to Propane Gas Conversion Kit For Thermador Professional Cooktops and Ranges Model STARLPKIT Part No. 35-00-682 Contains 7mm Hex Main Orifices This kit is used to convert
CONVERSION INSTRUCTIONS
 CONVERSION INSTRUCTIONS Propane Gas to Natural Gas Conversion Kit For Thermador Professional Cooktops and Ranges Model STARNGKIT Part No. 35-00-679 Contains 7mm Hex Main Orifices This kit is used to convert
TECHNICAL SUPPORT HOT LINE HOURS: 7:30-3:30
 TECHNICAL SUPPORT HOT LINE 1-800-526-0725 HOURS: 7:30-3:30 TO: Service Providers BULLETIN No: 0102-1 FROM: SUBJECT: BOB VAN WYCK Technical Support Manager Burner Pilot Tube Replacement DATE: Feb 1, 2001
Instructions for use, installation, and connection. Gas Built in Hob
 Instructions for use, installation, and connection Gas Built in Hob RB3311SGBS RB3312SGBS RB3311DGBS RB3311MGBS RB3311NGBS RB6313SGBST RB6323SGBST RB6314SGBS RB6313DGBST RB6313MGBST RB7312SGBS RB7313SGBST
INSTALLATION INSTRUCTIONS for folding arm awnings
 Custom made Awnings and Blinds Item No 0757 INSTALLATION INSTRUCTIONS for folding arm awnings IMPORTANT INFORMATION BEFORE INSTALLING YOUR Updated 08/09/15 AN AWNING INSTALLATION IS A HOME IMPROVEMENT
Installation & Operation Manual VHM Variable Height Series Arms with Fixed Angle Front End
 3875 Cypress Drive Petaluma, CA 94954 800.228.2555 707.773.1100 Fax 707.773.1180 www.gcx.com Installation & Operation Manual VHM Variable Height Series Arms with Fixed Angle Front End Products covered
Slimline Burner Manual
 Slimline Burner Manual 1 Operating Manual Thank you for purchasing this Icon Fires Burner. Icon Fires is very safety conscious and we have taken every care in designing, manufacturing and assembling your
Intrepid 2 Intrepid 3
 Intrepid 2 Intrepid 3 Model Nos. V 10 / V10-3 NAT GAS Model Nos. V12 / V12-3 L.P.G DECORATIVE COAL EFFECT GAS STOVE USER INSTRUCTIONS This appliance is only for use on Natural Gas (G20) at a supply pressure
* * 4023 KR. Step 1 Prepare the Keyed Removable Unit. Not for use on electric or fire rated removable mullions
 condition. *64009-00* 64009-00 Keyed Removable Mullions 403 KR Installation Instructions Not for use on electric or fire rated removable mullions This kit includes the following parts: (Not to scale) 5/6
300 Model 870 Four Wheel Hose Cart Owner s Manual
 300 Model 870 Four Wheel Hose Cart Owner s Manual IMPORTANT: READ THE OWNER S MANUAL BEFORE ASSEMBLING TOOLS REQUIRED: TWO ADJUSTABLE WRENCHES; HAND PUMP Estimated assembly time: 30 minutes PARTS LIST
ACCENDA Instructions for use and safety
 ACCENDA Instructions for use and safety READ CAREFULLY BEFORE USE Please store these safety warnings in a safe place for future reference. NOTICE: BUYER ASSUMES ALL RESPONSIBILITY FOR SAFETY AND USE THAT
Design for Luxury Living
 Design for Luxury Living Fire Design For Luxury Living 2 2 Icon Fires set the standard for luxury bioethanol fireplaces with advanced levels of performance, functionality and refinement. Icon Fires make
DESIGN FOR LUXURY LIVING
 DESIGN FOR LUXURY LIVING 2 Fire Design For Luxury Living 2 Icon Fires set the standard for luxury bioethanol fireplaces with advanced levels of performance, functionality and refinement. Icon Fires make
front runner READ ME! IMPORTANT WARNING! ENG Foxwing Awning Brackets
 front runner Foxwing Awning Brackets ENG RRAC0 READ ME! Thank you for purchasing Front Runner Foxwing Awning Brackets. Before you start, take a moment to familiarize yourself with the Fitting Instructions
ASSEMBLY GUIDE. Customer Service: INCH² 3-BURNER & 545 INCH² 3-BURNER
 ASSEMBLY GUIDE 455 INCH² 3-BURNER & 545 INCH² 3-BURNER DANGER If you smell gas: 1. Shut off gas to the appliance. 2. Extinguish any open flames. 3. Open lid. 4. If odor continues, keep away from the appliance
INSTALLATION INSTRUCTIONS for vertical awnings
 Custom made Awnings and Blinds Item No 0759 INSTALLATION INSTRUCTIONS for vertical awnings IMPORTANT INFORMATION BEFORE INSTALLING YOUR Updated 08/09/15 AN AWNING INSTALLATION IS A HOME IMPROVEMENT PROJECT
TB131. Gas Conversion Kits for NVx & VPC Heaters. Issue 1.0 May Applies to models: NVx & VPC
 TB131 Issue 1.0 May 2018 Applies to models: NVx & VPC Gas Conversion Kits for NVx & VPC Heaters www.powmatic.co.uk +44 (0) 1460 53535 info@powrmatic.co.uk General Information Heater conversion between
ALEKO Victoria Series Retractable Awning Instructions for Installation and Operation
 www.alekoproducts.com ALEKO Victoria Series Retractable Awning Instructions for Installation and Operation PLEASE DO NOT RETURN THIS PRODUCT TO THE STORE! The owner s manual includes assembly and operating
2 Burner ASSEMBLY MANUAL
 REVOLUTIONTM 2 Burner Black STEEL EDITION ASSEMBLY MANUAL 85-3139-2 (G36301) Propane Limited 5-Year Warranty Read and save manual for future reference. Assemble your grill immediately. Missing or damaged
EB300. Ethanol Burner. User s Manual Installation Instructions
 EB300 Ethanol Burner User s Manual Installation Instructions EB300 Burner Burner Lid User s Manual What s in the box: 1pc 1pc 1pc Installation Instructions EB300 - User s Manual The Ignis Ethanol Burner
Boardwalk Fire Pit Table
 Boardwalk Fire Pit Table Installation Instructions 1 P a g e Contents Required Tools....3 Placing the Table 5 Gas Connection..6 Igniter Installation (pt 1)...7 Fire Pit Assembly....8 Igniter Installation
Reverse Osmosis system 50 GPD Instruction manual EN
 Reverse Osmosis system 50 GPD Instruction manual EN Contents 1. Unpacking 2. Scope of supply 3. Insertion of the membranes 4. Connecting the lines 5. Installation 6. First commissioning 7. Consumables
VAMPA Instructions for use and safety
 VAMPA Instructions for use and safety READ CAREFULLY BEFORE USE Please store these safety warnings in a safe place for future reference. NOTICE: BUYER ASSUMES ALL RESPONSIBILITY FOR SAFETY AND USE THAT
18" Convert to Gel Log Set # 2610
 18" Convert to Gel Log Set # 2610 Instruction Manual Instructions and warnings for use. STOP! If parts are missing or damaged, call 1-800-654-1704 for assistance Welcome to the Real Flame family of gel
Box Burner L INSTALLATION AND OPERATION GUIDE
 Box Burner L INSTALLATION AND OPERATION GUIDE Before operating Bionova burner please read and follow instructions Compliance Statement and Testing ENGLISH The BIO NOVA Box Burner L - bioethanol fireplace
NEWMAR SERVICE SCHOOL
 NEWMAR SERVICE SCHOOL TRAINING INFORMATION GUIDELINE FOR FEBRUARY 2013 OUR PRODUCTS: NOVA DUAL PITCH AWNING G-2000/ G-1500 2 P a g e G-2085 G-5000 3 P a g e G-LINKS 4 P a g e NOVA/ G-2000/ G-1500 BASIC
ORIGO 1500, 3000 ORIGO 6000, 6100, Alcohol stoves Operating manual Spirituskocher Bedienungsanleitung... 24
 C C _Origo_5 6.book Seite Freitag,. Dezember 8 : 5 EN Alcohol stoves Operating manual............... 8 DE Spirituskocher Bedienungsanleitung............ ORIGO FR ES Cuisinières à alcool Notice d utilisation..............
Assembly/Installation/Use Instructions:
 IMPORTANT We highly recommend that our products be installed and serviced by professionals who are certified in the U.S. by NFI (National Fireplace Institute) or in Canada by WETT (Wood Energy Technical
Installation & User Manual EW5000 Outdoor Cooking Fire
 Installation & User Manual EW5000 Outdoor Cooking Fire IMPORTANT: Please read this manual before installing and using the ESCEA EW5000 Cooking fire. Failure to follow these instructions may lead to a possible
Installation instruction
 Installation instruction Ci51 116 FACTS Technical specifications Model i51 Log box (option) Output 6-11 kw Nominal output 8 kw Efficiency 80 % Weight (kg) 215 50 Powerstone (option): + 100 kg Width (mm)
Instruction Manual. 30 Steel Fire Pit with Solid Bowl. Questions, problems, missing parts? Before returning to the store, Call Yayi Mfg.
 Instruction Manual 30 Steel Fire Pit with Solid Bowl Questions, problems, missing parts? Before returning to the store, Call Yayi Mfg. at 855-600-9294 From 9:00 AM to 5:00 EST or email customercare@china-yayi.com
Installation Guide. LPKPDR - Universal LP Conversion Kit for Professional & Designer Ranges/Rangetops. Viking Range, LLC.
 Installation Guide Viking Range, LLC 111 Front Street Greenwood, Mississippi 38930 USA (662) 455-1200 For product information, call 1-888-845-4641 LPKPDR - Universal LP Conversion Kit for Professional
VISIT OUR WEBSITE: OR CALL US TOLL FREE AT
 Model #710 WATH THE VIEO Owner s Manual VISIT OUR WEBSITE: WWW.LIBERTYGARENPROUTS.OM OR ALL US TOLL FREE AT 1-866-820-5805 LIBERTY GAREN PROUTS, IN. 1161 SOUTH PARK RIVE, KERNERSVILLE N 27284 IMPORTANT:
Section 8 - Supplements
 FLIGHT Approved by EASA under Approval Number EASA.BA.A.01000 on 8.11 LINDSTRAND CLOUDHOPPER WITH CAMERON ENVELOPES 8.11.1 INTRODUCTION Issue 1 of this supplement has six pages. There are no additional
Assembly Instructions
 Assembly Instructions ITEM#L-GZ076PST-1B Hexagon Leaf Gazebo IMPORTANT: Please read and follow all safety statements, warnings, assembly instructions, use & care directions, before attempting to assemble.
SMART BIO-ETHANOL ELECTRONIC BURNER
 SMART BIO-ETHANOL ELECTRONIC BURNER User s Manual What s in the box: Smart Burner Remote Control AC Adapter Filling Hose User s Manual 1pc 1pc 1pc 1pc 1pc Preparations Remove all packaging materials prior
GAS STOVE GUARD for natural gas and propane stoves
 GAS STOVE GUARD for natural gas and propane stoves OPERATING INSTRUCTIONS September 18, 2017 STOVE GUARD is not designated for use with gas stoves with pilot light. STOVE GUARD is an electronic safety
Alcott Fire Table. Installation Instructions for ALC-1224
 Alcott Fire Table Installation Instructions for ALC-1224 IMPORTANT Please consult your Crystal Fire instruction manual for detailed instructions and important information related to the burner installation
LA STRADA Instructions for use and safety
 LA STRADA Instructions for use and safety READ CAREFULLY BEFORE USE Please store these safety warnings in a safe place for future reference. NOTICE: BUYER ASSUMES ALL RESPONSIBILITY FOR SAFETY AND USE
Apply for further information to the manufacturer, if you ve got additional questions after studying this manual.
 The given manual guide contains information about the design, operation principles, specifications and basic requirements providing accident-free operation and secure maintenance of the item Touristic
Sunjoy S-AW011-G Beauty-Mark Manual Retractable Awning -Green Strip Owner s Manual IMPORTANT
 Sunjoy S-AW011-G eauty-mark Manual Retractable Awning -Green Strip Owner s Manual IMPORTANT Thank you very much for choosing Sunjoy Group. Please take time to read these instructions thoroughly and follow
Brooks Fire Pit Table. Installation Instructions for Brooks Fire Pit Table BRK-1224
 Brooks Fire Pit Table Installation Instructions for Brooks Fire Pit Table BRK-1224 1 IMPORTANT Contents Please consult your Crystal Fire instruction manual for detailed instructions Required and important
TUCSON PATIO AWNING INSTALLATION MANUAL
 TUCSON PATIO AWNING INSTALLATION MANUAL Toll Free 877-792-1775 Fax 877-792-0031 swsuncontrolpro.com sales@swsuncontrol.com 1 INTRODUCTION...3 1.1 Symbols used in this manual... 3 1.2 Personnel requirements...
CERO Instructions for use and safety
 CERO Instructions for use and safety READ CAREFULLY BEFORE USE Please store these safety warnings in a safe place for future reference. NOTICE: BUYER ASSUMES ALL RESPONSIBILITY FOR SAFETY AND USE THAT
Installation Instructions
 Series NP-LE AIRFLO Burners Page 0-S- Installation Instructions General Important: Do not discard packing material until all loose items are accounted for. Avoid bending or damaging the steel mixing plates
Standard models feature the Around Burner. - please refer to specific Model Specification. BASE: The base is made in stainless steel.
 1 2 Model Specifications The offers a selection of portable, weather resistant fireplaces ideal for garden and swimming pool areas and perfect for intimate alfresco dining settings or commercial bars and
Automated Tiki Torch Installation Instructions
 Automated Tiki Torch Installation Instructions Automated Tiki Torch with Poles (Exploded View) 14 Automated Tiki Head 6 8 Tiki Pole (Powder Coated Aluminum or Faux Bamboo Pole) 12 Base Pole (Powder Coated
Professional Series Galley Range
 Professional Series Galley Range OWNER S MANUAL Read all instructions and warnings before operating. Force 10 Manufacturing Corporation Unit A 19169 21 st Ave Surrey, BC V3S 3M3 Tel: 604.536.0379 Fax:
* * KR54-F, KR9854 & KR9954 Installation Instructions. Read All Warnings Before Starting Installation! Index:
 *941061-00* 941061-00 Keyed Removable Mullion KR54-F, KR9854 & KR9954 Installation Instructions CLASSIFIED CLASSIFIED C Read All Warnings Before Starting Installation! Index: General Information ----------------
Y Camper Shell Tracks, 37 Cross Bars. Y Camper Shell Tracks, 44 Cross Bars.
 Y06-550 63 Camper Shell Tracks, 37 Cross Bars. Y06-560 63 Camper Shell Tracks, 44 Cross Bars. Important: Parts List Please read these instructions carefully prior to installation. Please refer to your
Signature Burner Manual
 Signature Burner Manual 1 Operating Manual Thank you for purchasing this Signi Fires Burner. Signi Fires is very safety conscious and we have taken every care in designing, manufacturing and assembling
Advantage Plus TIM-3600 Series Reel
 Read the following precautions and instructions before you begin assembly or using. Failure to comply with these instructions could result in personal injury or property damage. Keep these instructions
3 Burner ASSEMBLY MANUAL
 REVOLUTIONTM 3 Burner ASSEMBLY MANUAL 85-3118-2 (G53201) Propane 85-3119-0 (G53202) Natural Gas Limited 5-Year Warranty Read and save manual for future reference. Assemble your grill immediately. Missing
TC36 SEE-THRU LODGEWOOD BURNER AND PANEL KIT INSTRUCTIONS
 IMPORTANT: THESE INSTRUCTIONS ARE TO REMAIN WITH THE HOMEOWNER These instructions are supplementary to the Installation and Operating Instructions supplied with the fi replace and should be kept together.
Stonefire Fire Pit Table. Installation Instructions for SF-32-K
 Stonefire Fire Pit Table Installation Instructions for SF-32-K / 1 2 IMPORTANT Please consult your Crystal Fire instruction manual for detailed instructions and important information related to the burner
Installation instruction
 Installation instruction Turntable C500/C600 www.contura.eu 51 General These instructions explain how to install a stove on a turntable base. Read these installation instructions carefully before installation.
Model number. OXY-THERM FH burners. Forehearth burner - OXY-THERM FH. combustion systems for industry E-m -5/13. Burner model.
 3-18.5-3 Model number OXY-THERM FH burners Burner model Fuel flow SCFH Connection type Fuel Block material OT FH 17 A N A Y Burner block Burner model OT FH - OXY-THERM FH burner Fuel flow - SCFH 17-17
The Cove Fire Pit. Installation Instructions for CV-30
 The Cove Fire Pit Installation Instructions for CV-30 1 2 IMPORTANT Contents Please consult your Crystal Fire Burner Owner s instruction manual for detailed instructions and important information related