Structural Mullion System
|
|
|
- Margery Phillips
- 6 years ago
- Views:
Transcription

1 Structural Mullion System Installation Instructions DNA Part Number This system is designed to allow for larger window combinations. It is not intended to replace structural members in a building. Improper structural support may lead to performance problems. Before starting window installation, consultation with an architect, structural engineer or contractor is strongly recommended. Such consultation is necessary to determine if the window installation will meet all applicable design and building codes. The manufacturer assumes no responsibility for selection or installation. Selection and installation are the sole responsibility of the architect, contractor or consumer.
 1) 1 steel plate 2) 1 aluminum plate 3) 6 - #8 ¾ self")
 1 pre-fabricated aluminum mullion 6) As required #8 11 x ½ type 410")
2 Fig. 1 ii. Concrete Block opening (see figure 2) 1) 1 steel plate 2) 1 aluminum plate 3) 6 - #8 ¾ self tapping stainless steel screws 4) 6 - #10 x 2 ¼ hex head ITW Tapcons to achieve minimum 1 ¾ embedment into substrate 5) 1 pre-fabricated aluminum mullion 6) As required #8 11 x ½ type 410 stainless steel screws (used to secure the window frames to the mullion MAX 12 spacing) Fig. 2

 i. To remove the nailing fin 1. Score the fin as shown in Fig. 4 2.")
3 iii. Transom (see Fig. 3, in addition to the Traditional wood opening or the Concrete block opening kits, you should also have) 1. 2 steel plates #8-11 x 1 ½ pan head type 410 stainless steel screws 3. 4 #8 - type 410 stainless steel screws 4. 1 pre-fabricated aluminum mullion 5. As required #8 11 x 1/2 type 410 stainless steel screws (used to secure the window frames to the mullion MAX 12 spacing) Fig. 3 b. Remove the nailing fin from the side of the window frames that run with the mullion (see Figs. 4, 5, 6 & 7) i. To remove the nailing fin 1. Score the fin as shown in Fig Bend the nailing fin back and forth as shown in Fig Until the fin snaps off as shown in Fig If any nailing fin is left remaining at the corners, as shown in Fig.6, trim it back even with the frame as shown in Fig. 7 Fig. 4

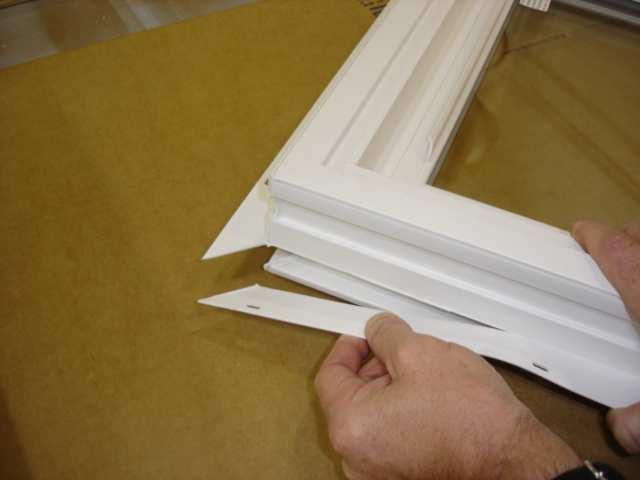

4 4 Fig. 5 Fig. 6 Fig. 7


5 c. Remove the weld flashing from the corners of the window frames where the mullion will be (see Figs. 8 & 9) i. To remove the weld flashing as shown in Fig Cut the flashing on the corners and in the grooves with snips as shown 2. Be sure to get as much of the flashing as possible 3. A box knife is also useful for more precise trimming. ii. Check for clearance using a piece of mullion as shown in Fig The mullion should slide down the frame and past the corner without hang-ups. 5 Fig. 8 Fig. 9
 1.")
6 6 II. Mullion assembly a. Traditional wood opening and Transom kits i. Attach the steel plates to the both ends of the mullion as shown (see Figs. 10 & 11) 1. Pay special attention to the orientation between the mullion and the plate 2. Use 2 of the #8 Fig. 10 Fig. 11
 1.")
7 b. Concrete block opening kits i. Attach the steel plate to the notched end of the mullion as shown (see Fig. 12) ii. Attach the aluminum plate to the straight cut end of the mullion as shown (see Fig. 13) 1. Pay special attention to the orientation between the mullion and the plates 2. Use of the #8 7 Fig. 12 Fig. 13


8 8 III. Window / mullion installation a. Apply code compliant sealant to the perimeter of the opening ONLY where the first window will be installed as shown (see Fig. 14) b. Sealant bead should be a minimum of 3/8 diameter. Fig. 14 c. Install the first window in the opening as shown (see Fig. 15) i. Use AAMA certified window installation techniques Fig. 15

 use 1 # 11 x 1 ½ pan head type 410 stainless steel screws to secure the top and bottom")
9 d. Install mullion assembly (see Figs. 16 & 17) i. Make sure the mullion is nested into the grooves on the side of the window frame and the notch is pointed toward the exterior ii. The fit should be snug and secure iii. For Traditional wood opening and Transom kits (shown below) use 1 # 11 x 1 ½ pan head type 410 stainless steel screws to secure the top and bottom plates to the rough opening iv. For Concrete block opening kits (not shown) use # x 1 ½ hex head TAPCON screws to secure the top plate (steel) and 3 3/16 x 1 ½ hex head TAPCON screws to secure the bottom plate (aluminum) 9 Fig. 16 Fig. 17
 f.")

10 e. Apply code compliant sealant to the remaining perimeter of the opening as shown (see Fig. 18) f. Sealant bead should be a minimum of 3/8 diameter. 10 Fig. 18 g. Install the second window in the opening as shown (see Fig. 19) Use AAMA certified window installation techniques Fig. 19


11 IV. 11 Secure frames to mullion a. Drill clearance holes for the screws using a 1/8 DIA x 3/8 DIA step drill. The 1/8 DIA portion of the bit should be approximately 1/2 long. The top and bottom holes should be 4 from each end. The remaining holes should be spaced evenly no more than 12 apart (see Fig. 20) i. Make sure the drill penetrates the aluminum but does not breach the last PVC wall of the frame. Stagger the holes about a ½ from one side of the mullion to the other Fig. 20 b. Shoot the screw thru the PVC into the aluminum (see Fig. 21) Fig. 21
 Fig. 22 V.")

12 12 c. Apply sealant to screw hole (see Fig. 22) Fig. 22 V. Trim package installation a. Trim back snap legs on the trim pieces as shown (see Fig. 23) Fig. 23
 Fig. 24 c.")

13 13 b. Apply sealant to the mullion as shown (see Figs. 24) Fig. 24 c. Install the mullion trim to the interior and the exterior (see Fig. 25) Fig. 25

 Fig.")
14 14 d. Apply sealant to J-channel at head of mulled units as shown (see Fig 26 & 27) Fig. 26 Fig. 27

 Fig.")
15 15 e. Apply the drip cap (see Figs. 28 & 29) Fig. 28 Fig. 29
 a.")

16 16 VI. Transom Installation (optional) a. Install the assembled transom mullion, section II.a., as shown (see Figs. 30 & 31) Fig. 30 Fig. 31
 i. Use a 1/8 DIA x 3/8 DIA step drill as before ii.")

17 b. Install the transom window and drill clearance holes as shown (see Fig. 32) i. Use a 1/8 DIA x 3/8 DIA step drill as before ii. Holes should be 4 from each end and spaced evenly between no more than 12 apart 17 Fig. 32 c. Use 3/8 DIA hole plugs to hide the holes (see Fig. 33) Fig. 33


18 d. Apply sealant to mullion as shown (see Figs. 34 & 35) 18 Fig. 34 Fig. 35 e. Install the trim using the same step as a twin installation (see Fig. 34) Fig. 36
250 SERIES 1" STRUCTURAL TUBE MULLION ASSEMBLY INSTRUCTIONS
 2014 Pella Corporation Part Number: V985711 250 SERIES 1" STRUCTURAL TUBE MULLION ASSEMBLY INSTRUCTIONS Be sure to thoroughly read and understand all the steps before beginning the mullion assembly process.
Vinyl French Door Assembly Instructions
 Vinyl French Door Assembly Instructions SERIES FD 5455/5555 Para instrucciones en español, visite: http://bit.ly/pgtassemblyinstructions FD 5455 / 5555 Parts List ITEM 1 FD 5455/5555 PARTS LIST FRAME HEAD
JOINING MULLION (DIRECT MULL) ASSEMBLY INSTRUCTIONS FOR 3-WAY OR 4-WAY JOINTS FOR IMPERVIA AWNING, CASEMENT AND LARGE AWNING
 ASSEMBLY INSTRUCTIONS FOR 3-WAY OR 4-WAY JOINTS FOR IMPERVIA AWNING, CASEMENT AND LARGE AWNING") 2014 Pella Corporation JOINING MULLION (DIRECT MULL) ASSEMBLY INSTRUCTIONS FOR 3-WAY OR 4-WAY JOINTS FOR IMPERVIA AWNING, CASEMENT AND LARGE AWNING For Additional Mullion Assembly Information; Visit www.installpella.com/mullions,
2014 Pella Corporation JOINING MULLION (DIRECT MULL) ASSEMBLY INSTRUCTIONS FOR 3-WAY OR 4-WAY JOINTS FOR IMPERVIA AWNING, CASEMENT AND LARGE AWNING For Additional Mullion Assembly Information; Visit www.installpella.com/mullions,
Introduction...COMB-2 Design Considerations and Examples...COMB-3
 SECTION DIRECTORY General Information Introduction...COMB-2 Design Considerations and Examples...COMB-3 Combination Assembly Recommendations and Limitations Composite Configurations...COMB-4 Typical Sealant
DURA WHEEL CHAIR LOCKER ASSEMBLY INSTRUCTIONS
 DURA WHEEL CHAIR LOCKER ASSEMBLY INSTRUCTIONS 1. Locate a Frame and Door: Start by locating a frame and door. 2. Front Frame: Now stand up the frame and door in the desired assembly area. 3. Exterior Wall:
KAWNEER 1786 RIM EXIT DEVICE
 FEBRUARY, 2015 1 DOOR STILE Device C L 40" 41-9/32" Cylinder C L Bottom of door RIM EXIT DEVICE LOCATION DOGGING KEY EXIT DEVICE FILLER PLATE CYLINDER & CYLINDER RING HOUSING COVER CYLINDER INSTALLATION
INSTALLATION INSTRUCTIONS
 INSTALLATION INSTRUCTIONS KR54, KR1654, & KR4954 Keyed Removable Mullion NOT FOR USE ON ELECTRIC OR FIRE RATED MULLIONS. This kit includes the following parts: (Not to scale) WARNING Remove key, reinstall,
* * 4023 KR. Step 1 Prepare the Keyed Removable Unit. Not for use on electric or fire rated removable mullions
 condition. *64009-00* 64009-00 Keyed Removable Mullions 403 KR Installation Instructions Not for use on electric or fire rated removable mullions This kit includes the following parts: (Not to scale) 5/6
HUNTCO SITE FURNISHINGS. Double Bike Locker Assembly Instructions HUNTCO SITE FURNISHINGS
 Double Bike Locker Assembly Instructions Includes instructions for both handle styles. Padlock Handle with U Lock Box and Keyed Pop Out T Handle SITE FURNISHINGS SITE FURNISHINGS and architectural site
* * KR54-F, KR9854 & KR9954 Installation Instructions. Read All Warnings Before Starting Installation! Index:
 *941061-00* 941061-00 Keyed Removable Mullion KR54-F, KR9854 & KR9954 Installation Instructions CLASSIFIED CLASSIFIED C Read All Warnings Before Starting Installation! Index: General Information ----------------
INSTALLATION INSTRUCTIONS for vertical awnings
 Custom made Awnings and Blinds Item No 0759 INSTALLATION INSTRUCTIONS for vertical awnings IMPORTANT INFORMATION BEFORE INSTALLING YOUR Updated 08/09/15 AN AWNING INSTALLATION IS A HOME IMPROVEMENT PROJECT
4 Season Enclosure. 3 Season Enclosure. Screen Enclosure. Suggested Installation Instructions. Patio Cover / Car Shield
 4 Season Enclosure 3 Season Enclosure Screen Enclosure Patio Cover / Car Shield Suggested Installation Instructions Table of Contents 4 Season Enclosure... 1 Anchoring Details... 2 Installation - Under
Use steel clip angle as a drill template and drill through mullion. Install bolts with bolt heads on the masonry side of the jamb mullion.
 Additional 200xpt and 250xpt installation instructions are shown on page 11. STICK METHOD ERECTION (refer to figures 1 and 2) Step 1 Establish all control lines and grades. Step 2 Attach steel intermediate
Series SSG and Captured corner mullion. Installation Instructions
 Series 5500 SSG and Captured corner mullion Installation Instructions Part NO. Y556 February 2013 SECTION TABLE OF CONTENTS S-5500 SSG and Captured Corner Mullion Installation Instructions PAGE I. General
70 WALL FABRICATION - SEALANT - ERECTION
 70 WALL FABRICATION - SEALANT - ERECTION GENERAL INSTALLATION NOTES SECTION 1 General Information................................... 3 Assessing the Opening................................. 4 SECTION
1Perma-Shield Gliding Doors (PSI 1968 to 1978)
") 1Perma-Shield Gliding Doors (PSI 1968 to 1978) Parts Catalog Main Menu Section TOC Search What s in This Section 2-Panel, 3-Panel, and Sidelights...................................... Page 3 Parts Illustration...........................................................
1Perma-Shield Gliding Doors (PSI 1968 to 1978) Parts Catalog Main Menu Section TOC Search What s in This Section 2-Panel, 3-Panel, and Sidelights...................................... Page 3 Parts Illustration...........................................................
READ ME FIRST! IMPORTANT WARNING! ENG. Roof top tent
 Roof top tent ENG TENT031 220 min READ ME FIRST! Thank you for purchasing a Front Runner Roof Top Tent. Before you start, take a moment to familiarize yourself with these Fitting Instructions and the components
ASTM E 1886 and ASTM E 1996 TEST REPORT. Report No.: A Rendered to: CORAL ARCHITECTURAL PRODUCTS Tuscaloosa, Alabama
 Architectural Testing ASTM E 1886 and ASTM E 1996 TEST REPORT Report No.: A2651.02 401 44 Rendered to: CORAL ARCHITECTURAL PRODUCTS Tuscaloosa, Alabama PRODUCT TYPE: 90 Corner Curtain Wall SERIES/MODEL:
803 Airport Rd Terrell, TX (972) RELIANCE-TCIG -THERMAL COMPOSITE CURTAIN WALL - 2 1/2 x 7 1/4 -
 RELIANCE-TCIG -THERMAL COMPOSITE CURTAIN WALL - 2 1/2 x 7 1/4 -") 803 Airport Rd Terrell, TX 75160 (972) 551-6100 RELIANCE-TCIG -THERMAL COMPOSITE CURTAIN WALL - 2 1/2 x 7 1/4 - Table of Contents (Drawing numbers ie V8401 used as CAD detail reference only ) Elevation_Rcw-TCIG_725
803 Airport Rd Terrell, TX 75160 (972) 551-6100 RELIANCE-TCIG -THERMAL COMPOSITE CURTAIN WALL - 2 1/2 x 7 1/4 - Table of Contents (Drawing numbers ie V8401 used as CAD detail reference only ) Elevation_Rcw-TCIG_725
803 Airport Rd Terrell, TX (972) RELIANCE-TCIG -THERMAL COMPOSITE CURTAIN WALL - 2 1/2 x 6 -
 RELIANCE-TCIG -THERMAL COMPOSITE CURTAIN WALL - 2 1/2 x 6 -") 803 Airport Rd Terrell, TX 75160 (972) 551-6100 RELIANCE-TCIG -THERMAL COMPOSITE CURTAIN WALL - 2 1/2 x 6 - Table of Contents (Drawing numbers ie V8501 used as CAD detail reference only ) Elevation_Rcw-TCIG_600
803 Airport Rd Terrell, TX 75160 (972) 551-6100 RELIANCE-TCIG -THERMAL COMPOSITE CURTAIN WALL - 2 1/2 x 6 - Table of Contents (Drawing numbers ie V8501 used as CAD detail reference only ) Elevation_Rcw-TCIG_600
AMS MU800 Mullion Drained Curtain Walling
 SPECIFICATION AMS MU800 Mullion Drained Curtain Walling The AMS MU800 mullion drained curtain walling system offers unique architectural design features combined with market leading weather performance.
YCU 750 TU Unitized Curtain Wall System
 INSTALLATION INSTRUCTIONS 1 2 Installation Manual 2010 YKK AP America Inc. is a subsidiary of YKK Corporation of America. TABLE OF CONTENTS Installation Notes........................................ Page
YCU 750 TU Unitized Curtain Wall System
 ASSEMBLY INSTRUCTIONS Assembly Manual 2009 YKK AP America Inc. is a subsidiary of YKK Corporation of America. TABLE OF CONTENTS Installation Notes........................................ Page ii PARTS
Series 2050 Garden Window Frequently Asked Questions
 1. What is the difference between new construction and retrofit? The difference is in the overall jamb depth and required components: For new construction, the flash flange on the head of the unit is left
YCW 750 SplineTech Shop Glazed Curtain Wall System Installation Manual
 YCW 750 SplineTech Shop Glazed Curtain Wall System Installation Manual 2009 YKK AP America Inc. is a subsidiary of YKK Corporation of America. TABLE OF CONTENTS Installation Notes........................................
Visions 3000 Series 9404 Parts Catalog
 3000 Series Visions 3000 Series 9404 Parts Catalog #1218587 FOR PRODUCT PRODUCED AFTER 4/07 Slider Single Slider Triple Slider (1/4-1/2-1/4) Triple Slider (Equal Sash) Mull/Stack/Picture/Transom mull/stack
apexfacades.com apexfacades.com Printed on 12/12/17
 M E R I D I A N apexfacades.com 1.866.970.5948 apexfacades.com 4 5 0 T 1.0 H E R M A L L Y B R O K Meridian E N Pg- 1 S T O R E F R O N T THIS PAGE INTENTIONALY LEFT BLANK apexfacades.com 1.0 Meridian
RETRACTABLE AWNING w/ OPTIONAL HOOD ASSEMBLY INSTRUCTIONS
 Contact us @ (800)851-0865 RETRACTABLE AWNING w/ OPTIONAL HOOD ASSEMBLY INSTRUCTIONS Congratulations on your purchase of a new retractable awning. With proper installation this awning will provide years
Otter Pro XT Cabin Installation and Set-Up Instructions
 Otter Pro XT Cabin Installation and Set-Up Instructions Otter Pro XT Cabin Fits Medium Otter Pro and Otter II Sled Only Parts Identification and Check List MODEL NUMBERS: Complete Pkg Pro XT Thermal Cabin
Otter XT Cabin Installation and Set-Up Instructions
 Otter XT Cabin Installation and Set-Up Instructions Otter XT Cabin Fits Medium Otter Wild Sled Only Parts Identification and Check List MODEL NUMBERS: Complete Pkg Otter XT Cabin 200962 2 1 PARTS LIST
, & Series Nested Hardware
 RECORD THIS INFORMATION FOR FUTURE REFERENCE BEFORE INSTALLING THE UNIT: Model Number Serial Number Date Purchased Place of Purchase USA SERVICE OFFICE Dometic Corp. 509 So. Poplar St. LaGrange, IN 46761
Uptown Fire Pit Table
 Uptown Fire Pit Table Installation Instructions 1 P a g e Contents Contents..2 Required Tools..3 Placing and assembling the Table. 4 Gas Connection..5 Igniter Installation....6 Locating Propane tank 8
PRODUCT MANUAL - M096
 PRODUCT MANUAL - M096 MODEL 270 ELECTRIC CAN OPENER 1 I. LABELS L087--CAUTION 2 II. SPECIFICATIONS MODEL NO. 270 POWER 115 VOLT, 1.5 AMP, 50-60HZ REQUIREMENTS 230 VOLT, 0.8 AMP, 50-60 HZ NORMAL SPEED 200-250
YCW 750 SSG Structural Silicone Glazed Curtain Wall System 4 Side SSG Shop Glazed (2 Side Toggle Glazing Method) Installation Manual
 Installation Manual") YCW 750 SSG Structural Silicone Glazed Curtain Wall System 4 Side SSG Shop Glazed (2 Side Toggle Glazing Method) Installation Manual 2014 YKK AP America Inc. is a subsidiary of YKK Corporation of America.
YCW 750 SSG Structural Silicone Glazed Curtain Wall System 4 Side SSG Shop Glazed (2 Side Toggle Glazing Method) Installation Manual 2014 YKK AP America Inc. is a subsidiary of YKK Corporation of America.
Otter Pro X-Over Lodge Installation and Set-Up Instructions
 Otter Pro X-Over Lodge Installation and Set-Up Instructions Otter Pro X-Over Lodge Fits Magnum Otter II & Pro Sled Only Parts Identification and Check List MODEL NUMBERS: Complete Pkg Pro X-Over Lodge
Solera Power Awning OEM INSTALLATION MANUAL
 Solera Power Awning OEM INSTALLATION MANUAL TABLE OF CONTENTS System Information 2 Safety 2 Prior To Installation 2 Resources Required 2 Awning Rail Installation (If Needed) 3 Installation 3 Awning Installation
Tall Cabinet Drawer Keyless Double Lock Installation [ xx]
![Tall Cabinet Drawer Keyless Double Lock Installation [ xx]](/thumbs/74/70709392.jpg "Tall Cabinet Drawer Keyless Double Lock Installation [ xx]") Tall Cabinet Drawer Keyless Double Lock Installation [002-97-xx] Note This install can be used for any Tall Cabinet Double Drawer Keyless Lock installation. The assembly process will be the same. The will
Tall Cabinet Drawer Keyless Double Lock Installation [002-97-xx] Note This install can be used for any Tall Cabinet Double Drawer Keyless Lock installation. The assembly process will be the same. The will
Lockable Fasport. IFP-600 Dimensions Overall Height 9.5" Overall Width 10" Opening Dia. 6.5" Weight 9 lbs. Model
 Lockable Fasport IFP-600 Overall Height 9.5" Overall Width 10" Opening Dia. 6.5" Weight 9 lbs Note: Specify glass thickness when ordering. Die cast body and lid. A12 Aluminum body and ASSA deadbolt. Steel
Assembly Manual. OLM Retractable Canopy for 12X16 Breeze Pergola by Outdoor Living Today. Revision 7 May 12th /2015
 Assembly Manual OLM Retractable Canopy for 12X16 Breeze Pergola by Outdoor Living Today Revision 7 May 12th /2015 Care and Maintenance - Do not leave canopy extended during heavy snow storms or any extreme
ACCESSORY SERVICE PARTS ACCESSORY INSTALLATION INSTRUCTIONS. Covered Toilet Paper Holder. 24 Double Towel Bar 24 Double Towel Shelf
 ACCESSORY INSTALLATION INSTRUCTIONS 143T 143T 143T 1431T 143T 14451T 14455T 14456T 1445T 1445T 14461T 14463T Brush Holder 1142345** Covered Toilet Paper Holder Brush Holder 24 Double Towel Bar 24 Double
Installation Instructions for the Rolltec Adalia X3M Extenda Awning
 Installation Instructions for the Rolltec Adalia X3M Extenda Awning Questions? Call Rolltec at 1-800-667-0474 General Tool Requirements Table of Contents Available installation brackets Side dimensions
Formulate 10 Vertical Curve - Kit 5
 Formulate 10 Vertical Curve - Kit 5 FMLT-WV10-05 Formulate TM is a collection of sophisticated, ergonomically designed exhibit booths. Formulate combines state-of-the-art zipper pillowcase dye-sublimated
PRODUCT INFORMATION MANUAL SECTION: 17 METAL LOUVRE AWNINGS METAL LOUVRE AWNINGS
 METAL LOUVRE AWNINGS Sizes & Limitations Metal Louvre Awnings TRINIDAD TRINIDAD SUNGUARD FIXED ADJUSTABLE Maximum Width Unlimited 5000mm Unlimited Minimum Width 500mm 500mm 500mm Maximum Drop 4000mm 2500mm
Installation Instructions for the Rolltec Physique XL Awning
 Installation Instructions for the Rolltec Physique XL Awning Questions? Call Rolltec at 1-800-667-0474 General Tool Requirements Table of Contents Available installation brackets Side dimensions of various
FIXED WINDOW SECTION DETAILS
 FIXED WINDOW SCALE " = '-0" FIXED WINDOW SECTION PROFILE @ HEAD SCALE '-0" = '-0" FIXED WINDOW SECTION PROFILE @ JAMB SCALE '-0" = '-0" FIXED WINDOW SECTION PROFILE @ SILL SCALE '-0" = '-0" NAO84 STEEL
DO NOT USE WITH CROSSBAR SPREAD LESS THAN 24.
 TM Please read all instructions carefully before assembly, installation and/or use of this product. DO NOT USE WITH CROSSBAR SPREAD LESS THAN 24. WARNING: Do not exceed the weight limit of your vehicle
M129 SERVICE MANUAL- M129 MODEL #G-2 MANUAL CAN OPENER
 SERVICE MANUAL- M129 MODEL #G-2 MANUAL CAN OPENER Model #G-2 Can Opener Assembly Procedure The Model #G-2 can opener will be assembled according to the following procedure. I. Model #G-2 Handle and Arbor
IMPORTANT OWNER-OPERATOR INSTALLATION INSTRUCTIONS C2204A
 IMPORTANT OWNER-OPERATOR INSTALLATION INSTRUCTIONS C2204A Warnings Truck Bed and Camper Protection Torklift does not recommend installing your camper on top of a plastic bed liner (or other compressible
W/ MAGNETIC TAPE ON FACE CENTER W/ MAGNETIC TAPE ON FACE CENTER W/ STEEL TAPE ON FACE BOTTOM L3-1 W/ STEEL TAPE ON FACE BOTTOM
 6 4 WITH CE 4 HALF UPRIGHT -1 1 & 5mm Hex key Tool Place vertical extrusion and lock horizontal extrusions by using 5mm hex key tool. W/ MAGNETIC TAPE W/ MAGNETIC TAPE / -2 /-1 HALF UPRIGHT Place horizontal
Safety instructions and warnings Package contents and parts Tool requirements Product features... 4
 Door Awning : PN Series Owner s Manual For safety reasons, please carefully read and understand all written instructions and warnings in this manual prior to assembling or installing this product. Table
Wv410 window. Installation Instructions
 Wv410 window Installation Instructions Part NO. Y007 February 2014 TABLE OF CONTENTS SECTION PAGE I. Product Description and Limitations..........3 II. General Statements and Definitions........3 III.
INSTALLATION INSTRUCTIONS for folding arm awnings
 Custom made Awnings and Blinds Item No 0757 INSTALLATION INSTRUCTIONS for folding arm awnings IMPORTANT INFORMATION BEFORE INSTALLING YOUR Updated 08/09/15 AN AWNING INSTALLATION IS A HOME IMPROVEMENT
Tarp Return. Questions? Contact Customer Or Parts Diagrams see Parts and Diagrams section on web at
 Roll Rite, LLC and its entire staff would like to not only Thank You but congratulate you on your purchase of one of what we feel to be the finest line of tarping systems in the industry. Tarp Return RR
Y Camper Shell Tracks, 37 Cross Bars. Y Camper Shell Tracks, 44 Cross Bars.
 Y06-550 63 Camper Shell Tracks, 37 Cross Bars. Y06-560 63 Camper Shell Tracks, 44 Cross Bars. Important: Parts List Please read these instructions carefully prior to installation. Please refer to your
Key Largo Fire Pit. Installation Instructions for Key Largo, all base materials and top styles. 1 P a g e
 Key Largo Fire Pit Installation Instructions for Key Largo, all base materials and top styles 1 P a g e Contents Contents 2 Required Tools...3 Placing and assembling the Table. 4 Gas Connection..5 Igniter
Reliance-TC-Type l Standard Horizontals-Aluminum Pressure Plates Integral TC Verticals w/o Face Cap - 2-1/2 x7-1/4
 Reliance-TC-Type l Standard Horizontals-Aluminum Pressure Plates Integral TC Verticals w/o Face Cap - 2-1/2 x7-1/4 Table of Contents (Drawing numbers ie H3405 used as CAD detail reference only ) Elev-RcwTC-Type
INSTALLATION INSTRUCTIONS for automatic awnings
 Custom made Awnings and Blinds Item No 0756 INSTALLATION INSTRUCTIONS for automatic awnings AUTOMATIC AWNING IMPORTANT INFORMATION BEFORE INSTALLING YOUR AUTOMATIC AWNING Updated 08/09/15 AN AWNING INSTALLATION
Reliance-TC-Type l Standard Horizontals-Aluminum Pressure Plates Integral TC Verticals w/o Face Cap - 2-1/2 x 6
 Reliance-TC-Type l Standard Horizontals-Aluminum Pressure Plates Integral TC Verticals w/o Face Cap - 2-1/2 x 6 Table of Contents (Drawing numbers ie H3505 used as CAD detail reference only ) Elev-RcwTC-Type
Key Largo Fire Pit. Installation Instructions. 1 P a g e. NorthlineExpress.com. Toll-Free
 Key Largo Fire Pit Installation Instructions 1 P a g e Contents Contents..2 Required Tools..3 Placing and assembling the Table. 4 Gas Connection..5 Igniter Installation....6 Locating Propane tank 8 Finishing
TensionLite Plus 10 ft. Wave Shape Mural Wall Design 2
 TensionLite Plus 10 ft. Wave Shape Mural Wall Design 2 TensionLite is a collection of sophisticated, ergonomically designed exhibit booths. Formulate combines state-of-the-art zipper pillowcase dye-sublimated
Universal 10 x 27 Canopy
 Universal 10 x 27 Canopy C81027PC Size: 10 8 x 27 x 6 8 (side) x 9 9 (center) With 10 Legs, Frame, and Cover Powell & Powell Supply Company Distributed by: 1730 Five Points Lane Fuquay-Varina, North Carolina
Formulate Designer Series 10 Backwall - Kit 01
 Formulate Designer Series 10 Backwall - Kit 01 FMLT-DS-10-01 Formulate TM Designer Series 10ft displays have unique stylistic features and shapes, are portable and easy to assemble. The aluminum tube frame
Assembly Manual. OLM Retractable Canopy for 12X20 Breeze Pergola by Outdoor Living Today. Revision #11 October 5, 2017
 Assembly Manual OLM Retractable Canopy for 12X20 Breeze Pergola by Outdoor Living Today Revision #11 October 5, 2017 Care and Maintenance - Canopy should be removed in winter to reduce the chance of collapse
Vanagon Ladder Kit Assembly & Installation Instructions
 Rocky Mountain Westy Vanagon Ladder Kit Assembly & Installation Instructions Introduction Thank you for purchasing the Rocky Mountain Westy Vanagon Ladder Kit. We pride ourselves in the products we develop
RELIANCE-SS CURTAIN WALL INSTALLATION AND GLAZING MANUAL
 RELIANCE-SS CURTAIN WALL INSTALLATION AND GLAZING MANUAL Note: The installation details found in this package are generic and are for representation only with the intent of giving the installation team
HANLIX INT'L CO., LTD. Feature
 941d95 941B95 Snap Suction Hook Feature Hanlix Snap Suction Hook can be used on a wide variety of common household slick non-porous surfaces. Holds more weight for longer periods of time than any other
COOPER FREESTANDING TUB FAUCET INSTALLATION
 SKU(s): 940972 COOPER FREESTANDING TUB FAUCET INSTALLATION BEFORE YOU BEGIN We recommend consulting a professional if you are unfamiliar with installing plumbing fixtures. Signature Hardware accepts no
SECTION SPECIFICATIONS PART 1 GENERAL
 PART 1 GENERAL 1.1 SECTION INCLUDES A. Shower doors. B. Sliding enclosures. C. Shower doors and panels. 1.2 RELATED SECTIONS A. Section 06100 - Rough Carpentry; blocking. B. Section 15400 - Plumbing Fixtures
FALL PRO TOOLS. Measure, Level, Cut and SAVE NOW! 2018 PROMO Ask your distributor for details! Jobsite Tools Hole Saws Recip Blades
 FALL PRO TOOLS 2018 PROMO Ask your distributor for details! The Pro s Tool of Choice. Measure, Level, Cut and SAVE NOW! Jobsite Tools Hole Saws Recip Blades Sale runs through November 30, 2018 SAVE UP
Formulate 10 Straight - Kit 4
 Formulate 10 Straight - Kit 4 FMLT-WS10-04 Formulate TM is a collection of sophisticated, ergonomically designed exhibit booths. Formulate combines state-of-the-art zipper pillowcase dye-sublimated fabric
Icelock Ratchet 621 Icelock Lanyard 631 Icelock Valve 641 Icelock Smooth 651
 Extremely light-weight and low build height. Fabrication Tools make the weight fabrication process very effective Very strong and durable Socket Adapters rated up to 100kg (220lbs) and 166kg (365lbs) Easily
AND LOAD CANOPY RACK SPECIFICATIONS
 8MAY15 INSTRUCTIONS for the LOCK AND LOAD CANOPY RACK SPECIFICATIONS and SAFE LOADING REQUIREMENTS The Lock and Load ladder carrier for Truck Caps is a rack designed to mount to the top of a pickup truck
TCWS.38NG03.C BLACK DIAMOND BURNER KIT INSTRUCTIONS
 IMPORTANT: THESE INSTRUCTIONS ARE TO REMAIN WITH THE HOMEOWNER These instructions are supplementary to the Installation and Operating Instructions supplied with the fireplace and should be kept together.
SERVICE MANUAL- M126
 SERVICE MANUAL- MANUAL CAN OPENER- MODEL # 2 1 Model #2 Can Opener Assembly Procedure The Model #2 can opener will be assembled according to the following procedure. I. Model #2 Handle and Arbor Assembly
WIDESPREAD LAVATORY MODELS WITH HI-ARC SPOUT
 5951, 5961, 5981, 5983, 5993 SERIES MT122B INSTALLATION INSTRUCTIONS THESE INSTRUCTIONS MUST BE LEFT WITH HOMEOWNER WIDESPREAD LAVATORY MODELS WITH HI-ARC TRADITIONAL CROSS NOTE: Handle Inserts are not
Assembly Manual. OLM Retractable Canopy for 10X12 Breeze Pergola by Outdoor Living Today. Revision 13 October 3rd /2017
 Assembly Manual OLM Retractable Canopy for 10X12 Breeze Pergola by Outdoor Living Today Revision 13 October 3rd /2017 Care and Maintenance - Canopy should be removed in winter to reduce the chance of collapse
Model 205 Fireview Maintenance Kit
 Model 205 Fireview Maintenance Kit Please read all of the instructions before you begin the procedure. Confirm that you have all the necessary tools and parts required. Allow about one hour to complete
SOLHARO ASSEMBLY & INSTALLATION INSTRUCT IONS
 A. Introduction: SOLHARO ASSEMBLY & INSTALLATION INSTRUCT IONS Rev. 01/30/2012 The Solharo is an external, retractable, tensioned sun shading system designed to fit over a sunroom or wood pergola. The
TC36 CHALET II BURNER KIT INSTALLATION INSTRUCTIONS
 INSTALLER: Leave this manual with the appliance. CONSUMER: Retain this manual for future reference. These instructions are supplementary to the Installation and Operating Instructions supplied with the
Dear Customer, thank you for purchasing Dolphin Aqualisers TM
 Dear Customer, thank you for purchasing Dolphin Aqualisers TM Aqualisers TM are made of quality, durable marine grade materials and will significantly increase the stability of your 10 to 16ft aluminium
TensionLite Plus 10 ft. Wave Shape Mural Wall Design 5
 TensionLite Plus 10 ft. Wave Shape Mural Wall Design 5 TensionLite is a collection of sophisticated, ergonomically designed exhibit booths. Formulate combines state-of-the-art zipper pillowcase dye-sublimated
Safety instructions and warnings Package contents and parts Tool requirements Product features... 5
 Door Awning : PA Series Owner s Manual For safety reasons, please carefully read and understand all written instructions and warnings in this manual prior to assembling or installing this product. Table
Assembly Manual. OLM Retractable Canopy for 12X12 Breeze Pergola by Outdoor Living Today. Revision 8 August 1st /2017
 Assembly Manual OLM Retractable Canopy for 12X12 Breeze Pergola by Outdoor Living Today Revision 8 August 1st /2017 Care and Maintenance - Do not leave canopy extended during heavy snow storms or any extreme
Bostonian style (DOME) Awning ASSEMBLY AND INSTALLATION INSTRUCTIONS
 Awning ASSEMBLY AND INSTALLATION INSTRUCTIONS") Bostonian style (DOME) Awning ASSEMBLY AND INSTALLATION INSTRUCTIONS CAUTION: When you are opening the box keep children away. This awning frame contains sharp metal and small hardware parts. Choking hazard:
Bostonian style (DOME) Awning ASSEMBLY AND INSTALLATION INSTRUCTIONS CAUTION: When you are opening the box keep children away. This awning frame contains sharp metal and small hardware parts. Choking hazard:
Otter XT 650 Cabin Installation and Set-Up Instructions
 Otter XT 650 Cabin Installation and Set-Up Instructions Otter XT 650 Cabin Fits Medium Otter Wild Sled Only Parts Identification and Check List MODEL NUMBERS: Complete Pkg Otter XT 650 Cabin 200891 2 1
2522 and 2523 Fiber Optic Splice Organizer Tray
 2522 and 2523 Fiber Optic Splice Organizer Tray Instructions February 1996 Issue 1, 34-7039-6256-2 1 Table of Contents 1. General... 3 2. Kit Contents... 3 3. Available Kits and Accessories... 4 4. Tray
A201 DOUBLE HUNG Sill WHITE - UI0028S1 ALMOND - UI0028S4 CLAY - UI0028S5 BRZ/WHT - UI HEAD/JAMB
 estbridge Elite Signature A201 DOUBLE HUNG GENTEK BUILDING PRODUCTS LIMITED 0201 SILL - STUCCO WHITE - UI0102S1 ALMOND - UI0102S4 CLAY - UI0102S5 BRZ/WHT - UI010292 0201 Sill WHITE - UI0028S1 ALMOND -
INSTALLATION INSTRUCTIONS TOWNSEND
 INSTALLATION INSTRUCTIONS TOWNSEND.00 DECK MOUNT BATH FILLER.0 Thank you for selecting American Standard... the benchmark of fine quality for over 00 years. To ensure that your installation proceeds smoothly-please
INSTALLATION INSTRUCTIONS AND OWNER'S MANUAL AWNINGS. For trailers & motor homes with straight sides TOOLS REQUIRED
 AWNINGS INSTALLATION INSTRUCTIONS AND OWNER'S MANUAL For trailers & motor homes with straight sides TOOLS REQUIRED 1/4" electric drill Ratchet handle kit 3/8" & 7/16" socket No. 1 and No. 2 screwdriver
TC42 TRANQUILITY BURNER KIT INSTRUCTIONS
 IMPORTANT: THESE INSTRUCTIONS ARE TO REMAIN WITH THE HOMEOWNER These instructions are supplementary to the Installation and Operating Instructions supplied with the fi replace and should be kept together.
Otter Pro XT 1200 Cottage Installation and Set-Up Instructions
 Otter Pro XT 1200 Cottage Installation and Set-Up Instructions Otter Pro XT 1200 Cottage Fits Small Ultra-Wide Otter Pro and Otter II Sled Only Parts Identification and Check List MODEL NUMBERS: Complete
TC30 HEARTWOOD BURNER INSTALLATION INSTRUCTIONS
 INSTALLER: Leave this manual with the appliance. CONSUMER: Retain this manual for future reference. These instructions are supplementary to the Installation and Operating Instructions supplied with the
CONVEX Awning Instructions
 CONVEX Awning Instructions IMPORTANT NOTE: Please take a few minutes to become familiar with this entire document BEFORE beginning your installation. The time you spend doing this is well spent and will
Assembly TOOLS REQUIRED: 17mm and 14mm or equivalent wrenches.
 Instructions for 3 Trimmer Rack, 3TR* *Patents Pending Assembly TOOLS REQUIRED: 17mm and mm or equivalent wrenches. 15 26 26 16 15 16 Attach the lower mounting brackets to the Trimmer Rack poles as shown
AJW. Athletic Series Lockers. Architectural Products ONE TIER TWO TIER THREE TIER FOUR TIER FIVE TIER SIX TIER
 ONE TIER TWO TIER THREE TIER FOUR TIER FIVE TIER SIX TIER Specifications Body: Backs constructed of mild cold rolled 18 ga. commercial grade steel. Bottom, sides, top, and shelves constructed of 16 ga.
TCWS.54NG03C2 BLACK DIAMOND BURNER KIT INSTRUCTIONS
 IMPORTANT: THESE INSTRUCTIONS ARE TO REMAIN WITH THE HOMEOWNER These instructions are supplementary to the Installation and Operating Instructions supplied with the fi replace and should be kept together.
Factory Style Bow Kit
 Installation Instructions Factory Style Bow Kit Vehicle Application: Jeep Wrangler Unlimited 2004 2006 Part Number: 55003 www.bestop.com - We re here to help! Visit our web site and click on Ask a Question.
INSTALLATION INSTRUCTIONS FOR BALCO, INC. FLOOR MATS FM2R-(A, C, D) W/O FRAME 4V
 W/O FRAME 4V") 2626 South Sheridan PO Box 17249 Wichita, Kansas 67217 Phone: (316) 945-9328 Fax: (316) 945-0789 INSTALLATION INSTRUCTIONS FOR BALCO, INC. FLOOR MATS FM2R-(A, C, D) W/O FRAME 4V 2012, Balco, Inc. INSTALLATION
2626 South Sheridan PO Box 17249 Wichita, Kansas 67217 Phone: (316) 945-9328 Fax: (316) 945-0789 INSTALLATION INSTRUCTIONS FOR BALCO, INC. FLOOR MATS FM2R-(A, C, D) W/O FRAME 4V 2012, Balco, Inc. INSTALLATION
Solera Power Awning w/ LED Lights OEM INSTALLATION MANUAL
 Solera Power wning w/ LED Lights OEM INSTLLTION MNUL TBLE OF CONTENTS Safety 2 Prior to Installation 2 Resources Required 2 wning Installation 3 wning Rail Installation (If Needed) 3 wning Support rm Installation