RDSA310M20X. Refrigerator-Freezer type I Refrigerador-Congelador de tipo I Refrigerador-Congelador tipo I Hladnjak-Zamrzivač tipa I
|
|
|
- Martha Dennis
- 5 years ago
- Views:
Transcription

1 Refrigerator-Freezer type I Refrigerador-Congelador de tipo I Refrigerador-Congelador tipo I Hladnjak-Zamrzivač tipa I Instruction of use Instrucciones para el uso Instruções de utilização Upute za uporabu RDSA310M20X ENIESIPTIHR
2
3 WARNING! In order to ensure a normal operation of your refrigerating appliance, which uses a completely environmentally friendly refrigerant the R600a (flammable only under certain conditions) you must observe the folloving rules: Do not hinder the free circulation of the air around the appliance. Do not use mechanic devices in order to accelerate the defrosting, others than the ones recommended by the manufacturer. Do not destroy the refrigerating circuit. Do not use electric appliances inside the food cheeping compartment, others than those that might have been reccommended by the manufacturer. ADVERTENCIA Con el fin de garantizar un funcionamiento normal de su frigorífico, que utiliza un refrigerante totalmente respetuoso con el medio ambiente, el R600a (inflamable sólo en ciertas condiciones), se deben observar las pautas siguientes: No impedir la libre circulación del aire alrededor del electrodoméstico. Para acelerar el deshielo no se deben utilizar dispositivos mecánicos que no sean aquellos recomendados por el fabricante. No destruir el circuito de refrigeración. No utilizar aparatos eléctricos dentro del compartimento de aviso de alimentos que no sean los que pudiera haber recomendado el fabricante. AVISO! Afim de assegurar um funcionamento normal do seu aparelho de refrigeração que utiliza um refrigerador, o R600a, completamente amigo do ambiente (inflamável apenas sob certas condições), deve observar as seguintes normas: Não obstrua a livre circulação do ar ao redor do aparelho. Não utilize dispositivos mecânicos que não os recomendados pelo fabricante para acelerar o descongelamento. Não destrua o circuito de refrigeração. Não utilize aparelhos eléctricos que não aqueles que devem ter sido recomendados pelo fabricante dentro do compartimento para guardar comida. UPOZORENJE! Kako bi se osigurao normalan rad vašeg zamrzivača koji koristi kompletno ekološki prihvatljivo rashladno sredstvo R600a (zapaljivo samo pod određenim uvjetima), trebate se pridržavati slijedećih pravila: Ne ometati slobodnu cirkulaciju zraka oko zamrzivača. Ne koristiti mehanička sredstva za ubrzavanje odleđivanja, koja nije preporučio proizvođač. Paziti da se ne ošteti krug rashladnog sredstva. Unutar prostora zamrzivača za spremanje namirnice ne koristiti električne uređaje koje nije preporučio proizvođač.
4 EN Index Safety first /1 Electrical requirements /2 Transportation instructions /2 Installation instructions /2 Getting to know your appliance /3 Suggested arrangement of food in the appliance /3 Temperature control and adjustment /4 Before operating /4 Storing frozen food /4 Freezing fresh food /4 Making ice cubes /5 Defrosting /5 Replacing the interior light bulb /6 Cleaning and care /6 Repositioning the door /6 Do s and don ts /7 Trouble shooting /8 ES Índice La seguridad es lo primero /9 Requisitos eléctricos /10 Instrucciones de transporte /10 Instrucciones de instalación /10 Detalles del frigorífico /11 Disposición recomendada de los alimentos en el frigorífico /11 Control y ajuste de la temperatura /12 Antes del funcionamiento /12 Almacenamiento de alimentos congelados /13 Congelación de alimentos frescos /13 Cubitos de hielo /13 Desescarchado /13 Sustitución de la bombilla interior /14 Conservación y limpieza /14 Reposicionamiento de la puerta /15 Prácticas correctas e incorrectas /15 Resolución de problemas /16 Advertencias sobre los ruidos de funcionamiento del aparato /16 HR Sadržaj Sigurnost prije svega /26 Električni priključak /27 Upute za transport /27 Upute za instaliranje /27 Dijelovi hladnjaka /28 Preporučeni raspored namirnica u hladnjaku /28 Kontrola temperature i podešavanje /29 Prije rada hladnjaka /29 Spremanje zamrznutih namirnica /29 Zamrzavanje svježih namirnica /29 Priprema kockica leda /30 Odleđivanje /30 Zamjena žaruljice unutarnje rasvjete /31 Ćišćenje i njega /31 Promjena smjera otvaranja vrata /31 Korisni savjeti /32 Otklanjanje smetnji u radu /33 PT Índice Princípios básicos de segurança /18 Requisitos eléctricos /19 Instruções para transporte /19 Instruções de instalação /19 Detalhes do frigorífico /20 Arrumação sugerida para os alimentos no frigorífico /20 Controlo e ajuste da temperatura /21 Antes do funcionamento /21 Armazenar alimentos congelados /21 Congelar alimentos frescos /22 Fazer cubos de gelo /22 Descongelar /22 Substituição da lâmpada interior /23 Limpeza e cuidados /23 Recolocação das portas /23 Procedimentos correctos e incorrectos /24 Resolução de problemas /25

5 1 Figures that take place in this instruction manual are schematic and may not correspond exactly with your product. If the subject parts are not included in the product you have purchased, then it is valid for other models. Las ilustraciones incluidas en el presente manual de instrucciones son esquemáticas y puede que no se adecúen a su aparato con exactitud. Si alguno de los elementos reflejados no se corresponde con el aparato que usted ha adquirido, entonces será válido para otros modelos. As figuras que aparecem neste manual de instruções são esquemáticas e podem não corresponder exactamente ao seu produto. Se as partes referidas não estiverem incluídas no produto que adquiriu, é porque são válidas para outros modelos. Slike koje se nalaze u ovom priručniku s uputama su shematske i možda ne odgovaraju vašem proizvodu u potpunosti. Ako dijelovi naslova nisu sadržani u proizvodu koji ste kupili, onda to vrijedi za ostale modele.


6
7 7
8 EN Instruction for use Congratulations on your choice of a BEKO Quality Appliance, designed to give you many years of service. Safety first! Do not connect your appliance to the electricity supply until all packing and transit protectors have been removed. Leave to stand for at least 4 hours before switching on, to allow compressor oil to settle, if transported horizontally. If you are discarding an old appliance with a lock or latch fitted to the door, ensure that it is left in a safe condition to prevent the entrapment of children. This appliance must only be used for its intended purpose. Do not dispose of the appliance on a fire. Your appliance contains non CFC substances in the insulation which are flammable. We suggest you contact your local authority for information on disposal and available facilities. We do not recommend use of this appliance in an unheated, cold room. (e.g. garage, conservatory, annex, shed, out-house etc.) To obtain the best possible performance and trouble free operation from your appliance it is very important to read these instructions carefully. Failure to observe these instructions may invalidate your right to free service during the guarantee period. Please keep these instructions in a safe place for easy reference. Original Spare parts will be provided for 10 years, following the product purchasing date. This appliance is not intended for use by person with reduced physical, sensory or mental capabilities or lack of experience and knowledge unless they have been given supervision or instruction concerning use of the appliance by a person responsible for their safety. Children should be supervised to ensure that they do not play with the appliance. 1
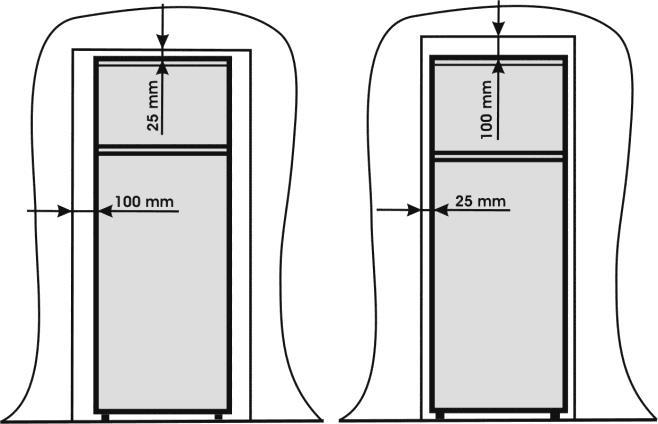
9 EN Electrical requirements Before inserting the plug into the wall socket make sure that the voltage and the frequency shown in the rating plate inside the appliance corresponds to your electricity supply. We recommend that this appliance is connected to the mains supply via a suitably switched and fused socket in a readily accessible position. Warning! This appliance must be earthed. Repairs to electrical equipment should only be performed by a qualified technician. Incorrect repairs carried out by an unqualified person are carry risks that may have critical consequences for the user of the appliance. ATTENTION! This appliance operates with R600a which is an environmental friendly but flammable gas. During the transportation and fixing of the product, care must be taken not to damage the cooling system. If the cooling system is damaged and there is a gas leakage from the system, keep the product away from open flame sources and ventilate the room for a while. WARNING - Do not use mechanical devices or other means to accelerate the defrosting process, others than those recommended by the manufacturer. WARNING - Do not damage the refrigerant circuit. WARNING - Do not use electrical appliances inside the food storage compartments of the appliance, unless they are of the type recommended by the manufacturer. WARNING - If the supply cord is damaged, it must be replaced by the manufacturer, its service agent or similarly qualified persons in order to avoid a hazard. Transportation instructions 1. The appliance should be transported only in an upright position. The packing as supplied must be intact during transportation. 2. If during the transport the appliance, has been positioned horizontally, it must not be operated for at least 4 hours, to allow the system to settle. Instruction for use 3. Failure to comply with the above instructions could result in damage to the appliance, for which the manufacturer will not be held liable. 4. The appliance must be protected against rain, moisture and other atmospheric influences. Important! Care must be taken while cleaning/carrying the appliance not to touch the bottom of the condenser metal wires at the back of the appliance, as this could cause injury to fingers and hands. Do not attempt to sit or stand on top of your appliance as it is not designed for such use. You could injure yourself or damage the appliance. Make sure that the mains cable is not caught under the appliance during and after moving, as this could damage the cable. Do not allow children to play with the appliance or tamper with the controls. Installation instructions 1. Do not keep your appliance in a room where the temperature is likely to fall below 10 degrees C (50 degrees F) at night and/or especially in winter, as it is designed to operate in ambient temperatures between +10 and +38 degrees C (50 and 100 degrees F). At lower temperatures the appliance may not operate, resulting in a reduction in the storage life of the food. 2. Do not place the appliance near cookers or radiators or in direct sunlight, as this will cause extra strain on the appliance's functions. If installed next to a source of heat or freezer, maintain the following minimum side clearances: From Cookers 30 mm From Radiators 300 mm From Freezers 25 mm 3. Make sure that sufficient room is provided around the appliance to ensure free air circulation (Item 2). Put the back airing lid to the back of your refrigerator to set the distance between the refrigerator and the wall (Item 3). 2
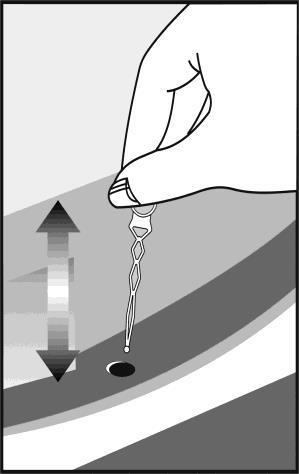
10 EN 4. The appliance should be positioned on a smooth surface. The two front feet can be adjusted as required.to ensure that your appliance is standing upright adjust the two front feet by turning clockwise or anticlockwise, until firm contact is secured with the floor. Correct adjustment of feet prevents excessive vibration and noise (Item 4). 5. Refer to "Cleaning and Care" section to prepare your appliance for use. Getting to know your appliance (Item 1) 1 - Freezer shelf 2 - Fan 3 - Thermostat and lamp housing 4 - Adjustable Cabinet shelves 5 - Wine bottles support 6 - Defrost water collection channel - Drain tube 7 - Crisper cover 8 - Crisper 9 - Adjustable front feet 10 - Dairy Compartment 11 - Shelves 12 - Bottle shelf Suggested arrangement of food in the appliance Guidelines for obtaining optimum storage and hygiene: 1. The fridge compartment is for the shortterm storage of fresh food and drinks. 2. The freezer compartment is rated and suitable for the freezing and storage of pre-frozen food. The recommendation for storage as stated on the food packaging should be observed at all times. 3. Dairy products should be stored in the special compartment provided in the door liner. 4. Cooked dishes should be stored in airtight containers. Instruction for use 5. Fresh wrapped produce can be kept on the shelf. Fresh fruit and vegetables should be cleaned and stored in the crispers. 6. Bottles can be kept in the door section. 7. To store raw meat, wrap in polythene bags and place on the lowest shelf. Do not allow to come into contact with cooked food, to avoid contamination. For safety, only store raw meat for two to three days. 8. For maximum efficiency, the removable shelves should not be covered with paper or other materials to allow free circulation of cool air. 9. Do not keep vegetable oil on door shelves. Keep the food packed, wrapped or covered. Allow hot food and beverages to cool before refrigerating. Leftover canned food should not be stored in the can. 10. Fizzy drinks should not be frozen and products such as flavoured water ices should not be consumed too cold. 11. Some fruit and vegetables suffer damage if kept at temperatures near 0 C. Therefore wrap pineapples, melons, cucumbers, tomatoes and similar produce in polythene bags. 12. High-proof alcohol must be stored upright in tightly closed containers. Never store products that contain an inflammable propellant gas (e.g. cream dispensers, spray cans, etc.) or explosive substances. These are an explosion hazard. 3
11 EN Temperature control and adjustment Operating temperatures are controlled by the thermostat knob and may be set at any position between 1 and 5 (the coldest position). If the thermostat knob is in position "0" the appliance is off. In this case neither the lamp for inside lighting will light. The average temperature inside the fridge should be around +5 C (+41 F). Therefore adjust the thermostat to obtain the desired temperature. Some sections of the fridge may be cooler or warmer (such as salad crisper and top part of the cabinet) which is quite normal. We recommend that you check the temperature periodically with a thermometer to ensure that the cabinet is kept to this temperature. Frequent door openings cause internal temperatures to rise, so it is advisable to close the door as soon as possible after use. Before operating Final Check Before you start using the appliance check that: 1. The feet have been adjusted for perfect levelling. 2. The interior is dry and air can circulate freely at the rear. 3. The interior is clean as recommended under "Cleaning and care. 4. The plug has been inserted into the wall socket and the electricity is switched on. When the door is open the interior light will come on. And note that: 5. You will hear a noise as the compressor starts up. The liquid and gases sealed within the refrigeration system may also make some (noise), whether the compressor is running or not. This is quite normal. 6. Slight undulation of the top of the cabinet is quite normal due to the manufacturing process used; it is not a defect. Instruction for use 7. We recommend setting the thermostat knob midway and monitor the temperature to ensure the appliance maintains desired storage temperatures (See section Temperature Control and Adjustment). 8. Do not load the appliance immediately it is switched on. Wait until the correct storage temperature has been reached. We recommend checking the temperature with an accurate thermometer (see; Temperature Control and Adjustment). Storing frozen food Your freezer is suitable for the long-term storage of commercially frozen foods and also can be used to freeze and store fresh food. If there is a power failure, do not open the door. Frozen food should not be affected if the failure lasts for less than 19 hrs. If the failure is longer, then the food should be checked and either eaten immediately or cooked and then re-frozen. Freezing fresh food Please observe the following instructions to obtain the best results. Do not freeze too large a quantity at any one time. The quality of the food is best preserved when it is frozen right through to the core as quickly as possible. Do not exceed the freezing capacity of your appliance in 24 h. Placing warm food into the freezer compartment causes the refrigeration machine to operate continously until the food is frozen solid. This can temporarily lead to excessive cooling of the refrigeration compartment. When freezing fresh food, keep the thermostat knob at medium position. Small quantities of food up to 1/2 kg. (1 lb) can be frozen without adjusting the temperature control knob. Take special care not to mix already frozen food and fresh food. 4
12 EN Making ice cubes Fill the ice - cube tray 3/4 full with water and place it in the freezer. Loosen frozen trays with a spoon handle or a similar implement; never use sharp-edged objects such as knives or forks. Defrosting A) Fridge compartment The fridge compartment defrosts automatically. The defrost water runs to the drain tube via a collection container at the back of the appliance (Item 5). During defrosting, water droplets may form at the back of the fridge compartment where a concealed evaporator is located. Some droplets may remain on the liner and refreeze when defrosting is completed. Do not use pointed or sharp-edged objects such as knives or forks to remove the droplets which have refrozen. If, at any time, the defrost water does not drain from the collection channel, check that no food particles have blocked the drain tube. The drain tube can be cleared with a pipecleaner or similar implement. Check that the tube is permanently placed with its end in the collecting tray on the compressor to prevent the water spilling on the electric installation or on the floor (Item 6). Instruction for use B) Freezer compartment Defrosting is very straightforward and without mess, thanks to a special defrost collection basin. Defrost twice a year or when a frost layer of around 7 (1/4") mm has formed. To start the defrosting procedure, switch off the appliance at the socket outlet and pull out the mains plug. All food should be wrapped in several layers of newspaper and stored in a cool place (e.g. fridge or larder). Containers of warm water may be placed carefully in the freezer to speed up the defrosting. Do not use pointed or sharp-edged objects, such as knives or forks to remove the frost. Never use hairdryers, electrical heaters or other such electrical appliances for defrosting. Sponge out the defrost water collected in the bottom of the freezer compartment. After defrosting, dry the interior thoroughly. Insert the plug into the wall socket and switch on the electricity supply. 5
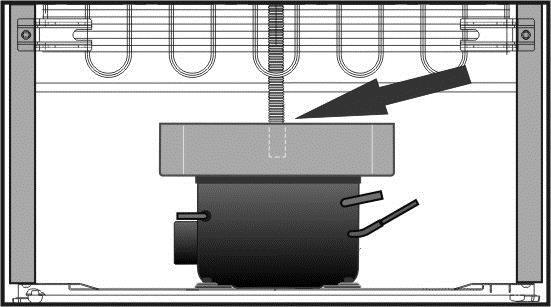
13 EN Replacing the interior light bulb To change the Bulb/LED used for illumination of your refrigerator, call your AuthorisedService. The lamp(s) used in this appliance is not suitable for household room illumination. The intended purpose of this lamp is to assist the user to place foodstuffs in the refrigerator/freezer in a safe and comfortable way. The lamps used in this appliance have to withstand extreme physical conditions such as temperatures below -20 C. Cleaning and care 1. We recommend that you switch off the appliance at the socket outlet and pull out the mains plug before cleaning. 2. Never use any sharp instruments or abrasive substances, soap, household cleaner, detergent or wax polish for cleaning. 3. Use luke warm water to clean the cabinet of the appliance and wipe it dry. 4. Use a damp cloth wrung out in a solution of one teaspoon of bicarbonate of soda to one pint of water to clean the interior and wipe it dry. 5. Make sure that no water enters the temperature control box. 6. If the appliance is not going to be used for a long period of time, switch it off, remove all food, clean it and leave the door ajar. 7. We recommend that you polish the metal parts of the product (i.e. door exterior, cabinet sides) with a silicone wax (car polish) to protect the high quality paint finish. 8. Any dust that gathers on the condenser, which is located at the back of the appliance, should be removed once a year with a vacuum cleaner. 9. Check door seals regularly to ensure they areclean and free from food particles. Instruction for use 10. Never: Clean the appliance with unsuitable material; eg petroleum based products. Subject it to high temperatures in any way, Scour, rub etc., with abrasive material. 11. Removal of dairy cover and door tray : To remove the dairy cover, first lift the cover up by about an inch and pull it off from the side where there is an opening on the cover. To remove a door tray, remove all the contents and then simply push the door tray upwards from the base. 12. Make sure that the special plastic container at the back of the appliance which collects defrost water is clean at all times. If you want to remove the tray to clean it, follow the instructions below: Switch off at the socket outlet and pull out the mains plug Gently uncrimp the stud on the compressor, using a pair of pliers, so that the tray can be removed Lift it up. Clean and wipe it dry Reassemble, reversing the sequence and operations 13. Large accumulation of ice will impair the performance of the appliance. Repositioning the door Proceed in numerical order (Item 7). 6
14 EN Do s and don ts Do- Clean and defrost your appliance regularly (See "Defrosting") Do- Keep raw meat and poultry below cooked food and dairy products. Do- Take off any unusable leaves on vegetables and wipe off any soil. Do- Leave lettuce, cabbage, parsley and cauliflower on the stem. Do- Wrap cheese firstly in greaseproof paper and then in a polythene bag, excluding as much air as possible. For best results, take out of the fridge compartment an hour before eating. Do- Wrap raw meat and poultry loosely in polythene or aluminium foil. This prevents drying. Do- Wrap fish and offal in polythene bags. Do- Wrap food with a strong odour or which may dry out, in polythene bags, or aluminium foil or place in airtight container. Do- Wrap bread well to keep it fresh. Do- Chill white wines, beer, lager and mineral water before serving. Do- Check contents of the freezer every so often. Do- Keep food for as short a time as possible and adhere to "Best Before" and "Use by" etc. dates. Do- Store commercially frozen food in accordance with the instructions given on the packets. Do- Always choose high quality fresh food and be sure it is thoroughly clean before you freeze it. Do- Prepare fresh food for freezing in small portions to ensure rapid freezing. Do- Wrap all food in aluminium foil or freezer quality polythene bags and make sure any air is excluded. Do- Wrap frozen food immediately after purchasing and put it in to the freezer as soon as possible. Do- Defrost food in the fridge compartment. Instruction for use Don t- Store bananas in your fridge compartment. Don t- Store melon in your fridge. It can be chilled for short periods as long as it is wrapped to prevent it flavouring other food. Don t- Cover the shelves with any protective materials which may obstruct air circulation. Don t- Store poisonous or any dangerous substances in your appliance. It has been designed for the storage of edible foodstuffs only. Don t- Consume food which has been refrigerated for an excessive length of time. Don t- Store cooked and fresh food together in the same container. They should be packaged and stored separately. Don t- Let defrosting food or food juices drip onto food. Don t- Leave the door open for long periods, as this will make the appliance more costly to run and cause excessive ice formation. Don t- Use sharp edged objects such as knives or forks to remove the ice. Don t- Put hot food into the appliance. Let it cool down first. Don t- Put liquid-filled bottles or sealed cans containing carbonated liquids into the freezer, as they may burst. Don t- Exceed the maximum freezing loads when freezing fresh food. Don t- Give children ice-cream and water ices direct from the freezer. The low temperature may cause 'freezer burns' on lips. Don t- Freeze fizzy drinks. Don t- Try to keep frozen food which has thawed; it should be eaten within 24 hours or cooked and refrozen. Don t- Remove items from the freezer with wet hands. 7
15 EN Trouble - shooting If the appliance does not operate when switched on, check; That the plug is inserted properly in the socket and that the power supply is on. (To check the power supply to the socket, plug in another appliance). Whether the fuse has blown/circuit breaker has tripped/main distribution switch has been turned off. Instruction for use That the temperature control has been set correctly. That the new plug is wired correctly, if you have changed the fitted, moulded plug. If the appliance is still not operating at all after above checks, contact the dealer from whom you purchased the unit. Please ensure that above checks have been done, as a charge will be made if no fault is found. Technical data Brand Appliance The symbol type on the product or on packaging indicates DS that this product may not be treated as household waste. Instead it shall be REFRIGERATOR-FREEZER handed over to the applicable type collection I Total point gross for the volume recycling (l.) of electrical and electronic equipment. By 310 ensuring this product is Total disposed usable of volume correctly, (l.) you will help prevent potential negative 306 consequences for the Freezer environment usable and volume human (l.) health, which could otherwise be otherwise 69 be caused by Refrigerator inappropriate useful waste volume handling of this product. For more detailed information 237 about recycling Freezing of this product, capacity please (kg/24 contact h) your local city office, you household 4 waste disposal service or the shop where you purchased the product. Energy class (1) A+ Power consumption (kwh/year) (2) 265 Autonomy (h) 19 Noise [db(a) re 1 pw] 42 Ecological refrigerating agent R600a (1) Energy class : A D (A+++ = more economical... D = less economical) (2) The real power consumption depends on using conditions and appliance location. 8
16 ES Instrucciones de uso Enhorabuena por haber elegido un electrodoméstico de alta calidad de BEKO, diseñado para prestar servicio durante muchos años. La seguridad es lo primero No conectar el frigorífico a la toma de corriente hasta que no se hayan retirado todos los protectores de embalaje y transporte. Si se transportó horizontalmente, dejar el frigorífico en posición normal al menos 4 horas antes de conectarlo, para que el aceite del compresor se asiente. Al deshacerse de un frigorífico antiguo con cerradura o pestillo en la puerta, comprobar que queda en una posición segura que impida que los niños puedan quedar atrapados. Este frigorífico sólo se debe utilizar para las funciones para las que se ha diseñado. No arrojar el frigorífico al fuego. Su aislamiento contiene sustancias inflamables sin CFC. Es recomendable ponerse en contacto con las autoridades locales para obtener información sobre residuos y centros de reciclaje. No se recomienda utilizar este frigorífico en lugares fríos sin calefacción. (Por ejemplo, garajes, invernaderos, cobertizos, cabañas, etc.) Para conseguir un funcionamiento sin averías y el mejor rendimiento posible del frigorífico, es muy importante leer cuidadosamente estas instrucciones. El incumplimiento de estas instrucciones puede invalidar el derecho a obtener asistencia gratuita durante el periodo de garantía. Conservar estas instrucciones en lugar seguro y donde puedan consultarse fácilmente. Se proporcionarán piezas de recambio originales durante 10 años, después de la fecha de compra del producto. Este aparato no ha sido diseñado para ser usado por personas con discapacidades físicas, sensoriales o mentales; tampoco para personas sin experiencia o conocimiento del aparato, a no ser que estén supervisadas o instruidas por alguien responsable de su seguridad. Los niños deben de estar controlados para que no jueguen con el aparato. 9
17 ES Requisitos eléctricos Antes de conectar el enchufe a la toma de corriente, se debe comprobar que el voltaje y la frecuencia mostradas en la placa de características del interior del frigorífico se corresponden con los de la alimentación eléctrica. Se recomienda conectar este frigorífico a la red de suministro eléctrico mediante una toma de corriente adecuada, con fusible e interruptor y en una posición de fácil acceso. Advertencia. Este frigorífico debe disponer de toma de tierra. Las reparaciones del equipo eléctrico sólo deben ser realizadas por técnicos cualificados. Las reparaciones incorrectas realizadas por personal no cualificado comportan riesgos que pueden acarrear graves consecuencias al usuario del frigorífico. ATENCIÓN! Este electrodoméstico funciona con R600a, un gas respetuoso con el medio ambiente pero inflamable. Durante el transporte y la fijación del electrodoméstico, es necesario tener cuidado para no dañar el sistema de refrigeración. Si el sistema de refrigeración sufre algún daño y se produce una fuga de gases del sistema, mantenga el producto alejado de fuentes de ignición y ventile el recinto durante el tiempo adecuado. ADVERTENCIA: Utilizar sólo los dispositivos mecánicos o los medios recomendados por el fabricante para acelerar el proceso de desescarchado. ADVERTENCIA: Evitar daños en el circuito de refrigeración. ADVERTENCIA: No utilizar aparatos eléctricos dentro de los compartimentos para alimentos del frigorífico, a menos que sean del tipo recomendado por el fabricante. ADVERTENCIA: Si el cable de alimentación estuviera dañado, el fabricante, el servicio de atención al cliente o una persona cualificada deberán sustituirlo para evitar peligros. Instrucciones de uso Instrucciones de transporte 1. El frigorífico sólo se debe transportar en posición vertical. El embalaje debe quedar intacto tras el transporte. 2. Si el frigorífico ha estado colocado horizontalmente durante el transporte, no ponerlo en funcionamiento hasta después de pasadas al menos 4 horas, para permitir que el sistema se asiente. 3. El incumplimiento de estas instrucciones puede provocar daños en el frigorífico y el fabricante no se considerará responsable de los mismos. 4. El frigorífico debe estar protegido de la lluvia, la humedad y demás agentes atmosféricos. Importante! Se debe poner especial cuidado al limpiar o desplazar el frigorífico, para no tocar el extremo inferior de las láminas metálicas del condensador, que se encuentran en la parte trasera del aparato, ya que pueden provocar heridas en dedos y manos. No ponerse de pie ni sentarse en la parte superior del frigorífico, ya que no está diseñado para tal fin. Podría sufrir lesiones o causar daños al electrodoméstico. Comprobar que el frigorífico no queda apoyado sobre el cable principal durante ni después del desplazamiento, ya que puede dañar el cable. No permitir a los niños jugar con el frigorífico ni jugar con sus mandos. Instrucciones de instalación 1. No instalar el frigorífico en habitaciones donde la temperatura pueda descender por debajo de los 10 grados centígrados por la noche o especialmente en invierno, ya que se ha diseñado para funcionar en ambientes con temperaturas entre 10 y 38 grados centígrados. A temperaturas inferiores, es posible que el frigorífico no funcione, reduciéndose el periodo de almacenamiento de los alimentos. 2. No colocar el frigorífico cerca de cocinas o radiadores ni bajo la luz solar directa, ya que el hacerlo puede provocar una mayor carga 10
18 ES para las funciones del frigorífico. Si se instala cerca de una fuente de calor o de un congelador, mantener las distancias laterales mínimas siguientes: Con respecto a cocinas, 30 mm. Con respecto a radiadores, 300 mm. Con respecto a congeladores, 25 mm. 3. Comprobar que hay espacio suficiente en torno al frigorífico para garantizar la circulación de aire (figura 2). Poner la tapa de ventilación posterior en la parte trasera del frigorífico para comprobar la distancia entre el frigorífico y la pared (figura 3). 4. El frigorífico sólo se debe colocar sobre superficies lisas. Los dos pies delanteros se pueden ajustar si es necesario. Para garantizar la verticalidad del frigorífico, ajustar los dos pies delanteros girándolos a derecha o izquierda hasta que el contacto con el suelo sea firme y seguro. El ajuste correcto de los pies evita vibraciones o ruidos excesivos (figura 4). 5. Consultar la sección "Conservación y limpieza" para preparar el frigorífico para su utilización. Detalles del frigorífico (figura 1) 1 - Reja congelador 2 - Ventilador 3 - Alojamiento de termostato y bombilla 4 - Estantes interiores ajustables 5 - Botellero para vinos 6 - Canal de recogida - tubo de desagüe 7 - Tapa del cajón de frutas y verduras 8 - Cajón de frutas y verduras 9 - Pie ajustable 10 - Compartimiento para lácteos 11 - Estante para botes 12 - Estante para botellas Instrucciones de uso Disposición recomendada de los alimentos en el frigorífico Normas para conseguir el almacenamiento e higiene óptimos: 1. El compartimento del frigorífico es para almacenamiento breve de alimentos frescos y bebidas. 2. El compartimento del congelador está clasificado como y es apto para congelar y almacenar alimentos precongelados. Se deben seguir las recomendaciones para el almacenamiento que figuran en el envase de alimentos en todo momento. 3. Los productos lácteos deben almacenarse en el compartimento especial incorporado en el revestimiento interior de la puerta. 4. Los platos cocinados deben almacenarse en recipientes herméticos. 5. Los productos frescos envueltos deben conservarse en el estante. Las frutas y verduras frescas deben estar limpias y almacenarse en los cajones correspondientes. 6. Las botellas se pueden conservar en la sección de la puerta. 7. Para almacenar carne cruda, envolverla en bolsas de polietileno y colocarla en el estante inferior. No permitir que la carne cruda entre en contacto con los alimentos cocinados, para evitar contaminaciones. Por seguridad, almacenar carne cruda sólo durante dos o tres días. 8. Para conseguir la máxima eficiencia, no cubrir los estantes desmontables con papel ni otros materiales que impedirían la circulación libre del aire. 9. No conservar aceite vegetal en los estantes de la puerta. Conservar los alimentos empaquetados, envueltos y cubiertos. Dejar que los alimentos y las bebidas calientes se enfríen antes de congelarlos. Los restos de alimentos enlatados no se deben almacenar dentro de sus latas. 10. No congelar bebidas gaseosas. No consumir demasiado fríos productos como los helados de agua con sabores. 11
19 ES 11. Algunas frutas y verduras se deterioran si se almacenan a temperaturas cercanas a 0 C. Por lo tanto, las piñas, los melones, los pepinos, los tomates y productos similares deben envolverse en bolsas de polietileno. 12. Las bebidas alcohólicas de alta graduación se deben almacenar en posición vertical en recipientes bien cerrados. No almacenar nunca productos que contengan gases inflamables (por ejemplo, botes de nata a presión, aerosoles, etc.) ni sustancias explosivas. Puede haber peligro de explosión. Control y ajuste de la temperatura El mando del termostato controla la temperatura de funcionamiento y se puede situar en cualquier posición entre 1 y 5 (la posición más fría). Si la mano del termostato esta en position O el aparado esta apagado. En este caso ni la bombillia para el ilumination interior no se va encender. La temperatura media del interior del frigorífico debe estar alrededor de 5 C. Por lo tanto, ajustar el termostato para conseguir la temperatura deseada. Algunas zonas del frigorífico pueden estar más frías o más calientes (como el cajón de ensaladas y la parte superior del armario), lo que es perfectamente normal. Se recomienda comprobar periódicamente la temperatura con un termómetro para comprobar que el armario se encuentre a esta temperatura. La apertura frecuente de la puerta provoca un aumento de la temperatura, por lo que se recomienda cerrar la puerta lo antes posible tras su uso. Instrucciones de uso Antes del funcionamiento Comprobación final Antes de empezar a utilizar el frigorífico, comprobar que: 1. Los pies se han ajustado hasta conseguir una nivelación perfecta. 2. El interior está seco y el aire circula libremente por la parte trasera. 3. El interior está limpio conforme a las recomendaciones de la sección Conservación y limpieza. 4. Se ha introducido el enchufe en la toma de corriente y se ha activado la electricidad. Cuando se abre la puerta, la luz interior se enciende. Y observar que: 5. Se oye un sonido cuando arranca el compresor. Los líquidos y gases del sistema de refrigeración también pueden hacer ruidos, esté o no el compresor en funcionamiento. Esto es perfectamente normal. 6. También es normal una ligera ondulación en la parte superior del armario debido al proceso de fabricación utilizado. No es un defecto. 7. Se recomienda ajustar el mando del termostato en la posición intermedia y supervisar la temperatura para asegurarse de que el frigorífico mantenga las temperaturas de almacenamiento deseadas (consultar la sección "Control y ajuste de la temperatura"). 8. No cargar el frigorífico inmediatamente después de encenderlo. Esperar hasta que alcance la temperatura de conservación correcta. Se recomienda comprobar la temperatura con un termómetro de precisión (consultar la sección Control y ajuste de la temperatura). 12
20 ES Almacenamiento de alimentos congelados El congelador es adecuado para almacenar alimentos precongelados durante periodos prolongados, así como para congelar y almacenar carne fresca. Para la conservación de alimentos frescos congelados por usted, consultar la guía de duraciones de conservación del revestimiento interior de la puerta. Si se produce un corte de corriente, no abrir la puerta. Los alimentos congelados no se verán afectados si el corte de corriente dura menos de 12 horas. Si dura más tiempo, se debe comprobar los alimentos para consumirlos inmediatamente o cocinarlos y congelarlos de nuevo. Congelación de alimentos frescos Para obtener los mejores resultados, se deben tener en cuenta las instrucciones siguientes. No congelar grandes cantidades de una vez. La calidad de los alimentos se mantiene mejor si la congelación alcanza su interior lo antes posible. No superar la cantidad de alimentos que es capaz de congelar el frigorífico en 24 h. Si se introducen alimentos calientes en el compartimento del congelador, se obliga a la máquina de refrigeración a funcionar de forma continua hasta congelarlos totalmente. Esto puede provocar temporalmente un enfriamiento excesivo del compartimento de refrigeración. Al congelar alimentos frescos, mantenga el mando del termostato en la posición intermedia. Las cantidades pequeñas de hasta 1/2 kg. se pueden congelar sin necesidad de ajustar el mando de control de temperatura. Poner especial cuidado en no mezclar alimentos ya congelados con alimentos frescos. Cubitos de hielo Instrucciones de uso Rellenar la cubitera hasta el 3/4 de su capacidad y colocarla en el congelador. Desprender las bandejas congeladas con una cuchara o instrumento similar. No utilizar nunca objetos con punta ni bordes afilados, como cuchillos o tenedores. Desescarchado A) Compartimento del frigorífico El compartimento del frigorífico se desescarcha automáticamente. El agua del desescarchado circula hasta el tubo de desagüe a través del recipiente de recogida situado en la parte trasera del frigorífico (figura 5). Durante el desescarchado, se pueden formar gotas de agua en la parte trasera del compartimento del frigorífico donde se encuentra empotrado el evaporador. Algunas gotas pueden permanecer en el revestimiento interior y volver a congelarse después de finalizado el desescarchado. No utilizar nunca objetos con punta o bordes afilados, como cuchillos o tenedores, para retirar las gotas que se hayan vuelto a congelar. Si en cualquier momento el agua del desescarchado no se desagua por el canal de recogida, comprobar que no haya restos de alimentos que obstruyan el tubo de desagüe. El tubo de desagüe se puede limpiar con limpiadores de tuberías o productos similares. Compruebe que el tubo está permanentemente situado con su extremo en la bandeja de recogida para prevenir que el agua se vierta sobre la instalación eléctrica o en el suelo (figura 6). 13
21 ES B) Compartimento del congelador El desescarchado es muy sencillo y no presenta complicaciones gracias al especial recipiente de recogida. Desescarchar dos veces al año o cuando se forme una capa de hielo de unos 7 mm. Para iniciar el proceso de desescarchado, desenchufar el frigorífico retirando el enchufe de la toma de corriente. Los alimentos deben ser envueltos en varias capas de papel de periódico y situados en un lugar frío (por ejemplo, un frigorífico o despensa). Para acelerar el desescarchado, se pueden colocar cuidadosamente recipientes con agua caliente en el congelador. No utilizar nunca objetos con punta o bordes afilados, como cuchillos o tenedores, para retirar el hielo. No utilizar nunca secadores de pelo, calentadores eléctricos u otros aparatos eléctricos para forzar el desescarchado. Recoger con una esponja el agua de desescarchado almacenada en la parte inferior del compartimento del congelador. Después de desescarchar, secar completamente el interior. Introducir el enchufe en la toma de corriente y encender el interruptor. Sustitución de la bombilla interior Para cambiar la bombilla utilizada para iluminar el frigorífico, póngase en contacto con el servicio técnico autorizado. Las bombillas de este electrodoméstico no sirven para la iluminación en el hogar. Su propósito es el de ayudar al usuario a colocar los alimentos en el frigorífico o congelador de forma cómoda y segura. Las lámparas utilizadas en este electrodoméstico deben soportan unas condiciones físicas extremas como temperaturas inferiores a -20º C. Instrucciones de uso Conservación y limpieza 1. Se recomienda desenchufar el frigorífico retirando el enchufe de la toma de corriente antes de realizar la limpieza. 2. No utilizar nunca en la limpieza instrumentos afilados o sustancias abrasivas, jabones, limpiadores domésticos, detergentes ni ceras abrillantadoras. 3. Utilizar agua tibia para limpiar el armario del frigorífico y secarlo con un paño. 4. Utilizar un paño humedecido con la solución de una cucharilla de café de bicarbonato sódico en un vaso grande de agua, para limpiar el interior. Secarlo con un trapo. 5. Asegurarse de que no entra agua en la caja de control de la temperatura. 6. Si no se va a utilizar el frigorífico durante un largo periodo, desenchufarlo, retirar toda la comida, limpiarlo y dejar la puerta entreabierta. 7. Se recomienda pulir las piezas de metal del producto (por ejemplo, la puerta exterior, los laterales del armario) con una cera de silicona (cera para coches) para proteger los acabados de alta calidad. 8. El polvo acumulado en el condensador, situado en la parte trasera del frigorífico, debe retirarse una vez al año con un aspirador. 9. Comprobar regularmente los cierres herméticos de la puerta para asegurarse de que estén limpios y sin restos de alimentos. 10. Nunca: Limpiar el frigorífico con material inadecuado; por ejemplo, productos derivados del petróleo. Exponerlo a altas temperaturas. Restregarlo, frotarlo, etc., con materiales abrasivos. 11. Retirada de la cubierta de lácteos y la bandeja de la puerta: Para retirar la cubierta de lácteos, levantar primero la cubierta unos 2,5 cm (una pulgada) y tirar desde el lateral que tiene una abertura en la cubierta. Para retirar la bandeja de la puerta, retirar todo su contenido y, a continuación, empujar simplemente la bandeja hacia arriba desde su base. 12. Comprobar que el recipiente especial de plástico de la parte posterior del frigorífico, que recoge el agua del desescarchado, esté limpio en todo momento. Si se desea retirar la bandeja para limpiarla, seguir las instrucciones siguientes: Desenchufar el frigorífico retirando el enchufe de la toma de corriente. Con unos alicates, ondular ligeramente el aro del compresor para poder retirar la bandeja. 14
22 ES Levantarlo. Limpiarlo y secarlo. Volver a colocarlo, invirtiendo la secuencia de operaciones. 13. Las grandes acumulaciones de hielo afectan al funcionamiento del congelador. Reposicionamiento de la puerta Continúe en orden de número (figura 7). Prácticas correctas e incorrectas Correcto- Limpiar y desescarchar periódicamente el frigorífico (consultar la sección "Desescarchado") Correcto- Conservar la carne cruda y de ave bajo los productos cocinados y los productos lácteos. Correcto- Retirar las hojas inservibles de las verduras y limpiar toda suciedad. Correcto- Dejar la lechuga, el repollo, el perejil y la coliflor con el tallo. Correcto- Envolver el queso primero en papel resistente a la grasa y, a continuación, en una bolsa de polietileno, sacando todo el aire posible. Para obtener los mejores resultados, sacar los alimentos del compartimento del frigorífico una hora antes de comerlos. Correcto- Envolver la carne cruda y de ave en polietileno o papel de aluminio sin apretar. Esto evita que se sequen. Correcto- Envolver el pescado y los despojos en bolsas de polietileno. Correcto- Envolver en bolsas de polietileno o en papel de aluminio los alimentos que desprendan olores fuertes o que se puedan secar, o bien introducirlos en recipientes herméticos. Correcto- Envolver bien el pan para mantenerlo fresco. Correcto- Enfriar los vinos blancos, las cervezas y el agua mineral antes de servirlas. Correcto- Comprobar el contenido del congelador de vez en cuando. Correcto- Conservar los alimentos el menor tiempo posible y cumpla sus fechas de caducidad. Correcto- Almacenar los alimentos precongelados conforme a las instrucciones proporcionadas en los envases. Instrucciones de uso Correcto- Elegir siempre alimentos frescos de alta calidad y comprobar que estén totalmente limpios antes de congelarlos. Correcto- Preparar los alimentos frescos para su congelación en pequeñas raciones para garantizar su rápida congelación. Correcto- Envolver todos los alimentos en papel de aluminio o bolsas de polietileno para congelador, haciendo salir todo el aire. Correcto- Envolver los alimentos congelados inmediatamente después de adquirirlos e introducirlos en el congelador lo antes posible. Correcto- Descongelar los alimentos en el compartimento del frigorífico. Incorrecto- Almacenar los plátanos en el compartimento del frigorífico. Incorrecto- Almacenar melones en el frigorífico. Se deben enfriar por cortos periodos y envolver para evitar que den olor a otros alimentos. Incorrecto- Cubrir los estantes con cualquier material protector que pueda obstruir la circulación de aire. Incorrecto- Almacenar sustancias venenosas o peligrosas en el frigorífico. Ha sido diseñado sólo para el almacenamiento de alimentos comestibles. Incorrecto- Consumir alimentos almacenados durante periodos excesivamente largos. Incorrecto- Almacenar alimentos frescos y cocinados en un mismo recipiente. Deben envolverse y almacenarse de forma separada. Incorrecto- Permitir que alimentos descongelados o los jugos de los alimentos goteen sobre otros alimentos. Incorrecto- Dejar la puerta abierta durante largos periodos, lo que encarece el coste de funcionamiento del frigorífico y provoca excesiva formación de hielo. Incorrecto- Utilizar objetos con punta o bordes afilados, como cuchillos o tenedores, para retirar el hielo. 15
23 ES Incorrecto- Introducir alimentos calientes en el frigorífico. Dejar primero que se enfríen. Incorrecto- Colocar en el congelador botellas o botes herméticos completamente rellenos de líquidos gaseosos, ya que pueden reventar. Incorrecto- Superar la carga máxima de congelación al congelar alimentos frescos. Incorrecto- Entregar a los niños helados o cubitos de hielo directamente del congelador. La baja temperatura puede provocar quemaduras en los labios. Incorrecto- Congelar bebidas gaseosas. Incorrecto- Intentar congelar de nuevo alimentos que se han descongelado. Deben consumirse antes de 24 horas o cocinarse y volverse a congelar. Incorrecto- Retirar alimentos del congelador con las manos húmedas. Resolución de problemas Si el frigorífico no funciona al conectarlo, comprobar: Si se ha introducido correctamente el enchufe en la toma de corriente y si la alimentación eléctrica está activada. (Para comprobar la alimentación eléctrica de la toma de corriente, enchufe otro electrodoméstico.) Si el fusible está fundido, si el automático ha saltado o si el interruptor principal está apagado. Si el control de temperatura está ajustado correctamente. Si el nuevo enchufe está correctamente cableado, en caso de que se haya cambiado el enchufe. Si el frigorífico sigue sin funcionar después de las comprobaciones anteriores, ponerse en contacto con el proveedor que lo suministró. Asegurarse de que se realicen las comprobaciones anteriores, ya que en caso de que realmente no haya ninguna avería, el proveedor puede exigirle sus gastos. Instrucciones de uso Advertencias sobre los ruidos de funcionamiento del aparato Con objeto de mantener constante la temperatura en el interior de su frigorffico, el compresor se conecta de tiempo en tiempo. Esto origina unos ruidos que son perfectamente naturales y se deben a razones técnicas. Tan pronto como el aparato ha alcanzado la temperatura de servicio, la intensidad de estos ruidos disminuye sensiblemente. Unos ruidos como de murmullos sordos son inevitables durante el funcionamiento del compresor. Pueden aumentar brevemente de intensidad al conectarse el motor (compresor) del aparato. Los ruidos en forma de gorgoteo se producen al penetrar elliquido refrigerante en los tubas delgados una vez que ha entrada en funcionamiento el compresor. Unos breves ruidos en forma de clic sólo se escuchan cuando el termostato conecta y desconecta el compresor. Unos ruidos en forma de chasquido pueden surgir... - durante el cicio de desescarchado del aparato - al enfriarse o calentarse el aparato (dilatación del material) En caso de alcanzarse un nivel sonora excesivamente elevado durante el funcionamiento del frigorifico, ello tal vez tenga una fácil solución. EI aparato se encuentra en posición desnivelada Nivelarlo con los soportes roscados que incorpora o calzándolo. En caso de estar el aparato en contacto con muebles u otros aparatos Separario de los muebles o aparatos con los que estuviera en contacto. Los cajones, estantes y soportes oscilan o están agarrotados Revisar log elementos afectados. En caso necesario, volverlos a colocar en su posición correcta. Las botellas o Ios recipientes en el aparato entran en contacto mutuo Separar algo las botellas y los recipientes. 16
2PT-175-NF. Instructions for use. Instrucciones de uso. Instruções para utilização
 2PT-175-NF GB ES PT Instructions for use Instrucciones de uso Instruções para utilização GB-Index 1-8 Safety first.../1 Electrical requirements.../2 Transportation instructions.../2 Installation instructions.../2
Apliques A BL
 Apliques A06 23 30 BL 45 Apliques A06 23 30 BL Apliques A06 14 30 Ne, A06 23 30 BL 48 LUMIK. IP40 Rectangular y estilizada. Gracias a su delicada luz esta luminaria de diseño sobrio envuelve los espacios
Proyectores P NE
 Proyectores P05 01 36 NE 91 Proyectores P05 01 36 NE 92 LUMIK. IP20 Base circular y cuerpo tubular. Este proyector montado en superficie es compacto y potente, a la vez que discreto y de líneas limpias.
Minibar User Manual MBA 4000 W
 Minibar User Manual MBA 4000 W Read this manual prior to initial operation of the product! Dear Customer, We hope that your product, which has been manufactured in modern facilities and passed through
INSTALLER AND OWNER GUIDE
 5118237/01 Model 0581901 Chester Log Effect Electric Stove This guide is intended to help you install and care for your Baxi Fires Division electric stove. Please read carefully before installing and using
electric knife sharpener
 electric knife sharpener USER GUIDE Now that you have purchased a Kitchen Living product you can rest assured in the knowledge that as well as your year parts and labour guarantee you have the added peace
Absorbentes solo aceites
 Absorbentes solo aceites SOLO ACEITES e hidrocarburos, rechaza el agua, por lo que está especialmente indicado para aplicaciones en acuíferos, puertos y lugares donde, en presencia de agua, se requiera
SINGLE BURNER STOVE IMPORTANT OPERATING INSTRUCTIONS COOKING & STORAGE POSITION PARTS IDENTIFICATION
 SINGLE BURNER STOVE OPERATING INSTRUCTIONS PARTS IDENTIFICATION Electronic Lighter Ignites the burner. Liquid Guard Holds liquid overflow. Windshield Prevents flame from being extinguished by wind. Ensures
Middle Panel Panneau du milieu Panel medio 1
 A Desktop Dessus de bureau Tapa del escritorio B Left Panel Panneau gauche Costado izquierdo C Middle Panel Panneau du milieu Panel medio D Right Panel Panneau droit Costado derecho E Back Panel Panneau
1 Pan - 6 Ways to Cook! Works in the Oven & On All Stovetops! electric gas ceramic induction. Broil Bake Sauté Fry Steam Braise
 *only use non-metal utensils 1 Pan - 6 Ways to Cook! Broil Bake Sauté Fry Steam Braise Non-stick Cerami-Tech Ceramic Coating Even Heating Good for All Surfaces Easy Cleaning Durable, Stain Resistant Coating
Product instruction manual Ream Cutting Systems RE3943, RE3946, RE3947, RE3971, RE3952E
 Product instruction manual Ream Cutting Systems RE3943, RE3946, RE3947, RE3971, RE3952E The Trimfast Ream Cutters are reliable, high performance cutters that will give you the results you need quickly
AFC-50 Automatic French Fry Cutter Instruction Manual
 AFC-50 Automatic French Fry Cutter Instruction Manual Fry Factory Inc. 67 Watts Ave, Charlottetown, PEI, C1E 2B7, Canada Phone: 902-368-2900 Fax: 902-368-8645 Email: info@fryfactoryinc.com Website: www.fryfactoryinc.com
Instructions for use, installation, and connection. Gas Built in Hob
 Instructions for use, installation, and connection Gas Built in Hob RB3311SGBS RB3312SGBS RB3311DGBS RB3311MGBS RB3311NGBS RB6313SGBST RB6323SGBST RB6314SGBS RB6313DGBST RB6313MGBST RB7312SGBS RB7313SGBST
Getting Started Guide
 Getting Started Guide Assembly Instructions User Guide Table Top Maintenance Warranty Information (800) 445-4559 www.designingfire.com Fax: 651-305-6347 @designingfire.com #253915-2528907 Installers: Please
MAQUINARIA PARA INSTALACIONES DE GRIFOS Y DISPENSADORES PORTÁTILES
 MAQUINARIA PARA INSTALACIONES DE GRIFOS DISTRIBUCIÓN DE CERVEZA ARTESANA Y DISTRIBUIDORES OFICIALES LINDR -PENÍNSULA IBÉRICA- www.beerbox.es MAQUINARIA PARA INSTALACIONES DE GRIFOS Lindr empresa Checa
Meat Slicer INSTRUCTION MANUAL CAUTION! ONE YEAR LIMITED WARRANTY
 ONE YEAR LIMITED WARRANTY INSTRUCTION MANUAL The original registered owner of this product should contact SKYFOOD EQUIPMENT LLC at 305-868-16 for any warranty problems or service. SKYFOOD EQUIPMENT LLC
Cajas industriales - Protección IP-65. Industrial enclosures - IP-65 protection
 Cajas industriales Protección IP65 Industrial enclosures IP65 protection CAJAS INDUSTRIALES PROTECCIÓN IP65 Industrial enclosures IP65 Protection Grado de protección/degree of protection IP65* *Dependiendo
Electric 2-STAGE SHARPENING FEATURES: system allows for safe, easy knife sharpening - Non-slip feet allows sharpener to stay in place while in use
 Electric FEATURES: - 2-Stage electric sharpening system allows for safe, easy knife sharpening - Non-slip feet allows sharpener to stay in place while in use 2-STAGE SHARPENING IMPORTANT SAFEGUARDS SAVE
S E L E C T I O N. Abdominal Crunch. User manual
 and S E L E C T I O N T H E S T R E N G T H E V O L U T I O N User manual and and The identification plate of the and manufacturer, affixed along side the seat on the frame of the weight stack, gives the
Operator s Manual. Medium-Duty Electric Slicers ENGLISH. Item Model Description Drive Peak HP Voltage Amps Hz Plug
 Medium-Duty Electric Slicers 40950 40951 Item Model Description Drive Peak HP Voltage Amps Hz Plug 40950 SLM250/S 10 Knife Medium-Duty Slicer 1/3 2.5 Belt 120 60 5-15P 40951 SLM300P/S 12 Knife Medium-Duty
User Manual. 110 Cup (55 Cup Raw) Rice Cooker. Model: 177GRCLP, 177GRCNAT 10/2017. Please read and keep these instructions. Indoor use only.
 Rice Cooker. Model: 177GRCLP, 177GRCNAT 10/2017. Please read and keep these instructions. Indoor use only.") 110 Cup (55 Cup Raw) Rice Cooker Model: 177GRCLP, 177GRCNAT 10/2017 Please read and keep these instructions. Indoor use only. www.avantcoequipment.com 1 NOTE: Save these instructions for future reference.
110 Cup (55 Cup Raw) Rice Cooker Model: 177GRCLP, 177GRCNAT 10/2017 Please read and keep these instructions. Indoor use only. www.avantcoequipment.com 1 NOTE: Save these instructions for future reference.
HARVIA IRON STOVE Instructions for installation and use
 HARVIA IRON STOVE EN Instructions for installation and use Harvia 10 08012014VTT Congratulations on a good choice of fireplace and thank you for your confidence in Harvia s products. Read these instructions
Sampling Guidelines. Multnomah County Health Department. Portland, OR 97232
 Sampling Guidelines Multnomah County Health Department 847 NE 19 th Ave. Suite 350 Portland, OR 97232 Processed Food Sampling - Processed foods include bakery items, jams, jellies, jerky, cheese, salsa,
PS-10 PS-12D PS-12. Primo Slicer Manual FOR OPERATOR-DO NOT DISCARD
 PS-10 PS-12D PS-12 Primo Slicer Manual FOR OPERATOR-DO NOT DISCARD TABLE OF CONTENTS 1. BRIEF INTRODUCTION 2. OPERATION 3. SLICING 4. MAINTENANCE AND CLEANING 5. TROUBLESHOOTING IMPORTANT The operator
INSTANT GARAGE MODEL NO: CIG81224 ASSEMBLY INSTRUCTIONS PART NO: ORIGINAL INSTRUCTIONS
 INSTANT GARAGE MODEL NO: CIG81224 PART NO: 3503578 ASSEMBLY INSTRUCTIONS ORIGINAL INSTRUCTIONS GC1117 INTRODUCTION Thank you for purchasing this CLARKE Instant Garage. When erected, the CIG81224 garage
Harrie Leenders Fuga el - Instructions for Installation, Use and Maintenance INSTRUCTIONS FOR INSTALLATION, USE AND MAINTENANCE
 INSTRUCTIONS FOR INSTALLATION, USE AND MAINTENANCE FUGA el 1 2 1. Flue 2. Case 3. Ceramic glass 4. Aeration slide 5. Convection fins 6. Door handle 7. Base 3 4 READ THE INSTRUCTION BOOKLET AND THESE SUPPLEMENTARY
Guida rapida di utilizzo Guía Rápida de Uso Guia Ràpido de Utilização Quick Start Guide Mode d emploi rapide FL-F60 MTL
 Guida rapida di utilizzo Guía Rápida de Uso Guia Ràpido de Utilização Quick Start Guide Mode d emploi rapide FL-F60 MTL FL-F60 MTL 1 2 3 4 5 6 7 8 9 10 11 12 13 14 15 16 17 18 19 1 Front control panel
Espacio para la pegatina de su hoja de etiquetas correspondiente a la asignatura indicada en la cabecera del examen: Calificación
 Examen 2010-11 / SEP Plan: [G25] ACCESO A GRADO PARA MAYORES DE 25 Asignatura: [538] INGLÉS Profesor: Ruth Amarilis Cotto Benitez Fecha: 10/09/2011 Horario peninsular 19:30 a 21:00 Modelo 1 Pegatina del
Installation & User Manual EW5000 Outdoor Cooking Fire
 Installation & User Manual EW5000 Outdoor Cooking Fire IMPORTANT: Please read this manual before installing and using the ESCEA EW5000 Cooking fire. Failure to follow these instructions may lead to a possible
USER INFORMATION For AcuTemp PX1L Carrying Case and AcuTemp PXC Coolant Packs (Formerly VaxiPac and VaxiSafe )
") USER INFORMATION For AcuTemp PX1L Carrying Case and AcuTemp PXC Coolant Packs (Formerly VaxiPac and VaxiSafe ) AcuTemp Thermal Systems 2900 Dryden Road Dayton, Ohio 45439 U.S.A. Tel: 937.312.0114 Fax:
USER INFORMATION For AcuTemp PX1L Carrying Case and AcuTemp PXC Coolant Packs (Formerly VaxiPac and VaxiSafe ) AcuTemp Thermal Systems 2900 Dryden Road Dayton, Ohio 45439 U.S.A. Tel: 937.312.0114 Fax:
Est A TRADITION OF EXCELLENCE INSTRUCTION BOOK.
 Est. 1887 A TRADITION OF EXCELLENCE INSTRUCTION BOOK www.wolseleygrooming.co.uk Stockshop (L.E.) Ltd., Lodge Trading Estate, Broadclyst, Exeter EX5 3BS Email: service@stockshop.co.uk Tel: 01392 460077
RITA SLOW COOKER NSC-15 (NSC-15F) Save these instruction for future use
 Save these instruction for future use") RITA SLOW COOKER NSC-15 (NSC-15F) r INSTRUCTION MANUAL Save these instruction for future use When using electrical appliances, basic safety precautions should always be followed, including the following:
RITA SLOW COOKER NSC-15 (NSC-15F) r INSTRUCTION MANUAL Save these instruction for future use When using electrical appliances, basic safety precautions should always be followed, including the following:
View slicer 800-S. meat pusher. handle. thumb. screw. sharpener. table release. handle. securety. screw. knifescraper
 View slicer 800-S meat pusher handle thumb screw sharpener securety screw table release handle knifescraper control on knob off knob thickness lamp regulator knob safety guard ddddddd meat table knife
THE EDGE12 SLICER. MODEL EDGE12-2 (220/50/1 voltage) FORM (July 2012) EDGE12 SLICER
 FORM (July 2012) EDGE12 SLICER") EDGE12 SLICER THE EDGE12 SLICER MODEL EDGE12-1 (120/60/1 voltage) EDGE12-2 (220/50/1 voltage) ML-136246 ML-136247 701 S. RIDGE AVENUE TROY, OHIO 45374-0001 937 332-3000 www.hobartcorp.com FORM 35283 (July
EDGE12 SLICER THE EDGE12 SLICER MODEL EDGE12-1 (120/60/1 voltage) EDGE12-2 (220/50/1 voltage) ML-136246 ML-136247 701 S. RIDGE AVENUE TROY, OHIO 45374-0001 937 332-3000 www.hobartcorp.com FORM 35283 (July
Intrepid 2 Intrepid 3
 Intrepid 2 Intrepid 3 Model Nos. V 10 / V10-3 NAT GAS Model Nos. V12 / V12-3 L.P.G DECORATIVE COAL EFFECT GAS STOVE USER INSTRUCTIONS This appliance is only for use on Natural Gas (G20) at a supply pressure
ELECTRIC KNIFE SHARPENER User Guide
 BRAND ELECTRIC KNIFE SHARPENER User Guide Item: 717822 Ginnys.com 800-544-1590 Facebook.com/GinnysBrand Pinterest.com/GinnysBrand Ginnys.com/Blog Thank you for purchasing a Ginny s Brand Electric Knife
MODEL MULTI-BRAND REMOTE CONTROL
 MODEL 57999 MULTI-BRAND REMOTE CONTROL This remote control can be programmed to activate up to two products, such as a garage door opener, gate operator, or commercial door operator. Each button on the
Installation and User s Manual 12 x 10 MOTORIZED AWNING
 12 x 10 MOTORIZED AWNING Installation and User s Manual 12 x 10 MOTORIZED AWNING 088-1763-0 Stop Please read and understand this manual before any assembly or use of this product. Before beginning assembly
REPUESTOS FRIGORÍFICO TEKA
 REPUESTOS FRIGORÍFICO TEKA Referencia: 81641024 CAJA PANEL CONTROL CB-340 S Referencia: 81634229 CAJA PLACA ELECTRICA CI 345 VR 04 Referencia: 81698812 MARCO EMBELL DISPLAY ARC P NFE1 3 Referencia: 81698314
INSTRUCTIONS FOR INSTALLATION, USE AND MAINTENANCE YSEN
 INSTRUCTIONS FOR INSTALLATION, USE AND MAINTENANCE YSEN READ THE INSTRUCTION BOOKLET AND THESE SUPPLEMENTARY INSTRUCTIONS CAREFULLY BEFORE INSTALLATION These instructions together with those in the instruction
EXPLOSIONADO DE PARTES
 EXPLOSIONADO DE PARTES REFRIGERADOR DUPLEX Modelo: CABINET PARTS Mexico S.A de C.V. 1/25 CCR R e f Descripción CABINET PARTS C a n t Numero de Parte 2 Front Roller (2) 1 4386774 3 Screw (2) 1 3400517 4
Instruction Manual please read before use
 Instruction Manual please read before use Slim Burner Insert (patent pending) 307 Tchoupitoulas Street, Suite 100 New Orleans, LA 70130 p : 888.596.6960 504.596.6960 e : office@brasafire.com www.brasafire.com
MULTI-FUEL STOVE INSTALLATION AND USER INSTRUCTIONS
 PRIORY MULTI-FUEL STOVE INSTALLATION AND USER INSTRUCTIONS The Priory stove has a nominal heat output of 8Kw. and a weight of 80 kg. The flue gas mass flow is 5.4g/s for mineral fuel and 6.3g/s for wood
Cordless Electric Teakettle. Model 685
 Cordless Electric Teakettle Model 685 Important Safeguards When using electrical appliances, basic safety precautions should always be followed, including the following: 1. Read all instructions. 2. Do
Installation and Maintenance Manual
 Freestanding Gas Stove MODEL: PGS2005 GPEBB20R GPEBW20R Installation and Maintenance Manual Warning Maintenance products should be carried out by professional and technical personnel with relevant qualification,
Curso sobre el Programa de intercambio de datos de inspecciones de seguridad en rampa (IDISR)
") Curso sobre el Programa de intercambio de datos de inspecciones de seguridad en rampa (IDISR) Módulo 5 Descripción de los ítems que son evaluados en las inspecciones en rampa (Parte II) 12 al 16 de septiembre
Curso sobre el Programa de intercambio de datos de inspecciones de seguridad en rampa (IDISR) Módulo 5 Descripción de los ítems que son evaluados en las inspecciones en rampa (Parte II) 12 al 16 de septiembre
Travel Accommodations
 - Finding En dónde puedo encontrar? Asking for directions to accommodation Where can I find?... una habitación para rentar?... a room to rent?... un hostal?... a hostel?... un hotel?... a hotel?... una
Instruction Manual please read before use
 Instruction Manual please read before use XL Burner (patent pending) 307 Tchoupitoulas Street, Suite 100 New Orleans, LA 70130 p : 888.596.6960 504.596.6960 e : office@brasafire.com www.brasa.co Item Identification
FAMILY INDEPENDENCE ADMINISTRATION Seth W. Diamond, Executive Deputy Commissioner
 FAMILY INDEPENDENCE ADMINISTRATION Seth W. Diamond, Executive Deputy Commissioner ` James K. Whelan, Deputy Commissioner Policy, Procedures and Training Lisa C. Fitzpatrick, Assistant Deputy Commissioner
MAX Series 9514 OPERATOR S MANUAL
 MAX Series 9514 OPERATOR S MANUAL Persons under age 18 are not permitted to operate or have accessibility to operate this equipment per U.S. Dept. Of Labor Employment Standards Administration Fact Sheet
1000M MANUAL Signature Series Slicer OPERATORS MANUAL
 1000M MANUAL Signature Series Slicer OPERATORS MANUAL Persons under age 18 are not permitted to operate or have accessibility to operate this equipment per U.S. Dept. Of Labor Employment Standards Administration
WARNING USING AND CARING. for use in extreme or varied soil conditions. For optional sand pegs Oztent recomends use of a Bluescrew Oztent Edition.
 OWNER S MANUAL WARNING Never use any fuel-burning products (stoves, lanterns, heaters, etc.) inside or within proximity of this tent. Use of fuel-burning products inside or within proximity of this tent
Safety & Warnings. A Material Safety Data Sheet for this product is available upon request by contacting
 Safety & Warnings Warning: This kit contains materials that may be harmful if used incorrectly. Please read all instructions before beginning. Failure to follow these instructions and warnings could result
ORIGO 1500, 3000 ORIGO 6000, 6100, Alcohol stoves Operating manual Spirituskocher Bedienungsanleitung... 24
 C C _Origo_5 6.book Seite Freitag,. Dezember 8 : 5 EN Alcohol stoves Operating manual............... 8 DE Spirituskocher Bedienungsanleitung............ ORIGO FR ES Cuisinières à alcool Notice d utilisation..............
Thank you for purchasing ANYWARE cookware by Little Griddle! ANYWARE
 A WORD FROM THE MAKER (READ ME FIRST!!!): Thank you for purchasing ANYWARE cookware by Little Griddle! ANYWARE is made from cast aluminum with an advanced ceramic coating and a hightemperature nonstick
INSTRUCTIONS MANUAL CAST IRON STOVE
 INSTRUCTIONS MANUAL CAST IRON STOVE CA-SGB06 Warning: Use outdoors only Read the instructions before using the appliance and retain for future reference. 1 These instructions give some important information
User Manual for Separera 40
 User Manual for Separera 40 User Manual for Separera 40 Congratulations on your purchase of a Separera 40. Before installing your new Separera 40, we recommend that you read through this instruction in
PATRIOT INSTRUCTION MANUAL SL300C 12 MEAT SLICER 1/2 HP
 INSTRUCTION MANUAL SL300C 12 MEAT SLICER 1/2 HP This manual contains important information regarding your Patriot unit. Please read this manual thoroughly prior to equipment set-up, operation and maintenance.
Mod. MONTANA WOOD BURNING STOVE USAGE AND MAINTENANCE INSTRUCTIONS
 Mod. MONTANA WOOD BURNING STOVE USAGE AND MAINTENANCE INSTRUCTIONS Nutrients Ashes Fertilizer Wood: an ecological fuel Wood is a renewable source of energy which answers the energy and environmental demands
Alma Mons EN Owners s manual INSTALATION, ADJUSTMENT AND OPERATING INSTRUCTION
 Alma Mons Owners s manual INSTALATION, ADJUSTMENT AND OPERATING INSTRUCTION EN 12815 1 INTRODUCTION Congratulations! You have invested in energy efficient and high quality product-alma Mons wood burning
1612P MODEL 1612P SLICER MODEL EXECUTIVE OFFICES 701 RIDGE AVENUE TROY, OHIO FORM (4-95)
") 1612P MODEL 1612P SLICER MODEL 1612P ML-104587 EXECUTIVE OFFICES 701 RIDGE AVENUE TROY, OHIO 45374-0001 FORM 19370 (4-95) Installation, Operation, and Care of MODEL 1612P SLICER SAVE THESE INSTRUCTIONS
1612P MODEL 1612P SLICER MODEL 1612P ML-104587 EXECUTIVE OFFICES 701 RIDGE AVENUE TROY, OHIO 45374-0001 FORM 19370 (4-95) Installation, Operation, and Care of MODEL 1612P SLICER SAVE THESE INSTRUCTIONS
USER MANUAL BMU WORKCAGE. CONFORM TO THE MACHINE DIRECTIVE 2006/42/EC and to EN1808 (1999)
") USER MANUAL BMU WORKCAGE CONFORM TO THE MACHINE DIRECTIVE 2006/42/EC and to EN1808 (1999) All persons operating this equipment must read and completely understand this manual. Any operation in violation
USER MANUAL BMU WORKCAGE CONFORM TO THE MACHINE DIRECTIVE 2006/42/EC and to EN1808 (1999) All persons operating this equipment must read and completely understand this manual. Any operation in violation
PREVENTION OF FALLS. If there is an object or spill on the floor? Immediately put up yellow caution sign & then clean up the spill
 PREVENTION OF FALLS What do you do If there is an object or spill on the floor? Immediately put up yellow caution sign & then clean up the spill If you need to reach something from a high shelf? Use a
User Manual Manual del usuario
 User Manual Manual del usuario GAZEBO REPLACEMENT CANOPY TOLDO DE RECAMBIO PARA GLORIETAS English... Page 3 Español... Página 11 * Gazebo and netting not included. * Glorieta y mallas no incluidas. AFTER
User Manual. Manual. del usuario SHOWER CHAIR WITH BACK REST SILLA PARA DUCHA CON RESPALDO. English...Page 04 Español...Página 13.
 User Manual Manual del usuario SHOWER CHAIR WITH BACK REST SILLA PARA DUCHA CON RESPALDO English...Page 04 Español...Página 13 CERTIFIED myhansecontrol.com User-friendly Manual ID: #07177 Contents Overview/assembly...3
WATERS GLOBAL SERVICES CUSTOMER FOCUS/OPERATIONAL EXCELLENCE PROGRAM
 WATERS GLOBAL SERVICES CUSTOMER FOCUS/OPERATIONAL EXCELLENCE PROGRAM Juan Vicente Marí Service Manager España y Portugal juan_vicente_mari@waters.com 2012 Waters Corporation 1 Excelencia en el Servicio
Simplified Instructions for Use BSO45
 Simplified Instructions for Use BSO45 Control Panel 1 2 3 4 5 6 7 C 11 Cooking Functions 12 Temperature Indicator 13 Electric Clock 14 Temperature Symbol 15 Electric Clock Symbol 9 8 16 Symbol 17 Symbol
17500 VRANJE, SRBIJA Radnička 1, Tel.: 017/ INSTRUCTIONS FOR INSTALLATION, ADJUSTMENT AND USE
 17500 VRANJE, SRBIJA Radnička 1, Tel.: 017/421-121 STOVE OF THICK METAL SHEETS PREMIJER PREMIJER K INSTRUCTIONS FOR INSTALLATION, ADJUSTMENT AND USE 1.Technical data about continuously burning stove of
PATRIOT INSTRUCTION MANUAL SL300ES, 300ES MEAT SLICER
 PATRIOT INSTRUCTION MANUAL SL300ES, 300ES-12 12 MEAT SLICER This manual contains important information regarding your unit. Please read this manual thoroughly prior to equipment set-up, operation and maintenance.
Read all instructions and warnings before using this fireplace. WARNING
 Frame User Manual 1 Operating Manual Thank you for purchasing this Signi Fires product. Signi Fires is very safety conscious, we have taken every care in designing, manufacturing and assembling your Signi
Installation Instructions Free-Standing and Front Control Electric Ranges
 Installation Instructions Free-Standing and Front Control Electric Ranges BEFORE YOU BEGIN Read these instructions completely and carefully. IMPORTANT Save these instructions for local inspector s use.
Before using your stove for the first time, we would like to give you useful instructions and security advice for the correct use of our product.
 instruction manual & security advices for decoration fire places of BFT / 01.2007 Model: Brennkammer Vario We congratulate for buying your non-smoking-stove Introduction BFT decoration fire places guarantee
Installation Instructions Electric Slide-In Ranges
 Installation Instructions Electric Slide-In Ranges 2 PREPARE THE OPENING (FOR INDOOR USE ONLY) See illustrations for all rough-in and spacing dimensions. The range may be placed with 0 clearance (flush)
GLM300 Semi-auto Slicer
 Frequency: Before each days use Division: Location: User: Supervisor: Preceda Code: Article Number:
Gas Conversion Kits and Instructions
 Gas Conversion Kits and Instructions INSTALLATION FORM RGM 432/433-GC (Version D.1) Obsoletes Form RGM 432/433-GC (Version D) APPLIES TO: Model FT and Model SFT All gas conversion must be done by a qualified
Genius 16-Cup Salad Chopper
 Genius 16-Cup Salad Chopper Dear Genius-Customer, It generally takes quite a while from the time you start to prepare a meal to the time it is ready to serve. You have to cut, dice, grate, keep them fresh,
MESAS CENTRO & TV B 01
 A MESAS CENTRO & TV PON ESTILO A TU CASA. RECURRE A LOS MUEBLES DE ESTE CATALOGO. TENEMOS PIEZAS PENSADAS PARA QUE GOCES DEL MEJOR DISEÑO SIN DESEQUILIBRAR TU PRESUPUESTO. OBJETOS QUE TE GUSTARÁN DURANTE
Blue Series Hot Melt Hose with RediFlext II Hanger System
 Instruction Sheet P/N 1124594_01 Blue Series Hot Melt Hose with RediFlext II Hanger System Safety WARNING! Allow only personnel with appropriate training and experience to operate or service the equipment.
FORM (Apr. 2006)
") 2212 Slcier MODEL 2212 SLICER MODEL 2212 ML-136132 701 S. RIDGE AVENUE TROY, OHIO 45374-0001 937 332-3000 www.hobartcorp.com FORM 35215 (Apr. 2006) Installation, Operation, and Care of MODEL 2212 Slicer
2212 Slcier MODEL 2212 SLICER MODEL 2212 ML-136132 701 S. RIDGE AVENUE TROY, OHIO 45374-0001 937 332-3000 www.hobartcorp.com FORM 35215 (Apr. 2006) Installation, Operation, and Care of MODEL 2212 Slicer
TUBULAR BURNER CONVERSION KIT AGCK-TBXX / AECK-UBXX
 TUBULAR BURNER CONVERSION KIT AGCK-TBXX / AECK-UBXX IMPORTANT - READ ALL INSTRUCTIONS BEFORE YOU BEGIN THE INSTRUCTIONS HEREIN SHOULD BE PERFORMED BY A QUALIFIED SERVICE TECHNICIAN. THE GRILL MUST BE COMPLETELY
BRANDON PIZZA OVEN INSTALLATION GUIDE AND OWNER S MANUAL
 BRANDON PIZZA OVEN INSTALLATION GUIDE AND OWNER S MANUAL TABLE OF CONTENTS COMPONENTS... 3 OVERALL DIMENSIONS.... 4 POSITIONING REFERENCE PER LAYER... 5 CONCRETE PAD PREPARATION... 5 INSTALLATION OF BLOCKS...
OWNER S MANUAL. IMPORTANT: This instruction manual contains important information necessary for the proper assembly and safe use of the appliance.
 Pizza Oven Workstation for use with Leg Kit FOR 6000 SERIES PORTABLE OVENS OWNER S MANUAL IMPORTANT: This instruction manual contains important information necessary for the proper assembly and safe use
Gavita Pro 1650 e LED ML
 Pro line Gavita Pro 1650 e LED ML 1 Introduction Thank you for purchasing the Gavita Pro 1650 e LED ML. This manual describes the mounting and installing of the product and also describes how to use the
Air Mattress. Model No.: EAM-DQ1 & EAM DT1. Questions or Concerns? (855)
") Air Mattress Model No.: EAM-DQ1 & EAM DT1 Questions or Concerns? (855) 686-3835 support@etekcity.com Thank You. Thank you for purchasing the EAM-DQ1/EAM-DT1 Air Mattress by Etekcity. We are dedicated to
Air Mattress Model No.: EAM-DQ1 & EAM DT1 Questions or Concerns? (855) 686-3835 support@etekcity.com Thank You. Thank you for purchasing the EAM-DQ1/EAM-DT1 Air Mattress by Etekcity. We are dedicated to
Contents. Introduction...3 Description...3. Pack Contents...4. Rada Heavy Duty EV Shower Fittings Right Angled Connector (RAC)...
...") SHOWER FITTINGS PRODUCT MANUAL IMPORTANT Installer: This manual is the property of the customer and must be retained with the product for maintenance and operational purposes. Contents Introduction...3
SHOWER FITTINGS PRODUCT MANUAL IMPORTANT Installer: This manual is the property of the customer and must be retained with the product for maintenance and operational purposes. Contents Introduction...3
USER S MANUAL MANUAL DE USUARIO 3 DMX CHANNELS MODES CONTINUOUS BLINDER EFFECT PREPROGRAMED SPECIAL EFFECTS
 www.quarkpro.com USER S MANUAL MANUAL DE USUARIO 3 DMX CHANNELS MODES CONTINUOUS BLINDER EFFECT PREPROGRAMED SPECIAL EFFECTS SAFETY INFORMATION To guard against electric shock Disconnect the fixture from
Style # Laguna Propane Tank Cover Owner s Manual
 Style # 26100117 Laguna Propane Tank Cover Owner s Manual Warning: For outdoor use only DO NOT use for cooking DO NOT use under any overhead enclosure Manufactured as Model # 6561 in China for: Restoration
Travel Getting Around
 - Location I am lost. Not knowing where you are Can you show me where it is on the map? Asking for a specific location on a map Where can I find? Asking for a specific Estoy perdido. Me puede mostrar su
DIANA EN Owners s manual INSTALATION, ADJUSTMENT AND OPERATING INSTRUCTION. Available in ceramic and metalsheet version.
 DIANA Owners s manual INSTALATION, ADJUSTMENT AND OPERATING INSTRUCTION Available in ceramic and metalsheet version. EN 13240 1 INTRODUCTION Congratulations! You have invested in energy efficient and high
USAGE AND MAINTENANCE MANUAL FOR A SOLID FUEL STOVE
 PREDUZEĆE ZA PROIZVODNJU, PROJEKTOVANJE I PROMET BELOŠEVAC BB, 14000 VALJEVO, SRBIJA USAGE AND MAINTENANCE MANUAL FOR A SOLID FUEL STOVE DEAR CUSTOMER, Congratulations on your purchase of BLIST solid fuel
PRBP675i. EN Operator's manual 2-13
 PRBP675i EN Operator's manual 2-13 ES-MX FR-CA Manual del usuario Manuel d utilisation 14-26 27-39 BBP58VPR Contents INTRODUCTION... 2 SAFETY...4 ASSEMBLY... 8 MAINTENANCE...11 TROUBLESHOOTING...11 TECHNICAL
User Manual. 1000W Stackable 1.2 Cu. Ft. Commercial Microwave. Model: 180MW112T 05/2017. Please read and keep these instructions. Indoor use only.
 1000W Stackable 1.2 Cu. Ft. Commercial Microwave Model: 180MW112T 05/2017 Please read and keep these instructions. Indoor use only. IMPORTANT SAFETY INSTRUCTIONS When using electrical equipment, basic
THIS CLIPPER IS INTENDED FOR HOUSEHOLD USE ONLY.
 2. INDEX Please read all instructions carefully to familiarize yourself with the Wahl Clipper before using. THIS CLIPPER IS INTENDED FOR HOUSEHOLD USE ONLY. Save these instructions for further reference.
2 PREPARE THE OPENING (FOR INDOOR USE ONLY)
") Installation Instructions Free-Standing and Front Control Electric Ranges Questions? Call 1.800.GE.CARES (1.800.432.2737) or visit www.geappliances.com In Canada, call 1.800.561.3344 or visit www.geappliances.ca
Installation Instructions Free-Standing and Front Control Electric Ranges Questions? Call 1.800.GE.CARES (1.800.432.2737) or visit www.geappliances.com In Canada, call 1.800.561.3344 or visit www.geappliances.ca
EB300. Ethanol Burner. User s Manual Installation Instructions
 EB300 Ethanol Burner User s Manual Installation Instructions EB300 Burner Burner Lid User s Manual What s in the box: 1pc 1pc 1pc Installation Instructions EB300 - User s Manual The Ignis Ethanol Burner
SHADING SYSTEMS WITH BACK PULL SYSTEM
 SHADING SYSTEMS WITH BACK PULL SYSTEM 800285_EN SHADING SYSTEMS WITH BACK PULL SYSTEM TABLE OF CONTENTS 1. BASIC INFORMATION...3 2. EXPLANATION OF THE NOTICES...3 3. VALIDITY...3 4. SAFETY...3 5. INTENDED
1 Pan - 6 Ways to Cook!
 1 Pan - 6 Ways to Cook! Broil Bake Sauté Fry Steam Braise To see our entire collection of Copper Chef products and all other available accessories, please visit: CopperChef.com *Only Use Nonmetallic Utensils
K 2.90 M. High Pressure Washer Operator Manual. Specifications or visit our website:
 K 2.90 M High Pressure Washer Operator Manual Specifications In USA call: 800-537-4129 or visit our website: www.karcher-usa.com OVERVIEW 2 IMPORTANT PRECAUTIONS Read First! IMPORTANT SAFETY INSTRUCTIONS
Electric Food Slicer. Model 610
 Electric Food Slicer Model 610 IMPORTANT SAFEGUARDS When using electrical appliances, basic safety precautions should always be followed, including the following: 1. Read all instructions carefully before
USER MANUAL. PRESSURE COOKER Ø22cm 7.6L Ref. Number: TRAS
 BEFORE USING READ THE COOKER PRESSURE USER MANUAL PRESSURE COOKER Ø22cm 7.6L Ref. Number: TRAS 0506 www.tramontina.com.au USER MANUAL TRAMONTINA PRESSURE COOKER CONTENT IMPORTANT SAFEGUARDS INTRODUCTION