USER MANUAL FLEXI Tent&Trailer Comfort
|
|
|
- Ruth Scott
- 5 years ago
- Views:
Transcription


1 USER MANUAL FLEXI Tent&Trailer Comfort


2 CONGRETULATIONS! By choosing a Combi-Camp tenttrailer, you have made a choice for quality and sustainablilty. We hope you will have lots of careless holidays with your tenttrailer. Should there be something you wish to communicate with us, please feel free to contact us at info@combi-camp.com. The purchase of your new tenttrailer is a special occasion which deserves a present. With each purchase of a Combi-Camp, we donate a gift to OXFAM NOVIB in your name. With this gift we support a project in Uganda, where children learn to read and write, together with their parents.
 35 / 77 n.a.")
3 Technical facts of the Flexi Comfort LL/XL Tent & Trailer Maximum weight (kg-lb) 750 / / 1650 Tare weight (kg/lb) 460 / / 880 Load capacity (kg/lb) 290 / / 770 Load capacity kitchen (kg/lb) 35 / 77 n.a. Dimensions including towbar LWH cm 398x146x x146x110 Dimensions including towbar LWH inch 159x61x46 141x68x45 Luggage space LWH cm 215x140x30 195x120x54 Luggage space LWH inch 83x55x16 83x47x15 Storing space in kitchen LWH cm 140x42x30 n.a. Storing space in kitchen LWH inch 59x17x19 n.a. Luggage space total in liters/gallons 953/ /219 Wheelsize 155/70R13 185/65R14 Wheel pressure 2,5 BAR 2,5 BAR Maximum speed of wheels kmh/mph 140/87,5 140/87,5 Maximum speed of trailer kmh/mph 100/62,5 100/62,5 Things to make sure of before you leave Heavy baggage should be placed above or in front of the axle. Tongue weight minimum 35 kg, maximum 75 kg. Tyre pressure of all three wheels. Check brake alignment (drive a short distance). Check the lights. Check the coupling. Fasten the safety cable.
.")
4 Setting up the tent First, remove the cover. Use the jockey wheel and the 2 corner steadies to set the trailer level. (After the set-up turn the nose wheel back up again). The wheels continue to be supports! On soft soil, use the included boards underneath the supports. Put down a groundsheet protector where the luggage compartment comes down (under the fold-up bed). Set the bed legs straight up and bring over the slatted bed make sure it doesn't slip down. The gas springs make this easier. See photo 1. For the Comfort model, lower the slatted bed support pole in the trailer: Loosen the black band that keeps the mattress and the frame in place. Fold out the tent. See photo 2. If you have a groundsheet, put a groundsheet protector on the ground and the groundsheet on top of it. Have this groundsheet border the luggage compartment and put the middle carefully in place. Fasten it with pins. Attach the T-bar, together with the stand, to the awning frame. You can then pull over the frame together with the tent. The easiest way to do it is to push up the rear while pulling on the front. See photo 3. Extend the frame on both sides until the pin comes out and fasten it with clamps. If the tent is wet and shrunken, you may want to move the clamps over the pins. Set both support poles in the corners angling forwards along with the canvas. The next step is setting up the middle bar between the beds. This ensures that both separate frame arches remain at the same distance from one another. Put the middle bar as high as possible. Close the zippers at the back of the trailer. Now zip the awning to the groundsheet OR secure the tent on all sides with pegs. Before tightening the lines, zip up the front wall.


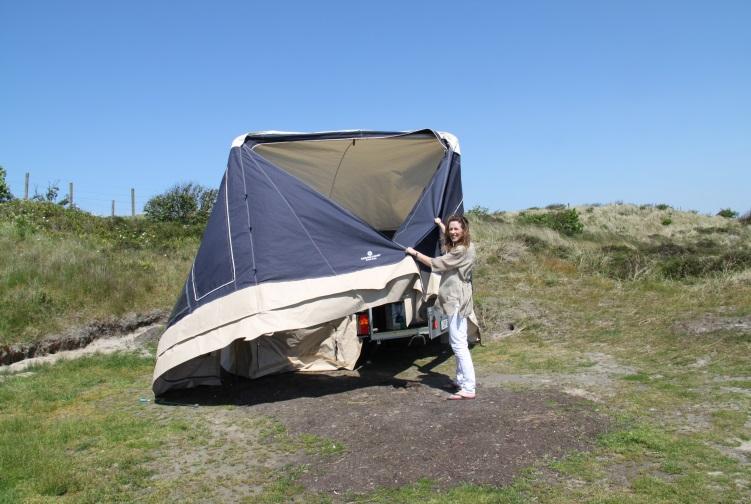
5 Photo 1 Photo 2 Photo 3

6 Setting up the vario canopy Zip the canopy to the awning and put it up with 3 poles (the longest one in the middle) and guy lines. The poles should stand at an angle to properly keep the canopy pulled tight. The canopy can be zipped to the wind shields or lifted at the end or rolled up. TIPS If the awning isn't pulled tightly enough, you can set the awning poles higher and/or make the guy lines longer. Keep in mind drainage in order to prevent pooling! Tighten the awning down in the middle, or, if you use the vario canopy, ensure that the middle pole is high enough so all roof surfaces are at an angle. Also ensure that the tent is stretched tight.

7 Taking down the tent In case of rain, first remove the ground sheet, so that you can keep it clean and dry to store it. Unfasten all tent pegs and guy lines. Store the awning poles. Detach the awning front. If it is raining, you may wish to spread the front out over the beds to keep them dry. Remove the middle bar, slide the tent poles back in and fasten them with the clamp. Use the middle stand to allow the tent to slowly lower. Zip the tunnels open a bit and pull out the stand and the T-bar. Unzip the tent about 40 cm from the trailer at the middle rear and at the front sides, so that the zipper isn't under tension while lowering. Fold the tent on the trailer and attach the black band over the fold-out bed. Now you can pull the bed back over and lay down the legs. For the Comfort model, put up the support pole for the slatted base: Attach the cover all the way around. The elastic should be fastened to all of the notches, starting at the loop on the end.


8 Loading without expanding the tent Open the rear door and open the tension clips on the inside of the trailer 2x. Raise the tent unit and load or unload the trailer. The gas springs will raise the tent unit and hold it up. Heavy items should be placed above or in front of the axle as much as possible. Then, let the tent unit come down, close both tension clips and then the one on the door. Always leave the door open when raising and lowering the tent unit to keep your fingers from getting caught. Use as a luggage trailer Open the rear door and open the tension clips on the inside of the trailer 2x. Disconnect the gas springs after removing the cotter pin. Remove the black caps from the hinges on the hitch side and remove the nut and bolt. Now you can lift the tent unit off the trailer.


9 Comfort Loading and unloading without folding out the tent Open the horizontal clips. After this, the top unit can be lifted.

10 Maintenance * Brush off the tent canvas well with a soft brush and remove any sand or dirt from the mud skirt and groundsheet with a damp cloth. * Ensure that the tent canvas as well as the seat cushions and mattresses are 100% dry. It is better to remove the tent components, inner tents, mattress covers etc. in connection with moisture retention and possible damage from vermin. Loosely (not tightly) rolling up the tent canvas is best. * Clean stains with lukewarm water, then use a soft brush to remove the dirt. Only clean plastic windows with water or a damp cloth. * Elastics should be removed. * Never store your trailer in a state of disrepair. Take it to the dealer so that it can be properly repaired and returned before the start of the next season. * Remember that the tent seams need to shrink from the first rain shower before they become waterproof. Important: do not use the tent trailer's hand brake in winter storage as it may corrode or get stuck. Flexi Comfort
USER MANUAL FLEXI Tent&Trailer Comfort
 USER MANUAL FLEXI Tent&Trailer Comfort CONGRETULATIONS! By choosing a Combi-Camp tenttrailer, you have made a choice for quality and sustainablilty. We hope you will have lots of careless holidays with
INSTRUCTION MANUAL (0)
") CANVAS BELL TENT INSTRUCTION MANUAL SETTING up YOUR CANVAS BELL TENT 1 3 Unpack the bell tent and lay out on the tent with the groundsheet down. Find the door and rotate the tent. so it s facing the desired
CANVAS BELL TENT INSTRUCTION MANUAL SETTING up YOUR CANVAS BELL TENT 1 3 Unpack the bell tent and lay out on the tent with the groundsheet down. Find the door and rotate the tent. so it s facing the desired
ASSEMBLY & CARE INSTRUCTIONS
 ASSEMBLY & CARE INSTRUCTIONS 7 x TRAILER TENT SERIES 3 9 Part No. FT3711 - on road FT3923 - off road OPTIONAL SUNROOM Wall and floor kit Part No. FT3723 - on road FT39 - off road OPTIONAL SPARE ROOM Roof,
Country. Instruction. Valley.
 Instruction Country www.combicamp.com Valley Contents UK Instruction 3 Before you set out 4 Hitching the COMBI-CAMP 5 Opening the trailer and erecting the tent 6 Final adjustment 7 Integrated sun canopy
ASSEMBLY & CARE INSTRUCTIONS. 7 x4 TRAILER TENT SERIES 4 9. OPTIONAL SUNROOM Wall and floor kit. OPTIONAL SPARE ROOM Roof, wall and floor kit
 ASSEMBLY & CARE INSTRUCTIONS 7 x TRAILER TENT SERIES 9 Part No. TM709 OPTIONAL SUNROOM Wall and floor kit Part No. TM723 OPTIONAL SPARE ROOM Roof, wall and floor kit Part No. TM76 Please keep these instructions
Gerjak Dear Customer, You will find below information that includes: Is the caravan rail in order? Is everything in place?
 Gerjak Dear Customer, We would like to wish you much pleasure with your new Gerjak product. We very much appreciate that you have chosen our product! Following are some hints and tips to give you pleasure
Putting up a Deluxe Bell Tent
 Hello, and thanks for buying one of our Bell Tents. Here is the best way to put up your Bell Tent. One person is shown doing this but the more people there are, the faster it goes up (our current record
Wall Tent Set Up & Care Instructions
 Wall Tent Set Up & Care Instructions Congratulations on the purchase of your new Colorado Tent! Your Wall Tent frame includes color coded poles for easy set up. Wall (Side) Poles: Red Roof / Rafter Poles:
'u se. Step-by-Step Instruction Leaflet, Conway Products Limited Skull House Lane, Appley Bridge, Wigan WN6 9DW ! ~-- ',I,
 'u se Step-by-Step Instruction Leaflet,! ~-- ',I, Conway Products Limited Skull House Lane, Appley Bridge, Wigan WN6 9DW Due to a proces s of ever-contmumq product Improvement. some details contained In
OPERATOR INSTRUCTION MANUAL INCLUDING REPAIR PARTS FOR MODULAR GENERAL PURPOSE TENT SYSTEM (MGPTS) TYPE I
 TYPE I") OPERATOR INSTRUCTION MANUAL INCLUDING REPAIR PARTS FOR MODULAR GENERAL PURPOSE TENT SYSTEM (MGPTS) TYPE I Johnson Outdoors Gear, Inc. Eureka! branded tent products 625 Conklin Road Binghamton, NY 13903
OPERATOR INSTRUCTION MANUAL INCLUDING REPAIR PARTS FOR MODULAR GENERAL PURPOSE TENT SYSTEM (MGPTS) TYPE I Johnson Outdoors Gear, Inc. Eureka! branded tent products 625 Conklin Road Binghamton, NY 13903
Assembly Instructions for Teepee
 Assembly Instructions for Teepee Thank you for purchasing your Teepee from Cyber Checkout Ltd, please read these instructions carefully so you fully understand how to erect the teepee before you start.
OWNER S MANUAL AND WARRANTY FORM
 OWNER S MANUAL AND WARRANTY FORM Jet Tent F25-25DX manual.indd 1 WARNING Never use any fuel-burning products (stoves, lanterns, heaters, etc.) inside or within proximity of this tent. Use of fuel-burning
LODGE 460 CABIN. Part No ASSEMBLY & CARE INSTRUCTIONS
 LODGE 460 CABIN Part No. 920645 ASSEMBLY & CARE INSTRUCTIONS SPECIFICATIONS PRE USE Size: 460L x 360W x 240H cm Material: Heavy duty polycotton blend Walls: 250g/m2 Roof: 340g/m2 Windows: 6 Side & Rear
Caravan Notes. Contents. Caravan_User_Notes.doc Page 1 10/01/18
 Contents Caravan_User_Notes.doc Page 1 10/01/18 Contents 1 Important 2 General notes 3 Towbar 3 Rear support legs 4 Severy hatch-cover 4 Rear doors / storage area 5 Front storage box 6 Inside the cabin
19. Unfold kitchen extension (bench) 20. Connect gas hose to gas bottle 21. Connect kitchen waste hose 22. Enjoy!!
 20. Connect gas hose to gas bottle 21. Connect kitchen waste hose 22. Enjoy!!") Kanga Marloo Trailer Setup and Packup 1. Site trailer with 3 4m of space on passenger side for tent. 2. Disconnect from vehicle with Jockey wheel 3. Put on handbrake and place chocks on wheels (peg down
Kanga Marloo Trailer Setup and Packup 1. Site trailer with 3 4m of space on passenger side for tent. 2. Disconnect from vehicle with Jockey wheel 3. Put on handbrake and place chocks on wheels (peg down
» AQUILA 320(HIGH TOP) «
 «") PERFORMANCE SERIES» AQUILA 320(HIGH TOP) «Model No. :12020253200000 Document-No.: FC-90037 Issue: November 2015 Top Quality Camping WELCOME Thank you for purchasing your Westfield Aquila 320 awning.please
PERFORMANCE SERIES» AQUILA 320(HIGH TOP) «Model No. :12020253200000 Document-No.: FC-90037 Issue: November 2015 Top Quality Camping WELCOME Thank you for purchasing your Westfield Aquila 320 awning.please
Installation Guide: Round Trampoline
 Trampolines & trampoline parts designed to survive in the harsh Oz climate. www.oztrampolines.com.au Installation Guide: Round Trampoline Safety Tips Here at Oz Trampolines we are passionate about your
Oxygen Speed. Annexe Instructions and Care Manual IMPORTANT: PLEASE CHECK YOUR EQUIPMENT
 IMPORTANT: PLEASE CHECK YOUR EQUIPMENT Oxygen Speed 1 x Flysheet (or outer) 1 x Oxygen Air Frame Tube 1 x Inner tent 1 x Bag of steel pegs Carrying Bag Annexe Instructions and Care Manual Thank you for
Installation and User s Manual 12 x 10 MOTORIZED AWNING
 12 x 10 MOTORIZED AWNING Installation and User s Manual 12 x 10 MOTORIZED AWNING 088-1763-0 Stop Please read and understand this manual before any assembly or use of this product. Before beginning assembly
WARNING USING AND CARING. for use in extreme or varied soil conditions. For optional sand pegs Oztent recomends use of a Bluescrew Oztent Edition.
 OWNER S MANUAL WARNING Never use any fuel-burning products (stoves, lanterns, heaters, etc.) inside or within proximity of this tent. Use of fuel-burning products inside or within proximity of this tent
» GEMINI 390 CARAVAN«
 TRAVEL-SMART AWNING SERIES» GEMINI 390 CARAVAN«Model No. 12010223900000 Document-No.: FC-90015-390 Issue:October 2015 Top Quality Camping WELCOME Thank you for purchasing your Westfield awning. Please
π H-3505 GARAGE CANOPY PARTS SAFETY uline.com TOOLS NEEDED 10' X 20' X 8'
 π H-3505 GARAGE CANOPY 10' X 20' X 8' 1-800-295-5510 uline.com TOOLS NEEDED Safety Glasses Wrench or Socket 9/16" or 14mm Tape Measure Phillips Screwdriver Rubber Mallet PARTS Cables x 5 2-way Corner Foot
Important! Read all of these instructions before assembling or riding the glider. For questions or help please call Glide Bikes at
 Go Glider Manual Congratulations on your purchase of the Go Glider! Your glider is designed for years of nearly carefree use by your child. These instructions include how to set up your glider and maintenance
33100 LH - Batwing Awning RH - Batwing Awning
 33100 LH - Batwing Awning 33200 RH - Batwing Awning 1. Check Part No./Kit is correct 3. Fit roof rack accessory 2. Read through instruction before installing 4. Check and recheck all fasteners are secure
When moving the frame don t force anything! Move the leg to allow the brace to go over the rod.
 THE IDLER Assembly and Care Instructions General notes Please read these instructions in their entirety before constructing your Idler Construction Before you begin constructing your Idler consider where
Instruction Manual. Mag Mission 8P Tent Style# Please keep this instruction manual for future reference. Customer Service: (877)
") Instruction Manual Mag Mission 8P Tent Style# 153640 Please keep this instruction manual for future reference Customer Service: (877) 579-1550 Business Hours: Monday thru Friday 8:30am to 5:30pm, EST (Made
Instruction Manual Mag Mission 8P Tent Style# 153640 Please keep this instruction manual for future reference Customer Service: (877) 579-1550 Business Hours: Monday thru Friday 8:30am to 5:30pm, EST (Made
Tipi Instructions. Hello and thanks for buying one of our Tipi Tents.
 Tipi Instructions Hello and thanks for buying one of our Tipi Tents. Here are the instructions for the best way to put it up, take it down and how to store when not in use. We ve provided a step-by-step
FULL AWNING MANUAL. Product No. OFA003. OFA003-UM-0316-Rev.A
 FULL AWNING MANUAL Product No. OFA003 OFA003-UM-0316-Rev.A FULL AWNING. IMPORTANT! PLEASE READ THIS GUIDE THOROUGHLY BEFORE ATTEMPTING FIRST SETUP. PARTS REFERENCE: 1. 2. 3. 4. 5. 6. Main Awning Section
Owner s Manual Truck Bed Tent
 Owner s Manual Truck Bed Tent Important! For safe and proper assembly, use, and care, read and follow all instructions. Everyone who uses this tent should first read this manual. 120810 www.kodiakcanvas.com
TRAVEL-SMART AWNING SERIES » LYNX 200 LOW TOP « Model No Issue:October Document-No.: LYNX 200 LOW TOP. Top Quality Camping
 TRAVEL-SMART AWNING SERIES» LYNX 200 LOW TOP «Document-No.: LYNX 200 LOW TOP Issue:October 2016 Model No 12010322450000. Top Quality Camping WELCOME Thank you for purchasing this Westfield Outdoors awning.
Rhino-Rack FOXWING ECO Awning 31117
 Rhino-Rack FOXWING ECO Awning 31117 Important: Please read these instructions carefully prior to installation. Please refer to your fitting instruction to ensure that the roof racks are installed in the
Come rain or shine its fine out with ScooterPac. Take a quick read of this manual to get the most out of your folding canopy.
 YOUR USER MANUAL Come rain or shine its fine out with ScooterPac. Take a quick read of this manual to get the most out of your folding canopy. Contents 1 Quick start guide 5 Fitting your canopy 9 Detailed
OWNER'S MANUAL CAMPOUT TABLE OF CONTENTS
 OWNER'S MANUAL CAMPOUT RV Before operating the awning, carefully review the Owner's Manual. The manual contains important safety information, detailed operating instructions, common maintenance procedures
10 Economy Popup Tent
 10 Economy Popup Tent ZM-TNT-ECO-3MX3M The Zoom Tent is great for outdoor fairs, exhibitions, sporting events and arenas, concerts, festivals and more. Strong, solid, stable, wind-resistant & durable.
Rhino-Rack FOXWING Awning by OZTENT
 Important: Please read these instructions carefully prior to installation. Please refer to your fitting instruction to ensure that the roof racks are installed in the correct locations. Check the contents
10 X 20 X 8 Dome Canopy
 10 X 20 X 8 Dome Canopy Warning Keep all flame and heat sources away from this tent fabric. Refer to labels for flamability specification. It is not fire proof. The tent fabric will burn if left in continuous
3x3 Pop Up Gazebo with Side Panels
 '-,- 3x3 Pop Up Gazebo with Side Panels Assembly Instructions - Please keep for future reference 650/1974 Width - 3m Depth - 3m Height - 270cm ~ Important: Make sure all the guy ropes and ~ pegs are used,
SIGNATURE EDITION OWNER S MANUAL
 JV SIGNATURE EDITION OWNER S MANUAL WARNING Never use any fuel-burning products (stoves, lanterns, heaters, etc.) inside or within proximity of this tent. Use of fuel-burning products inside or within
ROOF-TOP SAFARI TENT. ASSEMBLY & CARE INSTRUCTIONS Part No ENSURE YOU READ AND UNDERSTAND THESE INSTRUCTIONS PRIOR TO INSTALLATION
 ROOF-TOP SAFARI TENT ASSEMBLY & CARE INSTRUCTIONS Part No. 933101 ENSURE YOU READ AND UNDERSTAND THESE INSTRUCTIONS PRIOR TO INSTALLATION CONTENTS Parts List...2 Drawing & Tools You Will Need...2 Tent
Model 205 Fireview Maintenance Kit
 Model 205 Fireview Maintenance Kit Please read all of the instructions before you begin the procedure. Confirm that you have all the necessary tools and parts required. Allow about one hour to complete
INSTALLATION INSTRUCTIONS
 INSTALLATION INSTRUCTIONS Accessory HATCH KIT Application 2014 CR-V Publications No. AII 50018 Issue Date JULY 2013 Put this information in the glove box with the vehicle owner s manual PARTS LIST 4 Guide
RIDGE 380 SWAG INSTRUCTION MANUAL. Part No companionleisure.com.au
 RIDGE 380 SWAG INSTRUCTION MANUAL Part No. 777090 IMPORTANT Read these instructions for use carefully. Familiarise yourself with the product before use. Keep these instructions for future reference. PARTS
2015 JAYCO EAGLE- SETUP GUIDE TABLE OF CONTENTS. Pages SETTING UP THE PRIVACY SHADE SCREENS
 TABLE OF CONTENTS Pages 1-14... Pages 16...SETTING UP THE ANNEXE Pages 17-18...SETTING UP THE PRIVACY SHADE SCREENS Pages 19-20...INVENTORY Pages 21...EXCLUSIONS 1 This booklet is designed to give you
Bushwakka Safari Weekender Family Off-Road Camping Trailer
 New Generation 4 Safari Weekender Bushwakka Safari Weekender Family Off-Road Camping Trailer Bushwakka Africa Adventure Trailers have a solid reputation in building some of the best offroad camping trailers
INSTALLATION INSTRUCTIONS
 INSTALLATION INSTRUCTIONS Accessory HATCH KIT Application 2009 ELEMENT Publications No. AII 41008 Issue Date DEC 2008 PARTS LIST Tent bag 13 Stakes 4 Guide ropes Tent 2 Awning pole caps Gear loft 2 Tie
Instructions on how to set up a Dandy Destiny (High Side)
") Instructions on how to set up a Dandy Destiny (High Side) This is a FREE information sheet supplied by and for the Dandy Forum www.dandyforum.co.uk For more about the Dandy trailer tent / folding camper,
Instructions on how to set up a Dandy Destiny (High Side) This is a FREE information sheet supplied by and for the Dandy Forum www.dandyforum.co.uk For more about the Dandy trailer tent / folding camper,
SOFT TOP ROOF TENT INSTRUCTION MANUAL
 SOFT TOP ROOF TENT INSTRUCTION MANUAL CONTENTS SET UP INSTRUCTIONS: 1. INSTALLING YOUR ROOF TOP TENT P2-3 2. SETTING UP YOUR ROOF TOP TENT P4 3. PACKING DOWN YOUR ROOF TOP TENT P5-6 4. TIPS & TRICKS P7
 Assembling A Pennine Awning: A Pictorial Guide Below is a step by step pictorial guide to setting up a Pennine awning. This guide is based on the older, heavy duty awning poles, and the smaller awning
ALP TRAINER 25 2 OVERVIEW ALP TRAINER 25
 OVERVIEW Congratulations on your purchase of a SALEWA Pack. We want to besure that you understand and utilize your new SALEWA pack in the best way. Following you will find a description of all functions
10 X20 Dome Garage ITEM #: G Dimensions: 10ft. Wide x 20ft. Deep x 8ft. Center Height
 10 X20 Dome Garage ITEM #: G10208 Dimensions: 10ft. Wide x 20ft. Deep x 8ft. Center Height WARNING: Keep all flame and heat sources away from this tent fabric. It is not fire proof The fabric will burn
How to Erect a Queensland Ridge Tent
 How to Erect a Queensland Ridge Tent (aka Queenslander or Patrol Tent) Queensland Branch Inc. The procedure for erecting a Ridge Tent is laid out below in a sequential manner. Under the guidance of a Patrol
Parkes series caravan. customer guide
 Parkes series caravan customer guide Owners Name: Model: VIN #: Preparing vehicle Brake controller fitted. Yes: Tow tongue suitable for 3.5T. Yes: Hand over check list Locks / keys. Yes: Pole bag. Yes:
Solar Power Shade INSTRUCTION MANUAL
 INSTRUCTION MANUAL 20 June 2006, Revision Initial Release 26 September 2006, version 2 Powerfilm, Inc. 2337 230th Street Ames, IA 50014 (515) 292-7606 Web Site: www.powerfilmsolar.com Table of Contents
Instructions: PermaPRO
 Instructions: PermaPRO WARNING! Cover for storage use only. Do not occupy the RV while cover is on the RV. Do not run the RV engine with the cover on. WARNING! Installation is best done with two people
FEATHER-LITE ROOF TOP TENT SET-UP GUIDE
 FEATHER-LITE ROOF TOP TENT SET-UP GUIDE TENT031 INSTALL TIME: 30 minutes 0 GET ORGANIZED you will need: D Your Tent D The Ladder (in a separate box) D A Power Drill w/ Phillips screw bit D A solid, scratch
FLEX KEY ASSEMBLY. ..._ o RAFTER ARM TUBE MAIN ARM TUBE CAP NUT CLAW HINGE
 ZIP DEE Inc. 96 Crossen Ave. Elk Grove Village, IL 60007(847)437-0980 (800)338-2378 HEAD CASTING AWNING RAIL FLEX KEY ASSEMBLY..._ o GM1 Installation Instruction GMC Motorhome RAFTER ARM TUBE MAIN ARM
Rhino-Rack SUNSEEKER II Awning 2.0 metres (32109)
") Important: Please read these instructions carefully prior to installation. Please refer to your fitting instruction to ensure that the roof racks are installed in the correct locations. Check the contents
Important: Please read these instructions carefully prior to installation. Please refer to your fitting instruction to ensure that the roof racks are installed in the correct locations. Check the contents
OVERVIEW CAMMINO CAMMINO CAMMINO CAMMINO 50+10
 BACKPACK MANUAL OVERVIEW CAMMINO CAMMINO 70+10 CAMMINO 60+10 CAMMINO 50+10 Congratulations on your purchase of a SALEWA Pack. We want to be sure that you understand and utilize your new SALEWA pack in
Manual Awning. Assembly Instructions. Product No Toll-free:
 Manual Awning Product No. 088-30- Instructions Toll-free: -877-483-679 IMPORTANT: Please read this manual carefully before beginning assembly of this product. Keep this manual for future reference. 3 Table
Insruction manual Dukki
 Insruction manual Dukki Introduction Pg. 1 Product description Pg. 2 3 Assembly and disassembly Pg. 4 Installation and adjustment Pg. 5 12 Maintenance Pg. 13 Parts Pg. 14-17 INDEX 1. Introduction 1 2.
Rhino-Rack SUNSEEKER Awning Black
 Rhino-Rack SUNSEEKER Awning Black 1. Check Part No./Kit is correct 3. Fit roof rack accessory 2. Read through instruction before installing 4. Check and recheck all fasteners are secure Layout 2.0m - 32132
ALPTREK 50+5 ALPTREK 45+5
 OVERVIEW Congratulations on your purchase of a SALEWA Pack. We want to besure that you understand and utilize your new SALEWA pack in the best way. Following you will find a description of all functions
PEUTEREY 40 PEUTEREY 30
 OVERVIEW Congratulations on your purchase of a SALEWA Pack. We want to besure that you understand and utilize your new SALEWA pack in the best way. Following you will find a description of all functions
VACATION'R A ROOM FOR VERTICAL ARM AWNINGS
 VACATION'R A ROOM FOR VERTICAL ARM AWNINGS RV Made of durable, lightweight polyester material - the same material used for tents. Does not require hardware that is attached to the RV. No rafters to install.
OWNER'S MANUAL CAMPOUT TABLE OF CONTENTS
 OWNER'S MANUAL CAMPOUT RV Before operating the awning, carefully review the Owner's Manual. The manual contains important safety information, detailed operating instructions, common maintenance procedures
Rhino-Rack SUNSEEKER II Awning
 Important: Please read these instructions carefully prior to installation. Please refer to your fitting instruction to ensure that the roof racks are installed in the correct locations. Check the contents
CONVEX Awning Instructions
 CONVEX Awning Instructions IMPORTANT NOTE: Please take a few minutes to become familiar with this entire document BEFORE beginning your installation. The time you spend doing this is well spent and will
INSTALLATION INSTRUCTIONS AND OWNER'S MANUAL AWNINGS. For trailers & motor homes with straight sides TOOLS REQUIRED
 AWNINGS INSTALLATION INSTRUCTIONS AND OWNER'S MANUAL For trailers & motor homes with straight sides TOOLS REQUIRED 1/4" electric drill Ratchet handle kit 3/8" & 7/16" socket No. 1 and No. 2 screwdriver
OVERVIEW KOALA KOALA II
 BACKPACK MANUAL OVERVIEW KOALA KOALA II Congratulations on your purchase of a SALEWA Pack. We want to be sure that you understand and utilize your new SALEWA pack in the best way. Following you will find
OWNERS MANUAL. CABIN 12 x 9 TENT CTC-1209-D.
 OWNERS MANUAL CABIN 12 x 9 TENT CTC-1209-D www.oztrail.com IMPORTANT SAFETY AND CARE INFORMATION PLEASE READ BEFORE SETTING UP YOUR TENT/SHELTER going away. If problems are discovered in the brand new
TRAVEL-SMART AWNING SERIES »LYRA 4 « Family Tent. Model No. HW Document-No.: HW Issue: August Top Quality Camping
 TRAVEL-SMART AWNING SERIES»LYRA 4 «Family Tent Model No. HW-60136-1 Document-No.: HW-60136-1 Issue: August 2015 Top Quality Camping WELCOME Thank you for purchasing your Lyra 4. Please read these instructions
OWNERS MANUAL. CABIN 12 x 15 TENT CTC-1215-D.
 OWNERS MANUAL CABIN 12 x 15 TENT CTC-1215-D www.oztrail.com IMPORTANT SAFETY AND CARE INFORMATION PLEASE READ BEFORE SETTING UP YOUR TENT/SHELTER going away. If problems are discovered in the brand new
Assembly Instructions & User s Manual Grand Ponderosa 10P Cabin Tent
 Assembly Instructions & User s Manual Grand Ponderosa 10P Cabin Tent FSMGCT2010 Please keep this instruction manual for future reference Customer Service: (888) 922-2336 7:00 am to 12:00 am CST (daily)
Ace Air. Instructions & care manual
 Ace Air Instructions & care manual WELCOME Thank you for purchasing your Kampa awning. Please read these instructions carefully before attempting to set up your awning and retain for future reference.
INSTALLATION INSTRUCTIONS
 INSTALLATION INSTRUCTIONS Accessory HATCH KIT Application 201 PILOT Publications No. VERSION 1 Issue Date 201 PARTS LIST Stake bag Tent bag 13 Stakes 4 Guide ropes Tent 2 Awning pole caps 2 Tie straps
OWNER'S MANUAL AWNING EXTEND R TABLE OF CONTENTS
 OWNER'S MANUAL AWNING EXTEND R RV Before operating the awning, carefully review the Owner's Manual. The manual contains important safety information, detailed operating instructions, common maintenance
DO NOT USE WITH CROSSBAR SPREAD LESS THAN 24.
 TM Please read all instructions carefully before assembly, installation and/or use of this product. DO NOT USE WITH CROSSBAR SPREAD LESS THAN 24. WARNING: Do not exceed the weight limit of your vehicle
Before you start to fix your tent to your trailer, take a minute and check all parts provided.
 Thank you very much for buying a Gordigear Trailer Tent. We and countless satisfied customers worldwide believe that you have exercised excellent judgement in your selection. Our products have been designed
Rhino-Rack Sunseeker II Base Tent (32119)
") Important: Please read these instructions carefully prior to installation. Please refer to your fitting instruction to ensure that the roof racks are installed in the correct locations. Check the contents
Important: Please read these instructions carefully prior to installation. Please refer to your fitting instruction to ensure that the roof racks are installed in the correct locations. Check the contents
OVERVIEW GUIDE GUIDE 45 / GUIDE 35
 BACKPACK MANUAL OVERVIEW GUIDE GUIDE 45 / GUIDE 35 Congratulations on your purchase of a SALEWA Pack. We want to be sure that you understand and utilize your new SALEWA pack in the best way. Following
LITE Spear Awning Instructions
 LITE Spear Awning Instructions IMPORTANT NOTE: Please take a few minutes to become familiar with this entire document BEFORE beginning your installation. The time you spend doing this is well spent and
RANDONEE 36 RANDONEE 30
 OVERVIEW Congratulations on your purchase of a SALEWA Pack. We want to besure that you understand and utilize your new SALEWA pack in the best way. Following you will find a description of all functions
MYRIAD Banner Stand is a trademark of Skyline Exhibits. Patent Pending PN32294-B. MYRIAD Banner Stand
 is a trademark of Skyline Exhibits Patent Pending 1.1 1. Banner Stand Setup 1.1 Remove banner stand from standard case or Arrive Portable Display & Workstation and assemble pole. 1.2 Insert pole into base
CAPRI PLUS. Instruction Manual. 28' x 38' Including sidewall and connector instructions.
 CAPRI PLUS Instruction Manual 28' x 38' Including sidewall and connector instructions STOP Prior to installing any tent, always make sure you check for overhead and underground obstructions! For safe assembly,
Travel Pod Xpress Instructions & care manual
 Travel Pod Xpress Instructions & care manual Kampa UK Limited Witham, CM8 3EU mcl/kampa/2013 12 CARE WELCOME Thank you for purchasing your Kampa awning. Please read these instructions carefully before
OVERVIEW PEUTEREY PEUTEREY 40 / PEUTEREY 30
 BACKPACK MANUAL OVERVIEW PEUTEREY PEUTEREY 40 / PEUTEREY 30 Congratulations on your purchase of a SALEWA Pack. We want to be sure that you understand and utilize your new SALEWA pack in the best way. Following
SlimShady CONTENTS. SlimShady (1X) Tools Required: nut (4X) stake (2X) bolt (4X) wrench (1X) washer (4X) clamps (2X) stake sack (1X) key (2X)
 Tools Required: nut (4X) stake (2X) bolt (4X) wrench (1X) washer (4X) clamps (2X) stake sack (1X) key (2X)") SlimShady Tools Required: CONTENTS nut (4X) stake (2X) stake sack (1X) bolt (4X) wrench (1X) washer (4X) key (2X) SlimShady (1X) clamps (2X) 1 ASSEMBLE & INSTALL Be sure the awning is oriented correctly
SlimShady Tools Required: CONTENTS nut (4X) stake (2X) stake sack (1X) bolt (4X) wrench (1X) washer (4X) key (2X) SlimShady (1X) clamps (2X) 1 ASSEMBLE & INSTALL Be sure the awning is oriented correctly
Manufactured in our state of the art factory in China
 IMPORTANT We strongly suggest setting up your new tent before going camping to insure that all parts are present and to familiarize yourself with the tents assembly. This will have a great effect on how
Relax, Raclet s got you covered! SEASON
 ) folding caravans Relax, Raclet s got you covered! SEASON 2018 www.raclettrailertents.com )Contents RACLET, FOR ALL STYLES! RACLET: EXPERIENCE AND QUALITY SAFARI SOLENA PANAMA UP TECHNICAL SPECIFICATIONS
General Purpose Shelter
 General Purpose Shelter 0' x 0' x ' ( x x. m) ASSEMBLY MANUAL Model NO.: - Tools required for assembly (not included) TM TABLE OF CONTENTS Important safety instructions... Intended use... Parts list......
Ridgeline (A) Installation Instructions
 Installation Instructions") Ridgeline (A) Installation Instructions Please read instructions thoroughly before starting installation **Remove all contents of the Softopper carefully to protect from scratches.** Windows scratch easily!
Ridgeline (A) Installation Instructions Please read instructions thoroughly before starting installation **Remove all contents of the Softopper carefully to protect from scratches.** Windows scratch easily!
Rhino-Rack SUNSEEKER II Awning (32105)
") (32105) Important: Please read these instructions carefully prior to installation. Please refer to your fitting instruction to ensure that the roof racks are installed in the correct locations. Check the
(32105) Important: Please read these instructions carefully prior to installation. Please refer to your fitting instruction to ensure that the roof racks are installed in the correct locations. Check the
CARING FOR YOUR BORA TENT:
 The Bora is the perfect tent to take with you into the wilderness. The three-season Bora has a freestanding partial geodesic design that creates a comfortable, breathable inner shelter protected by a durable,
EYRE OWNERS MANUAL E-2 E-1 FOR MODELS
 EYRE OWNERS MANUAL FOR MODELS E-1 E-2 WARNING Never use any fuel-burning products (stoves, lanterns, heaters, etc.) inside or within proximity of this tent. Use of fuel-burning products inside or within
INSTRUCTION MANUAL 10M x 10M
 INSTRUCTION MANUAL 10M x 10M 10m x 10m PART LIST STANDARD PARTS These parts are included in the Standard 10m x 10m Bonga Stretchtent DESCRIPTION SIZE MATERIAL QUANTITY CANVAS 10m x 10m fabric 1 SIDE CLAMPS
Cassette-folding arm-awning markilux 990
 Cassette-folding arm-awning markilux 990 Mounting instructions 1. Overview 1 Projection profile 2 Folding arm 3 Fabric 4 Console 5 Cassette 6 Covering cap 7 Wall bracket 2. Mounting brackets 2.1 Overview
PR-429BF-600M. Bell 429 Blade Fold Kit Operations Manual
 Table of Contents Table of Contents... 1 Record of Revisions... 2 References... 3 Introduction... 4 Contact Information... 4 Prerequisites... 5 First Time Use... 6 Blade Clamp Placement... 6 Blade Clamp
Otter Pro XT Cabin Installation and Set-Up Instructions
 Otter Pro XT Cabin Installation and Set-Up Instructions Otter Pro XT Cabin Fits Medium Otter Pro and Otter II Sled Only Parts Identification and Check List MODEL NUMBERS: Complete Pkg Pro XT Thermal Cabin
Motor Rally Pro. 260 & 390 Instructions & care manual
 WELCOME Thank you for purchasing your Kampa awning. Please read these instructions carefully before attempting to set up your awning and retain for future reference. If used properly, your awning should
WARNING USING AND CARING
 OWNER S MANUAL WARNING Never use any fuel-burning products (stoves, lanterns, heaters, etc.) inside or within proximity of this tent. Use of fuel-burning products inside or within proximity of this tent