CP V3 Air/Oil Separator WRX / STi. S0699 Install Instructions. Parts List
|
|
|
- Richard Jeffery Elliott
- 5 years ago
- Views:
Transcription


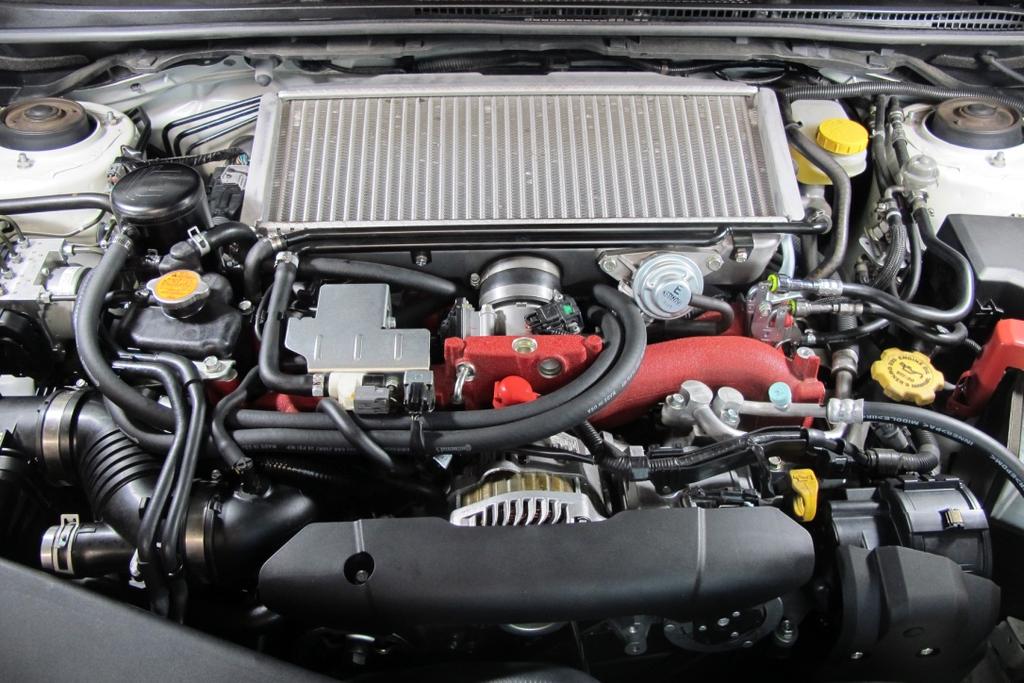
1 CP V3 Air/Oil Separator WRX / STi S0699 Install Instructions Parts List Item # Qty Description Sent Rcvd S Air/Oil Separator Unit for WRX/08+ STi H /8 PVC Hose: to port #1 H /8 PVC Hose: to port #2 H /2 Ventilation Hose: to port #3 H /2 Ventilation Hose: to port #4 F /2 Straight Fitting C Hose Clamps 1 2 TO MANIFOLD 40 3/8 Hose 3 TO PCV 20 3/8 Hose 4 TO INTAKE 43 1/2 Hose TO FITTING 5 1/2 Hose For further instruction, visit for a video
 Ideally use")

 Use 1/4 drive socket/ratchet to tighten faster Step")
 a.")
2 Tools Needed: Pliers Flathead Screwdriver* 10mm wrench and/or socket 12mm wrench and/or socket Ratchet * (For locking clamps) Ideally use the special tool. If you have difficulty re-installing the locking clamps, we have supplied extra worm clamps. (For worm clamps) Use 1/4 drive socket/ratchet to tighten faster Step by Step: 1. Disconnect Ground (-) on Battery 2. Disconnect Intake to Cabin Sound Generator (Only on STi) a. Remove 2 Clips with Pliers b. Remove 2 bolts with 10mm Socket or Wrench c. Plug firewall, and cap opening off intake with supplied plugs.


3 3. Remove Intercooler a. Remove Hoses from crossover pipe - Use special tool or flathead screwdriver to release locking clamps - pull hoses off pipes b. Remove four 12mm bolts from each mounting bracket and recirculation valve


4 c. loosen screw on the rear clamp on throttle body hose d. remove two 12mm bolts from the intercooler bracket connected to the intake manifold e. Set aside bracket f. Grab both sides of the intercooler, and wiggle it away from you until it pops out of the throttle body hose, then to the right to pop off of the turbo outlet 4. Remove throttle body from intake manifold a. Loosen screw on the front clamp on throttle body hose b. Remove four 10mm bolts from the back of the throttle body housing


5 c. Move throttle body out of the way 5. Attach Air/Oil Separator a. On the US passenger side behind/underneath the intake manifold, remove 2 of the 12mm bolts that hold the fuel injector cover to the intake manifold b. replace those 2 bolts with AOS bracket lined up to the appropriate openings - on an STi: A & C - on a WRX: A & B


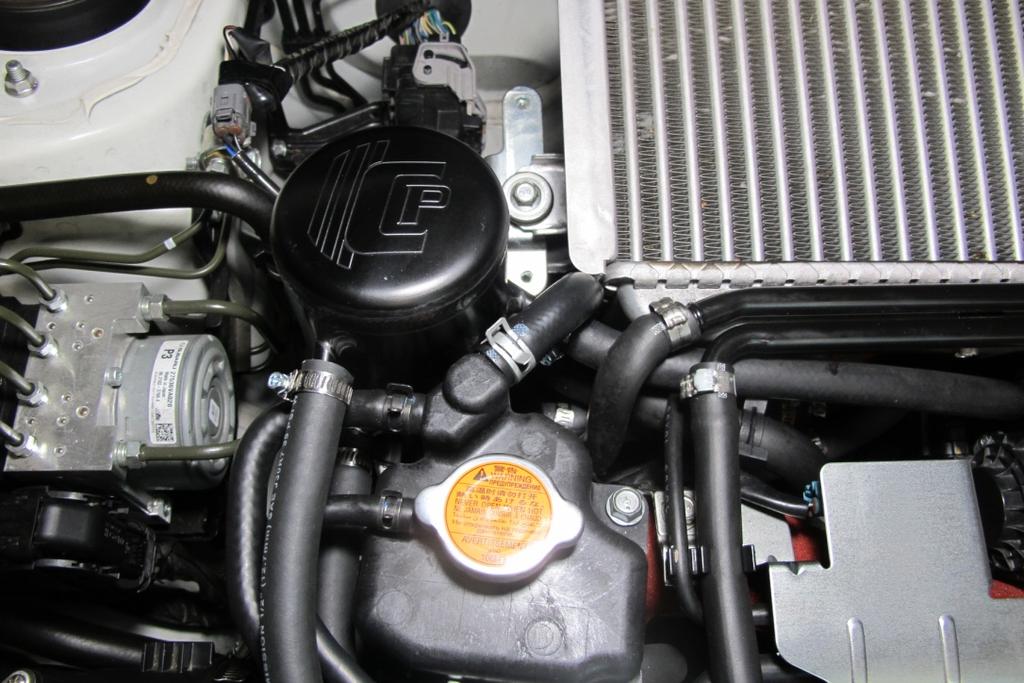
6 In order to make it easier to access these bolts, use zip ties (or other methods) to pull the hoses out of the way Pictured are the 2 bolts that need removed on an STi


7 6. Remove PVC to intake manifold hose a. Squeeze clamp with pliers and move away from end of hose b. repeat for other end of hose beneath turbo outlet c. remove hose (does not get re-installed; either throw away or store)


8 7. Attach supplied 40 3/8 hose to nipple underneath throttle body a. Slip worm clamp over hose, and push hose on to nipple until it butts up against flange b. Tighten worm clamp until it cannot be pulled off by hand, but not too tight that it cuts the hose 8. Re-attach throttle body by tightening the four 10mm bolts a. route 40 3/8 hose as pictured


9 9. Attach supplied 20 3/8 Hose to PCV nipple underneath turbo outlet a. Slip worm clamp over hose, and push hose on to nipple until it butts up against flange b. Tighten worm clamp until it cannot be pulled off by hand, but not too tight that it cuts the hose c. route hose behind sensor as pictured, either before attaching to the nipple, or by removing and re-attaching the plug d. Attach the other end of the 20 3/8 hose to port #2 on the AOS, trim if necessary

10 10. Remove hose from white sensor by the turbo outlet a. Use special tool or flathead screwdriver to release locking clamp b. pull hose off white sensor, and either throw away or store locking clamp c. replace locking clamp with supplied worm clamp d. Attach this loose hose to the supplied black straight fitting with the worm clamp e. Attach supplied 5 1/2 hose to the other end of the straight fitting, slip over a worm clamp and tighten both clamps until they cannot be pulled off the fitting by hand, but not too tight that it cuts the hose


11 11. Attach the other end of the 5 hose to port #4 on the AOS a. Route 5 hose under black OE hose shown in picture b. Slip supplied worm clamp over 5 hose, and push hose on to port #4 on the AOS until it butts up against the can, trim if necessary c. Tighten worm clamp until it cannot be pulled off by hand, but not too tight that it cuts the hose 12. Attach supplied 43 1/2 hose to white sensor nipple a. Slip worm clamp over hose, and push hose on to nipple until it butts up against sensor b. Tighten worm clamp until it cannot be pulled off by hand, but not too tight that it cuts the hose c. Route 40 3/8 hose with 43 1/2 hose together as pictured over the intake manifold and underneath coolant tank hoses / plug


12 13. Attach 40 3/8 hose to port #1 on the AOS a. Slip worm clamp over hose, and push hose on to port until it butts up against the can, trim if necessary b. Tighten worm clamp until it cannot be pulled off by hand, but not too tight that it cuts the hose 14. Attach 43 1/2 hose to port #3 on the AOS a. Slip worm clamp over hose, and push hose on to port until it butts up against the can, trim if necessary b. Tighten worm clamp until it cannot be pulled off by hand, but not too tight that it cuts the hose 15. Reinstall Intercooler a. Repeat steps 1 & 3 in reverse
13 Enjoy!
Mazdaspeed Version 1 Oil Catch Can Kit Install Guide
 Mazdaspeed 3 2010+ Version 1 Oil Catch Can Kit Install Guide 1 WARNING: By installing this Product, you understand that: The buyer/user assumes all risk as to quality, performance and use of these products
Mishimoto Direct Fit Coolant Expansion Tank All (EcoBoost install)
") Mishimoto Direct Fit Coolant Expansion Tank 15-16 All (EcoBoost install) Note: Mishimoto has an installation video (here) that explains it in 3 minutes. While the video provides a decent overview, the
Mishimoto Direct Fit Coolant Expansion Tank 15-16 All (EcoBoost install) Note: Mishimoto has an installation video (here) that explains it in 3 minutes. While the video provides a decent overview, the
Mazdaspeed6 Stage 1 Location 2 OCC Kit Install guide
 1 Mazdaspeed6 Stage 1 Location 2 OCC Kit Install guide WARNING: By installing this Product, you understand that: The buyer/user assumes all risk as to quality, performance and use of these products and
Genesis. Side Burner Accessory Installation. Step 3. Step 1. Step 2. For use with Genesis Gas Barbecues Only
 Genesis Side Burner Accessory Installation For use with Genesis Gas Barbecues Only Step 1 WARNING: All gas controls and supply valves should be in the OFF position. You will need: Side burner assembly
New Intercooler O-Rings fitted Viton CDT/CDTI... By Arctic
 New Intercooler O-Rings fitted Viton CDT/CDTI... By Arctic The intercooler is located at the bottom of the main radiator, and this is how it is possible to replace the O-rings with out taking the bumper
Otter Pro XT Cabin Installation and Set-Up Instructions
 Otter Pro XT Cabin Installation and Set-Up Instructions Otter Pro XT Cabin Fits Medium Otter Pro and Otter II Sled Only Parts Identification and Check List MODEL NUMBERS: Complete Pkg Pro XT Thermal Cabin
HANDLE AND WHEEL KIT INSTALLATION
 HANDLE AND WHEEL KIT INSTALLATION Select EB and EM Series Generators Honda Power Equipment Your generator is equipped with a wheel kit and folding handle kit for easy transport and convenient storage.
Otter Pro X-Over Lodge Installation and Set-Up Instructions
 Otter Pro X-Over Lodge Installation and Set-Up Instructions Otter Pro X-Over Lodge Fits Magnum Otter II & Pro Sled Only Parts Identification and Check List MODEL NUMBERS: Complete Pkg Pro X-Over Lodge
Advantage Plus TIM-3600 Series Reel
 Read the following precautions and instructions before you begin assembly or using. Failure to comply with these instructions could result in personal injury or property damage. Keep these instructions
Thermostatic Griddle Field Service Kit Instructions
 Thermostatic Griddle Field Service Kit Instructions The following document provides instructions on how to install a Garland Thermostatic Griddle Field Kit and is applicable to each 2 section of a Garland
Service Bulletin HHXDF5 Mechanical Ride-On Trowels LPG Hose Replacement
 Service Bulletin HHXDF5 Mechanical Ride-On Trowels LPG Hose Replacement Product Group: Date Issued: Service Bulletin No. Ride-On Trowels Bulletin Type X Mandatory 2/6/6 TR20622 Models/Series Affected:
TITAN Fuel Tanks. INSTALLATION INSTRUCTIONS G e n e r a t i o n V
 TITAN pt. no.: 02 0000 0128 Important: Please read these instructions carefully and completely before starting the installation. TITAN Fuel Tanks INSTALLATION INSTRUCTIONS G e n e r a t i o n V Extended
Roller Bar End Cap (w/round Drive Shaft) Replacement Instructions for Vista and Motorized Awnings * Helpers needed *
 Replacement Instructions for Vista and Motorized Awnings * Helpers needed *") RETRACTABLE AWNINGS For Technical Support visit us at www.sunsetter.com/ownerscorner or Call Toll Free 800-670-7071 Fax 877-224-4944 Roller Bar End Cap (w/round Drive Shaft) Replacement Instructions for
RETRACTABLE AWNINGS For Technical Support visit us at www.sunsetter.com/ownerscorner or Call Toll Free 800-670-7071 Fax 877-224-4944 Roller Bar End Cap (w/round Drive Shaft) Replacement Instructions for
VEPR Round Drum Disassembly and Assembly
 VEPR 12 25 Round Drum Disassembly and Assembly Required Tools ¼ Allen Wrench Flat Head Screwdriver Drum Parts List Drum Body Carousel Center Bolt Dummy Rounds Carousel Lock Spring Clear Drum Cover Step
GoBidet Bidet Attachment
 GoBidet Bidet Attachment 151 Ruths Place #5 Sequim, WA 98382 Tel 1-800-681-0753 Fax +1 360-681-4029 www.go-bidet.com MODEL #2003C In this box: 1 User Manual 1 GoBidet Unit w/ mounting bracket, nut, rubber
Assembly TOOLS REQUIRED: 17mm and 14mm or equivalent wrenches.
 Instructions for 3 Trimmer Rack, 3TR* *Patents Pending Assembly TOOLS REQUIRED: 17mm and mm or equivalent wrenches. 15 26 26 16 15 16 Attach the lower mounting brackets to the Trimmer Rack poles as shown
ZL1 Camaro Intercooler Fluid Reservoir Kit
 ZL1 Camaro Intercooler Fluid Reservoir Kit PN: L300152012 Revision - 1.2 Lingenfelter Performance Engineering 1557 Winchester Road Decatur, IN 46733 (260) 724-2552 (260) 724-8761 fax www.lingenfelter.com
ASSEMBLY GUIDE. Customer Service: INCH² 3-BURNER & 545 INCH² 3-BURNER
 ASSEMBLY GUIDE 455 INCH² 3-BURNER & 545 INCH² 3-BURNER DANGER If you smell gas: 1. Shut off gas to the appliance. 2. Extinguish any open flames. 3. Open lid. 4. If odor continues, keep away from the appliance
Color Light Streams Lighted Bubbler Spillway Pot (CLSDLP) Installation Manual
 Installation Manual") Color Light Streams Lighted Bubbler Spillway Pot (CLSDLP) Installation Manual 27.75 23.75 25.50 20.75 Specifications: 8-13 GPM 12-14 VAC only (Class 2 transformer required) 3W max. 100 ft. cord, conduit
Color Light Streams Lighted Bubbler Spillway Pot (CLSDLP) Installation Manual 27.75 23.75 25.50 20.75 Specifications: 8-13 GPM 12-14 VAC only (Class 2 transformer required) 3W max. 100 ft. cord, conduit
Otter XT Cabin Installation and Set-Up Instructions
 Otter XT Cabin Installation and Set-Up Instructions Otter XT Cabin Fits Medium Otter Wild Sled Only Parts Identification and Check List MODEL NUMBERS: Complete Pkg Otter XT Cabin 200962 2 1 PARTS LIST
ASSEMBLY GUIDE. Customer Service: INCH² 2-BURNER & 864 INCH² 2-BURNER
 ASSEMBLY GUIDE 688 INCH² 2-BURNER & 864 INCH² 2-BURNER DANGER If you smell gas: 1. Shut off gas to the appliance. 2. Extinguish any open flames. 3. Open lid. 4. If odor continues, keep away from the appliance
Auxiliary 63.5l Fuel Tank Ford/Mazda Pick-up Truck 2012-Current READ ME! IMPORTANT WARNING!
 Auxiliary 63.5l Fuel Tank Ford/Mazda Pick-up Truck 2012-Current ENG FTFM006 90 min READ ME! Thank you for purchasing a Front Runner Ford/Mazda Pick-Up Truck 2012 - Current Fuel Tank. Before you start,
RETRACTABLE AWNING w/ OPTIONAL HOOD ASSEMBLY INSTRUCTIONS
 Contact us @ (800)851-0865 RETRACTABLE AWNING w/ OPTIONAL HOOD ASSEMBLY INSTRUCTIONS Congratulations on your purchase of a new retractable awning. With proper installation this awning will provide years
COMPOSITE POLE. Operations Manual. Part No. T00134 Rev. 6.4 January 22, 2001
 COMPOSITE POLE Operations Manual Part No. T00134 Rev. 6.4 January 22, 2001 DANGER: Do NOT allow contact with ELECTRIC WIRES. Fiber Glass end section reduces the risk of electrocution. Ettore Products Company,
260 INSTALLATION OF OPTIONAL MARINE HEAD THRU-HULL, VENT, AND DECK PLATE
 INSTALLATION OF OPTIONAL MARINE HEAD THRU-HULL, VENT, AND DECK PLATE DRILLING HOLES FOR THE WASTE VENT AND WASTE DECK PLATE: 3 9 3 1/2 Drilling hole for the waste vent. Measure from the walk through outboard
DO NOT USE WITH CROSSBAR SPREAD LESS THAN 24.
 TM Please read all instructions carefully before assembly, installation and/or use of this product. DO NOT USE WITH CROSSBAR SPREAD LESS THAN 24. WARNING: Do not exceed the weight limit of your vehicle
TCWS.38NG03.C BLACK DIAMOND BURNER KIT INSTRUCTIONS
 IMPORTANT: THESE INSTRUCTIONS ARE TO REMAIN WITH THE HOMEOWNER These instructions are supplementary to the Installation and Operating Instructions supplied with the fireplace and should be kept together.
BILLY GOAT KV HOSE KIT (P/N ) PURPOSE: To allow for vacuuming in hard to reach places.
 PURPOSE: To allow for vacuuming in hard to reach places.") BILLY GOAT KV HOSE KIT (P/N 891125) PURPOSE: To allow for vacuuming in hard to reach places. Part No 891061-1 - Form No F052209A INSTALLATION: Step 1. Attach nozzle wear guards. 1. Disconnect spark plug
BILLY GOAT KV HOSE KIT (P/N 891125) PURPOSE: To allow for vacuuming in hard to reach places. Part No 891061-1 - Form No F052209A INSTALLATION: Step 1. Attach nozzle wear guards. 1. Disconnect spark plug
Otter XT 650 Cabin Installation and Set-Up Instructions
 Otter XT 650 Cabin Installation and Set-Up Instructions Otter XT 650 Cabin Fits Medium Otter Wild Sled Only Parts Identification and Check List MODEL NUMBERS: Complete Pkg Otter XT 650 Cabin 200891 2 1
Installation Guide. Single-Control Kitchen Sink Faucets
 Installation Guide Single-Control Kitchen Sink Faucets K-6352 K-6353 M product numbers are for Mexico (i.e. K-12345M) Los números de productos seguidos de M corresponden a México (Ej. K-12345M) Français,
Urea/Adblue Hose Reel
 www.scintex.com.au sales@scintex.com.au Model: SHR3408 Urea/Adblue Hose Reel Product Manual Specifications Spring driven drum: for automatic rewind. Locking ratchet: to maintain the desired length of hose
BERYL Service Guide. Travel Adjust OTT Change
 BERYL Service Guide Travel Adjust OTT Change SERVICE OVERVIEW This manual will guide you step by step performing a travel adjust and OTT setting change to your Beryl suspension fork. Please follow each
kit contents installation instructions suzuki samurai silicone radiator hose kit kit ( suzuki samurai, 1.
 303732-3-kit (1986-1995 suzuki samurai, 1.3l engine) kit contents 5356 PINE AVE FRESNO, CA 93727 USA TOLL FREE: 877.4X4.TOYS WORLDWIDE: 559.252.4950 WWW.TRAIL-GEAR.COM 303731-3-INS recommended tools Engine
TC36 SEE-THRU LODGEWOOD BURNER AND PANEL KIT INSTRUCTIONS
 IMPORTANT: THESE INSTRUCTIONS ARE TO REMAIN WITH THE HOMEOWNER These instructions are supplementary to the Installation and Operating Instructions supplied with the fi replace and should be kept together.
Installation Guide. LPKPDR - Universal LP Conversion Kit for Professional & Designer Ranges/Rangetops. Viking Range, LLC.
 Installation Guide Viking Range, LLC 111 Front Street Greenwood, Mississippi 38930 USA (662) 455-1200 For product information, call 1-888-845-4641 LPKPDR - Universal LP Conversion Kit for Professional
Instructional Booklet
 Instructional Booklet 936-894-3292 Thank you for choosing The Bathmaster! You are on your way to creating an unmatched bathing experience both for you and the lucky animal. The Bathmaster is designed to
Hose Reel Series L701/G701
 Hose Reel Series L70/G70.0 WARNING: Read carefully and understand all INSTRUCTIONS before operating. Failure to follow the safety rules and other basic safety precautions may result in serious personal
Auto Rewind Hose Reel 10M / 20M / 30M Models
 Auto Rewind Hose Reel 10M / 20M / 30M Models Instruction Manual 10M / 20M / 30M Auto Rewind Hose Reel Installation, Hose Replacement and Troubleshooting Guide Product Codes: 1110H / 1120H / 1130H Models
CONVERSION INSTRUCTIONS
 CONVERSION INSTRUCTIONS Natural Gas to Propane Gas Conversion Kit For Thermador Professional Cooktops and Ranges Model STARLPKIT Part No. 35-00-682 Contains 7mm Hex Main Orifices This kit is used to convert
P3000 UNIVERSAL Clamp-On
 IHI INSTRUCTION MANUAL Required Tools P3000 UNIVERSAL Clamp-On Wrench Allen Key P3001 65 ENDCAPS P3011 65 BLACK P300 7 ENDCAPS P301 7 WHITE P3003 ENDCAPS P3013 SILVER PART# DESCRIPTION ENDCAPS SIDE SUPPORTS
Barefoot International / Fly High Fat Sac Filling and Emptying Options
 Barefoot International / Fly High Fat Sac Filling and Emptying Options We are not trying to convince you one way or the other, but we want you to be able to make an informed decision about what is best
ASSEMBLY & CARE INSTRUCTIONS
 ASSEMBLY & CARE INSTRUCTIONS 7 x TRAILER TENT SERIES 3 9 Part No. FT3711 - on road FT3923 - off road OPTIONAL SUNROOM Wall and floor kit Part No. FT3723 - on road FT39 - off road OPTIONAL SPARE ROOM Roof,
REPLACEMENT PROCEDURE: ROTISSERIE ORIFICE: TOOLS REQUIRED TO INSTALL THIS KIT: ITEM DESCRIPTION: E C
 TOOLS REQUIRED TO INSTALL THIS KIT: ITEM DESCRIPTION: A SCREWDRIVER - PHILIPS SIZE # 2 B SCREWDRIVER - FLAT 1/8 WIDE TIP C 1/2 WRENCH - OPEN TYPE D 7/16 WRENCH - OPEN TYPE E RATCHETING SOCKET WRENCH -
Gosford Aquifier (Pre 2009) Replace O-rings here
 Replace O-rings here") Gosford Aquifier (Pre 2009) Replace O-rings here Gosford Aquifier (Pre 2009) General Advice: These instructions are intended as a guide only, if you are in any doubt you should seek the advice of a qualified
Gosford Aquifier (Pre 2009) Replace O-rings here Gosford Aquifier (Pre 2009) General Advice: These instructions are intended as a guide only, if you are in any doubt you should seek the advice of a qualified
Otter Pro XT 1200 Cottage Installation and Set-Up Instructions
 Otter Pro XT 1200 Cottage Installation and Set-Up Instructions Otter Pro XT 1200 Cottage Fits Small Ultra-Wide Otter Pro and Otter II Sled Only Parts Identification and Check List MODEL NUMBERS: Complete
ASSEMBLY & CARE INSTRUCTIONS. 7 x4 TRAILER TENT SERIES 4 9. OPTIONAL SUNROOM Wall and floor kit. OPTIONAL SPARE ROOM Roof, wall and floor kit
 ASSEMBLY & CARE INSTRUCTIONS 7 x TRAILER TENT SERIES 9 Part No. TM709 OPTIONAL SUNROOM Wall and floor kit Part No. TM723 OPTIONAL SPARE ROOM Roof, wall and floor kit Part No. TM76 Please keep these instructions
Voice Mail: (815) Fax: (815) OWNERS MANUAL
 Fax: (815) OWNERS MANUAL") www.countryhomescampers.com Email: info@countryhomescampers.com Voice Mail: (815) 346 3337 Fax: (815) 346 3337 OWNERS MANUAL Introduction: Your Country Homes Camper has been engineered and built with a
www.countryhomescampers.com Email: info@countryhomescampers.com Voice Mail: (815) 346 3337 Fax: (815) 346 3337 OWNERS MANUAL Introduction: Your Country Homes Camper has been engineered and built with a
INSTALLATION INSTRUCTIONS TOWNSEND
 INSTALLATION INSTRUCTIONS TOWNSEND.00 DECK MOUNT BATH FILLER.0 Thank you for selecting American Standard... the benchmark of fine quality for over 00 years. To ensure that your installation proceeds smoothly-please
TC36 CHALET BURNER KIT INSTALLATION INSTRUCTIONS
 INSTALLER: Leave this manual with the appliance. CONSUMER: Retain this manual for future reference. These instructions are supplementary to the Installation and Operating Instructions supplied with the
Stonefire Fire Pit Table. Installation Instructions for SF-32-K
 Stonefire Fire Pit Table Installation Instructions for SF-32-K / 1 2 IMPORTANT Please consult your Crystal Fire instruction manual for detailed instructions and important information related to the burner
VALORE SEVEN. Serial Number. Pacific) Version No.:V
 Version No.:V") VALORE SEVEN Version No.:V.206222 Serial Number Pacific) 7 9 8 " 5 8 " " 7 2 8 " 26 2 " 7 8 " 9" 2 8 " 2 8 " (H) 26.9" x (W) 8.26" x (D) 8.85" Hand shower hose: 59.05" Weight: Net: 0 lbs /Gross: 2 lbs
VALORE SEVEN Version No.:V.206222 Serial Number Pacific) 7 9 8 " 5 8 " " 7 2 8 " 26 2 " 7 8 " 9" 2 8 " 2 8 " (H) 26.9" x (W) 8.26" x (D) 8.85" Hand shower hose: 59.05" Weight: Net: 0 lbs /Gross: 2 lbs
HANDLES AND CONTROL CABLES
 Worm Drive Transmission........................ 1 Single Speed Spur/Bevel Gear Transmission............. Single Speed Bevel Gear Transmission................ Three Speed Transmission.......................
DWV AND STORMWATER SYSTEMS. Fittings / Pipes
 A DWV AND STORMWATER SYSTEMS Fittings / Pipes PLAIN BEND F+F SIZE CODE COMMENT 32mm x 45 101-32-45 32mm x 88 101-32-88 40mm x 15 101-40-15 40mm x 45 101-40-45 40mm x 88 101-40-88 40mm x 88 101-40-88W Inspection
Water Trailer Series. WT5HR Hose Reel Kit Installation REQUIRED TOOLS PARTS WORK SAFELY! PREPARATION
 Water Trailer Series WT5HR Hose Reel Kit Installation The following instructions are intended to assist the user in the installation of the WT5HR Hose Reel Kit for use on the WT5C, WTE5C, WT5CSG Series
INSTRUCTION MANUAL ALEKO RETRACTABLE AWNING
 INSTRUCTION MANUAL for ALEKO RETRACTABLE AWNING www.alekoproducts.com FAILURE TO FOLLOW THESE INSTRUCTIONS MAY RESULT IN PERSONAL INJURY! 1 Important Safety Precautions WARNING NOTE: FOR PERSONAL SAFETY,
Installation instruction
 903-CIS013-D Installation instruction 0.m Antenna LEAX Arkivator Telecom disclaims any liability for the results of improper or unsafe installation, inspection, maintenance, or removal practices. Torsgatan
Tools. For safety and easy faucet replacement, San-Ei recommends the use of the following helpful tools:
 BW-0BH INSTALLATION INSTRUCTIONS SINGLE HANDLE Kitchen Faucet Tools For safety and easy faucet replacement, San-Ei recommends the use of the following helpful tools: SAFETY GLASSES PIPE WRENCH PLIERS CHANNEL
Product instruction manual Ream Cutting Systems RE3943, RE3946, RE3947, RE3971, RE3952E
 Product instruction manual Ream Cutting Systems RE3943, RE3946, RE3947, RE3971, RE3952E The Trimfast Ream Cutters are reliable, high performance cutters that will give you the results you need quickly
NEWMAR SERVICE SCHOOL
 NEWMAR SERVICE SCHOOL TRAINING INFORMATION GUIDELINE FOR FEBRUARY 2013 OUR PRODUCTS: NOVA DUAL PITCH AWNING G-2000/ G-1500 2 P a g e G-2085 G-5000 3 P a g e G-LINKS 4 P a g e NOVA/ G-2000/ G-1500 BASIC
INSTALLATION MANUAL ECLIPSE ARMS UPGRADE FOR ONE-TOUCH
 RV INSTALLATION MANUAL ECLIPSE ARMS UPGRADE FOR ONE-TOUCH THIS PUBLICATION COVERS THE FOLLOWING MODELS: Universal Eclipse (8 foot extension) Eclipse XL (9 foot extension) These instructions apply to all
Brooks Fire Pit Table. Installation Instructions for Brooks Fire Pit Table BRK-1224
 Brooks Fire Pit Table Installation Instructions for Brooks Fire Pit Table BRK-1224 1 IMPORTANT Contents Please consult your Crystal Fire instruction manual for detailed instructions Required and important
WIDESPREAD LAVATORY MODELS WITH HI-ARC SPOUT
 5951, 5961, 5981, 5983, 5993 SERIES MT122B INSTALLATION INSTRUCTIONS THESE INSTRUCTIONS MUST BE LEFT WITH HOMEOWNER WIDESPREAD LAVATORY MODELS WITH HI-ARC TRADITIONAL CROSS NOTE: Handle Inserts are not
Assembly Instructions
 Assembly Instructions Thank You for your purchase of this conversion kit, we hope it makes your Media Blasting experience much more enjoyable. This kit was designed primarily to convert the Harbor Freight
MasterCraft Additional Ballast
 Barefoot International & Fly High Mfg. 3879 North Richards Street Milwaukee, WI 53212 Phone: 414-964-3668 Fax: 414-964-5767 E-Mail: orders@fatsac.com Web: www.fatsac.com MasterCraft Additional Ballast
DWV AND STORMWATER SYSTEMS. Fittings / Pipes
 A DWV AND STORMWATER SYSTEMS Fittings / Pipes PLAIN BEND F+F SIZE CODE COMMENT 32mm x 15 101-32-15 32mm x 45 101-32-45 32mm x 88 101-32-88 40mm x 15 101-40-15 40mm x 45 101-40-45 40mm x 88 101-40-88 40mm
π H-3505 GARAGE CANOPY PARTS SAFETY uline.com TOOLS NEEDED 10' X 20' X 8'
 π H-3505 GARAGE CANOPY 10' X 20' X 8' 1-800-295-5510 uline.com TOOLS NEEDED Safety Glasses Wrench or Socket 9/16" or 14mm Tape Measure Phillips Screwdriver Rubber Mallet PARTS Cables x 5 2-way Corner Foot
BMW K1200GT (RS) Throttle Spring Relaxation,v1.0 Documented by Matt McCabe
 Throttle Spring Relaxation,v1.0 Documented by Matt McCabe") BMW K1200GT (RS) Throttle Spring Relaxation,v1.0 Documented by Matt McCabe http://www.k12gt.com/ Disclaimer: You bear all responsibility for the results of this procedure. No whining! Starting with Larry
BMW K1200GT (RS) Throttle Spring Relaxation,v1.0 Documented by Matt McCabe http://www.k12gt.com/ Disclaimer: You bear all responsibility for the results of this procedure. No whining! Starting with Larry
CONVEX Awning Instructions
 CONVEX Awning Instructions IMPORTANT NOTE: Please take a few minutes to become familiar with this entire document BEFORE beginning your installation. The time you spend doing this is well spent and will
TC36 CHALET II BURNER KIT INSTALLATION INSTRUCTIONS
 INSTALLER: Leave this manual with the appliance. CONSUMER: Retain this manual for future reference. These instructions are supplementary to the Installation and Operating Instructions supplied with the
INSTALLATION INSTRUCTIONS AND OWNER'S MANUAL AWNINGS. For trailers & motor homes with straight sides TOOLS REQUIRED
 AWNINGS INSTALLATION INSTRUCTIONS AND OWNER'S MANUAL For trailers & motor homes with straight sides TOOLS REQUIRED 1/4" electric drill Ratchet handle kit 3/8" & 7/16" socket No. 1 and No. 2 screwdriver
Gas Go Anywhere /23/01
 Gas Go Anywhere 55014 02/23/01 FOR OUTDOOR USE ONLY This grill does not include an LP fuel tank. Check Package Contents You should have received the parts listed below. While we give much attention to
TUBULAR BURNER CONVERSION KIT AGCK-TBXX / AECK-UBXX
 TUBULAR BURNER CONVERSION KIT AGCK-TBXX / AECK-UBXX IMPORTANT - READ ALL INSTRUCTIONS BEFORE YOU BEGIN THE INSTRUCTIONS HEREIN SHOULD BE PERFORMED BY A QUALIFIED SERVICE TECHNICIAN. THE GRILL MUST BE COMPLETELY
Shut off combine and remove key before installing the hopper extension. Make sure the combine is on a level surface. Engage parking brake.
 ASSEMBLY INSTRUCTIONS CASE IH 5088, 6088/7088, 7010/8010 & 7120/8120/9120 Series NEW HOLLAND CR STD Series Combines (Large) big top 26301(service only), 29976 (service only), 53408, 53543 & 54274 The Crary
Instructions for Converting Range to Operate on Liquefied Petroleum Gas
 INSTALLATION AND SERVICES MUST BE PERFORMED BY A QUALIFIED INSTALLER IMPORTANT: SAVE INSTRUCTION MANUAL FOR THE LOCAL INSPECTOR S USE. READ AND SAVE THESE INSTRUCTIONS FOR FUTURE REFERENCE This conversion
Compact Stainless Spit Roast
 Compact Stainless Spit Roast Instructions As soon as you get the machine to your destination please start it up and make sure it works following the Instructions below. This is just in case something has
SAWYER DUAL BLADDER GRAVITY SYSTEM User s Guide
 SAWYER DUAL BLADDER GRAVITY SYSTEM User s Guide Since 1984, Sawyer s goal has been to provide the best solutions for outdoor protection. Our innovative water filtration systems, insect repellents, sunscreen,
TC42 TRANQUILITY BURNER KIT INSTRUCTIONS
 IMPORTANT: THESE INSTRUCTIONS ARE TO REMAIN WITH THE HOMEOWNER These instructions are supplementary to the Installation and Operating Instructions supplied with the fi replace and should be kept together.
Gas Supply Conversion and Orifice Replacement Guide
 Page 1 Gas Supply Conversion and Orifice Replacement Guide PURPOSE: If a barbeque or side burner unit is to be operated with a different gas supply other than the one provided by the factory, a conversion
Assembly/Installation/Use Instructions:
 IMPORTANT We highly recommend that our products be installed and serviced by professionals who are certified in the U.S. by NFI (National Fireplace Institute) or in Canada by WETT (Wood Energy Technical
Standard Awning Installation Instructions
 Standard Awning Installation Instructions Important Note: Please become familiar with this entire document BEFORE beginning your installation. The time you spend doing this is well spent and will make
* * 4023 KR. Step 1 Prepare the Keyed Removable Unit. Not for use on electric or fire rated removable mullions
 condition. *64009-00* 64009-00 Keyed Removable Mullions 403 KR Installation Instructions Not for use on electric or fire rated removable mullions This kit includes the following parts: (Not to scale) 5/6
NS 200 Series Hose Reel January 2011
 Instructions Parts List Service Manual NS 200 Series Hose Reel January 2011 Suitable for dispensing, transfer and evacuation of lubricants, fuels, air & other automotive & industrial products. To be used
TCWS.54NG03C2 BLACK DIAMOND BURNER KIT INSTRUCTIONS
 IMPORTANT: THESE INSTRUCTIONS ARE TO REMAIN WITH THE HOMEOWNER These instructions are supplementary to the Installation and Operating Instructions supplied with the fi replace and should be kept together.
USER MANUAL FLEXI Tent&Trailer Comfort
 USER MANUAL FLEXI Tent&Trailer Comfort CONGRETULATIONS! By choosing a Combi-Camp tenttrailer, you have made a choice for quality and sustainablilty. We hope you will have lots of careless holidays with
Operating Instructions
 Operating Instructions SD13035 OLP SD13050 OMP SD14005 OVP SD13050 OLP SD13000 OMP FSD13035 OLP SD13000 OLP SD13035 OVP FSD13050 OLP SD14035 OLP SD13050 OVP FSD13000 OLP SD14050 OLP SD13000 OVP FSD14035
LEG KIT. Pizza Oven OWNER S MANUAL. For 6000 Series Portable Ovens
 Pizza Oven LEG KIT For 6000 Series Portable Ovens OWNER S MANUAL IMPORTANT: This instruction manual contains important information necessary for the proper assembly and safe use of the appliance. Read
TCWS54 SEE THRU DIAMOND BURNER INSTALLATION KIT INSTRUCTIONS
 INSTALLER: Leave this manual with the appliance. CONSUMER: Retain this manual for future reference. These instructions are supplementary to the Installation and Operating Instructions supplied with the
TC30 HEARTWOOD BURNER INSTALLATION INSTRUCTIONS
 INSTALLER: Leave this manual with the appliance. CONSUMER: Retain this manual for future reference. These instructions are supplementary to the Installation and Operating Instructions supplied with the
FLEX KEY ASSEMBLY. ..._ o RAFTER ARM TUBE MAIN ARM TUBE CAP NUT CLAW HINGE
 ZIP DEE Inc. 96 Crossen Ave. Elk Grove Village, IL 60007(847)437-0980 (800)338-2378 HEAD CASTING AWNING RAIL FLEX KEY ASSEMBLY..._ o GM1 Installation Instruction GMC Motorhome RAFTER ARM TUBE MAIN ARM
Rooftop Tent Owners Manual
 WWW.SMITTYBILT.COM Installation Instructions Part # 2783 Overlander Tent Rooftop Tent Owners Manual Read instruction manual entirely before assembling and installing this product. The Smittybilt Overlander
TC36 COUNTRY HOME BURNER KIT INSTRUCTIONS (NATURAL GAS ONLY)
") INSTALLER: Leave this manual with the appliance. CONSUMER: Retain this manual for future reference. These instructions are supplementary to the Installation and Operating Instructions supplied with the
INSTALLER: Leave this manual with the appliance. CONSUMER: Retain this manual for future reference. These instructions are supplementary to the Installation and Operating Instructions supplied with the
DO NOT use Alien Flier Zip Line Products until you have read and fully understand the SAFETY WARNINGS below!
 SAFETY WARNING DO NOT use Alien Flier Zip Line Products until you have read and fully understand the SAFETY WARNINGS below! Assumption of Risk Zip line construction and use can be dangerous. Ensure you
INSTALLATION INSTRUCTIONS
 INSTALLATION INSTRUCTIONS KR54, KR1654, & KR4954 Keyed Removable Mullion NOT FOR USE ON ELECTRIC OR FIRE RATED MULLIONS. This kit includes the following parts: (Not to scale) WARNING Remove key, reinstall,
Installation Instructions
 THE COLLECTION by Installation Instructions 0 BIDET FITTING Thank you for selecting American-Standard...the benchmark of fine quality for over 00 years. To ensure that your installation proceeds smoothly--please
INSTRUCTION SHEET DETHATCHER KIT. STS-422LX LPSTS-42JD Assembly Installation Operation Repair Parts L-1660-D. Visit us on the web!
 INSTRUCTION SHEET DETHATCHER KIT MODEL: DK-422LX FOR USE WITH SWEEPER MODEL: STS-422LX LPSTS-42JD Assembly Installation Operation Repair Parts For use with Riders and Lawn/Garden Tractors For the latest
TB131. Gas Conversion Kits for NVx & VPC Heaters. Issue 1.0 May Applies to models: NVx & VPC
 TB131 Issue 1.0 May 2018 Applies to models: NVx & VPC Gas Conversion Kits for NVx & VPC Heaters www.powmatic.co.uk +44 (0) 1460 53535 info@powrmatic.co.uk General Information Heater conversion between
TC42 CHALET BURNER KIT INSTALLATION INSTRUCTIONS
 INSTALLER: Leave this manual with the appliance. CONSUMER: Retain this manual for future reference. These instructions are supplementary to the Installation and Operating Instructions supplied with the
Tidland External Element Shaft
 TIDLAND WINDING SOLUTIONS Tidland External Element Shaft User Manual EN Series 800 GL External Element MI 651853 1 U GE External Element GX Ultra-Lightweight External Element Series 850 GS Spiral External
42-YP Series. Serie 42-YP Série 42-YP. Single Control Lavatory Faucet Grifo Monomando para el Baño Mitigeur de Robinet pour Lavabo
 42-YP Series Serie 42-YP Série 42-YP Single Control Lavatory Faucet Grifo Monomando para el Baño Mitigeur de Robinet pour Lavabo 07-28-05 EO6852C 30022-0100 Copyright 2005, Price Pfi ster, Inc. A COMPANY
COOPER FREESTANDING TUB FAUCET INSTALLATION
 SKU(s): 940972 COOPER FREESTANDING TUB FAUCET INSTALLATION BEFORE YOU BEGIN We recommend consulting a professional if you are unfamiliar with installing plumbing fixtures. Signature Hardware accepts no