EMPIRE Comfort Systems
|
|
|
- Magdalen McDonald
- 5 years ago
- Views:
Transcription

1 LS60THF-1 LOGS AND ROCKS SET This decorative media set includes an unusual assortment of logs and rocks in varying textures and colors to complement your linear fireplace - plus stainless steel coils to add a unique flair. For ease of installation, unpack all pieces and lay out so that any identifying letters are visible. INSTALLATION INSTRUCTIONS AND OWNER S MANUAL Log Set for USE WITH DIRECT VENT FIREPLACE MODELS: DVLL60BP90(N,P)-1 GAS-FIRED EMPIRE Comfort Systems WARNINGS If the information in this manual is not followed exactly, a fire or explosion may result causing property damage, personal injury or loss of life. Do not store or use gasoline or other flammable vapors and liquids in the vicinity of this or any other appliance. Installation and service must be performed by a qualified installer, service agency or the gas supplier. WHAT TO DO IF YOU SMELL GAS Do not try to light any appliance. Do not touch any electrical switch; do not use any phone in your building. Immediately call your gas supplier from neighbor s phone. Follow the gas supplier s instructions. If you cannot reach your gas supplier, call the fire department. INSTALLER: Leave this manual with the appliance. CONSUMER: Retain this manual for future reference. WARNING: If not installed, operated and maintained in accordance with the manufacturer's instructions, this product could expose you to substances in fuel or from fuel combustion which can cause death or serious illness. Page 1
2 TABLE OF CONTENTS SECTION PAGE Important Installation Guidelines...3 General Information...3 Log Identification...4 Log Placement Master Parts Distributor List...11 How To Order Repair Parts...11 HARDWARE PACK R12061 (QUANTITY 12) 8-32 X 3/4 PH PN HD SCREW R8234 (QUANTITY 12) 1/4 OD X 9/16 SPACER Page 2
3 IMPORTANT INSTALLATION GUIDELINES Proper Log Placement Log placement is critical to proper burner performance. Logs must be correctly positioned. The photos in this manual show the proper pinned position for logs and rocks on this set. Owners need to be shown proper log placement and instructed not to move the logs. Logs and rocks must fit firmly onto the locating pins when positioned as shown in the photos. Misformed logs, rocks, or logs with sloppy pin holes must be replaced. Proper Placement of Crushed Glass Media This fireplace is designed to use crushed glass media on the burner. The maximum amount of crushed glass media should not exceed 7-1/2 lbs. Spread out over the entire burner cover, burner screen, and accent light glass panels. It is recommended that the crushed glass media be added after the log and rock set has been properly installed. CAUTION: Do not place crushed glass around the pilot assembly. Crushed glass is only to be placed on the burner screen and burner cover. See notice on page 26. Make Owners Aware of Proper Log Set Operation Properly installed and properly maintained log sets do not deposit soot on the logs. If users see soot appear on a log, call for service. Do not continue to operate the log set. GENERAL INFORMATION Qualified Installing Agency Installation and replacement of gas piping, gas utilization equipment or accessories and repair and servicing of equipment shall be performed only by a qualified agency. The term "qualified agency" means any individual, firm, corporation, or company that either in person or through a representative is engaged in and is responsible for (a) the installation, testing, or replacement of gas piping or (b) the connection, installation, testing, repair, or servicing of equipment; that is experienced in such work; that is familiar with all precautions required, and that has complied with all the requirements of the authority having jurisdiction. The installation must conform with local codes or, in the absence of local codes, with the National Fuel Gas Code, ANSI Z223.1/NFPA54.* *Available from the American National Standards Institute, Inc. 11 West 42nd St., New York, N.Y State of Massachusetts: The installation must be made by a licensed plumber or gas fitter in the Commonwealth of Massachusetts. Sellers of unvented propane or natural gas-fired supplemental room heaters shall provide to each purchaser a copy of 527 CMR 30 upon sale of the unit. Appliance Certification This logset is design certified in accordance with American National Standard/CSA Standard ANSI Z21.88/CSA 2.33 and by Underwriters Laboratories for use with a Direct Vent Gas Fireplace Heater and shall be installed according to these instructions. Page 3
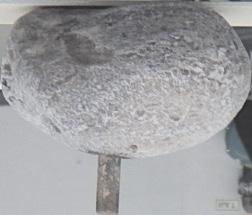


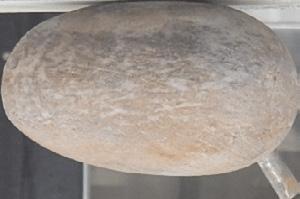
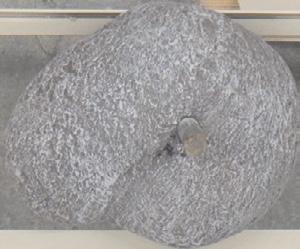
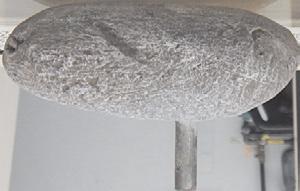

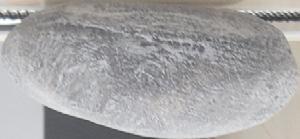

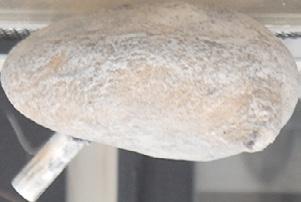


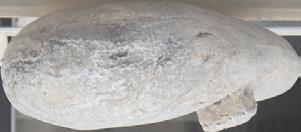


4 ROCK IDENTIFICATION PART NUMBER & DESCRIPTION PART NUMBER & DESCRIPTION ROCK A ROCK F ROCK B ROCK G ROCK C ROCK H ROCK D ROCK I ROCK E ROCK J ROCK K Page 4
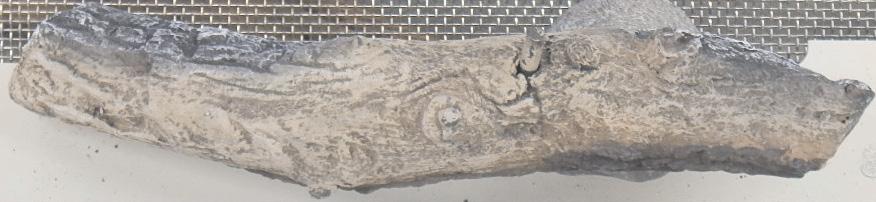
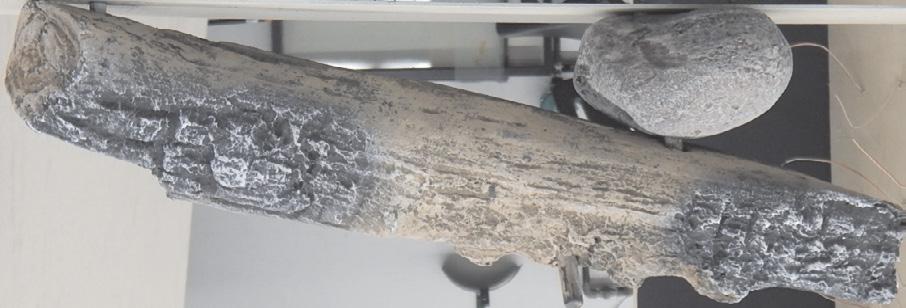
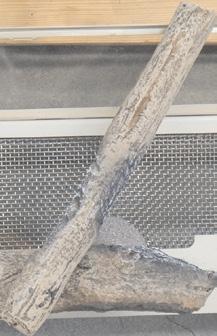
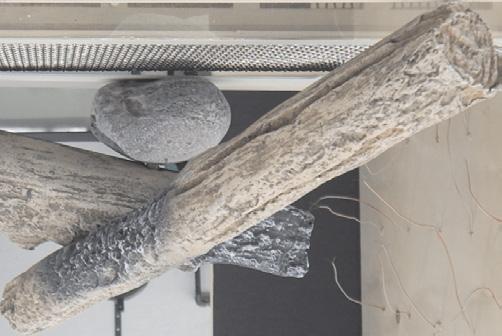
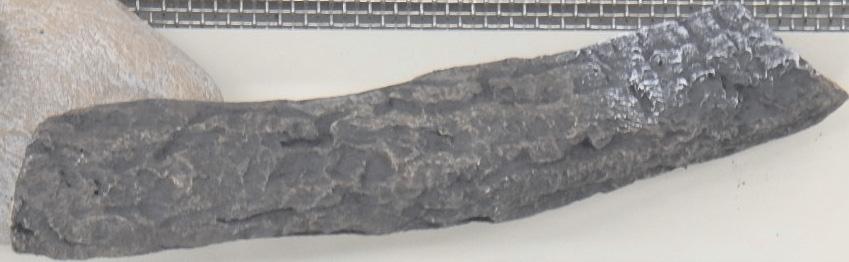
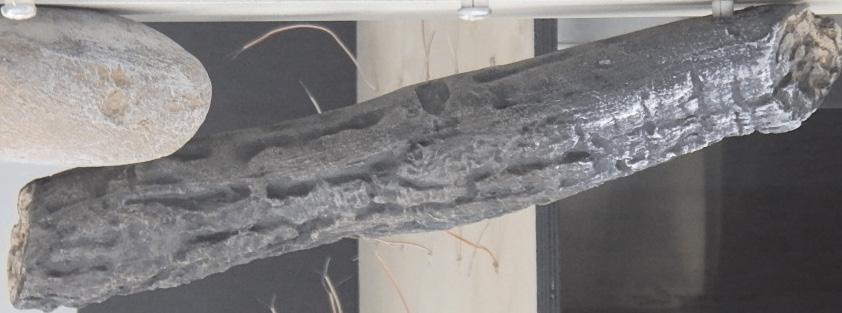
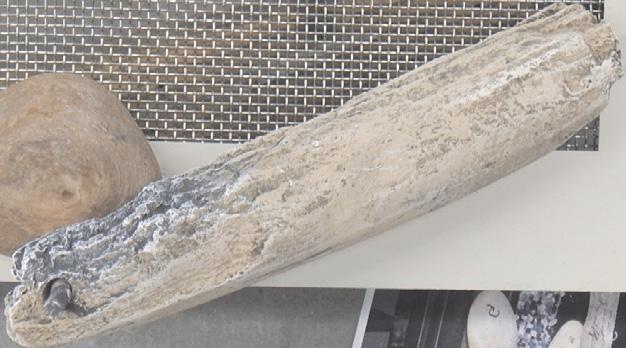
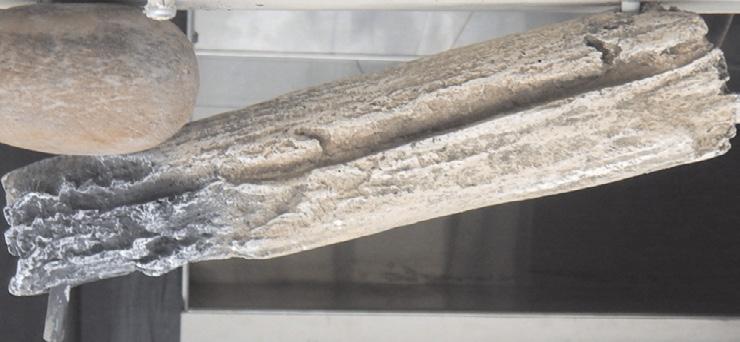
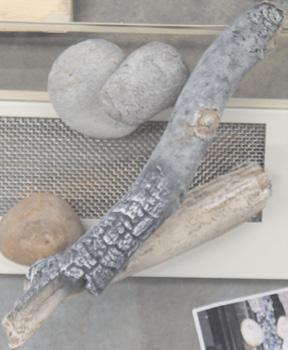
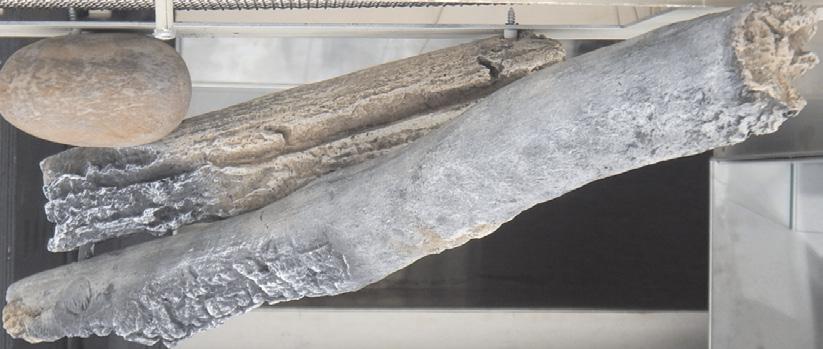

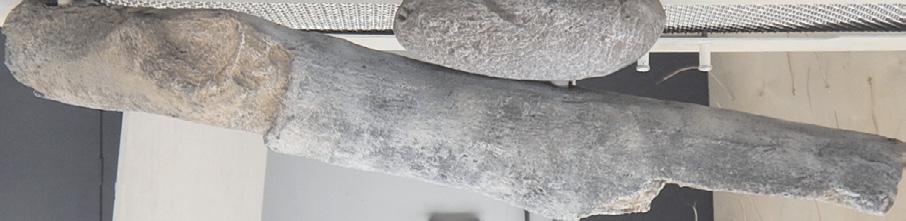

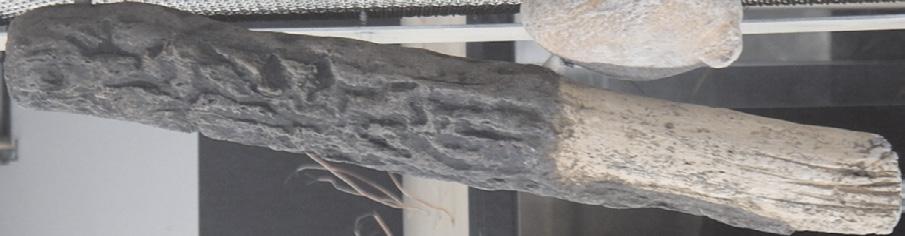
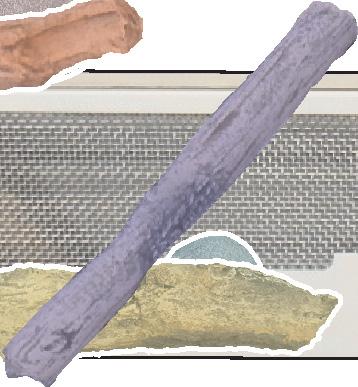
5 LOG IDENTIFICATION PART NUMBER & DESCRIPTION LOG L LOG M LOG N LOG O LOG P LOG Q LOG R Page 5
6 LOG PLACEMENT Tools Needed: Protective Gloves Phillips Screw Driver or Power Drill with Philips Drive Before you begin: Do not, handle these logs with your bare hands! Always wear gloves to prevent skin irritation. After handling logs, wash your hands gently with soap and water. All Logs The positioning of the logs is critical to the safe and clean operation of this heater. Sooting and other problems may result if the logs are not properly and firmly positioned in the appliance. Refer to Figure 1 for the following warning. Warning: Failure to position the parts in accordance with this diagram or failure to use only parts specifically approved with this appliance may result in property damage or personal injury. L M N R P O Attention: Refer to Pages 4 and 5 Parts List and Parts View to order logs or rocks. NOTE: Once the installation is complete with the logs, rocks, and crushed glass media in place, operate the fireplace to verify flame appearance. If there are flames directly impinging a log, turn off fireplace, then remove the crushed glass media directly below where the flame impingement occurred. This should eliminate sooting on the log, and provide a more pleasing flame appearance. Installation of the Pins for Log and Rock Placement The LS60THF Log and Rock kit includes twelve 8-32x3/4" long self-threading screws, and twelve 9/16" long spacers that will need to be installed prior to the log and rock placement. Note: It is highly recommended that the fireplace liner be installed prior to installling the log and rock spacers so interference with the locator pins is avoided. Use a standard Philips screwdriver or power drill with a philips drive to install the screws through a spacer at each of the twelve pilot hole locations provided in the burner cover. See Figure 2. These will be the locator pins for the logs and rocks. Q F A B G C D I E H J K Log Placement - Figure 1 Page 6
7 LOG PLACEMENT 1. Place "Rock D" onto Burner Pin #6. Do not allow the rock to rest on the pilot or igniter probes. D ACCENT LIGHT GLASS PANELS BURNER PIN LOCATIONS - Figure Page 7
8 LOG PLACEMENT 2. Place "Rock H" on the burner cover and accent glass panel. Position the rock with the locater pin up and to the left. The top protruding rectangle must be to the right side. This rock may be adjusted later to align with "Log R". H ACCENT LIGHT GLASS PANELS BURNER PIN LOCATIONS Page 8
9 LOG PLACEMENT 3. Place "Rock C" on Burner Pin #4. The pin must be positioned slightly to the right. This rock may be adjusted later to align with "Log N". C Page 9
10 LOG PLACEMENT 4. Place "Rock A" onto Burner Pin #2 and #3. A ACCENT LIGHT GLASS PANELS BURNER PIN LOCATIONS Page 10

11 LOG PLACEMENT 5. Place "Rock F" on the Accent Light Glass panel so the pin is approximately 11 inches from the left side liner. This rock may be adjusted later to position "Log Q". 11 F Page 11
12 LOG PLACEMENT 6. Place "Rock J" onto Burner Pin #12. The rectangle projection on the rock must be on the right side. This rock may be adjusted later to posistion "Rock K". J ACCENT LIGHT GLASS PANELS BURNER PIN LOCATIONS Page 12

13 LOG PLACEMENT 7. Place "Rock E" on Burner Pin #7. The pin on the rock must be on the right side. E Page 13

14 LOG PLACEMENT 8. Place "Rock K" onto the projection on "Rock J". These two rocks must be placed so they are away from the burner as shown. K ACCENT LIGHT GLASS PANELS BURNER PIN LOCATIONS Page 14
15 LOG PLACEMENT 9. Place "Rock G" onto Burner Pin #10. The rock must be placed away from the burner and on top of the Accent Light Glass Panel. G Page 15

16 10. Place "Rock I" on the rectangular protrusion on "Rock H". LOG PLACEMENT I ACCENT LIGHT GLASS PANELS BURNER PIN LOCATIONS Page 16
17 11. Place "Rock B" onto the pin on the left side of "Rock C". LOG PLACEMENT B Page 17
18 12. Place "LOG O" onto Burner Pin #8 and the pin on "Rock E". LOG PLACEMENT O ACCENT LIGHT GLASS PANELS BURNER PIN LOCATIONS Page 18


19 LOG PLACEMENT 13. Place "LOG P" onto the pin on "LOG O". Angle the log to the right so that it rests on the Accent Light Glass Panel. P Page 19

20 LOG PLACEMENT 14. Place "LOG N" onto Burner Pin #5 and the pin on "ROCK C". N ACCENT LIGHT GLASS PANELS 9 12 BURNER PIN LOCATIONS Page 20

21 LOG PLACEMENT 15. Place "Log R" onto Burner Pin #1 and onto the pin on "Rock H". R Page 21


22 LOG PLACEMENT 16. Place "Log Q" onto Burner Pin #9 and the pin on "Rock F". Q ACCENT LIGHT GLASS PANELS 9 12 BURNER PIN LOCATIONS Page 22


23 LOG PLACEMENT 17. Place "Log L" onto Burner Pin #1 and the pin on "Rock A". L Page 23


24 LOG PLACEMENT 18. Place "Log M" onto the pin on "Log L". Angle the log to the right so that it rests on the Accent Light Glass Panel. M Page 24


25 LOG PLACEMENT 19. Log Set assembly is complete. Page 25
26 Crushed Glass Media 1. Place crushed glass media onto the burner cover, burner screen and accent glass panels. See the Installation Instructions supplied with the fireplace for more information. NOTICE: Crushed glass should not be placed on the burner screen area more than one layer deep. Excessive use of crushed glass may create a greater chance of developing soot on logs. Do not allow crushed glass to restrict the pilot flame. Do not place crushed glass in the pilot bracket area. Optional Stainless Steel Coils Place the coils inside the fireplace. DO NOT place the coils in a location where they will come into contact with flame. If coils come in contact with flame, sooting may occur. NOTICE: Placement of coils near flame will cause the metal coil to discolor with shades of blue or brown. However, does not effect the performance of the fireplace. Final Steps 1. Re-install the glass door assembly. Test fire to ensure there is minimal contact between the flame and the logs, rocks and curls. 2. If the test fire is acceptable, re-install the barrier screen assembly. 3. If during the test firing there seems to be significant flame impingement on the cross logs, there are two steps that can be taken to reduce the impingement: a. Pivot log left or right to move away from flame. b. Thin out crushed glass directly under the cross log. This can reduce the height of the flame directly under the log. COMPLETING INSTALLATION Page 26
27 MASTER PARTS DISTRIBUTOR LIST To Order Parts Under Warranty, please contact your local Empire dealer. See the dealer locator at com. To provide warranty service, your dealer will need your name and address, purchase date and serial number, and the nature of the problem with the unit. To Order Parts After the Warranty Period, please contact your dealer or one of the Master Parts Distributors listed below. This list changes from time to time. For the current list, please click on the Master Parts button at Please note: Master Parts Distributors are independent businesses that stock the most commonly ordered Original Equipment repair parts for Heaters, Grills, and Fireplaces manufactured by Empire Comfort Systems Inc. Dey Distributing 1401 Willow Lake Boulevard Vadnais Heights, MN Phone: Toll Free: Website: Parts: Heater, Hearth and Grills Victor Division of F. W. Webb Company 200 Locust Street Hartford, CT Phone: Toll Free: Fax: Toll Free Fax: Websites: & Parts: Heater, Hearth and Grills East Coast Energy Products 10 East Route 36 West Long Branch, NJ Phone: Toll Free: Fax: Website: Parts: Heater, Hearth and Grills HOW TO ORDER REPAIR PARTS Parts Not Under Warranty Parts can be ordered through your Service Person, Dealer, or a Master Parts Distributor. See this page for the Master Parts Distributors list. For best results, the service person or dealer should order parts through the distributor. Parts can be shipped directly to the service person/dealer. Warranty Parts Warranty parts will need a proof of purchase and can be ordered by your Service Person or Dealer. Proof of purchase is required for warranty parts. All parts listed in the Parts List have a Part Number. When ordering parts, first obtain the Model Number and Serial Number from the name plate on your equipment. Then determine the Part Number (not the Index Number) and the Description of each part from the following illustration and part list. Be sure to give all this information... Appliance Model Number Appliance Serial Number Part Description Part Number Type of Gas (Propane or Natural) Do not order bolts, screws, washers or nuts. They are standard hardware items and can be purchased at any local hardware store. Shipments contingent upon strikes, fires and all causes beyond our control. Page 27
28 Empire Comfort Systems Inc. 918 Freeburg Ave. Belleville, IL If you have a general question about our products, please us at info@empirecomfort.com. If you have a service or repair question, please contact your dealer. Page 28
INSTALLATION INSTRUCTIONS AND OWNER S MANUAL
 INSTALLATION INSTRUCTIONS AND OWNER S MANUAL INSTALLER: Leave this manual with the appliance. CONSUMER: Retain this manual for future reference. LOG SET MODELS LS30TINF For Use With DVCT30CBN-1 Fireplace
INSTALLATION INSTRUCTIONS
 INSTALLATION INSTRUCTIONS (SEE HOMEOWNER MANUAL FOR OPERATING INSTRUCTIONS) INSTALLER: Leave this manual with the appliance. CONSUMER: Retain this manual for future reference. LOG SET MODEL LS30DINF For
INSTALLATION INSTRUCTIONS AND OWNER S MANUAL
 INSTALLATION INSTRUCTIONS AND OWNER S MANUAL INSTALLER: Leave this manual with the appliance. CONSUMER: Retain this manual for future reference. LOG SET MODEL LS35DINF For Use With DVCT35CBN-1 Fireplace
INSTALLATION AND OPERATIONS GUIDE FOR GRAND CANYON GAS JUMBO/JUMBO SLIMLINE LOG SYSTEMS
 Burner Systems: JUMBOSLIMBRNR-24 JUMBOSLIMBRNR-30 JUMBOBRNR-36 / JUMBOSLIMBRNR-36 JUMBOBRNR-42 / JUMBOSLIMBRNR-42 JUMBOBRNR-48 / JUMBOSLIMBRNR-48 JUMBOBRNR-60 / JUMBOSLIMBRNR-60 INSTALLATION AND OPERATIONS
INSTALLATION AND OPERATIONS GUIDE FOR GRAND CANYON GAS LOG FIRE PIT SERIES ONLY
 INSTALLATION AND OPERATIONS GUIDE FOR GRAND CANYON GAS LOG FIRE PIT SERIES ONLY Installation and service must be provided by a qualified installer, service agency or gas supplier Grand Canyon Gas Logs,
HD81 RIVER ROCK / STONE BURNER ASSEMBLY
 INSTALLER: LEAVE THIS MANUAL WITH THE APPLIANCE. CONSUMER: RETAIN THIS MANUAL FOR FUTURE REFERENCE. 1 INSTALLATION AND OPERATING INSTRUCTIONS CERTIFIED UNDER CANADIAN AND AMERICAN NATIONAL STANDARDS: CSA
HD81 RIVER ROCK / STONE BURNER ASSEMBLY
 INSTALLER: LEAVE THIS MANUAL WITH THE APPLIANCE. CONSUMER: RETAIN THIS MANUAL FOR FUTURE REFERENCE. 1 INSTALLATION AND OPERATING INSTRUCTIONS CERTIFIED UNDER CANADIAN AND AMERICAN NATIONAL STANDARDS: CSA
BOULEVARD 60-INCH LINEAR Direct-Vent Fireplace
 BOULEVARD 60-INCH LINEAR Direct-Vent Fireplace Boulevard 60-inch Direct-Vent Linear Fireplace with Ridgeback Corrugated Liner, and Logs, Rocks and Coils (shown in tile custom surround) BIG, BOLD, BOULEVARD.
INSTALLATION AND OPERATION GUIDE FOR
 INSTALLATION AND OPERATION GUIDE FOR Featuring Aquatic Glassel Tempered, Formulated Glass, 2005-2007 NATURAL GAS INSTRUCTIONS Adequate Fireplace Ventilation is Required NOTE: READ INSTRUCTIONS FULLY BEFORE
Gas Conversion Kits and Instructions
 Gas Conversion Kits and Instructions INSTALLATION FORM RGM 432/433-GC (Version D.1) Obsoletes Form RGM 432/433-GC (Version D) APPLIES TO: Model FT and Model SFT All gas conversion must be done by a qualified
280 Propane Barbecue Assembly Manual
 280 Propane Barbecue Assembly Manual 85-3001-8 (G20718) Propane 1 Year limited Warranty Read and save manual for future reference. Assemble your grill immediately. Missing or damaged parts claims must
BOULEVARD 48-INCH & 60-INCH Linear Direct-Vent Fireplaces
 BOULEVARD 48-INCH & 60-INCH Linear Direct-Vent Fireplaces Boulevard 60-inch Direct-Vent Linear Fireplace with Ridgeback Corrugated Liner, and Logs, Rocks and Coils (shown in tile custom surround) BIG,
TUBULAR BURNER CONVERSION KIT AGCK-TBXX / AECK-UBXX
 TUBULAR BURNER CONVERSION KIT AGCK-TBXX / AECK-UBXX IMPORTANT - READ ALL INSTRUCTIONS BEFORE YOU BEGIN THE INSTRUCTIONS HEREIN SHOULD BE PERFORMED BY A QUALIFIED SERVICE TECHNICIAN. THE GRILL MUST BE COMPLETELY
BOULEVARD 48-INCH, 60-INCH, and 72-INCH Linear Direct-Vent Fireplaces
 BOULEVARD 48-INCH, 60-INCH, and 72-INCH Linear Direct-Vent Fireplaces Boulevard 60-inch Direct-Vent Linear Fireplace with Black Porcelain Liner, Pewter Trim Kit, and Clear Frost Crushed Glass (shown in
TC30 HEARTWOOD BURNER INSTALLATION INSTRUCTIONS
 INSTALLER: Leave this manual with the appliance. CONSUMER: Retain this manual for future reference. These instructions are supplementary to the Installation and Operating Instructions supplied with the
NATURAL GAS CONVERSION KIT
 Model #: 85-2261-4 / G501-0057-03 NATURAL GAS CONVERSION KIT ONLY Compatible with barbecues that bear this SYMBOL: 04-14-17 FOR YOUR SAFETY CAUTION: Read and follow all safety statements, assembly instructions,
BOULEVARD 48-INCH & 60-INCH Linear Direct-Vent Fireplaces
 BOULEVARD 48-INCH & 60-INCH Linear Direct-Vent Fireplaces Boulevard 60-inch Direct-Vent Linear Fireplace with Ridgeback Corrugated Liner, and Logs, Rocks and Coils (shown in tile custom surround) Boulevard
t420 Barbecue Assembly Manual
 t20 Barbecue Assembly Manual 85-300-2 (G510) Propane 85-3005-0 (G5105) Natural Gas 1 Year limited Warranty Read and save manual for future reference. If pre-assembled, leave this manual with unit for consumer
TCWS54 SEE THRU DIAMOND BURNER INSTALLATION KIT INSTRUCTIONS
 INSTALLER: Leave this manual with the appliance. CONSUMER: Retain this manual for future reference. These instructions are supplementary to the Installation and Operating Instructions supplied with the
TC36 CHALET BURNER KIT INSTALLATION INSTRUCTIONS
 INSTALLER: Leave this manual with the appliance. CONSUMER: Retain this manual for future reference. These instructions are supplementary to the Installation and Operating Instructions supplied with the
BOULEVARD 60-inch & 72-inch LINEAR Vent-Free Fireplaces
 BOULEVARD 60-inch & 72-inch LINEAR Vent-Free Fireplaces Boulevard 60-inch Vent-Free Linear Fireplace with Black Reflective Liner and Log Set with Rocks Boulevard 72-inch Vent-Free Linear Fireplace with
2 Burner ASSEMBLY MANUAL
 REVOLUTIONTM 2 Burner Black STEEL EDITION ASSEMBLY MANUAL 85-3139-2 (G36301) Propane Limited 5-Year Warranty Read and save manual for future reference. Assemble your grill immediately. Missing or damaged
TCWS.38NG03.C BLACK DIAMOND BURNER KIT INSTRUCTIONS
 IMPORTANT: THESE INSTRUCTIONS ARE TO REMAIN WITH THE HOMEOWNER These instructions are supplementary to the Installation and Operating Instructions supplied with the fireplace and should be kept together.
TC36 CHALET II BURNER KIT INSTALLATION INSTRUCTIONS
 INSTALLER: Leave this manual with the appliance. CONSUMER: Retain this manual for future reference. These instructions are supplementary to the Installation and Operating Instructions supplied with the
TCWS54 BLACK DIAMOND BURNER KIT INSTRUCTIONS
 INSTALLER: Leave this manual with the appliance. CONSUMER: Retain this manual for future reference. These instructions are supplementary to the Installation and Operating Instructions supplied with the
Fire's Edge Fire Pit/Fire Pit Inserts For (Automated) Model 100-A
 Model 100-A") Fire's Edge Fire Pit/Fire Pit Inserts For (Automated) Model 100-A OWNER S MANUAL / OPERATING AND MAINTENANCE INSTRUCTIONS For your safety: If you smell gas: 1. Shut off gas to the appliance 2. Extinguish
Fire's Edge Fire Pit/Fire Pit Inserts For (Automated) Model 100-A OWNER S MANUAL / OPERATING AND MAINTENANCE INSTRUCTIONS For your safety: If you smell gas: 1. Shut off gas to the appliance 2. Extinguish
S420 Barbecue Assembly Manual
 TM MC S420 Barbecue Assembly Manual 85-3062-2 (G45123) Propane 85-3063-0 (G45124) Natural Gas 1 YEAR LIMITED WARRANTY READ AND SAVE MANUAL FOR FUTURE REFERENCE. Assemble your grill immediately. Missing
564 HO DancingFyre Burner Installation Instructions (sku: )
") Packing List Rear Fireback Side Firebacks Rockwool Embers Burner LS-43 Log Kit Log Spacers Burner Support Bracket Fireback Floor Intake Restrictor Grate Assembly Andiron Clips The log set includes: Rear
Packing List Rear Fireback Side Firebacks Rockwool Embers Burner LS-43 Log Kit Log Spacers Burner Support Bracket Fireback Floor Intake Restrictor Grate Assembly Andiron Clips The log set includes: Rear
Fyre-Stones Set C Installation Instructions (sku )
") Items Required ¼ Crushed Glass (see page 14 for quantities): -- Platinum (94500580) -- Reflective Bronze (94500581) -- Cobalt (94500582) Compatibility 33 DVI DVL GSR NB with Dancing-Fyre Burner 864 HO
Items Required ¼ Crushed Glass (see page 14 for quantities): -- Platinum (94500580) -- Reflective Bronze (94500581) -- Cobalt (94500582) Compatibility 33 DVI DVL GSR NB with Dancing-Fyre Burner 864 HO
TC42 CHALET BURNER KIT INSTALLATION INSTRUCTIONS
 INSTALLER: Leave this manual with the appliance. CONSUMER: Retain this manual for future reference. These instructions are supplementary to the Installation and Operating Instructions supplied with the
Installation Guide. LPKPDR - Universal LP Conversion Kit for Professional & Designer Ranges/Rangetops. Viking Range, LLC.
 Installation Guide Viking Range, LLC 111 Front Street Greenwood, Mississippi 38930 USA (662) 455-1200 For product information, call 1-888-845-4641 LPKPDR - Universal LP Conversion Kit for Professional
18" Convert to Gel Log Set # 2610
 18" Convert to Gel Log Set # 2610 Instruction Manual Instructions and warnings for use. STOP! If parts are missing or damaged, call 1-800-654-1704 for assistance Welcome to the Real Flame family of gel
LP/High Altitude LP/High Altitude Natural Gas Conversion Kit For United States Installations
 LP/High Altitude LP/High Altitude Natural Gas Conversion Kit For United States Installations Installation Instructions For Model Series G Furnaces, P(G,N) Gas/Electric Appliances, and R Gas/Electric Appliances
S405 Barbecue Assembly Manual
 S405 arbecue ssembly Manual 85-02-6 (G4705) Propane Year limited Warranty Read and save manual for future reference. If pre-assembled, leave this manual with unit for consumer s future reference. For product
TC36 COUNTRY HOME BURNER KIT INSTRUCTIONS (NATURAL GAS ONLY)
") INSTALLER: Leave this manual with the appliance. CONSUMER: Retain this manual for future reference. These instructions are supplementary to the Installation and Operating Instructions supplied with the
INSTALLER: Leave this manual with the appliance. CONSUMER: Retain this manual for future reference. These instructions are supplementary to the Installation and Operating Instructions supplied with the
Endless Choices. Masterful Results.
 SPARK LINEAR BURNER SYSTEM INDOOR Endless Choices. Masterful Results. Spark s latest, leading-edge linear fireplace is so customizable that gas fire becomes the ultimate designer s tool. Create the perfect
Colonial and Grand Colonial Fire Pit Tables. Installation Instructions for
 Colonial and Grand Colonial Fire Pit Tables Installation Instructions for Colonial-48-M-K, Col-48-MNB-K, Grand-Colonial-48-K, CM-48-DIN-K, MNB-48-DIN-K, GC-48-DIN-K, CM-48-PUB-K, MNB-48-PUB-K, GC-48-PUB-K
TC42 CHALET II BURNER KIT INSTALLATION INSTRUCTIONS
 INSTALLER: Leave this manual with the appliance. CONSUMER: Retain this manual for future reference. These instructions are supplementary to the Installation and Operating Instructions supplied with the
TWO BURNER STAINLESS STEEL PROPANE STOVE
 ROTATE TO LIGHT 842-A250-0_SSCmpStove.qxd 11/26/03 2:59 PM Page 1 OWNER S MANUAL FAILURE TO FOLLOW ALL S AND INSTRUCTIONS IN THIS MANUAL COULD LEAD TO PERSONAL INJURY, INCLUDING DEATH. RETAIN THIS MANUAL
ETHANOL FIREPLACES Certified as per ULC/ORD C UL Subject
 VOLCAN B12 Trident Laguna Vesuve ETHANOL FIREPLACES Certified as per ULC/ORD C627.1-2008 UL Subject 1370-2010 Fogo Kilauea Revised May 26, 2011 Taal Designed especially for fireplace hearth 490, rue de
Installer: Leave This Manual with Consumer Consumer: Save this Manual for Future Reference
 California Outdoor Concepts, Inc. 17671 Irvine Blvd., Suite 108 Tustin, CA 92780 Telephone 877-274-6773 Fax 877-274-0017 Monterey, Tradewinds Elegant, Carmel OWNER S MANUAL Del Mar, Palm OUTDOOR LIVING
TC30 BLACK DIAMOND BURNER KIT INSTRUCTIONS
 IMPORTANT: THESE INSTRUCTIONS ARE TO REMAIN WITH THE HOMEOWNER These instructions are supplementary to the Installation and Operating Instructions supplied with the fi replace and should be kept together.
Brooks Fire Pit Table. Installation Instructions for Brooks Fire Pit Table BRK-1224
 Brooks Fire Pit Table Installation Instructions for Brooks Fire Pit Table BRK-1224 1 IMPORTANT Contents Please consult your Crystal Fire instruction manual for detailed instructions Required and important
33 DVI/Cypress Log Set Installation Instructions (sku )
") Compatibility 33 DVI Insert (with no media 98400097) Cypress Stove Packing List Installation WARNING: 33 DVI/Cypress Log Set Rear Log (2) Log Chunks Left Log Rockwool Right Log (2) 4 oz. Bags of Embers
Compatibility 33 DVI Insert (with no media 98400097) Cypress Stove Packing List Installation WARNING: 33 DVI/Cypress Log Set Rear Log (2) Log Chunks Left Log Rockwool Right Log (2) 4 oz. Bags of Embers
INSTALLATION & OPERATING INSTRUCTIONS FOR. FIREPLACE GAS LOGS Model Numbers: MO18NG, MO24NG, SH18NG, SH24NG, CSO30NG
 INSTALLATION & OPERATING INSTRUCTIONS FOR FIREPLACE GAS LOGS Model Numbers: MO18NG, MO24NG, SH18NG, SH24NG, CSO30NG Applicable for use with all styles and sizes of Dual Burner Natural Gas Log Sets. Note:
TC36 SEE-THRU CHALET BURNER KIT INSTRUCTIONS
 IMPORTANT: THESE INSTRUCTIONS ARE TO REMAIN WITH THE HOMEOWNER These instructions are supplementary to the Installation and Operating Instructions supplied with the fi replace and should be kept together.
TCWS.54NG03C2 BLACK DIAMOND BURNER KIT INSTRUCTIONS
 IMPORTANT: THESE INSTRUCTIONS ARE TO REMAIN WITH THE HOMEOWNER These instructions are supplementary to the Installation and Operating Instructions supplied with the fi replace and should be kept together.
Stonefire Fire Pit Table. Installation Instructions for SF-32-K
 Stonefire Fire Pit Table Installation Instructions for SF-32-K / 1 2 IMPORTANT Please consult your Crystal Fire instruction manual for detailed instructions and important information related to the burner
Getting Started Guide
 Getting Started Guide Assembly Instructions User Guide Table Top Maintenance Warranty Information (800) 445-4559 www.designingfire.com Fax: 651-305-6347 @designingfire.com #253915-2528907 Installers: Please
Lit Table Top Firepit Bio-Ethanol Fireplace. User Manual. Model: GF301650
 Lit Table Top Firepit Bio-Ethanol Fireplace User Manual Model: GF301650 1 Moda Flame Lit Table Top Firepit Bio-Ethanol Fireplace Included in delivery (Parts List): A. Fireplace body 1pc B. Glass 1pc C.
CHALET BURNER KIT TC42.NG01
 CHALET BURNER KIT TC42.NG01 PACKAGE CONTENTS: BURNER ASSEMBLY PART # TC42.908501 LOG GRATE PART # TC42.9081 TC42 LOGS PART # 5098.31061 EMBER MATERIAL PART # 5096.981.B HARDWARE PACKAGE PART # TC36.NGHDWR
3 Burner ASSEMBLY MANUAL
 REVOLUTIONTM 3 Burner ASSEMBLY MANUAL 85-3118-2 (G53201) Propane 85-3119-0 (G53202) Natural Gas Limited 5-Year Warranty Read and save manual for future reference. Assemble your grill immediately. Missing
ASSEMBLY GUIDE. Customer Service: INCH² 2-BURNER & 864 INCH² 2-BURNER
 ASSEMBLY GUIDE 688 INCH² 2-BURNER & 864 INCH² 2-BURNER DANGER If you smell gas: 1. Shut off gas to the appliance. 2. Extinguish any open flames. 3. Open lid. 4. If odor continues, keep away from the appliance
TCWS54 SEE THRU LONG BEACH LOG INSTALLATION INSTRUCTIONS
 INSTALLER: Leave this manual with the appliance. CONSUMER: Retain this manual for future reference. These instructions are supplementary to the Installation and Operating Instructions supplied with the
ULTRAMAX CANOPY ENCLOSURE KIT Assembly Instructions
 ULTRAMAX CANOPY ENCLOSURE KIT Assembly Instructions Frame Not Included Above image for illustrative purposes only: 30' x 30' shown. FOR CANOPY MODELS: Description Model # 24' x 30' 2-3/8" ULTRAMAX - 12
CONVERSION INSTRUCTIONS
 CONVERSION INSTRUCTIONS Natural Gas to Propane Gas Conversion Kit For Thermador Professional Cooktops and Ranges Model STARLPKIT Part No. 35-00-682 Contains 7mm Hex Main Orifices This kit is used to convert
Style # Laguna Propane Tank Cover Owner s Manual
 Style # 26100117 Laguna Propane Tank Cover Owner s Manual Warning: For outdoor use only DO NOT use for cooking DO NOT use under any overhead enclosure Manufactured as Model # 6561 in China for: Restoration
ML-47DRIFTWOOD LOG KIT INSTALLATION INSTRUCTIONS
 ML-47DRIFTWOOD LOG KIT INSTALLATION INSTRUCTIONS Caution: The log pieces are fragile. Exercise extreme care when opening the log set package and removing individual log pieces. Introduction: The ML-47
TC36 SEE-THRU LODGEWOOD BURNER AND PANEL KIT INSTRUCTIONS
 IMPORTANT: THESE INSTRUCTIONS ARE TO REMAIN WITH THE HOMEOWNER These instructions are supplementary to the Installation and Operating Instructions supplied with the fi replace and should be kept together.
OW LEE CASUAL FIRESIDE Q&A
 Are the fire pits certified? All of our units are lab tested and certified by Labtest Certification, we are ANSI and CSA approved for the United States and Canada. The Casual Fireside Fire Pits BTU rated?
4 Burner ASSEMBLY MANUAL
 REVOLUTIONTM 4 Burner ASSEMBLY MANUAL 85-3120-4 (G53203) Propane 85-3121-2 (G53204) Natural Gas Limited 5-Year Warranty Read and save manual for future reference. Assemble your grill immediately. Missing
Quick Assembly Barbecue Assembly Manual
 Quick ssembly arbecue ssembly Manual 85-3039 (G31501) Propane 1 YER LIMITED WRRNTY RED ND SVE MNUL FOR FUTURE REFERENCE. If pre-assembled, leave this manual with unit for consumer s future reference. For
Pine Ridge Fire Pit Table. Installation Instructions for Pine Ridge fire pit models PR-1242-K and PR-2424-K
 Pine Ridge Fire Pit Table Installation Instructions for Pine Ridge fire pit models PR-1242-K and PR-2424-K Contents Required Tools...2 Placing and assembling the Table. 3 Gas Connection..4 Igniter Installation....6
READ ME! IMPORTANT WARNING! ENG. Quick Release Tent Mount Kit
 Quick Release Tent Mount Kit ENG TBMK008 READ ME! Thank you for purchasing a Front Runner Quick Release Tent Mount Kit. Before you start, take a moment to familiarize yourself with the Fitting Instructions
Boardwalk Fire Pit Table
 Boardwalk Fire Pit Table Installation Instructions 1 P a g e Contents Required Tools....3 Placing the Table 5 Gas Connection..6 Igniter Installation (pt 1)...7 Fire Pit Assembly....8 Igniter Installation
Installation and User s Manual 12 x 10 MOTORIZED AWNING
 12 x 10 MOTORIZED AWNING Installation and User s Manual 12 x 10 MOTORIZED AWNING 088-1763-0 Stop Please read and understand this manual before any assembly or use of this product. Before beginning assembly
G45-GL STAINLESS STEEL BURNER FOR OUTDOOR USE ONLY
 Owner s Manual Burner systems: G45-GL-16/19-SS G45-GL-18-SS G45-GL-24-SS G45-GL-30-SS G45-GL-36-SS G45-GL-42-SS G45-GL-48-SS G45-GL-60-SS Unregulated burner system, for use with natural gas only FOR INSTALLATION
G45 STAINLESS STEEL BURNER FOR OUTDOOR USE ONLY
 Owner s Manual Burner systems: G45-2-16/19-SS G45-2-18/20-SS G45-2-24-SS G45-2-30-SS G45-2-36-SS G45-2-42-SS G45-2-48-SS G45-2-60-SS Unregulated burner system, for use with natural gas only FOR INSTALLATION
Key Largo Fire Pit. Installation Instructions for Key Largo, all base materials and top styles. 1 P a g e
 Key Largo Fire Pit Installation Instructions for Key Largo, all base materials and top styles 1 P a g e Contents Contents 2 Required Tools...3 Placing and assembling the Table. 4 Gas Connection..5 Igniter
Key Largo Fire Pit. Installation Instructions. 1 P a g e. NorthlineExpress.com. Toll-Free
 Key Largo Fire Pit Installation Instructions 1 P a g e Contents Contents..2 Required Tools..3 Placing and assembling the Table. 4 Gas Connection..5 Igniter Installation....6 Locating Propane tank 8 Finishing
10' x 20' MAX AP CANOPY EXTENSION KIT Assembly Instructions
 10' x 20' MAX AP CANOPY EXTENSION KIT Assembly Instructions Frame Not Included Description Model # 10' x 20' MAX AP Canopy - Extension Kit - White 35730 Recommended Tools Please read instructions COMPLETELY
Installation & User Manual EW5000 Outdoor Cooking Fire
 Installation & User Manual EW5000 Outdoor Cooking Fire IMPORTANT: Please read this manual before installing and using the ESCEA EW5000 Cooking fire. Failure to follow these instructions may lead to a possible
Operator's Manual. Model: RY10MK-PRO MPN: RA-MLT Gallon Direct Fire Melter Kettle Burner Model with Adjustable Flame-Out Valve
 Operator's Manual Model: RY10MK-PRO MPN: RA-MLT-0009 10 Gallon Direct Fire Melter Kettle Burner Model with Adjustable Flame-Out Valve U.S. Patent No. 9,739,021 For Technical Support Please Visit www.rynoworx.com
Traditional and Linear Outdoor Product Guide
 Traditional and Linear Outdoor Product Guide outdoor OUTDOOR FIREPLACES, FIREBOXES & BURNERS The light from a fireplace extends the season for the outdoor living space you worked so hard to create. Our
INSTALLATION & OPERATION MANUAL MADISON SPLIT FIREPLACE GAS LOG
 INSTALLATION & OPERATION MANUAL MADISON SPLIT FIREPLACE GAS LOG Burner set for use with all styles and sizes of Emberside Vented Natural Gas Log Sets. May be used with accessory CVS303 or RVS304 Safety
COOK & GRILL STOVE. Model ASSEMBLY AND OPERATING INSTRUCTIONS
 COOK & GRILL STOVE Model 43343 ASSEMBLY AND OPERATING INSTRUCTIONS Due to continuing improvements, actual product may differ slightly from the product described herein. 349 Mission Oaks Blvd., Camarillo,
Assembly Instructions
 ShadeLogic Quick Clamp Canopy Tilt-Mount Table Top Pop Up Assembly Instructions Fits Any Table up to 10' Table Not Included Description Model # 7'4" x 10' Quick Clamp Canopy 14553 Please read instructions
Gas Go Anywhere /23/01
 Gas Go Anywhere 55014 02/23/01 FOR OUTDOOR USE ONLY This grill does not include an LP fuel tank. Check Package Contents You should have received the parts listed below. While we give much attention to
INSTALLER: Leave this manual with the appliance. CONSUMER: Retain this manual for future reference.
 Owner s Manual Burner Systems: G45-2-GL-16/19(P) G45-2-GL-18(P) G45-2-GL-24(P) G45-2-GL-30(P) G45-2-GL-36(P) G45-2-GL-42(P) G45-2-GL-48(P) G45-2-GL-60(P) Design Certified to: Z21.84b-2004 (16/19" - 30"
ML-47 TWIG SET INSTALLATION INSTRUCTIONS
 ML-47 TWIG SET INSTALLATION INSTRUCTIONS PARTS IDENTIFICATION DIAGRAMS Open the box and, very gently and carefully, pull out the three foam packages and lay on the floor. Use a utility knife to cut tape
Instruction Manual please read before use
 Instruction Manual please read before use XL Burner (patent pending) 307 Tchoupitoulas Street, Suite 100 New Orleans, LA 70130 p : 888.596.6960 504.596.6960 e : office@brasafire.com www.brasa.co Item Identification
10' x 20' 2-IN-1 MAX AP CANOPY & SCREEN KIT Assembly Instructions
 10' x 20' 2-IN-1 MAX AP CANOPY & SCREEN KIT Assembly Instructions Description Model # 10' x 20' 2-in-1 MAX AP Canopy & Screen Kit - 8 Leg - White 23531 Recommended Tools Please read instructions COMPLETELY
Uptown Fire Pit Table
 Uptown Fire Pit Table Installation Instructions 1 P a g e Contents Contents..2 Required Tools..3 Placing and assembling the Table. 4 Gas Connection..5 Igniter Installation....6 Locating Propane tank 8
ASSEMBLY GUIDE. Customer Service: INCH² 3-BURNER & 545 INCH² 3-BURNER
 ASSEMBLY GUIDE 455 INCH² 3-BURNER & 545 INCH² 3-BURNER DANGER If you smell gas: 1. Shut off gas to the appliance. 2. Extinguish any open flames. 3. Open lid. 4. If odor continues, keep away from the appliance
Instruction Manual please read before use
 Instruction Manual please read before use Slim Burner Insert (patent pending) 307 Tchoupitoulas Street, Suite 100 New Orleans, LA 70130 p : 888.596.6960 504.596.6960 e : office@brasafire.com www.brasafire.com
Installation GUIDE. NKVGR Natural Conversion Kit for 7 Series Ranges/Rangetops
 Installation GUIDE NKVGR Natural Conversion Kit for 7 Series Ranges/Rangetops Table of Contents Warnings... 3 Kit Contents... 3 Regulator Conversion... 4 Infrared Broiler Conversion... 5 Surface Burner
SPIRAL SLICER Instruction Manual Model #5280 & 5280M. Part No Revised Feb. 2010
 SPIRAL SLICER Instruction Manual Model #5280 & 5280M Part No. 82876 Revised Feb. 2010 SAFETY PRECAUTIONS INSTALLATION INSTRUCTIONS Inspection of Shipment: 5280 & 5280M SPIRAL SLICER Unpack all cartons
Napa Valley Fire Pit Table
 Napa Valley Fire Pit Table 48 x48 Model Installation Instructions For Models: NAPA-VALLEY-2424-K, NV-2424-BRN-K, NV-2424-BLK-K, NV-2424-GRY-K, NV-2424-BLK-W-K 1 P a g e Contents Contents..2 Required Tools..3
Motorized retractable awning
 Motorized retractable awning Model 95295 Set up And Operating Instructions Diagrams within this manual may not be drawn proportionally. Due to continuing improvements, actual product may differ slightly
TC42 TRANQUILITY BURNER KIT INSTRUCTIONS
 IMPORTANT: THESE INSTRUCTIONS ARE TO REMAIN WITH THE HOMEOWNER These instructions are supplementary to the Installation and Operating Instructions supplied with the fi replace and should be kept together.
PB SERIES VENTED GAS BURNER SYSTEMS (UNREGULATED)
") Owner s Manual Burner Systems: PB-16(P) PB-18(P) PB-24(P) PB-30(P) PB-36(P) PB-42(P) Designed to: Z21.84b-2004 (16" - 42" models) FOR INSTALLATION IN SOLID-FUEL BURNING FIREPLACES* FOR USE WITH FYRE GLASS
Owner s Manual Burner Systems: PB-16(P) PB-18(P) PB-24(P) PB-30(P) PB-36(P) PB-42(P) Designed to: Z21.84b-2004 (16" - 42" models) FOR INSTALLATION IN SOLID-FUEL BURNING FIREPLACES* FOR USE WITH FYRE GLASS
READ ME FIRST! IMPORTANT WARNING! ENG. Roof top tent
 Roof top tent ENG TENT031 220 min READ ME FIRST! Thank you for purchasing a Front Runner Roof Top Tent. Before you start, take a moment to familiarize yourself with these Fitting Instructions and the components
IGHT IMPRESSIONS OUTDOOR FIRE AND WATER PRODUCTS
 IGHT IMPRESSIONS OUTDOOR FIRE AND WATER PRODUCTS Commercial and Residential Packages Inserts Bowls Burners Accessories Hearth Products Controls 2 Fire-inspired since 1975. Working with HPC gives you more.
IGHT IMPRESSIONS OUTDOOR FIRE AND WATER PRODUCTS
 IGHT IMPRESSIONS OUTDOOR FIRE AND WATER PRODUCTS Commercial and Residential Packages Inserts Bowls Burners Accessories Hearth Products Controls Fire-inspired since 1975. Working with HPC gives you more.
Outdoor Hearth Products United States Price List April 1, 2018
 Outdoor Hearth Products United States Price List April 1, 2018 2340 Logan Avenue, Winnipeg, MB, Canada Phone 204-632-1962 Fax 204-632-1960 Table of Contents Outdoor Linear Product Page Number Linear Burner
Manual Awning. Assembly Instructions. Product No Toll-free:
 Manual Awning Product No. 088-30- Instructions Toll-free: -877-483-679 IMPORTANT: Please read this manual carefully before beginning assembly of this product. Keep this manual for future reference. 3 Table
10' x 20' MAX AP CANOPY Assembly Instructions
 10' x 20' MAX AP CANOPY Assembly Instructions Description Model # 10' x 20' MAX AP Canopy - 8 Leg - White 30522 Recommended Tools Please read instructions COMPLETELY before assembly. This shelter MUST
14' x 32' x 12' Round Top Round Style Shelter Assembly Instructions
 14' x 32' x 12' Round Top Round Style Shelter Assembly Instructions Description Model # 14' x 32' x 12' RoundTop Garage - Gray 62669 Recommended Tools Please read instructions COMPLETELY before assembly.
Table of Contents. Safety... 2 Specifications... 4 Assembly Maintenance... 6 Parts List... 7 Warranty... 8
 Table of Contents Safety... Specifications... 4 Assembly... 4 Maintenance... 6 Parts List... 7 Warranty... 8 WARNING SYMBOLS AND DEFINITIONS This is the safety alert symbol. It is used to alert you to