TAKE EVERY PRECAUTION TO PREVENT CONTACT WITH SKIN OR HAIR!!!
|
|
|
- Lewis Ford
- 5 years ago
- Views:
Transcription

1 Rev. 1 Rev. Date 5/31/2018 Seat Insert Instructions _ You have purchased the safest and easiest to use seat insert kit available. Please read these instructions and review the images carefully before starting your seat pour. TAKE EVERY PRECAUTION TO PREVENT CONTACT WITH SKIN OR HAIR!!! Items included in your full seat insert kit: 2 Containers of foam (Part A and Part B) Sheet(s) of foam. (Number of sheets and the thickness of the sheets vary per kit size). 1 Roll of double-sided adhesive tape 1 Roll of black gaffers tape 1 Plastic bag 1 electric carving knife Fire Resistant Material 1 mixer BSCI, Inc. 170 Barley Park Lane Mooresville, NC FAX:
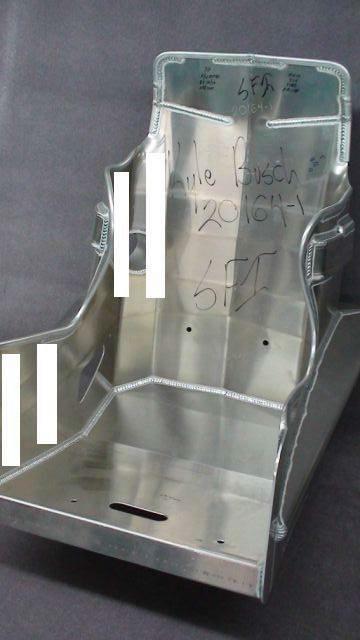
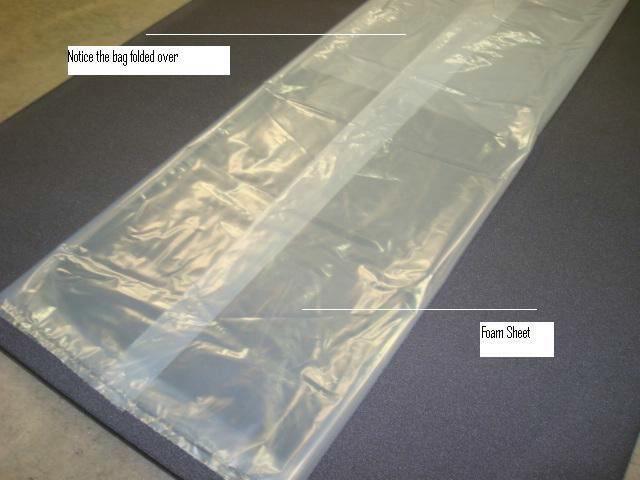
2 Additional tools and items needed to complete your pour include: Electric drill (Air powered drills or cordless drills will not be sufficient for mixing the chemicals properly. The electric drill needs to have a minimum rpm of 2,400), Scissors, Razor blade, Chalk/marker, and 3M Super 77 Glue. Cleaner such as Acetone or glass cleaner We suggest wearing your uniform if available. If not wearing uniform, make sure the driver is not wearing a belt and that all items are removed from pockets. We also recommend wearing your head and neck restraint if it extends below your shoulders. These units may push you out of the seat slightly. TAKE ALL NECESSARY STEPS TO AVOID CONTACT WITH SKIN OR HAIR. 1. Unpack all items from the box. Once taken out, your sheet(s) of foam will utilize their memory to flatten out. Inspect all items to be sure they were not damaged during transport. Pay special attention to the bag to ensure it does not have any holes. 2. Prepare your seat by cleaning the interior with acetone or a cleaner that does not leave any residue. 3. Using gaffers tape or a roll of duct tape, cover any sharp edges or protrusions in the seat. Pay special attention to bolt heads or any small sharp objects. You may also cover seat belt holes but this is not necessary unless they have sharp edges. By not covering the holes it will make trimming easier as you have an impression of the holes in the insert. 4. Apply a strip(s) of duct tape across the front edge of the seat bottom to close off the cavity of the box section, when applicable. This will allow easier removal of the completed insert. 5. Once this is complete, apply the double-sided adhesive to the interior of the seat. See Example in photos Next you will need to determine the thickness of foam needed to raise your body into position within the seat. The sheet(s) of foam provided are used for this purpose. A small person may need to be raised as much as 2, whereas a larger person may only need ¼ of foam. Please keep in mind that the sheets of foam provide a layer of protection and if no sheet foam is used the liquid will simply go around that area of the body leaving an area of no foam. For thicker foam you can use the spray adhesive to layer the materials together. 7. Once the number of sheets has been determined for proper thickness, measure them and cut them so that they fit easily into the bottom and back of the seat leaving approximately ½ of clearance around the edges of the seat bottom. This will allow the liquid material to completely surround the layer of foam. 8. Now is a good time to do a trial run for pouring the insert. Position your body in the seat the way you intend on pouring it. This will give you an idea of space available for the person pouring the chemical and any special techniques he or she will need to use to introduce the chemical into the bag. Do not use a funnel. 9. With your bag laying flat on the floor, insert the bottom piece(s) of foam into the bag and fold the bag over the foam. See Example in photo 4. You can add the back layer of foam after you complete step 9.
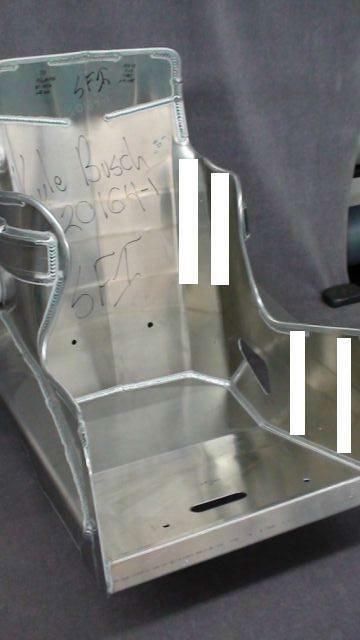
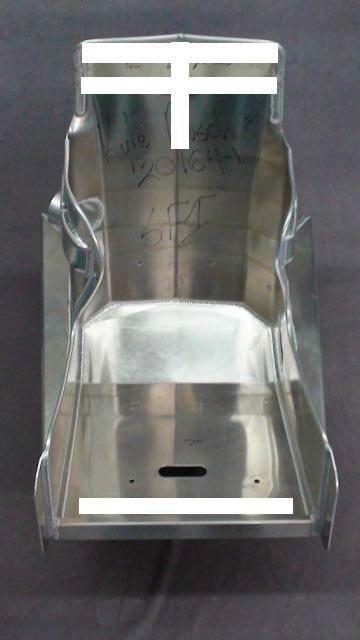
3 10. Lay the bag into the seat with the bottom of the bag located at the bottom of the seat paying special attention that the bag is centered in the seat. Reach under the bag to remove the liner of the double-sided adhesive revealing the adhesive. Stick your bag to this piece of tape. Repeat these steps with all pieces of tape ensuring that the bag fits nicely in the seat and that there are no areas that the bag isn t touching within the interior of the seat. The opening of the bag should be at the top of the seat above the driver s shoulders. The extra bag along the edges of the seat needs to be taped down so that it does not interfere with the driver s entry into the seat. See Example in photo Once the bag is placed in the seat, it is now time to open the chemicals. It is vitally important that the chemicals be at a temperature range of degrees. If the chemicals are not within this temperature range your results will not be satisfactory. It is not recommended to pour the chemicals the day you received them if they were shipped as they most likely have been in temperature extremes in transit to you. Leaving them in the suitable temperature range overnight will ensure proper temperature. DO NOT MICROWAVE THE CHEMICALS!!! 12. Open the pails of part A and part B. If part A and part B have been put in double pails, pour part A into the bigger pail provided. Mix part A for at least 1 minute until the entire mixture has turned black (SFI approved kits) or orange (FIA approved kits) without any white streaking in the liquid. 13. After part A has been thoroughly mixed now you are ready to pour the seat. Have the driver get into the seat being careful not to puncture the bag. Have the driver take their time getting in. Once they have taken their sitting position and are ready to pour, it is time to pour part B into part A. 14. Cover the floor under and around the buckets with a disposable item in case of splashing from the mixing. Mix on full rpm for seconds. Once part B has been poured into part A you cannot stop! Be sure every precaution has been taken for getting the foam into the bag quickly. Pour the chemical into the bag as quickly as possible after mixing is complete. Do not try and pour the chemical into certain areas, simply dump it in. The chemical will find its way around the driver. You will have to open the bag for good pouring access. You will need to smooth the bag out once you have poured. As the chemical is poured in, have the driver lean forward and slightly raise his or her butt so that the chemical can flow under and around the thigh and leg area. As the driver visually see the chemical flowing between the legs slowly sit down and back into the seat. For Large or Medium Kits-As the chemical starts rising, have the driver lean forward so that the chemical can easily flow up their back. Once it reaches the shoulder blades they can sit back into the seat. It is a good idea to have the steering wheel available when the driver is molding. Do not worry if their arms do not have full motion as the extra foam will be trimmed away once the pour is complete. 15. After your pour wait approximate 5-7 minutes for the chemical to cure enough for the driver to exit and wait another 5 minutes (or longer) to remove the insert from the seat. Be careful when removing not to tear the foam. If tearing does happen it can be easily glued back together using the spray adhesive 16. Carefully remove the plastic bag from the insert. 17. Now using your electric carving knife you can trim the seat. Remove the bulk of extra foam first and then replace the insert into the seat and mark the edges of the seat with a marker. You can then remove the foam again and finish the final trimming.
4 Photos 1.
5 Photos 2.
6 Photos 3.
7 Photos 4.

8 PHOTOS 5. TOP OF BAG BAG HANGS OVER LEADING EDGE FOAM INSIDE BAG
Preparation. BEDRUG, INC. n 635 Old Hickory Blvd, Old Hickory, TN n n bedrug.com
 BRJK07F4, BRJK07F2, FRONT KITS: BTJK07F4, BTJK07F2 Jeep Wrangler JK BedRug/BedTred Interior Installation Instructions Congratulations on choosing the finest interior flooring kit available for your Jeep.
CJ-7 YJ PREPARATION INSTALLING THE WHEEL WELLS. Jeep Wrangler CJ-7/YJ BedRug Interior Installation Instructions
 CJ-7 YJ BRCJ76R BRCJ81R REAR KITS: BRYJ87R Jeep Wrangler CJ-7/YJ BedRug Interior Installation Instructions Congratulations on choosing the finest interior flooring kit available for your Jeep. BedRug material
BRJK11F2, BTJK11F2, BRJK07F2, BTJK07F2, kit
 BRJK11F2, BTJK11F2, BRJK07F2, BTJK07F2, FRONT KITS: BRJK07F4, BTJK07F4 Jeep Wrangler JK BedRug/BedTred Interior Installation Instructions Congratulations on choosing the finest interior flooring kit available
How to make an inflatable cube
 How to make an inflatable cube Beta instruction manual produced by Tools for Action. First Edition November 2015. Paris. Second Edition March 2016. Materials & Tools Mylar insulation foil (we use Parotec
Model 205 Fireview Maintenance Kit
 Model 205 Fireview Maintenance Kit Please read all of the instructions before you begin the procedure. Confirm that you have all the necessary tools and parts required. Allow about one hour to complete
NNIN Nanotechnology Education
 NNIN Nanotechnology Education Student Worksheet Water purity and filtration Getting down to the nanoscale Water Filtration and Nanoparticles Dear Team: February 11, 2009 Thank you for your recommendation
Instructions. Fibrlok TM 2670 Multi-Fiber Ribbon Construction Tool. November, B
 Instructions Fibrlok TM 2670 Multi-Fiber Ribbon Construction Tool November, 1998 34-7032-7181-6-B Contents: 1.0 General... 3 2.0 Ribbon Construction Tool Kit...3 3.0 Preparing the Fibers...3 4.0 Arranging
WARNING: IMPROPER INSTALLATION WILL RESULT IN LINER FLYING OUT OF THE TRUCK. FOLLOW INSTRUCTIONS EXACTLY
 Preparation Instructions Part Number(s): Multiple Kit Contents Item # Qty Req'd Description 1 1 BedTred Floor Panel 2 1 BedTred Bulkhead Panel 3 2 BedTred Sidewall Panels (L&R) 4 1 BedTred Tailgate Panel
CIRRUS AIRPLANE MAINTENANCE MANUAL
 CABIN 1. GENERAL The aft passenger windows are manufactured of acrylic and adhesive bonded to the fuselage. Replacement is accomplished by removing the interior trim around the window, removing the sealant
CIRRUS AIRPLANE MAINTENANCE MANUAL MODELS SR22 AND SR22T CHAPTER 56-20: CABIN GENERAL. Cabin 56-20: CABIN. 1. General
 CIRRUS AIRPLANE MAINTENANCE MANUAL Cabin CHAPTER 56-20: CABIN GENERAL 56-20: CABIN 1. General The aft passenger windows are manufactured of acrylic and adhesive bonded to the fuselage. Replacement is accomplished
Swift. Additional Items You Will Need * Wood Glue * UHU Por or Foam safe glue
 Swift Included in Kit * Pre- cut balsa and Depron parts * Ballast weights * Diagram sheet * Sandpaper sheet * Rubber bands * Plastic wing bracing parts Additional Items You Will Need * Wood Glue * UHU
West Kingdom Thrust and Throw Example Weapon Construction
 West Kingdom Thrust and Throw Example Weapon Construction Javelin Construction method by Dauid ap Morgant Dinefwr - Axe construction method by Owen Flechyr Javelin Construction Method Parts: 1- Five foot
JOINING MULLION (DIRECT MULL) ASSEMBLY INSTRUCTIONS FOR 3-WAY OR 4-WAY JOINTS FOR IMPERVIA AWNING, CASEMENT AND LARGE AWNING
 ASSEMBLY INSTRUCTIONS FOR 3-WAY OR 4-WAY JOINTS FOR IMPERVIA AWNING, CASEMENT AND LARGE AWNING") 2014 Pella Corporation JOINING MULLION (DIRECT MULL) ASSEMBLY INSTRUCTIONS FOR 3-WAY OR 4-WAY JOINTS FOR IMPERVIA AWNING, CASEMENT AND LARGE AWNING For Additional Mullion Assembly Information; Visit www.installpella.com/mullions,
2014 Pella Corporation JOINING MULLION (DIRECT MULL) ASSEMBLY INSTRUCTIONS FOR 3-WAY OR 4-WAY JOINTS FOR IMPERVIA AWNING, CASEMENT AND LARGE AWNING For Additional Mullion Assembly Information; Visit www.installpella.com/mullions,
Termination Procedure LC 1.6mm & 2.0mm Connectors: 1060XX Series
 Connector Piece Parts LC Simplex Connector Boot LC Duplex Connector LC Connector CriMp Tulolng LC Duplex Clip Boot 86001-0110, Rev. B USN30MFO/5/2010 Procedure Chart Procedure Tool Required Tool Part Number
VINYL SPORTS MATS Setup, Care and Handling Non-Permanent Setup
 FLEXI-Roll VINYL SPORTS MATS Setup, Care and Handling Non-Permanent Setup CAUTION: This booklet is for the FLEXI-Roll series of Dollamur mats only. If you have the Standard non-flexi-roll series of Dollamur
The "Minimum" Solar Box Cooker
 The "Minimum" Solar Box Cooker A great solar oven you can build quickly from two cardboard boxes Experiments in Seattle and Arizona have proven that solar box cookers can be built more simply than even
Apple Watch Screen Replacement
 Apple Watch Screen Replacement Replace the screen (OLED display + digitizer) on your Apple Watch. Written By: Andrew Optimus Goldberg ifixit CC BY-NC-SA www.ifixit.com Page 1 of 17 INTRODUCTION Cracked
Safety & Warnings. A Material Safety Data Sheet for this product is available upon request by contacting
 Safety & Warnings Warning: This kit contains materials that may be harmful if used incorrectly. Please read all instructions before beginning. Failure to follow these instructions and warnings could result
SPIRAL SLICER Instruction Manual Model #5280 & 5280M. Part No Revised Feb. 2010
 SPIRAL SLICER Instruction Manual Model #5280 & 5280M Part No. 82876 Revised Feb. 2010 SAFETY PRECAUTIONS INSTALLATION INSTRUCTIONS Inspection of Shipment: 5280 & 5280M SPIRAL SLICER Unpack all cartons
INSTRUCTION MANUAL ALEKO RETRACTABLE AWNING
 INSTRUCTION MANUAL for ALEKO RETRACTABLE AWNING www.alekoproducts.com FAILURE TO FOLLOW THESE INSTRUCTIONS MAY RESULT IN PERSONAL INJURY! 1 Important Safety Precautions WARNING NOTE: FOR PERSONAL SAFETY,
Suggested Installation Instructions for: , Embroidered Front End Mask
 I I 1 Suggested Installation Instructions for: 602-246, 1975-1979 Embroidered Front End Mask 2-Cover Hooks 4-Air Foil Inserts 2-2" "U" Shaped Trim Locks 4-2" ADHESIVE BACKED Hook Strips 2-14" ADHESIVE
Instruction Manual. A step-by-step guide to building your own igloo. Andy Meldrum All rights are reserved.
 Instruction Manual A step-by-step guide to building your own igloo. Andy Meldrum 2007 1 Contents 1 Introduction 2 Get properly kitted up. 3 Choose and prepare your site. 4 Create the base. 5 Mark out the
READ ME FIRST! IMPORTANT WARNING! ENG. Roof top tent
 Roof top tent ENG TENT031 220 min READ ME FIRST! Thank you for purchasing a Front Runner Roof Top Tent. Before you start, take a moment to familiarize yourself with these Fitting Instructions and the components
Production Work Instruction
 Production Work Instruction Document: Trapped Air Ball Work Instructions Document No.: TABWI-1 Revision: 1 Revision Date: March 13, 2013 Approved By: Ossie Fowler, HR Manager; Marilyn Moore, Quality Supervisor;
Core practical 13: Isolate an individual species from a mixed culture of bacteria using streak plating
 Core practical 13 Teacher sheet Core practical 13: Isolate an individual species from a mixed culture of Objectives To successfully use streak plating techniques to isolate a single species of bacteria
Super Fat Cat-LCS ASSEMBLY INSTRUCTIONS AND OWNER S MANUAL
 Super Fat Cat-LCS ASSEMBLY INSTRUCTIONS AND OWNER S MANUAL This owner s manual will help you with initial set up of your new float tube, provide basic safety information, review boat maintenance tips,
PARTS INCLUDED IN YOUR KIT. You may want to lay them out in this manner for accessibility. Foam has NO adhesive to touch truck finish.
 INSTALL ATION SHEET Tarp Assembly with Cab Rail, Tail Rail and Support Bows attached. Left and Right Side Rail Assemblies U Clamps (x 6) NOTICE: If your truck has a bedliner that wraps over any top edges,
INSTALLATION SHEET-Ford Flareside ʻ97
 INSTALLATION SHEET-Ford Flareside ʻ97 Part Nos. 7615, 2615 DOUBLE HOOK Side Rail Clamps Cab Rail (BlackMax includes snaps on this rail) Spring Bows Tailgate Rail Side Rails Tarp Clamp Bolts U Shaped Clamps
electric knife sharpener
 electric knife sharpener USER GUIDE Now that you have purchased a Kitchen Living product you can rest assured in the knowledge that as well as your year parts and labour guarantee you have the added peace
Applications Engineering Notes
 Applications Engineering Notes Document Title Document Number MTP Brand Connector Installation Onto 3.0 mm Jacketed Round Cable With Loose Fibers AEN-1407 Revision Number 2.1 Effective Date November 15,
Operator s Manual. Medium-Duty Electric Slicers ENGLISH. Item Model Description Drive Peak HP Voltage Amps Hz Plug
 Medium-Duty Electric Slicers 40950 40951 Item Model Description Drive Peak HP Voltage Amps Hz Plug 40950 SLM250/S 10 Knife Medium-Duty Slicer 1/3 2.5 Belt 120 60 5-15P 40951 SLM300P/S 12 Knife Medium-Duty
Mandolin Slicer Quite possibly the safest mandolin in the world
 Mandolin Slicer Quite possibly the safest mandolin in the world MANDOLIN & COMPONENTS Handle Upper Plate Safe Hands Food Holder Non-Slip Retractable Leg Julianne Blades (3 sizes) Waffle / Crinkle Cut Blade
ML-47 TWIG SET INSTALLATION INSTRUCTIONS
 ML-47 TWIG SET INSTALLATION INSTRUCTIONS PARTS IDENTIFICATION DIAGRAMS Open the box and, very gently and carefully, pull out the three foam packages and lay on the floor. Use a utility knife to cut tape
Team Shananigans: The Funnelcoaster
 Team Shananigans: The Funnelcoaster 12 2 08 Presented by: Leslie Roberts, Ben Hemphill, Ryan Burnett, Cori Crenshaw, Austen Webber ii Abstract: This project was assigned so that students could work together
Written By: Sam Lionheart
 ipad Air Wi-Fi LCD Replacement Use this guide to replace the LCD screen in your ipad Air. Written By: Sam Lionheart ifixit CC BY-NC-SA www.ifixit.com Page 1 of 27 INTRODUCTION Replace a damaged or nonfunctioning
INSTALLATION SHEET -Explorer Sport Trac
 INSTALLATION SHEET -Explorer Sport Trac Long Neck Side Rail Clamps (x2) Cab Rail (BlackMax includes snaps on this rail) Side Rails Clamp Bolts Short Neck Side Rail Clamps (x2) Allen Wrench (3/16") Sport
FISH CAT SCOUT OWNER S MANUAL
 FISH CAT SCOUT OWNER S MANUAL ALWAYS WEAR A COAST GUARD APPROVED FLOTATION DEVICE WHEN OPERATING THE FISH CAT SCOUT. Know the limits of your abilities and the limits of your equipment. Changes in air temperature
SYSTIMAX RoloSplice Multiple Splice Organizer Installation
 SYSTIMAX RoloSplice Multiple Splice Organizer Installation General This instruction sheet provides procedures for installing the SYSTIMAX RoloSplice, multiple splice organizer management system and is
Setup. Assembling. Attaching the sharpening stone
 Kit 1. Sharpener base. 2. Vertical rod. 3. Fixing ring. 4. Horizontal rod with pivot unit. 5. Sharpening stones set. 6. Black marker. 7. User Guide. Technical specs Knife sharpener dimensions (ready to
It's easiest to divide the problem in two: rescuing the mother hawk and rescuing the young chicks.
 Makeshift Vol. 24 Winner: Most Creative, Daniel Chamudot It's easiest to divide the problem in two: rescuing the mother hawk and rescuing the young chicks. Rescuing the mother hawk is mainly a challenge
STEALTH PRO OWNER S MANUAL
 STEALTH PRO OWNER S MANUAL ALWAYS WEAR A COAST GUARD APPROVED FLOTATION DEVICE WHEN OPERATING THE STEALTH PRO. Know the limits of your abilities and the limits of your equipment. Changes in air temperature
Solera Family and Screen Room. Installation and Owner s Manual (For Aftermarket Applications) Table of Contents
 Table of Contents") Solera Family and Solera Family and Installation and Owner s Manual (For Aftermarket Applications) Table of Contents Introduction 2 Preparation 2 Resources Required 2 Installation 3 Install Upper Brackets
Solera Family and Solera Family and Installation and Owner s Manual (For Aftermarket Applications) Table of Contents Introduction 2 Preparation 2 Resources Required 2 Installation 3 Install Upper Brackets
Canvas Buckets & Lineman Accessories
 & Lineman Accessories Klein canvas buckets and accessories have been recognized for decades for their durability and dependability. They are built for strength to handle professional wear and tear. 247
Table Of Contents RV WEATHERSTRIPPING
 Table Of Contents RV WEATHERSTRIPPING SLIDE OUT SEALS....................... 2 DRIP RAIL SEALS....................... 4 VENT HATCH......................... 4 STATIONARY GLASS.................... 5 SLIDING
Materials MOTION, FORCE, AND MODELS. Contents. NOTE Delta Education Customer Service can be reached at
 MOTION, FORCE, AND MODELS Materials Contents Introduction... 39 Kit Inventory List... 40 Materials Supplied by the Teacher... 42 Preparing a New Kit... 44 Preparing the Kit for Your Classroom... 46 Care,
FEATURES & BENEFITS OF THE TOW PRO LITE :
 To Protect & Preserve PRODUCT MANUAL & FITTING GUIDE tow pro lite TYPE: SEMI - FIT EACH TOW PRO LITE COMES WITH THE FOLLOWING : 16 side securing straps & buckles (8 either side) 1 HITCH STRAP & buckles
WHAT TO KNOW BEFORE INSTALLING...
 WL600922H WL601022H WL601122H WL502086H WL602376H WL602322H Please read the information sheet before proceeding. WHAT TO KNOW BEFORE INSTALLING... 1. 2. When positioning the seat onto the pan ensure that
KNIFE SHARPENING TECHNIQUE
 SharpX A Information on Sharpening Technique Including Sharpening Instructions Sharpening is one of mans oldest skills and has laid the foundation for the development and survival of mankind. From the
CRASH KELLY. Directions for Use
 CRASH KELLY Directions for Use Table of Contents Laerdal Recommends 4 Items Included 5 Skills Taught 5 Head 5 Chest and Belly Plates 5 Injection Pads 6 Waist, Elbow, Knee and Ankle Joints 6 Arms 6 Legs
COMPASSION UK EVENTS
 COMPASSION UK EVENTS setting up the stand Here, you will find step-by-step instructions for the various stands and other equipment. These will differ depending on the event. SETTING UP A PULL-UP BANNER
LBH18BPK. Instruction Sheet
 LBH18BPK Instruction Sheet Included: 1. Backpack (includes belt and pouch) 2. Bottle and Hose Attachment Assembly 3. 1 each disposable 1.5 gallon Chemical Storage Bag 4. 1 each 1.5 gallon Warm Water Cleanout
INSTALLATION INSTRUCTIONS AND OWNER'S MANUAL AWNINGS. For trailers & motor homes with straight sides TOOLS REQUIRED
 AWNINGS INSTALLATION INSTRUCTIONS AND OWNER'S MANUAL For trailers & motor homes with straight sides TOOLS REQUIRED 1/4" electric drill Ratchet handle kit 3/8" & 7/16" socket No. 1 and No. 2 screwdriver
SHEARS AND SCISSORS EVERHARD PRODUCTS, INC.
 SHEARS AND SCISSORS EVERHARD PRODUCTS, INC. 1016 Ninth Street SW Canton, Ohio 44707 USA Toll-free: 1-800-298-2832 or 330-453-7786 Toll-free Fax: 1-800-225-0984 or 330-453-7449 Everhard.com BENT TRIMMERS
Auxiliary 63.5l Fuel Tank Ford/Mazda Pick-up Truck 2012-Current READ ME! IMPORTANT WARNING!
 Auxiliary 63.5l Fuel Tank Ford/Mazda Pick-up Truck 2012-Current ENG FTFM006 90 min READ ME! Thank you for purchasing a Front Runner Ford/Mazda Pick-Up Truck 2012 - Current Fuel Tank. Before you start,
Installation and Maintenance Manual
 Freestanding Gas Stove MODEL: PGS2005 GPEBB20R GPEBW20R Installation and Maintenance Manual Warning Maintenance products should be carried out by professional and technical personnel with relevant qualification,
RE-USE OF PADS IF YOU PAYING TO YOURSELF OR TO YOUR LABOR $ 10 OR MORE, IT IS LES EXPENSIVE TO BUY NEW KITS AND DISPOSE OF THE USED PADS AS DIRECTED.
 MiteGone Enterprises Int www.mitegone.com 2910 Glenmore Rd N HELPLINE & ORDERS. Kelowna, BC Use Phone or Fax. Canada V1V 2B6 1-250-762-8156 RE-USE OF PADS IF YOU PAYING TO YOURSELF OR TO YOUR LABOR $ 10
Wooden Koi/Octagonal Pond Instruction Manual
 www.gardenparadise.net Wooden Koi/Octagonal Pond Instruction Manual Introduction Please take time to read these instructions prior to installing your pond. This will help you understand the product and
Trinket Box. Kit Inventory
 Kit Inventory Trinket Box o Top Panel o Bottom Panel o Two (2) End and two (2) Side Box Pieces o Two (2) End and two (2) Side Lid Pieces o Right Latch Holder & Left Latch Holder o Two (2) Lock Bar Guides
Our sun is a constant source of energy.
 Cooking with the Sun Our sun is a constant source of energy. Each day, the sun bathes the Earth in unimaginable amounts of solar energy, most of which comes in the form of visible light. All over planet
Installation & User Manual EW5000 Outdoor Cooking Fire
 Installation & User Manual EW5000 Outdoor Cooking Fire IMPORTANT: Please read this manual before installing and using the ESCEA EW5000 Cooking fire. Failure to follow these instructions may lead to a possible
Applications Engineering Notes
 Applications Engineering Notes Document Title Document Number MTP Brand Connector Installation Onto AEN-1401 Revision Number 2.1 Effective Date November 15, 2011 THE USE OF SAFETY GLASSES FOR EYE PROTECTION
Sterile Technique TEACHER S MANUAL AND STUDENT GUIDE
 Sterile Technique TEACHER S MANUAL AND STUDENT GUIDE Table of Contents TEACHER S MANUAL Overview....3 Objectives............................................................. 3 Correlation to Science Standards...3
Ultimate survival knife The basic survival gear is a knife, so today I am going to be showing you how to make this bush craft knife
 Ultimate survival knife The basic survival gear is a knife, so today I am going to be showing you how to make this bush craft knife Things you ll need Tools 1. Grinder 2. Emery 3. Clamps 4. Vice grip 5.
Hot Tips to Reduce your Fire Risks Justrite Mfg. Co.
 Hot Tips to Reduce your Fire Risks 2009 Justrite Mfg. Co. Explaining Flash Point Liquid gives off flammable vapors Even a spark will ignite the vapor Flash Point Is: Lowest temperature at which sufficient
Train noise notes April 15, 2017 Bob Kingsnorth
 Train noise notes April 15, 2017 Bob Kingsnorth rckingsnorth@aol.com Summary Moving model locomotives and cars create vibrations, creating noise. Our locomotives create low pitched vibrations/noise from
The HTS (Z122 tilt-in-space base) tilts forward and the footboard flips up out of the way facilitating sit-to-stand transfers.
 tilts forward and the footboard flips up out of the way facilitating sit-to-stand transfers.") The HTS (Z122 tilt-in-space base) tilts forward and the footboard flips up out of the way facilitating sit-to-stand transfers. HTS ( HYGIENE & TOILETING SYSTEM) The HTS Hygienic, simple, affordable and
The HTS (Z122 tilt-in-space base) tilts forward and the footboard flips up out of the way facilitating sit-to-stand transfers. HTS ( HYGIENE & TOILETING SYSTEM) The HTS Hygienic, simple, affordable and
Poly Shelters. Instruction Manual. Sunblocker Shade House 10' Wide x 30' Long SKU #1030SPC. Note: Photo may be of a different but similar model
 Poly Shelters Note: Photo may be of a different but similar model Instruction Manual Sunblocker Shade House 10' Wide x 30' Long SKU #1030SPC 2004 ClearSpan TM All rights reserved. Reproduction prohibited
Header Bikini Installation Instructions
 Header Bikini Installation Instructions For: Jeep Wrangler 1997-2002 Part Number: 52525 with or without Soundbar with or without Door Surround DO NOT INSTALL THIS PRODUCT ON ANY VEHICLE OTHER THAN THOSE
The Ultimate Duct Tape Dummy.
 The Ultimate Duct Tape Dummy http://www.fursuit.org/wiki/doku.php?id=fursuit:patterns:duct_tape_dummies:diadexxus&s=duct Write up by Diadexxus TOOLS YOU WILL NEED 3 rolls of good quality Duct Tape (3M,
Electric 2-STAGE SHARPENING FEATURES: system allows for safe, easy knife sharpening - Non-slip feet allows sharpener to stay in place while in use
 Electric FEATURES: - 2-Stage electric sharpening system allows for safe, easy knife sharpening - Non-slip feet allows sharpener to stay in place while in use 2-STAGE SHARPENING IMPORTANT SAFEGUARDS SAVE
Leica CE/ Leica CN. Knife holder
 Leica CE/ Leica CN Knife holder Instruction Manual Leica knife holder CE/ knife holder CN V2.2 English 08/2005 Always keep this manual near the instrument. Read carefully prior to operating the knife holders.
[tips & tricks for modelmakers] Plate 4 Decks. Required tools
![[tips & tricks for modelmakers] Plate 4 Decks. Required tools](/thumbs/80/82218978.jpg "[tips & tricks for modelmakers] Plate 4 Decks. Required tools") Plate 4 Decks 2 4 18 3 Required tools 13 12 25 11 25 1 24 6 7 15 14 21 22 26 19 17 5 22 25 17 25 10 27 20 19 26 21 9 8 1 Gun locks 1 Do not cut the small link from the lock to the fret as it provides good
Plate 4 Decks 2 4 18 3 Required tools 13 12 25 11 25 1 24 6 7 15 14 21 22 26 19 17 5 22 25 17 25 10 27 20 19 26 21 9 8 1 Gun locks 1 Do not cut the small link from the lock to the fret as it provides good
Axe and Saw Permit: Safe Use of Axes
 Page 1 of 7 Objective: The objective of this workshop guide is for the Scout Leader and/or Scout youth to be able to describe and demonstrate safe use of the Axe. Axe or Hatchet: What s the difference?
The kitchen can be a dangerous place
 The kitchen can be a dangerous place The kitchen is a fast-paced and sometimes stressful place to be. With the addition of open flame, knives and other hazards, the kitchen can be dangerous. For this reason
as seen on 2016 Steve Spangler Inc. All Rights Reserved Englewood, CO (800) SteveSpanglerScience.com
 SteveSpanglerScience.com") as seen on A WORD ABOUT THIS ACTIVITY HANDBOOK Great teachers never miss the opportunity to create a learning experience out of something that kids love and that s exactly what this experiment guide is
as seen on A WORD ABOUT THIS ACTIVITY HANDBOOK Great teachers never miss the opportunity to create a learning experience out of something that kids love and that s exactly what this experiment guide is
INSTINCT ALASKAN TENTS
 INSTINCT ALASKAN TENTS GEAR GUIDE CABELA S SET NUMBER: 58-2656, 58-1600, 58-2658 PLEASE READ THIS MANUAL IN ITS ENTIRETY PRIOR TO USING THIS PRODUCT. VISIT WWW.CABELAS.COM OR CALL 1-800-237-4444 FOR ASSISTANCE.
User s Manual Trampoline 8
 User s Manual Trampoline 8 Model! WARNING Read all precautions and instructions in this manual before using this equipment. Save this manual for future reference. Maximum user weight 17 lbs. ASSEMBLY IMPORTANT
Applications Engineering Notes
 Applications Engineering Notes Document Title Document Number MTP Brand Connector Installation Onto AEN-1420 Revision Number 1.1 Effective Date January 17, 2017 THE USE OF SAFETY GLASSES FOR EYE PROTECTION
Product instruction manual Ream Cutting Systems RE3943, RE3946, RE3947, RE3971, RE3952E
 Product instruction manual Ream Cutting Systems RE3943, RE3946, RE3947, RE3971, RE3952E The Trimfast Ream Cutters are reliable, high performance cutters that will give you the results you need quickly
MOVE FASTER ORGANIZE. PERSONALIZE * for uniqueness
 WWW.GREENLEE.COM 1 MOVE FASTER with LIGHTER, ERGONOMIC bags that help you ORGANIZE for effi ciency PROTECT your MOST VALUABLE tools with CONFIDENCE & PERSONALIZE * for uniqueness 2 *The Professional Tool
Butler Personnel Parachute Systems, LLC
 Butler Personnel Parachute Systems, LLC 1820 Loudon Avenue NW PO Box 6098 Roanoke, VA 24017-0098 (540) 342-2501 (540) 342-4037 (FAX) Info@butlerparachutes.com Butler Personnel Parachute Systems Back Pack
KNIFE GRASPS featured in the film "The Spoon, the Bowl and the Knife" a documentary about Wille Sundqvist
 KNIFE GRASPS featured in the film "The Spoon, the Bowl and the Knife" a documentary about Wille Sundqvist Control, strength, and safety produce long smooth cuts that are characteristic of professionally
Containment Training. Jeff Hunter Hanford ALARA Center (509)
") Containment Training Jeff Hunter Hanford ALARA Center (509) 373-0656 jeffrey_l_hunter@rl.gov Hanford Information Introduction Mission Support Alliance Contract for DOE-RL at Hanford. The ALARA Center supports
Containment Training Jeff Hunter Hanford ALARA Center (509) 373-0656 jeffrey_l_hunter@rl.gov Hanford Information Introduction Mission Support Alliance Contract for DOE-RL at Hanford. The ALARA Center supports
SOUDATHERM SFI 600P. Revision date: 19/06/2015 Page 1 of 6
 Revision date: 19/06/2015 Page 1 of 6 Technical data: Basis Polyurethane Foam Consistency Liquid Curing system Moisture curing Skin formation (20 C and 60% R.H.)* 8 min Curing time (20 C and 60% R.H.)*
INSTANT GARAGE MODEL NO: CIG81224 ASSEMBLY INSTRUCTIONS PART NO: ORIGINAL INSTRUCTIONS
 INSTANT GARAGE MODEL NO: CIG81224 PART NO: 3503578 ASSEMBLY INSTRUCTIONS ORIGINAL INSTRUCTIONS GC1117 INTRODUCTION Thank you for purchasing this CLARKE Instant Garage. When erected, the CIG81224 garage
TOYOTA TUNDRA BEDRUG Preparation
 TOYOTA TUNDRA 2007 - BEDRUG Preparation Part Number(s): PTS12-34070 (5.5 bed) PTS12-34071 (6.5 bed) PTS12-34072 (8.1 bed) NOTE: Part number of this accessory may not be the same as the part number shown.
ULTRA SLIDE OUT AWNING
 ULTRA SLIDE OUT AWNING SG5000 INSTALLATION GUIDE REV.01262016 RV AWNING PRODUCTS 1361 CALLE AVANZADO, SAN CLEMENTE, CA 92673 (800) 382-8442 FAX (949)276-5500 www.girardrv.com Girard Systems awnings may
Y Camper Shell Tracks, 37 Cross Bars. Y Camper Shell Tracks, 44 Cross Bars.
 Y06-550 63 Camper Shell Tracks, 37 Cross Bars. Y06-560 63 Camper Shell Tracks, 44 Cross Bars. Important: Parts List Please read these instructions carefully prior to installation. Please refer to your
Instructions for Use AIMOVIG TM (AIM-oh-vig) (erenumab-aooe) Injection, For Subcutaneous Use Single-Dose Prefilled SureClick Autoinjector
 (erenumab-aooe) Injection, For Subcutaneous Use Single-Dose Prefilled SureClick Autoinjector") Instructions for Use AIMOVIG TM (AIM-oh-vig) (erenumab-aooe) Injection, For Subcutaneous Use Single-Dose Prefilled SureClick Autoinjector Guide to parts Before use After use Purple start button Expiration
Instructions for Use AIMOVIG TM (AIM-oh-vig) (erenumab-aooe) Injection, For Subcutaneous Use Single-Dose Prefilled SureClick Autoinjector Guide to parts Before use After use Purple start button Expiration
Instructions for Use Repatha (ri-path-a) (evolocumab) Single-Use Prefilled SureClick Autoinjector. Guide to parts
 (evolocumab) Single-Use Prefilled SureClick Autoinjector. Guide to parts") Instructions for Use Repatha (ri-path-a) (evolocumab) Single-Use Prefilled SureClick Autoinjector Before use Guide to parts After use Gray start button Expiration date Expiration date Window Yellow window
Instructions for Use Repatha (ri-path-a) (evolocumab) Single-Use Prefilled SureClick Autoinjector Before use Guide to parts After use Gray start button Expiration date Expiration date Window Yellow window
MAKING AN AXE HOLSTER By Oliver Cameron with Ole Wik
 MAKING AN AXE HOLSTER By Oliver Cameron with Ole Wik I don t use a conventional holster for small axes. I use what I call a drop-in holster that I wear on my regular pants belt. The axe goes into the holster
INSTALLATION INSTRUCTIONS FOR BALCO, INC. FLOOR MATS FM2R-(A, C, D) W/O FRAME 4V
 W/O FRAME 4V") 2626 South Sheridan PO Box 17249 Wichita, Kansas 67217 Phone: (316) 945-9328 Fax: (316) 945-0789 INSTALLATION INSTRUCTIONS FOR BALCO, INC. FLOOR MATS FM2R-(A, C, D) W/O FRAME 4V 2012, Balco, Inc. INSTALLATION
2626 South Sheridan PO Box 17249 Wichita, Kansas 67217 Phone: (316) 945-9328 Fax: (316) 945-0789 INSTALLATION INSTRUCTIONS FOR BALCO, INC. FLOOR MATS FM2R-(A, C, D) W/O FRAME 4V 2012, Balco, Inc. INSTALLATION
Brooks Fire Pit Table. Installation Instructions for Brooks Fire Pit Table BRK-1224
 Brooks Fire Pit Table Installation Instructions for Brooks Fire Pit Table BRK-1224 1 IMPORTANT Contents Please consult your Crystal Fire instruction manual for detailed instructions Required and important
Written By: Arthur Shi
 ipad 5 LTE LCD Replacement Follow this guide to replace the LCD screen in an ipad 5 LTE. Written By: Arthur Shi ifixit CC BY-NC-SA www.ifixit.com Page 1 of 26 INTRODUCTION Use this guide to replace the
Thomas Scientific Swedesboro, NJ U.S.A.
 Thomas Scientific Swedesboro, NJ 08085-0099 U.S.A. Wiley Laboratory Mill, Model 4 3375-E10 (115 V, 50/60 HZ) USE AND CARE OF CATALOG NUMBER: 3375-E10 Wiley Laboratory Mill, Model 4 (115 V, 50/60 HZ) UNPACKING
Come rain or shine its fine out with ScooterPac. Take a quick read of this manual to get the most out of your folding canopy.
 YOUR USER MANUAL Come rain or shine its fine out with ScooterPac. Take a quick read of this manual to get the most out of your folding canopy. Contents 1 Quick start guide 5 Fitting your canopy 9 Detailed
Series 2050 Garden Window Frequently Asked Questions
 1. What is the difference between new construction and retrofit? The difference is in the overall jamb depth and required components: For new construction, the flash flange on the head of the unit is left
Assembly TOOLS REQUIRED: 17mm and 14mm or equivalent wrenches.
 Instructions for 3 Trimmer Rack, 3TR* *Patents Pending Assembly TOOLS REQUIRED: 17mm and mm or equivalent wrenches. 15 26 26 16 15 16 Attach the lower mounting brackets to the Trimmer Rack poles as shown
Combat Archery 201 (Intermediate) Revised February 12, 2011
 Revised February 12, 2011") Combat Archery 201 (Intermediate) Revised February 12, 2011 Disclaimer: The information in this handout is only basic information and does not reflect the entire standards that are to be used. For full
Combat Archery 201 (Intermediate) Revised February 12, 2011 Disclaimer: The information in this handout is only basic information and does not reflect the entire standards that are to be used. For full
PL500A Platform Extension
 PL500A Platform Extension Operator Manual Copyright 2009 ServerLift Corporation 821 N 2nd Street Phoenix, AZ 85004 VOICE: 602.254.1557 FAX: 602.412.4479 821 N 2nd Street Phoenix, AZ 85004 VOICE: 602.254.1557