INSTRUCTIONS FOR INSTALLATION, USE AND MAINTENANCE RAIS 700
|
|
|
- Carol Ross
- 6 years ago
- Views:
Transcription

1 INSTRUCTIONS FOR INSTALLATION, USE AND MAINTENANCE RAIS 700 IMPORTANT INFORMATION On first lighting the stove you must be careful not to touch the painted surfaces and it is MOST IMPORTANT that the door is kept slightly ajar in order for the door seal and sealant to cure. This will prevent the door seal sticking to the painted body and becoming damaged. 1
2 2
3 Rais 700 Revision Date : 2011 INTRODUCTION.. 4 WARRANTY... 4 SPECIFICATIONS.. 5 INSTALLATION INSTRUCTIONS. 6 CONVECTION CHIMNEY FLUE OUTLET POSITIONS. 9 HEARTH QUICK GUIDE DRAWINGS VENTILATION. 13 COMBUSTION AIR SUPPLY 14 INSTALLATION INSTALLATION DISTANCE COMMISSIONING AND HANDOVER. 21 OPERATING INSTRUCTIONS FUEL REGULATION OF COMBUSTION AIR.. 23 USING THE WOOD BURNING STOVE. 24 ADJUSTMENT OF AIR DAMPER CONTROL 24 FIRST USAGE. 24 LIGHTING AND FUELLING MAINTENANCE CLEANING AND CARE. 27 CHIMNEY CLEANING 28 CLEANING THE FLUE WAYS. 29 PROBLEM SOLVING DO S AND DON TS.. 31 ACCESSORIES AND SPARE PARTS
4 INTRODUCTION Thank you for purchasing a Rais wood burning stove. These appliances have been approved by HETAS as intermittent operating appliances for burning wood logs only. These appliances have been approved for use in Smokeless Zones. A Rais wood burning stove is more than just a heat source: it also shows that you care about design and quality in your home. To make the most of your wood burning stove it is important that you read the manual thoroughly before installing and using it. In the case of warranty coverage, and for general queries regarding your wood burning stove, it is important that you know the stove s production number. We therefore recommend that you note down the number in the table below. The production number is located in the top of the convection box. WARRANTY Your Rais wood burning stove comes with a 5 year warranty. The warranty, however, does not cover heat-insulating materials, glass and seals. These are available to order from your local Rais dealer / stockist. Any alterations made to the stove will void the warranty. 4
5 SPECIFICATIONS Rais 700 RAIS 700 Nominal output (kw): 5.2 Nominal Min. / output Max. output (kw): (kw): Min. Heating / Max. output area (m (kw): 2 ): Ca Heating area (m 2 ): ca Size, width/depth/height (mm): 825 / 485 / 535 Size, width/depth/height (mm): Combustion chamber width/depth/height (mm). 562 / 289 / 300 Combustion chamber width/depth/height (mm). Recommended amount of wood when fuelling (kg) 1.8 Recommended (Based on 2 amount - 3 logs of of wood wood when approx. fuelling 25cm) (kg) 1.8 (Based on 2-3 logs of wood approx. 25cm) Min. uptake / Min. draught (Pascal): -12 Min. uptake (Pascal): -12 Weight (kg): Weight (kg): Efficiency (%): Efficiency (%): Particles after NS3058/3059 (g/kg): 2.6 Particles after NS3058/3059 (g/kg): 2.6 Dust measured according to Din+ (mg/nm 3 Dust measured according to Din+ (mg/nm 3 ): 8 ): 8 Smoke gas mass flow (g/s): 5.1 Smoke gas mass flow (g/s): 5.1 Smoke gas temperature ( C): 268 Smoke gas temperature ( C): 268 Intermittent operation: Fuelling should be Intermittent operation: Fuelling should undertaken be undertaken within within 33 hours. hours Please Note, this appliance has been tested by the manufacturers and works on a 3m straight flue. 5
6 INSTALLATION INSTRUCTIONS The following pages give instructions for the safe and proper installation of this heating appliance in the UK. These instructions cover the basic principles of installation, although some details may need slight modification to suit particular local site conditions. In all cases the installation must comply with current UK Building Regulations, Local Authority Byelaws and other specifications or regulations as they affect the installation of the stove. Please note that it is a legal requirement under England and Wales Building Regulations that the installation of the stove is either carried out under local Authority Building Control approval or is installed by a Competent Person registered with a Government approved Competent Persons Scheme. HETAS operate such a scheme and a listing of their registered Competent Persons can be found on their website at It should be noted that the current Building Regulations requirements are given in Approved Document J. These requirements may also be met by adopting the relevant recommendations given in British Standards BS 8303, BS EN :2007. WARNING. Health and Safety Advice Notice. The installation of this heating appliance is governed by the Health and Safety at Work Act it is the responsibility of the installer to ensure that all requirements of this Act are met during the installation works. Attention is drawn in particular to the following: Handling: The appliance is a heavy item and adequate facilities must be available for loading, unloading and site handling. Fire Cement: Some types of fire cement are caustic and should not be allowed to come into contact with the skin. Protective gloves should be worn when handling fire cement. In case of contact with the skin, wash immediately with plenty of water. Asbestos: This stove contains no asbestos. If there is a possibility of disturbing any asbestos in the course of the installation, then please seek specialist guidance and use appropriate protective equipment. Metal Parts: When installing or servicing this stove care should be taken to avoid the possibility of personal injury. Important Warning - Preparatory Work and safety Checks: This stove must not be installed into a chimney which serves any other heating appliance. There must not be an extractor fan fitted in the same room as the stove, as this can cause the stove to emit fumes into the room. If this appliance is installed into an existing chimney, the chimney must first be swept and examined for soundness and suitability, before the appliance is installed (see also section headed Chimney ). 6
7 Convection Rais stoves are convection stoves. This means that the stove s back and side panels are not over-heated. Convection means that there is a circulation of air, which ensures that the heat is distributed more evenly throughout the entire room. The cold air is sucked in at the base of the stove and up through the convection channel, which runs along the stove s combustion chamber. The heated air comes out at the top of the stove, which ensures a circulation of warm air throughout the room. The stoves are equipped with cool door handles - a Rais special feature - which means you could almost do away with gloves. Be aware, however, that all exterior surfaces become hot during use - so take extreme care. Chimney In order for the stove to perform satisfactorily the chimney height must be sufficient to ensure an adequate draught of approximately 15 Pa so as to clear the products of combustion and prevent smoke problems into the room. NOTE: A chimney height of not less than 4.5 metres measured vertically from the outlet of the stove to the top of the chimney should be satisfactory. Alternatively the calculation procedure given in EN may be used as the basis for deciding whether a particular chimney design will provide sufficient draught. Please Note, this appliance has been tested by the manufacturers and works on a 3m straight flue. The outlet from the chimney should be above the roof of the building in accordance with the provisions of Building Regulations Approved Document J. If installation is into an existing chimney then it must be sound and have no cracks or other faults which might allow fumes into the house. Older properties, especially, may have chimney faults or the cross section may be too large i.e. more than 230 mm x 230 mm. Remedial action should be taken, if required, seeking expert advice, if necessary. If it is found necessary to line the chimney then a flue liner suitable for solid fuel must be used in accordance with Building Regulations Approved Document J. Any existing chimney must be clear of obstruction and have been swept clean immediately before installation of the stove. If the stove is fitted in place of an open fire then the chimney should be swept one month after installation to clear any soot falls which may have occurred due to the difference in combustion between the stove and the open fire. If there is no existing chimney then any new system must be to the designation described above and in accordance with Building Regulations Approved Document J. A single wall metal fluepipe is suitable for connecting the stove to the chimney but is not suitable for use as the complete chimney. The chimney and connecting fluepipe must have a minimum diameter of 150 mm and its dimension should be not less than the size of the outlet socket of the stove. 7
8 Any bend in the chimney or connecting fluepipe should not exceed bends should not be used. Combustible material should not be located where the heat dissipating through the walls of fireplaces or flues could ignite it. Therefore when installing the stove in the presence of combustible materials due account must be taken of the guidance on the separation of combustible material given in Building Regulations Approved Document J and also in these stove instructions. If it is found that there is excessive draught in the chimney then a draught stabiliser should be fitted. Fitting of a draught stabiliser will affect the requirement for the permanent air supply into the room in which the stove is fitted in accordance with Approved Document J (see also combustion air supply). Adequate provision e.g. easily accessible soot door or doors must be provided for sweeping the chimney and connecting fluepipe where it is not intended for the chimney to be swept through the appliance. Chimney Fires If the chimney is thoroughly and regularly swept, chimney fires should not occur. However, if a chimney fire does occur turn off the stove immediately and isolate the mains electricity supply (if applicable), and tightly close the doors of the stove. This should cause the chimney fire to go out. If the chimney fire does not go out when the above action is taken then the fire brigade should be called immediately. Do not relight the stove until the chimney and flue ways have been cleaned and examined by a professional. 8
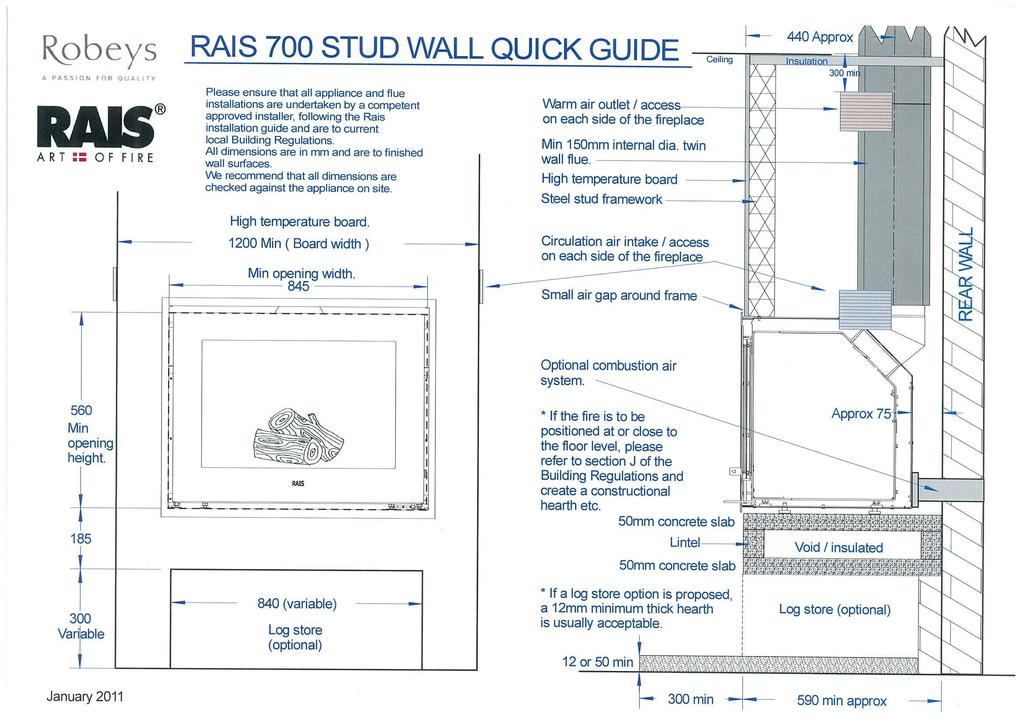
9 Flue Outlet Positions 9
10 Hearth The hearth should be able to accommodate the weight of the stove and its chimney if the chimney is not independently supported. The weight of the stove is indicated in the brochure. The stove should preferably be installed on a non-combustible hearth of a size and construction that is in accordance with the provisions of the current Building Regulations Approved Document J. The clearance distances to combustible material beneath, surrounding or upon the hearth and walls adjacent to the hearth should comply with the guidance on the separation of combustible material given in Building Regulations Approved Document J and also in these stove instructions. If the stove is to be installed on a combustible floor surface, it must be covered with a non-combustible material at least 12mm thick, in accordance with Building Regulations Approved Document J, to a distance of 30 cm in front of the stove and 15 cm to each side measuring from the door of the combustion chamber. 10
11 11
12 12
13 Ventilation - make the best possible use of the inserts. The stove is equipped with four convection air outlets, which can be connected with suitable air ducts to other rooms. Note, this is NOT a working drawing. 13
14 Combustion air supply In order for the stove to perform efficiently and safely there must be an adequate air supply into the room in which the stove is installed to provide combustion air. The provision of air supply to the stove must be in accordance with current Building Regulations Approved Document J. An opening window is not appropriate for this purpose. Installation It is prohibited to carry out unauthorised alterations to the stove. There must be plenty of fresh air in the room where the stove is being installed, in order to ensure proper combustion. Note that any mechanical exhaust ventilation - e.g. an extraction hood - is not permitted. Any air grilles must be placed in such a manner, that the air supply is not blocked. The stove is equipped with four convection air outlets, which may be connected with suit-able air ducts to other rooms. Building Regulations Approved Document J gives specific guidance on the required permanent ventilation into the room for combustion air of solid fuel appliances. The floor structure must be able to carry the weight of the wood burning stove, as well as the weight of a chimney, if necessary. When you choose where to set up your RAIS wood burning stove, you should consider the heat distribution to the other rooms. This will enable you to get the best use out of your stove. The stove should be set up at a safe distance from inflammable materials. See the manufacturer's plate on the wood burning stove. Installation of stove: NOTE! A decision must be made concerning the positioning of the inlets and outlets of the convection system. Discolouration of the wall above the doors and the convection air outlets may occur due to convected hot air. RAIS cannot take responsibility for any building work or consequential damage. The stove should be inspected for defects at receipt. 14
15 Lift the stove from the pallet to the place of installation on to a suitably protected floor. The stove can be mounted on the optional adjustable stand ( see page 29 ). These are available to order from your local Rais dealer / stockist. Using a spirit level against the door and body of the stove, ensure that the stove is perfectly level and make adjustments using the levelling bolts in the base. Remove the frame and door from the stove. Be careful not to damage the glass or paint. Seal the flue pipe on to the flue outlet using fire cement and self tapping screws and connect to the chimney. Connect the convection air ducts, if required. Install air system manifold kit ( A ) to the pipe stub, if required ( optional ). The stove is now ready to be built in using either stud walls or solid walls. When the walls have been finished and decorated, the frame and door can be re-fitted. Remove all protective plastic and tape prior to commissioning. A A It is possible to order made to measure frames. Contact your Rais dealer. 15
16 Insulation ability such as Aqua panel ( coefficient of thermal conductivity 0.36 W/mk ) or better. Please use metal stud. Insulate ceiling if necessary 16
17 Insulate ceiling if necessary 17
18 Insulate ceiling if necessary Distance to non combustible material 50mm min Distance to non combustible material 50mm min 18
19 19
20 20
21 Installation distance in case of combustible wall To find out whether the wall next to where the stove is going to be installed is flammable, you should contact your building contractor or the local building authorities. The hearth should be able to accommodate the weight of the stove. The chimney must be independently supported by wall brackets or a ceiling support plate. The weight of the stove is indicated in the brochure. The stove should always be installed on a non-combustible hearth of a size and construction that is in accordance with the provisions of the current UK Building Regulations Approved Document J. If the stove is to be installed on a wooden floor, it must be covered with a non-combustible material at least 12mm thick, in accordance with UK Building Regulations Approved Document J, to a distance of 300 mm in front of the stove and 150 mm to each side measuring from the door of the combustion chamber. The clearance distances to combustible material beneath, surrounding or upon the hearth and walls adjacent to the hearth should comply with the guidance on the separation of combustible material given in UK Building Regulations Approved Document J and also in these stove instructions. Commissioning and handover Ensure all parts are fitted in accordance with the instructions. On completion of the installation allow a suitable period of time for any fire cement and mortar to dry out, before lighting the stove. Once the stove is under fire check all seals for soundness and check that the flue is functioning correctly and that all products of combustion are vented safely to atmosphere via the chimney terminal. On completion of the installation and commissioning ensure that the operating instructions for the stove are left with the customer. Ensure to advise the customer on the correct use of the appliance and warn them to use only the recommended fuel for the stove. Advise the user what to do should smoke or fumes be emitted from the stove. The customer should be warned to use a fireguard to BS 8423:2002 (Replaces BS 6539) in the presence of children, aged and/or infirm persons. CO Alarm Building regulations require that when ever a new or replacement fixed solid fuel or wood/biomass appliance is installed in a dwelling a carbon monoxide alarm must be fitted in the same room as the appliance. Further guidance on the installation of the carbon monoxide alarm is available in BS EN 50292:2002 and from the alarm manufacturer s instructions. Provision of an alarm must not be considered a substitute for either installing the appliance correctly or ensuring regular servicing and maintenance of the appliance and chimney system. 21
22 OPERATING INSTRUCTIONS Please note that HETAS Appliance Approval only covers the use of dry seasoned wood logs on this appliance. HETAS Approval does not cover the use of other fuels either alone or mixed with the wood logs, nor does it cover instructions for the use of other fuels. Fuel The stove is designed and approved in accordance with EN and NS 3058 for burning split, dried firewood. The firewood must have a water content of 15-22% and its max. length should be the length of the combustion chamber minus mm. Stoking with wet firewood causes both soot, environmental pollution and bad fuel economy. Freshly cut wood contains approx % water and is thoroughly unsuitable for stoking. Allow at least 1 year of storage time for newly cut wood before using. Wood with a diameter of more than 100 mm should be split. Regardless of wood size, it should always have at least one surface area free of bark. We do not recommend stoking with painted, laminated or impregnated wood, wood with a synthetic surface, painted refuse wood, chipboard, plywood, domestic waste, paper bri-quettes and pit coal, as this will produce malodorous smoke, which could be poisonous. When firing with the above-mentioned items and amounts larger than those recommended, the stove is subjected to a larger amount of heat, which results in a higher chimney temperature and lower efficiency. This can result in the stove and chimney becoming damaged and would void the warranty. The calorific value of the firewood is closely connected to the moisture level. Moist firewood has a low heat value. The more water the wood contains, the more energy it takes for this water to vaporise, resulting in this energy being lost. ONLY USE RECOMMENDED FUELS The following table shows the calorific value of different types of wood, which have been stored for 2 years and which have a residual moisture of 15-17%. Wood Kg dry wood pr m 3 compared to beech/oak Hornbeam % Beech and oak % Ash % Maple % Birch % Mountain pine % Fir % Poplar % 1kg of wood yields the same heat energy irrespective of wood type. 1kg of beech merely takes up less space than 1kg of fir. 22
23 Drying and storage Drying wood takes time: proper air drying takes approximately 2 years. Here are some tips: Store the wood sawn, split and stacked in an airy, sunny place, which is protected against rain (the south side of the house is particularly suitable). Store the firewood stacks at a hand's breadth apart, as this ensures that the air flowing through takes the moisture with it. Avoid covering the firewood stacks with plastic, as this prevents the moisture from escaping. It is a good idea to bring the firewood into the house 2-3 days before you need it. Regulating the combustion air All RAIS stoves are equipped with a one-handed operating lever for regulating the damper. The stove-specific regulating mechanisms can be seen on the diagrams. Primary air is the combustion air added to the primary combustion zone, i.e. the bed of glowing embers. This air, which is cold, is only used in the lighting stage. Secondary air is the air which is added in the gas combustion zone, i.e. air which contributes to the combustion of the pyrolysis gasses (preheated air, which is used for the cleaner glass system and combustion). This air is sucked through the damper under the combustion chamber and is pre-heated through the side channels and then emitted as hot scavenging air onto the glass. The hot air rinses the glass and keeps it soot-free. The tertiary channel, which can be seen at the top of the combustion chamber towards the back, serves to combust the final gas residues. By setting the interval between position 1 and 2, the energy content in the firewood is used optimally, as there is oxygen for combustion and for the burning of the pyrolysis gasses. When the flames are a clear yellow the damper has been set correctly. Finding the correct position comes with time after you have used for stove for a while. It is not recommended that you turn it down completely. A mistake commonly made is shutting the damper too early because it feels too hot. This results in dark smoke emanating from the chimney and in the calorific value of the firewood not being used to its fullest. Room ventilation and stoves There must not be an extractor fan fitted in the same room as the stove as this can cause the stove to emit smoke and fumes into the room. The stove requires a permanent and adequate air supply in order for it to operate safely and efficiently. In accordance with current Building Regulations the installer may have fitted a permanent air supply vent into the room in which the stove is installed to provide combustion air. This air vent should not under any circumstances be shut off or sealed. CO Alarm Your installer should have fitted a CO alarm in the same room as the appliance. If the alarm sounds unexpectedly, follow the instructions given under Important - Warning Note on page

24 Using the wood burning stove Adjustment of the air damper - the damper has 3 settings Position 1 The damper is almost closed meaning that there is a minimal air intake. Position 2 Pull the lever until the first click. This position gives full secondary air. During normal use the lever is set between position 1 and 2. When the flames are clear and yellow, the damper is set correctly, i.e. resulting in a slow / optimal burning. Position 3 Pull the lever until the next click. The air damper is completely open and gives full primary and secondary air. This position is for the lighting stage and is not used under normal operation. Control If the ash is white and the walls in the combustion chamber are soot free after the stove has been used, the air regulation was set correctly and the wood was sufficiently dry. First usage A careful start pays off. Start with a small fire, so that the wood burning stove can get accustomed to the high temperature. This gives the best start and any damage is avoided. Be aware that a strange but harmless odour and smoke concoction may emanate from the surface of the stove, the first time you fire up. This is because the paint and materials need to harden. The odour disappears quickly, but you should check the ventilation and draught, if possible. See also, the IMPORTANT warning notice below about persistent fumes. During this process you must be careful not to touch the painted surfaces, it is recommended that you regularly open and close the door to prevent the door seal from sticking. The stove may also produce "clicking noises" during heating and cooling, caused by the large temperature differences which the material is subjected to. Never use any type of liquid fuel for kindling or maintaining the fire. You could be at risk of explosion. The stove gets very hot when in use, always wear protective gloves when tending the stove. If the stove has not been used for a while, follow the steps as if you were using it for the first time. 24
25 Before lighting the stove check with the installer that the installation work and commissioning checks described above have been carried out correctly and that the chimney has been swept clean, is sound and free from any obstructions. As part of the stoves commissioning and handover the installer should have shown you how to operate the stove correctly. IMPORTANT - Warning Note! Properly installed, operated and maintained this appliance will not emit fumes into the dwelling. Occasional fumes from de-ashing and re-fuelling may occur. However, persistent fume emission is potentially dangerous and must not be tolerated. If fume emission does persist, the following immediate actions should be taken: (a) Open doors and windows to ventilate the room and then leave the premises. (b) Let the fire go out. (c) Check for flue or chimney blockage, and clean if required. (d) Do not attempt to relight the fire until the cause of the fume emission has been identified and corrected. If necessary seek expert advice. The most common cause of flue emission is flue way or chimney blockage. For your own safety these must be kept clean at all times. IMPORTANT - Warning Note! Do not use an aerosol spray on or near the stove when it is alight. IMPORTANT - Safety advice! When using the stove in situations where children, aged and/or infirm persons are present a fireguard must be used to prevent accidental contact with the stove. The fireguard should be manufactured in accordance with BS 8423:2002 (Replaces BS 6539). 25
26 ENGLISH RAIS - manual for Rais 700 Lighting and fuelling To light the stove, use alcohol briquettes or similar, as well as approximately 2kg of firewood, split into kindling sticks. Set the air damper to the fully open position. Tips before firing up: Open a door or window close to the wood burning stove. If there is storm in the stove coming from the chimney it is advisable to place a screwed up piece of newspaper between the upper baffle plate and the chimney. Light the paper and wait until you hear a rumbling noise in the chimney. This means that there is definitely a draught in the chimney and you should avoid smoke coming back into the room. Light the fire and shut the door, leave the door ajar approximately 10-15mm. 26
27 ENGLISH RAIS - manual for Rais 700 When the flames are clear, after approximately 5-10 minutes, close the door. Damper - see adjustment of the damper. After approximately minutes, when you have a good bed of glowing embers, add 2-3 pieces of wood. Leave the door ajar until the fire has caught properly, then close the door. Damper - see adjustment of the damper. After approximately 5 minutes, or when the flames are clear and stable, close the damper gradually. It is recommended to have a layer of approximately 20mm, as it has an insulating effect. NOTE! During operation the door should always remain closed. 27
28 MAINTENANCE Cleaning and care The wood burning stove and the chimney must be serviced by a chimney sweep twice a year. During cleaning and care, the stove must be cold. If the glass is sooty: - Moisten a piece of paper or newspaper, dip it in the ash, and rub the sooty glass with it. - Now rub with a dry piece of paper and the glass will become clean. - As an alternative you can use glass cleaner, which you can buy from you RAIS distributor. Clean the exterior with a dry sponge or a soft brush. Cleaning the combustion chamber: Scrape/shovel the ash out and store it in a non-flammable container until it has cooled down. You can dispose of ash with your normal household waste or recycle on the garden. REMEMBER!! Never remove all the ashes from the combustion chamber - the wood will burn at its best with a layer of ashes of approx. 20 mm. Prolonged periods of non-use: If the stove is to be left unused for a prolonged period of time then it should be given a thorough clean to remove ash and unburned fuel residues. To enable a good flow of air through the appliance to reduce condensation and subsequent damage, leave the air controls fully open. Prior to a new heating season, it should be checked that the chimney and flue pipe connector are not blocked. Chimney cleaning The chimney should be swept at least twice a year. It is important that the flue connection and chimney are swept prior to lighting up after a prolonged shutdown period. If the stove is fitted in place of an open fire then the chimney will require sweeping after a month of continuous operation. This is a precaution to ensure that any softer deposits left from the open fire usage have not been loosened by the higher flue temperatures generated by the closed stove. In situations where it is not possible to sweep through the stove the installer will have provided alternative means, such as a soot door. After sweeping the chimney the stove flue outlet and the flue pipe connecting the stove to the chimney must be cleaned with a flue brush. 28
29 Cleaning the flue ways The flue ways consist of a baffle plate and a smoke conductor above. These parts are screwed together. Both parts are made of Vermiculite. Handle these parts carefully. Lift the baffle plate a little and push towards one of the sides. Remove the baffle plate by lifting it upwards and tilting on it s end. Gently take out the baffle plate. Now there is a clear view of the smoke exit. Remove any dirt / dust and put the parts back in, in reverse order. NB Make sure that the baffle plates are level with the hole in the back of the stove. 29
30 Problem solving Smoke spillage around door: - could be due to too low draught in the chimney <12Pa - check if the flue or chimney is blocked Soot on glass: - could be because the firewood is too wet. - make sure that the stove is heated properly when firing up, prior to closing the door - could be because the damper regulation is too low. A stove burning too strong could be caused by: - a leak around the door seal - chimney draught too large >22 Pa, draught control regulator should be installed. A stove burning too weakly could be caused by: - too little firewood - too little air supply for the room ventilation - dirty smoke channels - leaking chimney - leakage between chimney and flue If your stove continues to malfunction, we recommend that you contact your RAIS distributor or chimney sweep. IMPORTANT!! To ensure safe burning there must be clear yellow flames or clear embers at all times. The firewood should not be smouldering. Therefore, you should never completely cut off the air supply. WARNING!! In case of chimney fire: - shut off all air supply on the wood burning stove - contact the fire services - never attempt to put out fire with water! - afterwards, you should ask your chimney sweep to check the stove and chimney 30
31 DO S AND DON TS Do s Sweep the chimney / flue twice a year. Service the appliance at least once a year Dry, burn dry wood only. Use a moisture meter if unsure. Spares, only use genuine Rais spare parts Contact your dealer if you are unsure about the operation of your stove. Line and insulate the chimney. Use a qualified installer ( HETAS ) or building control. Spend time with your stove - get to know how your stove and chimney works. Don ts Overload your stove with wood. Overfire, allow your stove to get too hot. Use a stove thermometer. Burn poor quality fuel - painted / treated wood. Slowburn - this can damage your stove and / or chimney - please take advice from an expert first. Closedown too soon - never load your stove and close down the air supply - always burn off the gasses first - seek advice if in doubt. 31
32 ACCESSORIES AND SPARE PARTS If spare parts other than those recommended by Rais are used, the warranty is voided MON Stand Telescopic support Air system manifold kit SV Special adaptor 70914Spec Special frame Spare parts are available to order from your Rais dealer / stockist SORT Complete cover Steel door Glass door Fire brick set Air damper MON Convection box Seal set 32
33 33

34 U K Distributor. Robeys Ltd. Riverside, Goods Road, Belper, Derbyshire, England. DE56 1UU Tel: Fax: E Mail: info@robeys.co.uk June
Harrie Leenders Fuga el - Instructions for Installation, Use and Maintenance INSTRUCTIONS FOR INSTALLATION, USE AND MAINTENANCE
 INSTRUCTIONS FOR INSTALLATION, USE AND MAINTENANCE FUGA el 1 2 1. Flue 2. Case 3. Ceramic glass 4. Aeration slide 5. Convection fins 6. Door handle 7. Base 3 4 READ THE INSTRUCTION BOOKLET AND THESE SUPPLEMENTARY
INSTRUCTIONS FOR INSTALLATION, USE AND MAINTENANCE YSEN
 INSTRUCTIONS FOR INSTALLATION, USE AND MAINTENANCE YSEN READ THE INSTRUCTION BOOKLET AND THESE SUPPLEMENTARY INSTRUCTIONS CAREFULLY BEFORE INSTALLATION These instructions together with those in the instruction
Installation Instructions. Woolly Mammoth Stoves Albert Road, Braintree, Essex, CM7 3JQ
 Installation Instructions Woolly Mammoth Stoves 20-28 Albert Road, Braintree, Essex, CM7 3JQ INSTALLATION INSTRUCTIONS TO BE READ IN CONJUNCTION WITH THOSE IN THE INSTRUCTION BOOKLET These instructions
INSTRUCTIONS FOR INSTALLATION, USE AND MAINTENANCE RAIS Q20
 INSTRUCTIONS FOR INSTALLATION, USE AND MAINTENANCE RAIS Q20 IMPORTANT INFORMATION On first lighting the stove you must be careful not to touch the painted surfaces and it is MOST IMPORTANT that the door
INSTRUCTIONS FOR INSTALLATION, USE AND MAINTENANCE RAIS RONDO & RAIS MINO 2 IMPORTANT INFORMATION
 INSTRUCTIONS FOR INSTALLATION, USE AND MAINTENANCE RAIS RONDO & RAIS MINO 2 IMPORTANT INFORMATION On first lighting the stove you must be careful not to touch the painted surfaces and it is MOST IMPORTANT
INSTRUCTIONS FOR INSTALLATION, USE AND MAINTENANCE RAIS PALO & RAIS PILAR
 INSTRUCTIONS FOR INSTALLATION, USE AND MAINTENANCE RAIS PALO & RAIS PILAR IMPORTANT INFORMATION On first lighting the stove you must be careful not to touch the painted surfaces and it is MOST IMPORTANT
INSTRUCTIONS FOR INSTALLATION, USE AND MAINTENANCE RAIS AVANT
 INSTRUCTIONS FOR INSTALLATION, USE AND MAINTENANCE RAIS AVANT IMPORTANT INFORMATION On first lighting the stove you must be careful not to touch the painted surfaces and it is MOST IMPORTANT that the door
INSTRUCTIONS FOR INSTALLATION, USE AND MAINTENANCE RAIS PILAR 13 L & PILAR 13 H
 INSTRUCTIONS FOR INSTALLATION, USE AND MAINTENANCE RAIS PILAR 13 L & PILAR 13 H IMPORTANT INFORMATION On first lighting the stove you must be careful not to touch the painted surfaces and it is MOST IMPORTANT
INSTRUCTIONS FOR INSTALLATION, USE AND MAINTENANCE RAIS RIVA
 INSTRUCTIONS FOR INSTALLATION, USE AND MAINTENANCE RAIS RIVA IMPORTANT INFORMATION On first lighting the stove you must be careful not to touch the painted surfaces and it is MOST IMPORTANT that the door
RAIS - manual for Q-BIC & Q-BIC insert USER MANUAL RAIS Q-BIC RAIS Q-BIC INSERT
 USER MANUAL RAIS Q-BIC & RAIS Q-BIC INSERT 1 We cannot be held responsible for any misprints. RAIS Q-BIC RAIS Q-BIC insert Date: 29-09-2017 Modified: 5 INTRODUCTION... 4 WARRANTY... 4 SPECIFICATIONS...
This booklet applies to following Westfire stoves WF UNIQ 4 / WF4 WF UNIQ 18 /WF 18 WF UNIQ 16 /WF16 WF UNIQ 23 /WF 23 WF UNIQ 32 /WF32
 SUPPLEMENTARY INSTALLATION INSTRUCTIONS FOR THE UK MARKET TO BE READ IN CONJUNCTION WITH THOSE IN THE WESTFIRE INSTRUCTION INDIVIDUAL INSTRUCTION BOOKLETS This booklet applies to following Westfire stoves
OPERATION AND INSTALLATION MANUAL. Multi-fuel Burcott Fireplace inset stove
 OPERATION AND INSTALLATION MANUAL Multi-fuel Burcott Fireplace inset stove 1 Installation Manual and Operating instructions BURCOTT fireplace inset stove This manual refers to the stoves listed above,
User Manual for New Zealand
 ENVRIONMENTALLY FRIENDLY FIRE User Manual for New Zealand Authorisation number: 152619 (AS/NZS 4012/4013) Authorisation number: 154319 (ULEB) Website for authorised burners: http://ecan.govt.nz/services/online
Installation and Operating. Instructions. Multifuel Stove. Salamander. Model Lighting a solid fuel fire. 6.5 De-ashing the stove
 Installation and Operating Instructions Salamander Model 0901 Multifuel Stove Section Contents Page 1 Important information about installing and 3 using the Salamander stove 2 Unpacking the Salamander
BRANSDALE DOUBLE SIDED WOOD BURNING STOVE
 BRANSDALE DOUBLE SIDED WOOD BURNING STOVE INSTALLATION AND USER INSTRUCTIONS Read these instructions carefully before installation and use. These instructions should be retained by the user for future
IN THE EVENT OF CHIMNEY FIRE, EVACUATE THE PROPERTY AND CALL THE EMERGENCY SERVICES.
 EKOL INSET 8 INSTALLATION AND OPERATING INSTRUCTIONS INTRODUCTION. SAFETY Safety is the most important consideration when using and installing your stove. If not installed and used correctly, a house fire
Saltfire ST1 INSTALLATION AND OPERATING INSTRUCTIONS.
 Saltfire ST1 INSTALLATION AND OPERATING INSTRUCTIONS. INTRODUCTION SAFETY Safety is the most important consideration when using and installing your stove. If not installed and used correctly, a house fire
Bloomsbury SE SMOKE EXEMPT WOODBURNING STOVE INSTALLATION & USER INSTRUCTIONS (TO BE LEFT WITH THE CUSTOMER) UK & IRELAND GUARANTEE
 UK & IRELAND GUARANTEE") 9/11 (PP) GUARANTEE CONDITIONS OF GUARANTEE Your ACQUISITIONS stove is guaranteed against defects arising from faulty manufacture for one year subject to the following express conditions. Failure to comply
9/11 (PP) GUARANTEE CONDITIONS OF GUARANTEE Your ACQUISITIONS stove is guaranteed against defects arising from faulty manufacture for one year subject to the following express conditions. Failure to comply
WELBURN DOUBLE SIDED MULTI-FUEL STOVE
 WELBURN DOUBLE SIDED MULTI-FUEL STOVE INSTALLATION AND USER INSTRUCTIONS Read these instructions carefully before installation and use. These instructions should be retained by the user for future reference.
Multi-fuel and SE models
 ENG OPERATION AND INSTALLATION MANUAL Multi-fuel and SE models Loxton 3 July 2016 1 Installation Manual and Operating instructions ENG Loxton 3 kw This manual refers to the stoves listed above, which are
MULTI-FUEL STOVE INSTALLATION AND USER INSTRUCTIONS
 PRIORY MULTI-FUEL STOVE INSTALLATION AND USER INSTRUCTIONS The Priory stove has a nominal heat output of 8Kw. and a weight of 80 kg. The flue gas mass flow is 5.4g/s for mineral fuel and 6.3g/s for wood
IN THE EVENT OF CHIMNEY FIRE, EVACUATE THE PROPERTY AND CALL THE EMERGENCY SERVICES.
 Ekol Clarity 12 INSTALLATION AND OPERATING INSTRUCTIONS. INTRODUCTION SAFETY Safety is the most important consideration when using and installing your stove. If not installed and used correctly, a house
WESTFIRE WF SERIES ONE & TWO
 WF series one & Two INSTALLATION MANUAL AND OPERATING INSTRUCTIONS 1 the art of danish engineering Westfire WF SERIES ONE Westfire WF SERIES TWO WF series ONE & Two This manual refers to the stove type
Saltfire ST4 INSTALLATION AND OPERATING INSTRUCTIONS.
 Saltfire ST4 INSTALLATION AND OPERATING INSTRUCTIONS. INTRODUCTION SAFETY Safety is the most important consideration when using and installing your stove. If not installed and used correctly, a house fire
Chew & Sheppey Multi-fuel and SE models
 Chew & Sheppey Multi-fuel and SE models 1 Installation Manual and Operating instructions Chew 4.6 kw, Sheppey 8 kw, This manual refers to the stoves listed above, which are tested in accordance with EN
(EN 13240/CE marked / Sintef)
") Installation and user s manual: TT40+TT40S + TT40W (99-272) Please read also the: SUPPLEMENTARY INSTALLATION INSTRUCTIONS FOR THE UK MARKET (last 6 pages) (EN 13240/CE marked / Sintef) Congratulations
Installation and user s manual: TT40+TT40S + TT40W (99-272) Please read also the: SUPPLEMENTARY INSTALLATION INSTRUCTIONS FOR THE UK MARKET (last 6 pages) (EN 13240/CE marked / Sintef) Congratulations
Dry Stove Installation Guide BK545. November 2012 Rev02. EN 13240:2001+ Amd. A2:2004
 Dry Stove Installation Guide BK545 EN 13240:2001+ Amd. A2:2004 November 2012 Rev02 Please read carefully through this installation guide before proceeding with installation of the stove. Should you have
OPERATION AND INSTALLATION MANUAL. Multi-fuel and SE models Loxton 3, 5, 6, 8 & 10 Churchill 5, 6, 8 & 10 Sqabox uno, duo
 OPERATION AND INSTALLATION MANUAL Multi-fuel and SE models Loxton 3, 5, 6, 8 & 10 Churchill 5, 6, 8 & 10 Sqabox uno, duo 1 Installation Manual and Operating instructions LOXTON 3kW LOXTON 5 kw, LOXTON
WoodBurningStove. Instalation&Operation Guide
 WoodBurningStove Instalation&Operation Guide Toensureyourstoveworkssafelyandeficiently,itisimportantthatthe instalationofyoursolidfuelstoveiscariedoutbyatrainedand competentinstaler. InstalationsmustcomplywithUKBuildingRegulations.
Supplementary Installation & Operation instructions for UK Market
 Supplementary Installation & Operation instructions for UK Market For use Morsø UK Stoves EN 13 240 & HETAS Ltd. Distributed by: Morsø UK Valley Drive Swift Valley Rugby, Warks CV21 1TW England MORSØ JERNSTØBERI
125SE SMOKE EXEMPT WOODBURNING STOVE INSTALLATION & USER INSTRUCTIONS (TO BE LEFT WITH THE CUSTOMER) UK & Ireland GB IE GUARANTEE
 UK & Ireland GB IE GUARANTEE") 12/09 GUARANTEE Conditions of Guarantee Your ESSE stove is guaranteed against defects arising from faulty manufacture for one year subject to the following express conditions. Failure to comply with these
12/09 GUARANTEE Conditions of Guarantee Your ESSE stove is guaranteed against defects arising from faulty manufacture for one year subject to the following express conditions. Failure to comply with these
HARVIA IRON STOVE Instructions for installation and use
 HARVIA IRON STOVE EN Instructions for installation and use Harvia 10 08012014VTT Congratulations on a good choice of fireplace and thank you for your confidence in Harvia s products. Read these instructions
HERALD COMPACT 5 Wood Burning Stove. Installation and Operating Instructions. JINHHC05WB RevA 27/04/12
 HERALD COMPACT 5 Wood Burning Stove Installation and Operating Instructions Herald Compact 5 Technical Specification Appliance Mass 95 kg Total Efficiency 76.0 % Nominal Heat Output 4.5 kw Mean CO Emission
LITTLE THURLOW MULTI-FUEL STOVE
 LITTLE THURLOW MULTI-FUEL STOVE INSTALLATION AND USER INSTRUCTIONS Read these instructions carefully before installation and use. These instructions should be retained by the user for future reference.
THORNTON DALE MULTI-FUEL STOVE
 THORNTON DALE MULTI-FUEL STOVE INSTALLATION AND USER INSTRUCTIONS Read these instructions carefully before installation and use. These instructions should be retained by the user for future reference.
O P E R A T I O N AND INST A L L A T I O N M A N U A L
 O P E R A T I O N AND INST A L L A T I O N M A N U A L OPUS TEMPO FIRED BY DESIGN Contents Disposal of packaging 3 Introduction 3 1 Description 3 2 General 3 3 Installation of the Stove 4 3.1 Flue pipe
Lighting Instructions
 SE DE NO FR DK FI IT NL Eldningsinstruktion 2 Heizinstruktionen 7 Fyringsinstruksjon 12 Instructions d allumage 17 Fyringsvejledning 22 Lämmitysohjeet 27 Istruzioni per l accensione 32 Stookinstructies
WESTFIRE WF ONE SERIES
 WF one series UK: INSTALLATION MANUAL AND OPERATING INSTRUCTIONS 1 dansk ingeniørkunst WF ONE SERIES This manual refers to the stove type listed above, which has been tested in accordance with EN13240.
How to use a multi fuel stove
 How to use a multi fuel stove Important!! When lighting the stove for the first time only a small fire should be lit. Too hot a fire will result in the paint emitting smoke - not necessarily bad but unpleasant.
HARROGATE WOODBURNING STOVE INSTALLATION AND USER INSTRUCTIONS
 HARROGATE WOODBURNING STOVE INSTALLATION AND USER INSTRUCTIONS Read these instructions carefully before installation and use. These instructions should be retained by the user for future reference. The
INSTALLATION AND USER INSTRUCTIONS
 WELBURN MULTI-FUEL STOVE INSTALLATION AND USER INSTRUCTIONS Read these instructions carefully before installation and use. These instructions should be retained by the user for future reference. The Welburn
Norvik 5 Multi-fuel stove 80% Efficient
 Installation & Operating Instruction Norvik 5 Multi-fuel stove 80% Efficient This stove is designed for intermittent use and is tested and manufactured as a closed multi-fuel appliance. Cast Tec recommend
CONTENTS. INSTALLATION INSTRUCTIONS Building regulations 4 Positioning and Clearances 4 Chimney 4 Flue connection 5 Problem solving 6 PRODUCT DATA
 PRODUCT DATA MODEL WEIGHT NOMINAL HEAT OUTPUT FB1 DS 80KG 6KWs CONTENTS OPERATING INSTRUCTIONS Lighting the fire 2 Firebox linings and baffle 2 Wood burning tips & theory 2 Running temperatures 3 Cleaning
Mod. MONTANA WOOD BURNING STOVE USAGE AND MAINTENANCE INSTRUCTIONS
 Mod. MONTANA WOOD BURNING STOVE USAGE AND MAINTENANCE INSTRUCTIONS Nutrients Ashes Fertilizer Wood: an ecological fuel Wood is a renewable source of energy which answers the energy and environmental demands
Saltfire ST3 INSTALLATION AND OPERATING INSTRUCTIONS.
 Saltfire ST3 INSTALLATION AND OPERATING INSTRUCTIONS. INTRODUCTION SAFETY Safety is the most important consideration when using and installing your stove. If not installed and used correctly, a house fire
Lighting Instructions
 SE DE NO FR DK FI IT NL GB Eldningsinstruktion 2 Heizinstruktionen 9 Fyringsinstruksjon 16 Instructions d allumage 23 Fyringsvejledning 30 Lämmitysohjeet 37 Istruzioni per l accensione 44 Stookinstructies
SALTBURN SMOKE CONTROL / DALBY SMOKE CONTROL WOOD BURNING STOVE INSTALLATION AND USER INSTRUCTIONS
 SALTBURN SMOKE CONTROL / DALBY SMOKE CONTROL WOOD BURNING STOVE INSTALLATION AND USER INSTRUCTIONS Read these instructions carefully before installation and use. These instructions should be retained by
Installation and Operating Instructions
 Heritage 5 (5kw) Woodburning Stove Installation and Operating Instructions Vesta Stoves. 197 Hesketh Lane. Tarleton. Lancashire. PR4 6AT Tel 01704 828067 1 2 Annual servicing 3 General Safety Advice Properly
ROSEDALE SMOKE CONTROL STOVE INSTALLATION AND USER INSTRUCTIONS
 ROSEDALE SMOKE CONTROL STOVE INSTALLATION AND USER INSTRUCTIONS Read these instructions carefully before installation and use. These instructions should be retained by the user for future reference. The
FIREWARM INSET STOVE FW5C. Installation and Operating Instructions
 FIREWARM INSET STOVE 5kW Nominal Output FW5C Installation and Operating Instructions Please hand these instructions to the stove user when the installation is complete. Leave the stove ready for operation
BLOOMSBURY SE INSTALLATION & USER INSTRUCTIONS. Smoke Exempt Multi-Fuel Stove (TO BE LEFT WITH THE CUSTOMER) UK & IRELAND
 UK & IRELAND") BLOOMSBURY SE Smoke Exempt Multi-Fuel Stove INSTALLATION & USER INSTRUCTIONS (TO BE LEFT WITH THE CUSTOMER) UK & IRELAND GB IE CONTENTS General Safety Notes Page 2 Operating Instructions Page 8 Installation
BLOOMSBURY SE Smoke Exempt Multi-Fuel Stove INSTALLATION & USER INSTRUCTIONS (TO BE LEFT WITH THE CUSTOMER) UK & IRELAND GB IE CONTENTS General Safety Notes Page 2 Operating Instructions Page 8 Installation
Installation and Operating Instructions
 Installation and Operating Instructions Wood-burning Stove Model: Ottawa 5kw INTRODUCTION Wood-burning Stove Item No.: Ottawa 5kw curve SAFETY Safety is the most important consideration when using and
Installation Instructions
 Installation Instructions For use in and IE only C i4 FS www.contura.eu 2 CERTIFICATE DECLARATION OF PERFORMANCE No. Ci4FS-CPR-130619-SE-1 PRODUCT Product type Type designation Manufacturing number Intended
OPERATING INSTRUCTIONS
 OPERATING INSTRUCTIONS SCANDIA 6304 2015 www.heta.dk UK 1 Congratulations on your new stove. We are sure that you will be happy with your investment, especially if you follow the advice and instructions
Installation Instructions
 Installation Instructions For use in GB and IE only C i4 www.contura.eu 82 CERTIFICATE EC Declaration of conformity www.contura.eu Manufacturer name address Place of manufacture NIBE AB/Contura Box 134,
T e l: Operating Instructions for the Dean Forge Hembury 6 & 8
 Dean Stoves Dean Forge Fabrication Ltd. Dean Prior, Buckfastleigh, Devon TQ11 0LS T e l: 0 1 3 6 4 6 4 3 5 7 4 w w w.d e a n f o r g e.c o.u k e m a i l: s t o v e s @ d e a n-f o r g e.c o.u k Operating
Alma Mons EN Owners s manual INSTALATION, ADJUSTMENT AND OPERATING INSTRUCTION
 Alma Mons Owners s manual INSTALATION, ADJUSTMENT AND OPERATING INSTRUCTION EN 12815 1 INTRODUCTION Congratulations! You have invested in energy efficient and high quality product-alma Mons wood burning
Saltfire ST-X5 INSTALLATION AND OPERATING INSTRUCTIONS
 Saltfire ST-X5 INSTALLATION AND OPERATING INSTRUCTIONS INTRODUCTION SAFETY Safety is the most important consideration when using and installing your stove. If not installed and used correctly, a house
BLOOMSBURY SE 8kW Smoke Exempt Multi-Fuel Stove
 BLOOMSBURY SE 8kW Smoke Exempt Multi-Fuel Stove INSTALLATION & USER INSTRUCTIONS (TO BE LEFT WITH THE CUSTOMER) UK & IRELAND GB IE CONTENTS General Safety Notes Page 2 Operating Instructions Page 9 Installation
Firestorm Stoves 10KW MULTI-FUEL STOVE INSTALLATION & USER INSTRUCTIONS. 10Kw 6.5Kw 4.5Kw
 Firestorm Stoves 10KW MULTI-FUEL STOVE INSTALLATION & USER INSTRUCTIONS 10Kw 6.5Kw 4.5Kw Firestorm Stoves Welcome Court, Unit 2 Bracewell Avenue, Poulton Business Park Poulton-Le-Fylde, Lancashire FY6
Installation Instructions
 Installation Instructions C750 C750A www.contura.eu 50 CERTIFICATE EC Declaration of conformity www.contura.eu Manufacturer name address Place of manufacture NIBE AB/NIBE STOVES Box 134, Skulptörvägen
Installation and Operating Instructions
 Installation and Operating Instructions Wood-burning Stove Model: Ottawa 7kw INTRODUCTION Wood-burning Stove Item No.: Ottawa 7kw SAFETY Safety is the most important consideration when using and installing
Inis Airc 6kw Room-heating Stove User and installation manual.
 Inis Airc 6kw Room-heating Stove User and installation manual. 1 Congratulations on the purchase of your new Inis Airc room-heating stove. We here at Inis Stoves truly love building high quality stoves
Installation Instructions
 Installation Instructions C 880 www.contura.eu 50 CERTIFICATE EC Declaration of conformity www.contura.eu Manufacturer name address Place of manufacture NIBE AB/NIBE STOVES Box 134, Skulptörvägen, SE-285
Installation Instructions
 Installation Instructions C 710 www.contura.eu 50 CERTIFICATE Declaration of performance according to Regulation (EU) 305/2011 No. C710-CPR-160329-SE-1 PRODUCT Product type Stove lit with solid biofuels
Reference: Ottawa 12kw Operating Instructions Version 1 04/06/15. Installation and Operating Instructions
 Reference: Ottawa 12kw Operating Instructions Version 1 04/06/15 Installation and Operating Instructions Wood-burning Stove Model: Ottawa 12kw Size: W580XD410XH610MM 1 INTRODUCTION Wood-burning Stove Item
User Instructions. Bronte Freestanding Woodburner
 1 User Instructions Bronte Freestanding Woodburner Firenzo Woodfires UK Limited The Dairy, Forton, Chard, Somerset, TA20 4HB. Phone: +44 (0) 1460 984570 Fax: +44 (0)1460 984620 firenzo@firenzo.co.uk www.firenzo.co.uk
500 MULTI - FUEL STOVE
 02/10 (PP) INSTR.ST-500MF/u GUARANTEE CONDITIONS OF GUARANTEE Your ESSE stove is guaranteed against defects arising from faulty manufacture for one year subject to the following express conditions. Failure
OPERATION AND INSTALLATION MANUAL OPUS TRIO FIRED BY DESIGN
 OPERATION AND INSTALLATION MANUAL OPUS TRIO FIRED BY DESIGN Contents Disposal of packaging 3 Introduction 4 1. Description 4 2. General 5 3. Installation of the Stove and the flue pipe connection 5 3.1.
OPERATING INSTRUCTIONS
 OPERATING INSTRUCTIONS SCAN-LINE 550 INSET STOVE www.heta.dk UK 1 2 tended to ensure that the materials used are of good quality, that the stove does not adversely affect the environment, and hat it is
APPENDIX TO THE INSTALLATION AND OPERATING MANUAL OF STOVEMAN SAUNA STOVE
 APPENDIX TO THE INSTALLATION AND OPERATING MANUAL OF STOVEMAN SAUNA STOVE Technical data of the sauna stove Sauna stove type Stoveman 16 Model Stoveman 16 Nominal heat capacity, i.e. ability to 17 kw heat
Dean Forge Fabrication Ltd. Dean Prior, Buckfastleigh, Devon TQ11 0LS. T e l:
 Dean Stoves Dean Forge Fabrication Ltd. Dean Prior, Buckfastleigh, Devon TQ11 0LS T e l: 0 1 3 6 4 6 4 3 5 7 4 w w w.d e a n f o r g e.c o.u k e m a i l: s t o v e s @ d e a n-f o r g e.c o.u k Operating
Saltfire ST2 INSTALLATION AND OPERATING INSTRUCTIONS.
 Saltfire ST2 INSTALLATION AND OPERATING INSTRUCTIONS. INTRODUCTION SAFETY Safety is the most important consideration when using and installing your stove. If not installed and used correctly, a house fire
T e l:
 Dean Stoves Dean Forge Fabrication Ltd. Dean Prior, Buckfastleigh, Devon TQ11 0LS T e l: 0 1 3 6 4 6 4 3 5 7 4 w w w.d e a n f o r g e.c o.u k e m a i l: s t o v e s @ d e a n-f o r g e.c o.u k Operating
CONSORT 7. CleanBurn Stove. Installation and Operating Instructions. JINCNS07 RevF 27/04/12
 CONSORT 7 CleanBurn Stove Installation and Operating Instructions Consort 7 Technical Specification Appliance Mass 111 kg Total Efficiency 75.9 % Nominal Heat Output 5.5 kw Mean CO Emission (@13% O 2 )
Asgård 7F User Manual Ecolabel - Sintef EN
 Asgård 7F User Manual Ecolabel - Sintef 110-0234 - EN 13240 www.aduro.dk Version 1 Good luck with your new wood burning stove! In order to get the best possible pleasure and benefit from your new Asgård
Dry Stove Installation Guide July 2014
 Dry Stove Installation Guide July 2014 BS EN 13240:2001 +A2:2004 CE BK545 Rev07 Arada Ltd July 2014 Please carefully read through the entirety of this installation guide before commencing installation.
Glás Non Boiler Insert
 Glás Non Boiler Insert Installation & Operating Instructions Table of content Page no: 1. Technical data................... 1/2 2. General Information. 3/6 3. Installation Instructions................
Asgård 3 / Asgård 4 / Asgård 6
 Asgård 3 / Asgård 4 / Asgård 6 User Manual Ecolabel - Sintef 110-0227 - EN 13240 www.aduro.dk Good luck with your new wood burning stove! In order to get the best possible pleasure and benefit from your
Installation Instructions
 Installation Instructions C810 www.contura.eu 50 CERTIFICATE Declaration of performance according to Regulation (EU) 305/2011 No. C810-CPR-130610-SE-1 PRODUCT Product type Stove lit with solid biofuels
Installation Instructions
 Installation Instructions C 780 www.contura.eu 50 CERTIFICATE PERFORMANCE DECLARATION No. C780-CPR-130612-SE-1 PRODUCT Product type Stove lit with solid biofuels Type designation Contura 780 Manufacturing
EKOL CRYSTAL-8 INSTALLATION AND OPERATING INSTRUCTIONS
 EKOL CRYSTAL-8 INSTALLATION AND OPERATING INSTRUCTIONS INTRODUCTION SAFETY Safety is the most important consideration when using and installing your stove. If not installed and used correctly, a house
Aduro 10. User Manual. Ecolabel - Sintef EN Version 2
 Aduro 10 User Manual Ecolabel - Sintef 110-0234 - EN 13240 www.aduro.dk Version 2 Congratulations with your new wood burning stove! In order to get the best possible pleasure and benefit from your new
AVALON 4. CleanBurn Stove Installation and Operating Instructions. JINAVA04 RevC 13/06/12
 AVALON 4 CleanBurn Stove Installation and Operating Instructions Avalon 4 Technical Specification Appliance Mass 88 kg Total Efficiency 78.0 % Nominal Heat Output 4.0 kw Mean CO Emission (@13% O 2 ) 0.44
Cassette stove installation guide
 Cassette stove installation guide BK605 EN 13229:2001 +A2:2004 Rev 04 Issue Date: 02/11/2018 Cassette stove installation guide Please carefully read through the entirety of this installation guide before
Installation Instructions
 Installation Instructions C 556 www.contura.eu 50 CERTIFICATE PERFORMANCE DECLARATION No. C556-CPR-130601-SE-2 PRODUCT Product type Stove lit with solid biofuels Type designation Contura 556 Manufacturing
CONSORT COMPACT. CleanBurn Stove Installation and Operating Instructions. JINCNC05 RevF 27/04/12
 CONSORT COMPACT 5 CleanBurn Stove Installation and Operating Instructions Consort Compact 5 Technical Specification Appliance Mass 95 kg Total Efficiency 76.0 % Nominal Heat Output 4.5 kw Mean CO Emission
CONSORT 5. CleanBurn Stove. Installation and Operating Instructions. JINCND05 RevG 14/05/14
 CONSORT 5 CleanBurn Stove Installation and Operating Instructions Consort 5 Technical Specification Appliance Mass 85 kg Total Efficiency 78.0 % Nominal Heat Output 4.0 kw Mean CO Emission (@13% O 2 )
OPERATION AND INSTALLATION MANUA L OPUS TEMPO
 OPERATION AND INSTALLATION MANUA L OPUS TEMPO 0 FIRED BY DESIGN 1 Contents Disposal of packaging 4 Introduction 4 1 Description 4 2 General 4 3 Installation of the Stove 5 3.1 Flue pipe connection 5 3.2
WOOD BURNING STOVES. Installation and Operating Instructions
 WOOD BURNING STOVES IOJ IOJ IOJ O IOJ IOJ IOJ IOJ IOJ IOJ O IOJ IOJ IOJ Installation and Operating Instructions IMPORTANT Installation MUST ONLY be carried out by a Gas Safe registered engineer/installer
Dry Stove Installation Guide
 Dry Stove Installation Guide August 2017 BS EN 13240:2001 +A2:2004 CE BK545 Rev09 Arada Ltd August 2017 Please carefully read through the entirety of this installation guide before commencing installation.
FIRENZO HASTINGS MULTIFUEL STOVE
 P a g e 1 INSTALLATION AND OPERATION INSTRUCTIONS FIRENZO HASTINGS MULTIFUEL STOVE Firenzo have been making stoves of the highest quality for over 35 years in New Zealand. Pioneers in manufacturing stoves
Installation and Operation Manual
 Installation and Operation Manual This installation and operation guide covers evolution 5 woodburning stove* *Exempt for use in smoke control areas when burning wood THIS APPLIANCE MUST BE INSTALLED AND
T e l: Operating Instructions for the Dean Forge Clearburn Range (Excluding Junior and Junior SE)
") Dean Stoves Dean Forge Fabrication Ltd. Dean Prior, Buckfastleigh, Devon TQ11 0LS T e l: 0 1 3 6 4 6 4 3 5 7 4 w w w.d e a n f o r g e.c o.u k e m a i l: s t o v e s @ d e a n-f o r g e.c o.u k Operating
Dean Stoves Dean Forge Fabrication Ltd. Dean Prior, Buckfastleigh, Devon TQ11 0LS T e l: 0 1 3 6 4 6 4 3 5 7 4 w w w.d e a n f o r g e.c o.u k e m a i l: s t o v e s @ d e a n-f o r g e.c o.u k Operating
Installation instruction
 Installation instruction C 35T-Low www.contura.eu 82 CERTIFICATE PERFORMANCE DECLARATION No. C35TL-CPR-130618-SE-1 PRODUCT Product type Type designation Manufacturing number Intended area of use Fuel Stove
FGi, FXi & FPi 5 Taper INSET STOVE. Installation and Operating Instructions
 FGi, FXi & FPi 5 Taper INSET STOVE 5 kw Nominal Output With Patented TTi Air System Installation and Operating Instructions Please hand these instructions to the stove user when the installation is complete.
Dean Forge Fabrication Ltd. Dean Prior, Buckfastleigh, Devon TQ11 0LS. T e l:
 Dean Stoves Dean Forge Fabrication Ltd. Dean Prior, Buckfastleigh, Devon TQ11 0LS T e l: 0 1 3 6 4 6 4 3 5 7 4 w w w.d e a n f o r g e.c o.u k e m a i l: s t o v e s @ d e a n-f o r g e.c o.u k Operating
USAGE AND MAINTENANCE MANUAL FOR A SOLID FUEL STOVE
 PREDUZEĆE ZA PROIZVODNJU, PROJEKTOVANJE I PROMET BELOŠEVAC BB, 14000 VALJEVO, SRBIJA USAGE AND MAINTENANCE MANUAL FOR A SOLID FUEL STOVE DEAR CUSTOMER, Congratulations on your purchase of BLIST solid fuel
Installation & User Manual EW5000 Outdoor Cooking Fire
 Installation & User Manual EW5000 Outdoor Cooking Fire IMPORTANT: Please read this manual before installing and using the ESCEA EW5000 Cooking fire. Failure to follow these instructions may lead to a possible
DIANA EN Owners s manual INSTALATION, ADJUSTMENT AND OPERATING INSTRUCTION. Available in ceramic and metalsheet version.
 DIANA Owners s manual INSTALATION, ADJUSTMENT AND OPERATING INSTRUCTION Available in ceramic and metalsheet version. EN 13240 1 INTRODUCTION Congratulations! You have invested in energy efficient and high