The Three Rivers Baptist Association Staff
|
|
|
- Damon Bruce
- 6 years ago
- Views:
Transcription


1

2 Dear Church Leader, Thank you for your work to expand God s Kingdom through evangelism. As your partner, the Three Rivers Baptist Association is excited to offer our churches the choice between 3 Block Party Trailers to assist in reaching out to your communities. The Block Party Trailers are a great resource for all types of evangelistic events. Our churches have used the trailers for church neighborhood block parties, outreach festivals, backyard Bible Clubs, and to support outreach events such as Vacation Bible School. Through your support we are able to offer these ministry resources for $100 per usage for 2 of our trailers and $125 for the large trailer. The usage fee covers insurance, ongoing maintenance, supplies and content replacement. We also require a $100 deposit in addition to the rental fee. This deposit is refundable upon return of the trailer in proper condition and keys turned into our office. This manual is designed to give you all the information needed to conduct a successful block party or evangelistic event. Please give us a call if you have any questions. We look forward to celebrating the harvest with you and your ministry team as we spread the Gospel in this area and beyond. Our Blessings to You, The Three Rivers Baptist Association Staff Randy Bradley Tom Capps Denise Sudduth Paige Andrews

3 Table of Contents 4 Purpose & Description 5 Contract Example 6 Planning & Preparation 7-9 Check In & Check Out Sheet Samples Inflatables Instructions 15 Canopy Tents 16 Snow Cone Machine 17 Popcorn Machine 18 Cotton Candy Machine 19 Take Down & Packing Up 20 Highlights Form Block Party Trailer pick-up Trailers are located at: Three Rivers Baptist Association Mission Center 4305 Locust Hill Road Taylors, SC (864)


4 Purpose and Description The Block Party Trailers are a ministry tool provided by the Three Rivers Baptist Association through its member churches. Evangelistic block parties provide great opportunities for churches to provide a variety of platforms to share the Gospel and cultivate relationships in the community. Three Rivers Baptist Association churches may use this trailer for the purpose of evangelism. Individuals are not eligible. Trailer A: 15ft. Inflatable Bounce House 18ft. Inflatable Slide 2 blowers for inflatables Popcorn machine Cotton candy machine Sno-cone machine Supplies 1 canopy Ext. Cords Rental Cost: $125 Deposit required (refundable): $100 Trailer B: 15ft. Inflatable Bounce House 1 blower for inflatable Popcorn machine Cotton candy machine Sno-cone machine Supplies 1 canopy Ext. Cords Rental Cost: $100 Deposit required (refundable): $100 Trailer C: 15 ft. Inflatable Bounce House 1 blower for inflatable Popcorn machine Cotton candy machine Sno-cone machine Supplies 2 canopies Ext. Cords Rental Cost: $100 Deposit required (refundable): $100 4

5
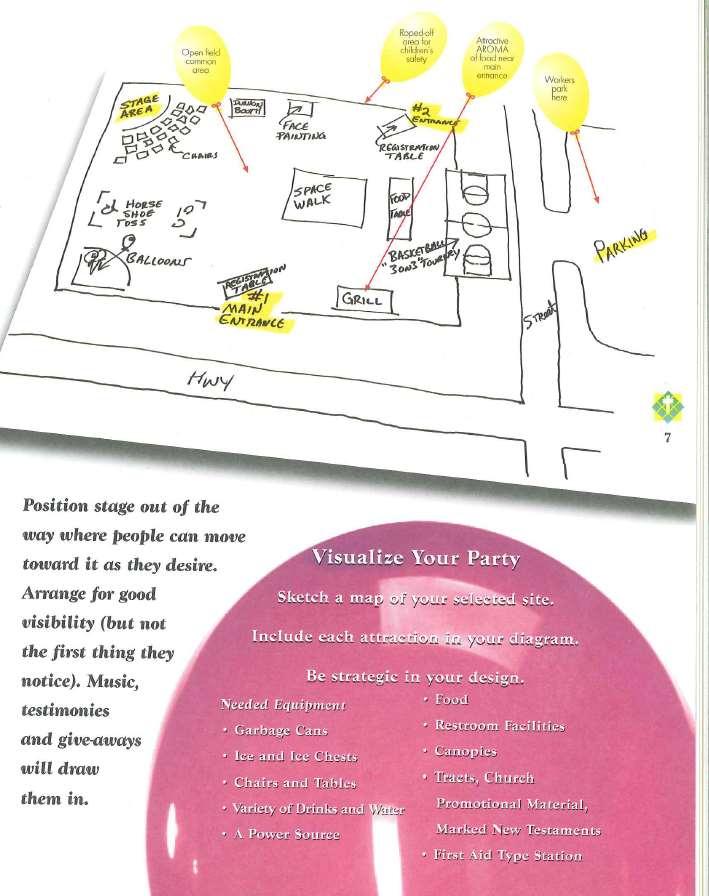
6 Planning & Preparation What do I need to do to use the Block Party Trailers? Step 1: Reserve the Date Contact Three Rivers Baptist Association office and check availability. We will then provide you with a Block Party Contract Agreement by , US mail, or you may pick it up at our office. Step 2: Confirm the Reservation Complete the Block Party Contract Agreement and send it along with payment: $125 usage fee for trailer A (this fee includes supplies for 200 people) *additional supplies may be purchased: $25 for each additional 100 people $100 usage fee for trailers B and C (this fee includes supplies for 200 people) *additional supplies may be purchased: $25 for each additional 100 people Step 3: Pick up the trailer Trailers are located at: Three Rivers Baptist Association Mission Center 4305 Locust Hill Road Taylors, SC What will I need to transport the trailer? 1. Make sure the transport vehicle meets the following requirements: A. Tow vehicle: Truck, van or car with a 6 cylinder engine and trailer hitch. B. Hitch: 2 in. ball hitch-minimum class 2 (trailers B and C) C. Hitch: 2 5/16 in. ball hitch-minimum class 2 (trailer A) C. Light Connection: standard 7 pin factory connection D. Trailer brakes: the trailer is equipped with hydraulic brakes Proof of Insurance & the trailer registration are located inside door of the trailer Step 4: fill out the Block Party Highlights Form These forms are located in sleeve on the inside door of the trailers. Place form back in sleeve. Step 5: Return the trailer to proper location The Block Party Trailer should be returned properly cleaned & properly reloaded. If any equipment, equipment parts, etc. are missing or any damage has been done to the trailer or its contents, the using church will be responsible. Step 6: Please send the Three Rivers Baptist Association office pictures or highlights by to paige@threeriversba.org 6
7 Check Out & Check In Sheet for block party trailer A Have a person keeping track of what is coming off and placed back in the trailer so that nothing Check Out 15 Inflatable Bounce House 18 Inflatable Slide Bounce House operation equipment Popcorn Machine Popcorn Supplies Snow Cone Machine Snow Cone Supplies Cotton Candy Machine Cotton Candy Supplies (1) 10 x10 Folding Canopy Ext. Cord Check In 15 Inflatable Bounce House 18 Inflatable Slide Bounce House operation equipment Popcorn Machine Popcorn Supplies Snow Cone Machine Snow Cone Supplies Cotton Candy Machine Cotton Candy Supplies (1) 10 x10 Folding Canopy Ext. Cord 7
8 Check Out & Check In Sheet for block party trailer B Have a person keeping track of what is coming off and placed back in the trailer so that nothing Check Out 15 Inflatable Bounce House Bounce House operation equipment Extension Cord Popcorn Machine Popcorn Supplies Snow Cone Machine Snow Cone Supplies Cotton Candy Machine Cotton Candy Supplies (1) 10 x10 Folding Canopy Check In 15 Inflatable Bounce House Bounce House operation equipment Extension Cord Popcorn Machine Popcorn Supplies Snow Cone Machine Snow Cone Supplies Cotton Candy Machine Cotton Candy Supplies (1) 10 x10 Folding Canopy 8
9 Check Out & Check In Sheet for block party trailer C Have a person keeping track of what is coming off and placed back in the trailer so that nothing Check Out 15 Inflatable Bounce House Bounce House operation equipment Extension Cord Popcorn Machine Popcorn Supplies Snow Cone Machine Snow Cone Supplies Cotton Candy Machine Cotton Candy Supplies (2) 10 x10 Folding Canopies Check In 15 Inflatable Bounce House Bounce House operation equipment Extension Cord Popcorn Machine Popcorn Supplies Snow Cone Machine Snow Cone Supplies Cotton Candy Machine Cotton Candy Supplies (2) 10 x10 Folding Canopies 9
10 15 Inflatable Bounce House Setup, Takedown Operation Guide (photos posted inside trailer) How to Set-up 1) Check ground for a flat level surface void of any rocks, sticks, pine cones, etc. (Anything that may puncture the bottom of the Inflatable). Also check height clearance for trees, power lines, or overhead obstructions. Tarps should be placed underneath all Inflatables before proceeding to Step 2. (Never operate the Inflatable on a hard surface without under padding (i.e. tarp).) 2) Unroll the Inflatable in the direction you wish the Inflatable to face. 3) Unfold and Attach the Blower (s) to the Port (extended air hose / blower tube). The Port is generally located in the very back or on the sides of the Inflatable. Tie off any additional Ports by turning the material clockwise and tying the Port to itself. (Rope can also be used to close off additional Ports. Some Inflatables allow you to tuck away additional ports). 4) Close All Velcro / Zipper compartments. 5) Attach heavy extension cord (s) from power source. (Designate One 20 amp fuse for each Blower. Generally, this equates to One 110-volt Outlet for each Blower.) Use 14 gauge or heavier extension cord (s) that extend No More than 100 feet from the Inflatable to the power source. (The lower the gauge number, the thicker the cord. Most household / garden extension cords are 16 gauge (Not Sufficient enough) and can harm the blower- reducing the air source to the Inflatable.) 6) Turn the Power on. (Some Blowers have an On/Off switch located on the blower.) While the Inflatable inflates- Check to make sure no air is escaping vents or ports. 7) Check to make sure the Port (air hose) leading to the Blower is not twisted. 8) Secure the Inflatable by staking the unit on all 4 corners. Drive stakes half way in at a 45 degree angle away from the inflatable. For larger Inflatables tie-outs will need to be staked. Safety Instructions / Operation 1) Adult supervision is required at all times. Never leave the Inflatable unattended or unwatched. 2) Most Inflatables only allow 4-5 Guests on the Inflatable at a time. (Check Inflatable Instructions) 3) Guest must remove shoes, pocket items, glasses, jewelry, etc. 4) Diving and flipping are strictly prohibited. No back flips, roughhousing, horseplay or bouncing against walls. Guests should not take unnecessary risks. 5) No food, drink, or gum on or in the inflatable. *The Inflatable should not be operated if winds exceed 20 mph. *The Inflatable should not be used in rain or lightning conditions. 10

 Fully Unroll")
")
 Stake each corner")

11 15 ft. Inflatable Bounce House 1) Layout tarp 2) Fully Unroll Inflatable on top of tarp and unfold 3) Completely Spread Out 4) Stake each corner (some 5) Attach Blower to Blower units use straps) 6) Turn Blower on and Inflate 11
12 18 ft. Inflatable Slide How to Takedown 1) Check for any loose items left on the Inflatable. (Sweep or vacuum where appropriate.) 2) All Guests should be clear of Inflatable- Including: stakes, flagging, weight bags, etc. 3) Turn Off or Unplug Blower. Disconnect the Blower from the Inflatable. 4) Open All Velcro / Zipper Flaps, Vents, and Ports to allow air to escape and the Inflatable to deflate. Deflation time varies on the Inflatable (10 20 minutes). How to Roll an Inflatable The Key to a Good Roll is to fold the material neatly in to the middle of the Inflatable. 1) Fold all material toward the middle of the Inflatable and find the bottom seams of the Inflatable. 2) Fold the Inflatable like a large bed sheet. Be sure to tuck all colorful designs inside your folds to avoid contact with the ground. 3) Fold sides in 2-3 feet lengthwise. 4) Continue to fold Inflatable from the outside-in until folded layers overlap leaving a fold of 2-3 feet. 5) Tuck in any extra material. (Leave Ports out to allow air to escape as you roll.) 6) Walk air out of the Inflatable by walking on the Inflatable towards the Port (Blower tube). (Doing so pushes air and allows air to escape.) 7) Where the Inflatable roll is to end- tuck in rope or strap 2-3 feet underneath Inflatable that is to be used for tying. (Doing so will allow you to not lift the entire roll to tie off.) 8) Begin rolling from the furthest point away from the Port (Blower tube). (Doing so pushes air to escape as you roll.) Roll as tightly as possible. Keep the roll lined up, tuck any in extra material, and do not allow any part of the roll to sag. Slack rolls are difficult to move. Take your time and roll it tight. 9) Tuck in Ports (Blower tubes). 10) Tie off roll with rope or strap. Tuck in hoses and any extra material. Place in bag when applicable. (Placing in a Bag: Turn Inflatable to a standing position, pull bag from the top d own to ground level. Rotate Inflatable in bag for transportation.) 12


 and")
13 18 ft. Inflatable Slide Folding Instructions Step 1: Make sure the inside is clean Step 2: Fold Material neatly before deflating. Deflate middle. towards Step 3: Walk out air towards Ports (Blower tubes). Step 3a: Fold the Inflatable lengthwise and walk out air towards Ports (Blower tubes). Helpful hint: Have two people roll from one side to the other. Step 4: Roll tight, keep the roll lined up and tuck in any extra material. Step 5: Tuck in Ports (Blower tubes) and tie off roll. Step 6: Place in Bag while Inflatable is "Standing". Step 7: Place Inflatable on hand truck and load in trailer. 13
14 Safety Check This model does not require daily, monthly or yearly inspection, however, once inflated and before use, inspect the inflatable inside and out for the following: Holes, tears, rips and punctures. Check all seams for separations, especially bounce house floors. Make sure all netting and windows are secure and in place. Make sure all attachable items such as pop-ups and basketball hoops are secure. Re-inspect for mold and mildew. Make sure the inflatable has been cleaned and sanitized with a disinfectant cleaner. Make sure door is unobstructed. Check inflation tube(s).make sure they are clear and undamaged. Re-inspect blower, electrical cords, components, plugs, switches and insulation. Make sure they are undamaged, in good condition and all electrical components are grounded properly with no exposed contracts. Make sure the correct blower is matched to this inflatable model. Check bolts and screws of blower to make sure they are tight and properly installed. Make sure guards are in place over inlets and outlets. Make sure blower is positioned properly on a level, flat ground area, away from faucets or water hazards and not placed to be a tripping hazard. Make sure anchoring is consistent with the anchoring instructions in this manual. Make sure the blower is plugged into a GFCI 110v outlet only. Make sure inflatable is fully inflated and not sagging or drooping. Make sure blower and inflatable is at least 20FT away from utility lines. Check to make sure anchors are secure and the straps are taught, attached securely and are not damaged or frayed. Make sure adult supervision is in place and present before allowing users into the inflatable. It is recommended that a supervisor trained in CPR be on premise at all times when the inflatable is in use. Make sure local police, fire and emergency medical service phone numbers are clearly displayed on premises and all supervisors are aware of them. Make sure supervisor explains all posted safety rules to users before they enter. Make sure supervisor groups users by relative size to each other. Large weight disparities among both children and adults are not safe. If inflatable is being used outside, and directly exposed to the sun in hot weather, make sure supervisor monitors the temperature inside he unit for excessive heat. In addition, surface temperatures for dry slides should be monitored as well to prevent possible skin burns. Discontinuation of Operation 1) Ensure that all the users have exited the inflatable and have the left play area. 2) Inspect the inside of the inflatable and remove any loose articles, objects or debris. 3) Wipe down and clean the bounce floor and inside area with a disinfectant cleaner. 4) Empty any water from water units while still inflated and allow the unit to continue to run until dry. Wipe down and thoroughly dry water inflatables with soft cloths. 5) Turn off, and unplug blower, inflatable will deflate. 6) If removing from location for transport and storage, disconnect blower from inflatable. 7) Make sure as much air is squeezed out as possible. 8) Once product is fully deflated, roll up unit according to Take Down instructions. 14

15 Canopies NOTE: You must have 4 people, one for each leg, to set up and take down the portable tents. If you do not then you will risk breaking the tent. Setup: 1. Remove the tent from the bag and stand it up. 2. With 4 people, one for each leg, walk the tent out so that it opens to its make size. 3. All together begin to raise the height of the tent by pulling up on legs and pressing buttons. 4. Once the tent is at its max height, stake it down where you desire to have it. The stakes are in tent bags. Take Down: 1. Reverse steps

16 How to use Snow Cone Machine 16

17 How to use Pop Corn Machine 17
 4. Turn on MOTOR switch. 5. Turn on HEAT switch. 6.")
18 How to use Pop Cotton Candy Machine Operating Instructions 1. Plug unit into a properly grounded 120 volt power supply. 2. Be sure to keep hands and loose clothing away from the spinning head. 3. Fill spinning head with desired amount of sugar floss (1/8 cup = an average cone) 4. Turn on MOTOR switch. 5. Turn on HEAT switch. 6. Once the head heats up floss will begin to melt and create cotton candy. 7. Using a paper cone collect the cotton candy from the edges of the bowl in a circular motion. 8. Repeat steps 3-7 until the desired amount of cotton candy has been produced. 9. Turn OFF motor and heat switches when finished making cotton candy. Cleaning 1. Make sure unit is unplugged and has had time to cool down before cleaning. The COTTON CANDY MACHINE breaks down to body, bowl, dome, and extractor head for easy cleaning. 2. After excessive build up of sugar in the extractor head, unplug the unit. Remove the extractor head by disconnecting it from the unit. Allow the extractor head to soak in hot water for at least 15 minutes. Let dry and replace on the unit. 2. Remove bowl and dome and wash with soap and water. Use wash cloth to wipe clean and let dry. 3. Use a slightly damp, non-abrasive sponge or non-abrasive towel to wipe clean the outside of the unit, wipe with a non-abrasive towel to dry. Do not use excessive water when cleaning this unit. 18
19 Block Party Trailers Take Down and Packing Up Notes ***Very Important Note: If your event was rained out and the tents, Bounce Houses & Slide became wet during the event, you must find a place where they can dry out before folding them back up. If you do fold them back up wet they will mold. 1. Make sure everything is dry and clean before returning equipment to trailer. 2. Have a person checking back in all the equipment that was taken out of the trailer so that nothing is lost or accidently taken. 3. Make sure everything is in its proper place in the trailer and secured down tightly so that it will not move during the transportation of the trailer. Remember: Do not leave the trailer a mess. Other people will be using the trailer after you, leave it in the same condition you would like to receive it. 19
20 Highlights Form Please fill out and return to three Rivers Baptist Association Office Report of Damaged Equipment or Missing Equipment, parts, etc Comments: 20
21 The following pages are from the SC Baptist Convention. Tips on How to Host an Evangelistic Block Party.

22

23

24

25
26

27

28

29

30

31

32
Physical Address: Mailing Address: Phone: for Block Party Information: Block Party Trailer User Manual
 Physical Address: 881-A Tigerville Road Travelers Rest, SC 29690 Mailing Address: PO Box 215 Travelers Rest, SC 29690 Phone: (864)834-9635 Email for Block Party Information: paige@threeriversba.org Block
Trailer Inventory: Check Out & Check In
 Trailer Inventory: Check Out & Check In It is very important to make sure you have a person keeping track of what is coming off and placed back in the trailer so that noting is lost or accidently taken
Block Party Trailer General Instructions
 Block Party Trailer General Instructions Name: Church: The Block Party Trailer is an evangelistic/mission tool, providing the basic resources needed to conduct special fellowships, outreach, or family
Hamilton County Baptist Association & Tennessee Baptist Convention BLOCK PARTY TRAILER. Operation and Procedure Manual
 Hamilton County Baptist Association & Tennessee Baptist Convention BLOCK PARTY TRAILER Operation and Procedure Manual GENERAL INFORMATION This manual is intended to help you have a productive evangelistic
INSTANT GARAGE MODEL NO: CIG81224 ASSEMBLY INSTRUCTIONS PART NO: ORIGINAL INSTRUCTIONS
 INSTANT GARAGE MODEL NO: CIG81224 PART NO: 3503578 ASSEMBLY INSTRUCTIONS ORIGINAL INSTRUCTIONS GC1117 INTRODUCTION Thank you for purchasing this CLARKE Instant Garage. When erected, the CIG81224 garage
OWNER'S MANUAL CAMPOUT TABLE OF CONTENTS
 OWNER'S MANUAL CAMPOUT RV Before operating the awning, carefully review the Owner's Manual. The manual contains important safety information, detailed operating instructions, common maintenance procedures
FISH CAT SCOUT OWNER S MANUAL
 FISH CAT SCOUT OWNER S MANUAL ALWAYS WEAR A COAST GUARD APPROVED FLOTATION DEVICE WHEN OPERATING THE FISH CAT SCOUT. Know the limits of your abilities and the limits of your equipment. Changes in air temperature
OWNER'S MANUAL AWNING EXTEND R TABLE OF CONTENTS
 OWNER'S MANUAL AWNING EXTEND R RV Before operating the awning, carefully review the Owner's Manual. The manual contains important safety information, detailed operating instructions, common maintenance
STEALTH PRO OWNER S MANUAL
 STEALTH PRO OWNER S MANUAL ALWAYS WEAR A COAST GUARD APPROVED FLOTATION DEVICE WHEN OPERATING THE STEALTH PRO. Know the limits of your abilities and the limits of your equipment. Changes in air temperature
10 X 20 X 8 Dome Canopy
 10 X 20 X 8 Dome Canopy Warning Keep all flame and heat sources away from this tent fabric. Refer to labels for flamability specification. It is not fire proof. The tent fabric will burn if left in continuous
OWNER S MANUAL AND WARRANTY FORM
 OWNER S MANUAL AND WARRANTY FORM Jet Tent F25-25DX manual.indd 1 WARNING Never use any fuel-burning products (stoves, lanterns, heaters, etc.) inside or within proximity of this tent. Use of fuel-burning
OWNER'S MANUAL CAMPOUT TABLE OF CONTENTS
 OWNER'S MANUAL CAMPOUT RV Before operating the awning, carefully review the Owner's Manual. The manual contains important safety information, detailed operating instructions, common maintenance procedures
OPERATOR INSTRUCTION MANUAL INCLUDING REPAIR PARTS FOR MODULAR GENERAL PURPOSE TENT SYSTEM (MGPTS) TYPE I
 TYPE I") OPERATOR INSTRUCTION MANUAL INCLUDING REPAIR PARTS FOR MODULAR GENERAL PURPOSE TENT SYSTEM (MGPTS) TYPE I Johnson Outdoors Gear, Inc. Eureka! branded tent products 625 Conklin Road Binghamton, NY 13903
OPERATOR INSTRUCTION MANUAL INCLUDING REPAIR PARTS FOR MODULAR GENERAL PURPOSE TENT SYSTEM (MGPTS) TYPE I Johnson Outdoors Gear, Inc. Eureka! branded tent products 625 Conklin Road Binghamton, NY 13903
Wall Tent Set Up & Care Instructions
 Wall Tent Set Up & Care Instructions Congratulations on the purchase of your new Colorado Tent! Your Wall Tent frame includes color coded poles for easy set up. Wall (Side) Poles: Red Roof / Rafter Poles:
π H-3505 GARAGE CANOPY PARTS SAFETY uline.com TOOLS NEEDED 10' X 20' X 8'
 π H-3505 GARAGE CANOPY 10' X 20' X 8' 1-800-295-5510 uline.com TOOLS NEEDED Safety Glasses Wrench or Socket 9/16" or 14mm Tape Measure Phillips Screwdriver Rubber Mallet PARTS Cables x 5 2-way Corner Foot
1.1 F.D.N.Y. Designation Inflatable Soft Landing Mat. 1.5 Weight Landing Mat...80 lbs. Blower Unit...80 lbs. Figure 1
 T.B. ROPE 1 DATA SHEET 4 March 8, 2007 1. DESCRIPTION 1.1 F.D.N.Y. Designation Inflatable Soft Landing Mat 1.2 Material Use Vinyl Coated Nylon 1.3 Size 10' x 10' x 2½' 1.4 Motor/Blower Unit 110 Volts A.C./12
FORM (Apr. 2006)
") 2212 Slcier MODEL 2212 SLICER MODEL 2212 ML-136132 701 S. RIDGE AVENUE TROY, OHIO 45374-0001 937 332-3000 www.hobartcorp.com FORM 35215 (Apr. 2006) Installation, Operation, and Care of MODEL 2212 Slicer
2212 Slcier MODEL 2212 SLICER MODEL 2212 ML-136132 701 S. RIDGE AVENUE TROY, OHIO 45374-0001 937 332-3000 www.hobartcorp.com FORM 35215 (Apr. 2006) Installation, Operation, and Care of MODEL 2212 Slicer
WARNING USING AND CARING. for use in extreme or varied soil conditions. For optional sand pegs Oztent recomends use of a Bluescrew Oztent Edition.
 OWNER S MANUAL WARNING Never use any fuel-burning products (stoves, lanterns, heaters, etc.) inside or within proximity of this tent. Use of fuel-burning products inside or within proximity of this tent
OWNER S MANUAL. ezup.com. 13 x 13 (4.0m x 4.0m) 10 x 10 (3.0m x 3.0m) 16 x 16 (5.0m x 5.0m)
 10 x 10 (3.0m x 3.0m) 16 x 16 (5.0m x 5.0m)") Shown: Aero Dome with optional awning, sidewall and custom graphics OWNER S MANUAL 10 x 10 (3.0m x 3.0m) 13 x 13 (4.0m x 4.0m) 16 x 16 (5.0m x 5.0m) ezup.com THANK YOU THANK YOU FOR PURCHASING YOUR AERO
Shown: Aero Dome with optional awning, sidewall and custom graphics OWNER S MANUAL 10 x 10 (3.0m x 3.0m) 13 x 13 (4.0m x 4.0m) 16 x 16 (5.0m x 5.0m) ezup.com THANK YOU THANK YOU FOR PURCHASING YOUR AERO
LBH18BPK. Instruction Sheet
 LBH18BPK Instruction Sheet Included: 1. Backpack (includes belt and pouch) 2. Bottle and Hose Attachment Assembly 3. 1 each disposable 1.5 gallon Chemical Storage Bag 4. 1 each 1.5 gallon Warm Water Cleanout
10 X20 Dome Garage ITEM #: G Dimensions: 10ft. Wide x 20ft. Deep x 8ft. Center Height
 10 X20 Dome Garage ITEM #: G10208 Dimensions: 10ft. Wide x 20ft. Deep x 8ft. Center Height WARNING: Keep all flame and heat sources away from this tent fabric. It is not fire proof The fabric will burn
User Guide. 12ft (3.66m) ZorbPOD. with 15.5ft (4.72m) wide enclosure. Got a Problem building your trampoline? Call us on and we can help
 ZorbPOD. with 15.5ft (4.72m) wide enclosure. Got a Problem building your trampoline? Call us on and we can help") User Guide 12ft (3.66m) ZorbPOD with 15.5ft (4.72m) wide enclosure Got a Problem building your trampoline? Call us on 0344 800 4060 and we can help Patent no: DE602006006495D1, EP1721640B1 and US7628731
User Guide 12ft (3.66m) ZorbPOD with 15.5ft (4.72m) wide enclosure Got a Problem building your trampoline? Call us on 0344 800 4060 and we can help Patent no: DE602006006495D1, EP1721640B1 and US7628731
User s Manual Trampoline 8
 User s Manual Trampoline 8 Model! WARNING Read all precautions and instructions in this manual before using this equipment. Save this manual for future reference. Maximum user weight 17 lbs. ASSEMBLY IMPORTANT
Owner s Manual Truck Bed Tent
 Owner s Manual Truck Bed Tent Important! For safe and proper assembly, use, and care, read and follow all instructions. Everyone who uses this tent should first read this manual. 120810 www.kodiakcanvas.com
10 ft / 3m 10 ft / 3m INSTANT CANOPY ITM. /ART ASSEMBLY INSTRUCTIONS IMPORTANT, RETAIN FOR FUTURE REFERENCE: READ CAREFULLY
 10 ft / 3m 10 ft / 3m INSTANT CANOPY ITM. /ART. 966761 ASSEMBLY INSTRUCTIONS IMPORTANT, RETAIN FOR FUTURE REFERENCE: READ CAREFULLY Please check with your local regulations prior to purchasing this item.
Rhino-Rack Sunseeker II Base Tent (32119)
") Important: Please read these instructions carefully prior to installation. Please refer to your fitting instruction to ensure that the roof racks are installed in the correct locations. Check the contents
Important: Please read these instructions carefully prior to installation. Please refer to your fitting instruction to ensure that the roof racks are installed in the correct locations. Check the contents
Installation Guide: Round Trampoline
 Trampolines & trampoline parts designed to survive in the harsh Oz climate. www.oztrampolines.com.au Installation Guide: Round Trampoline Safety Tips Here at Oz Trampolines we are passionate about your
Contents. AFTER SALES SUPPORT / KB-8085
 Contents 02 Introduction 03 General Information and Safety Instructions 05 Assembly and Parts List 07 Getting Started 08 Other Useful Information 10 Warranty Card Introduction 1 2 Congratulations! You
OHENRY SECTIONAL TENT INSTRUCTIONS
 INSTRUCTIONS Please follow these instructions carefully so your new Ohenry tent will be installed correctly. The pictures are based on installing a Traditional Pole Type Tent, but also apply to High Peak
PIONEER LITE PATIO AWNING OWNER'S MANUAL
 A Manual Crank Operated Awning RV OWNER'S MANUAL TABLE OF CONTENTS Introduction... 2 Operating the Awning... 3 To Open the Awning:... 3 Adjusting the Pitch... 4 Rain Release Setting... 4 Setting the Arms
General Purpose Shelter
 General Purpose Shelter 0' x 0' x ' ( x x. m) ASSEMBLY MANUAL Model NO.: - Tools required for assembly (not included) TM TABLE OF CONTENTS Important safety instructions... Intended use... Parts list......
Garden Party 13ft X 13ft 12ft 9in Wide x 12ft 9in Deep x 6ft3in Side Height / 10ft4in Center Height
 Garden Party 13ft X 13ft 12ft 9in Wide x 12ft 9in Deep x 6ft3in Side Height / 10ft4in Center Height King Canopy Item #: GP1313 With 4 Legs, Foot Pads, Cover & Screens. Distributed by: PIC America, LTD.
PIONEER LITE PATIO AWNING
 A Manual Crank Operated Awning RV OWNER'S MANUAL Before operating the awning, carefully review the Owner's Manual. The manual contains important safety information, detailed operating instructions, common
Kontrol Kube Advanced Owners Manual
 Mobile Containment. Simplified. TM Kontrol Kube Advanced Owners Manual KONTROL KUBE www.kontrolkube.com 800.343755 1 IMPORTANT SAFETY INFORMATION SAVE THESE INSTRUCTIONS. CAREFULLY READ AND FOLLOW THESE
Installation and User s Manual 12 x 10 MOTORIZED AWNING
 12 x 10 MOTORIZED AWNING Installation and User s Manual 12 x 10 MOTORIZED AWNING 088-1763-0 Stop Please read and understand this manual before any assembly or use of this product. Before beginning assembly
VACATION'R A ROOM FOR VERTICAL ARM AWNINGS
 VACATION'R A ROOM FOR VERTICAL ARM AWNINGS RV Made of durable, lightweight polyester material - the same material used for tents. Does not require hardware that is attached to the RV. No rafters to install.
Manufactured in our state of the art factory in China
 IMPORTANT We strongly suggest setting up your new tent before going camping to insure that all parts are present and to familiarize yourself with the tents assembly. This will have a great effect on how
WARNING USING AND CARING
 OWNER S MANUAL WARNING Never use any fuel-burning products (stoves, lanterns, heaters, etc.) inside or within proximity of this tent. Use of fuel-burning products inside or within proximity of this tent
TRAVEL-SMART AWNING SERIES » LYNX 200 LOW TOP « Model No Issue:October Document-No.: LYNX 200 LOW TOP. Top Quality Camping
 TRAVEL-SMART AWNING SERIES» LYNX 200 LOW TOP «Document-No.: LYNX 200 LOW TOP Issue:October 2016 Model No 12010322450000. Top Quality Camping WELCOME Thank you for purchasing this Westfield Outdoors awning.
Voice Mail: (815) Fax: (815) OWNERS MANUAL
 Fax: (815) OWNERS MANUAL") www.countryhomescampers.com Email: info@countryhomescampers.com Voice Mail: (815) 346 3337 Fax: (815) 346 3337 OWNERS MANUAL Introduction: Your Country Homes Camper has been engineered and built with a
www.countryhomescampers.com Email: info@countryhomescampers.com Voice Mail: (815) 346 3337 Fax: (815) 346 3337 OWNERS MANUAL Introduction: Your Country Homes Camper has been engineered and built with a
10 Economy Popup Tent
 10 Economy Popup Tent ZM-TNT-ECO-3MX3M The Zoom Tent is great for outdoor fairs, exhibitions, sporting events and arenas, concerts, festivals and more. Strong, solid, stable, wind-resistant & durable.
Eaton ET Hydraulic Hose Saw INSTRUCTION MANUAL
 Eaton ET9100-07-110 Hydraulic Saw INSTRUCTION MANUAL INSTRUCTION MANUAL Eaton ET9100-07-110 Hydraulic Saw Table of Contents Introduction... 3 Old Method... 3 New Eaton Method... 3 Operation... 4 Operation
USER MANUAL PLEASE READ AND UNDERSTAND THIS MANUAL COMPLETELY BEFORE USE.
 Self-inflating Foam Mattress USER MANUAL PLEASE READ AND UNDERSTAND THIS MANUAL COMPLETELY BEFORE USE. Warning & Safety Information Keep the mattress well away from naked flames and sharp objects. DO NOT
Solar Power Shade INSTRUCTION MANUAL
 INSTRUCTION MANUAL 20 June 2006, Revision Initial Release 26 September 2006, version 2 Powerfilm, Inc. 2337 230th Street Ames, IA 50014 (515) 292-7606 Web Site: www.powerfilmsolar.com Table of Contents
Meat Slicer INSTRUCTION MANUAL CAUTION! ONE YEAR LIMITED WARRANTY
 ONE YEAR LIMITED WARRANTY INSTRUCTION MANUAL The original registered owner of this product should contact SKYFOOD EQUIPMENT LLC at 305-868-16 for any warranty problems or service. SKYFOOD EQUIPMENT LLC
OWNER'S MANUAL FREEDOM AWNINGS
 OWNER'S MANUAL FREEDOM AWNINGS RV PATIO, WINDOW AND OTD AWNINGS Freedom Patio Awning Freedom Window and OtD Awnings Special Note: This manual provides a basic description of the product and the standard
Assembly and Installation Instructions
 U.S. patent number 8,708,369 part number 4750 for Blue Ox tow bars with Blue Ox brackets, Demco tow bars with Demco brackets, and all motorhome-mounted ROADMASTER tow bars Assembly and Installation Instructions
» GEMINI 390 CARAVAN«
 TRAVEL-SMART AWNING SERIES» GEMINI 390 CARAVAN«Model No. 12010223900000 Document-No.: FC-90015-390 Issue:October 2015 Top Quality Camping WELCOME Thank you for purchasing your Westfield awning. Please
MAX Series 9514 OPERATOR S MANUAL
 MAX Series 9514 OPERATOR S MANUAL Persons under age 18 are not permitted to operate or have accessibility to operate this equipment per U.S. Dept. Of Labor Employment Standards Administration Fact Sheet
SIGNATURE EDITION OWNER S MANUAL
 JV SIGNATURE EDITION OWNER S MANUAL WARNING Never use any fuel-burning products (stoves, lanterns, heaters, etc.) inside or within proximity of this tent. Use of fuel-burning products inside or within
Assembly instructions for Eurotramp trampolines Series: Ultimate, Grand Master Exclusiv, Grand Master, Master
 Assembly instructions for Eurotramp trampolines Series: Ultimate, Grand Master Exclusiv, Grand Master, Master 1. Assembly instructions 2. Attaching the plastic coated steel cables on the Ultimate frame
BR B Bike Rack Instructions
 IMPORTANT NOTE: It is common that vehicles with lids and hatches have a single rear wiper. It is important that you make yourself aware that the wiper cannot be used while the rack is attached to the vehicle.
» AQUILA 320(HIGH TOP) «
 «") PERFORMANCE SERIES» AQUILA 320(HIGH TOP) «Model No. :12020253200000 Document-No.: FC-90037 Issue: November 2015 Top Quality Camping WELCOME Thank you for purchasing your Westfield Aquila 320 awning.please
PERFORMANCE SERIES» AQUILA 320(HIGH TOP) «Model No. :12020253200000 Document-No.: FC-90037 Issue: November 2015 Top Quality Camping WELCOME Thank you for purchasing your Westfield Aquila 320 awning.please
OHENRY 1-PIECE TENT INSTALLATION INSTRUCTIONS INSTRUCTIONS. Instructions for Ohenry one piece top Traditional Pole Tents & High Peak Pole Tents
 OHENRY 1-PIECE INSTRUCTIONS Please follow the steps in these instructions carefully to ensure your new Ohenry tent is installed correctly. TENT INSTALLATION INSTRUCTIONS Instructions for Ohenry one piece
14' x 32' x 12' Round Top Round Style Shelter Assembly Instructions
 14' x 32' x 12' Round Top Round Style Shelter Assembly Instructions Description Model # 14' x 32' x 12' RoundTop Garage - Gray 62669 Recommended Tools Please read instructions COMPLETELY before assembly.
Installation Instructions Part # 2784 Awning
 Please read instructions entirely before installing this product. Parts Included Qty Parts Included Qty 1 Flat Washer (U-Bolt) 4 L Bracket 2 Nylock Nut ( U-Bolt) 4 Stake with Cord 2 6mm x 1 Bolt/Nut 10
INSTALLATION INSTRUCTIONS
 GENUINE PARTS INSTALLATION INSTRUCTIONS 1. DESCRIPTION: Hatch Tent 2. APPLICATION: See dealer application chart 3. PART NUMBER: 999T7 XR100 and 999T7 XY100 4. KIT CONTENTS: Item Qty Description A 1 Tent
SAFETY GUIDELINES FOR DIY TENTS
 SAFETY GUIDELINES FOR DIY TENTS Please read carefully and fully before starting assembly of the tent 1. The installer is solely responsible for evaluating the site and proper securing method determined.
FEATURES & BENEFITS OF THE TOW PRO LITE :
 To Protect & Preserve PRODUCT MANUAL & FITTING GUIDE tow pro lite TYPE: SEMI - FIT EACH TOW PRO LITE COMES WITH THE FOLLOWING : 16 side securing straps & buckles (8 either side) 1 HITCH STRAP & buckles
Assembly and Installation Instructions
 U.S. patent number 8,708,369 part number 4750 for Blue Ox tow bars with Blue Ox brackets, Demco tow bars with Demco brackets, and all motorhome-mounted ROADMASTER tow bars Assembly and Installation Instructions
Butler Personnel Parachute Systems, LLC
 Butler Personnel Parachute Systems, LLC 1820 Loudon Avenue NW PO Box 6098 Roanoke, VA 24017-0098 (540) 342-2501 (540) 342-4037 (FAX) Info@butlerparachutes.com Butler Personnel Parachute Systems Back Pack
ROOFBAG CAR TOP CARRIER INSTALLATION BOOKLET
 ROOFBAG CAR TOP CARRIER INSTALLATION BOOKLET RoofBag s unique and versatile design fits cars WITH Roof Rack or WITHOUT Roof Rack. Congratulations on your purchase! You can rest assured your decision was
Greenhouse 10ft X 10ft 9ft4in Wide x 10ft3in Deep x 5ft4in Side Height / 7ft10in Center Height
 Greenhouse 10ft X 10ft 9ft4in Wide x 10ft3in Deep x 5ft4in Side Height / 7ft10in Center Height These Tools Are Recommended: King Canopy Item #: GH1010 With 6 Legs, Cover, Elastic Ball Straps & Foot Pads.
MYRIAD Banner Stand is a trademark of Skyline Exhibits. Patent Pending PN32294-B. MYRIAD Banner Stand
 is a trademark of Skyline Exhibits Patent Pending 1.1 1. Banner Stand Setup 1.1 Remove banner stand from standard case or Arrive Portable Display & Workstation and assemble pole. 1.2 Insert pole into base
The Bubble Blaster sprayer tip. UL listed plug. water hose attachment. easy access to sprayer tips
 The Bubble Blaster 3000 sprayer tip UL listed plug water hose attachment easy access to sprayer tips wide shot of sprayer tips and easy access door sprayer tip access aluminum mesh rear view of machine
WARNING: Read these materials prior to assembling and using this trampoline and enclosure
 All Weather Cover Assembly, Installation, Care, Maintenance & Use Instructions VERSION 1.2 WARNING: Read these materials prior to assembling and using this trampoline and enclosure * O92 Model Shown Do
EVENT TENT HUMANITY TENT ASSEMBLY INSTRUCTIONS
 EVENT TENT HUMNITY TENT EN SSEMBLY INSTRUCTIONS 1 EN CONTENT / SCOPE OF DELIVERY ENGLISH MNUL Scope of delivery........................ 18 Instructions for use / Safety warnings.. 19 Setting up your Event
2-N-1 Expandable 12ft X 20ft / 20ft x 20ft 19ft7in Wide x 20ft Deep x 10ft3in Center Height (12x20) / 11ft7in Center Height (20x20)
 / 11ft7in Center Height (20x20)") 2-N-1 Expandable 12ft X 20ft / 20ft x 20ft 19ft7in Wide x 20ft Deep x 10ft3in Center Height (12x20) / 11ft7in Center Height (20x20) King Canopy Item #: EX1220 With 8 Legs, Cover with Leg Skirts (12x20
2-N-1 Expandable 12ft X 20ft / 20ft x 20ft 19ft7in Wide x 20ft Deep x 10ft3in Center Height (12x20) / 11ft7in Center Height (20x20) King Canopy Item #: EX1220 With 8 Legs, Cover with Leg Skirts (12x20
THE EDGE12 SLICER. MODEL EDGE12-2 (220/50/1 voltage) FORM (July 2012) EDGE12 SLICER
 FORM (July 2012) EDGE12 SLICER") EDGE12 SLICER THE EDGE12 SLICER MODEL EDGE12-1 (120/60/1 voltage) EDGE12-2 (220/50/1 voltage) ML-136246 ML-136247 701 S. RIDGE AVENUE TROY, OHIO 45374-0001 937 332-3000 www.hobartcorp.com FORM 35283 (July
EDGE12 SLICER THE EDGE12 SLICER MODEL EDGE12-1 (120/60/1 voltage) EDGE12-2 (220/50/1 voltage) ML-136246 ML-136247 701 S. RIDGE AVENUE TROY, OHIO 45374-0001 937 332-3000 www.hobartcorp.com FORM 35283 (July
USER MANUAL FLEXI Tent&Trailer Comfort
 USER MANUAL FLEXI Tent&Trailer Comfort CONGRETULATIONS! By choosing a Combi-Camp tenttrailer, you have made a choice for quality and sustainablilty. We hope you will have lots of careless holidays with
Gerjak Dear Customer, You will find below information that includes: Is the caravan rail in order? Is everything in place?
 Gerjak Dear Customer, We would like to wish you much pleasure with your new Gerjak product. We very much appreciate that you have chosen our product! Following are some hints and tips to give you pleasure
VACATION'R A ROOM FOR VERTICAL ARM AWNINGS 2015 & ON
 RV VACATION'R A ROOM FOR VERTICAL ARM AWNINGS 2015 & ON Before operating the awning, carefully review the Owner's Manual. The manual contains important safety information, detailed operating instructions,
SPIRITFX, FIESTA AND SIMPLICITY
 OWNER'S MANUAL MANUAL PATIO AWNING RV SPIRITFX, FIESTA AND SIMPLICITY Table of Contents Introduction... 2 Operation... 3 Opening the Awning... 3 Adjusting the Pitch... 4 Rain Release Setting... 4 Setting
Maintenance 45 Serie CAUTION. Before resetting your electronic card that displays an error code.
 29-10-2013 CAUTION Before resetting your electronic card that displays an error code. Error Code H Service the stove COMPLETELY as described in this manual. Check the chimney pipe. Error Code O Service
Rooftop Tent Owners Manual
 WWW.SMITTYBILT.COM Installation Instructions Part # 2783 Overlander Tent Rooftop Tent Owners Manual Read instruction manual entirely before assembling and installing this product. The Smittybilt Overlander
SlimShady CONTENTS. SlimShady (1X) Tools Required: nut (4X) stake (2X) bolt (4X) wrench (1X) washer (4X) clamps (2X) stake sack (1X) key (2X)
 Tools Required: nut (4X) stake (2X) bolt (4X) wrench (1X) washer (4X) clamps (2X) stake sack (1X) key (2X)") SlimShady Tools Required: CONTENTS nut (4X) stake (2X) stake sack (1X) bolt (4X) wrench (1X) washer (4X) key (2X) SlimShady (1X) clamps (2X) 1 ASSEMBLE & INSTALL Be sure the awning is oriented correctly
SlimShady Tools Required: CONTENTS nut (4X) stake (2X) stake sack (1X) bolt (4X) wrench (1X) washer (4X) key (2X) SlimShady (1X) clamps (2X) 1 ASSEMBLE & INSTALL Be sure the awning is oriented correctly
WATER-POCKET CAUTION
 Must Be Securely Anchored At All Times RAIN WARNING Do not leave unattended in continuous precipitation as water can pocket and cause frame damage. Material is water resistant however we recommend using
CAPRI PLUS. Instruction Manual. 28' x 38' Including sidewall and connector instructions.
 CAPRI PLUS Instruction Manual 28' x 38' Including sidewall and connector instructions STOP Prior to installing any tent, always make sure you check for overhead and underground obstructions! For safe assembly,
Item # BJ2PC With 8 Leg Frame, Cover, and Enclosure Kit with Windows Size: 10 8 Wide x 20 Long (Side Height 6 8 ) (Center Peak Height 9 9 )
 (Center Peak Height 9 9 )") Item # BJ2PC With 8 Leg Frame, Cover, and Enclosure Kit with Windows Size: 10 8 Wide x 20 Long (Side Height 6 8 ) (Center Peak Height 9 9 ) Powell & Powell Supply Company, L.L.C. Manufactured by: 1730
Item # BJ2PC With 8 Leg Frame, Cover, and Enclosure Kit with Windows Size: 10 8 Wide x 20 Long (Side Height 6 8 ) (Center Peak Height 9 9 ) Powell & Powell Supply Company, L.L.C. Manufactured by: 1730
FT054 BearMountain OWNER'S MANUAL
 FT054 BearMountain 10'x10'x84"(H) OWNER'S MANUAL PAT PENDING o 145 145 PENDING PAT o PAT PENDING 145 o 145 PENDING PAT o 145 o PENDING PAT 12 11 10 155 PAT PENDING o Assembly instructions IMPORTANT We
4.2 Assembly Instructions
 4.2 Assembly Instructions 4.2.1 Assembly of Reserve Canopy. Assembly of Reserve Canopy using Rapide Links. After inspecting the Parachute and the Wings Harness/Container System, hang or lay the parachute
USER S MANUAL LT EN
 TRAMPOLINE ENCLOSURE FOR 13FT TRAMPOLINE WITH 4 LEGS Assembly, Installation, Care Maintenance, and Use Instructions USER S MANUAL LT-6005-156+EN WARNING THE TRAMPOLINE ENCLOSURE IS ONLY TO BE USED AS AN
3x3 Pop Up Gazebo with Side Panels
 '-,- 3x3 Pop Up Gazebo with Side Panels Assembly Instructions - Please keep for future reference 650/1974 Width - 3m Depth - 3m Height - 270cm ~ Important: Make sure all the guy ropes and ~ pegs are used,
Required Tools: Phillips screw driver to remove original soft top. Torx sockets are required to completely remove the original soft top hardware.
 RAMPAGE P R O D U C T S Installation Instructions Part number 1098XX, Frameless Soft Top for 4 door Jeep Wrangler JK 2007- NOTE: Installation of the top in warm weather is optimal for ease of installation.
OWNER'S MANUAL FREEDOM WM PATIO AWNING
 OWNER'S MANUAL FREEDOM WM RV PATIO AWNING Special Note: This manual provides a basic description of the product and the standard operating controls provided by Carefree of Colorado. Some Original Equipment
Air Mattress. Model No.: EAM-DQ1 & EAM DT1. Questions or Concerns? (855)
") Air Mattress Model No.: EAM-DQ1 & EAM DT1 Questions or Concerns? (855) 686-3835 support@etekcity.com Thank You. Thank you for purchasing the EAM-DQ1/EAM-DT1 Air Mattress by Etekcity. We are dedicated to
Air Mattress Model No.: EAM-DQ1 & EAM DT1 Questions or Concerns? (855) 686-3835 support@etekcity.com Thank You. Thank you for purchasing the EAM-DQ1/EAM-DT1 Air Mattress by Etekcity. We are dedicated to
Garden Party 10ft X 10ft 10ft Wide x 10ft Deep x 6ft3in Side Height / 9ft7in Center Height
 Garden Party 10ft X 10ft 10ft Wide x 10ft Deep x 6ft3in Side Height / 9ft7in Center Height King Canopy Item #: GP1010 With 4 Legs, Foot Pads, Cover & Screens. Distributed by: PIC America, LTD. 1730 Five
Globe Slicer Safety Tips
 Globe Slicer Safety Tips TO AVOID SERIOUS PERSONAL INJURY: NEVER touch this slicer without training and authorization from your supervisor or if you are under 18 years old. Read this instruction manual
LODGE 460 CABIN. Part No ASSEMBLY & CARE INSTRUCTIONS
 LODGE 460 CABIN Part No. 920645 ASSEMBLY & CARE INSTRUCTIONS SPECIFICATIONS PRE USE Size: 460L x 360W x 240H cm Material: Heavy duty polycotton blend Walls: 250g/m2 Roof: 340g/m2 Windows: 6 Side & Rear
APEX BASE-CAMP TENT. User HandBook. Warning:
 By UNDERCOVER APEX BASE-CAMP TENT User HandBook Warning: KEEP ALL FLAME AND HEAT SOURCES AWAY FROM THIS GAZEBO FABRIC. This Gazebo is made with fabric that meets CPAI-84 Specifications for flame resistance.
Caravan Notes. Contents. Caravan_User_Notes.doc Page 1 10/01/18
 Contents Caravan_User_Notes.doc Page 1 10/01/18 Contents 1 Important 2 General notes 3 Towbar 3 Rear support legs 4 Severy hatch-cover 4 Rear doors / storage area 5 Front storage box 6 Inside the cabin
Instructions: PermaPRO
 Instructions: PermaPRO WARNING! Cover for storage use only. Do not occupy the RV while cover is on the RV. Do not run the RV engine with the cover on. WARNING! Installation is best done with two people
10' x 20' MAX AP CANOPY Assembly Instructions
 10' x 20' MAX AP CANOPY Assembly Instructions Description Model # 10' x 20' MAX AP Canopy - 8 Leg - White 30522 Recommended Tools Please read instructions COMPLETELY before assembly. This shelter MUST
TRAVEL-SMART AWNING SERIES »LYRA 4 « Family Tent. Model No. HW Document-No.: HW Issue: August Top Quality Camping
 TRAVEL-SMART AWNING SERIES»LYRA 4 «Family Tent Model No. HW-60136-1 Document-No.: HW-60136-1 Issue: August 2015 Top Quality Camping WELCOME Thank you for purchasing your Lyra 4. Please read these instructions
BT013 Redleg 3 7 x7 x52 (H)
") BT03 Redleg 3 7 x7 x52 (H) IMPORTANT We strongly suggest setting up your new tent before going camping to insure that all parts are present and to familiarize yourself with the tents assembly. This will
BT03 Redleg 3 7 x7 x52 (H) IMPORTANT We strongly suggest setting up your new tent before going camping to insure that all parts are present and to familiarize yourself with the tents assembly. This will
1612P MODEL 1612P SLICER MODEL EXECUTIVE OFFICES 701 RIDGE AVENUE TROY, OHIO FORM (4-95)
") 1612P MODEL 1612P SLICER MODEL 1612P ML-104587 EXECUTIVE OFFICES 701 RIDGE AVENUE TROY, OHIO 45374-0001 FORM 19370 (4-95) Installation, Operation, and Care of MODEL 1612P SLICER SAVE THESE INSTRUCTIONS
1612P MODEL 1612P SLICER MODEL 1612P ML-104587 EXECUTIVE OFFICES 701 RIDGE AVENUE TROY, OHIO 45374-0001 FORM 19370 (4-95) Installation, Operation, and Care of MODEL 1612P SLICER SAVE THESE INSTRUCTIONS
ASSEMBLY & CARE INSTRUCTIONS
 ASSEMBLY & CARE INSTRUCTIONS 7 x TRAILER TENT SERIES 3 9 Part No. FT3711 - on road FT3923 - off road OPTIONAL SUNROOM Wall and floor kit Part No. FT3723 - on road FT39 - off road OPTIONAL SPARE ROOM Roof,
USER MANUAL FLEXI Tent&Trailer Comfort
 USER MANUAL FLEXI Tent&Trailer Comfort CONGRETULATIONS! By choosing a Combi-Camp tenttrailer, you have made a choice for quality and sustainablilty. We hope you will have lots of careless holidays with
Color Light Streams Lighted Bubbler Spillway Pot (CLSDLP) Installation Manual
 Installation Manual") Color Light Streams Lighted Bubbler Spillway Pot (CLSDLP) Installation Manual 27.75 23.75 25.50 20.75 Specifications: 8-13 GPM 12-14 VAC only (Class 2 transformer required) 3W max. 100 ft. cord, conduit
Color Light Streams Lighted Bubbler Spillway Pot (CLSDLP) Installation Manual 27.75 23.75 25.50 20.75 Specifications: 8-13 GPM 12-14 VAC only (Class 2 transformer required) 3W max. 100 ft. cord, conduit
Assembly Instructions
 ShadeLogic Quick Clamp Canopy Tilt-Mount Table Top Pop Up Assembly Instructions Fits Any Table up to 10' Table Not Included Description Model # 7'4" x 10' Quick Clamp Canopy 14553 Please read instructions