Four Grand Mere Wood Fired Ovens Imported by
|
|
|
- Ashlyn Liliana Garrison
- 6 years ago
- Views:
Transcription
1 ! Four Grand Mere Wood Fired Ovens Imported by Bread Stone Ovens, LLC Petal St. Suite 250 Dallas, Tx U.S.A Instruction for ovens: 700 Neapolitan-B-C, 800 B-C, 950 B-C, 1030 C, 1350 B-C, 1500 Lateral and Short B-C, 1200 B-C and 1400 B-C Manufactured by Four Grand Mere 2 rue de la Gare, Jeanmenil FRANCE This unit was tested and listed to UL , UL , ULC-S627-00, and NSF ANSI e by OMNI-Test Laboratories Report Number: 508-D-01-2 Assembly Instructions READ ALL INSTRUCTIONS BEFORE INSTALLING AND USING THE APPLIANCE A MAJOR CAUSE OF OVEN-RELATED FIRES IS FAILURE TO MAINTAIN REQUIRED CLEARANCES (AIR SPACES) TO COMBUSTIBLE MATERIALS. IT IS OF UTMOST IMPORTANCE THAT THIS OVEN BE INSTALLED ONLY IN ACCORDANCE WITH THESE INSTRUCTIONS.
2 If this oven is not properly installed, a fire may result. To reduce the risk of fire, follow the installation instructions. Contact local building or fire officials about restrictions and installation inspection requirements in your area. Please read this entire manual before you install the oven. Failure to follow instructions may result in property damage, bodily injury, or even death. Do not use products not specified for use with this oven. For your safety it is important that you instal all of the components of the oven according to the instructions: oven floor, oven dome, flue connector, top and bottom insulation and the cast iron door. Prior to installing your oven, you should consult with the authorities having jurisdiction such as but not limited to municipal building department, fire department, fire prevention bureau, to determine the need to obtain a permit. The Oven Stand: The stand should be made of masonry or steel. The concrete slab supporting the stand should be 8 inch wider and 4 inches deeper than the external dimension of the oven. The concrete slab must be build according to your local building code and be able to support the weight of the oven, support materials such as the stand and any finish. The vertical support walls are usually made of cinder blocks and the top of the stand or table is 4 (102mm) concrete slab with rebar. CAUTION! ALL CONSTRUCTION MUST BE IN COMPLIANCE WITH YOUR LOCAL BUILDING CODE To calculate the final height of the oven s cooking floor, just add 5 (127mm) to the top of your stand. For example for 52 (1321 mm) height cooking floor, you will build 43 (1092 mm) height of cinder block, 4 (102 mm) of concrete slab for the table and then put you oven with 5 (127mm).!
3 When using the metal stand provided by Four Grand Mere or Bread Stone Ovens, before installing any part of the oven on the stand: Step 1- Insert the metal legs into the metal stand. The metal feet must facing inside the metal stand Step 2- Place the stand in the up-right position and using the provided bolts, tighten the the bolts to secure the legs into place Step 3- The stand must be bolted to a concrete slab using the pre-drilled halls in the legs (concrete fastener not provided) WARNING! DO NOT OBSTRUCT THE SPACE BENEATH THE OVEN. The cooking floor: When handling the insulation you must wear appropriate eye, respiratory and skin protection as it may get itchy. To use the oven in the best condition, the floor of the oven must be insulated with the provided ceramic fiber boards. The two 1 (25mm) ceramic fiber boards are place on top of the table to create a 2 thick insulation pad. The fiber boards can be easily cut with a box cutter knife. Step 1- Position the insulation exactly where your want your oven to be and so the oven is centered on the stand. Please make sure to crisscross the boards joint to provide better insulation. Fig. 1 and 1 bis Step 2- Cut the front wires of the front part of the oven floor those are positioned directly under the bricked part of the oven floor. Do not cut the wires to the side of the of the oven floor. Fig. 2 Step 3- Place the concrete part of the oven on the insulation so it is centered on the insulation and the stand. Fig. 3 Do not use any of the joint mortar so the floor can expend and retract freely. Make sure the oven floor lays flat on the insulation with no high nor low points. Fig. 4 Step 4- Tie the 2 pieces of the oven floor with the built in metal wires. Fig. 5 Step 5- Install the pre-cut red refractory bricks. The first brick is a full one placed front and center of the oven bricked entry. Place one number 1 on the left of it and the second number 2 to the right. Then number 3 and 4 on each side. Continue placing full bricks and installing the bricks in numerical orders. One extra full brick is provided as a spare. Neither joint compound nor mortar is to be placed between each brick. If one brick was to be lower than the others, you may put a little joint compound with sand to level it. Fig. 6, 7, 8, 9, 10 Step 6- At the circumference of the oven floor, where the brick and the concrete meet, file in the gap with the provided joint compound mixed with sand (1 part compound 3 parts sand). Fig. 11
4 The dome: Step 1- Mix the joint compound with water, 1 part water for 3 part compound mix, to obtain a plaster like texture. No sand is used in the mix. The joint mix will air dry. If the mix is too thick, add some water. If too wet, let the water evaporate or add a little more of the dry compound powder. Step 2- Place about 1 (25mm) wide by 1/8 (3 mm) thick of the compound on the concrete floor perimeter. Fig. 12 Step 3- Place the rear part of the dome first, to be flush with the rear part of the floor. Fig. 13 Step 4- Place the joint compound on the inside of the groove of the dome where the front piece will rest. No more than 1/8 (3 mm) thick. Fig. 14 Step 5- Place the front part of the dome against the rear part of the dome. The grooves are to overlap. Make sure the front part of the dome is 3 ( 75mm ) away front the brick landing front of the floor. Fig. 15 Step 6- Using a sponge at the end of a broom handle, clean any joint compound that may have fell inside the oven or was squeezed out during the assembly. Never partially nor entirely should anyone enter the inside of the oven. Step 7- Using the metal wires, tie the different dome pieces together. The Bricked Arch: Step 1- Place the compound mix about 1/8 (3 mm) thick on the front part of the dome where the bricked arch will be placed. Fig. 16 Step 2- Place the bricked arch against the front part of the dome and ensure it is flush with the bricked oven earth. Fig. 17 Step 3- Tie down the metal wires between the 2 dome parts and the bricked arch and the dome to securely retain the 3 pieces together. Fig. 17 Step 4- Fill in the joint of the dome and the bricked arch with the left over compound mix. Fig. 18 The Chimney: Step 1- Place the provided flue connector with the shut-off valve on top the oven dome. Line up the 2 whole in the flue connector to the 2 built in screws and mark the area around the flue connector with a pencil. Fig. 19 Step 2- Remove the flue connector and place ½ (13 mm) wide by 1/8 (3 mm) thick of joint compound over the pencil mark. Place the flue connector over the joint compound and bolt it securely with the provide bolts. Fig. 20
5 You must use the proper chimney connector to connect the oven flue connector to the chimney exhaust. The chimney connector and chimney pipe must be a UL 103 chimney of 6 (152 mm) packed double wall for Neapolitan, 700 and 800 type ovens. Chimney must be of 8 (203 mm) diameter double wall packed for oven type 950 and larger. The chimney pipe must fit tightly with the oven flue connector. Do not connect this unit to a chimney flue serving another appliance. For Canada: Chimney must be 8 (203 mm) packed pipe up to and through pass through of oven enclosure. See diagram bellow. CAUTION! USING MAKE-SHIFT COMPROMISE DURING INSTALLATION MAY RESULT IN FIRE, IMPROPER SMOKE EXHAUST AND SEVER INJURIES OR DEATH. CAUTION! THE CHIMNEY MUST USED MUST BE SUITABLE FOR SOLID FUEL WARNING! THE CHIMNEY CONNECTOR MUST BE IN GOOD CONDITION AND KEPT CLEAN For the rest of the chimney or exhaust pipe it is important to refer to your local building code to ensure compliance. The oven must not support more than 250 lb (150kgs). This load must be supported by the oven dome and not the bricked arch. A requirement that a chimney connector shall not pass through an attic or roof space, closet, or similar concealed space, or a floor, or ceiling. Where passage through a wall, or partition of combustible construction is desired, the installation shall conform to CAN/CSA-B365, Installation Code for Solid-Fuel-Burning Appliances and Equipment. For Canada, Chimney pipe must be minimum 6 (152 mm) for 700 and 800 type oven and 8 (203 mm) for any other oven, packed pipe up to and through pass through. The Cast Iron Oven Door: The oven may be equipped with the door part number AC6 or door part number AC61. The door is installed using the provide screw and threaded metal insert built into the bricked arch. We recommend for the door to be installed once the installation is completed to avoid damage. Also wait that your oven is cured before installing the door as the evaporating moisture may generate unusual rusting. The door once tightly installed will help prevent water from getting inside the oven if exposed to the elements. We recommend keeping the door closed when the oven is not in use. Refer to the User Guide for instruction on using the door.
6 The Dome thermometer: One hole has been bored on the right side of the oven to receive the thermometer. The thermometer stem should never be bent or modified in any sort. Fig. 21 The thermometer should be installed so the reading gauge is flush with the outside finish decoration. If you plan on heating your oven to above 400C or 752F, we recommend you remove the thermometer to prevent damaging it. Top Insulation: WARNING! DO NOT PACK REQUIRED AIR SPACES WITH INSULATION OR OTHER MATERIALS. When handling the insulation you must wear the appropriate eye, respiratory and skin protection as it may get itchy. For the longevity and proper functioning of the oven, the supplied insulation (ceramic fiber blanket) should be installed with no less than 3 (76 mm)thickness. Step 1- Wrap the Ceramic Fiber Blanket vertically around the oven. Fig. 22 Step 2- Cut notch(es) in the top part of the blanket so it fits tightly against the oven dome with ripples or folds. Keep the notches for step 4. Fig. 23 Step 3- Push down the blanket so it is tight against the oven dome. Fig. 24 Step 4- Place the notches you cut in step 4 in the top part of the oven. Ensure the entire dome is covered, cutting more blanket into the proper shape if necessary. Fig. 25 Ensure the flue connector is insulated as part of the oven dome. Fig. 26 Step 5- Repeat steps 1 through 4 twice to create the 3 layers of insulation on top of one another. Important Information: Now is the best time to start the curing process of you oven. Drying your oven with the insulation on will help maintaining you oven at the desired temperature while allowing for the moisture to properly evaporate. Step 6- Wrap the oven in foil, running across the top from one side to the other. Fig. 27 and 28
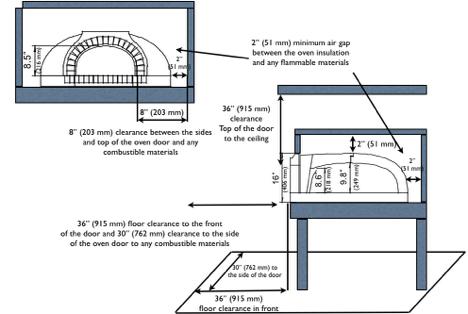
7 Step 7- Using adhesive foil tape, cover the seams and secure the foil into place. Fig. 29 Step 8- Ensure the foil runs all the way to the side of the door and slightly under the insulation around the door. Fig. 30 If you decide to add extra insulation, you must insure the insulation is fire proof and recommend using perlite, vermiculite or ceramic fiber. Other considerations: The proximity of combustible materials: The required heat safety gap must be: - at least 2 (51mm) between the oven insulation and any flammable material which would be likely to burn or scorch such as but not limited to wood, carpentry, paper, - The minimum area of non-combustible floor protection must be 36 (914mm) away from front of the door and 30 (762mm) from the sides. - For Canada only. You must have 1.5 (38 mm) of thermal protection under fueling door, if material under fueling door is combustible (R = 1.79). - Space above the oven door should be 30 (762mm) or more from any combustible materials such as wood, door frames, wood constructions and decorative woodwork The clearances listed above may only be reduced by means approved by the regulatory authority. Remove from around the oven all combustible material which are likely to become damaged by heat or catch fire. The outer temperature of the surfaces must not exceed 50 C or 122F in areas where they can be touched. These standards must be strictly adhered to, and even increased within the immediate proximity of the oven. A minimum air gap of 2 (51mm) is required between the oven insulation and all combustible materials, in addition to the oven being correctly ventilated. Burning wood or charcoal may become a hazard if insufficient air flow and smoke exhaust is provided as it may result in generating carbon monoxide. Carbon monoxide can lead to sever injuries or death. Air room starvation, icing, exhaust fan may result in insufficient air flow and smoke exhaust for your oven. WARNING! YOU MUST ENSURE ADEQUATE VENTILATION FOR YOUR OVEN
8 CAUTION! DO NOT INSTALL IN A MOBILE HOME. DO NOT CONNECT TO OR USE IN CONJUNCTION WITH ANY AIR DISTRIBUTION DUCTWORK UNLESS SPECIFICALLY APPROVED FOR SUCH INSTALLATIONS. DO NOT USE CHEMICALS OR FLUIDS TO START THE FIRE. DO NOT BURN GARBAGE OR FLAMMABLE FLUIDS SUCH AS GASOLINE, NAPHTHA OR ENGINE OIL. HOT WHILE IN OPERATION. KEEP CHILDREN, CLOTHING AND FURNITURE AWAY. CONTACT MAY CAUSE SKIN BURNS. Instruction and precaution for passing a chimney through a combustible wall or ceiling: Please refer to the instruction at the end of this manual. Oven Enclosure Your oven must be installed and sealed inside a non flammable enclosure directly around the oven respecting the air gap and flammable material clearances. When exposed to the elements, the enclosure must be water proof and offer sufficient protection so water can not infiltrate, drain or in anyway get into the oven. Water in the oven would result in severe cracking of you oven. Failure to properly enclose the oven would result in voiding the warranty. For indoor installation, there are no requirement for venting of the enclosure. However we do recommend a small vent such an undereave vent or gable vent made of non flammable materials. There should be no flammable material on the enclosure above the door. WARNING! YOU MUST SEAL THE ENCLOSURE AROUND THE OVEN If you were to notice any humidity or water in your oven, it is your responsibility to repair your installation in such way to prevent further water getting into the oven prior to making any fire. Once repaired you must perform the oven currying following the instructions bellow. Wood storage The wood intended for heating-up and maintaining the fire in the oven should be stored away from the oven. The minimum space between the oven and wood storage must be 36 (914mm). The would should not be stored within the space required for charging and ash removal. WARNING! DO NOT SToRE WOOD UNDER THE OVEN Oven cleaning: We recommend for the oven cooking chamber to be emptied of all ashes, wood and other debris after each use. Using the proper heat protective gear and a long handle wire brush and or scraper.
9 Disposal of Ashes Ashes should be placed in a steel container with a tight-fitting lid and moved outdoors immediately. Other waste shall not be placed in this container. The closed container of ashes should be placed on non-combustible floor or on the ground, well away from combustible materials, pending final disposal. When the ashes are disposed by burial in soil or otherwise locally dispersed, they should be retained in the closed container until all cinders have thoroughly cooled. Never use any water to clean the oven even when it has completely cooled. Establish a routine for the fuel, wood burner and firing technique. Check daily for creosote build-up until experience shows how often you need to clean to be safe. Be aware that the hotter the fire the less creosote is deposited, and weekly cleaning may be necessary in mild weather even though monthly cleaning may be enough in the coldest months. Contact your local municipal or provincial fire authority for information on chimney fires and have a clearly understood plan to handle a chimney fire. Creosote Formation and need for removal: When wood is burned slowly, it produces tar and other organic vapors that combine with expelled moisture to form creosote. The creosote vapors condense in a relatively cool oven flue and exhaust hood of a slow burning fire. As a result, creosote residue accumulates on the flue lining and exhaust hood. When ignited, this creosote makes an extremely hot fire. The oven flue should be inspected at least twice a year to determine when the creosote buildup has occurred. If a significant layer of creosote has accumulated (1/8 (3 mm) or more) it should be removed to reduce the risk of a chimney fire Smoke Detectors: When the oven is installed inside a building, when you first start a fire, some smoke may escape through the door while the chimney pipe heats-up and set off the smoke detector. This should only be temporary. Under no circumstance you should disable smoke detector. Curing you oven and the first fire: Important warning: While firing or operating the oven any part of the oven may become extremely hot and cause serious injury if handled without the appropriate protection, and so for up to 48 hours after the fire has been removed. The curing or drying of the oven should be done in the following manner: Make small fires over the course of 3 days, consecutive or not, for about 8 hours a day. It is imperative that the temperature of the dome, as indicated by the dome thermometer, does not exceed 60 C or 150 F on the first and second day and 90 C or 195 F on the third day. - The 1st day, light a small fire for 7 to 8 hours in the center of the oven floor. Pay attention that
10 the flames do not touch the dome of the oven. It is possible to leave the fire die and close the oven with the insulation door to keep the heat in the baking chamber. The dome temperature must not exceed 60 C or 150 F. - The next day we make the identical fire to what is above mentioned. The dome temperature must not exceed 70 C or 158 F. - On the 3rd day we begin with a gentle heating as above and after 2 hours we can begin to put bigger logs of wood so that the flame licks the vault on the height of 8 (300 mm)for 5 to 6 hours. You must move the fire on the floor so that each part of the dome and floor are dried. For the 3rd days of heating, the vault remains black and the temperature of the dome must not exceed 90 C or 190 F. On the 4th day and after a period of two hours keeping a gentle fire, it is possible to exceed 100 C or 210 F and increase gradually to obtain a white vault on the three quarters of the surface. The oven is now dried so it is possible to increase the temperature and get the entire dome to turn white. As the oven turns from black to white, tinny line forming a web like design may appear. These are called marbling and are perfectly normal. We advise to repeat these stages after a long period of time where the oven has not been used, particularly if it is installed outdoor and exposed to the elements. During cold weather or if the oven has not been used for more than 2 weeks, make a small fire the evening prior to using the oven. This will help removing any moisture that may have accumulated and avoid any thermal shock. Micro cracks on a height until 5 (130 mm) can appear during the first heating at the back of the vault. They are not disturbing either for the quality or the longevity of your oven. If cracks reach the upper part of the vault or elsewhere, it is because you did not respect drying instructions. We consider that the oven achieved 300 C or 572 F when the inside goes through the black to the clear or white color. This temperature is widely sufficient to cook any food. We recommend not heating up your oven any hire than 540 C or 1000 F Do not throw the wood inside the oven during its functioning because it would risk providing damages in the oven and spark may fly injuring you or bystanders. To safely place the wood in the oven, especially in hard to reach place such as the back of the oven, use appropriate tools, such as a peel or ember rake to place the wood in the oven. The heating of the oven is made by having the fire move from front to back and side to side in such a manner to evenly heat-up the floor. The user is expected neither to eat nor to sell the paste stemming from the first two cooking. The manufacturer is not responsible for any nuisance to the environment because of a wood fire which would throw back smokes or particles of carbon, these problems resulting most of the time from a too wet wood, an unsuitable flue, from incapacity or from an absence of air inlet in the backing room or an insufficiently frequent Chimney-sweeping in accordance with the use. The responsibility of the manufacturer would not be engaged in the case of an appearance of micro cracks due to a proved overheating. Subject to the respect of these various specifications, our ovens are guaranteed three years. The installation of our ovens must be made by a professional or a qualified person. SAVE THESE INSTRUCTIONS
11


12 Figures Fig. 1 Fig. 1 bis Fig. 2 Fig. 3 and 4 Fig. 5 Fig. 6 Fig. 7 Fig. 8


13 Fig. 9 Fig. 10 Fig. 11 Fig. 12 Fig. 13 Fig. 14


14 Fig. 15 Fig. 16! Fig. 17 Fig 17 Bis Fig. 18 Fig. 19


15 Fig. 20 Fig. 21 Fig. 22 Fig. 23 Fig. 24 Fig. 25 Fig. 26 Fig. 27 Fig. 28 Fig. 29
16 ! Fig. 30 Other related parts listing: Oven cart iron door AC6 and AC61 Insulated door AC1R and AC11R Flue connector AC 101 and AC99 Flue pipe adaptor VACIERA 180/200 Metal Stand 700, 800, 950, 1030, 1200, 1350, 1400, 1500 SAVE THESE INSTRUCTIONS
17 User Guide READ ALL INSTRUCTIONS BEFORE INSTALLING AND USING THE APPLIANCE WARNING! - ANY PART OF THE OVEN MAY BECOME EXTREMELY HOT AND CAUSE SERIOUS BURNS AND INJURIES. ALWAYS USE PROPER PROTECTIONS TO PREVENT BURNS WHILE FIRING THE OVEN AND AFTER THE FIRE HAS BEEN REMOVED. - NEVER THROW WOOD INTO THE OVEN AS YOU MAY INJURE YOURSELF AND DAMAGE THE OVEN. USE FIRE MANAGEMENT TOOLS OR A PIZZA PEEL TO PLACE THE WOOD IN THE OVEN ESPECIALLY IN HARD TO REACH PLACES SUCH THE BACK OF THE OVEN - ONLY BURN FULLY DRIED, WELL SEASONED WOOD. - ONLY BURN HARD WOOD SUCH OAK, ASH OR MAPLE. - NEVER BURN ANY TYPE OF SAPPY WOOD SUCH AS EVERGREENS. - LEAVE THE DOOR OF THE OVEN OPEN WHILE FIRING THE OVEN. - DO NOT OVER FIRE- IF FIREPLACE OR CHIMNEY CONNECTOR GLOWS, YOU ARE OVERFIRING. - DO NOT OVERFIRE WHEN FLAMES SPILLS OUT OF THE OVEN, YOU ARE OVERFIRING. - FLAMES SHOULD NOT BE COMING OUT THROUGH THE DOOR OF THE OVEN AND SHOULD BE CONTAINED INSIDE THE OVEN. - NEVER THROW WATER IN THE OVEN UNDER ANY CIRCUMSTANCES AS IT MAY RESULT IN SERIOUS INJURIES AND DAMAGING THE OVEN. - THE CHIMNEY PIPE AND SMOKE EXHAUST REQUIRES CLEANING AT LEAST ONCE A YEAR. MORE FREQUENT CLEANING MAY BE REQUIRED DEPENDING ON THE TYPE OF WOOD BURNT AND THE FREQUENCY AT WHICH THE OVEN IS USED. - NEVER USE GASOLINE, GASOLINE-TYPE LANTERN FUEL, KEROSENE, CHARCOAL LIGHTER FLUID, OR SIMILAR LIQUIDS TO START OR FRESHEN UP A FIRE IN THIS OVEN. KEEP ALL SUCH LIQUIDS WELL AWAY FROM THE OVEN WHEN IN USE. Firing up the oven: WARNING! USER MUST OPEN THE DAMPER PRIOR TO OPENING THE OVEN S DOOR OR OPERATING THE OVEN. - Damper is open when the handle is vertical and closed when the handle is horizontal. - Damper must remain open while the oven is in use - Do not use grate or elevate fire-build, wood fire directly on hearth - Due to the very high temperatures generated by the oven, we recommend living the door wide open to prevent serious injuries. Should you decide to partially close the door for a faster heat-up time, never completely close the door as this would result in asphyxiating the fire and possibly generating carbon monoxide. When handling the door while the oven is still hot, never touch the door with your bare hands. Always use the appropriate heat protection device or a tool to handle the door when it may be hot. - Use small pieces of wood such as kindle or small wood trimming along with some paper to start the fire -
 to 2 (48mm) in diameter, and move the fire to the center of the oven.")


18 - Always start a small fire right under the flue exhaust of the oven. Image 1 - Once the fire is going add medium size wood pieces, 1 (24mm) to 2 (48mm) in diameter, and move the fire to the center of the oven. Image 2 - The heating of the oven is made by having the fire move from front to back and side to side in such a manner to evenly heat up the floor. - Every 20 to 30 minutes or as the burning wood turns to embers, move the fire and add more wood. We recommend using wood pieces 1 to 3 in diameter for faster heating. - Move your fire from the center to the side of the oven. Then from one side to the opposite side. Then from the side to the center of the oven. From the center to the back. Image 3 - Continue moving the fire in different places until the oven is heated to the desired temperature. - For larger ovens, 950 and bigger, it is possible to have 2 fires, one on each side of the oven, burning at the same time. Ensure multiple fires do not result in over firing the oven. - As your fire generates some ambers, add more wood and spread the ambers over the entire floor of the oven. This will allow to properly heat-up the floor and the dome of the oven. - Around 572 F or 300 C the dome of the oven will start turning from black to a white / grey color. Once the entire dome of the oven has achieved the white / grey color, we consider the oven to be fully heated as such temperature is sufficient. Image 4 - If firing the oven above 752 F or 400 C, you must remove the dome thermometer to prevent damaging it. - We strongly recommend not firing the oven above 1000 F or 572 C. Image 1 Image 2
19 Image 3 Image 4 Cooking in your oven: open door with a burning fire, pizza for example: - once the desired temperature has been achieved, move the fire to the side and rake out out any excess ambers and ashes. - Let the oven rest for about 20 to 30 minutes with the fire burning on the side. Add more wood as necessary to maintain the fire. This will allow for the temperature of the oven s floor to drop a little and even out. - With a lightly damp mop or rag at the end of the oven brush, sweep any ashes that may have deposited on the oven floor. - Ensure you have enough wood to maintain a good burning flame in the oven. - Place your pizza directly on the oven floor, in the back of the oven away form the fire as much as possible. - As you pizza cooks and turn brown, rotate the pizza so a different side is exposed to the direct fire. - You may place your pizza closer to the fire to finish your pizza and obtain the desired color Cooking in your oven: closed door and fire removed, bread for example: - once the desired temperature has been achieved, spread the remaining fire and ambers over the entire floor of the oven. Let the fire and ambers die down for about 30 minutes. - Rake out all the ambers and ashes. Close the insulated door and let the oven rest for about 30 minutes. - Open the insulated door. With a lightly damp mop or rag at the end of the oven brush, sweep any ashes that may have deposited on the oven floor. - Place your bread directly on the oven floor and close the insulated door. - Do not through water on the oven floor to generate steam. To create some steam, using a small spray bottle, spray some water on the bread. Another solution is to place a small container in the oven with water in it. Ensure the container is made for high temperatures and make to not spill it. SAVE THESE INSTRUCTIONS
CBO-750 ASSEMBLY INSTRUCTIONS
 CBO-750 ASSEMBLY INSTRUCTIONS CBO-750 Ovens Should be Installed by a Professional or Suitably-Qualified Individual. Support Base The CBO-750 Oven Support Base must: be constructed of masonry or metal have
MODEL DCC DOUBLE WALL CHIMNEY CONNECTOR
 Installation & Maintenance LISTED Tested to *UL 103HT & ULC-S641 Instructions MODEL DCC DOUBLE WALL CHIMNEY CONNECTOR A MAJOR CAUSE OF CHIMNEY RELATED FIRES IS FAILURE TO MAINTAIN REQUIRED CLEARANCES (AIR
MODEL DCC DOUBLE WALL CHIMNEY CONNECTOR
 Installation & Maintenance LISTED Tested to *UL 103HT & ULC-S641 Instructions MODEL DCC DOUBLE WALL CHIMNEY CONNECTOR A MAJOR CAUSE OF CHIMNEY RELATED FIRES IS FAILURE TO MAINTAIN REQUIRED CLEARANCES (AIR
EXCEL ULTRABlack FS 6 Clearance Connector INSTALLATION AND MAINTENANCE INSTRUCTIONS
 EXCEL ULTRABlack FS 6 Clearance Connector INSTALLATION AND MAINTENANCE INSTRUCTIONS A MAJOR CAUSE OF CHIMNEY RELATED FIRES IS FAILURE TO MAINTAIN REQUIRED CLEARANCES (AIR SPACE) TO COMBUSTIBLE MATERIALS.
For Outdoor Use Only!
 ITEM NAME: Red Ember Bronze Crossweave Firebowl Fire Pit with Free Cover and Fire Tool with Optional Grill Grate SKU: ALZ109 For Outdoor Use Only! 1. Improper installation, adjustment, alteration, service
For Outdoor Use Only!
 ITEM NAME: Red Ember 4 ft. Smokestack Rubbed Bronze Fireplace with Cover SKU: ALZ655-1 For Outdoor Use Only! 1. Improper installation, adjustment, alteration, service or maintenance can cause injury or
BRANDON PIZZA OVEN INSTALLATION GUIDE AND OWNER S MANUAL
 BRANDON PIZZA OVEN INSTALLATION GUIDE AND OWNER S MANUAL TABLE OF CONTENTS COMPONENTS... 3 OVERALL DIMENSIONS.... 4 POSITIONING REFERENCE PER LAYER... 5 CONCRETE PAD PREPARATION... 5 INSTALLATION OF BLOCKS...
MODEL DL INSTALLATION AND OPERATING INSTRUCTIONS 2100º F 1150º C
 6", 7" & 8" dia. MODEL DL DOUBLE WALL CONNECTOR INSTALLATION AND OPERATING INSTRUCTIONS THIS STOVE CONNECTOR HAS BEEN LISTED AT 2100º F 1150º C LISTED ACCORDING TO: ULC-S641 WH-PN-016 SECURITY CHIMNEYS
Installation & User Manual EW5000 Outdoor Cooking Fire
 Installation & User Manual EW5000 Outdoor Cooking Fire IMPORTANT: Please read this manual before installing and using the ESCEA EW5000 Cooking fire. Failure to follow these instructions may lead to a possible
Assembly Instructions & User s Manual 26 Florence Folding Leg Fire Pit
 Assembly Instructions & User s Manual 26 Florence Folding Leg Fire Pit FSMVPT6022 Please keep this instruction manual for future reference Customer Service: (888) 922-2336 7:00 am to 2:00 am CST (daily)
THE INSTALLATION MANUAL FOR GEMINI 1200 AND GEMINI 1500 WOODSTOVES. Manufactured by DROLET STOVES & FIREPLACES INC.
 THE INSTALLATION MANUAL FOR GEMINI 1200 AND GEMINI 1500 WOODSTOVES Manufactured by DROLET STOVES & FIREPLACES INC. Rev 07/96 45041a THE INSTALLATION MANUAL FOR GEMINI 1200 ET GEMINI 1500 WOODSTOVES DROLET
Installation Instructions. Woolly Mammoth Stoves Albert Road, Braintree, Essex, CM7 3JQ
 Installation Instructions Woolly Mammoth Stoves 20-28 Albert Road, Braintree, Essex, CM7 3JQ INSTALLATION INSTRUCTIONS TO BE READ IN CONJUNCTION WITH THOSE IN THE INSTRUCTION BOOKLET These instructions
User Manual CBO OVENS. Fire Up the Good Life!
 User Manual CBO OVENS Fire Up the Good Life! A MAJOR CAUSE OF OVEN-RELATED FIRES IS FAILURE TO MAINTAIN REQUIRED CLEARANCES (AIR SPACES) TO COMBUSTIBLE MATERIALS. IT IS OF UTMOST IMPORTANCE THAT THIS OVEN
Please read this manual before installation and use. We wish you many years of pleasure and warmth.
 Thank you for purchasing this product. This multi fuel burning stove is compliant with the EN13240 Please read this manual before installation and use. We wish you many years of pleasure and warmth. Manufactured
Harrie Leenders Fuga el - Instructions for Installation, Use and Maintenance INSTRUCTIONS FOR INSTALLATION, USE AND MAINTENANCE
 INSTRUCTIONS FOR INSTALLATION, USE AND MAINTENANCE FUGA el 1 2 1. Flue 2. Case 3. Ceramic glass 4. Aeration slide 5. Convection fins 6. Door handle 7. Base 3 4 READ THE INSTRUCTION BOOKLET AND THESE SUPPLEMENTARY
INSTALLATION AND OPERATIONS GUIDE FOR GRAND CANYON GAS JUMBO/JUMBO SLIMLINE LOG SYSTEMS
 Burner Systems: JUMBOSLIMBRNR-24 JUMBOSLIMBRNR-30 JUMBOBRNR-36 / JUMBOSLIMBRNR-36 JUMBOBRNR-42 / JUMBOSLIMBRNR-42 JUMBOBRNR-48 / JUMBOSLIMBRNR-48 JUMBOBRNR-60 / JUMBOSLIMBRNR-60 INSTALLATION AND OPERATIONS
INSTRUCTIONS FOR INSTALLATION, USE AND MAINTENANCE YSEN
 INSTRUCTIONS FOR INSTALLATION, USE AND MAINTENANCE YSEN READ THE INSTRUCTION BOOKLET AND THESE SUPPLEMENTARY INSTRUCTIONS CAREFULLY BEFORE INSTALLATION These instructions together with those in the instruction
INSTALLATION & OPERATING INSTRUCTIONS FOR. FIREPLACE GAS LOGS Model Numbers: MO18NG, MO24NG, SH18NG, SH24NG, CSO30NG
 INSTALLATION & OPERATING INSTRUCTIONS FOR FIREPLACE GAS LOGS Model Numbers: MO18NG, MO24NG, SH18NG, SH24NG, CSO30NG Applicable for use with all styles and sizes of Dual Burner Natural Gas Log Sets. Note:
SMART BIO-ETHANOL ELECTRONIC BURNER
 SMART BIO-ETHANOL ELECTRONIC BURNER User s Manual What s in the box: Smart Burner Remote Control AC Adapter Filling Hose User s Manual 1pc 1pc 1pc 1pc 1pc Preparations Remove all packaging materials prior
TWO BURNER STAINLESS STEEL PROPANE STOVE
 ROTATE TO LIGHT 842-A250-0_SSCmpStove.qxd 11/26/03 2:59 PM Page 1 OWNER S MANUAL FAILURE TO FOLLOW ALL S AND INSTRUCTIONS IN THIS MANUAL COULD LEAD TO PERSONAL INJURY, INCLUDING DEATH. RETAIN THIS MANUAL
EB300. Ethanol Burner. User s Manual Installation Instructions
 EB300 Ethanol Burner User s Manual Installation Instructions EB300 Burner Burner Lid User s Manual What s in the box: 1pc 1pc 1pc Installation Instructions EB300 - User s Manual The Ignis Ethanol Burner
Alma Mons EN Owners s manual INSTALATION, ADJUSTMENT AND OPERATING INSTRUCTION
 Alma Mons Owners s manual INSTALATION, ADJUSTMENT AND OPERATING INSTRUCTION EN 12815 1 INTRODUCTION Congratulations! You have invested in energy efficient and high quality product-alma Mons wood burning
INSTANT GARAGE MODEL NO: CIG81224 ASSEMBLY INSTRUCTIONS PART NO: ORIGINAL INSTRUCTIONS
 INSTANT GARAGE MODEL NO: CIG81224 PART NO: 3503578 ASSEMBLY INSTRUCTIONS ORIGINAL INSTRUCTIONS GC1117 INTRODUCTION Thank you for purchasing this CLARKE Instant Garage. When erected, the CIG81224 garage
SINGLE BURNER STOVE IMPORTANT OPERATING INSTRUCTIONS COOKING & STORAGE POSITION PARTS IDENTIFICATION
 SINGLE BURNER STOVE OPERATING INSTRUCTIONS PARTS IDENTIFICATION Electronic Lighter Ignites the burner. Liquid Guard Holds liquid overflow. Windshield Prevents flame from being extinguished by wind. Ensures
Style # Laguna Propane Tank Cover Owner s Manual
 Style # 26100117 Laguna Propane Tank Cover Owner s Manual Warning: For outdoor use only DO NOT use for cooking DO NOT use under any overhead enclosure Manufactured as Model # 6561 in China for: Restoration
Clarry Pellet Stove. This product is patented under US Patent # and Canadian Patent # CA Made in the USA
 Clarry Pellet Stove This product is patented under US Patent #8020547 and Canadian Patent # CA2604313 Made in the USA Clarry is a registered trademark of Clarry Pellet Stove, LLC Report number: 0397PS001S
USAGE AND MAINTENANCE MANUAL FOR A SOLID FUEL STOVE
 PREDUZEĆE ZA PROIZVODNJU, PROJEKTOVANJE I PROMET BELOŠEVAC BB, 14000 VALJEVO, SRBIJA USAGE AND MAINTENANCE MANUAL FOR A SOLID FUEL STOVE DEAR CUSTOMER, Congratulations on your purchase of BLIST solid fuel
HARVIA IRON STOVE Instructions for installation and use
 HARVIA IRON STOVE EN Instructions for installation and use Harvia 10 08012014VTT Congratulations on a good choice of fireplace and thank you for your confidence in Harvia s products. Read these instructions
Installation, Operation, & Safety Handbook
 Installation, Operation, & Safety Handbook Model 1500 Model 2500 Obadiah's Wood Stoves 1660 Whalebone Dr. Kalispell, MT 59901 www.woodstoves.net 800-968-8604 Model 2500 and 1500 Freestanding Stove or Fireplace
Read all instructions and warnings before using this fireplace. WARNING
 Frame User Manual 1 Operating Manual Thank you for purchasing this Signi Fires product. Signi Fires is very safety conscious, we have taken every care in designing, manufacturing and assembling your Signi
Installation Instructions
 Installation Instructions C750 C750A www.contura.eu 50 CERTIFICATE EC Declaration of conformity www.contura.eu Manufacturer name address Place of manufacture NIBE AB/NIBE STOVES Box 134, Skulptörvägen
TCWS.38NG03.C BLACK DIAMOND BURNER KIT INSTRUCTIONS
 IMPORTANT: THESE INSTRUCTIONS ARE TO REMAIN WITH THE HOMEOWNER These instructions are supplementary to the Installation and Operating Instructions supplied with the fireplace and should be kept together.
Installation and Operating Instructions
 Installation and Operating Instructions Wood-burning Stove Model: Ottawa 5kw INTRODUCTION Wood-burning Stove Item No.: Ottawa 5kw curve SAFETY Safety is the most important consideration when using and
Installation Instructions
 Installation Instructions C 880 www.contura.eu 50 CERTIFICATE EC Declaration of conformity www.contura.eu Manufacturer name address Place of manufacture NIBE AB/NIBE STOVES Box 134, Skulptörvägen, SE-285
Gas Conversion Kits and Instructions
 Gas Conversion Kits and Instructions INSTALLATION FORM RGM 432/433-GC (Version D.1) Obsoletes Form RGM 432/433-GC (Version D) APPLIES TO: Model FT and Model SFT All gas conversion must be done by a qualified
How to use a multi fuel stove
 How to use a multi fuel stove Important!! When lighting the stove for the first time only a small fire should be lit. Too hot a fire will result in the paint emitting smoke - not necessarily bad but unpleasant.
Installation Instructions
 Installation Instructions C 780 www.contura.eu 50 CERTIFICATE PERFORMANCE DECLARATION No. C780-CPR-130612-SE-1 PRODUCT Product type Stove lit with solid biofuels Type designation Contura 780 Manufacturing
Installation Instructions
 Installation Instructions C 710 www.contura.eu 50 CERTIFICATE Declaration of performance according to Regulation (EU) 305/2011 No. C710-CPR-160329-SE-1 PRODUCT Product type Stove lit with solid biofuels
ALCOVE INSTALLATIONS THE MODEL 212 NAVAJO STEEL HYBRID WOODSTOVE IS NOT APPROVED FOR AN ALCOVE INSTALLATION.
 INSTALLATION Woodstock Soapstone Co. has been designing, building, and innovating since 1978. A properly installed and operated Woodstock Soapstone Stove will warm your home and delight your eye for a
Seasoning Your Stove. Starting a Fire And Establishing Proper Draft
 OPERATION Seasoning Your Stove Both soapstone and steel need to be seasoned. The seasoning can be accomplished through a series of small to moderate fires. Your Woodstock Soapstone Stove is an easy stove
Installation and Operating Instructions
 Installation and Operating Instructions Wood-burning Stove Model: Ottawa 7kw INTRODUCTION Wood-burning Stove Item No.: Ottawa 7kw SAFETY Safety is the most important consideration when using and installing
INSTALLATION AND OPERATIONS GUIDE FOR GRAND CANYON GAS LOG FIRE PIT SERIES ONLY
 INSTALLATION AND OPERATIONS GUIDE FOR GRAND CANYON GAS LOG FIRE PIT SERIES ONLY Installation and service must be provided by a qualified installer, service agency or gas supplier Grand Canyon Gas Logs,
OSBURN 900 WOOD STOVE
 OWNER S MANUAL OSBURN 900 WOOD STOVE Distributed by Glen Dimplex Australasia NEW ZEALAND 38 Harris Road, East Tamaki, Auckland Ph: 09 274 8265 Fax 09 274 8472 Email: sales@glendimplex.co.nz www.glendimplex.com.au
Wood/Coal Range SAFETY INSTRUCTIONS. Save this manual for future reference!
 THE Rancher Wood/Coal Range Model SR57E Owners Manual Save this manual for future reference! READ ALL INSTRUCTIONS CARE- FULLY BEFORE STARTING THE INSTALLATION OR OPERATING THE STOVE. Failure to follow
Installation and Operating. Instructions. Multifuel Stove. Salamander. Model Lighting a solid fuel fire. 6.5 De-ashing the stove
 Installation and Operating Instructions Salamander Model 0901 Multifuel Stove Section Contents Page 1 Important information about installing and 3 using the Salamander stove 2 Unpacking the Salamander
TCWS54 SEE THRU DIAMOND BURNER INSTALLATION KIT INSTRUCTIONS
 INSTALLER: Leave this manual with the appliance. CONSUMER: Retain this manual for future reference. These instructions are supplementary to the Installation and Operating Instructions supplied with the
SENECA SMALL & MEDIUM SIZE WOOD STOVES
 Installation and Operating Instructions For SENECA SMALL & MEDIUM SIZE WOOD STOVES SAVE THESE INSTRUCTIONS PLEASE READ THIS ENTIRE MANUAL BEFORE YOU INSTALL AND USE YOUR NEW ROOM HEATER. FAILURE TO FOLLOW
IN THE EVENT OF CHIMNEY FIRE, EVACUATE THE PROPERTY AND CALL THE EMERGENCY SERVICES.
 Ekol Clarity 12 INSTALLATION AND OPERATING INSTRUCTIONS. INTRODUCTION SAFETY Safety is the most important consideration when using and installing your stove. If not installed and used correctly, a house
OSBURN MODEL 1000 FREESTANDING STOVE (OB01010)
") OWNER S MANUAL OSBURN MODEL 1000 FREESTANDING STOVE (OB01010) Distributed by Glen Dimplex Australasia NEW ZEALAND 38 Harris Road, East Tamaki, Auckland Ph: 09 274 8265 Fax 09 274 8472 Email:sales@glendimplex.co.nz
OWNER S MANUAL OSBURN MODEL 1000 FREESTANDING STOVE (OB01010) Distributed by Glen Dimplex Australasia NEW ZEALAND 38 Harris Road, East Tamaki, Auckland Ph: 09 274 8265 Fax 09 274 8472 Email:sales@glendimplex.co.nz
INSTALLATION INSTRUCTIONS for folding arm awnings
 Custom made Awnings and Blinds Item No 0757 INSTALLATION INSTRUCTIONS for folding arm awnings IMPORTANT INFORMATION BEFORE INSTALLING YOUR Updated 08/09/15 AN AWNING INSTALLATION IS A HOME IMPROVEMENT
Installation Instructions
 Installation Instructions C810 www.contura.eu 50 CERTIFICATE Declaration of performance according to Regulation (EU) 305/2011 No. C810-CPR-130610-SE-1 PRODUCT Product type Stove lit with solid biofuels
Forno Bravo, LLC. Modena Refractory Oven, Including: Installation and Operating Manual
 Forno Bravo, LLC Modena Refractory Oven, Including: Modena120W (FRPM120W) Modena140W (FRPM140W) Modena160W (FRPM160W) Modena180W (FRPM180W) Installation and Operating Manual A MAJOR CAUSE OF OVEN-RELATED
Capacity kw. Thermal turndown from specified maximum capacity 8:1 8:1
 3-18.3-5 Specifications of OXY-THERM TITAN burners Typical burner data Fuel: natural gas at 15 C with 10.9 kwh/nm 3 HHV - sg = 0.6 Oxygen: 90-100% purity Stated pressures are indicative. Actual pressures
Installation Instructions
 Installation Instructions For use in GB and IE only C i4 www.contura.eu 82 CERTIFICATE EC Declaration of conformity www.contura.eu Manufacturer name address Place of manufacture NIBE AB/Contura Box 134,
Vesuvio Series. Fully Assembled, Hand Tiled Pizza Ovens Naples-style Wood-Fired Ovens for the Home
 The Forno Bravo Vesuvio Series is a family of Naples-style ovens designed for backyard baking. These beautiful and innovative ovens feature a traditional center vent system where hot air exhausted from
DIANA EN Owners s manual INSTALATION, ADJUSTMENT AND OPERATING INSTRUCTION. Available in ceramic and metalsheet version.
 DIANA Owners s manual INSTALATION, ADJUSTMENT AND OPERATING INSTRUCTION Available in ceramic and metalsheet version. EN 13240 1 INTRODUCTION Congratulations! You have invested in energy efficient and high
Installation Instructions
 Installation Instructions C 556 www.contura.eu 50 CERTIFICATE PERFORMANCE DECLARATION No. C556-CPR-130601-SE-2 PRODUCT Product type Stove lit with solid biofuels Type designation Contura 556 Manufacturing
Dry Stove Installation Guide BK545. November 2012 Rev02. EN 13240:2001+ Amd. A2:2004
 Dry Stove Installation Guide BK545 EN 13240:2001+ Amd. A2:2004 November 2012 Rev02 Please read carefully through this installation guide before proceeding with installation of the stove. Should you have
Saltfire ST1 INSTALLATION AND OPERATING INSTRUCTIONS.
 Saltfire ST1 INSTALLATION AND OPERATING INSTRUCTIONS. INTRODUCTION SAFETY Safety is the most important consideration when using and installing your stove. If not installed and used correctly, a house fire
TC30 HEARTWOOD BURNER INSTALLATION INSTRUCTIONS
 INSTALLER: Leave this manual with the appliance. CONSUMER: Retain this manual for future reference. These instructions are supplementary to the Installation and Operating Instructions supplied with the
IN THE EVENT OF CHIMNEY FIRE, EVACUATE THE PROPERTY AND CALL THE EMERGENCY SERVICES.
 EKOL INSET 8 INSTALLATION AND OPERATING INSTRUCTIONS INTRODUCTION. SAFETY Safety is the most important consideration when using and installing your stove. If not installed and used correctly, a house fire
Saltfire ST4 INSTALLATION AND OPERATING INSTRUCTIONS.
 Saltfire ST4 INSTALLATION AND OPERATING INSTRUCTIONS. INTRODUCTION SAFETY Safety is the most important consideration when using and installing your stove. If not installed and used correctly, a house fire
Fire's Edge Fire Pit/Fire Pit Inserts For (Automated) Model 100-A
 Model 100-A") Fire's Edge Fire Pit/Fire Pit Inserts For (Automated) Model 100-A OWNER S MANUAL / OPERATING AND MAINTENANCE INSTRUCTIONS For your safety: If you smell gas: 1. Shut off gas to the appliance 2. Extinguish
Fire's Edge Fire Pit/Fire Pit Inserts For (Automated) Model 100-A OWNER S MANUAL / OPERATING AND MAINTENANCE INSTRUCTIONS For your safety: If you smell gas: 1. Shut off gas to the appliance 2. Extinguish
Installation and operation instructions for KINEMAX burners
 -. - Installation and operation instructions for KINEMAX burners Application requirements View port A view port to observe burner flame is essential to inspect the flame aspect. Locate the view port downstream
A carbon monoxide detector has been supplied with your stove. You must plug it in. Burn Nut and Pea anthracite coal only
 70,000 & 90,000 Hand Fired Deep Box Operating instructions and maintenance enclosed Thoroughly read and understand instructions Always leave this manual with stove owner Follow the instructions within
TC36 CHALET BURNER KIT INSTALLATION INSTRUCTIONS
 INSTALLER: Leave this manual with the appliance. CONSUMER: Retain this manual for future reference. These instructions are supplementary to the Installation and Operating Instructions supplied with the
Installation and User s Manual 12 x 10 MOTORIZED AWNING
 12 x 10 MOTORIZED AWNING Installation and User s Manual 12 x 10 MOTORIZED AWNING 088-1763-0 Stop Please read and understand this manual before any assembly or use of this product. Before beginning assembly
INSTALLATION INSTRUCTIONS AND OWNER S MANUAL
 INSTALLATION INSTRUCTIONS AND OWNER S MANUAL INSTALLER: Leave this manual with the appliance. CONSUMER: Retain this manual for future reference. LOG SET MODEL LS35DINF For Use With DVCT35CBN-1 Fireplace
Inspecting your combustor
 Inspecting your combustor Ash, a fluffy light grey powder, and soot, a darker granular material, accumulate on the combustor surfaces in normal use. Ashes accumulate both as a result of the smoke being
HOT WHILE IN OPERATION. KEEP CHILDREN, CLOTHING, AND FURNITURE AWAY. CONTACT MAY CAUSE SKIN BURNS.
 Installation and Operation Instructions for USA Models HF-577DU Safety Notice: If this solid fuel room heater is not properly installed, a house fire may result. For your safety and to reduce the risk
Manual Awning. Assembly Instructions. Product No Toll-free:
 Manual Awning Product No. 088-30- Instructions Toll-free: -877-483-679 IMPORTANT: Please read this manual carefully before beginning assembly of this product. Keep this manual for future reference. 3 Table
Instruction Manual please read before use
 Instruction Manual please read before use Slim Burner Insert (patent pending) 307 Tchoupitoulas Street, Suite 100 New Orleans, LA 70130 p : 888.596.6960 504.596.6960 e : office@brasafire.com www.brasafire.com
ACCENDA Instructions for use and safety
 ACCENDA Instructions for use and safety READ CAREFULLY BEFORE USE Please store these safety warnings in a safe place for future reference. NOTICE: BUYER ASSUMES ALL RESPONSIBILITY FOR SAFETY AND USE THAT
Lit Table Top Firepit Bio-Ethanol Fireplace. User Manual. Model: GF301650
 Lit Table Top Firepit Bio-Ethanol Fireplace User Manual Model: GF301650 1 Moda Flame Lit Table Top Firepit Bio-Ethanol Fireplace Included in delivery (Parts List): A. Fireplace body 1pc B. Glass 1pc C.
Instruction Manual please read before use
 Instruction Manual please read before use XL Burner (patent pending) 307 Tchoupitoulas Street, Suite 100 New Orleans, LA 70130 p : 888.596.6960 504.596.6960 e : office@brasafire.com www.brasa.co Item Identification
ETHANOL FIREPLACES Certified as per ULC/ORD C UL Subject
 VOLCAN B12 Trident Laguna Vesuve ETHANOL FIREPLACES Certified as per ULC/ORD C627.1-2008 UL Subject 1370-2010 Fogo Kilauea Revised May 26, 2011 Taal Designed especially for fireplace hearth 490, rue de
TCWS54 BLACK DIAMOND BURNER KIT INSTRUCTIONS
 INSTALLER: Leave this manual with the appliance. CONSUMER: Retain this manual for future reference. These instructions are supplementary to the Installation and Operating Instructions supplied with the
Outdoor Fireplace. Model No. WAF513C, WAF1013C. Table of Contents
 OWNER S MANUAL Outdoor Fireplace Model No. WAF513C, WAF1013C For Outdoor Use Only (outside any enclosure) WARNING FOR YOUR SAFETY: WARNING FOR YOUR SAFETY: 1. Improper installation, adjustment, alteration,
CERO Instructions for use and safety
 CERO Instructions for use and safety READ CAREFULLY BEFORE USE Please store these safety warnings in a safe place for future reference. NOTICE: BUYER ASSUMES ALL RESPONSIBILITY FOR SAFETY AND USE THAT
Owner s Operation and Instruction Manual
 Owner s Operation and Instruction Manual MODELS: 2000, 2500 SAFETY TESTED TO UL 1482 US ENVIRONMENTAL PROTECTION AGENCY PHASE II CERTIFIED WOODSTOVE WASHINGTON STATE APPROVED MOBILE HOME APPROVED (US ONLY)
Instruction Manual. 30 Steel Fire Pit with Solid Bowl. Questions, problems, missing parts? Before returning to the store, Call Yayi Mfg.
 Instruction Manual 30 Steel Fire Pit with Solid Bowl Questions, problems, missing parts? Before returning to the store, Call Yayi Mfg. at 855-600-9294 From 9:00 AM to 5:00 EST or email customercare@china-yayi.com
14' x 32' x 12' Round Top Round Style Shelter Assembly Instructions
 14' x 32' x 12' Round Top Round Style Shelter Assembly Instructions Description Model # 14' x 32' x 12' RoundTop Garage - Gray 62669 Recommended Tools Please read instructions COMPLETELY before assembly.
Corn Flame Energy Corn Stove Model 5000
 Corn Flame Energy Corn Stove Model 5000 Installation and Operation Guide Read thoroughly before starting installation Save this manual for future reference SAFETY NOTICE If this stove is not properly installed,
Mod. MONTANA WOOD BURNING STOVE USAGE AND MAINTENANCE INSTRUCTIONS
 Mod. MONTANA WOOD BURNING STOVE USAGE AND MAINTENANCE INSTRUCTIONS Nutrients Ashes Fertilizer Wood: an ecological fuel Wood is a renewable source of energy which answers the energy and environmental demands
INSTALLATION AND OPERATIONS MANUAL
 INSTALLATION AND OPERATIONS MANUAL Before using your Eco-Feu, please read this Installation and Operations Manual carefully. Keep this Installation and Operations Manual in a safe place for future reference.
18" Convert to Gel Log Set # 2610
 18" Convert to Gel Log Set # 2610 Instruction Manual Instructions and warnings for use. STOP! If parts are missing or damaged, call 1-800-654-1704 for assistance Welcome to the Real Flame family of gel
Installation Instructions
 Installation Instructions For use in and IE only C i4 FS www.contura.eu 2 CERTIFICATE DECLARATION OF PERFORMANCE No. Ci4FS-CPR-130619-SE-1 PRODUCT Product type Type designation Manufacturing number Intended
INSTALLATION AND OPERATION MANUAL
 INSTALLATION AND OPERATION MANUAL Free-Standing EPA Certified Wood-Burning Stoves Save These Instructions For Future Reference P/N 775,214M, Rev. C, 05/2008 Striker S160 Striker SA160 Wood Stoves Model
Maintenance 45 Serie CAUTION. Before resetting your electronic card that displays an error code.
 29-10-2013 CAUTION Before resetting your electronic card that displays an error code. Error Code H Service the stove COMPLETELY as described in this manual. Check the chimney pipe. Error Code O Service
TC36 CHALET II BURNER KIT INSTALLATION INSTRUCTIONS
 INSTALLER: Leave this manual with the appliance. CONSUMER: Retain this manual for future reference. These instructions are supplementary to the Installation and Operating Instructions supplied with the
Installation and Operation Instructions for USA only Model: HF-737U Cast Iron Freestanding Stove
 Installation and Operation Instructions for USA only Model: HF-737U Cast Iron Freestanding Stove (EPA Approved) Conform to UL 1482-2010 Tested by Intertek KINDLY SAVE THESE INSTRUCTIONS FOR FUTURE REFERENCE
INSTALLATION/OWNERS MANUAL for. Kodiak HAND FIRED GRAVITY FED COAL STOVE Columbia Blvd. Bloomsburg PA Fuel: Nut or Pea Coal
 INSTALLATION/OWNERS MANUAL for Kodiak HAND FIRED GRAVITY FED COAL STOVE 3162 Columbia Blvd. Bloomsburg PA 17815 Fuel: Nut or Pea Coal Caution Fossil fuel burning can create lethal doses of carbon monoxide
Care and Replacement Manual for Woodstove Catalytic Combustors
 Care and Replacement Manual for Woodstove Catalytic Combustors A good combustor is designed to withstand approximately 12,000 hours of continuous use. For most people, this will translate into two to five
APPENDIX TO THE INSTALLATION AND OPERATING MANUAL OF STOVEMAN SAUNA STOVE
 APPENDIX TO THE INSTALLATION AND OPERATING MANUAL OF STOVEMAN SAUNA STOVE Technical data of the sauna stove Sauna stove type Stoveman 16 Model Stoveman 16 Nominal heat capacity, i.e. ability to 17 kw heat
GX-Series Wood-Fired Ovens Owner s Manual
 Congratulations on your Purchase of a Tuscan Chef GX Series Outdoor Oven GX-Series Wood-Fired Ovens Owner s Manual Installation and Operating Instructions for Models: GX-CS/CI GX-CM/C2 GX-B1 GX-A2 GX-DL/D1
Installation instruction
 Installation instruction C 35T-Low www.contura.eu 82 CERTIFICATE PERFORMANCE DECLARATION No. C35TL-CPR-130618-SE-1 PRODUCT Product type Type designation Manufacturing number Intended area of use Fuel Stove
Reference: Ottawa 12kw Operating Instructions Version 1 04/06/15. Installation and Operating Instructions
 Reference: Ottawa 12kw Operating Instructions Version 1 04/06/15 Installation and Operating Instructions Wood-burning Stove Model: Ottawa 12kw Size: W580XD410XH610MM 1 INTRODUCTION Wood-burning Stove Item
MULTI-FUEL STOVE INSTALLATION AND USER INSTRUCTIONS
 PRIORY MULTI-FUEL STOVE INSTALLATION AND USER INSTRUCTIONS The Priory stove has a nominal heat output of 8Kw. and a weight of 80 kg. The flue gas mass flow is 5.4g/s for mineral fuel and 6.3g/s for wood
Installation instructions
 Installation instructions C 790T www.contura.eu 82 CERTIFICATE PERFORMANCE DECLARATION No. C790T-CPR-130612-SE-1 PRODUCT Product type Type designation Manufacturing number Intended area of use Fuel Stove
Smoke House. What you will need. Personal protective equipment
 Smoke House What you will need Several planks of tongue and groove floorboards (18mm by 119mm) Do not use any treated wood Wooden battens (18mm by 44mm) for edging the doors. Wooden battens (34mm by 34mm)