* * * * * * W a r r a n t y I n f o r m a t i o n * * * * * *
|
|
|
- Marion Taylor
- 6 years ago
- Views:
Transcription
1 Model No p/n S p e c i f i ca t i o n s H e i g h t ( 2 3 p a c k e d ) Width Depth ( 48 p a c k e d ) W e i g h t 1 45 l b s. Instructions IMPORTANT - PLEASE READ: * * * * * * W a r r a n t y I n f o r m a t i o n * * * * * * NOTICE!!! Once used, this shelter cannot be returned to the store. ** Warranty cannot be honored without an original, dated receipt ** This product is warranted to the original retail purchaser (from an authorized dealer) and is non-transferable. Clam Corporation has a one year manufacturer s defect warranty from the date of original purchase. Warranty does not cover cracked or worn bases (if runner kits have not been installed as recommended), cracked windows, tent tears or cuts, or broken or bent hoops due to high wind weather conditions or unattended use. Defective parts will be replaced or repaired (at the manufacturer s option) if found to be defective within one (1) year from the date of original purchase. Warranty will be void if product has been subject to neglect, misuse, improper installation, misapplication, alteration, accident including but not limited to improper maintenance, or use of unauthorized parts or attachments. Please read the entire owner s manual to ensure proper installation, use, storage and care of your Clam Shelter. To submit a warranty claim request, please use one of the following methods: CustomerService@ClamCorp.com (Preferred Method) Fax: Write: Customer Service Warranty Department 600 Clydesdale Trail Medina, MN In your request, please include your full name, address, phone number, a copy of your receipt, a brief description of the problem, and pictures to clearly show the area(s) of concern. Our Warranty Department will review your request, and a Clam representative will contact you regarding your claim status. All returns must be shipped to us postage pre-prepaid. A customer service representative can be reached at L i m i t a t i o n o f L i a b i l i t y - It is expressly understood that Clam Corporation s liability for its products, whether due to breach of warranty, negligence, strict liability, or otherwise, is limited to the repair of the product as stated above. Clam Corporation is not liable for any injury, loss, damage, or expense, whether direct or consequential, including but not limited to loss of use, income, profit, or damage to material arising in connection with the sale, installation, use of, inability to use, or the repair or replacement of Clam Corporation products. Clam Corporation reserves the right to make alterations or modifications in its products at any time, which in its opinion, may improve the performance and efficiency of the product. Clam shall not be obligated to make such alterations or modifications to products already in service.
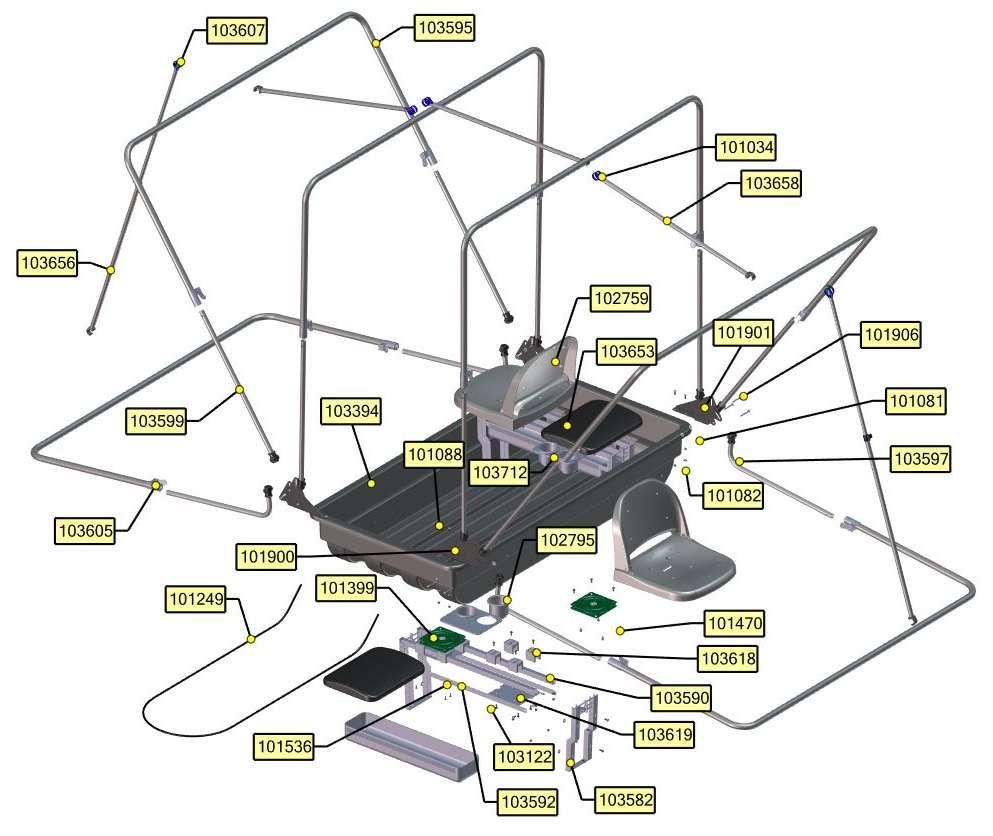
2 - P a r t s L i s t - ITEM NO. PART NUMBER DESCRIPTION QTY BASE, ADVENTURE HOOP POLES DELUXE SEAT SEAT SWIVEL STRAP, HAMMOCK TENT, ADVENTURE ROPE, 3/8 DIA X 11 FT TOW HOOP POLE COLLAR SPREADER POLE COLLAR SEAT RAILS SEAT LEG ASM BENT HOOP SUPPORT POLE RIGHT HOOP BRACKET LEFT HOOP BRACKET STRAIGHT HOOP POLE FRONT & REAR ADJ. SPREADER POLE WASHER, 1/4 FLAT REG NUT, 1/4-20 THIN NYLOCK ROOF SPREADER POLE SCREW, 1/4-20 X SCREW, 1/4-20 X SCREW, 1/4-20 X PLASTIC SLIDE BLOCK SLIDE BLOCK BOTTOM SCREW, #14 X 5/ SCREW, HI-LOW WITH.448 HEAD SCREW, #10 X 3/4" SLIP COVER, BOTTOM SLIP COVER, BACK INSTRUCTION, ADVENTURE CONSOLE, ADVENTURE CUP HOLDER SMALL SEAT ASM LARGE ORGANIZER TOOL KIT 1 2
3 PARTS 3


4 STEP 1 Install pole mount brackets, PN and STEP 2 Install leg assemblies PN


5 STEP 3 Mount the hammocks, PN to the leg assemblies using the hammock straps, PN STEP 4 Mount the console, PN , to the small seat assembly, PN using the wood screws, PN Align the console to the seat so it is straight and the cup holders can be installed. See next illustration. 5


6 STEP 4 cont. Console mounted to small seat. STEP 5 Install the deluxe seat, PN and the small seat assembly, PN to the swivels. 6


7 STEP 6 Install seat slip covers Install back slip cover PN Install bottom slip cover PN Seat covers installed STEP 7 Mount the seat assemblies into the leg brackets as shown. 7


8 STEP 8 Install the eight (8) straight hoop support poles, PN and the four (4) bent hoop support poles, PN The holes near the ends of the poles faces inward. STEP 8 cont. Tighten hardware so that the ends of the bolts are even with the ends of the thin lock nuts. DO NOT OVERTIGHTEN! The poles must slide inside the bracket cutouts. 8
9 STEP 9 Install the hoop pole collars, PN to the hoop poles as shown. The lever will be in a downward position. STEP 10 Install the hoop poles, PN to the hoop support poles. Install the tow rope, PN and knot the ends. 9
10 STEP 11 Slide collar PN over the hoop poles. Secure the collar to the spreader pole using screw PN To store the spreader poles, simply loosen the tightener and collapse the pole. Swing the pole up and attach to the hoop as shown. 10
11 STEP 12 Extend the hoop poles until the spring buttons engage the holes near the ends of each hoop support pole. The poles will be fully extended. Support the hoop poles as pictured with the spreader poles to create a skeleton of the shelter. 11

12 STEP 13 Front hoop Drape the tent over the supported hoops, then go inside and attach the Velcro straps. Front hoop sleeves Remove the front spreader poles and front hoop poles. Feed the length of the pole through the front hoop sleeves sewn on the tent. Slide the front hoop poles onto the long bent hoop support poles. Attach the front hoop Velcro. Re-install the front spreader poles and attach the buckles on the side of the tent in the middle. Inspect the tent for proper fit. IMPORTANT! When collapsing the Adventure it is very important to collapse the front hoop poles first to relieve tension on the tent when folding. Failure to collapse the porch hoop poles first may cause the tent to tear at the corners and will not be covered under warranty. 12
13 STEP STEP 1412 To collapse the shelter: Detach all spreader poles and store them in their proper position. Detach sidewall Velcro on the inner-most canopy hoop poles and disconnect the attachment straps. Press the buttons on the hoop pole collars and slide each canopy hoop pole in as far as it will go. Fold down the poles, starting at the inner-most pole on either side, then the inner-most pole on the other side, etc. alternating the sequence of folding from side-to-side (see numbered sequence above). Disconnect the attachment straps on each side of the unit. Tuck the tent into the base between the poles as best you can. NOTE: It does not matter on which side you start the folding sequence since both lengths are equal. 13
14 - T i p s f o r U s e - Folding and transporting your Clam Ice Fishing shelter is easy: Unsnap the spreader poles and lay them in the bottom of the base. Push the RPS push buttons and retract each hoop, starting with the two floor hoops and working towards the middle. Rotate all retracted hoops to the resting position. Tuck the tent into the base and between the hoops so that no material is left hanging on the ground for transport. Cover with the Travel Cover* (PN an optional but recommended accessory to help prolong the life of the unit). We recommend the optional Runner Kit* (PN ) be mounted to the base of your Fish Trap (NOTE: Pulling behind an ATV or snowmobile may result in premature wear of the base). Make sure your ice shelter is completely dried out before storing for long periods of time. Store your Ice Shelter in a cool, dry place. Keep away from rodents. *See our web site at for these items and more! - S a f e t y I n s t r u c t i o n s - Please fully understand and follow all safety instructions as outlined. Failure to do so could result in severe injury or death. Do not use open flame heaters in your ice shelter. Injury or death may result from fire if tent fabric is exposed to open flame. The tent is not fireproof, but the fabric is treated with a fire retardant that meets CPAI-84 specifications. Application of any foreign substance may render the flame retardant properties ineffective. Ice Armor fabric will melt when contact is made with hot surfaces (i.e., heaters). Death from asphyxiation may result from use of oxygen depleting heaters. Open all vents for fresh air ventilation. Never leave shelter unattended when set up. Due to the increase in traffic (snowmobiles, autos, etc.) on area lakes, ice fishing can be hazardous at night. If you choose to fish at night or in poor visibility conditions, be sure to take precautions with lights or reflectors to show drivers your location. Night time: exterior reflectors must be visible to reduce risk of collisions. Death from asphyxiation may result from use of oxygen depleting heaters. Open all vents for fresh air ventilation. Injury or death may result from fire if tent fabric is exposed to open flame. Tent fabric is not fireproof. Fabric will burn with extended exposure to open flame. Do not use open flame products inside tent. Tent fabric is treated with fire retardant. Application of any foreign substance may render the flame retardant properties ineffective. Night time: exterior reflectors must be visible to reduce risk of collisions. This tent is made with flame resistant fabric which meets CPAI-84 specifications. 14
15 FREQUENTLY ASKED QUESTIONS Fish Trap FAQ s Find parts and accessories at Q: The zipper on my shelter freezes up and/or sticks. Is there anything I can use to help prevent this from happening? A: Yes, there are a couple of zipper lubricants available that our customers and pro staff have used with good results. Zipper Lube is one brand, often found in the camping section of sporting goods stores. This is a gel applied to the zipper. There are also a few silicone sprays that may used to lubricate the zipper. Q: Are there replacement bases available for my Clam/Fish Trap? A: We have bases available for current shelters. If your shelter is an older model, we may not have the exact replacement for that shelter, but may have one that will work. Go to or Customer Service at customerservice@clamcorp.com Q: What will help keep mice or rodents from eating the tent of my Clam or Fish Trap? A: We recommend that you keep your tent in a sealed plastic tote with laundry dryer sheets or moth balls. If the shelter is stored in a barn or shed take the tent off the house and store it in a rodent-free environment such as in your home. Q: I have lost the owner s manual for my shelter. Where can I get another one? A: There are owner s manuals available online at Q: Do you have replacement tents for Clam and/or Fish Trap shelters that are a few years old? A: We have replacement tents available, but are limited on tents that are several seasons old. Go to our on-line store at Q: The sliding seat poles, frame poles, or spreader poles of my shelter are sticking. Is there anything to put on these poles to help them slide better? A: Our pro staff and customers have used the following with good results. Zipper Lube, a gel, can be found in the camping section of your local sporting goods store. Apply the gel to the poles and use a rag to wipe off the excess. Car wax can be effective in helping to lubricate poles. Apply wax and rub well. Wipe off excess wax. When poles slide up and down against each other sometimes burrs are created. If this happens separate the affected poles and use a fine file or sand paper to deburr the pole(s) and then apply a thin coat of lubricant before rejoining the poles. Q: Must I put screws through the V-channel molding and tent of my shelter? A: Yes, putting screws through the V-channel helps to securely fasten the tent of your shelter to the base. This is a necessary step for proper installation and failure to do so will void the warranty. Q: I am trying to attach the V-channel molding to my shelter, but am having difficulty getting it started, as it seems too stiff and will not stay attached to the edge of the sled. What can be done to help? A: It may be difficult to attach the V-channel in cold conditions. Assembly of the shelter should be done indoors with the V-channel warmed with a hair dryer, heat gun, or soak it in a bucket of hot water for several minutes so it will be more pliable. Q: I can see pinholes of light through the fabric of my tent. What can be done? A: Tent fabric is a woven material and these pin holes are part of the thread that the coating did not attach to. Also, sometimes more pinholes appear along seams, and are simply holes where the stitching is pulling the fabric. In either case, this has no effect on the function of the fabric and is simply an appearance issue. Q: There are cracks on the inside finish of the fabric of my shelter. Is this normal? Can anything be done to fix this? A: It is normal for some of the dark colored coating to come off the inside of the tent. Over time, as you set up and take down the shelter, the dark coating can begin to flake off, especially along the folds in the fabric when the shelter is collapsed. This does not affect the function of the fabric. If you feel that too much light is now entering your shelter in the places where some of the coating has come off, you may wish to apply a new layer of rubberized coating. A product you may use for this is Loctite Color Guard (black), available in liquid (paint-on) or aerosol form. The product number is LOC This is available at many hardware or home improvement stores. Q: Would it be best to completely dry out my shelter after every time it gets used? A: It is recommended that your tent be dried out completely after each use. If it is not dried out, moisture may cause some damage to the shelter. This is especially important if the shelter is to be stored for a long period of time. Q: I bought the correct travel cover for my Fish Trap or flipover style shelter, but it does not seem to fit properly. Is there a certain way the travel cover should be put on? A: The travel covers are custom made and most of them do need to be put on a certain way. If you are have trouble getting the cover on over the last corner, or if it seems too short, try rotating the cover 180 degrees and pull it over the collapsed shelter. Q: How do I wash the tent of my ice fishing shelter? A: We recommend that you use a mild bleach and water solution (1 part bleach to 10 parts water), or a mild soap 15
16 detergent and water solution. This will help to get rid of mildew and odor in your tent. Be sure to dry the tent thoroughly. Note: We do not recommend using a washing machine to wash your tent, as this may damage the tent. Q: Will my fish house leak because I see pinholes in the fabric? A: While the fabric of the tents on the shelters is water resistant it is not waterproof, so some water from rain or melting snow may come through your tent. It is good to have small holes in the fabric to allow vapors inside the shelter to escape. Q: Will using a heater help to eliminate or reduce water vapor and condensation in my shelter? A: No. A byproduct of burning propane is water. A bigger heater will produce more water vapor. Also, the colder the temperature the more condensation there will be inside the shelter. Q: Are tent patch kits available for my flipover style Fish Trap or Clam ice fishing shelter? A: Yes, patch kits are available for a wide range of shelters, and may be purchased at clamoutdoors.com Q: How do I apply the patch material? A: When applying a patch it works best to spray some adhesive (we recommend using 3M #77 or 3M #90 spray adhesive) on to both surfaces the part of the tent where the patch is going to be applied and the patch itself. Wait until the adhesive begins to dry and becomes tacky, then place the patch on the tent, and they will stick together. (Note: Care should be taken to apply the patch evenly and smoothly, since wrinkles or uneven areas will be very difficult to correct once the two surfaces with the adhesive have come into contact with each other.) Q: Is there anything that can be applied to the outside of the tent to prevent water from coming through? A: There are products that can be applied to the outside of a tent that will make it make it more water repellent, such as Kiwi Camp Dry. Q: I have seen some flipover style shelters with a removable console. Where can I get one? A: This console now comes with a retractable leg, and can be purchased from our online Store at clamoutdoors.com Q: I have a plastic C-clip connector on the poles of my Clam/Fish Trap that have broken. Are these clips available for purchase? A: These clips, called Quick Connects, may be purchased through our online Store at clamoutdoors.com. Q: What is the proper way to set up and take down my Fish Trap? Set-Up: Face the seats. Grab the hoop that is on top and pull on it until you feel and hear the push buttons engaging in the full open position. Grab the next hoop and do the same until all the hoops are fully open. When finished, you should be inside the shelter. Install the roof spreaders, then the front spreader(s), and finally the rear spreader(s). (Spreader count varies with shelter style/configuration smaller shelters use only a rear spreader). Take-Down: Remove all spreaders. For adjustable spreaders, snug the tension knobs after compacting so that they don t vibrate out during transit. From inside the shelter, start with the rear wall hoop. Compress both buttons and retract the hoop, then the same with next inward hoop, etc. Continue until all upright hoops are collapsed. Step out of the shelter, disengage the porch hoop buttons and swing the porch hoop onto the previously retracted FREQUENTLY ASKED QUESTIONS hoops. Make sure the tent does not catch on the mount brackets while collapsing the porch hoop. Go around the shelter and tuck the tent material in between the rested hoops the best you can to keep the tent material from dragging during transit a travel cover works great here to hold everything together. ***Please Note: Make sure that the tent material is clear of the canopy brackets to minimize rubbing or possible tearing. Q : Do you ship outside of the United States? A: We are only set up to ship warranty or replacement parts required to MAINTAIN a Clam shelter (tents, poles, parts, patch kits, etc.). No accessories see a local dealer or an online dealer of Clam products. If the replacement parts are not warranty you will be charged for the product plus actual shipping charges. It will be the customer s responsibility to pay all importing costs (duties, taxes, etc) at the time the goods are delivered. Q: The poles to my Clam/Fish Trap have gotten bent out of place. Should I try to bend them back? A: It might be possible to bend the poles back into their proper place. If your bent pole is not creased lay it on a flat surface and bend it back into shape. If you need to order replacement poles you can do that on our online Store at clamoutdoors.com. 16
NOTICE: Once used, this shelter cannot be returned to the store. If you have a warranty claim, please contact Clam Corporation directly.
 Model No. - 8235 - p/n 108440 S p e c i f i c a t i o n s H e i g h t - 75 (24 packed) Width - 7 5 Depth - 144 (45 packed) W e i g h t 155 lbs. - Clam Customer Service Information - NOTICE: Once used,
NOTICE!!! Once used, this shelter cannot be returned to the store. ** Warranty cannot be honored without an original, dated receipt **
 Model No. - 8391 - p/n 109165 S p e c i f i c a t i o n s H e i g h t - 62 (17 packed) Width - 3 5 Depth - 98 (59 packed) W e i g h t 50 lbs. Instructions 103652 IMPORTANT - PLEASE READ: ******Warranty
NOTICE!!! Once used, this shelter cannot be returned to the store. ** Warranty cannot be honored without an original, dated receipt **
 Model No. - 9027 - p/n 109027 S p e c i f i c a t i o n s H e i g h t - 65 (24 packed) Width - 5 9 Depth - 132 (41 packed) W e i g h t 100 lbs. Instructions 103419 Denali TC ******Warranty Claim Information******
* * * * * * W a r r a n t y I n f o r m a t i o n * * * * * *
 Model No. - 9224 - p/n 109224 S p e c i f i ca t i o n s H e i g h t - 58 ( 14 p a c k e d ) Width - 3 6 to 50 Depth - 8 7 ( 50 p a c k e d ) W e i g h t 4 8 l b s. Instructions 1 0 3 7 8 3 * * * * * *
- Limitation of Liability -
 Model No. - 8398 - p/n 108884 S p e c i f i c a t i o n s H e i g h t - 65 (24 packed) Width - 5 9 Depth - 132 (41 packed) W e i g h t 95 lbs. Instructions 103146 Denali II - Clam Customer Service Information
NOTICE!!! Once used, this shelter cannot be returned to the store. ** Warranty cannot be honored without an original, dated receipt **
 Model No. - 8935 - p/n 109164 S p e c i f i c a t i o n s H e i g h t - 70 (26 packed) Width - 6 5 Depth - 86 (38 packed) W e i g h t 83 lbs. Instructions 103688 IMPORTANT - PLEASE READ: ******Warranty
- Limitation of Liability -
 Model No. - 8389 - p/n 108389 S p e c i f i c a t i o n s H e i g h t - 70 (22 packed) Width - 3 8 Depth - 110 (63 packed) W e i g h t 60 lbs. Instructions 102695 - Clam Customer Service Information -
NOTICE!!! Once used, this shelter cannot be returned to the store. ** Warranty cannot be honored without an original, dated receipt **
 Model No. - 8393 - p/n 108468 S p e c i f i c a t i o n s H e i g h t - 70 (26 packed) Width - 6 5 Depth - 86 (38 packed) W e i g h t 92 lbs. Instructions 103077 ******Warranty Claim Information******
* * * * * * W a r r a n t y I n f o r m a t i o n * * * * * *
 Mod el No. - 9709 - p/n 109709 S p e c i f i c a t i o n s H e i g h t -56 (Packed 20 ) Width -36 Depth -89 (Packed 45 ) W e i g h t 50# Instructions 104153 * * * * * * W a r r a n t y I n f o r m a t
- Limitation of Liability -
 Model No. - 8843 - p/n 108843 S p e c i f i c a t i o n s H e i g h t - 70 (26 packed) Width - 6 5 Depth - 86 (38 packed) W e i g h t 83 lbs. Instructions 103153 - Clam Customer Service Information - NOTICE:
- Limitation of Liability -
 Model No. - 8280 - p/n 108885 S p e c i f i c a t i o n s H e i g h t - 75 (25 packed) Width - 7 2 Depth - 92 (45 packed) W e i g h t 115 lbs. Instructions 103160 - Clam Customer Service Information -
- Limitation of Liability -
 The Clam Twin Hub I M o d e l N o. 9019 S p e c i f i ca t i o n s Center Height - 6 8 i n c h e s Hub-to-Hub - 6 1 i n c h e s Footprint 60x60 inches W e i g h t 13 lbs. Part Numbers: Twin Hub I: 109019;
* * * * * * W a r r a n t y Inf o r m a t i o n ******
 Mode l N o. - 9502 - p/n 109502 S p e c i f i c a t i o n s H e i g h t - 70 ( 2 6 p a c k e d ) Width - 6 5 Depth - 8 6 (38 p a c k e d ) W e i g h t 9 2 l b s. Instructions 1 0 3 994 * * * * * * W a
* * * * * * W a r r a n t y I n f o r m a t i o n * * * * * *
 Model No. - 9534 - p/n 109534 S p e c i f i ca t i o n s H e i g h t - 5 6 ( 14 p a c k e d ) Width - 3 5 Depth - 8 8 ( 43 p a c k e d ) W e i g h t 5 0 l b s. Instructions 1 0 3 9 9 6 * * * * * * W a
* * * * * * W a r r a n t y Inf o r m a t i o n ******
 Mode l N o. - 9538 - p/n 109538 S p e c i f i c a t i o n s H e i g h t - 61 ( 2 1 p a c k e d ) Width - 6 1 Depth - 8 3 (36 p a c k e d ) W e i g h t 8 5 l b s. Instructions 1 0 3 983 * * * * * * W a
- Limitation of Liability -
 Cabela s/ice Team 6x6 Hub Shelter M o d e l N o. 8432 S p e c if ica t i o n s H e i g h t - 72 inches Footprint 72x72 inches Instructions: 103284 Hub-to-Hub - 90x90inches W e i g h t 27 lbs. - Cust omer
- Cust omer Serv i c e I n for m ation -
 5x6 Cabin Shelter M o d e l N o. - 8888 - S p e c i f i c a t i o n s H e i g h t - 77 inches (9 packed) Depth - 7 2 i n c h e s (32 packed) W i d t h - 6 0 i n c h e s W e i g h t 75 lbs. p /n 108888
- Limitation of Liability -
 M o d e l N o. 9021 S p e c i f i ca t i o n s Center Height - 6 7 i n c h e s Hub-to-Hub - 75x75inches Footprint 60x60 inches W e i g h t 15 lbs. Part Numbers: Tamarack: 109021; Instruction No: 103722
Cabela s/ice Team 6x8 Hub Shelter M o d e l N o Cust omer Serv i c e I n for m ation -
 Cabela s/ice Team 6x8 Hub Shelter M o d e l N o. 8433 S p e c if ica t i o n s H e i g h t - 72 inches Footprint - 72x96 inches Instructions: 103285 Hub-to-Hub - 90x115 inches W e i g h t 32 lbs. - Cust
* * * * * * W a r r a n t y Inf o r m a t i o n ******
 Mode l N o. - 9543 - p/n 109712 S p e c i f i c a t i o n s H e i g h t - 75 ( 2 5 p a c k e d ) Width - 7 2 Depth - 9 2 (45 p a c k e d ) W e i g h t 115 l b s. Instructions 104188 * * * * * * W a r r
- L i m i t a t i o n o f L i a b i l i t y -
 M o d e l N o. 9281 S p e c i f i ca t i o n s Center Height - 9 0 i n c h e s Footprint 9 4 t o t a l s q u a r e f t. Hub-to-Hub - 1 4 0 x 1 4 0 i n c h e s W e i g h t 3 4 l b s. p / n 1 0 9 2 8 1 I
- Limitation of Liability -
 The Clam Summit Thermal & Summit Thermal FLR M o d e l N o. 8848 Summit Thermal 8845 Summit Thermal FLR S p e c i f i c a t i o n s Center Height - 8 4 i n c h e s Footprint - 72x96 inches Hub-to-Hub -
- Limitation of Liability -
 The Clam Exp edition & Exp edition FLR M o d e l N o. 8419 Expedition 8396 Expedition FLR S p e c i f i c a t i o n s H e i g h t - 72 inches Footprint - 60x72 inches Hub-to-hub - 70x90 inches W e i g
Cabela s/ Ice Team 6x6 Hub Shelter M o d e l N o Cust omer Serv i c e I n for m ation -
 Cabela s/ Ice Team 6x6 Hub Shelter M o d e l N o. 8432 S p e c if ica t i o n s H e i g h t - 78 inches Footprint 72x72 inches Hub-to-Hub - 90x90inches W e i g h t 27 lbs. - Cust omer Serv i c e I n for
C a b e l a s / I c e T e a m T C H u b S h e l t e r M o d e l N o C u s t o m e r S e r v i c e I n f o r m a t i o n -
 C a b e l a s / I c e T e a m 3 6 0 T C H u b S h e l t e r M o d e l N o. 9602 S p e c i fi cat i o n s H e i g h t - 8 0 i n c h e s Footprint 9 ft diameter W e i g h t 45 l b s. Instructions: 104071
8333 S p e c i f i c a t i o n s H e i g h t - 78 inches Footprint 72x72 inches Hub-to-Hub - 90x90inches W e i g h t 27 lbs.
 M o d e l N o. 8333 S p e c i f i c a t i o n s H e i g h t - 78 inches Footprint 72x72 inches Hub-to-Hub - 90x90inches W e i g h t 27 lbs. The Clam Base Camp p/n 108333 I nstruction No. 102868 - Clam
Otter Pro XT 1200 Cottage Installation and Set-Up Instructions
 Otter Pro XT 1200 Cottage Installation and Set-Up Instructions Otter Pro XT 1200 Cottage Fits Small Ultra-Wide Otter Pro and Otter II Sled Only Parts Identification and Check List MODEL NUMBERS: Complete
Otter XT 650 Cabin Installation and Set-Up Instructions
 Otter XT 650 Cabin Installation and Set-Up Instructions Otter XT 650 Cabin Fits Medium Otter Wild Sled Only Parts Identification and Check List MODEL NUMBERS: Complete Pkg Otter XT 650 Cabin 200891 2 1
Otter Pro XT Cabin Installation and Set-Up Instructions
 Otter Pro XT Cabin Installation and Set-Up Instructions Otter Pro XT Cabin Fits Medium Otter Pro and Otter II Sled Only Parts Identification and Check List MODEL NUMBERS: Complete Pkg Pro XT Thermal Cabin
Otter Pro X-Over Lodge Installation and Set-Up Instructions
 Otter Pro X-Over Lodge Installation and Set-Up Instructions Otter Pro X-Over Lodge Fits Magnum Otter II & Pro Sled Only Parts Identification and Check List MODEL NUMBERS: Complete Pkg Pro X-Over Lodge
INSTALLATION INSTRUCTIONS
 GENUINE PARTS INSTALLATION INSTRUCTIONS 1. DESCRIPTION: Hatch Tent 2. APPLICATION: See dealer application chart 3. PART NUMBER: 999T7 XR100 and 999T7 XY100 4. KIT CONTENTS: Item Qty Description A 1 Tent
FT054 BearMountain OWNER'S MANUAL
 FT054 BearMountain 10'x10'x84"(H) OWNER'S MANUAL PAT PENDING o 145 145 PENDING PAT o PAT PENDING 145 o 145 PENDING PAT o 145 o PENDING PAT 12 11 10 155 PAT PENDING o Assembly instructions IMPORTANT We
LM601 Landmark Permanent Blind
 LM601 Landmark Permanent Blind Get parts online at www.huntriversedge.com P/N: 26742 REV1: 01/13/17 2017 RETI All Rights Reserved INTRODUCTION Landmark Permanent Blinds are engineered with you the hunter
Otter XT Cabin Installation and Set-Up Instructions
 Otter XT Cabin Installation and Set-Up Instructions Otter XT Cabin Fits Medium Otter Wild Sled Only Parts Identification and Check List MODEL NUMBERS: Complete Pkg Otter XT Cabin 200962 2 1 PARTS LIST
GEAR GUIDE CABELA S SET NUMBER:
 WEST WIND DOME TENT GEAR GUIDE CABELA S SET NUMBER: 58-0518 WESTWIND 4 PLEASE READ THIS MANUAL IN ITS ENTIRETY PRIOR TO USING THIS PRODUCT. VISIT WWW.CABELAS.COM OR CALL 1-800-237-4444 FOR ASSISTANCE.
WARNING USING AND CARING
 OWNER S MANUAL WARNING Never use any fuel-burning products (stoves, lanterns, heaters, etc.) inside or within proximity of this tent. Use of fuel-burning products inside or within proximity of this tent
1946 READ AND SAVE THESE INSTRUCTIONS!
 EasyAwn Installation, Care and Maintenance Manual EasyAwn Quality, Since 1946 EasyAwn, LLC Toll Free: 877-EasyAwn http://www.easyawn.com READ AND SAVE THESE INSTRUCTIONS! EasyAwn Quarter Round Awning Installation
INSTANT GARAGE MODEL NO: CIG81224 ASSEMBLY INSTRUCTIONS PART NO: ORIGINAL INSTRUCTIONS
 INSTANT GARAGE MODEL NO: CIG81224 PART NO: 3503578 ASSEMBLY INSTRUCTIONS ORIGINAL INSTRUCTIONS GC1117 INTRODUCTION Thank you for purchasing this CLARKE Instant Garage. When erected, the CIG81224 garage
ORION TENT GEAR GUIDE CABELA S SET NUMBER: ,
 ORION TENT GEAR GUIDE CABELA S SET NUMBER: 58-2725, 58-2726 TWO-POLE PLEASE READ THIS MANUAL IN ITS ENTIRETY PRIOR TO USING THIS PRODUCT. VISIT WWW.CABELAS.COM OR CALL FOR ASSISTANCE 1-800-237-4444. SAVE
WARNING USING AND CARING. for use in extreme or varied soil conditions. For optional sand pegs Oztent recomends use of a Bluescrew Oztent Edition.
 OWNER S MANUAL WARNING Never use any fuel-burning products (stoves, lanterns, heaters, etc.) inside or within proximity of this tent. Use of fuel-burning products inside or within proximity of this tent
Quik Shade Go Hybrid Backpack Canopy 6 x 6 ft.
 DO NOT RETURN YOUR CANOPY TO THE PLACE OF PURCHASE Please contact ShelterLogic for questions, comments, parts & accessories, or assistance with any warranty related issues. www.shelterlogic.com/support
PIONEER LITE PATIO AWNING OWNER'S MANUAL
 A Manual Crank Operated Awning RV OWNER'S MANUAL TABLE OF CONTENTS Introduction... 2 Operating the Awning... 3 To Open the Awning:... 3 Adjusting the Pitch... 4 Rain Release Setting... 4 Setting the Arms
OWNER'S MANUAL CAMPOUT TABLE OF CONTENTS
 OWNER'S MANUAL CAMPOUT RV Before operating the awning, carefully review the Owner's Manual. The manual contains important safety information, detailed operating instructions, common maintenance procedures
Ridgeline (A) Installation Instructions
 Installation Instructions") Ridgeline (A) Installation Instructions Please read instructions thoroughly before starting installation **Remove all contents of the Softopper carefully to protect from scratches.** Windows scratch easily!
Ridgeline (A) Installation Instructions Please read instructions thoroughly before starting installation **Remove all contents of the Softopper carefully to protect from scratches.** Windows scratch easily!
SlimShady CONTENTS. SlimShady (1X) Tools Required: nut (4X) stake (2X) bolt (4X) wrench (1X) washer (4X) clamps (2X) stake sack (1X) key (2X)
 Tools Required: nut (4X) stake (2X) bolt (4X) wrench (1X) washer (4X) clamps (2X) stake sack (1X) key (2X)") SlimShady Tools Required: CONTENTS nut (4X) stake (2X) stake sack (1X) bolt (4X) wrench (1X) washer (4X) key (2X) SlimShady (1X) clamps (2X) 1 ASSEMBLE & INSTALL Be sure the awning is oriented correctly
SlimShady Tools Required: CONTENTS nut (4X) stake (2X) stake sack (1X) bolt (4X) wrench (1X) washer (4X) key (2X) SlimShady (1X) clamps (2X) 1 ASSEMBLE & INSTALL Be sure the awning is oriented correctly
Owner s Manual Truck Bed Tent
 Owner s Manual Truck Bed Tent Important! For safe and proper assembly, use, and care, read and follow all instructions. Everyone who uses this tent should first read this manual. 120810 www.kodiakcanvas.com
10 X 20 X 8 Dome Canopy
 10 X 20 X 8 Dome Canopy Warning Keep all flame and heat sources away from this tent fabric. Refer to labels for flamability specification. It is not fire proof. The tent fabric will burn if left in continuous
HARD DOOR UPGRADE KIT
 RV Accessories OWNER'S MANUAL HARD DOOR UPGRADE KIT FOR ADD-A-ROOM & BREEZEWAY SCREEN ROOMS THIS MANUAL SUPPLEMENTS THE ADD-A-ROOM INSTRUCTIONS TABLE OF CONTENTS First Time Assembly... 2 Assembling the
COPPER RIVER CABIN TENT
 COPPER RIVER CABIN TENT GEAR GUIDE CABELA S SET NUMBER: 58-2735 PLEASE READ THIS MANUAL IN ITS ENTIRETY PRIOR TO USING THIS PRODUCT. VISIT WWW.CABELAS.COM OR CALL FOR ASSISTANCE 1-800-237-4444. SAVE THESE
Installation Instructions
 Installation Instructions 3rd Generation Chevy Blazer & GMC Jimmy 3 Please read instructions thoroughly before starting installation **Remove all contents of the Softopper carefully to protect from scratches.**
READ AND SAVE THESE INSTRUCTIONS! EasyAwn Spear Awning Installation
 EasyAwn Installation, Care and Maintenance Manual EasyAwn Quality, Since 1946 EasyAwn, LLC Toll Free: 877-EasyAwn http://www.easyawn.com READ AND SAVE THESE INSTRUCTIONS! EasyAwn Spear Awning Installation
INSTINCT ALASKAN TENTS
 INSTINCT ALASKAN TENTS GEAR GUIDE CABELA S SET NUMBER: 58-2656, 58-1600, 58-2658 PLEASE READ THIS MANUAL IN ITS ENTIRETY PRIOR TO USING THIS PRODUCT. VISIT WWW.CABELAS.COM OR CALL 1-800-237-4444 FOR ASSISTANCE.
Assembly Instructions & User s Manual Academy USA Flag 10x10 Straight Canopy
 Assembly Instructions & User s Manual Academy USA Flag 10x10 Straight Canopy FSAAPT0301 Please keep this instruction manual for future reference Customer Service: (888) 922-2336, 7:00am to 12:00am Everyday
Honda Ridgeline Installation Instructions
 Honda Ridgeline Installation Instructions READ THIS... If you read these instructions from beginning to end before starting you will probably not need to look at them again during the installation, but
International Scout 80/800
 International Scout 80/800 Tools needed: sockets wrenches powered drill #2 phillips bit for drill #3 phillips bit for drill or screwdriver tape measure Contents: 2- bedrails, (2 pieces each) 4- bedrail
READ AND SAVE THESE INSTRUCTIONS! EasyAwn Standard Awning Installation
 EasyAwn Installation, Care and Maintenance Manual EasyAwn Quality, Since 1946 EasyAwn, LLC Toll Free: 877-EasyAwn http://www.easyawn.com READ AND SAVE THESE INSTRUCTIONS! EasyAwn Standard Awning Installation
Greenhouse 10ft X 10ft 9ft4in Wide x 10ft3in Deep x 5ft4in Side Height / 7ft10in Center Height
 Greenhouse 10ft X 10ft 9ft4in Wide x 10ft3in Deep x 5ft4in Side Height / 7ft10in Center Height These Tools Are Recommended: King Canopy Item #: GH1010 With 6 Legs, Cover, Elastic Ball Straps & Foot Pads.
OWNER S MANUAL AND WARRANTY FORM
 OWNER S MANUAL AND WARRANTY FORM Jet Tent F25-25DX manual.indd 1 WARNING Never use any fuel-burning products (stoves, lanterns, heaters, etc.) inside or within proximity of this tent. Use of fuel-burning
10 ft / 3m 10 ft / 3m INSTANT CANOPY ITM. /ART ASSEMBLY INSTRUCTIONS IMPORTANT, RETAIN FOR FUTURE REFERENCE: READ CAREFULLY
 10 ft / 3m 10 ft / 3m INSTANT CANOPY ITM. /ART. 966761 ASSEMBLY INSTRUCTIONS IMPORTANT, RETAIN FOR FUTURE REFERENCE: READ CAREFULLY Please check with your local regulations prior to purchasing this item.
General Purpose Shelter
 General Purpose Shelter 0' x 0' x ' ( x x. m) ASSEMBLY MANUAL Model NO.: - Tools required for assembly (not included) TM TABLE OF CONTENTS Important safety instructions... Intended use... Parts list......
FISH CAT SCOUT OWNER S MANUAL
 FISH CAT SCOUT OWNER S MANUAL ALWAYS WEAR A COAST GUARD APPROVED FLOTATION DEVICE WHEN OPERATING THE FISH CAT SCOUT. Know the limits of your abilities and the limits of your equipment. Changes in air temperature
Softopper Installation Instructions (CB)
") Softopper Installation Instructions (CB) Please read instructions thoroughly before starting installation **Remove all contents of the Softopper carefully to protect from scratches.** Windows scratch easily!
Softopper Installation Instructions (CB) Please read instructions thoroughly before starting installation **Remove all contents of the Softopper carefully to protect from scratches.** Windows scratch easily!
STEALTH PRO OWNER S MANUAL
 STEALTH PRO OWNER S MANUAL ALWAYS WEAR A COAST GUARD APPROVED FLOTATION DEVICE WHEN OPERATING THE STEALTH PRO. Know the limits of your abilities and the limits of your equipment. Changes in air temperature
OWNER'S MANUAL CAMPOUT TABLE OF CONTENTS
 OWNER'S MANUAL CAMPOUT RV Before operating the awning, carefully review the Owner's Manual. The manual contains important safety information, detailed operating instructions, common maintenance procedures
PIONEER LITE PATIO AWNING
 A Manual Crank Operated Awning RV OWNER'S MANUAL Before operating the awning, carefully review the Owner's Manual. The manual contains important safety information, detailed operating instructions, common
Enclosed Universal 10ft X 20ft 10ft8in Wide x 20ft Deep x 6ft8in Side Height / 9ft9in Center Height
 Enclosed Universal 10ft X 20ft 10ft8in Wide x 20ft Deep x 6ft8in Side Height / 9ft9in Center Height King Canopy Item #: BJ2PC With 8 Legs, Cover, Side Wall kit with Windows, Elastic Ball Straps & Foot
10FT. X 10FT. STRAIGHT WALL GAZEBO COMBO OWNER S MANUAL
 10FT. X 10FT. STRAIGHT WALL GAZEBO COMBO OWNER S MANUAL WARNING: Read carefully and understand all ASSEMBLY AND OPERATION INSTRUCTIONS before operating. Failure to follow the safety rules and other basic
Enclosed Hercules 10ft X 20ft 10ft8in Wide x 20ft Deep x 6ft8in Side Height / 9ft9in Center Height
 Enclosed Hercules 10ft X 20ft 10ft8in Wide x 20ft Deep x 6ft8in Side Height / 9ft9in Center Height King Canopy Item #: HC1020PCF With 8 Legs, White Cover, 2 Side Walls, 2 End Walls, Elastic Ball Straps
Hercules Enclosed Snow Load 10ft X 20ft 10ft 8in Wide x 20ft Deep x 6ft 8in Side / 9ft 6in Center Height
 Hercules Enclosed Snow Load 10ft X 20ft 10ft 8in Wide x 20ft Deep x 6ft 8in Side / 9ft 6in Center Height King Canopy Item #: HC1020PCSL With 8 Legs, King Truss Roof Cable System, Cover, and 4 Piece- Side-Wall
OWNER'S MANUAL AWNING EXTEND R TABLE OF CONTENTS
 OWNER'S MANUAL AWNING EXTEND R RV Before operating the awning, carefully review the Owner's Manual. The manual contains important safety information, detailed operating instructions, common maintenance
READ AND SAVE THESE INSTRUCTIONS! EasyAwn Dome Awning Installation
 EasyAwn Installation, Care and Maintenance Manual EasyAwn Quality, Since 1946 EasyAwn, LLC Toll Free: 877-EasyAwn http://www.easyawn.com READ AND SAVE THESE INSTRUCTIONS! EasyAwn Dome Awning Installation
Suggested Installation Instructions for: , Embroidered Front End Mask
 I I 1 Suggested Installation Instructions for: 602-246, 1975-1979 Embroidered Front End Mask 2-Cover Hooks 4-Air Foil Inserts 2-2" "U" Shaped Trim Locks 4-2" ADHESIVE BACKED Hook Strips 2-14" ADHESIVE
10 X20 Dome Garage ITEM #: G Dimensions: 10ft. Wide x 20ft. Deep x 8ft. Center Height
 10 X20 Dome Garage ITEM #: G10208 Dimensions: 10ft. Wide x 20ft. Deep x 8ft. Center Height WARNING: Keep all flame and heat sources away from this tent fabric. It is not fire proof The fabric will burn
ASSEMBLY & CARE INSTRUCTIONS
 ASSEMBLY & CARE INSTRUCTIONS 7 x TRAILER TENT SERIES 3 9 Part No. FT3711 - on road FT3923 - off road OPTIONAL SUNROOM Wall and floor kit Part No. FT3723 - on road FT39 - off road OPTIONAL SPARE ROOM Roof,
OWNER'S MANUAL FREEDOM AWNINGS
 OWNER'S MANUAL FREEDOM AWNINGS RV PATIO, WINDOW AND OTD AWNINGS Freedom Patio Awning Freedom Window and OtD Awnings Special Note: This manual provides a basic description of the product and the standard
THANK YOU. Thank you for purchasing your E-Z UP Instant Shelter Product!
 THANK YOU Thank you for purchasing your E-Z UP Instant Shelter Product! With proper care, this shelter will deliver years of trouble-free use. Please take a few minutes to read the use and care instructions
Softopper Installation Instructions
 Softopper Installation Instructions (O.S.) Please read instructions thoroughly before starting installation **Remove all contents of the Softopper carefully to protect from scratches.** Windows scratch
LODGE 460 CABIN. Part No ASSEMBLY & CARE INSTRUCTIONS
 LODGE 460 CABIN Part No. 920645 ASSEMBLY & CARE INSTRUCTIONS SPECIFICATIONS PRE USE Size: 460L x 360W x 240H cm Material: Heavy duty polycotton blend Walls: 250g/m2 Roof: 340g/m2 Windows: 6 Side & Rear
OWNER S MANUAL. ezup.com. 13 x 13 (4.0m x 4.0m) 10 x 10 (3.0m x 3.0m) 16 x 16 (5.0m x 5.0m)
 10 x 10 (3.0m x 3.0m) 16 x 16 (5.0m x 5.0m)") Shown: Aero Dome with optional awning, sidewall and custom graphics OWNER S MANUAL 10 x 10 (3.0m x 3.0m) 13 x 13 (4.0m x 4.0m) 16 x 16 (5.0m x 5.0m) ezup.com THANK YOU THANK YOU FOR PURCHASING YOUR AERO
Shown: Aero Dome with optional awning, sidewall and custom graphics OWNER S MANUAL 10 x 10 (3.0m x 3.0m) 13 x 13 (4.0m x 4.0m) 16 x 16 (5.0m x 5.0m) ezup.com THANK YOU THANK YOU FOR PURCHASING YOUR AERO
10ft X 20ft Titan Cable Truss System 10ft8in Wide x 20ft Deep x 6ft8in/9ft6in High
 10ft X 20ft Titan Cable Truss System 10ft8in Wide x 20ft Deep x 6ft8in/9ft6in High King Canopy Item #: TITAN1020 With 8 Legs, Woven Steel Cable Truss System (8pc anchors and 8pc 10ft sections of rope and
Mt. Adams 10 W x 7 D x 62 H
 Model # FT027 Mt. Adams 10 W x 7 D x 62 H Owner s Manual IMPORTANT We strongly suggest setting up your new tent before initial use to insure that all parts are present and to familiarize yourself with
9 PERSON INSTANT CABIN TENT. 15 x 9 x 78 (4.57m x 2.74m x 1.98m)
") 9 PERSON INSTANT CABIN TENT 5 x 9 x 78 (4.57m x.74m x.98m) FEATURES TECHNOLOGY & INSTANT 60 SECOND SETUP Patented instant technology makes setup and take down quick and easy. HEAT SHIELD TECHNOLOGY Special
9 PERSON INSTANT CABIN TENT 5 x 9 x 78 (4.57m x.74m x.98m) FEATURES TECHNOLOGY & INSTANT 60 SECOND SETUP Patented instant technology makes setup and take down quick and easy. HEAT SHIELD TECHNOLOGY Special
Hercules Snow Load 10ft X 20ft 10ft8in Wide x 20ft Deep x 6ft8in Side Height / 9ft6in Center Height
 Hercules Snow Load 10ft X 20ft 10ft8in Wide x 20ft Deep x 6ft8in Side Height / 9ft6in Center Height King Canopy Item #: HC1020PCSL With 8 Legs, Cable Truss System, Cover, 4 Piece Zippered Side-Wall Kit
Manufactured in our state of the art factory in China
 IMPORTANT We strongly suggest setting up your new tent before going camping to insure that all parts are present and to familiarize yourself with the tents assembly. This will have a great effect on how
Header Bikini Installation Instructions
 Header Bikini Installation Instructions For: Jeep Wrangler 1997-2002 Part Number: 52525 with or without Soundbar with or without Door Surround DO NOT INSTALL THIS PRODUCT ON ANY VEHICLE OTHER THAN THOSE
Prospect Rock 10 W x 8 D x 81 H
 Model # FT049 Prospect Rock 10 W x 8 D x 81 H Owner s Manual IMPORTANT We strongly suggest setting up your new tent before initial use to insure that all parts are present and to familiarize yourself with
PARTS INCLUDED IN YOUR KIT. You may want to lay them out in this manner for accessibility. Foam has NO adhesive to touch truck finish.
 -'07 Ford Sport Trac Tarp Assembly with Cab Rail, Tail Rail and Support Bows attached. Left and Right Side Rail Assemblies Sport Trac Brackets (x4) Clamp Bolts Allen Wrench PARTS INCLUDED IN YOUR KIT.
Table of Contents. Safety... 2 Specifications... 4 Assembly Maintenance... 6 Parts List... 7 Warranty... 8
 Table of Contents Safety... Specifications... 4 Assembly... 4 Maintenance... 6 Parts List... 7 Warranty... 8 WARNING SYMBOLS AND DEFINITIONS This is the safety alert symbol. It is used to alert you to
12FT. x 12FT. Pop-Up Straight Leg Canopy. Owner s Manual
 12FT. x 12FT. Pop-Up Straight Leg Canopy Owner s Manual s WARNING: Read carefully and understand all ASSEMBLY AND OPERATION INSTRUCTIONS before operating. Failure to follow the safety rules and other basic
Garden Party 13ft X 13ft 12ft 9in Wide x 12ft 9in Deep x 6ft3in Side Height / 10ft4in Center Height
 Garden Party 13ft X 13ft 12ft 9in Wide x 12ft 9in Deep x 6ft3in Side Height / 10ft4in Center Height King Canopy Item #: GP1313 With 4 Legs, Foot Pads, Cover & Screens. Distributed by: PIC America, LTD.
ASSEMBLY & CARE INSTRUCTIONS. 7 x4 TRAILER TENT SERIES 4 9. OPTIONAL SUNROOM Wall and floor kit. OPTIONAL SPARE ROOM Roof, wall and floor kit
 ASSEMBLY & CARE INSTRUCTIONS 7 x TRAILER TENT SERIES 9 Part No. TM709 OPTIONAL SUNROOM Wall and floor kit Part No. TM723 OPTIONAL SPARE ROOM Roof, wall and floor kit Part No. TM76 Please keep these instructions
Hercules 18ft X 20ft 17ft9in Wide x 20ft Deep x 6ft8in Side Height / 11ft6in Center Height
 Hercules 18ft X 20ft 17ft9in Wide x 20ft Deep x 6ft8in Side Height / 11ft6in Center Height King Canopy Item #: HC1820PC With 8 Legs, White Drawstring Cover, Elastic Ball Straps & Foot Pads. Distributed
RAFTER VI. Installation and Operation CAREFREE WITH AUTOMATIC AWNING SUPPORT. RV Accessory PRODUCT OVERVIEW
 CAREFREE RAFTER VI RV Accessory WITH AUTOMATIC AWNING SUPPORT Installation and Operation PRODUCT OVERVIEW The gives the awning user the ability to easily tighten the center fabric when the awning is extended.
Instruction Manual. Mag Mission 8P Tent Style# Please keep this instruction manual for future reference. Customer Service: (877)
") Instruction Manual Mag Mission 8P Tent Style# 153640 Please keep this instruction manual for future reference Customer Service: (877) 579-1550 Business Hours: Monday thru Friday 8:30am to 5:30pm, EST (Made
Instruction Manual Mag Mission 8P Tent Style# 153640 Please keep this instruction manual for future reference Customer Service: (877) 579-1550 Business Hours: Monday thru Friday 8:30am to 5:30pm, EST (Made
Nova. Rollator OWNERS HANDBOOK. Product Code: WA01063
 Nova Rollator OWNERS HANDBOOK Product Code: WA01063 Your Tuni Nova Rollator Product Features 1. Easily removable bag attached. 2. Easy to fold, easy to store and transport. 3. Easy to adjust handle to
INSTALLATION INSTRUCTIONS
 INSTALLATION INSTRUCTIONS Accessory HATCH KIT Application 2009 ELEMENT Publications No. AII 41008 Issue Date DEC 2008 PARTS LIST Tent bag 13 Stakes 4 Guide ropes Tent 2 Awning pole caps Gear loft 2 Tie
Garden Party 10ft X 10ft 10ft Wide x 10ft Deep x 6ft3in Side Height / 9ft7in Center Height
 Garden Party 10ft X 10ft 10ft Wide x 10ft Deep x 6ft3in Side Height / 9ft7in Center Height King Canopy Item #: GP1010 With 4 Legs, Foot Pads, Cover & Screens. Distributed by: PIC America, LTD. 1730 Five
Assembly Manual. OLM Retractable Canopy for 12X20 Breeze Pergola by Outdoor Living Today. Revision #11 October 5, 2017
 Assembly Manual OLM Retractable Canopy for 12X20 Breeze Pergola by Outdoor Living Today Revision #11 October 5, 2017 Care and Maintenance - Canopy should be removed in winter to reduce the chance of collapse
Installation Instructions Supertop NX
 Installation Instructions Supertop NX Vehicle Application: Jeep Wrangler Unlimited 2004 2006 Part Number: 54721 www.bestop.com - We re here to help! Visit our web site and click on Ask a Question. Click
2-N-1 Expandable 12ft X 20ft / 20ft x 20ft 19ft7in Wide x 20ft Deep x 10ft3in Center Height (12x20) / 11ft7in Center Height (20x20)
 / 11ft7in Center Height (20x20)") 2-N-1 Expandable 12ft X 20ft / 20ft x 20ft 19ft7in Wide x 20ft Deep x 10ft3in Center Height (12x20) / 11ft7in Center Height (20x20) King Canopy Item #: EX1220 With 8 Legs, Cover with Leg Skirts (12x20
2-N-1 Expandable 12ft X 20ft / 20ft x 20ft 19ft7in Wide x 20ft Deep x 10ft3in Center Height (12x20) / 11ft7in Center Height (20x20) King Canopy Item #: EX1220 With 8 Legs, Cover with Leg Skirts (12x20