Re Keying R1200RT Cases Re Keying R1200RT R1200ST K1200GT Cases Created 29/01/ Amended 04/09/2012
|
|
|
- Russell Lewis Warren
- 6 years ago
- Views:
Transcription
.")
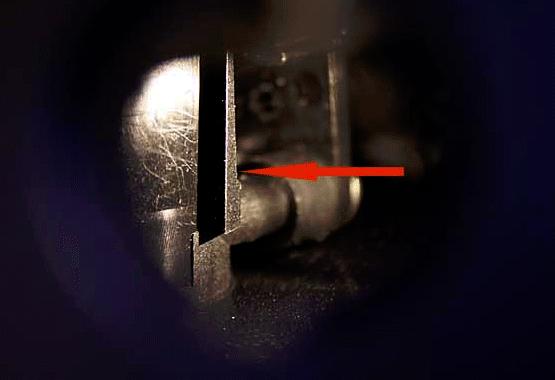
1 Re Keying R1200RT Cases Re Keying R1200RT R1200ST K1200GT Cases Created 29/01/ Amended 04/09/2012 This walkthrough describes re-keying the large 49L top case for the BMW R1200RT / ST & K1200GT, but the methods described below should also also suit the panniers and the smaller 28L top case. Tools: Paper clip. Long thin screwdriver. Coin (to remove the access bung). A sheet of white A4 paper to work on while changing wafers. And a very small torch to light the way (a torch bulb on a wire would be great). Pictured below, my home made lock barrel extractor. It's only a paper clip straightened out and taped tightly to the end of an electrician's screwdriver. Note the end is not bent over exactly 90 degrees, it's angled down slightly. Don't snip off the end of the paper clip to shorten it as it also sharpens the end of the wire making it difficult to move over the lock surfaces. The Maglite Solitaire torch is actually a poor substitute for a bulb on the end of a wire (which is what I used to take the third picture down with). Lock barrel removal: Remove the lock access bung by turning it a quarter turn and lifting it out with a small screwdriver (a piece of insulating tape stuck to it works well too).

2 Place the working key in the lock and turn it to the locked position; this aligns the lock barrel retaining wafer with the release hole. This is a picture taken through the access hole in the top case, and is just as you should see the mechanism The red arrow is pointing directly at the lock barrel release hole in the side of the lock mechanism, immediately underneath the heavily moulded lip.

3 'This is gonna need some patience...!' Shine a very small torch through to illuminate the lock mechanism and probe around for the release hole gently. Once the probe drops in to the release hole, almost no pressure is needed to depress the lock retaining wafer and release the lock barrel. Use the key to pull the lock barrel out, but be careful as the lock retaining wafer and its spring are free to drop out. All the other lock wafers will be held in place by the key. To help guide you to the release hole, here's a side view of a partially disassembled lock from one of my panniers. The blue line represents the outer shell of the case, the orange arrow is pointing directly at the release hole and its also the direction you will be viewing the lock through the access hole.

4 Update 4th Sept 2012 I've received information from Conrad in Australia the lock access has been changed, there is now a cover over the lock with a slot in it. The release hole in the lock barrel is some 20mm behind the slotted cover, you will probably need a longer probe on the end of your screwdriver for this type of lock. This animated picture should help you aligned your probe.
5


6 Pannier locks: If you want to Re Key a pannier you need to know the lock mechanism is rotated 180 degrees in the case, so instead of probing below the heavy moulding to release the lock barrel, you need to probe above it. It's not easy, but with patience you should be able to release the lock barrel, if you have the lock in

7 your hand now, it's time to move on to re keying. Re Keying Lock Barrel: Type 1 The lock is a Wafer Tumbler type, with the key removed the wafers are free to be changed. counting from the key end there are 6 lock wafers, 3 in the top and 3 in the bottom - plus a lock retaining wafer in the last slot. Pictured below are the 4 different wafers. Top row are the lock wafers, all numbered. Bottom row is the lock retaining wafer and spring.

8 Hold the lock barrel gently between fingers and thumb so the wafers both top and bottom are held in place and pull out the key. As the key comes out you will feel the wafers riding up and down between your fingers - DO NOT LET GO. Now, put your normal ignition key in to the lock barrel. Once its fully home you can safely let the lock barrel go again. Take a close look at the 6 wafers in the barrel (there is no seventh wafer, do not fit one!) at the end of the lock barrel is the lock pawl, it was this you pressed in to release the lock barrel from the case) correct wafers will be laid completely level top and bottom with the lock barrel, incorrect wafers will be slightly proud, either sticking up or down from the lock barrel, these obviously are the ones to change.

9 With the correct lock wafers in place, all lay even both top and bottom. You have options modifying the lock to suit your key: 1, You can buy BMW's Lock Repair Kit. Part No: to obtain spare wafers and springs.
 4, After swapping wafers around to obtain the best fit, remaining incorrect wafers")
10 2, You can try swapping around the incorrect wafers in the lock barrel as they can be correct when placed in another position. 3, You could leave out wafers and spring that you cannot correct (don't leave out too many as this reduces security) 4, After swapping wafers around to obtain the best fit, remaining incorrect wafers could be ground off flush (which I don't recommend!) Re Keying Lock Barrel: Type 2 This lock is the same Wafer Tumbler type as above, but, with the key removed the wafers are still retained by a pin through the length of the lock barrel. To access the pin you need to remove the stainless steel cap from the key end of the lock barrel. Carefully prise the edges of the cap away from the lock barrel where they are crimped in with a small screwdriver or other suitable tool. Under the cap you will find the the rain guards and springs, remove them carefully, don't loose the springs!


11 Under the rain guards is the retaining pin (arrowed in red). With the pin removed, the wafers are free to be changed. After changing the lock wafers to suit your key, as described in the section above, replace the pin, rain guards and springs. Replace the cap and re crimp it to the lock barrel with a small screwdriver

12 or punch and hammer. My thanks to Jim VonBaden for above pictures and descriptions of the 'Type 2 Pinned Lock Barrel', and to all those who contributed to the project on this thread from the BMW Sport Touring forum Re Keying. I recommend you read it for Jim's and others experiences of re keying their cases. Thank You. Lock replacement: Offer the lock barrel up to the lock mechanism with the lock retaining wafer facing the 'Release' position, note there is a 'lead in' arrowed in red to ease the lock retaining wafer down. gently push the lock barrel in until it stops, turn it 90 degrees clockwise while still pushing gently and the lock barrel will drop in to place with a click.

13 All you need to do now is test the lock, if all's well replace the access bung, and you're done! Lubrication: You may want to re-lubricate the lock and parts during assembly, I used a light coating of silicon grease obtained quite cheaply from a plumbers' merchants. Lock barrel removal without a key: I get lots of s from people who have purchased cases but don't have the keys wondering if they can still change the locks, here's what you can and cannot do. If the case lid is OPEN and the lock barrel is in the LOCKED POSITION but you don't have the correct key. You can still remove the lock barrel using the procedure shown above, just use a key that will fit the lock (even if it won't turn or unlock) or any hook tool that will pull the lock barrel from the case once its been released. If the case lid is OPEN but the lock barrel is in the UNLOCKED position. or If the case lid is CLOSED and the lock barrel is in the LOCKED position. You can't remove the lock barrel using the procedure shown above. You could try a lock smith to remove the lock barrel or you could drill the lock barrel out.

14 Buying a used case without a key: If you are considering buying a used case without a key all I can suggest is you ask the seller to send the case to you locked, with the release handle pushed in and the lid open. Something placed between the lid and the case will help prevent damage to the lock mechanisms while in transit. Notes: The BMW 1200 series locks share a very similar construction to the 1100/1150 series bikes, six lock wafers and one lock retaining wafer. the main difference with the lock itself is that the lock wafers read their position from the track cut in to the sides of the key instead of the saw tooth profile on the top and bottom of a more traditional key. This is Wikpedia's description of a wafer tumbler lock. At the time of writing, the price of the Lock Repair Kit ('Lock rep kit' part No: ) is vat, I obtained my kit from UK supplier Motorworks

15 According to the BMW ETK parts DVD, the above repair kit also suits:- K40 K1200S K43 K1200R K44 K1200GT K25 R1200GS K26 R1200RT K28 R1200ST It's highly likely the K1200 machines listed above share a similar lock layout, so this guide could help these owners too. Disclaimer This page is offered as a guide only Any work you carry out on your motorcycle you do so entirely at your own risk
BMW K1200GT (RS) Throttle Spring Relaxation,v1.0 Documented by Matt McCabe
 Throttle Spring Relaxation,v1.0 Documented by Matt McCabe") BMW K1200GT (RS) Throttle Spring Relaxation,v1.0 Documented by Matt McCabe http://www.k12gt.com/ Disclaimer: You bear all responsibility for the results of this procedure. No whining! Starting with Larry
BMW K1200GT (RS) Throttle Spring Relaxation,v1.0 Documented by Matt McCabe http://www.k12gt.com/ Disclaimer: You bear all responsibility for the results of this procedure. No whining! Starting with Larry
functionality with the necessary maintenance tools stored in a convenient built in tool box, as well as parallel handles for
 GuilloMax User Manual The Guillomax has distinct features such as its unique structure and ease of cutting. It combines symmetry with functionality with the necessary maintenance tools stored in a convenient
Product instruction manual Ream Cutting Systems RE3943, RE3946, RE3947, RE3971, RE3952E
 Product instruction manual Ream Cutting Systems RE3943, RE3946, RE3947, RE3971, RE3952E The Trimfast Ream Cutters are reliable, high performance cutters that will give you the results you need quickly
VEPR Round Drum Disassembly and Assembly
 VEPR 12 25 Round Drum Disassembly and Assembly Required Tools ¼ Allen Wrench Flat Head Screwdriver Drum Parts List Drum Body Carousel Center Bolt Dummy Rounds Carousel Lock Spring Clear Drum Cover Step
JARVIS. Model 70 Airsnip Air Powered Scissors
 Air Powered Scissors EQUIPMENT SELECTION... Ordering No. Airsnip Model 70... 4019009 Air Filter/Regulator/Lubricator.. 3022003 Balancer... 1350084 Power--Pak (250 PSI)... 4026016 TABLE OF CONTENTS... Page
Tank. Part B, Section 1. This section covers the following unit configurations. Pump Piston Pump (E or G)
") Part B, ection Model Voltage This section covers the following unit configurations. 3400V All Pump Piston Pump (E or G) Manifold Control 4-Port (A) Vista tandard (V) Vista Pattern (PC) Vista Temperature
Part B, ection Model Voltage This section covers the following unit configurations. 3400V All Pump Piston Pump (E or G) Manifold Control 4-Port (A) Vista tandard (V) Vista Pattern (PC) Vista Temperature
An Improved Pedestal To A Version One Worksurface
 Steelcase, Inc. Grand Rapids, MI 49501 U.S.A. 1-888-783-3522 An Improved Pedestal To A Version One Worksurface NOTE: This installation applies to 25, 30, and 35 deep worksurfaces with lock rail only. VERSION
Door Bushing Replacement & Latch Adjustment Monaco Group Coaches
 Door Bushing Replacement & Latch Adjustment Monaco Group Coaches Contents Door Latch Adjustment & Repair... 1 Symptoms:... 1 Replacing the bushing VS. Adjusting the latch rods.... 1 How the bushing works....
INSTALLATION INSTRUCTIONS AND OWNER'S MANUAL AWNINGS. For trailers & motor homes with straight sides TOOLS REQUIRED
 AWNINGS INSTALLATION INSTRUCTIONS AND OWNER'S MANUAL For trailers & motor homes with straight sides TOOLS REQUIRED 1/4" electric drill Ratchet handle kit 3/8" & 7/16" socket No. 1 and No. 2 screwdriver
FREEDOM BUTTON KIT INSTALLATION GUIDE STEP 1
 FREEDOM BUTTON KIT INSTALLATION GUIDE Installation of the Freedom Button kit is very simple and similar to the installation of a standard rear takedown pin and bolt catch latch. Before installing your
Assembly instructions for Eurotramp trampolines Series: Ultimate, Grand Master Exclusiv, Grand Master, Master
 Assembly instructions for Eurotramp trampolines Series: Ultimate, Grand Master Exclusiv, Grand Master, Master 1. Assembly instructions 2. Attaching the plastic coated steel cables on the Ultimate frame
4A1-114/114KR & 4A1-2 MANUAL TENSIONERS
 M L. C O O N AL TO 4A1-114/114KR & 4A1-2 W W W.T R AD IT IO MANUAL TENSIONERS READ THESE INSTRUCTIONS CAREFULLY. FAILURE TO FOLLOW THESE INSTRUCTIONS CAN RESULT IN SEVERE PERSONAL INJURY. GENERAL SAFETY
INFRARED BURNER KIT INSTRUCTIONS
 3 INFRARED BURNER KIT INSTRUCTIONS (HOT SURFACE IGNITION) 5 1 4 NOTE: This unit has been retrofi tted with an infrared burner. Model # 3050 # 3060 Included parts 2 6* PARTS INCLUDED 1. Infrared burner
* * 4023 KR. Step 1 Prepare the Keyed Removable Unit. Not for use on electric or fire rated removable mullions
 condition. *64009-00* 64009-00 Keyed Removable Mullions 403 KR Installation Instructions Not for use on electric or fire rated removable mullions This kit includes the following parts: (Not to scale) 5/6
Instruction Manual Remote Swabbing and Microbiological Sampling and Teflon template tools Version , Rev.0
 ASSEMBLY AND OPERATIONAL INSTRUCTIONS The remote swabbing and microbiological sampling tool and the Teflon template tool are shipped partially assembled. Complete assembly instructions are provided below:
* * KR54-F, KR9854 & KR9954 Installation Instructions. Read All Warnings Before Starting Installation! Index:
 *941061-00* 941061-00 Keyed Removable Mullion KR54-F, KR9854 & KR9954 Installation Instructions CLASSIFIED CLASSIFIED C Read All Warnings Before Starting Installation! Index: General Information ----------------
BERYL Service Guide. Travel Adjust OTT Change
 BERYL Service Guide Travel Adjust OTT Change SERVICE OVERVIEW This manual will guide you step by step performing a travel adjust and OTT setting change to your Beryl suspension fork. Please follow each
MYRIAD Banner Stand is a trademark of Skyline Exhibits. Patent Pending PN32294-B. MYRIAD Banner Stand
 is a trademark of Skyline Exhibits Patent Pending 1.1 1. Banner Stand Setup 1.1 Remove banner stand from standard case or Arrive Portable Display & Workstation and assemble pole. 1.2 Insert pole into base
Thermostatic Griddle Field Service Kit Instructions
 Thermostatic Griddle Field Service Kit Instructions The following document provides instructions on how to install a Garland Thermostatic Griddle Field Kit and is applicable to each 2 section of a Garland
SERVICE MANUAL- M126
 SERVICE MANUAL- MANUAL CAN OPENER- MODEL # 2 1 Model #2 Can Opener Assembly Procedure The Model #2 can opener will be assembled according to the following procedure. I. Model #2 Handle and Arbor Assembly
INFRARED BURNER KIT INSTRUCTIONS
 6 4 3 2 INFRARED BURNER KIT INSTRUCTIONS 1 Model # 3049 (A790, A660, & A530) Model # 3051 (A540, & A430) Included parts 5 NOTE: This unit has been retrofi tted with an infrared burner. PARTS INCLUDED 1.
INSTALLATION INSTRUCTIONS
 INSTALLATION INSTRUCTIONS KR54, KR1654, & KR4954 Keyed Removable Mullion NOT FOR USE ON ELECTRIC OR FIRE RATED MULLIONS. This kit includes the following parts: (Not to scale) WARNING Remove key, reinstall,
Installation Guide: Round Trampoline
 Trampolines & trampoline parts designed to survive in the harsh Oz climate. www.oztrampolines.com.au Installation Guide: Round Trampoline Safety Tips Here at Oz Trampolines we are passionate about your
M129 SERVICE MANUAL- M129 MODEL #G-2 MANUAL CAN OPENER
 SERVICE MANUAL- M129 MODEL #G-2 MANUAL CAN OPENER Model #G-2 Can Opener Assembly Procedure The Model #G-2 can opener will be assembled according to the following procedure. I. Model #G-2 Handle and Arbor
Genesis. Side Burner Accessory Installation. Step 3. Step 1. Step 2. For use with Genesis Gas Barbecues Only
 Genesis Side Burner Accessory Installation For use with Genesis Gas Barbecues Only Step 1 WARNING: All gas controls and supply valves should be in the OFF position. You will need: Side burner assembly
Contents. Awnings USA - Full Protective Hood Manual Instructions ft 11" - 11ft 6" Awnings
 Awnings USA - Full Protective Hood Manual Instructions Contents Warning We recommend that two or more people are required to lift the awning into place. 4ft 11" - 11ft 6" Awnings 8 x Expansion bolts **
Instructional Booklet
 Instructional Booklet 936-894-3292 Thank you for choosing The Bathmaster! You are on your way to creating an unmatched bathing experience both for you and the lucky animal. The Bathmaster is designed to
Otter Pro X-Over Lodge Installation and Set-Up Instructions
 Otter Pro X-Over Lodge Installation and Set-Up Instructions Otter Pro X-Over Lodge Fits Magnum Otter II & Pro Sled Only Parts Identification and Check List MODEL NUMBERS: Complete Pkg Pro X-Over Lodge
Installation and User s Manual 12 x 10 MOTORIZED AWNING
 12 x 10 MOTORIZED AWNING Installation and User s Manual 12 x 10 MOTORIZED AWNING 088-1763-0 Stop Please read and understand this manual before any assembly or use of this product. Before beginning assembly
American Classic Rear Terrain Hub Bearing Change, Cassette Body Swap and Overhaul Instructions.
 12 x 142mm Thru Axle Retrofit Page 1 IDENTIFY YOUR TERRAIN HUB To identify, see the non-drive side of the hub (side without the cassette). Terrain hubs are in Terrain, Terrain Tubeless, and TCX Trekking
Operation, Cleaning & Maintenance. For Aluminium Secondary
 , Cleaning & Maintenance For Aluminium Secondary Contents Horizontal Sliders 3 Vertical Sliders - Non-Balanced 4 Vertical Sliders - Balanced 5 Vertical Sliders - Tilt Back 6-7 Lift Outs 8 Hinged Units
WHAT TO KNOW BEFORE INSTALLING...
 WL600922H WL601022H WL601122H WL502086H WL602376H WL602322H Please read the information sheet before proceeding. WHAT TO KNOW BEFORE INSTALLING... 1. 2. When positioning the seat onto the pan ensure that
Otter Pro XT Cabin Installation and Set-Up Instructions
 Otter Pro XT Cabin Installation and Set-Up Instructions Otter Pro XT Cabin Fits Medium Otter Pro and Otter II Sled Only Parts Identification and Check List MODEL NUMBERS: Complete Pkg Pro XT Thermal Cabin
Auto Rewind Hose Reel 10M / 20M / 30M Models
 Auto Rewind Hose Reel 10M / 20M / 30M Models Instruction Manual 10M / 20M / 30M Auto Rewind Hose Reel Installation, Hose Replacement and Troubleshooting Guide Product Codes: 1110H / 1120H / 1130H Models
Operating Instructions
 Operating Instructions OVERVIEW Read the Before You Begin section on page 11 of the ProFiller 3700/3800 Manual v 1.2.1 before using this machine. A. ORIENTATION OF OUTER CAPSULES Orient the capsules as
Auxiliary 63.5l Fuel Tank Ford/Mazda Pick-up Truck 2012-Current READ ME! IMPORTANT WARNING!
 Auxiliary 63.5l Fuel Tank Ford/Mazda Pick-up Truck 2012-Current ENG FTFM006 90 min READ ME! Thank you for purchasing a Front Runner Ford/Mazda Pick-Up Truck 2012 - Current Fuel Tank. Before you start,
COMPASSION UK EVENTS
 COMPASSION UK EVENTS setting up the stand Here, you will find step-by-step instructions for the various stands and other equipment. These will differ depending on the event. SETTING UP A PULL-UP BANNER
FagronLab FG. Semi-automatic capsule filling machine. User Manual
 Semi-automatic capsule filling machine User Manual Table of contents 1. Introduction... 4 2. Service.. 4 3. Warranty... 4 4. Overview... 5 System features... 5 FagronLab FG-1 Filler Base & Orienter Base...
ELE-3COP-375 Title - Braid termination using a Band Strap Adaptor.
 Before starting work please read this document carefully and note the guidance given. 1 Purpose and Scope This COP describes the procedure to be used when carrying out the installation of a Band Strap
When moving the frame don t force anything! Move the leg to allow the brace to go over the rod.
 THE IDLER Assembly and Care Instructions General notes Please read these instructions in their entirety before constructing your Idler Construction Before you begin constructing your Idler consider where
I N ST R UC T I ON MODELS 1612E, 1712E & 1712RE SLICERS. FORM Rev. B (10-97) 1712RE 701 S. RIDGE AVENUE TROY, OHIO 45374
 1712RE 701 S. RIDGE AVENUE TROY, OHIO 45374") I N ST R UC 1712E T I ON MODELS 1612E, 1712E & 1712RE SLICERS S ML-104546 ML-104547 ML-104548 1612E 1712E 1712RE 701 S. RIDGE AVENUE TROY, OHIO 45374 FORM 19238 Rev. B (10-97) TABLE OF CONTENTS GENERAL......................................................................
I N ST R UC 1712E T I ON MODELS 1612E, 1712E & 1712RE SLICERS S ML-104546 ML-104547 ML-104548 1612E 1712E 1712RE 701 S. RIDGE AVENUE TROY, OHIO 45374 FORM 19238 Rev. B (10-97) TABLE OF CONTENTS GENERAL......................................................................
Vanagon Ladder Kit Assembly & Installation Instructions
 Rocky Mountain Westy Vanagon Ladder Kit Assembly & Installation Instructions Introduction Thank you for purchasing the Rocky Mountain Westy Vanagon Ladder Kit. We pride ourselves in the products we develop
1612P MODEL 1612P SLICER MODEL EXECUTIVE OFFICES 701 RIDGE AVENUE TROY, OHIO FORM (4-95)
") 1612P MODEL 1612P SLICER MODEL 1612P ML-104587 EXECUTIVE OFFICES 701 RIDGE AVENUE TROY, OHIO 45374-0001 FORM 19370 (4-95) Installation, Operation, and Care of MODEL 1612P SLICER SAVE THESE INSTRUCTIONS
1612P MODEL 1612P SLICER MODEL 1612P ML-104587 EXECUTIVE OFFICES 701 RIDGE AVENUE TROY, OHIO 45374-0001 FORM 19370 (4-95) Installation, Operation, and Care of MODEL 1612P SLICER SAVE THESE INSTRUCTIONS
Type N550 Packing Removal/Replacement
 Instruction Manual MCK-1155 Type N550 April 1981 Type N550 Packing Removal/Replacement! WARNING Only qualified servicemen should attempt to repair these valves. The skill required is similar to the complexity
Primrose Awnings - Full Cassette Manual & Electric Instructions
 Primrose Awnings - Full Cassette Manual & Electric Instructions Contents Warning 2.0m - 3.5m Awnings 8 x Expansion bolts ** 2 x brackets 1 x Awning 1 x Winder 4.0m - 5.0m Awnings 12 x Expansion bolts **
Patagonia Transport Roller Telescoping Handle Replacement
 Patagonia Transport Roller Telescoping Handle Replacement Here s how to replace a jammed or stuck telescoping handle on your Patagonia Transport Roller Luggage, Style Number 49405. Written By: Marty Rippens
Operating Instructions
 A) ORIENTATION View capsule filling video online at www.profiller.com Cam Lever 1. Place Caps Tray onto Filler with Position I and II markings in front. Check that Cam Lever is set to 3 o clock. 2. Pour
Sectioning Paraffin Blocks
 Description Laboratory Standard Operating Procedure for: Sectioning Paraffin Blocks This SOP requires a Designated Trainer! This SOP describes how to section tissue embedded in paraffin wax with a Leica
MODEL # 1 MANUAL CAN OPENER
 REV.B SERVICE MANUAL MODEL # 1 MANUAL CAN OPENER Model #1 Can Opener Assembly Procedure The Model #1 can opener will be assembled according to the following procedure. I. Model #1 Handle and Arbor Assembly
ASSEMBLY & CARE INSTRUCTIONS
 ASSEMBLY & CARE INSTRUCTIONS 7 x TRAILER TENT SERIES 3 9 Part No. FT3711 - on road FT3923 - off road OPTIONAL SUNROOM Wall and floor kit Part No. FT3723 - on road FT39 - off road OPTIONAL SPARE ROOM Roof,
Crimp & Cleave Termination Instructions for 200 µm F07 Connectors
 Your Optical Fiber Solutions Partner Crimp & Cleave Termination Instructions for 200 µm F07 Connectors For Use With: F07 Termination Kits 200 µm HCS Fiber-Optic Cable F07 Crimp & Cleave Connectors Important
Crystal Compact Housing and Winter Kit
 Crystal Compact Housing and Winter Kit Operating instructions Page 3 Installation instructions Page 6 To be kept in the vehicle! Sales and Service in UK and Eire: Truma (UK) Ltd. Truma House, Eastern Avenue,
DIAMOND TECH INTERNATIONAL Innovations For Creativity DIAMOND LASER BAND SAW OPERATIONS MANUAL
 SPEEDSTER-XL INSTRUCTION MANUAL DIAMOND TECH INTERNATIONAL Innovations For Creativity SPEEDSTER-XL DIAMOND LASER BAND SAW OPERATIONS MANUAL SPEEDSTER-XL INSTRUCTION MANUAL - PAGE 1 Before You Begin Read
Tidland Series 'C' Knifeholder MAINTENANCE MANUAL Crush Cartridge Class I, II, III Crush Slitting
 Tidland Series 'C' Knifeholder MAINTENANCE MANUAL Crush Cartridge Class I, II, III Crush Slitting Please read and understand all the instructions before you start to maintain the Tidland Series 'C' Knifeholder.
Owner s Manual & Installation Instructions. Model 900XT & 1000XT Awnings
 Owner s Manual & Installation Instructions Do Not Discard, Retain for Future Reference Model 900XT & 1000XT Awnings WARNING: Failure to Follow These Instructions Could Result In Personal Injury! For Technical
Instructions. Fibrlok TM 2670 Multi-Fiber Ribbon Construction Tool. November, B
 Instructions Fibrlok TM 2670 Multi-Fiber Ribbon Construction Tool November, 1998 34-7032-7181-6-B Contents: 1.0 General... 3 2.0 Ribbon Construction Tool Kit...3 3.0 Preparing the Fibers...3 4.0 Arranging
KNIFE SHARPENING TECHNIQUE
 SharpX A Information on Sharpening Technique Including Sharpening Instructions Sharpening is one of mans oldest skills and has laid the foundation for the development and survival of mankind. From the
ASSEMBLY & CARE INSTRUCTIONS. 7 x4 TRAILER TENT SERIES 4 9. OPTIONAL SUNROOM Wall and floor kit. OPTIONAL SPARE ROOM Roof, wall and floor kit
 ASSEMBLY & CARE INSTRUCTIONS 7 x TRAILER TENT SERIES 9 Part No. TM709 OPTIONAL SUNROOM Wall and floor kit Part No. TM723 OPTIONAL SPARE ROOM Roof, wall and floor kit Part No. TM76 Please keep these instructions
Model. Oasis Automatic and Manual RV Door Awning System INSTALLATION & OPERATING INSTRUCTIONS
 Oasis Automatic and Manual RV Door Awning System USA SERVICE OFFICE Dometic Corp. 509 So. Poplar St. LaGrange, IN 46761 260-463-4858 CANADA Dometic Dist. 866 Langs Dr. Cambridge, Ontario CANADA N3H 2N7
READ ME FIRST! IMPORTANT WARNING! ENG. Roof top tent
 Roof top tent ENG TENT031 220 min READ ME FIRST! Thank you for purchasing a Front Runner Roof Top Tent. Before you start, take a moment to familiarize yourself with these Fitting Instructions and the components
SOLHARO ASSEMBLY & INSTALLATION INSTRUCT IONS
 A. Introduction: SOLHARO ASSEMBLY & INSTALLATION INSTRUCT IONS Rev. 01/30/2012 The Solharo is an external, retractable, tensioned sun shading system designed to fit over a sunroom or wood pergola. The
Honda Ridgeline Installation Instructions
 Honda Ridgeline Installation Instructions READ THIS... If you read these instructions from beginning to end before starting you will probably not need to look at them again during the installation, but
quick and easy installation guide
 www.directdriveopener.com quick and easy installation guide Back 2 Front. Motor Carriage 2. C-rail. Chain. Limit stops. Slide in part (tensioner) Rail assembly Insert C-rail parts () into the connecting
Written By: Brittany McCrigler
 Installing a Zipper in a Patagonia Fleece Jacket Replace the zipper in your fleece jacket. Written By: Brittany McCrigler ifixit CC BY-NC-SA www.ifixit.com Page 1 of 19 INTRODUCTION [video: https://vimeo.com/48376830]
Mandolin Slicer Quite possibly the safest mandolin in the world
 Mandolin Slicer Quite possibly the safest mandolin in the world MANDOLIN & COMPONENTS Handle Upper Plate Safe Hands Food Holder Non-Slip Retractable Leg Julianne Blades (3 sizes) Waffle / Crinkle Cut Blade
Primrose Awnings Full Cassette Manual & Electric Instructions
 Primrose Awnings Full Cassette Manual & Electric Instructions Contents for Full Cassette Awning 1 x Remote control receiver box 2 x Remote hand-held zappers 1 x 5 metre cable 1 x Template sticker **The
Deep Cleaning a Passap is a three step process: Tear down, Clean, and Reassemble.
 kni!sings Deep Clean A Passap Duomatic Deep Cleaning a Passap is a three step process: Tear down, Clean, and Reassemble. I won t mislead you. Your nerves will be on edge while you take apart your precious
SERVICE MANUAL V-SERIES HEAVY DUTY BROILERS, DOUBLE DECK AND RANGE MATCH MODELS - NOTICE - For a complete listing of models, see the MODELS section.
 SERVICE MANUAL V-SERIES HEAVY DUTY BROILERS, DOUBLE DECK AND RANGE MATCH MODELS For a complete listing of models, see the MODELS section. - NOTICE - This Manual is prepared for the use of trained Vulcan
AND LOAD CANOPY RACK SPECIFICATIONS
 8MAY15 INSTRUCTIONS for the LOCK AND LOAD CANOPY RACK SPECIFICATIONS and SAFE LOADING REQUIREMENTS The Lock and Load ladder carrier for Truck Caps is a rack designed to mount to the top of a pickup truck
Dear Customer, thank you for purchasing Dolphin Aqualisers TM
 Dear Customer, thank you for purchasing Dolphin Aqualisers TM Aqualisers TM are made of quality, durable marine grade materials and will significantly increase the stability of your 10 to 16ft aluminium
Instructions for turning a pair of 2012 Large Rolie Bags into Tank Panniers. This is a "Do it yourself " Kit.
 Instructions for turning a pair of 2012 Large Rolie Bags into Tank Panniers. This is a "Do it yourself " Kit. ***The Large Rolie bags function best when full as they have no stiffeners****************
Lock Picking Infopaedia
 Lock Picking Infopaedia rd 3 Edition WithoutaKey.co.uk WithoutaKey.co.uk A Brief History The Lock Picking Infopaedia has been provided free for over 15 years. First published online in 1997 it quickly
Operation and Maintenance Instructions for the TrimMaster Clipper
 Operation and Maintenance Instructions for the TrimMaster Clipper Safety Alert: Read the following instructions completely before operating the clipper. The clipper is designed for indoor use only, and
Retractable Hose Reel
 Retractable Hose Reel installation and Operation Please read before use We recommend keeping these instructions for future reference Hose Reel must be mounted before use Keep the hose retracted when not
Swagelok Thermoplastic Hose Hand Swager User s Manual
 Swagelok Thermoplastic Hose Hand Swager User s Manual Thermoplastic Hose Hand Swager User s Manual Contents Hand Swager Components....................... 2 Setup Swager.......................................
StratoLauncher IV Standard Instruction Manual
 StratoLauncher IV Standard Instruction Manual IMPORTANT: Nozzle water rockets function differently than full bore water rockets. Forget most everything you might know about water rockets and follow our
LBH18BPK. Instruction Sheet
 LBH18BPK Instruction Sheet Included: 1. Backpack (includes belt and pouch) 2. Bottle and Hose Attachment Assembly 3. 1 each disposable 1.5 gallon Chemical Storage Bag 4. 1 each 1.5 gallon Warm Water Cleanout
Trinket Box. Kit Inventory
 Kit Inventory Trinket Box o Top Panel o Bottom Panel o Two (2) End and two (2) Side Box Pieces o Two (2) End and two (2) Side Lid Pieces o Right Latch Holder & Left Latch Holder o Two (2) Lock Bar Guides
31 Series. Serie 31 Série 31. Two Handle Kitchen Faucet Grifo Con Dos Manijas Para Cocina Robinet De Cuisine À Avec Deux Poignées COMPANY
 31 Series Serie 31 Série 31 Two Handle Kitchen Faucet Grifo Con Dos Manijas Para Cocina Robinet De Cuisine À Avec Deux Poignées 05-06-08 EO7284A 32947-0100 Copyright 2008, Price Pfister, Inc. A COMPANY
Optional Controls (Depends which set was purchased) Set A (Remote control kit)
 Set A (Remote control kit)") Primrose Awnings - Full Cassette Manual & Electric Instructions Contents Warning 1.5m - 3.5m Awnings 8 x Expansion bolts ** 2 x brackets 1 x Awning 1 x Winder 4.0m - 5.0m Awnings 12 x Expansion bolts **
Primrose Awnings - Full Cassette Manual & Electric Instructions Contents Warning 1.5m - 3.5m Awnings 8 x Expansion bolts ** 2 x brackets 1 x Awning 1 x Winder 4.0m - 5.0m Awnings 12 x Expansion bolts **
APPENDIX A LIGHT SOURCE
 APPENDIX A LIGHT SOURCE GASOLINE LANTERN One source of artificial light for the field kitchen is the gasoline lantern (NSN 6260-00-170-0430). It is a one-mantle lantern with a heat-resistant globe or globe
Crimp & Cleave Termination Instructions
 Your Optical Fiber Solutions Partner Crimp & Cleave Termination Instructions for 200 µm Harsh Environment SMA For Use With: 200 µm HE SMA Termination Kit 200 µm HCS Fiber-Optic Cable HE SMA 200 µm Crimp
Aquastream. Thermo. Thermostatic integral power shower. Installation guide. Aquastream Thermo installation instructions Page 1
 Aquastream Thermo Thermostatic integral power shower Installation guide Aquastream Thermo installation instructions Page 1 Aquastream Thermo Aquastream Thermo Thermostatic integral power shower Satin chrome
INSTRUCTION MANUAL ALEKO RETRACTABLE AWNING
 INSTRUCTION MANUAL for ALEKO RETRACTABLE AWNING www.alekoproducts.com FAILURE TO FOLLOW THESE INSTRUCTIONS MAY RESULT IN PERSONAL INJURY! 1 Important Safety Precautions WARNING NOTE: FOR PERSONAL SAFETY,
STERILE CONTAINER SYSTEMS
 »» Extra Long Size EXTRA LONG SIZE 280 mm 710 mm h Specificiations Lid (Perforated) Lid (Perforated) Sizes Box (Non Perforated) Box (Perforated) TK6-2010 TK6-2040 TK6-2011 TK6-2041 h=120 mm TK6-2012 TK6-2013
HANDWHEELS.
 HANDWHEELS 5 Handwheels Aluminum Angular Solid Handwheel...5.2 Aluminum Angular Spoked Handwheel... 5.2 Aluminum Finger Wheel... 5.10 Cast Angular Spoked Handwheel... 5.3 Cast Iron Angular Spoked Handwheel...
KAWNEER 1786 RIM EXIT DEVICE
 FEBRUARY, 2015 1 DOOR STILE Device C L 40" 41-9/32" Cylinder C L Bottom of door RIM EXIT DEVICE LOCATION DOGGING KEY EXIT DEVICE FILLER PLATE CYLINDER & CYLINDER RING HOUSING COVER CYLINDER INSTALLATION
RM 2125 Troubleshooting Guide
 Problems, possible causes and corrective action Problem Cause Corrective Action 1) Thick and Thin Sections. a) Partial Sections b) Shorter Sections in ribbon c) Section thickness varies from one section
Crimp & Cleave Termination Instructions for 200 µm Harsh Environment SMA
 Your Optical Fiber Solutions Partner Crimp & Cleave Termination Instructions for 200 µm Harsh Environment SMA For Use With: 200 µm HE SMA Termination Kit 200 µm HCS Fiber-Optic Cable HE SMA 200 µm Crimp
Ridgeline (A) Installation Instructions
 Installation Instructions") Ridgeline (A) Installation Instructions Please read instructions thoroughly before starting installation **Remove all contents of the Softopper carefully to protect from scratches.** Windows scratch easily!
Ridgeline (A) Installation Instructions Please read instructions thoroughly before starting installation **Remove all contents of the Softopper carefully to protect from scratches.** Windows scratch easily!
Optional Controls (Depends which set was purchased) Set A (Remote control kit)
 Set A (Remote control kit)") Primrose Awnings - Half Cassette Manual & Electric Instructions Contents Warning 1.5m - 3.0m Awnings 4 x Expansion bolts (2 per bracket)** 2 x brackets 1 x Awning 1 x Winder handle 3.5m - 4.0m Awnings
Primrose Awnings - Half Cassette Manual & Electric Instructions Contents Warning 1.5m - 3.0m Awnings 4 x Expansion bolts (2 per bracket)** 2 x brackets 1 x Awning 1 x Winder handle 3.5m - 4.0m Awnings
Ceramic Liner Inserter. Surgical Technique
 Ceramic Liner Inserter Surgical Technique SIZE SELECTION AND ASSEMBLY Gripper Pusher Figure 1. PINNACLE Ceramic Liner Inserter instrument tray Figure 2. Assemble Pusher and Gripper Size Selection Select
Model 205 Fireview Maintenance Kit
 Model 205 Fireview Maintenance Kit Please read all of the instructions before you begin the procedure. Confirm that you have all the necessary tools and parts required. Allow about one hour to complete
STERILE CONTAINER SYSTEMS
 »» Extra Long Size EXTRA LONG SIZE 280 mm 710 mm h h 1 Specificiations Lid (with barrier) Lid (with barrier) Box (Non Perforated) Box (with barrier) TK7-2010 TK7-2040 TK7-2011 TK7-2041 TK7-2012 TK7-2013
MAX Series 9514 OPERATOR S MANUAL
 MAX Series 9514 OPERATOR S MANUAL Persons under age 18 are not permitted to operate or have accessibility to operate this equipment per U.S. Dept. Of Labor Employment Standards Administration Fact Sheet
Application Tooling Specification
 Order No. 200218-3100 FEATURES Application Tooling Specification A full cycle ratcheting hand tool ensures complete crimps Long handles for comfortable crimping with reduced crimping force and a safety
GoBidet Bidet Attachment
 GoBidet Bidet Attachment 151 Ruths Place #5 Sequim, WA 98382 Tel 1-800-681-0753 Fax +1 360-681-4029 www.go-bidet.com MODEL #2003C In this box: 1 User Manual 1 GoBidet Unit w/ mounting bracket, nut, rubber
Crimp & Cleave Termination Instructions
 Crimp & Cleave Termination Instructions for 200 µm Factory5 Cable with ST and SMA Connectors For Use With: 200 µm ST and SMA Factory5 Termination Kits 200 µm HCS Factory5 Fiber-Optic Cable ST and SMA Factory5
DURA WHEEL CHAIR LOCKER ASSEMBLY INSTRUCTIONS
 DURA WHEEL CHAIR LOCKER ASSEMBLY INSTRUCTIONS 1. Locate a Frame and Door: Start by locating a frame and door. 2. Front Frame: Now stand up the frame and door in the desired assembly area. 3. Exterior Wall:
Shark Guard Installation
 Shark Guard Installation In the Package When you receive your Shark Guard, verify that nothing was damaged in shipping. Here is a current list of parts that should be included with a standard Felder and