Greenfield Operation & Maintenance Manual
|
|
|
- Marjorie Georgina Palmer
- 6 years ago
- Views:
Transcription
1 Greenfield Operation & Maintenance Manual Table of Contents ST. CROIX FEATURES...3 INSTALLATION... 4 PREVENTING CHIMNEY PROBLEMS... 4 SATISFACTORY PERFORMANCE... 4 SHELLED CORN...4 OPERATING INSTRUCTIONS... 5 Control Board Features...6 Pre-Lighting Instructions...7 Lighting Your Stove... 7 Shutting the Stove off... 8 Diagnostic Features...8 Safety Features...8 Combustion Air Damper Thermostat Control MAINTAINING THE STOVE...11 Clinker Removal...11 Daily Maintenance Periodic Maintenance Yearly Maintenance SAFE OPERATION PELLETS AS FUEL TROUBLESHOOTING AND FAQ PARTS LAYOUT WARRANTY
2 Dear St. Croix Corn Stove Owner: Congratulations! Your purchase of a St. Croix corn stove places you among a select group of individuals who have demonstrated their concern about residential heating efficiency and our environment. This owner's manual is designed to help you obtain maximum benefit from your St. Croix corn stove. Please read this manual in its entirety BEFORE operating your corn stove. During the manufacturing process every effort has been expended to ensure that each St. Croix corn stove meets the highest quality standards of material and workmanship. Here are some important aspects of corn stove installation and operation which you must observe in order to obtain maximum comfort and safety from your new St. Croix corn stove. 1. Have your new St. Croix corn stove installed by trained, qualified personnel. 2. Use only clean, dry quality corn for optimum performance in your St. Croix corn stove. 3. Faithfully adhere to the maintenance program described in this manual. Thank you for selecting a St. Croix corn stove as the environmentally preferred answer to your residential heating needs. 2

3 The Greenfield Hopper opening has 2 hopperlids. The Inner Lid has a gasket and provides a tight seal. Figure 1 3
4 Operation and Maintenance Greenfield corn Stove SAVE THIS OPERATIONS AND MAINTENANCE MANUAL CAUTION: Operate this unit only with the fuel hopper lid closed. Failure to do so may result in emission of products of combustion from the hopper under certain conditions. Maintain hopper seal in good condition INSTALLATION Proper installation is essential for safety, effective operation, warranty coverage, insurance requirements and to meet local building codes. Installation requirements are described in the Installation Manual included with your new stove. PREVENTING CHIMNEY PROBLEMS When burning corn care should be taken in how the venting system is installed. To burn corn the moisture content should be 15% or less. This is much higher that the moisture content of wood pellets and can result in condensation forming in the venting system in certain installations. The chimney system should stay within the warm envelope of the house as much as possible. Only penetrate the exterior of the home where the exhaust system will terminate. Remember condensation from a corn stove is detrimental to the venting system. Only buy venting systems that are warranted when burning corn. The chimney and chimney connector should be inspected at least once every two months during the heating season to prevent the system from getting plugged with Fly ash. Clean the exhaust system if needed. Use of an appropriately sized chimney brush or the Services of a Professional chimney sweep are recommended. SHELLED CORN SATISFACTORY PERFORMANCE Shelled corn must be 15% or less moisture content. The keys to satisfactory performance are: proper operation of the stove, diligent maintenance and burning only dry, clean, quality corn. Corn dust must be screened prior to using. NOTE: Corn with excessive grain dust must be screened, by sifting with 3/16" mesh screening. Large pieces of cob may plug the auger. Clinkers and ash are a by-product of burning corn and are not caused by your stove. Stove performance can be quickly and severely reduced if poor quality corn is used. Contact your dealer for more information on where to get high quality corn to burn in your new corn stove. Store corn in a tight container use other methods to ensure they do not become rain soaked or absorb moisture from damp or wet floors. This will also prevent rodents from becoming a problem. Do not store corn within stove installation clearances or within the space required for clinker removal. The stove is not warranted against damage caused by poor quality corn, incorrect operation, poor maintenance or incorrect installation. 4
5 Pellets as Fuel St. Croix Corn stoves come equipped with a corn pot installed and this pot is only approved with corn as a fuel. An optional Pellet Pot may be purchased and installed in the stove if you want to burn pellets. Check with your dealer about burning pellets in your St. Croix corn stove. Caution: Do not burn pellets as a fuel in a stove equipped with a corn pot. Optional pellet pot, part # 80P53782, must be installed to burn to pellets. PREVENTING CHIMNEY FIRES Chimney fires can be prevented by properly operating the Stove and by periodic inspection and cleaning of the chimney. When wood is burned it produces tar and other organic vapors, which combine with expelled moisture to form creosote. The creosote vapors condense in the relatively cool chimney flue associated with a slow burning fire. As a result, creosote residue accumulates on the flue lining. When ignited this creosote can result in an extremely hot chimney fire. The chimney and chimney connector should be inspected at least once every two months during the heating season to determine if a creosote build-up has occurred. If a significant layer of creosote has accumulated (3 mm or more) it should be removed to reduce the risk of a chimney fire. Use of an appropriately sized chimney brush or the services of a professional chimney sweep are recommended. The chimney and chimney connector should be inspected at least once every two months during the heating season to prevent the system from getting plugged with Fly ash. Clean the exhaust system if needed. Use of an appropriately sized chimney brush or the Services of a Professional chimney sweep are recommended. OPERATING INSTRUCTIONS A different type of heater. The corn stove is neither a cordwood stove nor a Stove. Its operation and maintenance differ from the traditional wood stove. FOLLOW THESE OPERATING INSTRUCTIONS EXACTLY AS STATED TO ENSURE SAFE AND RELIABLE OPERATION. 1. Carefully read this Operation and Maintenance manual in its entirety BEFORE lighting your stove for the first time. 2. Obtain final inspection and approval of installation from local building officials. 3. If it applies, carefully clean all marks off the gold plated parts before the first fire is lighted. Use a soft cloth and a Windex type cleaner. Caution: Never use an abrasive cleaner on any plated or painted parts of the stove. 4. Have your dealer demonstrate all the operational and maintenance steps necessary for proper use of the stove. Sign and return the warranty card, to the address listed on the back page. 5. Some odors may be given off during the first few hours of burning during initial break-in. These odors are normal and not harmful. However, ventilating the room until the odors disappear is recommended. 6. The stove will become HOT while in operation. Keep children, clothing and furniture away from all stove surfaces. WARNING: Direct contact with the stove while operating may cause skin burns. 7. To avoid the possibility of smoke and/or sparks entering the room always keep firebox and ash pan doors closed whenever the stove is operating. 8. A certain amount of carbon monoxide may be produced within the stove as a by-product of combustion. All exhaust vent connections must be sealed with RTV silicone to assure a gas tight seal. Any leaks into a confined area caused by faulty installation or improper operation of the stove could produce dizziness, nausea and in extreme cases, death. 9. An outside source of combustion air is required on all mobile home installations. If room air is used to supply combustion air, room air starvation, operation of exhaust fans and icing of air vents can adversely affect proper stove operation. If these conditions exist, outside air should be used. 10. Smoke detectors, installed in the same general area as the stove, may be activated if the stove door is left open and smoke is allowed to enter the area. 5


6 Control Board Features READ FREQUENTLY ASKED QUESTIONS ON PAGES BEFORE OPERATING THE STOVE. The Control Board controls all functions of the stove by monitoring sensors that are in the system. These sensors serve 2 purposes. a. General Operation of the Stove. b. Safety Features, to shut the unit down in the event the sensors detect a problem in the unit. The Control Board also has Diagnostic Capabilities to help in diagnosing 3 areas in the Stove. These areas are: 1. High Temperature Limit. 2. Proof of Fire Sensor 3. Vacuum in the Firebox A closer look at the Control Board to the right in figure 2 will explain how the board works. There are five buttons labeled 1 through 5, a slide switch labeled 6 and a LED Light bar with 5 Heat Settings. The LED Light bar is also used during the Diagnostic process, see page 8 for more details. The buttons on the board function as follows: (Refer to Figure 2. The touch pad buttons and Slide Switch are labeled with the white numbers 1 through 6) 1. The Heat Level button (1) will advance the setting between level 1 and 5. Once you reach level 5, it will drop back to level 1. Each level has a LED light to indicate where the board is set. 2. The On/Off button (2) turns the Stove On and Off. It will also reset the board after the board has sensed a problem and is flashing a Diagnostic code. 3. The auger button (3) will allow the customer to manually auger corn into the burn pot on start up when needed. This is particularly helpful in priming the Auger Tube when it is empty. 4. The Draft Trim button (4) allows for adjusting the Exhaust fan voltage on Heat Level 1 only. Push the button and the all of the LED Lights in the light bar will flash once. This decreases the draft fan voltage Figure 2 approximately 5 volts below the default setting. Push the button a second time and all of the LED Lights in the light bar will flash twice. This decreases the voltage approximately another 5 volts. Pushing the button a 3 rd time will reset the voltage to the default setting. This adjustment is available to fine tune the #1 Heat Level draft setting. This would only be used in the case the Stove was hooked up to a tall Vertical Chimney ( see point 11 on page 23 for more information) 5. The Feed Trim button (5) will allow the Fuel feed rate to be adjusted on Heat Level 1 only. Heat Level 1 should be seen as the Pilot setting of the Stove, when operating on a Thermostat. Pushing the Feed Trim button (5) will switch between the different adjustments. Heat Level one can be adjusted in the following ways:(see points 10 & 11 on pages 22 & 23 ). 6
7 a. The first LED only indicates the Normal #1 setting. (1.5 second on time). This is the default setting. b. The first and fourth LED lights indicate the #1 Low setting. (1.25 second on time) This will reduce the heat output on the #1 setting. This setting will also create more buildup on the glass. (see point 10 on page 22) c. The first and fifth LED lights indicate the #1 High setting. (1.75 second on time) This will produce the most heat available on the #1 setting. This is helpful in keeping the glass a little cleaner when burning on low. The adjustments described in points 4 and 5 remain in effect as long as the unit is plugged in. If the unit gets unplugged or if there is a power failure the settings are lost and the adjustments would need to be reset. 6. Thermostat Slide Switch. Use this switch to change the Operations mode from a Manual Mode to Thermostat Mode. Pre-Lighting Instructions When lighting your stove for the first time or any time you have run out of corn you will need to fill the hopper with corn. Corn is fed from the hopper to the burn pot by an auger. A high torque motor that is capable of doing SERIOUS harm to fingers drives the auger. Keep fingers and other objects away from the auger. WARNING: The Auger can start at any time while the stove is running CAUTION: The Coal Rake must be pulled out and the Slide-Bottom pushed in to operate the stove. (See Figure 1, Stove Layout on page 1) WARNING: The Fire Door and Ash Pan Doors must be in the latched position during normal operation. Lighting Your Stove. 1. Make sure there is corn in the hopper. 2. Add one cup of Pellets to the burn pot (not more and not less). Do not try to start your stove with corn; Corn is difficult to start. Add a generous amount of starter gel to the pellets. 3. This next item is optional, but it will give an immediate boost to the start up procedure. Crumple up half of a newspaper page, light the gel and toss the paper in the burn pot. 4. Close the door and push the On/Off button on the control board. (Button #2, see figure 2) At this point all that needs to be done is to monitor the burn pot to make sure the stove starts up properly. Once the On/Off button has been pushed the Start Up program takes over. The Start up Program works as follows: a. The Combustion Fan comes on at high speed and the control board checks to make sure the Vacuum switch locks in. (See section on Diagnostic features on page 8.) b. When the Control Board senses the Vacuum switch the Exhaust Fan drops to a lower start up speed until the Proof of Fire Switch locks in. c. After 5 minutes the board checks for Proof of Fire and automatically starts feeding corn on the #1 setting. If the board senses P.O.F. then the stove has started successfully. d. If the board fails to sense P.O.F. after 5 minutes it will repeat the last step and continue feeding corn on the #1 setting for 5 more minutes. e. The board will check for P.O.F. again. If the board still fails to sense the Proof of Fire switch the stove will go into Safety shutdown (See section on Diagnostic Features on page 8.) If stove fails to start, repeat steps 2 through 4 from the section on Lighting Your Stove. CAUTION: NEVER ADD FIRE STARTER TO A HOT STOVE. 7
8 Shutting The Stove Off (Refer to Figure 2) 1. Press the On/Off switch (2) once; the lights will go off and the fire will go out in a few minutes. The board essentially goes into Safety shutdown. 2. As long as the Exhaust Temperature within the stove remains above 110 F, the Room Air Fan and the Combustion Exhaust Fan will continue to run. Once the P.O.F. switch drops out the Combustion Fan will run for another 10 minutes and finally the stove will shut down completely. 3. NEVER unplug the stove to shut it off. Doing so may cause a significant amount of smoke to enter the room. Diagnostic Features of the Control Board The #2 LED and the #3 LED lights on the LED Light bar as show in Figure 2 will flash to give a diagnostic code to help in diagnosing problems that may occur. These conditions fall into 2 categories: a. Heat related issues. b. Vacuum related issues. The Diagnostic Lights flash as follows: 1. The Proof of Fire switch. This switch will sense the temperature of the Exhaust rising during start up. If the Exhaust temperature does not reach 110 degrees F, or if during use the temperature drops below 110 degrees F, the Stove will go into Internal Alarm and the Auger will quit feeding fuel. Once the stove completes the safety shutdown, the #3 LED will start blinking. (See Figure 2 on Page 6 and point 4 on page 20) 2. The High Limit switch. This sensor will sense if the unit reaches temperatures that are too high for normal operation. If this happens the Auger will quit feeding and the #2 and #3 LED lights will flash simultaneously. (See Figure 2 on Page 6 and point 6 on page 21) 3. The Vacuum Switch - For the stove to operate, the Firebox needs to be sealed. During the first 30 seconds after the stove has been turned on the Control Board will check if the switch senses negative pressure (Vacuum) in the Firebox of the stove. If there is no negative pressure, the stove will shut down and the #2 LED will start blinking. (See Figure 2 on Page 6 and point 5 on page 21) Power Reset. If the board becomes unresponsive you must unplug the stove, wait 10 seconds and plug the stove back in to reset the board. Internal Alarm. When the control board becomes unresponsive, the control board is in Internal Alarm. The control board has sensed one of the Safety sensors. This may cause the stove to go out. In some cases, after waiting approximately 45 seconds the stove will start responding to the control board again. Many times, the cause of this is a change in the vacuum inside the stove. This may be caused by excessive wind, opening the Firebox door or opening the Ash Pan door. The control board will monitor the vacuum switch and resume normal operation if the vacuum returns to normal. Safety Features 1. High Limit switch, an overheat safety switch will shut off the fuel feed if the Stove reaches temperatures above normal operating temperature. This is a Normally Closed switch and is part of the Fan limit control. If the High limit switch trips several times, the problem in the Stove must be diagnosed before the Stove is put back in service, (Defective Room Fan, dirty Room Fan, dirty Return Air Filter, defective Fan Limit Control or possibly a bad Control Board) 2. Proof of Fire switch also called the P.O.F. This senses the temperature rise in the exhaust system. The switch is Normally Open and closes the circuit at 110 degrees. The Stove will shut down if temperatures above 110 degrees F are not sensed during start up or if the temperature drops below 110 degrees during normal operation. 3. Vacuum switch also called the Negative pressure switch. When the stove is turned on the Exhaust fan will create a negative pressure in the firebox. The control board continually checks to see if Negative Pressure (vacuum) is present during operation of the Stove. If the exhaust venting system becomes clogged or obstructed, the firebox door or ash pan door are left open or 8
9 the exhaust fan quits working the control board will go into Safety shutdown. There is a 60 second window to allow for cleaning the glass and removing the clinker before then Stove shuts down. This is sufficient for the Daily Maintenance The St. Croix corn Stove has been Safety Tested by an accredited, independent laboratory. WARNING: These safety features are designed to protect life and property. Bypassing these features voids all warranties and the safety listing of the stove. Combustion Air Damper The damper is preset at the factory with a setscrew. The damper will most likely only need small adjustments during the break in period. To know if the damper needs to be adjusted you should learn to recognize how corn burns in the St. Croix corn burning system. The burn pot should be BALANCED. What this means is the corn that is being augered into the burn pot rapidly turns into glowing coals. If you see a lot of unburned corn in the pot an adjustment may be needed. In an unbalanced pot the corn will quickly stick together and prevent the proper flow of combustion air. The pot will overload and the fire will go out. Once the damper is adjusted for your installation, it should not be necessary to make any further adjustments to the damper. The combustion air is automatically increased every time the feed rate is advanced on the control board. Adjusting the damper should be done during Break-in. This requires the burning of 15 bags of corn or continuous burn for two weeks. Figure 3 Your stove is equipped with an air inlet damper. (See Figure 3) This is one of the most important areas of setting up your stove to burn corn. Adjusting the Damper may take a little time and patience, but only needs to be done once. After the damper has been adjusted for the unique installation in your home the control board will do the rest. The purpose of this damper is to adjust combustion airflow to match the characteristic of each specific air inlet and chimney configuration. Figure 4 If you experience problems adjusting the stove during the Break-In Period, contact your dealer. Figure 4 above may be used to gage the approximate damper setting when making an adjustment. Some chimney systems will fall outside the norm, for example, a chimney with excessive draft or one with a long horizontal run. In dealing with technical support, the terminology listed in figure 4 may be used to clarify where your damper needs to be set. Terminology used in the Damper Adjustment 1. Balanced burn pot. This means the corn rapidly turns into red-hot coals once it is in the burn pot. 9
10 2. Lag time. This is the time it takes for the corn to start burning and the burn pot to become balanced. Corn will tend to stick together in a clump in the burn pot if the corn feeds in faster than it s burning. 3. Overloaded burn pot. Once the corn has formed a clump in the burn pot the pot will overload and slowly the fire will die out. Procedure for adjusting the damper: As was stated earlier there is a setscrew in the damper and the damper has been preset at the factory. This setting will most likely work for 90% of the most common installations. Long horizontal runs might need the damper opened. Tall vertical runs might need the damper to be closed a little, etc. To adjust the damper, use the setscrew to make the adjustments. To make an adjustment turn the screw ½ turn clockwise to open the damper or ½ turn counter clockwise to close the damper. Remember to use the damper handle to bring the damper up to the screw. The damper will not close by itself. After making an adjustment wait at least 15 minutes to see how the burn pot reacts to the change. a. Once the stove is burning, leave the control board on the #1 setting for ½ an hour. This will allow the stove to warm up before any adjustments to the damper are made. After ½ an hour look in the burn pot to see if the burn pot is balanced. Unless there weren t enough coals in the pot, when the corn started augering into the pot on start up, the stove should be burning fine and an adjustment is not needed. b. Advance the heat setting to #2 and let the stove burn at this setting for ½ an hour. Check the burn pot to see if it is balanced. Most likely the stove will be burning fine at this point, because the damper was preset at the factory. c. Advance the heat setting to #3 and let the stove burn at this setting for ½ an hour. Check the burn pot to see if it is balanced. Remember: Look at the coals in the pot, not at what the flame looks like. Most likely the damper will not need to be adjusted. d. Advance the heat setting to #4 and let the stove burn at this setting for ½ an hour. Check to see if the pot is balanced. This is where a damper adjustment might need to be made. As the heat setting reaches the higher settings the Lag time can become too long if the air isn t adjusted correctly. If you notice that the coals are being covered up with unburned corn, adjust the damper to give it more air. Remember: Only turn the setscrew one ½ turn clockwise to open the damper (You might need to use a screwdriver to break up the clump of corn in the burn pot to allow for proper airflow). Wait 15 minutes to see if the burn pot becomes balanced. Repeat this step as many times as needed until the burn pot becomes balanced. e. Advance the heat setting to #5 and let the stove burn at this setting for ½ an hour. Check the burn pot to see if it is balanced. A small damper adjustment might need to be made at this time to make sure the Lag time isn t too long. Remember: Only turn the setscrew one 1/2 turn clockwise to open the damper. Wait 15 minutes to see if the burn pot becomes balanced. Repeat this step as many times as needed until the burn pot becomes balanced. If the stove has been connected to an existing Chimney system that has good Natural Draft, the procedure mentioned in the points d and e above may actually require that the damper gets closed slightly instead of opened to compensate for the additional draft in the chimney system. This process will take about 3 hours, but it only needs to be done once at the initial burn. This will adjust the stove to the unique circumstances of your home. 10
11 Thermostat Control. - Most corn stoves aren t capable of using a thermostat. This is due to the fact that corn doesn t react very well to sudden increases in the feed rate. A stove that goes from a #1 setting to a #5 setting will almost always have problems making that transition. The burn pot will overload and the fire will go out. The St. Croix corn stove uses a simple time delay between each Heat setting to allow the stove to react to the increase in corn. This allows the stove to function very well on a thermostat. A Milivolt type thermostat will work with this control board. The stove is not fully automatic when running on a thermostat, when the thermostat is not calling for heat the stove will drop to the low (#1) setting as a pilot. For location to connect the thermostat wires see Figure 3 on page 9. MAINTENANCE OF THE STOVE The St. Croix corn clinker theory - And why we do what we do. Most manufacturers of corn stoves use complicated stirring mechanisms to break up the clinker in the burn pot. We feel that is a mistake. Corn doesn t burn as well when it is disturbed in the burn pot. Corn needs high temperatures and proper airflow in the burn pot to burn properly. That energy is stored in the clinker that is being formed in the burn pot. It glows red-hot and provides the heat needed to ignite the corn that is being fed into the burn pot. When the clinker is broken up, that constant source of energy is lost, and now it becomes more difficult to burn corn. When corn is not burning properly it tends to stick together and form a clump in the burn pot. It is impossible for air to flow through this clump and soon the pot will overload and the fire goes out. This is where some manufacturers use the stirring mechanism to break up the clump of corn to maintain proper airflow and others use large burn pots to handle this problem (Smaller burn pots are better). The truth is neither is needed. The St. Croix corn burning system allows the corn to be burned efficiently and completely in a relatively small burn pot Clinker Removal. Once a clinker has formed in the burn pot, the problem is how to get rid of it. The St. Croix Burn system is designed to be able to remove the clinker without loosing the fire in the burn pot. It is a 3-part system. 1. The coal rake. This is a fork shaped device that will allow the stove operator to separate the burning coals from the top of the clinker. 2. The slide out bottom. This allows the bottom to be pulled out so the clinker can drop out of the bottom of the burn pot. 3. The program on the control board. To drop the clinker you set the board on the #1 setting for a couple of seconds and then return the stove to the desired setting. This starts a timed delay in the program to allow the clinker to be removed, the coals to be dropped to the bottom of the pot and the Burn pot to become balanced again before the board resumes on the setting of you choice. NOTE: FAILURE TO KEEP YOUR STOVE CLEAN, AS DESCRIBED IN THIS MANUAL, COULD RESULT IN POOR OPERATION, INEFFICIENT FUEL USAGE AND A POSSIBLE SAFETY HAZARD! IT IS YOUR RESPONSIBILITY TO DETERMINE NEEDED MAINTENANCE FREQUENCY. CAUTION: THE DOOR AND FRONT PART OF THE STOVE WILL BE HOT. DO NOT TOUCH ANY PART OF THE STOVE THAT IS HOT! This stove requires a minimum amount of daily maintenance. Required maintenance depends largely upon the quality of corn burned and the rate of burn. The amount of daily maintenance will increase if fuel quality decreases and/or the burning rate of corn increases. The operator of the stove is responsible for determining the frequency of cleaning the stove. 11
12 Daily Maintenance Example of Schedule for dropping Clinkers from the burn pot: This may be required more than once a day, depending on the burn rate of the stove and the quality of Corn used. Check the stove frequently at first to establish a Maintenance Schedule for cleaning the burnpot. If Clinker is not removed, the burnpot will overload and fuel will spill into the Ashpan. 1 - Continuous burning of the stove on the Low burn setting (Pilot) Approximately every 48 hours. This may vary depending on the quality of Corn used. 2 - Continuous burning of the stove at the High burn setting (#5) Approximately every 18 hours. This may vary depending on the quality of Corn used. The Daily Maintenance will focus on 4 areas in the stove: removing the Clinkers from the Ash Pan (if needed), dropping the Clinker from the Burnpot, cleaning the Heat Exchange Tubes and cleaning the Glass. A break down of this process consists of these steps: Caution: Note the position of the Coal Rake Rod and the Slide-out Pot Bottom Rod during normal operation!! The Greenfield has a Coal Rake Rod that pivots to allow the front cast panel to close. If the rod is left in the extended position, the Coal Rake will be pushed back into the pot when closing the cast panel. Leaving the Coal Rake in the burn pot for extended periods will damage it! Normal Operation Figure 5 12
13 How to drop the Clinker from the pot 1. The coal Rake. The first step is to push the coal rake in and separate the burning coals and corn from the clinker. Once this is done open the door and add a ¼ cup of pellets on top of the coals (See figure 6 below). To push in the Coal rake, use the Rod Handle tool shown in figure 8 on page 15. Figure 6 2. The ash pan. The Greenfield has a small ashpan. It is recommended to remove the clinker from the ashpan on a daily basis before dropping the next clinker. This allows the previous clinker to cool down and it is easy to handle (see point 1 at the top of page 15). 3. The slide out bottom. (See figure 7 on page 14) Now you are ready to drop the clinker from the burn pot. Pull the bottom out in one quick motion and let the clinker drop into the ash pan. Quickly push the bottom in again. To pull out the slide bottom use the Rod Handle tool shown in figure 8 on page 15 (see point 2 at the top of page 15). 13
14 Figure 7 4. The control board. Set the heat setting to #1 for a few seconds and return to the setting it was on. This initiates a time delay for dropping the clinker. 5. Dropping the coals back into the burn pot. At this time pull the coal rake back out of the burn pot to drop the coals in the pot. See position of Coal Rake & Pot Bottom in figure 5 on page 12 for normal operation. The time delay in the program will allow a smooth transition back to where the stove was burning before the clinker was dropped. 6. Cleaning the Heat exchange tubes. Now you can pull the tube scraper back and forth a couple of times to keep the tubes clean. If the Tube Scraper feels sticky and difficult to move, check for the presence of creosote on the tubes. If creosote is present a damper adjustment may be needed or the Stove has become plugged and needs a thorough cleaning. Call Dealer for assistance. To pull the tube scraper back and forth use the Rod Handle tool shown in Fig. 8 on page Use a dry paper towel to clean the glass. Quickly open the door and wipe the glass. The rate of burn will determine how often the window needs cleaning. Prolonged burning at a slow burn rate will result in the need for more frequent window cleaning. Cooling the Stove and wiping the window daily with a cloth or paper towel will normally keep the window from accumulating difficult to clean residue. Use of a glass cleaner ONLY permitted when the Stove is cold. CAUTION: Do not slam the door. Do not operate the Stove with a broken or cracked glass. Replace only with heat resistant ceramic glass supplied by the manufacturer. 14
15 There are 2 things to keep an eye on during the cleaning process. 1. If the ash pan door or firebox door were left open for more than 60 seconds the Stove will go into safety shutdown. You will notice that the Stove quits augering corn into the burn pot. Toggle the On/Off switch off and back on. This will reset the board. You will need to use the auger button (#3) to manually feed corn into the pot for a couple of minutes until the program resumes. 2. If the stove has been running for an extended period of time on the #5 setting, the clinker will sometimes stick to the burn pot. If that happens, pull the coal rake back out. Open the door and use a long screwdriver and give the clinker a couple nudges in the pot. (Make sure the burnpot bottom is closed when you do this or you will lose the coals with the clinker) Then repeat the steps for dropping the clinker. Remember: The coal rake must be pulled out and the slide bottom pushed in during normal operation of the stove. (See figure 5 on page 12) Remember: The fire door and ash pan doors must be in the latched position during normal operation of the Stove. (See stove layout on page 3) Periodic Maintenance CAUTION: Periodic maintenance should only be done while the Stove is shut off and cold. Figure 8 Burnpot & Slide-out Bottom Removal 1. Ashpan. Empty the ash pan when it appears full (approximately once a week if the clinkers have been removed an a daily basis). The frequency of cleaning the ash pan will depend on the quality and amount of Corn/Pellets being used. Carefully check to make sure the ash pan door is tightly closed after each opening. 2. Burnpot and Slide-Out Bottom. Clean burn grate holes whenever needed. Remove the Burnpot and use a small metal object (Nail, Drill Bit, etc) to clean out plugged holes. (See Figure 8 & 9) 15
16 Figure 9 To remove the Burnpot from the stove, the Coal Rake must be pulled back so the pot will clear it. Open the Firebox door of the stove and you will see 2 Hex head screws. Follow steps 1 through 4 in figure 8 to remove the Burnpot from the stove. To remove the Slide-out Bottom follow steps 1 through 3 in figure Clean-Out Ports/Ash Traps. The stove has 2 Exhaust Cleanout Ports located in the LEFT AND RIGHT lower corners of the firebox. Left Cleanout/Ash Trap Cover shown in figure 9. To access the Ash Traps, first remove the shipping screws that hold the Decorative Grills in place. These screws may be discarded at this point. Remove Decorative Grills. Remove Cleanout Covers and clean Ash Traps regularly with a vacuum. Frequency of cleaning depends on the amount of fuel being burnt and the quality of the Corn. Failure to clean the Ash Traps will cause the Stove to become plugged with Fly Ash. 4. Heat Exchange Baffle. Remove the baffle and clean the ashes that accumulate on a regular basis. Once a month or sooner, depending on the quality of fuel being used (See Figure 10 on Page 17) Figure 10 shows how the baffle is removed from the Stove. Clean the baffle on a regular basis. Frequency of cleaning depends on amount of fuel being burnt and the quality of the corn. Failure to clean the Baffle can cause the stove to become plugged with Fly Ash. 16
17 Baffle Removal Figure 10 To remove the baffle, lift the back of the baffle up to clear the inner back of the stove and slide towards the front of the Stove. The baffle will slide out of the keyhole slots and drop down. When putting the baffle back in the stove, make sure the screws are in the keyhole slots and the back of the baffle is lifted up over the inner back to keep the Baffle locked in place. 5. Exhaust System. Periodic cleaning of the exhaust system is required. Under certain conditions, chimneys may plug up rapidly. Dirty/High moisture content Corn and poor installations require more frequent chimney cleanings. See Page 5 Preventing Chimney Fires, if burning pellets. The products of combustion will also contain small particles of fly ash. The fly ash will collect in the exhaust vent and restrict the flow of the flue gases. Judge the frequency of cleaning by checking the amount of ash that accumulates in the elbows or tee s of the exhaust system. Ask the dealer for suggested frequency of cleaning, equipment needed and procedures for cleaning. Check the Exhaust system and Ash Traps at least once every two months during the heating season. 6. Gaskets. Periodically inspect the condition of the rope gasket around the door, window and ash door. Replace as needed. 17
18 Many dealers offer a Service Contract that will cover Yearly Maintenance. Contact your St. Croix Dealer for assistance in maintaining your stove in top condition. Yearly Maintenance Yearly maintenance is designed to assure safe operation, prolong the life of the stove and help preserve its aesthetic appeal. 1. Spring Shutdown. After the last burn in the spring, cool the stove. Remove all corn from the hopper and the auger. Thoroughly clean the burn pot, burn pot box, ash pan and ash traps behind the ash pan. (To locate the ash traps see figure 9 on page 16) 2. The exhaust system should be thoroughly cleaned at least annually. Call your dealer for this service. 3. The motor/fan area behind the firebox and under the hopper should be vacuumed annually. NOTE: UNPLUG THE STOVE. Open the access panels of the stove. Carefully clean or vacuum any dust, cobwebs and household dust. Carefully vacuum around the fan motors. If electrical wires become disconnected call your dealer for service. Figure 11 Note: The Vacuum Switch may be removed to allow easier access to the combustion fan 4. The exhaust fan should be removed (may require a new gasket) and cleaned with compressed air annually. Call dealer for this service. Annual oiling of the motors is not needed. (See Figure 11) 5. The Convection Blower should be removed and cleaned with compressed air annually. Annual oiling of the motors is not needed. (See Figure 11) 18
19 Fall Startup. Prior to lighting the first fire check the outside area around the exhaust and air intake systems for obstructions. Try all controls to see that they are working prior to lighting a fire. SAFE OPERATION. 1. Disposal of Ashes. Ashes should be placed in a metal container with a tight fitting lid. The closed container of ashes should be placed on a non-combustible floor or on the ground, well away from all combustible materials, pending final disposal. If the ashes are disposed of burial in soil or otherwise locally dispersed, they should be retained in the container until all cinders have thoroughly cooled. 2. Never use Gasoline, gasoline type lantern fluid. Kerosene, charcoal lighter fluid or similar liquids to start or freshen up a fire in this heater. Keep all such liquids well away from the heater while it is in use. 3. Creosote, Soot and Fly Ash: Formation and Need for Removal. The products of combustion will contain small particles of Fly Ash. The fly ash will collect in the venting system and restrict the flow of flue gases. Incomplete combustion, such as occurs during start-up and shut-down, or incorrect operation of the room heater will lead to some soot or creosote formation which will collect in the venting system. The exhaust system should be inspected regularly during the heating season to determine if creosote buildup has occurred. Check more frequently at first to determine a schedule for cleaning the venting system based on individual use of this Corn/Pellet-burning heater. If creosote has accumulated, it should be removed to reduce the risk of a chimney fire. 4. Do not Overfire this unit. Follow all instructions regarding the proper use of this heater. CAUTION: The Electrical Components of the stove are not Owner Serviceable. Call your dealer for proper diagnosis of electrical problems and service to those components. See Installations Manual for a copy of the Wiring Schematic. 19
20 TROUBLESHOOTING & FRQUENTLY ASKED QUESTIONS The stove is very trouble free in operation when properly maintained and quality pellets are used. When the stove fails to operate properly, troubleshooting by the operator of the stove is limited. Please read the following guide for answers to frequently asked questions 1. When first starting the stove remember the auger tube is empty, which will delay feeding fuel to the burn pot. This will in some cases prevent the stove from starting. Solution: Prime the burn pot if the auger tube is empty. 2. My stove keeps overloading the burnpot. First check the Moisture Content of your corn. It should be 15% or less. Also make sure you are using clean corn. Otherwise this is mainly caused by improper combustion (See Damper Adjustment section of the Operations Manual). Besides the damper adjustment there are several areas that can have an effect on the combustion process. Solution: Check all Gaskets, Doors and door Latching Systems for air leaks. Any leaks in these areas will negatively affect the burn process and cause the pot to overload. Also make sure the slide out bottom is closed all the way. If this is left open, combustion air will leak out the bottom of the Burn Pot area instead of being used in the combustion process. 3. My stove runs for approximately 2 4 hours and then overloads the burnpot. What s wrong? Solution: This most likely means the combustion process is taking place on top of the Coal Rake. During normal burning of corn the Coal Rake must be pulled out of the burnpot. This causes the pot to fill up prematurely and overload. The Coal Rake will be damaged if left in the Burn Pot for long periods of time. 4. My stove isn t burning and the number 2 Feed Light is blinking. This diagnostic light indicates the vacuum switch no longer senses negative pressure in the firebox area of the stove. What caused the stove to go out? a. The door of the unit was left open longer than 60 seconds. (See solution) b. The ash pan door was left open for longer than 60 seconds. (See solution) c. The combustion fan is not running. (Defective fan or control board) d. The vacuum switch is defective. e. The vacuum hose is disconnected f. The vent system is plugged with fly ash. Solution: If the fire is out, re-light the stove. If the fire is still burning make sure all doors are securely latched and hold down the On/Off button (approximately 5 seconds) until stove starts up again. This will restart the stove in the start-up program. Occasionally use the auger button to manually feed fuel until the auto-feed takes over (Auto feed will start 5 minutes after the stove has been restarted). 20
21 5. My stove isn t burning and the number 3 Feed Light is blinking. This diagnostic light indicates that the Proof of Fire Switch no longer senses a fire in the stove. First check to see if there are pellets in the hopper. If there are pellets in the hopper, why did the stove go out? a. Unburned fuel in the Burn Pot means the fire went out before the Auger quit feeding. Solution: Adjust the air damper. (See section covering an Unbalanced Burnpot). Corn would still feed until the P.O.F. switch eventually shuts the stove down. Adjust the damper. (See Damper Adjustment in the Operations Manual) b. The Burn Pot is empty means the Auger quit feeding fuel while there was still a fire in the burnpot. Check to see if there is fuel in the hopper. If the hopper is empty, fill the hopper and re-light the stove. c. If there is fuel in the hopper check to see if there is an obstruction in the auger system or if the auger set screw is loose. Solution: Remove obstruction and re-light the stove or tighten the setscrew on the auger shaft. 6. My stove isn t burning and the #2 and #3 Feed Lights are blinking simultaneously. These 2 lights diagnose the High Limit Switch and will indicate the stove reached an Over Temp situation. a. Check to see if the High Limit switch needs to be reset. If the High limit switch needs to be reset, do not use the stove until you find out why the High Limit tripped. b. The room air fan could be defective or the fan may need cleaning. c. The high limit switch also may be defective. It is best to call your dealer for support when trying to troubleshoot the High Limit Switch. Do not use your stove if the High Limit switch frequently trips. 7. I lit the stove and the # 2 Feed Light immediately started blinking and smoke spills out of the stove. How do I get the stove to quit smoking? Cause: Solution: The stove did not establish a vacuum and shut down. With the fuel in the pot burning, the smoke finds the path of least resistance and leaks out into the house. (See Installations Manual. Minimum vertical height needed to establish some natural draft and prevent smoke spillage) Pull the Slide-Out Bottom out and drop the fuel into the ash pan. This will minimize the amount of smoke that can spill into the room. 21
22 8. I turned the stove on with the On/Off switch and nothing happens. First check to see if the stove is plugged in and the receptacle has power to it. Solution: Check the fuse on the back of the control board. Replace with a 250 Volt, 5 Amp fuse (part number 80P20057-R). 9. Why is my glass dirty? Normal operation of your St. Croix corn stove will produce a white build-up on the glass that wipes off with a dry paper towel. However extended burning on the low setting only will produce a light tan color. These types of build-up on the glass are normal. A heavy black build-up on the glass could indicate a problem. Solution: a. Adjust the combustion air setting to the proper setting. If this doesn t seem to help, make sure the clean out cover plates are installed in the stove. It also could be an indication that the stove is getting plugged and needs a good cleaning. Refer to the section in the manual that covers the Daily, Periodic and Yearly Maintenance of the stove. 10. How do I adjust my low burn (#1 setting)? Not all corn burns at the same rate. The moisture content of the corn greatly influences the burn. Following is a description of the function of the auger trim button. The solution described first will most likely be the only one used while burning corn. It would be unusual to use the second use of the trim button (decreasing the feed). Solution: The auger trim button on the control board allows the feed rate on #1 to be increased or decreased depending on the type of fuel used. a. Pressing the auger trim button once will turn the #1 and #5 light on at the same time. This is an increase of.25 seconds to the On-Time of the #1 setting. This is the #1-High setting, 1.75 seconds Using the auger trim button is also helpful when trying to keep the glass cleaner when burning on the #1 setting. The more fuel on low will usually mean less build up on the glass. 22

23 b. Pressing the auger trim button again will turn on the #1 and #4 light at the same time. This will decrease the feed rate by.25 seconds. This is the #1-Low setting, 1.25 seconds. The #1 Low setting will give less heat, but will also cause more build-up to form on the glass. 11. What does the Draft Trim Button do? This button will rarely be used. In the event the stove is connected with a chimney system that has a strong Natural Draft, this button will allow the draft on the low (#1) feed setting to be adjusted, by reducing the voltages to the combustion fan. The control board must be on the #1 setting to see the LED lights flashing. By pressing the button the first time, the voltage will be reduced 5-8 volts. All LED lights will flash once. Pressing the button a second time will reduce the voltage another 5-8 volts. The LED lights will flash twice, indicating the second adjustment. Pressing the button a third time will return the control board to the default setting, and the LED lights will flash once. Remember: Any of the above mentioned adjustments to the #1 setting on the control board will be lost if the unit gets unplugged or if there is a Power Failure. 23
24 13. The ON/OFF light blinks under certain conditions. Does this mean anything? a. The ON/OFF light blinking will mean one of two things. When the stove is first started and the stove is in the Start-up program, the light blinks until the Proof of Fire switch locks in. This indicates the Normal Operation and the light stays on constantly. b. If the stove is running on a Thermostat it will start up as described in point (a), but during Normal Operation when the Thermostat is not calling for heat the stove drops to the #1 setting and Pilots until the thermostat calls for heat again. The LED light indicating the Heat Level will not drop to the #1 setting during Pilot Mode. During this time the ON/OFF light will be blinking, indicating that the stove is in Pilot Mode. 14. The ON/OFF light is always blinking and the stove only runs on with a low fire, even though I have the Heat Level on #5. This usually indicates a problem in the Thermostat circuit. There is either a bad connection in the wires or the Thermostat itself has a problem. Troubleshoot all of the components in the system. If the stove is not operating on a Thermostat, check the small jumper wire between the Red and Black connectors of the Thermostat wire Terminal on the back of the stove. (See page 20 of the Installations Manual, Thermostat Hook-up) These questions and answers will usually solve most problems that you run into during the break in period of the stove or if a component fails in the stove. Before calling your dealer for assistance, please read your Operations Manual and perform all the maintenance issues covered in the Daily and Periodic Maintenance section of the Manual. If the stove still does not operate correctly call your Dealer for Assistance. 24
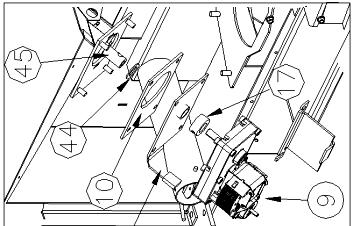
25 When installing the stove it is best to remove the castings to make it easier to handle. This makes the stove approximately 200 Lbs. lighter. It disassembles in four easy steps: top assembly, left and right sides and finally the front assembly Greenfield Cast iron Parts # PART NUMBER DESCRIPTION BLACK FERRIS GRAY 1 80P20083-R 80P20083-GR CAST LEG 2 1/2HFW 1/2-13 WHIZNUT 3 1/2X1-1/2CB 1/2-13 X 1-1/2 CARRIAGE BOLT 4 80P20090-R 80P20090-GR CAST SIDE PANEL - RIGHT 5 8OP20088-R 80P20088-GR CAST TOP 6 80P20102-R MOUNTING SCREWS CAST HOPPER LID 7 80P20108-R MOUNTING PLATE CAST HOPPER LID 8 80P20099-R HINGE PINS CAST HOPPR LID 9 80P20089-R CAST HOPPER LID 10 80P52650-R MOUNTING BRACKET CAST FRONT PANEL 11 80P20093-R 80P20093-GR CAST FRONT FRAME 12 80P20094-R 80P20094-GR CAST FRONT PANEL 13 80P20100-R HINGE PINS - CAST FRONT PANEL 14 80P20098-R 80P20098-GR CAST DOOR RIGHT 15 80P20097-R 80P20097-GR CAST DOOR - LEFT 16 80P20101-R HINGE PINS CAST DOORS 17 80P20092-R 80P20093-GR CAST SIDE PANEL - LEFT 25
26 26
Afton Bay Operation & Maintenance Manual
 Afton Bay Operation & Maintenance Manual Table of Contents ST. CROIX FEATURES...2 INSTALLATION... 3 PREVENTING CHIMNEY FIRES...3 SATISFACTORY PERFORMANCE... 3 APPROVED FUELS...3 Pellets, Cherry Pits &
Hastings Operation & Maintenance Manual
 Hastings Operation & Maintenance Manual Table of Contents ST. CROIX FEATURES...2 INSTALLATION... 3 PREVENTING CHIMNEY FIRES...3 SATISFACTORY PERFORMANCE... 3 Pellet Fuel...3 Add Corn to the Mix...3 OPERATING
Pepin Operation & Maintenance Manual
 Pepin Operation & Maintenance Manual Table of Contents St. CROIX FEATURES... 2 INSTALLATION... 3 PREVENTING CHIMNEY FIRES... 3 SATISFACTORY PERFORMANCE... 3 PELLETS... 3 OPERATING INSTRUCTIONS... 4 Pre-Lighting
Hastings Operation & Maintenance Manual
 Hastings Operation & Maintenance Manual Table of Contents ST. CROIX FEATURES...2 INSTALLATION... 3 PREVENTING CHIMNEY FIRES...3 SATISFACTORY PERFORMANCE... 3 APPROVED FUELS...3 Pellets, Cherry Pits & Pellet
St. Croix P E L L E T S T O V ES. Save this Operation & Maintenance. Manual MODELS: PRESCOTT EX PRESCOTT EXL AFTON BAY YORK.
 St. Croix P E L L E T S T O V ES Save this Operation & Maintenance Manual MODELS: PRESCOTT EX PRESCOTT EXL AFTON BAY YORK Table of Contents St. CROIX FEATURES... 1 INSTALLATION... 4 PREVENTING CHIMNEY
Maintenance 45 Serie CAUTION. Before resetting your electronic card that displays an error code.
 29-10-2013 CAUTION Before resetting your electronic card that displays an error code. Error Code H Service the stove COMPLETELY as described in this manual. Check the chimney pipe. Error Code O Service
Wood Pellet Stove Guide
 Wood Pellet Stove Guide How does a wood pellet stove work? Wood pellet stoves work similar to traditional wood burning stoves but use wood pellets as the fuel source. Pellet stoves have a hopper where
SHERWOOD INDUSTRIES IS AN ENVIRONMENTALLY RESPONSIBLE COMPANY. THIS MANUAL IS PRINTED ON RECYCLED PAPER. OWNER S MANUAL
 SHERWOOD INDUSTRIES IS AN ENVIRONMENTALLY RESPONSIBLE COMPANY. THIS MANUAL IS PRINTED ON RECYCLED PAPER. PLEASE KEEP THESE INSTRUCTIONS FOR FUTURE REFERENCE PELLET STOVE Windsor OWNER S MANUAL PLEASE READ
Corn Flame Energy Corn Stove Model 5000
 Corn Flame Energy Corn Stove Model 5000 Installation and Operation Guide Read thoroughly before starting installation Save this manual for future reference SAFETY NOTICE If this stove is not properly installed,
SHERWOOD INDUSTRIES IS AN ENVIRONMENTALLY RESPONSIBLE COMPANY. THIS MANUAL IS PRINTED ON RECYCLED PAPER. Freestanding and Fireplace Insert
 SHERWOOD INDUSTRIES IS AN ENVIRONMENTALLY RESPONSIBLE COMPANY. THIS MANUAL IS PRINTED ON RECYCLED PAPER. PLEASE KEEP THESE INSTRUCTIONS FOR FUTURE REFERENCE PELLET STOVE EF4 Freestanding and Fireplace
HTP BAY & HTP STANDARD PELLET STOVE OWNER S MANUAL
 HTP BAY & HTP STANDARD PELLET STOVE OWNER S MANUAL Installation, Operating and Maintenance Instructions for Pellet Stoves Congratulations on your purchase of a HEAT-TECH pellet stove. We at HEAT-TECH take
Installation and Operating. Instructions. Multifuel Stove. Salamander. Model Lighting a solid fuel fire. 6.5 De-ashing the stove
 Installation and Operating Instructions Salamander Model 0901 Multifuel Stove Section Contents Page 1 Important information about installing and 3 using the Salamander stove 2 Unpacking the Salamander
INSTALLATION/OWNERS MANUAL for. Kodiak HAND FIRED GRAVITY FED COAL STOVE Columbia Blvd. Bloomsburg PA Fuel: Nut or Pea Coal
 INSTALLATION/OWNERS MANUAL for Kodiak HAND FIRED GRAVITY FED COAL STOVE 3162 Columbia Blvd. Bloomsburg PA 17815 Fuel: Nut or Pea Coal Caution Fossil fuel burning can create lethal doses of carbon monoxide
How to use a multi fuel stove
 How to use a multi fuel stove Important!! When lighting the stove for the first time only a small fire should be lit. Too hot a fire will result in the paint emitting smoke - not necessarily bad but unpleasant.
Installation, Operation, & Safety Handbook
 Installation, Operation, & Safety Handbook Model 1500 Model 2500 Obadiah's Wood Stoves 1660 Whalebone Dr. Kalispell, MT 59901 www.woodstoves.net 800-968-8604 Model 2500 and 1500 Freestanding Stove or Fireplace
Inspecting your combustor
 Inspecting your combustor Ash, a fluffy light grey powder, and soot, a darker granular material, accumulate on the combustor surfaces in normal use. Ashes accumulate both as a result of the smoke being
Please read this manual before installation and use. We wish you many years of pleasure and warmth.
 Thank you for purchasing this product. This multi fuel burning stove is compliant with the EN13240 Please read this manual before installation and use. We wish you many years of pleasure and warmth. Manufactured
Installation & Operations Manual. Eclipse-MF. SmartScan Maintenance Sensor
 Installation & Operations Manual Eclipse-MF With SmartScan Maintenance Sensor "Please read this entire manual before installation and use of this Multi-fuelburning room heater. Failure to follow these
Toyostove Error Code EE 2 (EE 6)
") Toyostove Error Code EE 2 (EE 6) WARNING Rural Energy Enterprises, Inc. does not accept liability for the improper use of this information. Installation, service, and maintenance of heating equipment should
Toyostove Error Code EE 2 (EE 6) WARNING Rural Energy Enterprises, Inc. does not accept liability for the improper use of this information. Installation, service, and maintenance of heating equipment should
A carbon monoxide detector has been supplied with your stove. You must plug it in. Burn Nut and Pea anthracite coal only
 70,000 & 90,000 Hand Fired Deep Box Operating instructions and maintenance enclosed Thoroughly read and understand instructions Always leave this manual with stove owner Follow the instructions within
EXCEL ULTRABlack FS 6 Clearance Connector INSTALLATION AND MAINTENANCE INSTRUCTIONS
 EXCEL ULTRABlack FS 6 Clearance Connector INSTALLATION AND MAINTENANCE INSTRUCTIONS A MAJOR CAUSE OF CHIMNEY RELATED FIRES IS FAILURE TO MAINTAIN REQUIRED CLEARANCES (AIR SPACE) TO COMBUSTIBLE MATERIALS.
Contents. AFTER SALES SUPPORT / KB-8085
 Contents 02 Introduction 03 General Information and Safety Instructions 05 Assembly and Parts List 07 Getting Started 08 Other Useful Information 10 Warranty Card Introduction 1 2 Congratulations! You
MODEL DCC DOUBLE WALL CHIMNEY CONNECTOR
 Installation & Maintenance LISTED Tested to *UL 103HT & ULC-S641 Instructions MODEL DCC DOUBLE WALL CHIMNEY CONNECTOR A MAJOR CAUSE OF CHIMNEY RELATED FIRES IS FAILURE TO MAINTAIN REQUIRED CLEARANCES (AIR
Seasoning Your Stove. Starting a Fire And Establishing Proper Draft
 OPERATION Seasoning Your Stove Both soapstone and steel need to be seasoned. The seasoning can be accomplished through a series of small to moderate fires. Your Woodstock Soapstone Stove is an easy stove
For Outdoor Use Only!
 ITEM NAME: Red Ember 4 ft. Smokestack Rubbed Bronze Fireplace with Cover SKU: ALZ655-1 For Outdoor Use Only! 1. Improper installation, adjustment, alteration, service or maintenance can cause injury or
Installation & Operations Manual. Lincoln SCS. SmartScan Maintenance Sensor
 Installation & Operations Manual Lincoln SCS With SmartScan Maintenance Sensor "Please read this entire manual before installation and use of this pellet fuelburning room heater. Failure to follow these
INSTALLATION & OPERATION MANUAL. Pellet Stove MODELS 25-PDVC / 55-SHP10 / 55-TRP10
 INSTALLATION & OPERATION MANUAL Pellet Stove MODELS 25-PDVC / 55-SHP10 / 55-TRP10 SAVE THESE Manufactured By: England s Stove Works, Inc. PO Box 206 Monroe, VA 24574 10/7/2013 SAVE THESE INSTRUCTIONS Introduction
You recognize it immediately. The shape, the name, the quality. The Harman. P-Series gives you the heat you want when you want it.
 P - S E R I E S P e l l e t S t o v e s The Smartest pellet stoves on the market Decorative plated or brushed air grilles (optional) Sealed hopper holds up to 76 pounds of pellets State-of-the-art, whisperquiet,
For Outdoor Use Only!
 ITEM NAME: Red Ember Bronze Crossweave Firebowl Fire Pit with Free Cover and Fire Tool with Optional Grill Grate SKU: ALZ109 For Outdoor Use Only! 1. Improper installation, adjustment, alteration, service
THE INSTALLATION MANUAL FOR GEMINI 1200 AND GEMINI 1500 WOODSTOVES. Manufactured by DROLET STOVES & FIREPLACES INC.
 THE INSTALLATION MANUAL FOR GEMINI 1200 AND GEMINI 1500 WOODSTOVES Manufactured by DROLET STOVES & FIREPLACES INC. Rev 07/96 45041a THE INSTALLATION MANUAL FOR GEMINI 1200 ET GEMINI 1500 WOODSTOVES DROLET
Assembly Instructions & User s Manual 26 Florence Folding Leg Fire Pit
 Assembly Instructions & User s Manual 26 Florence Folding Leg Fire Pit FSMVPT6022 Please keep this instruction manual for future reference Customer Service: (888) 922-2336 7:00 am to 2:00 am CST (daily)
MODEL DCC DOUBLE WALL CHIMNEY CONNECTOR
 Installation & Maintenance LISTED Tested to *UL 103HT & ULC-S641 Instructions MODEL DCC DOUBLE WALL CHIMNEY CONNECTOR A MAJOR CAUSE OF CHIMNEY RELATED FIRES IS FAILURE TO MAINTAIN REQUIRED CLEARANCES (AIR
SINGLE BURNER STOVE IMPORTANT OPERATING INSTRUCTIONS COOKING & STORAGE POSITION PARTS IDENTIFICATION
 SINGLE BURNER STOVE OPERATING INSTRUCTIONS PARTS IDENTIFICATION Electronic Lighter Ignites the burner. Liquid Guard Holds liquid overflow. Windshield Prevents flame from being extinguished by wind. Ensures
Studio stove, Studio oven and Oh-Ah
 Studio stove, Studio oven and Oh-Ah Maintenance and Operating Instructions Visit www.warmington.co.nz for specs, DWG s and PDF uploads of fires Fire, flue system and instructions to comply with AS/NZS
MULTI-FUEL STOVE INSTALLATION AND USER INSTRUCTIONS
 PRIORY MULTI-FUEL STOVE INSTALLATION AND USER INSTRUCTIONS The Priory stove has a nominal heat output of 8Kw. and a weight of 80 kg. The flue gas mass flow is 5.4g/s for mineral fuel and 6.3g/s for wood
MODEL DL INSTALLATION AND OPERATING INSTRUCTIONS 2100º F 1150º C
 6", 7" & 8" dia. MODEL DL DOUBLE WALL CONNECTOR INSTALLATION AND OPERATING INSTRUCTIONS THIS STOVE CONNECTOR HAS BEEN LISTED AT 2100º F 1150º C LISTED ACCORDING TO: ULC-S641 WH-PN-016 SECURITY CHIMNEYS
Model 205 Fireview Maintenance Kit
 Model 205 Fireview Maintenance Kit Please read all of the instructions before you begin the procedure. Confirm that you have all the necessary tools and parts required. Allow about one hour to complete
Gas Conversion Kits and Instructions
 Gas Conversion Kits and Instructions INSTALLATION FORM RGM 432/433-GC (Version D.1) Obsoletes Form RGM 432/433-GC (Version D) APPLIES TO: Model FT and Model SFT All gas conversion must be done by a qualified
RMC1E - Variable Flame Height EASY Control
 Owner s Manual RMC1E - Variable Flame Height EASY Control General Assembly, Installation, and Operation Instructions for use with Natural Gas Burners; F, FX, CS, CXF, TNA or Propane Gas Burners: FA, FAX,
Setting Up Your Stove
 OPERATION Setting Up Your Stove 11. Your Palladian/Keystone has been shipped fully assembled except for three parts: 1) The bottom heat shield, 2) The flue collar/cover plate, and 3) the knob for the bypass
Operator s Manual. Medium-Duty Electric Slicers ENGLISH. Item Model Description Drive Peak HP Voltage Amps Hz Plug
 Medium-Duty Electric Slicers 40950 40951 Item Model Description Drive Peak HP Voltage Amps Hz Plug 40950 SLM250/S 10 Knife Medium-Duty Slicer 1/3 2.5 Belt 120 60 5-15P 40951 SLM300P/S 12 Knife Medium-Duty
The wall where the product will be placed must not be constructed in wood, or in any case, made of an
 Dear Client, GB We thank you for having chosen one of our products, the fruit of technological experience and of continual research for a superior quality product in terms of safety, dependability, and
Clarry Pellet Stove. This product is patented under US Patent # and Canadian Patent # CA Made in the USA
 Clarry Pellet Stove This product is patented under US Patent #8020547 and Canadian Patent # CA2604313 Made in the USA Clarry is a registered trademark of Clarry Pellet Stove, LLC Report number: 0397PS001S
Installation and Operating Instructions
 Installation and Operating Instructions Wood-burning Stove Model: Ottawa 7kw INTRODUCTION Wood-burning Stove Item No.: Ottawa 7kw SAFETY Safety is the most important consideration when using and installing
PLATINUM MODEL WITH AUTO-RETRACT AND REMOTE CONTROL. Owner s Manual
 PLATINUM MODEL WITH AUTO-RETRACT AND REMOTE CONTROL Owner s Manual THIS MANUAL CONTAINS INSTRUCTIONS FOR UPGRADING BOTH THE GOLD MODEL ONE-TOUCH AND THE ONE-TOUCH MODEL WITH THE KEY SWITCH TO THE PLATINUM
Installation and Operating Instructions
 Installation and Operating Instructions Wood-burning Stove Model: Ottawa 5kw INTRODUCTION Wood-burning Stove Item No.: Ottawa 5kw curve SAFETY Safety is the most important consideration when using and
TC30 HEARTWOOD BURNER INSTALLATION INSTRUCTIONS
 INSTALLER: Leave this manual with the appliance. CONSUMER: Retain this manual for future reference. These instructions are supplementary to the Installation and Operating Instructions supplied with the
TECHNICAL SUPPORT HOT LINE HOURS: 7:30-3:30
 TECHNICAL SUPPORT HOT LINE 1-800-526-0725 HOURS: 7:30-3:30 TO: Service Providers BULLETIN No: 0102-1 FROM: SUBJECT: BOB VAN WYCK Technical Support Manager Burner Pilot Tube Replacement DATE: Feb 1, 2001
Operator's Manual. Model: RY10MK-PRO MPN: RA-MLT Gallon Direct Fire Melter Kettle Burner Model with Adjustable Flame-Out Valve
 Operator's Manual Model: RY10MK-PRO MPN: RA-MLT-0009 10 Gallon Direct Fire Melter Kettle Burner Model with Adjustable Flame-Out Valve U.S. Patent No. 9,739,021 For Technical Support Please Visit www.rynoworx.com
Intrepid 2 Intrepid 3
 Intrepid 2 Intrepid 3 Model Nos. V 10 / V10-3 NAT GAS Model Nos. V12 / V12-3 L.P.G DECORATIVE COAL EFFECT GAS STOVE USER INSTRUCTIONS This appliance is only for use on Natural Gas (G20) at a supply pressure
INSTANT GARAGE MODEL NO: CIG81224 ASSEMBLY INSTRUCTIONS PART NO: ORIGINAL INSTRUCTIONS
 INSTANT GARAGE MODEL NO: CIG81224 PART NO: 3503578 ASSEMBLY INSTRUCTIONS ORIGINAL INSTRUCTIONS GC1117 INTRODUCTION Thank you for purchasing this CLARKE Instant Garage. When erected, the CIG81224 garage
Fire's Edge Fire Pit/Fire Pit Inserts For (Automated) Model 100-A
 Model 100-A") Fire's Edge Fire Pit/Fire Pit Inserts For (Automated) Model 100-A OWNER S MANUAL / OPERATING AND MAINTENANCE INSTRUCTIONS For your safety: If you smell gas: 1. Shut off gas to the appliance 2. Extinguish
Fire's Edge Fire Pit/Fire Pit Inserts For (Automated) Model 100-A OWNER S MANUAL / OPERATING AND MAINTENANCE INSTRUCTIONS For your safety: If you smell gas: 1. Shut off gas to the appliance 2. Extinguish
IN THE EVENT OF CHIMNEY FIRE, EVACUATE THE PROPERTY AND CALL THE EMERGENCY SERVICES.
 EKOL INSET 8 INSTALLATION AND OPERATING INSTRUCTIONS INTRODUCTION. SAFETY Safety is the most important consideration when using and installing your stove. If not installed and used correctly, a house fire
17500 VRANJE, SRBIJA Radnička 1, Tel.: 017/ INSTRUCTIONS FOR INSTALLATION, ADJUSTMENT AND USE
 17500 VRANJE, SRBIJA Radnička 1, Tel.: 017/421-121 STOVE OF THICK METAL SHEETS PREMIJER PREMIJER K INSTRUCTIONS FOR INSTALLATION, ADJUSTMENT AND USE 1.Technical data about continuously burning stove of
INSTRUCTIONS FOR MVK-NQM PILOT KIT
 MVK-NQM IMPORTANT READ AND UNDERSTAND THESE INSTRUCTIONS BEFORE INSTALLING These instructions must be used as a supplement to the instructions supplied with your gas log set. Follow the Gas Log Set instructions
The Facts About Pellet Stoves. Bobbi Anne Barnowsky Alutiiq Tribe of Old Harbor Tribal Administrator/Environmental Director
 The Facts About Pellet Stoves Bobbi Anne Barnowsky Alutiiq Tribe of Old Harbor Tribal Administrator/Environmental Director AGENDA The Beginning of the Project The Thinking Cap There are many factors needed
Installation & User Manual EW5000 Outdoor Cooking Fire
 Installation & User Manual EW5000 Outdoor Cooking Fire IMPORTANT: Please read this manual before installing and using the ESCEA EW5000 Cooking fire. Failure to follow these instructions may lead to a possible
The WoodGas Campstove By: Spenton LLC
 The WoodGas Campstove By: Instruction Manual IMPORTANT Please read this manual carefully before using this stove. Store this manual for future use. If you have any questions about the operation of this
SPK3E - Manual EASY Control
 SPK3E - Manual EASY Control General Assembly, Installation, and Operation Instructions for use with Natural Gas Burners; F, FX, CS, CXF, TNA or Propane Gas Burners: FA, FAX, CA, CXFA, TNA/LP LISTED BY
Installation and operation instructions for KINEMAX burners
 -. - Installation and operation instructions for KINEMAX burners Application requirements View port A view port to observe burner flame is essential to inspect the flame aspect. Locate the view port downstream
Reference: Ottawa 12kw Operating Instructions Version 1 04/06/15. Installation and Operating Instructions
 Reference: Ottawa 12kw Operating Instructions Version 1 04/06/15 Installation and Operating Instructions Wood-burning Stove Model: Ottawa 12kw Size: W580XD410XH610MM 1 INTRODUCTION Wood-burning Stove Item
TUBULAR BURNER CONVERSION KIT AGCK-TBXX / AECK-UBXX
 TUBULAR BURNER CONVERSION KIT AGCK-TBXX / AECK-UBXX IMPORTANT - READ ALL INSTRUCTIONS BEFORE YOU BEGIN THE INSTRUCTIONS HEREIN SHOULD BE PERFORMED BY A QUALIFIED SERVICE TECHNICIAN. THE GRILL MUST BE COMPLETELY
TC36 CHALET BURNER KIT INSTALLATION INSTRUCTIONS
 INSTALLER: Leave this manual with the appliance. CONSUMER: Retain this manual for future reference. These instructions are supplementary to the Installation and Operating Instructions supplied with the
GNOME PELLET STOVE Owner s Manual
 GNOME PELLET STOVE Owner s Manual Leave this manual with the owner. Please read this entire manual before installation and use of the pellet fuel-burning stove. Failure to follow these instructions could
Installation and Maintenance Manual
 Freestanding Gas Stove MODEL: PGS2005 GPEBB20R GPEBW20R Installation and Maintenance Manual Warning Maintenance products should be carried out by professional and technical personnel with relevant qualification,
For converting 72 PKN for use with (LP) propane gas.
 propane gas.") IMPORTANT READ AND UNDERSTAND THESE INSTRUCTIONS BEFORE INSTALLING These instructions must be used as a supplement to the instructions supplied with your gas log set. Follow the Gas Log Set instructions
IMPORTANT READ AND UNDERSTAND THESE INSTRUCTIONS BEFORE INSTALLING These instructions must be used as a supplement to the instructions supplied with your gas log set. Follow the Gas Log Set instructions
AFC-50 Automatic French Fry Cutter Instruction Manual
 AFC-50 Automatic French Fry Cutter Instruction Manual Fry Factory Inc. 67 Watts Ave, Charlottetown, PEI, C1E 2B7, Canada Phone: 902-368-2900 Fax: 902-368-8645 Email: info@fryfactoryinc.com Website: www.fryfactoryinc.com
OPTIMA PS1 Pellet Stove
 OPTIMA PS1 Pellet Stove Users Installation Operation and Maintenance Manual PRIOR TO FIRST FIRE: Remove all labels from glass. Clean fingerprints from plated surfaces with a non-abrasive liquid glass cleanser
r e - p a r t s. c o m
 Owner s Manual SPK3E - Manual EASY Control General Assembly, Installation, and Operation Instructions for use with Natural Gas Burners; F, FX, CS, CXF, TNA or Propane Gas Burners: FA, FAX, CA, CXFA, TNA/LP
THE EDGE12 SLICER. MODEL EDGE12-2 (220/50/1 voltage) FORM (July 2012) EDGE12 SLICER
 FORM (July 2012) EDGE12 SLICER") EDGE12 SLICER THE EDGE12 SLICER MODEL EDGE12-1 (120/60/1 voltage) EDGE12-2 (220/50/1 voltage) ML-136246 ML-136247 701 S. RIDGE AVENUE TROY, OHIO 45374-0001 937 332-3000 www.hobartcorp.com FORM 35283 (July
EDGE12 SLICER THE EDGE12 SLICER MODEL EDGE12-1 (120/60/1 voltage) EDGE12-2 (220/50/1 voltage) ML-136246 ML-136247 701 S. RIDGE AVENUE TROY, OHIO 45374-0001 937 332-3000 www.hobartcorp.com FORM 35283 (July
TC36 CHALET II BURNER KIT INSTALLATION INSTRUCTIONS
 INSTALLER: Leave this manual with the appliance. CONSUMER: Retain this manual for future reference. These instructions are supplementary to the Installation and Operating Instructions supplied with the
Filter Oil 8-HD. Lower cookpot lid. Be careful not to pinch fingers between lock and roller or lock and frame.
 Turn OFF Cooker With the filter tank under the cooker, slowly open the drain valve. Remove the cook basket and tilt the lid back for cleaning. Cooker and cook basket surfaces will be extremely hot. Take
PLATINUM MODEL WITH AUTO-RETRACT AND REMOTE CONTROL. Owner s Manual
 PLATINUM MODEL WITH AUTO-RETRACT AND REMOTE CONTROL Owner s Manual THIS MANUAL CONTAINS INSTRUCTIONS FOR UPGRADING BOTH THE GOLD MODEL ONE-TOUCH AND THE ONE-TOUCH MODEL WITH THE KEY SWITCH TO THE PLATINUM
USAGE AND MAINTENANCE MANUAL FOR A SOLID FUEL STOVE
 PREDUZEĆE ZA PROIZVODNJU, PROJEKTOVANJE I PROMET BELOŠEVAC BB, 14000 VALJEVO, SRBIJA USAGE AND MAINTENANCE MANUAL FOR A SOLID FUEL STOVE DEAR CUSTOMER, Congratulations on your purchase of BLIST solid fuel
Care and Replacement Manual for Woodstove Catalytic Combustors
 Care and Replacement Manual for Woodstove Catalytic Combustors A good combustor is designed to withstand approximately 12,000 hours of continuous use. For most people, this will translate into two to five
User Manual. 110 Cup (55 Cup Raw) Rice Cooker. Model: 177GRCLP, 177GRCNAT 10/2017. Please read and keep these instructions. Indoor use only.
 Rice Cooker. Model: 177GRCLP, 177GRCNAT 10/2017. Please read and keep these instructions. Indoor use only.") 110 Cup (55 Cup Raw) Rice Cooker Model: 177GRCLP, 177GRCNAT 10/2017 Please read and keep these instructions. Indoor use only. www.avantcoequipment.com 1 NOTE: Save these instructions for future reference.
110 Cup (55 Cup Raw) Rice Cooker Model: 177GRCLP, 177GRCNAT 10/2017 Please read and keep these instructions. Indoor use only. www.avantcoequipment.com 1 NOTE: Save these instructions for future reference.
Installation and User s Manual 12 x 10 MOTORIZED AWNING
 12 x 10 MOTORIZED AWNING Installation and User s Manual 12 x 10 MOTORIZED AWNING 088-1763-0 Stop Please read and understand this manual before any assembly or use of this product. Before beginning assembly
SAFETY NOTICE WARNING TABLE OF CONTENTS SAVE THESE INSTRUCTIONS FOR FUTURE REFERENCE THIS STOVE IS NOT INTENDED FOR USE IN COMMERCIAL APPLICATIONS.
 1 TABLE OF CONTENTS INSTALLATION AND ASSEMBLY RIKA: An Overview 3 Safety Precautions 4 Safety Labels 6 Clearance Minimums 7 Main Control Board 8 Specifications 9 Parts Illustrations 10 Automatic Safety
Meat Slicer INSTRUCTION MANUAL CAUTION! ONE YEAR LIMITED WARRANTY
 ONE YEAR LIMITED WARRANTY INSTRUCTION MANUAL The original registered owner of this product should contact SKYFOOD EQUIPMENT LLC at 305-868-16 for any warranty problems or service. SKYFOOD EQUIPMENT LLC
FORM (Apr. 2006)
") 2212 Slcier MODEL 2212 SLICER MODEL 2212 ML-136132 701 S. RIDGE AVENUE TROY, OHIO 45374-0001 937 332-3000 www.hobartcorp.com FORM 35215 (Apr. 2006) Installation, Operation, and Care of MODEL 2212 Slicer
2212 Slcier MODEL 2212 SLICER MODEL 2212 ML-136132 701 S. RIDGE AVENUE TROY, OHIO 45374-0001 937 332-3000 www.hobartcorp.com FORM 35215 (Apr. 2006) Installation, Operation, and Care of MODEL 2212 Slicer
Product instruction manual Ream Cutting Systems RE3943, RE3946, RE3947, RE3971, RE3952E
 Product instruction manual Ream Cutting Systems RE3943, RE3946, RE3947, RE3971, RE3952E The Trimfast Ream Cutters are reliable, high performance cutters that will give you the results you need quickly
Troubleshooting Guide
 Troubleshooting Guide XS-2000/3000/4000 Series A user reference guide to better help understand and overcome error conditions experienced with your spa pool. TM This page is intentionally left blank for
Alma Mons EN Owners s manual INSTALATION, ADJUSTMENT AND OPERATING INSTRUCTION
 Alma Mons Owners s manual INSTALATION, ADJUSTMENT AND OPERATING INSTRUCTION EN 12815 1 INTRODUCTION Congratulations! You have invested in energy efficient and high quality product-alma Mons wood burning
GAS STOVE GUARD for natural gas and propane stoves
 GAS STOVE GUARD for natural gas and propane stoves OPERATING INSTRUCTIONS September 18, 2017 STOVE GUARD is not designated for use with gas stoves with pilot light. STOVE GUARD is an electronic safety
Copyright 2008 by Lucky Distributing
 1 TABLE OF CONTENTS INSTALLATION AND ASSEMBLY RIKA: An Overview 3 Safety Precautions 4 Labels 6 Main Control Board/Specifications 7 Parts Illustration 8 Automatic Safety Functions 12 Installation Instructions
Tips For Using a Catalytic Woodstove
 5555 Pleasantdale Road Doraville, GA 30340 678-735-4937 Tips For Using a Catalytic Woodstove By Mike Preetorius, Customer Service A model of your stove was sent to Environmental Protection Agency for testing
Hitch Hiker Operating Instructions
 1 Hitch Hiker Operating Instructions Read Completely and Carefully Before Operating The Hitch Hiker is designed as an electric pedal assist system. A pedal assist system helps the riders propel the cycle
CONTENTS. INSTALLATION INSTRUCTIONS Building regulations 4 Positioning and Clearances 4 Chimney 4 Flue connection 5 Problem solving 6 PRODUCT DATA
 PRODUCT DATA MODEL WEIGHT NOMINAL HEAT OUTPUT FB1 DS 80KG 6KWs CONTENTS OPERATING INSTRUCTIONS Lighting the fire 2 Firebox linings and baffle 2 Wood burning tips & theory 2 Running temperatures 3 Cleaning
TWO BURNER STAINLESS STEEL PROPANE STOVE
 ROTATE TO LIGHT 842-A250-0_SSCmpStove.qxd 11/26/03 2:59 PM Page 1 OWNER S MANUAL FAILURE TO FOLLOW ALL S AND INSTRUCTIONS IN THIS MANUAL COULD LEAD TO PERSONAL INJURY, INCLUDING DEATH. RETAIN THIS MANUAL
WARNING USING AND CARING
 OWNER S MANUAL WARNING Never use any fuel-burning products (stoves, lanterns, heaters, etc.) inside or within proximity of this tent. Use of fuel-burning products inside or within proximity of this tent
Seasoning Your Stove. Starting a Fire And Establishing Proper Draft
 OPERATION Seasoning Your Stove Both soapstone and steel need to be seasoned. The seasoning can be accomplished through a series of small to moderate fires. Your Woodstock Soapstone Stove is an easy stove
Wood as Fuel. Chimney sweeps in particular have a unique opportunity to deliver information on good burning habits to their customers.
 Wood as Fuel This document is intended to supply additional background information to compliment the consumer awareness information in Burn Right We all breathe the same air Chimney sweeps in particular
Read all instructions and warnings before using this fireplace. WARNING
 Frame User Manual 1 Operating Manual Thank you for purchasing this Signi Fires product. Signi Fires is very safety conscious, we have taken every care in designing, manufacturing and assembling your Signi
PRODUCT MANUAL - M096
 PRODUCT MANUAL - M096 MODEL 270 ELECTRIC CAN OPENER 1 I. LABELS L087--CAUTION 2 II. SPECIFICATIONS MODEL NO. 270 POWER 115 VOLT, 1.5 AMP, 50-60HZ REQUIREMENTS 230 VOLT, 0.8 AMP, 50-60 HZ NORMAL SPEED 200-250
MAX Series 9514 OPERATOR S MANUAL
 MAX Series 9514 OPERATOR S MANUAL Persons under age 18 are not permitted to operate or have accessibility to operate this equipment per U.S. Dept. Of Labor Employment Standards Administration Fact Sheet
POWER STOVE OWNER S MANUAL. Woodland Group Inc th Ave Kirkland, WA Made in the U.S.A. Phone: (425) Fax: (425)
 Fax: (425)") The Woodland POWER STOVE TM OWNER S MANUAL Woodland Group Inc. 544 7th Ave Kirkland, WA 98033 Phone: (425) 481-8187 Fax: (425) 488-3619 www.powerstove.net Made in the U.S.A. 1 Warning READ AND UNDERSTAND
The Woodland POWER STOVE TM OWNER S MANUAL Woodland Group Inc. 544 7th Ave Kirkland, WA 98033 Phone: (425) 481-8187 Fax: (425) 488-3619 www.powerstove.net Made in the U.S.A. 1 Warning READ AND UNDERSTAND
Gas Go Anywhere /23/01
 Gas Go Anywhere 55014 02/23/01 FOR OUTDOOR USE ONLY This grill does not include an LP fuel tank. Check Package Contents You should have received the parts listed below. While we give much attention to
TCWS.38NG03.C BLACK DIAMOND BURNER KIT INSTRUCTIONS
 IMPORTANT: THESE INSTRUCTIONS ARE TO REMAIN WITH THE HOMEOWNER These instructions are supplementary to the Installation and Operating Instructions supplied with the fireplace and should be kept together.
INSTALLATION AND OPERATION MANUAL
 INSTALLATION AND OPERATION MANUAL Free-Standing EPA Certified Wood-Burning Stoves Retain These Instructions For Future Reference P/N 775,217M, Rev. B, 09/2007 Wood Stoves Model Canyon ST310 A French manual
How to Set up Your Configurable (Home and Camping) Stir Fry Stove
 Stir Fry Stove") How to Set up Your Configurable (Home and Camping) Stir Fry Stove Setting up the outdoor stir fry stove is quick and easy. However, EXERCISE EXTREME CAUTION and apply common sense -- you are dealing with
How to Set up Your Configurable (Home and Camping) Stir Fry Stove Setting up the outdoor stir fry stove is quick and easy. However, EXERCISE EXTREME CAUTION and apply common sense -- you are dealing with