Rocketry for Kids. Science Level 4. Rocketry Activities
|
|
|
- Oscar Reed
- 6 years ago
- Views:
Transcription


1 Rocketry for Kids Science Level 4 Rocketry Activities
2 Victorian Space Science Education Centre 400 Pascoe Vale Road Strathmore, Vic Some material for this program has been derived from the work of others and is reproduced with the generous permission of the original copyright owners: NASA National Aeronautics and Space Administration, Office of Human Resources and Education, Education Division. 2
3 Rocketry Activities 1. Rocket Parts (Colouring activity) Pg 5 2. Two Stage Balloon Rocket 7 3. Paper Rockets 9 4. Altitude Tracking Water Rockets POP! Antacid Tablet Race 27 3
4 4

5 Activity 1. Identify the Rocket s Parts What you need: Colouring pencils Rocket pattern What to do: Colour in and label the different parts of a rocket: Nosecone Body Fins Nozzle 5
6 6

, secure it with a peg. 5.")
7 Activity 2. Two Stage Balloon Rocket What you need: 3 long balloons Nylon fishing line 3 Plastic straws Styrofoam cup Masking tape Scissors 3 Spring clothes pegs What to do: 1. Thread the fishing line through all three straws, stretch it across the room and secure the ends. Make sure the line is taught. It should be high enough that people can pass beneath it. 2. Cut the Styrofoam cup in half, so that the lip of the cup is in a ring. 3. Pre inflate the balloons to stretch them out. 4. Inflate a balloon fully and twist the nozzle shut, (don t knot it), secure it with a peg. 5. Carry the balloon to one end of the string and sticky tape the first of the straws along the length of the balloon. 6. Countdown to launch the balloon and release. 7. Draw a pen marking on the string to mark where the balloon stopped. 8. Inflate the second balloon to about ¾ full and squeezing the nozzle tight, pull it through the Styrofoam ring. Twist the balloon nozzle shut and secure with a peg. 9. Inflate the last balloon. As you do this, make sure that the front of this balloon extends into the Styrofoam ring a short distance. See the picture. As the last balloon inflates it will press against the nozzle of the second balloon and firmly seal the nozzle. 10. Twist and clip the nozzle of the last balloon shut with the other clothes peg. 11. Take the balloons to the end of the fishing line and tape a straw to each balloon. The balloons should be oriented parallel to the fishing line. 12. Remove the clothes peg from the leading balloon and untwist the nozzle. Do the same for the trailing balloon, but continue to hold the nozzle shut with your fingers. 7
8 13. Countdown to launch the two balloons and release your grip on the trailing balloon. The gas escaping from the trailing balloon will propel both balloons along the fishing line, until it begins to run out of air near the Styrofoam ring. This will release the nozzle on the leading balloon which will then power the rocket along the fishing line. 14. Mark with a pen where the staged balloon rockets stop. Questions: 1) Which balloon rocket travelled further: the first, single balloon rocket or the second, two stage rocket? 2) How does the single balloon rocket work? 3) How does the two stage balloon rocket work? 4) Why do rockets use staging? 8
9 Activity 3. Paper Rockets What you need: A4 paper Sticky tape Scissors Sharpened, large diameter pencil Eye protection Ruler Plastic straw (slightly thinner than pencil) Masking tape or altitude trackers Pictures of the sun and planets What to do: Making and launching the paper rockets 1. Photocopy and enlarge planet templates from the next page. Lay out the Solar System across the classroom. 2. Each student should construct one rocket as shown in instructions below. 3. Students try to predict which planet they will reach when they launch their rocket from the Sun. 4. Following the first flight students should construct at least two more rockets of different sizes and different designs (e.g. Add more fins). Making the paper rockets 1. Roll a strip of paper cut 4cm x 28cm length around the pencil. (See the diagram.) 2. Tape the rolled paper in three places along its length, being careful not to tape the rolled paper to the pencil. 3. Remove pencil from the rolled paper tube. 4. Cut off the excess lengths at either end. 5. Cut out fins (at least two) in any shape or design you like. 6. Tape the fins to the base of the rolled paper tube. 7. Fold over the upper end and tape shut. 8. Insert the straw into base (the fin end). 9. Blow through the straw to launch the rocket 10. Record your results. 11. Redesign the rockets; determine what needs to be changed to make the rocket fly further. 12. Predict how far the new rocket design will fly and create and launch new rockets. Questions: 1) Which rocket design went the furthest? 2) Which planet did the rocket travel to? 3) Which rocket design travelled the shortest distance? 4) Which planet did this rocket travel to? 5) How do these two rockets differ in design? 6) What made the rocket that travelled the furthest so successful? 9
10 10
11 11
12 12
13 Activity 4 Altitude Tracking Construct this tracker to build an instrument for accurately measuring the altitude of your water rockets or AlkaSeltzer rockets. What you need: Altitude tracker pattern (below) Altitude calculator pattern (below) 3 pieces heavy weight paper or light weight cardboard Thread or light weight string Small metal washer Split pin Scissors Stanley knife and cutting surface Stapler Meter long ruler Rocket What to do: Constructing the altitude tracker scope 1. Copy or glue the altitude tracker pattern onto a heavy weight paper or light cardboard. 2. Cut out the pattern on the thick, dark outside lines 3. Curl (do not fold) the B edge of the pattern to the back until it lines up with the A edge. 4. Staple the edges together where marked. If done correctly, the As and Bs will be on the outside of edges of the tracker. 5. Punch a small hole through the apex of the protractor quadrant on the pattern. 6. Slip the thread through the hole and tie off at the back. 7. Attach the small washer to the loose end of the thread on the A side to act as a weight. 13
14 14
15 Constructing the altitude calculator. 1. Copy or glue the two patterns for the altitude calculator onto a heavy weight paper or light cardboard. Cut out the patterns. 2. Place the top pattern (with the rocket on it) on the cutting surface and carefully cut out three windows. 3. Join the two patterns together and where the two centre marks are located insert the split pin. Make sure the two pieces rotate smoothly. 15


16 the Using altitude tracker 1. Set up your tracking station a short distance away from your rocket launch site. If you are using paper or Alka Seltzer rockets a 5 meter distance is sufficient, 15 meters is recommended for water and air powered bottle rockets. This is your baseline ( or the opposite/adjacent). 2. As your rocket launches, the person monitoring/tracking the rocket s launch will follow the flight with the sighting tube (in the altitude tracker). Hold the tracker light a pistol and keep it at the same level as the rocket when it is launched. Aim the tracker at the highest point the rocket reached in the sky. 16


17 3. A second student should then read off the angle the thread and washer makes at this position. Record the angle. Determining the altitude 1. Use the altitude calculator to determine the height the rocket reached. 2. Rotate the inner wheel of the calculator so that the nose of the rocket pointer is aimed at the angle measured by the altitude tracker. 3. Read the altitude of the rocket by looking in the window; if you used a paper or Alka Seltzer rocket the baseline would be 5 meters and would be read from the 5 meter window. If you used water or air powered bottle rockets, the baseline would be 15 m and would be read from the 15m window of the rocket pointer. 4. If the angle falls between two marks, average the numbers above and below the marks. Completed altitude tracker 17
18 18
19 Activity 5 Water Rockets Teachers should pass the construction of the launcher over to a parent with the time, tools and skills to do this successfully. The cost is not high. SAFETY Water rockets are quite safe to use with primary school students provided a handful of sensible precautions are taken. Use eye protection. Keep clear of pressurised rockets. The water exhaust can break fingers. A water rocket may break bones if it hits you. Do not pressurise beyond 7 bar or 100psi. Only use bottles from carbonated soft drinks. Do not use bottles which were filled with non fizzy drinks, they aren t strong enough. Do not use bottles with cracks, kinks or flaws, they will burst. Use a release mechanism which allows you to stand at least 4 metres from the rocket. Begin with lower pressure. We suggest you try steps of 2, 4 and 6 bar, (30, 60 and 90 psi) Constructing the Launcher Constructing water rockets is relatively easy; the harder part is making the launcher. There are many different designs of water rocket launcher. The one we describe below is fairly simple. For more sophisticated designs search the internet. There are hundreds of launchers on the web. They fall into two main categories: 1. Cable tie releases invented by Ian Clark of Melbourne. 2. Hose fitting releases. This is a simple pinned release. What you need: 4 x 125mm angle brackets (shelf brackets) with 12x 19mm wood screws to fit 1x 125mm steel strip (cut an angle bracket in half) 2x 150mm nails 4x 300mm tent pegs or similar spikes 2x 125mm x 6mm carriage bolts with 6 nuts and 4 washers to suit 75mm eye bolt with 2 nuts to suit Number 3 rubber stopper with a single hole Snap in tubeless tyre valve (get this from a tyre service centre) Wood 300 x 450 x 19 mm 1.25L bottle Electric drill and bits including a 10mm bit Screw driver Spanner to fit nuts Vice 4 metres of 3mm cord Pencil Bicycle pump with pressure gauge. 19

20 What to do: 1. Prepare the rubber stopper by enlarging the hole with a drill. Grip the stopper lightly with a vice and gently enlarge the hole with a 10mm bit and electric drill. The rubber will stretch during cutting, making the finished hole slightly less than 10mm. 2. Remove the stopper from the vice and push the valve end of the tire stem through the stopper from the narrow end to the wide end. 3. Drill a 10mm hole through the centre of the steel strip. Hold the strip with a vice during drilling and put on eye protection. 4. Enlarge the holes at the ends of the strip to 6mm. 5. Lay the strip in the centre of the wood base and mark the centres of the two 6mm holes. Drill 6mm holes through the wood at these points. 6. Push and twist the tyre stem into the hole you drilled in the centre of the steel strip. The fat end of the stopper should rest on the plate. 7. Insert the carriage bolts through the wood base from the bottom up. Place a hex nut over each bolt and tighten the nut so that the bolt head pulls in the wood. 8. Screw a second nut over each bolt and spin it about half way down the bolt. Place a washer over each nut and then slip the steel strip over the two bolts. 9. Press the neck of a 1.25L plastic bottle over the stopper. 10. Set up angle brackets so they look like book ends. Insert a 150mm nail through the top hole of each bracket. Slide the bracket near the bottle neck so that the nail rests immediately above the wide neck lip. The nail will hold the bottle in place while you pump up the rocket. If the bottle is too low or high, adjust the nuts beneath the steel strip on both sides to raise it. 11. Set up the other two angle brackets as you did in the previous step. Place them on the opposite side of the bottle. When you have the brackets aligned so that the nails rest and hold the bottle lip, mark the above centres of the holes in the brackets on the For more precise screwing, drill wood base. small pilot holes for each screw and then screw the corner irons tightly to the base. 20
. Refer to the launching instructions for safety notes.")

21 12. Install an eyebolt near the edge of the base aligned between the two angle brackets. 13. Attach the launch pull cord to the head of each nail. Run the cord through the eyebolt. 14. Make final adjustments to the launcher by attaching the pump to the tire stem and pumping up the bottle to no more than 3 bar (40 psi). Refer to the launching instructions for safety notes. If the air seeps out around the stopper, the stopper is too loose. Raise the steel strip to press the stopper with slightly more force to the bottle neck. When satisfied with the position, use the remaining nuts to hold the strip in position. 15. Drill a hole in each corner of the base. The holes should be large enough to pass the tent pegs. When the launch pad is set up on a grassy field, the tent pegs will hold the launcher in place when you yank the pull cord. The launcher is now complete. SAFETY ADDITION: The launcher described here can be made safer by the addition of four guide dowels to direct the rockets. 16. Mount an empty bottle on the launcher, do not pressurise. 17. Stand four 1 metre long dowels vertically around the bottle, mark the base at the four contact points. 18. Drill four holes. 19. Glue the dowels in the base. The launcher with dowels can be tilted to one side to aim the rockets in a controlled direction. This is safer than launching the rockets vertically. 21
22 22


23 Bottle Rocket What you need: 1.25L plastic soft drink bottles Glue guns Poster board Tape Modelling clay Scissors Safety glasses Marker pens Launch pad (Bottle Rocket Launcher) What to do: 1. Wrap and glue or tape cardboard to the 2L bottle. 2. Cut out several different types of fins and glue or tape them onto the cardboard. 3. Make a nosecone out of cardboard and hold it together with either tape or glue. 4. Press a ball of modeling clay into the top of the nosecone. 5. Glue or tape the nosecone to the upper end of the bottle (opposite end from the fins). 23
24 Launch Safety Instructions: 1. Select a grassy field that measures approximately 30m across. Place the launcher in the centre of the field and anchor it in place with the spikes or tent pegs. (If it is a windy day, place the launcher closer to the side of the field from which the wind is blowing so that the rocket will drift on to the field as it comes down) 2. Have each student or student group set up their rocket on the launch pad. Other students should stand back several meters. It will be easier to keep observers away by roping off the launch site. 3. After the rocket is attached to the launcher, the student pumping the rocket should put on eye protection. The rocket should be pumped no higher than about 50psi. 4. When pressurization is complete, all students should stand back behind the rope for the countdown. 5. Before conducting the countdown, be sure the place where the rocket is expected to come down is clear of people. Launch the rocket when the recovery range is clear. 6. Only permit the students launching the rocket to retrieve it. Questions: 1) Using the altitude tracker, calculate how high your rocket flew. 2) What made your rocket launch? 3) Could you design a different rocket that could fly higher? What would you change? 24

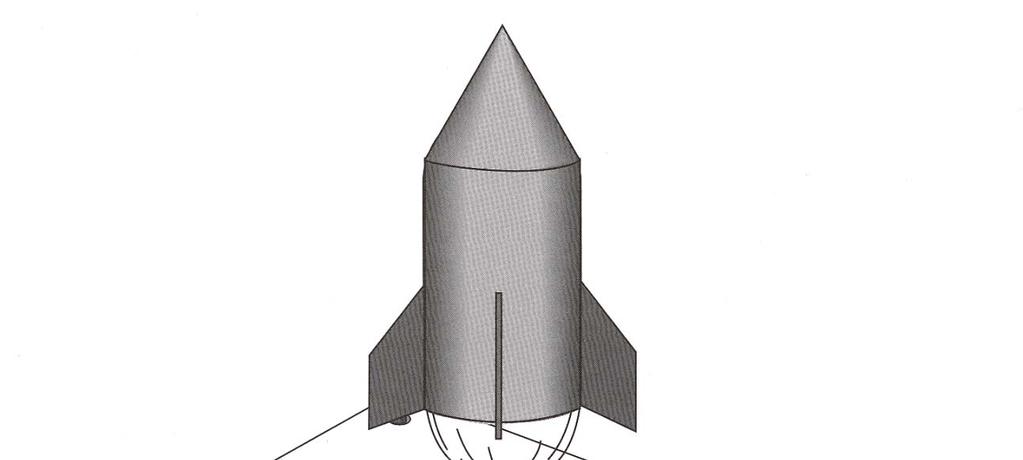
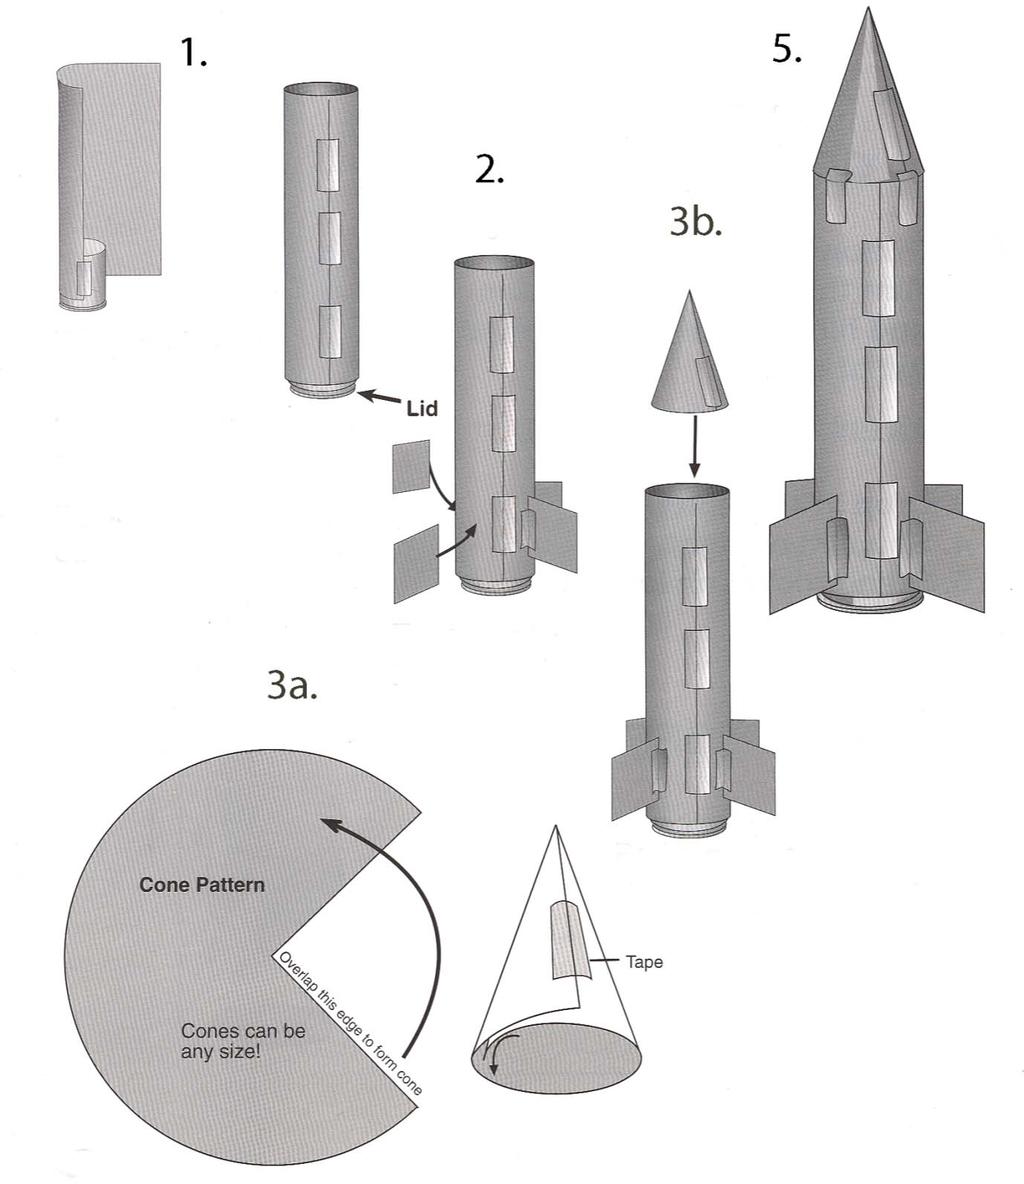
25 Activity Pop! What you need: Coloured cardboard Plastic 35mm film canister with internally sealing lid. Student sheets Sticky tape Scissors Antacid tablet Paper towels Water Eye protection What to do: 1. Wrap and tape a tube of coloured cardboard around the film canister. Make sure that the lid of the film canister is downward. 2. Tape fins of any shape or size to the base of the rocket (same end as the lid) 3. Roll a cone of paper (using the cone template), tape the edges together and tape the cone to the top of rocket. 4. Put on eye protection 5. Turn the rocket upside down and fill the film canister 1/3 full of water. 6. Quickly, drop in ½ a table of Alka Seltzer or water soluble aspirin. 7. QUICKLY Snap the lid on tight. 8. Stand the rocket on the launch platform. 9. Stand back. Questions: 1) How could you make your rocket fly better? What would you change? 2) What would happen if you dropped a full tablet of Alka Seltzer (or aspirin) into the film canister? If you re not sure try the experiment. 3) What would happen if you dropped a ¼ of Alka Seltzer (or aspirin) into the film canister? Experiment. 4) Which fuel quantity launched the rocket best: ¼ tablet, ½ tablet or 1 tablet? 5) If you put a payload in your rocket will it affect the launch? Try putting a ball of plasticine under the nosecone of the rocket. 25
26 26
27 Activity 7. Antacid tablet race What you need: 4x antacid/ aspirin tablets 2x 500mL beakers Tweezers Scrap paper Stop watch Thermometer Eye protection 250mL of hot water 250mL of cold water 500mL of cold water What to do: 1. Fill both beakers with equal amounts of 500mL cold water. 2. Put on eye protection 3. Predict how long it will take a tablet to dissolve in the water. 4. Drop a tablet in the first beaker and time how long it takes to dissolve. 5. Wrap another tablet in paper and crush it carefully with a wooden block or rolling pin. 6. Predict how long it will take the crushed table to dissolve. 7. As a variation: both the solid tablet and the crushed table can be dropped into the separate beakers at the same time, record which finishes first. 27
28 8. Empty the two beakers and refill one with the hot water and the other with 250mL cold water. 9. Measure the temperature in the first beaker (with hot water) and predict how long it will take a tablet to dissolve. 10. Drop a tablet into the water and time how long it takes to dissolve. 11. Measure the temperature in the second beaker (with cold water) and predict how long it will take a table to dissolve. 12. Drop a tablet into the water and time how long it takes to dissolve. 13. As a variation: both tablets could be dropped into the hot and cold water at the same time, record which finishes first. Questions: 1) Which fuel dissolved faster in cold water: the solid fuel or the powdered fuel? 2) Why? 3) Which fuel dissolved faster in warm water: the solid fuel or the powdered fuel? 4) Why? 5) Which fuel source would you recommend to NASA to power the launch of their next rocket, solid fuel or powdered? 6) Why? 28
POW WOW "Fun With Rockets"
 POW WOW 2001 - "Fun With Rockets" Class Outline I. Introduction (5') - Distribute Handouts - Sign-in Sheet - Brief history of Rockets Date: January 27, 2001 Course Sessions: 2 (9:30-10:20) 3 (11:00-11:50)
Flying Tea Bag. Procedure 1. With the scissors cut off the "head" of the tea bag as straight as possible.
 Flying Tea Bag tea bag matches fire-resistant base (e.g., plate) (cup) Procedure 1. With the scissors cut off the "head" of the tea bag as straight as possible. 2. Open the tea bag and empty out the tea
Materials MOTION, FORCE, AND MODELS. Contents. NOTE Delta Education Customer Service can be reached at
 MOTION, FORCE, AND MODELS Materials Contents Introduction... 39 Kit Inventory List... 40 Materials Supplied by the Teacher... 42 Preparing a New Kit... 44 Preparing the Kit for Your Classroom... 46 Care,
300 ft. 5/8 Hose wagon
 300 ft. 5/8 Hose wagon Model 95956 Assembly And Operation Instructions Due to continuing improvements, actual product may differ slightly from the product described herein. (Garden hose is not included).
StratoLauncher IV Standard Instruction Manual
 StratoLauncher IV Standard Instruction Manual IMPORTANT: Nozzle water rockets function differently than full bore water rockets. Forget most everything you might know about water rockets and follow our
Cabinet Mount Assist Lift n Lock Instructions
 Cabinet Mount Assist Lift n Lock Instructions PART LIST 2 @ Gas Cylinder 1 @ Lock Bar 2 @ Rubber Sleeve (preset) 4 @ Stopper Pin (2pcs preset) 4 @ Saddle Block 8 @ 19mm Black PVC Cap 5 @ 14mm Black PVC
Retractable Hose Reel
 Retractable Hose Reel installation and Operation Please read before use We recommend keeping these instructions for future reference Hose Reel must be mounted before use Keep the hose retracted when not
Otter Pro XT Cabin Installation and Set-Up Instructions
 Otter Pro XT Cabin Installation and Set-Up Instructions Otter Pro XT Cabin Fits Medium Otter Pro and Otter II Sled Only Parts Identification and Check List MODEL NUMBERS: Complete Pkg Pro XT Thermal Cabin
Middle School Physics Lab Supply List
 Middle School Physics Lab Supply List Where to purchase supplies: http://www.hometrainingtools.com/ http://www.arborsci.com/ Lab One 4 different brands of paper towels that have varying cost (write down
ESTES INDUSTRIES 1295 H Street Penrose, CO PRINTED IN CHINA BLACK ENGINE HOOK RETAINER RING (1) (30160) KEY
 (30160) KEY") COUNTDOWN AND LAUNCH #2190 www.estesrockets.com KEY ALWAYS OUT UNTIL FINAL COUNTDOWN! 1... 10" (25.4 cm) 2... 3... ESTES INDUSTRIES 1295 H Street Penrose, CO 81240 PRINTED IN CHINA TIP: Read all instructions
COUNTDOWN AND LAUNCH #2190 www.estesrockets.com KEY ALWAYS OUT UNTIL FINAL COUNTDOWN! 1... 10" (25.4 cm) 2... 3... ESTES INDUSTRIES 1295 H Street Penrose, CO 81240 PRINTED IN CHINA TIP: Read all instructions
AND LOAD CANOPY RACK SPECIFICATIONS
 8MAY15 INSTRUCTIONS for the LOCK AND LOAD CANOPY RACK SPECIFICATIONS and SAFE LOADING REQUIREMENTS The Lock and Load ladder carrier for Truck Caps is a rack designed to mount to the top of a pickup truck
Materials INTRODUCTION BALANCE AND MOTION
 BALANCE AND MOTION Materials Contents Introduction... 33 Kit Inventory List... 34 Materials Supplied by the Teacher... 36 Preparing a New Kit... 38 Preparing the Kit for Your Classroom... 39 Care, Reuse,
Otter Pro X-Over Lodge Installation and Set-Up Instructions
 Otter Pro X-Over Lodge Installation and Set-Up Instructions Otter Pro X-Over Lodge Fits Magnum Otter II & Pro Sled Only Parts Identification and Check List MODEL NUMBERS: Complete Pkg Pro X-Over Lodge
INSTALLATION INSTRUCTIONS AND OWNER'S MANUAL AWNINGS. For trailers & motor homes with straight sides TOOLS REQUIRED
 AWNINGS INSTALLATION INSTRUCTIONS AND OWNER'S MANUAL For trailers & motor homes with straight sides TOOLS REQUIRED 1/4" electric drill Ratchet handle kit 3/8" & 7/16" socket No. 1 and No. 2 screwdriver
300 Model 870 Four Wheel Hose Cart Owner s Manual
 300 Model 870 Four Wheel Hose Cart Owner s Manual IMPORTANT: READ THE OWNER S MANUAL BEFORE ASSEMBLING TOOLS REQUIRED: TWO ADJUSTABLE WRENCHES; HAND PUMP Estimated assembly time: 30 minutes PARTS LIST
Mini-Condor. Mini-Condor. (Competition Boost Glider for 1/2A & A motors) Shock Cord Anchor Pattern. Kit # Skill Level 3: Average Skills Needed
 Shock Cord Anchor Pattern. Kit # Skill Level 3: Average Skills Needed") Mini-Condor Kit #05008 Mini-Condor (Competition Boost Glider for 1/2A & A motors) P/N Description Qty 10058 AT-13/9.0 Body Tube 1 13020 CR 10-13 Green Engine Block 1 13051 1/8 Launch Lug 1 Long 1 15578
Mini-Condor Kit #05008 Mini-Condor (Competition Boost Glider for 1/2A & A motors) P/N Description Qty 10058 AT-13/9.0 Body Tube 1 13020 CR 10-13 Green Engine Block 1 13051 1/8 Launch Lug 1 Long 1 15578
Vanagon Ladder Kit Assembly & Installation Instructions
 Rocky Mountain Westy Vanagon Ladder Kit Assembly & Installation Instructions Introduction Thank you for purchasing the Rocky Mountain Westy Vanagon Ladder Kit. We pride ourselves in the products we develop
Installation Guide: Round Trampoline
 Trampolines & trampoline parts designed to survive in the harsh Oz climate. www.oztrampolines.com.au Installation Guide: Round Trampoline Safety Tips Here at Oz Trampolines we are passionate about your
Model 205 Fireview Maintenance Kit
 Model 205 Fireview Maintenance Kit Please read all of the instructions before you begin the procedure. Confirm that you have all the necessary tools and parts required. Allow about one hour to complete
Get A Grip! Student Activity 1D Introduction: Materials: (per group) LESSON 2
 LESSON 2") Get A Grip! Student Activity 1D Introduction: Think for a minute about all of the sports and daily activities that depend on a strong grip! Baseball, bowling, golf, gymnastics, football, hockey, mountain
Get A Grip! Student Activity 1D Introduction: Think for a minute about all of the sports and daily activities that depend on a strong grip! Baseball, bowling, golf, gymnastics, football, hockey, mountain
IMPORTANT OWNER-OPERATOR INSTALLATION INSTRUCTIONS. Part # A7006
 IMPORTANT OWNER-OPERATOR INSTALLATION INSTRUCTIONS Part # A7006 Parts List Wobble Stopper Body Wobble Stopper Shaft Camper Bracket Lower Bracket Assembly Upper Bracket Upper Bracket Clamp 3/8 SAE Flat
Math in Motion Idlewild & SoakZone Copyright
 STUDENT PACKET MATH IN MOTION Your visit to Idlewild & SoakZone is an opportunity to not only have fun, but learn about math and the use of technology throughout the park. Use our Outdoor Classroom to
Auxiliary 63.5l Fuel Tank Ford/Mazda Pick-up Truck 2012-Current READ ME! IMPORTANT WARNING!
 Auxiliary 63.5l Fuel Tank Ford/Mazda Pick-up Truck 2012-Current ENG FTFM006 90 min READ ME! Thank you for purchasing a Front Runner Ford/Mazda Pick-Up Truck 2012 - Current Fuel Tank. Before you start,
Installation Guide. Single-Control Kitchen Sink Faucets
 Installation Guide Single-Control Kitchen Sink Faucets K-6352 K-6353 M product numbers are for Mexico (i.e. K-12345M) Los números de productos seguidos de M corresponden a México (Ej. K-12345M) Français,
GoBidet Bidet Attachment
 GoBidet Bidet Attachment 151 Ruths Place #5 Sequim, WA 98382 Tel 1-800-681-0753 Fax +1 360-681-4029 www.go-bidet.com MODEL #2003C In this box: 1 User Manual 1 GoBidet Unit w/ mounting bracket, nut, rubber
Replacement of External Pipe Assembly on PFS December 21, 2014
 Replacement of External Pipe Assembly on PFS December 21, 2014 The pipe assembly shown in Figure 1 is currently attached to the wooden shelf on PFS. It is covered with foam that acts as insulation. There
7. Do not dispose of the packaging immediately.the package insert contains a template for mounting the slide bar A/Rev01 G1/2" G1/2" G1/2"
 INSTALLATION INSTRUCTIONS Magnetic Slide Shower 550 552 BEFORE YOU BEGIN MAGNETIC SLIDE SHOWER All information is based on the latest product information available at the time of publication. Kohler Co.
Deep Cleaning a Passap is a three step process: Tear down, Clean, and Reassemble.
 kni!sings Deep Clean A Passap Duomatic Deep Cleaning a Passap is a three step process: Tear down, Clean, and Reassemble. I won t mislead you. Your nerves will be on edge while you take apart your precious
Installation Instructions for the Rolltec Adalia X3M Extenda Awning
 Installation Instructions for the Rolltec Adalia X3M Extenda Awning Questions? Call Rolltec at 1-800-667-0474 General Tool Requirements Table of Contents Available installation brackets Side dimensions
INSTALLATION INSTRUCTIONS
 INSTALLATION INSTRUCTIONS KR54, KR1654, & KR4954 Keyed Removable Mullion NOT FOR USE ON ELECTRIC OR FIRE RATED MULLIONS. This kit includes the following parts: (Not to scale) WARNING Remove key, reinstall,
Section 8 - Supplements
 FLIGHT Approved by EASA under Approval Number EASA.BA.A.01000 on 8.11 LINDSTRAND CLOUDHOPPER WITH CAMERON ENVELOPES 8.11.1 INTRODUCTION Issue 1 of this supplement has six pages. There are no additional
Core Systems Installation Instructions
 185-3017 185-3018 185-3517 607-0149 WLH 09/17/18 TABLE OF CONTENTS ***Assembly*** Roller Tube Assembly Roller Tube Assembly... Standard Application Attaching Tarp to Roller Tube - Standard... Installing
Otter Pro XT 1200 Cottage Installation and Set-Up Instructions
 Otter Pro XT 1200 Cottage Installation and Set-Up Instructions Otter Pro XT 1200 Cottage Fits Small Ultra-Wide Otter Pro and Otter II Sled Only Parts Identification and Check List MODEL NUMBERS: Complete
How to make an inflatable cube
 How to make an inflatable cube Beta instruction manual produced by Tools for Action. First Edition November 2015. Paris. Second Edition March 2016. Materials & Tools Mylar insulation foil (we use Parotec
π H-3505 GARAGE CANOPY PARTS SAFETY uline.com TOOLS NEEDED 10' X 20' X 8'
 π H-3505 GARAGE CANOPY 10' X 20' X 8' 1-800-295-5510 uline.com TOOLS NEEDED Safety Glasses Wrench or Socket 9/16" or 14mm Tape Measure Phillips Screwdriver Rubber Mallet PARTS Cables x 5 2-way Corner Foot
* * 4023 KR. Step 1 Prepare the Keyed Removable Unit. Not for use on electric or fire rated removable mullions
 condition. *64009-00* 64009-00 Keyed Removable Mullions 403 KR Installation Instructions Not for use on electric or fire rated removable mullions This kit includes the following parts: (Not to scale) 5/6
Otter XT 650 Cabin Installation and Set-Up Instructions
 Otter XT 650 Cabin Installation and Set-Up Instructions Otter XT 650 Cabin Fits Medium Otter Wild Sled Only Parts Identification and Check List MODEL NUMBERS: Complete Pkg Otter XT 650 Cabin 200891 2 1
Otter XT Cabin Installation and Set-Up Instructions
 Otter XT Cabin Installation and Set-Up Instructions Otter XT Cabin Fits Medium Otter Wild Sled Only Parts Identification and Check List MODEL NUMBERS: Complete Pkg Otter XT Cabin 200962 2 1 PARTS LIST
STEALTH PRO OWNER S MANUAL
 STEALTH PRO OWNER S MANUAL ALWAYS WEAR A COAST GUARD APPROVED FLOTATION DEVICE WHEN OPERATING THE STEALTH PRO. Know the limits of your abilities and the limits of your equipment. Changes in air temperature
Installation Instructions for the Rolltec Bravo Awning
 Installation Instructions for the Rolltec Bravo Awning Questions? Call Rolltec at 1-800-667-0474 Table of Contents Available installation brackets Side dimensions of various installations Determining installation
FISH CAT SCOUT OWNER S MANUAL
 FISH CAT SCOUT OWNER S MANUAL ALWAYS WEAR A COAST GUARD APPROVED FLOTATION DEVICE WHEN OPERATING THE FISH CAT SCOUT. Know the limits of your abilities and the limits of your equipment. Changes in air temperature
Product instruction manual Ream Cutting Systems RE3943, RE3946, RE3947, RE3971, RE3952E
 Product instruction manual Ream Cutting Systems RE3943, RE3946, RE3947, RE3971, RE3952E The Trimfast Ream Cutters are reliable, high performance cutters that will give you the results you need quickly
POP-UP OPTION USER HARDWARE MANUAL. EdgeTech 4 Little Brook Road West Wareham, MA _REV_B 8/29/2018
 POP-UP OPTION USER HARDWARE MANUAL 0019850_REV_B 8/29/2018 EdgeTech 4 Little Brook Road West Wareham, MA 02576 Tel: (508) 291-0057 Fax: (508) 291-2491 www.edgetech.com ii The information, figures, and
Installation Instructions for the Rolltec Physique XL Awning
 Installation Instructions for the Rolltec Physique XL Awning Questions? Call Rolltec at 1-800-667-0474 General Tool Requirements Table of Contents Available installation brackets Side dimensions of various
Student kit. for Haiti. Items to include: More than 8,000 needed
 Student kit for Haiti More than 8,000 needed 10 pens (blue ink, medium, stick, BIC or Papermate ) 7 wooden No. 2 pencils (unsharpened, good quality) 1 Pink Pearl eraser, or similar quality (not pencil
Urea/Adblue Hose Reel
 www.scintex.com.au sales@scintex.com.au Model: SHR3408 Urea/Adblue Hose Reel Product Manual Specifications Spring driven drum: for automatic rewind. Locking ratchet: to maintain the desired length of hose
* * KR54-F, KR9854 & KR9954 Installation Instructions. Read All Warnings Before Starting Installation! Index:
 *941061-00* 941061-00 Keyed Removable Mullion KR54-F, KR9854 & KR9954 Installation Instructions CLASSIFIED CLASSIFIED C Read All Warnings Before Starting Installation! Index: General Information ----------------
Contents. Introduction...3 Description...3. Pack Contents...4. Rada Heavy Duty EV Shower Fittings Right Angled Connector (RAC)...
...") SHOWER FITTINGS PRODUCT MANUAL IMPORTANT Installer: This manual is the property of the customer and must be retained with the product for maintenance and operational purposes. Contents Introduction...3
SHOWER FITTINGS PRODUCT MANUAL IMPORTANT Installer: This manual is the property of the customer and must be retained with the product for maintenance and operational purposes. Contents Introduction...3
TITAN Fuel Tanks. INSTALLATION INSTRUCTIONS G e n e r a t i o n V
 TITAN pt. no.: 02 0000 0128 Important: Please read these instructions carefully and completely before starting the installation. TITAN Fuel Tanks INSTALLATION INSTRUCTIONS G e n e r a t i o n V Extended
Contents. Awnings USA - Full Protective Hood Manual Instructions ft 11" - 11ft 6" Awnings
 Awnings USA - Full Protective Hood Manual Instructions Contents Warning We recommend that two or more people are required to lift the awning into place. 4ft 11" - 11ft 6" Awnings 8 x Expansion bolts **
INSTRUCTION MANUAL ALEKO RETRACTABLE AWNING
 INSTRUCTION MANUAL for ALEKO RETRACTABLE AWNING www.alekoproducts.com FAILURE TO FOLLOW THESE INSTRUCTIONS MAY RESULT IN PERSONAL INJURY! 1 Important Safety Precautions WARNING NOTE: FOR PERSONAL SAFETY,
Wenger Corporation 2014 Printed in USA 05/14 Part #049B015-09
 Assembly Instructions Tuba Tamer Contents Important User Information...........................2 Replacemant Parts List..............................3 Assembly.........................................4
Auto Rewind Hose Reel 10M / 20M / 30M Models
 Auto Rewind Hose Reel 10M / 20M / 30M Models Instruction Manual 10M / 20M / 30M Auto Rewind Hose Reel Installation, Hose Replacement and Troubleshooting Guide Product Codes: 1110H / 1120H / 1130H Models
AERONAUTICS An Educator s Guide with Activities in Science, Mathematics, and Technology Education National Aeronautics and Space Administration
 AERONAUTICS An Educator s Guide with Activities in Science, Mathematics, and Technology Education National Aeronautics and Space Administration Objective The students will: Learn how to change the flight
Important! Read all of these instructions before assembling or riding the glider. For questions or help please call Glide Bikes at
 Go Glider Manual Congratulations on your purchase of the Go Glider! Your glider is designed for years of nearly carefree use by your child. These instructions include how to set up your glider and maintenance
Lab Skills: Introduction to the Air Track
 Lab Skills: Introduction to the Air Track 1 What is an air track? An air track is an experimental apparatus that allows the study of motion with minimal interference by frictional forces. It consist of
Tank. Part B, Section 1. This section covers the following unit configurations. Pump Piston Pump (E or G)
") Part B, ection Model Voltage This section covers the following unit configurations. 3400V All Pump Piston Pump (E or G) Manifold Control 4-Port (A) Vista tandard (V) Vista Pattern (PC) Vista Temperature
Part B, ection Model Voltage This section covers the following unit configurations. 3400V All Pump Piston Pump (E or G) Manifold Control 4-Port (A) Vista tandard (V) Vista Pattern (PC) Vista Temperature
Assembly Instructions
 Assembly Instructions Thank You for your purchase of this conversion kit, we hope it makes your Media Blasting experience much more enjoyable. This kit was designed primarily to convert the Harbor Freight
APPENDIX A LIGHT SOURCE
 APPENDIX A LIGHT SOURCE GASOLINE LANTERN One source of artificial light for the field kitchen is the gasoline lantern (NSN 6260-00-170-0430). It is a one-mantle lantern with a heat-resistant globe or globe
CONVEX Awning Instructions
 CONVEX Awning Instructions IMPORTANT NOTE: Please take a few minutes to become familiar with this entire document BEFORE beginning your installation. The time you spend doing this is well spent and will
INSTALLATION INSTRUCTIONS for vertical awnings
 Custom made Awnings and Blinds Item No 0759 INSTALLATION INSTRUCTIONS for vertical awnings IMPORTANT INFORMATION BEFORE INSTALLING YOUR Updated 08/09/15 AN AWNING INSTALLATION IS A HOME IMPROVEMENT PROJECT
INSTRUCTION MANUAL 10M x 10M
 INSTRUCTION MANUAL 10M x 10M 10m x 10m PART LIST STANDARD PARTS These parts are included in the Standard 10m x 10m Bonga Stretchtent DESCRIPTION SIZE MATERIAL QUANTITY CANVAS 10m x 10m fabric 1 SIDE CLAMPS
ASSEMBLY & CARE INSTRUCTIONS. 7 x4 TRAILER TENT SERIES 4 9. OPTIONAL SUNROOM Wall and floor kit. OPTIONAL SPARE ROOM Roof, wall and floor kit
 ASSEMBLY & CARE INSTRUCTIONS 7 x TRAILER TENT SERIES 9 Part No. TM709 OPTIONAL SUNROOM Wall and floor kit Part No. TM723 OPTIONAL SPARE ROOM Roof, wall and floor kit Part No. TM76 Please keep these instructions
Assembly instructions for Eurotramp trampolines Series: Ultimate, Grand Master Exclusiv, Grand Master, Master
 Assembly instructions for Eurotramp trampolines Series: Ultimate, Grand Master Exclusiv, Grand Master, Master 1. Assembly instructions 2. Attaching the plastic coated steel cables on the Ultimate frame
OHENRY SECTIONAL TENT INSTRUCTIONS
 INSTRUCTIONS Please follow these instructions carefully so your new Ohenry tent will be installed correctly. The pictures are based on installing a Traditional Pole Type Tent, but also apply to High Peak
Motorized Cassette Awning E6100. Instruction ROHS
 Motorized Cassette Awning E6100 Instruction ROHS 1 Installation Instruction for E6100 Cassette Awning I. Installation Steps of E6100 Cassette Awning.2 II. Installation Guide of DLC-B Controlling board
Setup. Assembling. Attaching the sharpening stone
 Kit 1. Sharpener base. 2. Vertical rod. 3. Fixing ring. 4. Horizontal rod with pivot unit. 5. Sharpening stones set. 6. Black marker. 7. User Guide. Technical specs Knife sharpener dimensions (ready to
10 X 20 X 8 Dome Canopy
 10 X 20 X 8 Dome Canopy Warning Keep all flame and heat sources away from this tent fabric. Refer to labels for flamability specification. It is not fire proof. The tent fabric will burn if left in continuous
ASSEMBLY & CARE INSTRUCTIONS
 ASSEMBLY & CARE INSTRUCTIONS 7 x TRAILER TENT SERIES 3 9 Part No. FT3711 - on road FT3923 - off road OPTIONAL SUNROOM Wall and floor kit Part No. FT3723 - on road FT39 - off road OPTIONAL SPARE ROOM Roof,
BowDown. MiniMuM Crossbar spread 24 (61CM) Steel Hook (2X) Buckle Strap (2X) Plastic Tube (2X) Plain Strap (2X) SHORT BLACK T-BOLT (2x) BOWDOWN (2x)
 Steel Hook (2X) Buckle Strap (2X) Plastic Tube (2X) Plain Strap (2X) SHORT BLACK T-BOLT (2x) BOWDOWN (2x)") BowDown MiniMuM Crossbar spread 24 (61CM) Heavy Duty strap (2x) SHORT BLACK T-BOLT (2x) BOWDOWN (2x) Bow Stern Tie Down Buckle Strap (2X) Plastic Tube (2X) Plain Strap (2X) Steel Hook (2X) IMPORTANT WARNING
BowDown MiniMuM Crossbar spread 24 (61CM) Heavy Duty strap (2x) SHORT BLACK T-BOLT (2x) BOWDOWN (2x) Bow Stern Tie Down Buckle Strap (2X) Plastic Tube (2X) Plain Strap (2X) Steel Hook (2X) IMPORTANT WARNING
DIAMOND TECH INTERNATIONAL Innovations For Creativity DIAMOND LASER BAND SAW OPERATIONS MANUAL
 SPEEDSTER-XL INSTRUCTION MANUAL DIAMOND TECH INTERNATIONAL Innovations For Creativity SPEEDSTER-XL DIAMOND LASER BAND SAW OPERATIONS MANUAL SPEEDSTER-XL INSTRUCTION MANUAL - PAGE 1 Before You Begin Read
Egg-streme Parachuting Flinn STEM Design Challenge
 Egg-streme Parachuting Flinn STEM Design Challenge 6 07, Flinn Scientific, Inc. All Rights Reserved. Reproduced for one-time use with permission from Flinn Scientific, Inc. Batavia, Illinois, U.S.A. No
When moving the frame don t force anything! Move the leg to allow the brace to go over the rod.
 THE IDLER Assembly and Care Instructions General notes Please read these instructions in their entirety before constructing your Idler Construction Before you begin constructing your Idler consider where
RETRACTABLE PATIO SHADE AWNING Patio Awning Guide-10ft. x12ft.(proj. X Width) Model: APR ***/APR (version: GEN2-V1)
 Model: APR ***/APR (version: GEN2-V1)") Page 1 of 14 RETRACTABLE PATIO SHADE AWNING Patio Awning Guide-10ft. x12ft.(proj. X Width) Model: APR-101012***/APR-60021012 (version: GEN2-V1) WARNING: DO NOT CUT THE PLASTIC ZIP TIES ON THE AWNING EXTENSION
Page 1 of 14 RETRACTABLE PATIO SHADE AWNING Patio Awning Guide-10ft. x12ft.(proj. X Width) Model: APR-101012***/APR-60021012 (version: GEN2-V1) WARNING: DO NOT CUT THE PLASTIC ZIP TIES ON THE AWNING EXTENSION
ZIP LINE CHALLENGE. DESIGN CHALLENGE Build a device that can transport a ping-pong ball from the top of a zip line to the bottom in 4 seconds or less.
 Grades 3 5, 6 8 20 60 minutes ZIP LINE CHALLENGE DESIGN CHALLENGE Build a device that can transport a ping-pong ball from the top of a zip line to the bottom in 4 seconds or less. SUPPLIES AND EQUIPMENT
BERYL Service Guide. Travel Adjust OTT Change
 BERYL Service Guide Travel Adjust OTT Change SERVICE OVERVIEW This manual will guide you step by step performing a travel adjust and OTT setting change to your Beryl suspension fork. Please follow each
Perrin & Rowe Kitchen ROHL Pull-Out/Pull-Down COLORS/FINISHES. Polished Chrome Polished Nickel Satin Nickel English Bronze Inca Brass* 9 1/4
 PERRIN & ROWE TRADITIONAL PULL-DOWN FAUCET Perrin & Rowe Kitchen ROHL Pull-Out/Pull-Down U.4744 FEATURES Brass construction Metal lever CNC machined Dual spray with lock in modes 1 3/4 max installation
FLEX KEY ASSEMBLY. ..._ o RAFTER ARM TUBE MAIN ARM TUBE CAP NUT CLAW HINGE
 ZIP DEE Inc. 96 Crossen Ave. Elk Grove Village, IL 60007(847)437-0980 (800)338-2378 HEAD CASTING AWNING RAIL FLEX KEY ASSEMBLY..._ o GM1 Installation Instruction GMC Motorhome RAFTER ARM TUBE MAIN ARM
SOLHARO ASSEMBLY & INSTALLATION INSTRUCT IONS
 A. Introduction: SOLHARO ASSEMBLY & INSTALLATION INSTRUCT IONS Rev. 01/30/2012 The Solharo is an external, retractable, tensioned sun shading system designed to fit over a sunroom or wood pergola. The
IMPORTANT OWNER-OPERATOR INSTALLATION INSTRUCTIONS C2204A
 IMPORTANT OWNER-OPERATOR INSTALLATION INSTRUCTIONS C2204A Warnings Truck Bed and Camper Protection Torklift does not recommend installing your camper on top of a plastic bed liner (or other compressible
Utility Trailer Loadbar Kit Model: MPG493 TopTier - Assembly Instructions
 TopTier Utility Trailer Loadbar Kit Model: MPG493 TopTier - Assembly Instructions Take a few moments and read through these instructions to familiarize yourself with the step by step assembly process before
Advantage Plus TIM-3600 Series Reel
 Read the following precautions and instructions before you begin assembly or using. Failure to comply with these instructions could result in personal injury or property damage. Keep these instructions
Installation and Maintenance Manual
 Freestanding Gas Stove MODEL: PGS2005 GPEBB20R GPEBW20R Installation and Maintenance Manual Warning Maintenance products should be carried out by professional and technical personnel with relevant qualification,
Color Light Streams Lighted Bubbler Spillway Pot (CLSDLP) Installation Manual
 Installation Manual") Color Light Streams Lighted Bubbler Spillway Pot (CLSDLP) Installation Manual 27.75 23.75 25.50 20.75 Specifications: 8-13 GPM 12-14 VAC only (Class 2 transformer required) 3W max. 100 ft. cord, conduit
Color Light Streams Lighted Bubbler Spillway Pot (CLSDLP) Installation Manual 27.75 23.75 25.50 20.75 Specifications: 8-13 GPM 12-14 VAC only (Class 2 transformer required) 3W max. 100 ft. cord, conduit
VALORE SEVEN. Serial Number. Pacific) Version No.:V
 Version No.:V") VALORE SEVEN Version No.:V.206222 Serial Number Pacific) 7 9 8 " 5 8 " " 7 2 8 " 26 2 " 7 8 " 9" 2 8 " 2 8 " (H) 26.9" x (W) 8.26" x (D) 8.85" Hand shower hose: 59.05" Weight: Net: 0 lbs /Gross: 2 lbs
VALORE SEVEN Version No.:V.206222 Serial Number Pacific) 7 9 8 " 5 8 " " 7 2 8 " 26 2 " 7 8 " 9" 2 8 " 2 8 " (H) 26.9" x (W) 8.26" x (D) 8.85" Hand shower hose: 59.05" Weight: Net: 0 lbs /Gross: 2 lbs
MYRIAD Banner Stand is a trademark of Skyline Exhibits. Patent Pending PN32294-B. MYRIAD Banner Stand
 is a trademark of Skyline Exhibits Patent Pending 1.1 1. Banner Stand Setup 1.1 Remove banner stand from standard case or Arrive Portable Display & Workstation and assemble pole. 1.2 Insert pole into base
Shut off combine and remove key before installing the hopper extension. Make sure the combine is on a level surface. Engage parking brake.
 ASSEMBLY INSTRUCTIONS CASE IH 5088, 6088/7088, 7010/8010 & 7120/8120/9120 Series NEW HOLLAND CR STD Series Combines (Large) big top 26301(service only), 29976 (service only), 53408, 53543 & 54274 The Crary
Primrose Awnings - Standard Manual Instructions
 Primrose Awnings - Standard Manual Instructions Contents Warning 1.5m - 3.0m Awnings 4 x Expansion bolts (2 per bracket)** 2 x brackets 1 x Awning 1 x Winder handle 3.5m - 4m Awnings 6 x Expansion bolts
Axiom Surface Mounted Headwalls
 www.hsiheadwalls.com Axiom Surface Mounted Headwalls Installation Instructions Tel: 925.427.7800 Fax: 925.427.0800 support@hsiheadwalls.com Hospital Systems Inc. 750 Garcia Avenue Pittsburg CA 94565 USA
READ ME FIRST! IMPORTANT WARNING! ENG. Roof top tent
 Roof top tent ENG TENT031 220 min READ ME FIRST! Thank you for purchasing a Front Runner Roof Top Tent. Before you start, take a moment to familiarize yourself with these Fitting Instructions and the components
TCWS.38NG03.C BLACK DIAMOND BURNER KIT INSTRUCTIONS
 IMPORTANT: THESE INSTRUCTIONS ARE TO REMAIN WITH THE HOMEOWNER These instructions are supplementary to the Installation and Operating Instructions supplied with the fireplace and should be kept together.
Standard Awning Installation Instructions
 Standard Awning Installation Instructions Important Note: Please become familiar with this entire document BEFORE beginning your installation. The time you spend doing this is well spent and will make
OPERATOR INSTRUCTION MANUAL INCLUDING REPAIR PARTS FOR MODULAR GENERAL PURPOSE TENT SYSTEM (MGPTS) TYPE I
 TYPE I") OPERATOR INSTRUCTION MANUAL INCLUDING REPAIR PARTS FOR MODULAR GENERAL PURPOSE TENT SYSTEM (MGPTS) TYPE I Johnson Outdoors Gear, Inc. Eureka! branded tent products 625 Conklin Road Binghamton, NY 13903
OPERATOR INSTRUCTION MANUAL INCLUDING REPAIR PARTS FOR MODULAR GENERAL PURPOSE TENT SYSTEM (MGPTS) TYPE I Johnson Outdoors Gear, Inc. Eureka! branded tent products 625 Conklin Road Binghamton, NY 13903
Notes, Parts List & Drawings
 Biomass Chopper/Cutter Notes, Parts List & Drawings Page 1 of 16 The Easy BioChop biomass chopper/cutter was designed to cut both wet and dry biomass and to accomplish a number of goals. The objectives
FORM (Apr. 2006)
") 2212 Slcier MODEL 2212 SLICER MODEL 2212 ML-136132 701 S. RIDGE AVENUE TROY, OHIO 45374-0001 937 332-3000 www.hobartcorp.com FORM 35215 (Apr. 2006) Installation, Operation, and Care of MODEL 2212 Slicer
2212 Slcier MODEL 2212 SLICER MODEL 2212 ML-136132 701 S. RIDGE AVENUE TROY, OHIO 45374-0001 937 332-3000 www.hobartcorp.com FORM 35215 (Apr. 2006) Installation, Operation, and Care of MODEL 2212 Slicer
ALEKO Victoria Series Retractable Awning Instructions for Installation and Operation
 www.alekoproducts.com ALEKO Victoria Series Retractable Awning Instructions for Installation and Operation PLEASE DO NOT RETURN THIS PRODUCT TO THE STORE! The owner s manual includes assembly and operating
Y Camper Shell Tracks, 37 Cross Bars. Y Camper Shell Tracks, 44 Cross Bars.
 Y06-550 63 Camper Shell Tracks, 37 Cross Bars. Y06-560 63 Camper Shell Tracks, 44 Cross Bars. Important: Parts List Please read these instructions carefully prior to installation. Please refer to your
WHAT TO KNOW BEFORE INSTALLING...
 WL600922H WL601022H WL601122H WL502086H WL602376H WL602322H Please read the information sheet before proceeding. WHAT TO KNOW BEFORE INSTALLING... 1. 2. When positioning the seat onto the pan ensure that
Alien Flier Zip Line Products Installation/Owner s Manual
 Alien Flier Zip Line Products Installation/Owner s Manual 1 Table of Contents SAFETY PLEASE READ CAREFULLY... 4 Constructing your Zip Line Xtreme Models... 6 Installing your Alien Flier Trolley on an Existing
Darkly LabsR AIR-ASSIST. Installation Manual. English. Deutsch. Emblaser 2 Air-Assist Installation Manual 1.3
 Darkly LabsR AIR-ASSIST Installation Manual English Deutsch Emblaser 2 Air-Assist Installation Manual 1.3 1. WHATS IN THE BOX Air-Assist pump Nozzle Bracket Nozzle Air-Assist pump with bracket, Nozzle