Installation and Operating Instructions
|
|
|
- Derick Richards
- 5 years ago
- Views:
Transcription


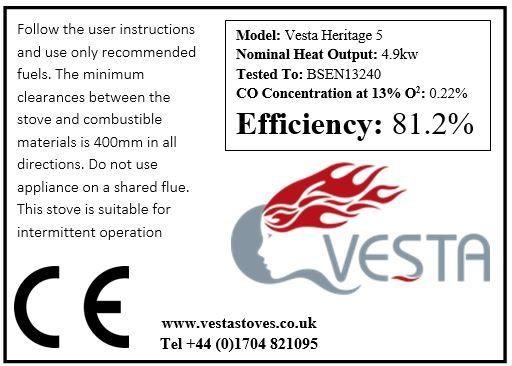
1 Heritage 5 (5kw) Woodburning Stove Installation and Operating Instructions Vesta Stoves. 197 Hesketh Lane. Tarleton. Lancashire. PR4 6AT Tel


2 2
3 Annual servicing 3
4 General Safety Advice Properly installed, operated and maintained, this appliance will not emit fumes into the dwelling. However occasional fumes from deashing and re-fuelling may occur. Persistent fume emission is potentially dangerous and must not be tolerated. If fume emission does persist, open doors and windows to ventilate the room. Let the fire burn out or eject and safely dispose of fuel from the appliance. Once the fire is cold, check the flue and chimney for blockages and clean if required. Do not attempt to relight the fire until the cause of the fume emission has been identified and corrected. Seek expert advice if necessary. Do not fit an extractor fan in the same room as the appliance. An adequate air supply for combustion and ventilation is essential in accordance with Building Regulations Document J Section 2. Air openings provided for this purpose must not be restricted. It is important that flue ways are cleaned frequently and the chimney swept regularly. Also the stove must be maintained in good mechanical order. The chimney should be swept at least once per year for smokeless fuel and a minimum of twice per year for other fuels. If the chimney was previously used for an open fire, it is possible that the higher flue gas temperatures generated by the stove may loosen deposits that were firmly adhering to the inner surface of the chimney and cause blockage of the flue pipe. We recommend that in such a situation a second sweeping of the chimney should be carried out within one month of regular use of the stove after installation. Also, lock open or remove any existing dampers in the flue way. Should it be likely that children, aged or infirm people approach the fire, then a fireguard should be fitted. Avoid the use of aerosol sprays in the vicinity of the stove when it is in operation. 4
5 Heritage 5 Wood Burning Stove Operating Instructions 5
6 Building regulations Installation of the Vesta wood burning stove must comply with all local building regulations, including those referring to national and European standards. It is a good idea to consult your local chimney sweep to check the suitability of the chimney and ensure there is adequate updraft and suggest any remedies to potential chimney problems. Document J of the Building Regulations contains further information regarding the installation of solid fuel appliances and can be viewed here : or follow the link on our website. Lighting the stove When lighting the stove for the first time it should not be stoked excessively as all the materials must be given time to adapt to the effects of heat. The paint will take some time to fully cure and during this period some odours will be evident. It is recommended that doors or windows should be opened the first time the stove is fired. Before lighting check the firebricks and other internal components are in position and that all packaging has been removed. (Continued on page 7) 6
7 Open the side and bottom air control fully This is done by sliding the bottom air control into the Right position, and rotating the side air control until the slots are aligned. See Fig 1. Place rolled up/scrunched newspaper into the back of the appliance and stack small kindling/sticks into the back of the fire. A few larger pieces of fuel can be added to each side of the pile. Firelighters can be used if required. Larger pieces of wood can now be added slowly towards the back of the fire. Adding too much cold fuel will put out the fire. The bottom air control can now be closed down and the fire regulated by means of the airwash. Opening the bottom control slightly helps to draw the fire into the stove and will allow the door to be opened for loading more easily. Lighting a wood burner is a skill and is learned over the fist few weeks of owning your wood burner, It can be frustrating at first until you get to know your fire and your chimney... 7
8 Lighting the stove (cont) Do not run the appliance with the door open. This reduces the efficiency of the burn and you will use much more fuel. Tips The first stage of the fire, just after lighting, is usually the smokiest because the cold wood and cold stove take heat away from the flames. During this stage, ensure both air inlets of the stove are fully open to get a hot flame. It might appear that this initial hot burn lets too much heat go up the chimney, but it is a necessary part of an efficient fire. The extra heat primes the chimney to produce a strong draft, and helps keep the flue clean by loosening creosote that might have been deposited by the previous fire. The hot initial burn also drives moisture out of the firewood and gives an ignition source for the smoke that is released from the wood. Make small changes. Do not try to add too much fuel at once, the fuel should not be stacked higher than the top of the back fire brick. Adding fuel gradually will help maintain a steady temperature and burning rate so that the stove burns efficiently and cleanly. Adding a large amount of fuel all at once will dramatically reduce the temperature inside the stove. After adding a large piece of wood/log it is a good idea to increase the top air opening slightly more until the new fuel begins to burn and the stove returns to temperature. This also applies to the air controls. Adjusting them gradually will help maintain a steady combustion rate. Do not run the stove with the top air control fully closed. The top air control supplies air for the glass air shield system. The further 8
9 open the top air control the more effective the air shield system. Use a piece of newspaper to wipe the inside of the window glass before lighting the stove each time to prevent the gradual build up of deposits. Small, hot fires are more efficient than large slumbering fires. Most of the energy in burning wood is released as a bright flame. The turbulence in the flames creates good mixing between the combustion air and the gases that are released from the wood as it heats up. The heat of the fire ignites and burns these gases. In contrast, the dense smoke from a slow, smouldering fire is potential heat energy that escapes up the chimney and either clings to the chimney flue as creosote or pollutes the outdoor air. Therefore, to gain the most heat from each load of firewood, the wood should be flaming throughout the burn cycle until it is reduced to ash. If you do a fair bit of slow wood burning, it is good practice to burn a good, hot stove at regular intervals to keep your chimney dry and prevent the build up of tar. When refuelling, place wood towards the back of the stove where it will burn hotter and more efficiently. Try to place logs length ways so that any spitting from the end grain does not go onto the glass window. The fuel should not be stacked higher than the top of the back fire brick. Once the stove is hot and running steady, it should be possible to maintain the nominal output by refuelling approximately once an hour. Notes on wood burning Wood burns most efficiently when the air for combustion is supplied from above the fire bed rather than below. The air supplied above the fire bed provides the oxygen necessary for the volatile gases (smoke), given off by the wood as it heats, to combust. This ensures that the gases are burnt and used to heat the appliance instead of 9
10 being wasted up the chimney or condensing and forming tarry deposits inside the stove, the flue pipe or on the door glass. Running the stove with only the bottom air control open in a Vesta stove does not supply air to the base of the fire but adds oxygen to the top of the fire at the back of the stove. This helps to draw the fire into the back of the stove away from the glass. Slow wood burning To slow the burning rate and output from the stove reduce the air entering the stove via the air controls. The fire must be well established and the stove hot before a minimum combustion rate is attempted. Note that if the air supply is restricted too much the fire will burn dirty and inefficiently. Slow overnight burning is not advised for this reason. Ventilation The stove requires an adequate air supply for successful operation (see Installation section of these instructions for more details). Ensure that air bricks or grilles supplied for this purpose are not blocked. Be aware that the operation of exhaust fans or other appliances that compete for ventilation in the vicinity may affect the performance of the stove. Running temperature To get the best results from your stove it is recommended that a wood stove thermometer be fitted to the flue pipe just above the stove. Most thermometers are magnetic and if attached to the single wall flue pipe just above your stove will give a good indication of the flue gas temperatures. Flue thermometers are available from 10
11 Flue Temperature Ranges. 150 C C The flue gases should be in this temperature band for the safest, most efficient and most economical operation of your stove. Below 150 C This is below the condensation point of wood gases and may cause the build up of tar in the chimney, dirty the stove glass and result in the inefficient burning of fuel. Above 300 C Too hot. Heat will be wasted up the chimney. Excess heat may damage the stove or ignite an existing accumulation of tar resulting in a chimney fire. Over heating If the stove is allowed to get too hot and is over heating, close both of the air controls fully and keep the fire door closed to let the fire burn down. Chimney Fire In the event of a chimney fire dial 999 and ask for the Fire Service. Fully close the air controls on the stove and keep the fire door shut. Move any combustibles away from the stove and the chimney breast. Also check other rooms that the chimney passes through and move furniture and other combustibles away from the chimney here too. Before using the stove again after a chimney fire have the chimney cleaned and inspected by a qualified person. 11
12 Cleaning the stove We recommend using Vesta stove glass cleaner. This is available from Only clean the glass when the stove is cold. The painted surface of the stove can be wiped down with a dry cloth only when cold. The paint can be easily damaged if touched when hot for the first few firings. Touching up the stove paint is easy and can be done with Thermacure stove paint available from Types of fuel Wood needs to be well seasoned before it is burnt. Different woods take varying amounts of time to season but, as a general guide, before being used in a stove, wood should be cut to length, split and then stacked under cover (with the sides open to the air) for at least a year. Wood is ready for burning when radial cracks appear in the end of the logs and the water content is no higher than 20%. It is then good practice to have it in the log basket, inside the house, for a few days before it is actually used in the stove. The internal width of the firebox is 350mm and so firewood should be no longer than this. Do not burn unseasoned wood in your wood burner. Do not burn particle board, lacquered, painted or treated wood, plastics, rubber or liquid fuels. The stove is not suitable for burning solid fuel i.e. briquettes\ coal\coke\smokeless fuel. The stove should not be used as an incinerator. Remember water doesn't burn so use dry fuel. Wet wood causes black glass and tar build up inside chimneys and will damage your appliance. 12
13 Maintenance & Cleaning Any maintenance of the stove should only be carried out when it is cold. Daily maintenance is limited to vacuum cleaning the stove externally, or brushing down with a soft brush. Never use spirits to clean the stove, as this will remove the paint. Regularly check the flue exit from the stove to make sure there is no build up of deposits that will restrict the exit of the flue gasses. Note: The stove must not be modified by an unauthorised person and any replacement parts should be as recommended by the manufacturer. Chimney sweeping The chimney should be swept a minimum once a year. If the stove is used regularly then the chimney should be swept more often. Your stove should be given a preventive inspection every time the chimney is swept to check the door rope seal, door handle, fire bricks and baffle and to remove any build up of soot and ashes. The flue can be swept through the stove by removing the fire bricks Fire bricks The fire brick insulation of the combustion chamber may, in time, become worn and damaged. Cracks in the insulation have no effect on the efficiency of the stove. The insulation only needs to be replaced if it has deteriorated to an extent that the insulation is no longer protecting the steel of the stove from flames. Replacement bricks are not covered under warranty as there are many factors that can shorten the life of them. These included; throwing fuel into the fire, wet wood, burning the fire too hot. Glass If the glass is blackened with soot, it can easily be cleaned using one of the many specialist stove glass cleaning products available from stove shops. We recommend Vesta Stove Glass Cleaner. 13
14 Surface The high temperature paint finish normally requires no treatment. Any damage or wear to small areas of the paint finish may be remedied using Thermacure high temperature aerosol paint available from stove shops and from Vesta. Make sure the stove is cold and read the instructions on the can carefully before applying the paint. Applying too much paint can cause blistering. If this occurs the surface must be sanded back to the bare steel prior to re painting. Final Note: We hope that you enjoy your experience and that we meet all of your expectations. Occasionally some people experience problems with their wood burner that is caused by poor installation or chimney problems. If you should have any problems with your woodburner please contact us through the link on our website Thank you for choosing Vesta. 14
15 Heritage 5 Wood Burning Stove Installation Instructions 15
16 Installation Building regulations Installation of the Vesta woodburning stove must comply with all local building regulations, including those referring to national and European standards. It is a good idea to consult your local chimney sweep to check the suitability of the chinmney and ensure there is adequate updraft and suggest any remedies to potential chimney problems. Document J of the Building Regulations contains further information regarding the installation of solid fuel appliances and can be viewed here : or follow the link on the Vesta website. Ventilation There must be a constant supply of fresh air to the room in which the stove is to be installed. Fixed ventilation must be provided when installing any solid fuel stove which has an output higher than 5kws. This stove does not require an additional air supply. Load-bearing capacity of the floor Before installing the stove, you must ensure that the load-bearing capacity of the floor can withstand the weight of the stove and any flue pipe and connections. The weight of the stove is 62KG. Hearth The stove should always be installed on a non-combustible hearth. The hearth should extend to a distance of 225mm in front of the stove and 150 mm to each side measured from the door of the combustion chamber. See document J of the building regulations for more information on hearth requirements. The V4 stove may be fitted on a 12mm non combustible hearth. The temperature below 16
17 the stove does not exceed 100 degree C. Clearances The minimum distance to combustible materials should be 450mm at the back of the stove and 450mm to the sides of the stove. Adjacent walls should be of suitable non-combustible construction, preferably brickwork. Make sure that there is a gap between an uninsulated flue pipe and any combustible material. This gap must be at least 3 x the outside diameter of the flue pipe (375mm for 5 single wall flue pipe), or 1.5 x the flue diameter (375mm for 5 single wall flue pipe) to non combustible surface. A minimum clearance of 80mm around the sides and back of the stove is recommended to allow for air movement and heat from the stove to enter the room. Chimney requirements An existing chimney or a new flue or chimney installation should be given a visual inspection to check that it is in good order, clear of obstructions and is of a suitable size and type for the stove. It may be necessary to sweep the flue (which should always be done anyway before fitting a stove or lining a chimney) and also, if necessary, to do a smoke test to check for gas tightness and chimney draft. The chimney or flue must not serve any other appliance. For nominal heat output: The minimum flue draught required is 12PA. The flue gas mass flow will be 4.3g/s. The flue gas temperature directly down of the socket will be approximately 221 deg C. Air damper Flue draught stabilisers can be used if necessary with this appliance. 17
18 Flue connection The stoves has both rear and top flue connection. The flue blanking plate should be positioned over which ever outlet is not being used, position the blanking plate over the outlet and use the access via the opposite flue outlet to fix the clamp to the back of it, see Position the stove and seal the flue connections with fire cement or a high temperature rope seal. Care should be taken not to allow fire cement to come into contact with the paintwork on either the stove or the flue pipe. A rear flue can be secured to the stove by using 4 M5 nuts and bolts. The flue collar is predrilled to accept these. 18
19 Troubleshooting Fault Cause Resolution Black Glass Wet Fuel Season Wood foe at least Months. Low Flue Pressure Damaged Rope Seal Blocked Flue Consult Installer Fit new rope seal Consult chimney sweep/installer Fire goes out Wet wood, Season Wood foe at least Months. Low Flue Pressure Blocked Flue No combustion Air Consult installer, this could be due to downdraught or you may require a liner Consult chimney sweep. Fit combustion air brick in line with document J of Building regulations Cant slow down burn rate Damaged rope seal Door Handle Loose Replace rope seal using HT Silicone Adjust collar tension using allen key Flue Blanking Plate Loose Realign flue blanking plate and seal all joints with fire cement. Firebricks cracking after 1-6 months Paint blistering Wet fuel, careless loading Fire cement contact, burning too hot. 19 Ensure fuel is dry. Do not load fuel by throwing into the fire Rub down back to bear metal using wire wool or 240 grit sand paper then re-coat using Thermacure HT paint.
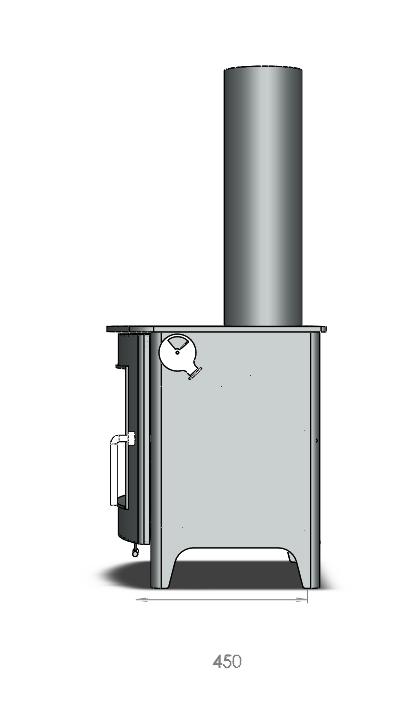
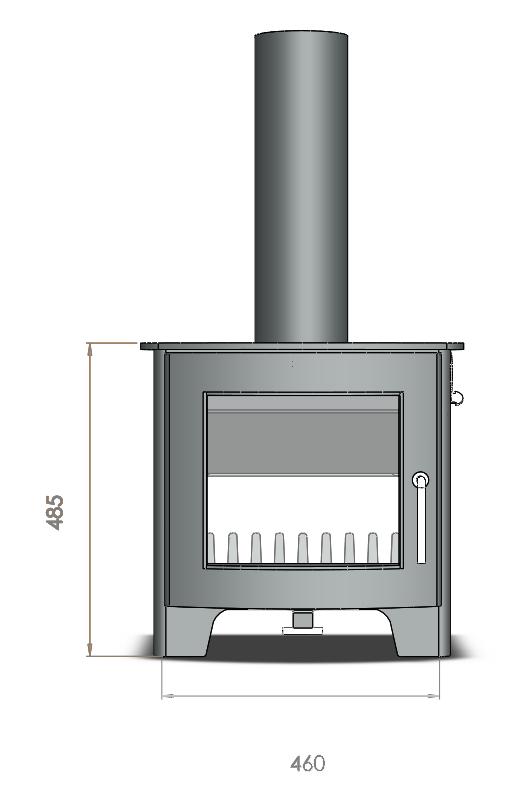
20 Illustrations Front View Side View Top View 20

21 Log Bar Retainer Fire Brick 21
22 Spare Parts List Part Code HER/001 HER/002 HER/003 HER/004 HER/005 HER/006 HER/007 HER/008 HER/008 HER/009 HER/010 HER/011 Door Rope Seal Description Door Glass & Sealing Kit (incl Retainers & Screws) Heat Resistant Brick Set Door Handle Door Handle Collar Door Pin catch Door handle Spring Top Air Spinner Bottom Slider Plate Bottom Slider Fixings Flue Blanking Plate Levelling Foot 22
23 23
CONTENTS. INSTALLATION INSTRUCTIONS Building regulations 4 Positioning and Clearances 4 Chimney 4 Flue connection 5 Problem solving 6 PRODUCT DATA
 PRODUCT DATA MODEL WEIGHT NOMINAL HEAT OUTPUT FB1 DS 80KG 6KWs CONTENTS OPERATING INSTRUCTIONS Lighting the fire 2 Firebox linings and baffle 2 Wood burning tips & theory 2 Running temperatures 3 Cleaning
How to use a multi fuel stove
 How to use a multi fuel stove Important!! When lighting the stove for the first time only a small fire should be lit. Too hot a fire will result in the paint emitting smoke - not necessarily bad but unpleasant.
Operating Instructions
 Operating Instructions Building regulations Installation of the Firebelly woodburning stove must comply with all local building regulations, including those referring to national and European standards.
Norvik 5 Multi-fuel stove 80% Efficient
 Installation & Operating Instruction Norvik 5 Multi-fuel stove 80% Efficient This stove is designed for intermittent use and is tested and manufactured as a closed multi-fuel appliance. Cast Tec recommend
Bloomsbury SE SMOKE EXEMPT WOODBURNING STOVE INSTALLATION & USER INSTRUCTIONS (TO BE LEFT WITH THE CUSTOMER) UK & IRELAND GUARANTEE
 UK & IRELAND GUARANTEE") 9/11 (PP) GUARANTEE CONDITIONS OF GUARANTEE Your ACQUISITIONS stove is guaranteed against defects arising from faulty manufacture for one year subject to the following express conditions. Failure to comply
9/11 (PP) GUARANTEE CONDITIONS OF GUARANTEE Your ACQUISITIONS stove is guaranteed against defects arising from faulty manufacture for one year subject to the following express conditions. Failure to comply
Installation and Operating. Instructions. Multifuel Stove. Salamander. Model Lighting a solid fuel fire. 6.5 De-ashing the stove
 Installation and Operating Instructions Salamander Model 0901 Multifuel Stove Section Contents Page 1 Important information about installing and 3 using the Salamander stove 2 Unpacking the Salamander
125SE SMOKE EXEMPT WOODBURNING STOVE INSTALLATION & USER INSTRUCTIONS (TO BE LEFT WITH THE CUSTOMER) UK & Ireland GB IE GUARANTEE
 UK & Ireland GB IE GUARANTEE") 12/09 GUARANTEE Conditions of Guarantee Your ESSE stove is guaranteed against defects arising from faulty manufacture for one year subject to the following express conditions. Failure to comply with these
12/09 GUARANTEE Conditions of Guarantee Your ESSE stove is guaranteed against defects arising from faulty manufacture for one year subject to the following express conditions. Failure to comply with these
INSTRUCTIONS FOR INSTALLATION, USE AND MAINTENANCE YSEN
 INSTRUCTIONS FOR INSTALLATION, USE AND MAINTENANCE YSEN READ THE INSTRUCTION BOOKLET AND THESE SUPPLEMENTARY INSTRUCTIONS CAREFULLY BEFORE INSTALLATION These instructions together with those in the instruction
Harrie Leenders Fuga el - Instructions for Installation, Use and Maintenance INSTRUCTIONS FOR INSTALLATION, USE AND MAINTENANCE
 INSTRUCTIONS FOR INSTALLATION, USE AND MAINTENANCE FUGA el 1 2 1. Flue 2. Case 3. Ceramic glass 4. Aeration slide 5. Convection fins 6. Door handle 7. Base 3 4 READ THE INSTRUCTION BOOKLET AND THESE SUPPLEMENTARY
BLOOMSBURY SE INSTALLATION & USER INSTRUCTIONS. Smoke Exempt Multi-Fuel Stove (TO BE LEFT WITH THE CUSTOMER) UK & IRELAND
 UK & IRELAND") BLOOMSBURY SE Smoke Exempt Multi-Fuel Stove INSTALLATION & USER INSTRUCTIONS (TO BE LEFT WITH THE CUSTOMER) UK & IRELAND GB IE CONTENTS General Safety Notes Page 2 Operating Instructions Page 8 Installation
BLOOMSBURY SE Smoke Exempt Multi-Fuel Stove INSTALLATION & USER INSTRUCTIONS (TO BE LEFT WITH THE CUSTOMER) UK & IRELAND GB IE CONTENTS General Safety Notes Page 2 Operating Instructions Page 8 Installation
500 MULTI - FUEL STOVE
 02/10 (PP) INSTR.ST-500MF/u GUARANTEE CONDITIONS OF GUARANTEE Your ESSE stove is guaranteed against defects arising from faulty manufacture for one year subject to the following express conditions. Failure
Saltfire ST4 INSTALLATION AND OPERATING INSTRUCTIONS.
 Saltfire ST4 INSTALLATION AND OPERATING INSTRUCTIONS. INTRODUCTION SAFETY Safety is the most important consideration when using and installing your stove. If not installed and used correctly, a house fire
Installation Instructions. Woolly Mammoth Stoves Albert Road, Braintree, Essex, CM7 3JQ
 Installation Instructions Woolly Mammoth Stoves 20-28 Albert Road, Braintree, Essex, CM7 3JQ INSTALLATION INSTRUCTIONS TO BE READ IN CONJUNCTION WITH THOSE IN THE INSTRUCTION BOOKLET These instructions
Saltfire ST1 INSTALLATION AND OPERATING INSTRUCTIONS.
 Saltfire ST1 INSTALLATION AND OPERATING INSTRUCTIONS. INTRODUCTION SAFETY Safety is the most important consideration when using and installing your stove. If not installed and used correctly, a house fire
BLOOMSBURY SE 8kW Smoke Exempt Multi-Fuel Stove
 BLOOMSBURY SE 8kW Smoke Exempt Multi-Fuel Stove INSTALLATION & USER INSTRUCTIONS (TO BE LEFT WITH THE CUSTOMER) UK & IRELAND GB IE CONTENTS General Safety Notes Page 2 Operating Instructions Page 9 Installation
MULTI-FUEL STOVE INSTALLATION AND USER INSTRUCTIONS
 PRIORY MULTI-FUEL STOVE INSTALLATION AND USER INSTRUCTIONS The Priory stove has a nominal heat output of 8Kw. and a weight of 80 kg. The flue gas mass flow is 5.4g/s for mineral fuel and 6.3g/s for wood
IN THE EVENT OF CHIMNEY FIRE, EVACUATE THE PROPERTY AND CALL THE EMERGENCY SERVICES.
 Ekol Clarity 12 INSTALLATION AND OPERATING INSTRUCTIONS. INTRODUCTION SAFETY Safety is the most important consideration when using and installing your stove. If not installed and used correctly, a house
Firestorm Stoves 10KW MULTI-FUEL STOVE INSTALLATION & USER INSTRUCTIONS. 10Kw 6.5Kw 4.5Kw
 Firestorm Stoves 10KW MULTI-FUEL STOVE INSTALLATION & USER INSTRUCTIONS 10Kw 6.5Kw 4.5Kw Firestorm Stoves Welcome Court, Unit 2 Bracewell Avenue, Poulton Business Park Poulton-Le-Fylde, Lancashire FY6
IN THE EVENT OF CHIMNEY FIRE, EVACUATE THE PROPERTY AND CALL THE EMERGENCY SERVICES.
 EKOL INSET 8 INSTALLATION AND OPERATING INSTRUCTIONS INTRODUCTION. SAFETY Safety is the most important consideration when using and installing your stove. If not installed and used correctly, a house fire
Smoke Exempt Wood Burning Stove
 Smoke Exempt Wood Burning Stove GB IE CONTENTS General Safety Notes Page 2 Operating Instructions Page 12 Installation instructions Page 3 Wood Burning Page 14 Chimney & Flue Page 4 Solid Fuel Burning
Saltfire ST3 INSTALLATION AND OPERATING INSTRUCTIONS.
 Saltfire ST3 INSTALLATION AND OPERATING INSTRUCTIONS. INTRODUCTION SAFETY Safety is the most important consideration when using and installing your stove. If not installed and used correctly, a house fire
HERALD COMPACT 5 Wood Burning Stove. Installation and Operating Instructions. JINHHC05WB RevA 27/04/12
 HERALD COMPACT 5 Wood Burning Stove Installation and Operating Instructions Herald Compact 5 Technical Specification Appliance Mass 95 kg Total Efficiency 76.0 % Nominal Heat Output 4.5 kw Mean CO Emission
This booklet applies to following Westfire stoves WF UNIQ 4 / WF4 WF UNIQ 18 /WF 18 WF UNIQ 16 /WF16 WF UNIQ 23 /WF 23 WF UNIQ 32 /WF32
 SUPPLEMENTARY INSTALLATION INSTRUCTIONS FOR THE UK MARKET TO BE READ IN CONJUNCTION WITH THOSE IN THE WESTFIRE INSTRUCTION INDIVIDUAL INSTRUCTION BOOKLETS This booklet applies to following Westfire stoves
Saltfire ST2 INSTALLATION AND OPERATING INSTRUCTIONS.
 Saltfire ST2 INSTALLATION AND OPERATING INSTRUCTIONS. INTRODUCTION SAFETY Safety is the most important consideration when using and installing your stove. If not installed and used correctly, a house fire
700-SE Multi-Fuel & Wood Burning Stove
 700-SE Multi-Fuel & Wood Burning Stove INSTALLATION & USER INSTRUCTIONS (TO BE LEFT WITH THE CUSTOMER) Australia & New Zealand Tested to AS/NZS 4012/4013 (2014) CONTENTS General Safety Notes P 2 Installing
500 Range. Multi-Fuel & Smoke Exempt Wood Burning Stoves 550, 525, and 500 Vista models INSTALLATION & USER INSTRUCTIONS
 500 Range Multi-Fuel & Smoke Exempt Wood Burning Stoves 550, 525, and 500 Vista models INSTALLATION & USER INSTRUCTIONS (TO BE LEFT WITH THE CUSTOMER) UK & IRELAND GB IE CONTENTS General Safety Notes Page
Installation and Operating Instructions
 Installation and Operating Instructions Wood-burning Stove Model: Ottawa 7kw INTRODUCTION Wood-burning Stove Item No.: Ottawa 7kw SAFETY Safety is the most important consideration when using and installing
Mod. MONTANA WOOD BURNING STOVE USAGE AND MAINTENANCE INSTRUCTIONS
 Mod. MONTANA WOOD BURNING STOVE USAGE AND MAINTENANCE INSTRUCTIONS Nutrients Ashes Fertilizer Wood: an ecological fuel Wood is a renewable source of energy which answers the energy and environmental demands
eco JINECO02 RevG 11/06/12 Clean Burn Stove Installation and Operating Instructions
 eco 2 Clean Burn Stove Installation and Operating Instructions eco 2 Technical Specification Appliance Mass 87 kg Total Efficiency 76.0 % Nominal Heat Output 4.5 kw Mean CO Emission (@13% O 2 ) 0.20 %
200XK, 200XK DD, & 225XK Multi-Fuel & Smoke Exempt Wood Burning Stove
 200XK, 200XK DD, & 225XK Multi-Fuel & Smoke Exempt Wood Burning Stove INSTALLATION & USER INSTRUCTIONS (TO BE LEFT WITH THE CUSTOMER) UK & IRELAND GB IE CONTENTS General Safety Notes Page 2 Installing
K E S T R E L 5 C L E A N B U R N S T O V E. Installation and Operating Instructions
 K E S T R E L 5 C L E A N B U R N S T O V E Installation and Operating Instructions An accredited competent person must carry out the installation of this appliance; alternatively, your local Building
Dean Forge Fabrication Ltd. Dean Prior, Buckfastleigh, Devon TQ11 0LS. T e l:
 Dean Stoves Dean Forge Fabrication Ltd. Dean Prior, Buckfastleigh, Devon TQ11 0LS T e l: 0 1 3 6 4 6 4 3 5 7 4 w w w.d e a n f o r g e.c o.u k e m a i l: s t o v e s @ d e a n-f o r g e.c o.u k Operating
OPERATION AND INSTALLATION MANUAL. Multi-fuel Burcott Fireplace inset stove
 OPERATION AND INSTALLATION MANUAL Multi-fuel Burcott Fireplace inset stove 1 Installation Manual and Operating instructions BURCOTT fireplace inset stove This manual refers to the stoves listed above,
700-SE Multi-Fuel & Smoke Exempt Wood Burning Stove
 700-SE Multi-Fuel & Smoke Exempt Wood Burning Stove INSTALLATION & USER INSTRUCTIONS (TO BE LEFT WITH THE CUSTOMER) UK & IRELAND GB IE CONTENTS General Safety Notes Page 2 Installing the Stove Page 11
HARVIA IRON STOVE Instructions for installation and use
 HARVIA IRON STOVE EN Instructions for installation and use Harvia 10 08012014VTT Congratulations on a good choice of fireplace and thank you for your confidence in Harvia s products. Read these instructions
WoodBurningStove. Instalation&Operation Guide
 WoodBurningStove Instalation&Operation Guide Toensureyourstoveworkssafelyandeficiently,itisimportantthatthe instalationofyoursolidfuelstoveiscariedoutbyatrainedand competentinstaler. InstalationsmustcomplywithUKBuildingRegulations.
HERALD 6 CE. Installation and Operating Instructions
 HERALD 6 CE M U L T I F U E L C L E A N B U R N S T O V E Installation and Operating Instructions A Hetas certified engineer must carry out the installation of this appliance; alternatively, your local
BRANSDALE DOUBLE SIDED WOOD BURNING STOVE
 BRANSDALE DOUBLE SIDED WOOD BURNING STOVE INSTALLATION AND USER INSTRUCTIONS Read these instructions carefully before installation and use. These instructions should be retained by the user for future
Installation and Operating Instructions
 Installation and Operating Instructions Wood-burning Stove Model: Ottawa 5kw INTRODUCTION Wood-burning Stove Item No.: Ottawa 5kw curve SAFETY Safety is the most important consideration when using and
 Installation and Operating Instructions Section Contents Page The Hobbit 1 Important information about installing and 3 using the Hobbit stove 2 Unpacking the Hobbit Stove 4 3 Assembly of the Hobbit Stove
Saltfire ST-X5 INSTALLATION AND OPERATING INSTRUCTIONS
 Saltfire ST-X5 INSTALLATION AND OPERATING INSTRUCTIONS INTRODUCTION SAFETY Safety is the most important consideration when using and installing your stove. If not installed and used correctly, a house
HARROGATE WOODBURNING STOVE INSTALLATION AND USER INSTRUCTIONS
 HARROGATE WOODBURNING STOVE INSTALLATION AND USER INSTRUCTIONS Read these instructions carefully before installation and use. These instructions should be retained by the user for future reference. The
Inis Airc 6kw Room-heating Stove User and installation manual.
 Inis Airc 6kw Room-heating Stove User and installation manual. 1 Congratulations on the purchase of your new Inis Airc room-heating stove. We here at Inis Stoves truly love building high quality stoves
Dean Forge Fabrication Ltd. Dean Prior, Buckfastleigh, Devon TQ11 0LS. T e l:
 Dean Stoves Dean Forge Fabrication Ltd. Dean Prior, Buckfastleigh, Devon TQ11 0LS T e l: 0 1 3 6 4 6 4 3 5 7 4 w w w.d e a n f o r g e.c o.u k e m a i l: s t o v e s @ d e a n-f o r g e.c o.u k Operating
SALTBURN SMOKE CONTROL / DALBY SMOKE CONTROL WOOD BURNING STOVE INSTALLATION AND USER INSTRUCTIONS
 SALTBURN SMOKE CONTROL / DALBY SMOKE CONTROL WOOD BURNING STOVE INSTALLATION AND USER INSTRUCTIONS Read these instructions carefully before installation and use. These instructions should be retained by
FIREWARM INSET STOVE FW5C. Installation and Operating Instructions
 FIREWARM INSET STOVE 5kW Nominal Output FW5C Installation and Operating Instructions Please hand these instructions to the stove user when the installation is complete. Leave the stove ready for operation
EKOL CRYSTAL-8 INSTALLATION AND OPERATING INSTRUCTIONS
 EKOL CRYSTAL-8 INSTALLATION AND OPERATING INSTRUCTIONS INTRODUCTION SAFETY Safety is the most important consideration when using and installing your stove. If not installed and used correctly, a house
T e l: Operating Instructions for the Dean Forge Hembury 6 & 8
 Dean Stoves Dean Forge Fabrication Ltd. Dean Prior, Buckfastleigh, Devon TQ11 0LS T e l: 0 1 3 6 4 6 4 3 5 7 4 w w w.d e a n f o r g e.c o.u k e m a i l: s t o v e s @ d e a n-f o r g e.c o.u k Operating
INSTRUCTIONS FOR INSTALLATION, USE AND MAINTENANCE RAIS PILAR 13 L & PILAR 13 H
 INSTRUCTIONS FOR INSTALLATION, USE AND MAINTENANCE RAIS PILAR 13 L & PILAR 13 H IMPORTANT INFORMATION On first lighting the stove you must be careful not to touch the painted surfaces and it is MOST IMPORTANT
LITTLE THURLOW MULTI-FUEL STOVE
 LITTLE THURLOW MULTI-FUEL STOVE INSTALLATION AND USER INSTRUCTIONS Read these instructions carefully before installation and use. These instructions should be retained by the user for future reference.
C O N S O R T 9 S L I M L I N E
 C O N S O R T 9 S L I M L I N E C L E A N B U R N S T O V E Installation and Operating Instructions An accredited competent person must carry out the installation of this appliance; alternatively, your
Reference: Ottawa 12kw Operating Instructions Version 1 04/06/15. Installation and Operating Instructions
 Reference: Ottawa 12kw Operating Instructions Version 1 04/06/15 Installation and Operating Instructions Wood-burning Stove Model: Ottawa 12kw Size: W580XD410XH610MM 1 INTRODUCTION Wood-burning Stove Item
100/200/700 INSTALLATION & USER INSTRUCTIONS (TO BE LEFT WITH THE CUSTOMER) UK & Ireland MULTI-FUEL STOVES GUARANTEE GB IE
 UK & Ireland MULTI-FUEL STOVES GUARANTEE GB IE") GUARANTEE 08/08 CONDITIONS OF GUARANTEE Your ESSE stove is guaranteed against defects arising from faulty manufacture for two years subject to the following express conditions. Failure to comply with these
GUARANTEE 08/08 CONDITIONS OF GUARANTEE Your ESSE stove is guaranteed against defects arising from faulty manufacture for two years subject to the following express conditions. Failure to comply with these
O P E R A T I O N AND INST A L L A T I O N M A N U A L
 O P E R A T I O N AND INST A L L A T I O N M A N U A L OPUS TEMPO FIRED BY DESIGN Contents Disposal of packaging 3 Introduction 3 1 Description 3 2 General 3 3 Installation of the Stove 4 3.1 Flue pipe
Installation & User Manual EW5000 Outdoor Cooking Fire
 Installation & User Manual EW5000 Outdoor Cooking Fire IMPORTANT: Please read this manual before installing and using the ESCEA EW5000 Cooking fire. Failure to follow these instructions may lead to a possible
WELBURN DOUBLE SIDED MULTI-FUEL STOVE
 WELBURN DOUBLE SIDED MULTI-FUEL STOVE INSTALLATION AND USER INSTRUCTIONS Read these instructions carefully before installation and use. These instructions should be retained by the user for future reference.
INSTALLATION AND USER INSTRUCTIONS
 WELBURN MULTI-FUEL STOVE INSTALLATION AND USER INSTRUCTIONS Read these instructions carefully before installation and use. These instructions should be retained by the user for future reference. The Welburn
Multi-fuel and SE models
 ENG OPERATION AND INSTALLATION MANUAL Multi-fuel and SE models Loxton 3 July 2016 1 Installation Manual and Operating instructions ENG Loxton 3 kw This manual refers to the stoves listed above, which are
CONSORT 7. CleanBurn Stove. Installation and Operating Instructions. JINCNS07 RevF 27/04/12
 CONSORT 7 CleanBurn Stove Installation and Operating Instructions Consort 7 Technical Specification Appliance Mass 111 kg Total Efficiency 75.9 % Nominal Heat Output 5.5 kw Mean CO Emission (@13% O 2 )
Glás Non Boiler Insert
 Glás Non Boiler Insert Installation & Operating Instructions Table of content Page no: 1. Technical data................... 1/2 2. General Information. 3/6 3. Installation Instructions................
C O N S O R T 1 5 V. I I
 C O N S O R T 1 5 V. I I M U L T I F U E L C L E A N B U R N S T O V E Installation and Operating Instructions An accredited competent person must carry out the installation of this appliance; alternatively,
THORNTON DALE MULTI-FUEL STOVE
 THORNTON DALE MULTI-FUEL STOVE INSTALLATION AND USER INSTRUCTIONS Read these instructions carefully before installation and use. These instructions should be retained by the user for future reference.
D O U B L E / D O U B L E H E R A L D 1 4 C E
 D O U B L E / D O U B L E H E R A L D 1 4 C E M U L T I F U E L C L E A N B U R N S T O V E Installation and Operating Instructions An accredited competent person must carry out the installation of this
WESTFIRE WF SERIES ONE & TWO
 WF series one & Two INSTALLATION MANUAL AND OPERATING INSTRUCTIONS 1 the art of danish engineering Westfire WF SERIES ONE Westfire WF SERIES TWO WF series ONE & Two This manual refers to the stove type
Dean Forge Fabrication Ltd. Dean Prior, Buckfastleigh, Devon TQ11 0LS. T e l:
 Dean Stoves Dean Forge Fabrication Ltd. Dean Prior, Buckfastleigh, Devon TQ11 0LS T e l: 0 1 3 6 4 6 4 3 5 7 4 w w w.d e a n f o r g e.c o.u k e m a i l: s t o v e s @ d e a n-f o r g e.c o.u k Operating
Operating & Installation Instructions
 Operating & Installation Instructions CONTENTS QUICK GUIDE 4 OPERATING INSTRUCTIONS 5 FUEL 5 WOOD LOGS 5 MULTI GRATE 5 RIDDLING 6 LIGHTING 6 CONTROLLING THE FIRE 6 REFUELLING 7 ASH CLEARANCE 7 OPERATING
Brunel 1A / 2CB / 3CB
 Brunel 1A / 2CB / 3CB Multi-Fuel Stoves Installation and Operating Instructions IMPORTANT Please read these instructions carefully before using the appliance. Keep them safe for future reference and when
Chew & Sheppey Multi-fuel and SE models
 Chew & Sheppey Multi-fuel and SE models 1 Installation Manual and Operating instructions Chew 4.6 kw, Sheppey 8 kw, This manual refers to the stoves listed above, which are tested in accordance with EN
OPERATION AND INSTALLATION MANUAL. Multi-fuel and SE models Loxton 3, 5, 6, 8 & 10 Churchill 5, 6, 8 & 10 Sqabox uno, duo
 OPERATION AND INSTALLATION MANUAL Multi-fuel and SE models Loxton 3, 5, 6, 8 & 10 Churchill 5, 6, 8 & 10 Sqabox uno, duo 1 Installation Manual and Operating instructions LOXTON 3kW LOXTON 5 kw, LOXTON
T e l:
 Dean Stoves Dean Forge Fabrication Ltd. Dean Prior, Buckfastleigh, Devon TQ11 0LS T e l: 0 1 3 6 4 6 4 3 5 7 4 w w w.d e a n f o r g e.c o.u k e m a i l: s t o v e s @ d e a n-f o r g e.c o.u k Operating
Please read this manual before installation and use. We wish you many years of pleasure and warmth.
 Thank you for purchasing this product. This multi fuel burning stove is compliant with the EN13240 Please read this manual before installation and use. We wish you many years of pleasure and warmth. Manufactured
AVALON 4. CleanBurn Stove Installation and Operating Instructions. JINAVA04 RevC 13/06/12
 AVALON 4 CleanBurn Stove Installation and Operating Instructions Avalon 4 Technical Specification Appliance Mass 88 kg Total Efficiency 78.0 % Nominal Heat Output 4.0 kw Mean CO Emission (@13% O 2 ) 0.44
CONSORT COMPACT. CleanBurn Stove Installation and Operating Instructions. JINCNC05 RevF 27/04/12
 CONSORT COMPACT 5 CleanBurn Stove Installation and Operating Instructions Consort Compact 5 Technical Specification Appliance Mass 95 kg Total Efficiency 76.0 % Nominal Heat Output 4.5 kw Mean CO Emission
WOOD BURNING STOVES. Installation and Operating Instructions
 WOOD BURNING STOVES IOJ IOJ IOJ O IOJ IOJ IOJ IOJ IOJ IOJ O IOJ IOJ IOJ Installation and Operating Instructions IMPORTANT Installation MUST ONLY be carried out by a Gas Safe registered engineer/installer
CONSORT 5. CleanBurn Stove. Installation and Operating Instructions. JINCND05 RevG 14/05/14
 CONSORT 5 CleanBurn Stove Installation and Operating Instructions Consort 5 Technical Specification Appliance Mass 85 kg Total Efficiency 78.0 % Nominal Heat Output 4.0 kw Mean CO Emission (@13% O 2 )
ROSEDALE SMOKE CONTROL STOVE INSTALLATION AND USER INSTRUCTIONS
 ROSEDALE SMOKE CONTROL STOVE INSTALLATION AND USER INSTRUCTIONS Read these instructions carefully before installation and use. These instructions should be retained by the user for future reference. The
Installation and Operating Instructions
 Installation and Operating Instructions Multi-Fuel Stove Model - Purefire 5kw Curve Approved under (Ottawa 5kw Curve SE01) SE01, version 5, 26/02/2016 INTRODUCTION Multi-Fuel Stove Model Purefire 5kw Curve
Installation and Operating Instructions. Ottawa 12kw
 Installation and Operating Instructions Ottawa 12kw 1 Wood-burning Stove Model: Ottawa 12kw Size: W580XD410XH610MM INTRODUCTION Wood-burning Stove Item No.: Ottawa 12.3kw Size: W580XD410XH610MM SAFETY
Installation Instructions
 Installation Instructions For use in and IE only C i4 FS www.contura.eu 2 CERTIFICATE DECLARATION OF PERFORMANCE No. Ci4FS-CPR-130619-SE-1 PRODUCT Product type Type designation Manufacturing number Intended
WESTFIRE WF ONE SERIES
 WF one series UK: INSTALLATION MANUAL AND OPERATING INSTRUCTIONS 1 dansk ingeniørkunst WF ONE SERIES This manual refers to the stove type listed above, which has been tested in accordance with EN13240.
T e l: Operating Instructions for the Dean Forge Clearburn Range (Excluding Junior and Junior SE)
") Dean Stoves Dean Forge Fabrication Ltd. Dean Prior, Buckfastleigh, Devon TQ11 0LS T e l: 0 1 3 6 4 6 4 3 5 7 4 w w w.d e a n f o r g e.c o.u k e m a i l: s t o v e s @ d e a n-f o r g e.c o.u k Operating
Dean Stoves Dean Forge Fabrication Ltd. Dean Prior, Buckfastleigh, Devon TQ11 0LS T e l: 0 1 3 6 4 6 4 3 5 7 4 w w w.d e a n f o r g e.c o.u k e m a i l: s t o v e s @ d e a n-f o r g e.c o.u k Operating
Studio stove, Studio oven and Oh-Ah
 Studio stove, Studio oven and Oh-Ah Maintenance and Operating Instructions Visit www.warmington.co.nz for specs, DWG s and PDF uploads of fires Fire, flue system and instructions to comply with AS/NZS
Intrepid 2 Intrepid 3
 Intrepid 2 Intrepid 3 Model Nos. V 10 / V10-3 NAT GAS Model Nos. V12 / V12-3 L.P.G DECORATIVE COAL EFFECT GAS STOVE USER INSTRUCTIONS This appliance is only for use on Natural Gas (G20) at a supply pressure
Wood as Fuel. Chimney sweeps in particular have a unique opportunity to deliver information on good burning habits to their customers.
 Wood as Fuel This document is intended to supply additional background information to compliment the consumer awareness information in Burn Right We all breathe the same air Chimney sweeps in particular
MODEL DCC DOUBLE WALL CHIMNEY CONNECTOR
 Installation & Maintenance LISTED Tested to *UL 103HT & ULC-S641 Instructions MODEL DCC DOUBLE WALL CHIMNEY CONNECTOR A MAJOR CAUSE OF CHIMNEY RELATED FIRES IS FAILURE TO MAINTAIN REQUIRED CLEARANCES (AIR
APPENDIX TO THE INSTALLATION AND OPERATING MANUAL OF STOVEMAN SAUNA STOVE
 APPENDIX TO THE INSTALLATION AND OPERATING MANUAL OF STOVEMAN SAUNA STOVE Technical data of the sauna stove Sauna stove type Stoveman 16 Model Stoveman 16 Nominal heat capacity, i.e. ability to 17 kw heat
H E R A L D I N S E T 7
 H E R A L D I N S E T 7 M U L T I F U E L S T O V E Installation and Operating Instructions An accredited competent person must carry out the installation of this appliance; alternatively, your local Building
T e l:
 Dean Stoves Dean Forge Fabrication Ltd. Dean Prior, Buckfastleigh, Devon TQ11 0LS T e l: 0 1 3 6 4 6 4 3 5 7 4 w w w.d e a n f o r g e.c o.u k e m a i l: s t o v e s @ d e a n-f o r g e.c o.u k Operating
MODEL DCC DOUBLE WALL CHIMNEY CONNECTOR
 Installation & Maintenance LISTED Tested to *UL 103HT & ULC-S641 Instructions MODEL DCC DOUBLE WALL CHIMNEY CONNECTOR A MAJOR CAUSE OF CHIMNEY RELATED FIRES IS FAILURE TO MAINTAIN REQUIRED CLEARANCES (AIR
USAGE AND MAINTENANCE MANUAL FOR A SOLID FUEL STOVE
 PREDUZEĆE ZA PROIZVODNJU, PROJEKTOVANJE I PROMET BELOŠEVAC BB, 14000 VALJEVO, SRBIJA USAGE AND MAINTENANCE MANUAL FOR A SOLID FUEL STOVE DEAR CUSTOMER, Congratulations on your purchase of BLIST solid fuel
T e l:
 Dean Stoves Dean Forge Fabrication Ltd. Dean Prior, Buckfastleigh, Devon TQ11 0LS T e l: 0 1 3 6 4 6 4 3 5 7 4 w w w.d e a n f o r g e.c o.u k e m a i l: s t o v e s @ d e a n-f o r g e.c o.u k Operating
D O U B L E / S I N G L E H E R A L D 6 C E
 D O U B L E / S I N G L E H E R A L D 6 C E M U L T I F U E L C L E A N B U R N S T O V E Installation and Operating Instructions An accredited competent person must carry out the installation of this
FGi, FXi & FPi 5 Taper INSET STOVE. Installation and Operating Instructions
 FGi, FXi & FPi 5 Taper INSET STOVE 5 kw Nominal Output With Patented TTi Air System Installation and Operating Instructions Please hand these instructions to the stove user when the installation is complete.
Dry Stove Installation Guide BK545. November 2012 Rev02. EN 13240:2001+ Amd. A2:2004
 Dry Stove Installation Guide BK545 EN 13240:2001+ Amd. A2:2004 November 2012 Rev02 Please read carefully through this installation guide before proceeding with installation of the stove. Should you have
INSTALLATION AND OPERATING INSTRUCTIONS. REF:
 Ekol Clarity 30 Boiler Woodburning Stove INSTALLATION AND OPERATING INSTRUCTIONS. REF: Ekol Claity 30 Boiler Wood Version, MANUAL Version 1.1 MANUAL PUBLICATION DATE: 22.01.2014 Recommended as suitable
Supplementary Installation & Operation instructions for UK Market
 Supplementary Installation & Operation instructions for UK Market For use Morsø UK Stoves EN 13 240 & HETAS Ltd. Distributed by: Morsø UK Valley Drive Swift Valley Rugby, Warks CV21 1TW England MORSØ JERNSTØBERI
OPERATION AND INSTALLATION MANUAL OPUS TRIO FIRED BY DESIGN
 OPERATION AND INSTALLATION MANUAL OPUS TRIO FIRED BY DESIGN Contents Disposal of packaging 3 Introduction 4 1. Description 4 2. General 5 3. Installation of the Stove and the flue pipe connection 5 3.1.
VEGA VEGA VEGA 200SL MULTI FUEL STOVES
 VEGA 100 - VEGA 200 - VEGA 200SL MULTI FUEL STOVES APPROVED - CONFORMING TO EN13240:2001 and EN13240 A2:2004 INSTALLATION AND OPERATING INSTRUCTIONS STOVES MUST BE FITTED BY APPROVED, QUALIFIED AND COMPETENT
H E R A L D I N S E T 5
 H E R A L D I N S E T 5 M U L T I F U E L S T O V E Installation and Operating Instructions An accredited competent person must carry out the installation of this appliance; alternatively, your local Building
Inset Sønderskoven 8. Multi-Fuel Inset Stove Installation and Operating Instructions. JINCN09 RevH 22/07/14
 Inset Sønderskoven 8 Multi-Fuel Inset Stove Installation and Operating Instructions 13 Inset Sønderskoven 8 Cleanburn, Trevilla Park, Slaughterbridge, Camelford, PL32 9TT DSEN13229 Inset Wood Burning Stove