D3107/ FMT09DGRO6.5 REAR TIEDOWNS W/ FACTORY INSTALLED RECEIVER APPLICATION FITS
|
|
|
- Christal Cox
- 5 years ago
- Views:
Transcription

1 D3107/ FMT09DGRO6.5 REAR TIEDOWNS W/ FACTORY INSTALLED RECEIVER APPLICATION FITS Minor movement (or settling) can occur in some incidental harsh driving conditions (on or off road). A rubber bed mat is not a requirement to maintain the lifetime warranty on a Torklift system, but a strong recommendation, simply as a safety precaution to protect the truck bed, the bottom of the camper and to give the camper additional support. Warning!! TORKLIFT DOES NOT RECOMMEND: Installing your truck camper in your truck on top of a drop in plastic bed liner!!! THIS WILL VOID YOUR WARRANTY! The drop in plastic bed liners can slide on top of the truck bed surface, and the camper can slide on top of the slick surface of the bed liner. The liner can also act as a spring causing a trampoline effect increasing vertical truck camper movement, independent of the vehicle, possibly resulting in truck bed damage and/or camper damage!
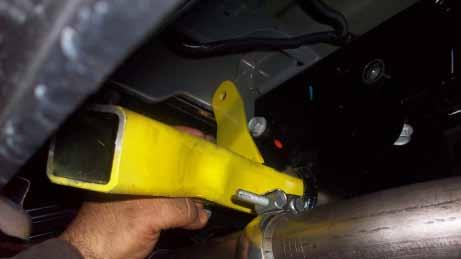
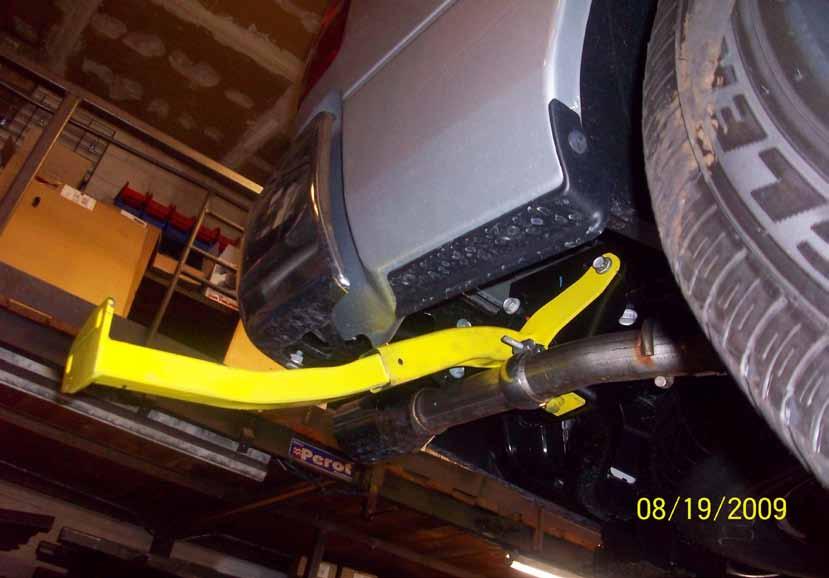
2 D3107 PARTS INVENTORY 2- Tie Down Receiver 2- Double Bent Insert 2-2 x 3 Plate Washer 2-1/4 Pin 4-1/2 Star Washer 2-1/2 Lock Washer 2-1/2-13 x 1-1/2 Hex Bolt 2-1/2-13 x 2 Hex Bolt NOTE: YOU MUST INSTALL THESE TIEDOWNS ONE SIDE AT A TIME. RE- MOVING BOLTS ON BOTH SIDES OF THE TRUCK AT THE SAME TIME CAN RESULT IN YOUR REAR BUMPER SLIPPING AND MAY CAUSE INJURY AND/OR DAMAGE! Step 1: Driver Side - Locate the forward factory hitch attachment bolt on the outside of the frame. This is a grey colored bolt that runs through the frame. See Photo A. This bolt will need to be removed and set aside for later reinstall. Step 2: Next, your tie down receiver needs to be slid into the end of your factory hitch, with the welded bracket facing toward the front of the truck. The hole in this welded bracket will line up with the hole from the bolt that was previously removed in step 1. *NOTE*- it is easier to install the tie down receiver and a lower risk of scratching the vehicle if you rotate the tie down receiver 90 degrees so that the welded bracket faces rearward, once the receiver tube is inside the hitch crosstube you can begin to rotate it back towards the front of the truck. See photos B, C, D. Step 3: Once the receiver is fully inside the crosstube, the hole in the welded bracket will be lined up with the hole in the frame, re-install the bolt that was removed earlier. Be sure to only hand tighten!! Step 4: Next, locate the hole on the bottom of the hitch cross tube. This is where the supplied 1/2-13 x 1-1/2 Hex Bolt, 1/2 Lock Washer, 1/2 Star Washer, and 2 x 3 Plate Washer will be installed up into the tie down receiver as seen in Photos E,F,G. The 2 x 3 Plate Washer will sit inside the factory 3 hitch plates snug as seen in Photo G. Note: On some 2013 and newer models you will need to use the supplied 1/2-13 x 2 Hex Bolt. Step 5: Tighten the bolts to 75 ft pounds. Step 6: Re- tighten the factory bolt removed earlier. Repeat steps 1-7 for passenger side. Page 2


3 Photo A (DRIVER SIDE) Photo B (PASSENGER)
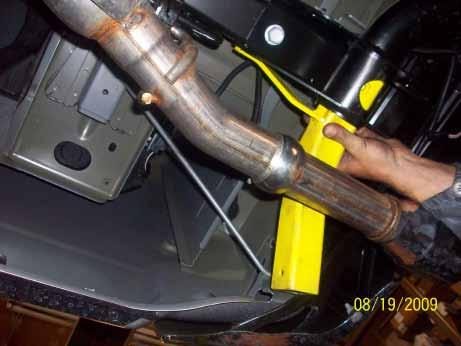
4 Photo C (PASSENGER) Photo D (PASSENGER)

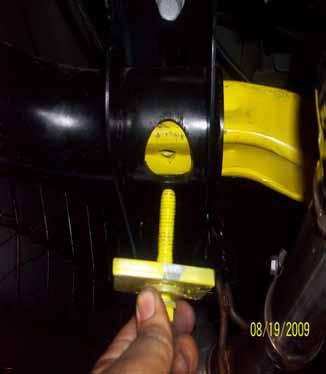
5 Photo E Photo F (PASSENGER)
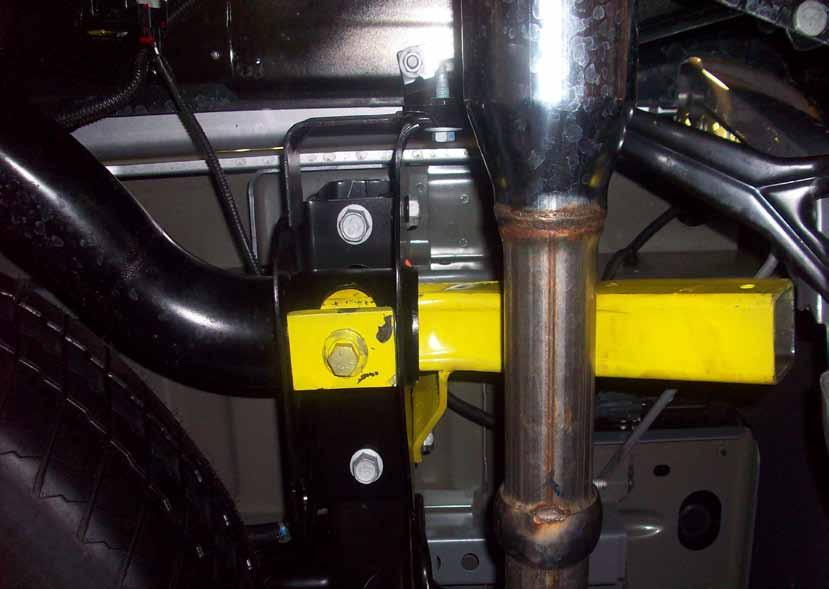
6 Photo G (PASSENGER) Finished (PASSENGER)
7 INSTRUCTIONS FOR MAINTENANCE OF POLISHED STAINLESS STEEL PRODUCTS TorkLift utilizes quality grade 304 stainless steel in this product. 304 stainless steel is well known for its anti corrosive properties, however in some environments such as coastal regions or when in contact with some road chemicals, corrosion may occur. We recommend occasional polishing of our product to maintain its attractive finish. Use an approved stainless steel cleaning/polishing product which can be purchased from any automotive supplier.


8 Frame Mounted Tie Downs Leading the camper tie down industry in strength, quality, advanced design and installation. TorkLift TRUE frame mounted tie downs are far superior to all tie down systems available. The TorkLift system is unique in its design and is patented. Four independent tie down points (with no belly or crossbar) working much like your receiver type trailer hitch as the inserts are removable allowing the system to be virtually undetectable when not in use. They are designed for each make and model to fit tight to the frame so as not to compromise ground clearance. Tork- Lift tie downs are not universal one size fits all therefore all the problems with correct fit for each particular application have been eliminated. Original SuperHitch & SuperHitch Magnum High strength extended hitch system engineered for safely towing all types of trailers behind your truck and camper. With a max towing capacity of 14,000 lbs. with an extension*, (17,000 lbs. to 20,000 lbs. without*) the Original SuperHitch and SuperHitch Magnum are rated the strongest in the industry.

9 TORKLIFT S BOLT FISHING GUIDE Your guide to understanding the installation of our frame mounted tie downs. -Coiled End of Bolt Fisher- Note: The hardware may vary as to what is being fished along with the bolt. In this instance a 1 X 2 plate washer is being fished along with the hex bolt. Different applications may reqire fishing through various star washers and flat washers for example. Desired Hole on Vehicle (Place the coiled end of the bolt fisher through this hole). This side of the Bolt Fisher should come out of a hole where the required hardware (for example 1 X 2 plate washer) can pass through. -Opposite End of Bolt Fisher- This bottom example shows the bolt when it s completely fished through the vehicle. You may find it easier to keep the bolt fisher attached until you get the tie down receiver in place so that the bolt doesn t fall into the vehicle frame. WARNING: PULLING TOO HARD ON THE BOLT FISHER CAN RESULT IN LOST FASTENERS, OR BROKEN BOLT FISHER.


10 TIE DOWN INSERT INSTALLATION INSTRUCTIONS On one end of each of your tiedown inserts is a triangular plate referred to by TorkLift as a bullet plate. Your tiedown inserts should be installed with the shorter side of the bullet plate facing away from each other, i.e.. The shorter side of the front insert should point to the front of the truck and the shorter side of the rear insert should point towards the rear of the truck. Once installed, attach the TorkLift directional stickers to the face of the bullet plate on the insert as a reminder. DRIVERS SIDE FRONT DRIVERS SIDE REAR SHORTER SIDE


11 TURNBUCKLE SPRINGLOAD OPTIONS CONTACT YOUR LOCAL DEALER FOR MORE DETAILS TorkLift requires all 4 tiedown points to be spring loaded in order to qualify for our manufacturer s Industry Exclusive Camper Anchor and Truck Frame Warranty BASIC SPRINGLOAD KIT - S9000 Includes 2 External Springload Cylinder Units, 2 Heavy Duty Forged Turnbuckles and 24 of Chain. Also comes with the TorkLift Lifetime Guarantee. FASTGUNS LEVER ACTION TURNBUCKLES FOR BED MOUNTED TIEDOWNS S9520-GREY SS / S9521-WHITE SS / S9527-POLISHED SS FOR FRAME MOUNTED TIE DOWNS S9522-GREY SS/ S9523-WHITE SS/ S9526-POLISHED SS S9529-BLACK SS FRAME OR BUMPER MOUNTED TIEDOWNS Includes 2 Stainless Steel Turnbuckles with an Internal Set Spring. Available in 2 Lengths and 4 Finishes (Grey, White, Polished Stainless Steel and Black) Also comes with the TorkLift Lifetime Guarantee. FASTGUN DERRINGERS Polished Stainless S9528 Transforms Your Pre-Existing Conventional Turnbuckles into a Lever Action FastGun Style Turnbuckle. Kit includes 4 Lever Action Derringers. Also comes with the TorkLift Lifetime Guarantee. SPRINGLOAD XL KIT - S9050A This set includes 2 Long Square Bodied Turnbuckles with an Internal Set Spring. The Springload XL Kit comes with a High Impact Powdercoated Finish and is compatible with the FastGun Derringer handles. Also comes with the TorkLift Lifetime Guarantee.
12 RECOMMENDED TRUCK CAMPER INSTALLATION INSTRUCTIONS When securing any heavy load (especially a camper) in your truck bed, your front tie down points should pull the load forward as much as possible. Some camper anchor points may differ with different manufacturers, as well as the camper jack mounting locations. Your TorkLift tie down inserts have offset triangular brackets to increase the angle of pull. These are designed to be used in the front facing forward, and the rear facing rearward but can be used in either front or rear. These recommendations are to be considered and followed as a basic rule of thumb. Obviously there will be some applications where this may not be possible. At a minimum, if opposite pull of both front and rear tiedowns cannot be achieved for whatever reason, you should have at least a forward pull at the front or rear location. If your camper does not come with Rubber Bumpers on the front lower portion of the camper, installing Rubber Bumpers (TorkLift has Rubber Bumpers available Part A7001) or using a block of wood such as a 2 x 4 in the bed, will prevent the camper from damaging the front bulk head of the truck bed. Minor movement (or settling) can occur in some incidental harsh driving conditions (on or off road). A rubber bed mat is not a requirement to maintain the lifetime warranty on a TorkLift system, but a strong reccommendation simply as a safety precaution to protect the truck bed, the bottom of the camper and to give the camper additional support. TORKLIFT DOES NOT RECOMMEND: Installing your truck camper in your truck on top of a drop in plastic bed liner!!! The drop in plastic bed liners can slide on top of the truck bed surface, and the camper can slide on top of the slick surface of the bed liner. The liner can also act as a spring causing a trampoline effect increasing vertical truck camper movement, independent of the vehicle, possibly resulting in truck bed, and camper damage! INSTRUCTIONS FOR FINISH MAINTENANCE OF TORKLIFT PRODUCTS POWDER COATED STEEL: To keep your TorkLift products looking good follow these guidlines. All steel powder coated TorkLift products are sandblasted for maximum adhesion and use a high quality industrial urethane based powder coat. Due to the extreme, harsh, undercar environment that your TorkLift products live in, (consistantly sprayed with corrosive road chemicals such as salt, and road debris), TorkLift does not warranty the power coated finish. To minimize corrosion from these factors on powder coated steel products, TorkLift recommends regularly cleaning and inspecting the powder coated surface and touching up any affected areas with an enamel or urethane based aerosol paint product. If there are any areas of surface rust, there are also aerosol spray rust converters available on the market that can be used as a preparation to touch-up paint application. These finish maintenance products are available at any automotive parts supplier. POLISHED STAINLESS STEEL : TorkLift utilizes quality grade 304 stainless steel in our stainless steel polished products. 304 stainless steel is well known for its anti-corrosive properties. However, in some environments such as coastal regions or when coming in contact with some road chemicals, corrosion may occur. For a quick clean simply use WD40 and a cloth rag. We also recommend occasional Page polishing 20 of our polished stainless products to maintain their attractive finish. Use an approved stainless steel chrome or aluminum mag wheel polish cleaning product which can be purchased from any automotive parts supplier.
IMPORTANT OWNER-OPERATOR INSTALLATION INSTRUCTIONS C3215/C3215A
 IMPORTANT OWNER-OPERATOR INSTALLATION INSTRUCTIONS C3215/C3215A Minor movement (or settling) can occur in some incidental harsh driving conditions (On or off road). A rubber bed mat is not a requirement
IMPORTANT OWNER-OPERATOR INSTALLATION INSTRUCTIONS C2213 / C2220
 IMPORTANT OWNER-OPERATOR INSTALLATION INSTRUCTIONS C2213 / C2220 Minor movement (or settling) can occur in some incidental harsh driving conditions (On or off road). A rubber bed mat is not a requirement
IMPORTANT OWNER-OPERATOR INSTALLATION INSTRUCTIONS REAR TIEDOWNS W/ FACTORY INSTALLED RECEIVER
 IMPORTANT OWNER-OPERATOR INSTALLATION INSTRUCTIONS C3203/FMTCHRO-6.5 REAR TIEDOWNS W/ FACTORY INSTALLED RECEIVER Minor movement (or settling) can occur in some incidental harsh driving conditions (on or
IMPORTANT OWNER-OPERATOR INSTALLATION INSTRUCTIONS. Part # A7006
 IMPORTANT OWNER-OPERATOR INSTALLATION INSTRUCTIONS Part # A7006 Parts List Wobble Stopper Body Wobble Stopper Shaft Camper Bracket Lower Bracket Assembly Upper Bracket Upper Bracket Clamp 3/8 SAE Flat
IMPORTANT OWNER-OPERATOR INSTALLATION INSTRUCTIONS FRONT TIEDOWNS CHAIN AND CLEVIS REMOVED
 IMPORTANT OWNER-OPERATOR INSTALLATION INSTRUCTIONS C2205/FMTPJ01NDCHSB FRONT TIEDOWNS CHAIN AND CLEVIS REMOVED 07.06.2011 Minor movement (or settling) can occur in some incidental harsh driving conditions
C2211/FMTPJ07CHLDCC5.5
 IMPORTANT OWNER-OPERATOR INSTALLATION INSTRUCTIONS C2211/FMTPJ07CHLDCC5.5 FRONT TIEDOWNS CHAIN AND CLEVIS REMOVED 07.06.2011 Minor movement (or settling) can occur in some incidental harsh driving conditions
IMPORTANT OWNER-OPERATOR INSTALLATION INSTRUCTIONS FRONT TIE DOWNS F2017. REVISED vers7 BY: JL 8/7/15 TECH SUPPORT (800)
") IMPORTANT OWNER-OPERATOR INSTALLATION INSTRUCTIONS FRONT TIE DOWNS F2017 REVISED vers7 BY: JL 8/7/15 TECH SUPPORT (800) 246-8132 AFTER INSTALL, PLEASE GIVE THIS BOOKLET TO YOUR CUSTOMER 1 Warnings Truck
IMPORTANT OWNER-OPERATOR INSTALLATION INSTRUCTIONS FRONT TIE DOWNS F2017 REVISED vers7 BY: JL 8/7/15 TECH SUPPORT (800) 246-8132 AFTER INSTALL, PLEASE GIVE THIS BOOKLET TO YOUR CUSTOMER 1 Warnings Truck
IMPORTANT OWNER-OPERATOR INSTALLATION INSTRUCTIONS R3500. REVISED vers4 BY: DSK 1/15/15 TECH SUPPORT (800)
") IMPORTANT OWNER-OPERATOR INSTALLATION INSTRUCTIONS R3500 REVISED vers4 BY: DSK 1/15/15 TECH SUPPORT (800) 246-8132 AFTER INSTALL, PLEASE GIVE THIS BOOKLET TO YOUR CUSTOMER 1 Warnings Truck Bed and Camper
IMPORTANT OWNER-OPERATOR INSTALLATION INSTRUCTIONS R3500 REVISED vers4 BY: DSK 1/15/15 TECH SUPPORT (800) 246-8132 AFTER INSTALL, PLEASE GIVE THIS BOOKLET TO YOUR CUSTOMER 1 Warnings Truck Bed and Camper
IMPORTANT OWNER-OPERATOR INSTALLATION INSTRUCTIONS F2010. REVISED vers5 BY: JL 8/7/15 TECH SUPPORT (800)
") IMPORTANT OWNER-OPERATOR INSTALLATION INSTRUCTIONS F2010 REVISED vers5 BY: JL 8/7/15 TECH SUPPORT (800) 246-8132 AFTER INSTALL, PLEASE GIVE THIS BOOKLET TO YOUR CUSTOMER 1 Warnings Truck Bed and Camper
IMPORTANT OWNER-OPERATOR INSTALLATION INSTRUCTIONS F2010 REVISED vers5 BY: JL 8/7/15 TECH SUPPORT (800) 246-8132 AFTER INSTALL, PLEASE GIVE THIS BOOKLET TO YOUR CUSTOMER 1 Warnings Truck Bed and Camper
IMPORTANT OWNER-OPERATOR INSTALLATION INSTRUCTIONS C2204A
 IMPORTANT OWNER-OPERATOR INSTALLATION INSTRUCTIONS C2204A Warnings Truck Bed and Camper Protection Torklift does not recommend installing your camper on top of a plastic bed liner (or other compressible
IMPORTANT OWNER-OPERATOR INSTALLATION INSTRUCTIONS D2101/D2115/D2118. REVISED vers7 BY: JL 8/6/15 TECH SUPPORT (800)
") IMPORTANT OWNER-OPERATOR INSTALLATION INSTRUCTIONS D2101/D2115/D2118 REVISED vers7 BY: JL 8/6/15 TECH SUPPORT (800) 246-8132 AFTER INSTALL, PLEASE GIVE THIS BOOKLET TO YOUR CUSTOMER 1 Warnings Truck Bed
IMPORTANT OWNER-OPERATOR INSTALLATION INSTRUCTIONS D2101/D2115/D2118 REVISED vers7 BY: JL 8/6/15 TECH SUPPORT (800) 246-8132 AFTER INSTALL, PLEASE GIVE THIS BOOKLET TO YOUR CUSTOMER 1 Warnings Truck Bed
IMPORTANT OWNER-OPERATOR INSTALLATION INSTRUCTIONS D4101. REVISED vers6 BY: JL 8/6/2015 TECH SUPPORT (800)
") IMPORTANT OWNER-OPERATOR INSTALLATION INSTRUCTIONS D4101 REVISED vers6 BY: JL 8/6/2015 TECH SUPPORT (800) 246-8132 AFTER INSTALL, PLEASE GIVE THIS BOOKLET TO YOUR CUSTOMER 1 Warnings Truck Bed and Camper
IMPORTANT OWNER-OPERATOR INSTALLATION INSTRUCTIONS D4101 REVISED vers6 BY: JL 8/6/2015 TECH SUPPORT (800) 246-8132 AFTER INSTALL, PLEASE GIVE THIS BOOKLET TO YOUR CUSTOMER 1 Warnings Truck Bed and Camper
IMPORTANT OWNER-OPERATOR INSTALLATION INSTRUCTIONS F3006. REVISED vers6 BY: JL 8/7/15 TECH SUPPORT (800)
") IMPORTANT OWNER-OPERATOR INSTALLATION INSTRUCTIONS F3006 REVISED vers6 BY: JL 8/7/15 TECH SUPPORT (800) 246-8132 AFTER INSTALL, PLEASE GIVE THIS BOOKLET TO YOUR CUSTOMER 1 Warnings Truck Bed and Camper
IMPORTANT OWNER-OPERATOR INSTALLATION INSTRUCTIONS F3006 REVISED vers6 BY: JL 8/7/15 TECH SUPPORT (800) 246-8132 AFTER INSTALL, PLEASE GIVE THIS BOOKLET TO YOUR CUSTOMER 1 Warnings Truck Bed and Camper
IMPORTANT OWNER-OPERATOR INSTALLATION INSTRUCTIONS D3109. REVISED vers10 BY: DSK 1/9/2015 TECH SUPPORT (800)
") IMPORTANT OWNER-OPERATOR INSTALLATION INSTRUCTIONS D3109 REVISED vers10 BY: DSK 1/9/2015 TECH SUPPORT (800) 246-8132 AFTER INSTALL, PLEASE GIVE THIS BOOKLET TO YOUR CUSTOMER 1 Warnings Truck Bed and Camper
IMPORTANT OWNER-OPERATOR INSTALLATION INSTRUCTIONS D3109 REVISED vers10 BY: DSK 1/9/2015 TECH SUPPORT (800) 246-8132 AFTER INSTALL, PLEASE GIVE THIS BOOKLET TO YOUR CUSTOMER 1 Warnings Truck Bed and Camper
IMPORTANT OWNER-OPERATOR INSTALLATION INSTRUCTIONS F2011. REVISED vers6 BY:JL 8/7/15 TECH SUPPORT (800)
") IMPORTANT OWNER-OPERATOR INSTALLATION INSTRUCTIONS F2011 REVISED vers6 BY:JL 8/7/15 TECH SUPPORT (800) 246-8132 AFTER INSTALL, PLEASE GIVE THIS BOOKLET TO YOUR CUSTOMER 1 Warnings Truck Bed and Camper
IMPORTANT OWNER-OPERATOR INSTALLATION INSTRUCTIONS F2011 REVISED vers6 BY:JL 8/7/15 TECH SUPPORT (800) 246-8132 AFTER INSTALL, PLEASE GIVE THIS BOOKLET TO YOUR CUSTOMER 1 Warnings Truck Bed and Camper
IMPORTANT OWNER-OPERATOR INSTALLATION INSTRUCTIONS D2126, D2127. REVISED version 8 BY: TD 1/30/2015 TECH SUPPORT (800)
") IMPORTANT OWNER-OPERATOR INSTALLATION INSTRUCTIONS D2126, D2127 REVISED version 8 BY: TD 1/30/2015 TECH SUPPORT (800) 246-8132 Warnings Truck Bed and Camper Protection Torklift does not recommend installing
IMPORTANT OWNER-OPERATOR INSTALLATION INSTRUCTIONS D2126, D2127 REVISED version 8 BY: TD 1/30/2015 TECH SUPPORT (800) 246-8132 Warnings Truck Bed and Camper Protection Torklift does not recommend installing
IMPORTANT OWNER-OPERATOR INSTALLATION INSTRUCTIONS. Part # C3206. REVISED Version 6 BY: JL 8/5/2015 TECH SUPPORT (800)
") IMPORTANT OWNER-OPERATOR INSTALLATION INSTRUCTIONS Part # C3206 REVISED Version 6 BY: JL 8/5/2015 TECH SUPPORT (800) 246-8132 Warnings Truck Bed and Camper Protection Torklift does not recommend installing
IMPORTANT OWNER-OPERATOR INSTALLATION INSTRUCTIONS Part # C3206 REVISED Version 6 BY: JL 8/5/2015 TECH SUPPORT (800) 246-8132 Warnings Truck Bed and Camper Protection Torklift does not recommend installing
IMPORTANT OWNER-OPERATOR INSTALLATION INSTRUCTIONS C4203. REVISED vers5 BY: JL 8/6/15 TECH SUPPORT (800)
") IMPORTANT OWNER-OPERATOR INSTALLATION INSTRUCTIONS C4203 REVISED vers5 BY: JL 8/6/15 TECH SUPPORT (800) 246-8132 AFTER INSTALL, PLEASE GIVE THIS BOOKLET TO YOUR CUSTOMER 1 Warnings Truck Bed and Camper
IMPORTANT OWNER-OPERATOR INSTALLATION INSTRUCTIONS C4203 REVISED vers5 BY: JL 8/6/15 TECH SUPPORT (800) 246-8132 AFTER INSTALL, PLEASE GIVE THIS BOOKLET TO YOUR CUSTOMER 1 Warnings Truck Bed and Camper
IMPORTANT OWNER-OPERATOR INSTALLATION INSTRUCTIONS C4201. REVISED Version7 BY: JL 8/6/2015 TECH SUPPORT (800)
") IMPORTANT OWNER-OPERATOR INSTALLATION INSTRUCTIONS C4201 REVISED Version7 BY: JL 8/6/2015 TECH SUPPORT (800) 246-8132 AFTER INSTALL, PLEASE GIVE THIS BOOKLET TO YOUR CUSTOMER 1 Warnings Truck Bed and Camper
IMPORTANT OWNER-OPERATOR INSTALLATION INSTRUCTIONS C4201 REVISED Version7 BY: JL 8/6/2015 TECH SUPPORT (800) 246-8132 AFTER INSTALL, PLEASE GIVE THIS BOOKLET TO YOUR CUSTOMER 1 Warnings Truck Bed and Camper
IMPORTANT OWNER-OPERATOR INSTALLATION INSTRUCTIONS F4006. REVISED vers5 BY: DSK 8/21/15 TECH SUPPORT (800)
") IMPORTANT OWNER-OPERATOR INSTALLATION INSTRUCTIONS F4006 REVISED vers5 BY: DSK 8/21/15 TECH SUPPORT (800) 246-8132 AFTER INSTALL, PLEASE GIVE THIS BOOKLET TO YOUR CUSTOMER 1 Warnings Truck Bed and Camper
IMPORTANT OWNER-OPERATOR INSTALLATION INSTRUCTIONS F4006 REVISED vers5 BY: DSK 8/21/15 TECH SUPPORT (800) 246-8132 AFTER INSTALL, PLEASE GIVE THIS BOOKLET TO YOUR CUSTOMER 1 Warnings Truck Bed and Camper
IMPORTANT OWNER-OPERATOR INSTALLATION INSTRUCTIONS F4000. REVISED vers5 BY: JL 8/7/15 TECH SUPPORT (800)
") IMPORTANT OWNER-OPERATOR INSTALLATION INSTRUCTIONS F4000 REVISED vers5 BY: JL 8/7/15 TECH SUPPORT (800) 246-8132 AFTER INSTALL, PLEASE GIVE THIS BOOKLET TO YOUR CUSTOMER 1 Warnings Truck Bed and Camper
IMPORTANT OWNER-OPERATOR INSTALLATION INSTRUCTIONS F4000 REVISED vers5 BY: JL 8/7/15 TECH SUPPORT (800) 246-8132 AFTER INSTALL, PLEASE GIVE THIS BOOKLET TO YOUR CUSTOMER 1 Warnings Truck Bed and Camper
DO NOT USE WITH CROSSBAR SPREAD LESS THAN 24.
 TM Please read all instructions carefully before assembly, installation and/or use of this product. DO NOT USE WITH CROSSBAR SPREAD LESS THAN 24. WARNING: Do not exceed the weight limit of your vehicle
INSTALLATION INSTRUCTIONS
 INSTALLATION INSTRUCTIONS KR54, KR1654, & KR4954 Keyed Removable Mullion NOT FOR USE ON ELECTRIC OR FIRE RATED MULLIONS. This kit includes the following parts: (Not to scale) WARNING Remove key, reinstall,
* * 4023 KR. Step 1 Prepare the Keyed Removable Unit. Not for use on electric or fire rated removable mullions
 condition. *64009-00* 64009-00 Keyed Removable Mullions 403 KR Installation Instructions Not for use on electric or fire rated removable mullions This kit includes the following parts: (Not to scale) 5/6
AND LOAD CANOPY RACK SPECIFICATIONS
 8MAY15 INSTRUCTIONS for the LOCK AND LOAD CANOPY RACK SPECIFICATIONS and SAFE LOADING REQUIREMENTS The Lock and Load ladder carrier for Truck Caps is a rack designed to mount to the top of a pickup truck
CHANGING YOUR LANDSCAPE SINCE 1945 OWNER S MANUAL. Tow Hitch Replacement Kit For Rough Cut Trailcutters. Starting Serial # L
 CHANGING YOUR LANDSCAPE SINCE 1945 OWNER S MANUAL Tow Hitch Replacement Kit For Rough Cut Trailcutters 21100 Starting Serial # L118-023001 Tools Required: Wrench/Socket Qty. Size (1) 1-1/8 (1) 1-1/16 (2)
READ ME FIRST! IMPORTANT WARNING! ENG. Roof top tent
 Roof top tent ENG TENT031 220 min READ ME FIRST! Thank you for purchasing a Front Runner Roof Top Tent. Before you start, take a moment to familiarize yourself with these Fitting Instructions and the components
P3000 UNIVERSAL Clamp-On
 IHI INSTRUCTION MANUAL Required Tools P3000 UNIVERSAL Clamp-On Wrench Allen Key P3001 65 ENDCAPS P3011 65 BLACK P300 7 ENDCAPS P301 7 WHITE P3003 ENDCAPS P3013 SILVER PART# DESCRIPTION ENDCAPS SIDE SUPPORTS
--- BIG LEAGUE BATTING CAGE ---
 --- BIG LEAGUE BATTING CAGE --- BGLC-7500 Call Jaypro Sports Equipment at 1-800-243-0533 during regular business hours for technical support. www.jaypro.com Rev-B Page 1 of 22 IMPORTANT NOTICE: 1. BEFORE
UTV BLADE MOUNT HARDWARE
 1701 38TH AVE W PO BOX 257 SPENCER, IA 51301 PHONE: 712-262-4191 FAX: 712-262-0248 SERVICE: 800-841-2222 E-MAIL: ccac@cyclecountry.com UTV BLADE MOUNT HARDWARE For the KUBOTA RTV900 OWNER S MANUAL MODEL
Aluminum Products. Why Aluminum? About Powerbrace Corporation. High-end Appearance. Strength and Light Weight. Better Corrosion Resistance
 Why Aluminum? About Powerbrace Corporation You can count on Powerbrace to solve almost any door closure challenge! Customers are often surprised to learn just how many door securement alternatives we have
80070 TOP MOUNT CAMPER SHELL and TRANSIT CONNECT RACK TMCS_3:1
 ASSEMBLY INSTRUCTIONS for : 80070 TOP MOUNT CAMPER SHELL and TRANSIT CONNECT RACK TMCS_3:1 (916) 638-8703 (800) 343-7486 11261 Trade Center Drive Rancho Cordova, CA 95742 www.kargomaster.com Transit ASSEMBLY
Model 698/ and Model in 1 Hose Reel Owner s Manual
 Model 698/694 200 and Model 706 100 4 in 1 Hose Reel Owner s Manual 698/694 706 VISIT OUR WEBSITE: WWW.LIBERTYGARDENPRODUCTS.COM OR CALL US TOLL FREE AT 1-866-820-5805 LIBERTY GARDEN PRODUCTS, INC. 500
MASTER LOCK MASTER LOCK
 PADLOCKS & ACCESSORIES Laminated 1-3/4" wide laminated steel body for superior strength hardened steel shackle for extra cut resistance 4-pin cylinder helps prevent picking dual locking levers provide
Stainless Steel Deck Rack. Safari Rack Urban Rack Basket Racks. Hard Top Carrier Bike Racks. Made in the USA
 Safari Rack Urban Rack Basket Racks Stainless Steel Deck Rack Hard Top Carrier Bike Racks Made in the USA Safari Rack 5.0 Flat out carries what you need to take 5" deep basket ¾" Aluminum square tubing
BowDown. MiniMuM Crossbar spread 24 (61CM) Steel Hook (2X) Buckle Strap (2X) Plastic Tube (2X) Plain Strap (2X) SHORT BLACK T-BOLT (2x) BOWDOWN (2x)
 Steel Hook (2X) Buckle Strap (2X) Plastic Tube (2X) Plain Strap (2X) SHORT BLACK T-BOLT (2x) BOWDOWN (2x)") BowDown MiniMuM Crossbar spread 24 (61CM) Heavy Duty strap (2x) SHORT BLACK T-BOLT (2x) BOWDOWN (2x) Bow Stern Tie Down Buckle Strap (2X) Plastic Tube (2X) Plain Strap (2X) Steel Hook (2X) IMPORTANT WARNING
BowDown MiniMuM Crossbar spread 24 (61CM) Heavy Duty strap (2x) SHORT BLACK T-BOLT (2x) BOWDOWN (2x) Bow Stern Tie Down Buckle Strap (2X) Plastic Tube (2X) Plain Strap (2X) Steel Hook (2X) IMPORTANT WARNING
INSTALLATION INSTRUCTIONS AND OWNER'S MANUAL AWNINGS. For trailers & motor homes with straight sides TOOLS REQUIRED
 AWNINGS INSTALLATION INSTRUCTIONS AND OWNER'S MANUAL For trailers & motor homes with straight sides TOOLS REQUIRED 1/4" electric drill Ratchet handle kit 3/8" & 7/16" socket No. 1 and No. 2 screwdriver
CUSTOM CYLINDERS INTERNATIONAL, INC. SOCKET JENIE PRODUCTS
 CUSTOM CYLINDERS INTERNATIONAL, INC. SOCKET JENIE PRODUCTS The SOCKET JENIE product line was developed for use with a 110V or battery operated drill motor to reduce the amount of time required to set up
Operation, Cleaning & Maintenance. For Aluminium Secondary
 , Cleaning & Maintenance For Aluminium Secondary Contents Horizontal Sliders 3 Vertical Sliders - Non-Balanced 4 Vertical Sliders - Balanced 5 Vertical Sliders - Tilt Back 6-7 Lift Outs 8 Hinged Units
TITAN Fuel Tanks. INSTALLATION INSTRUCTIONS G e n e r a t i o n V
 TITAN pt. no.: 02 0000 0128 Important: Please read these instructions carefully and completely before starting the installation. TITAN Fuel Tanks INSTALLATION INSTRUCTIONS G e n e r a t i o n V Extended
/ Tool and Equipment Safety Tether System (T.E.S.T.S)
") 20 INSTRUCTIONS FOR USE AND PRODUCT GUIDE 799953 / 799955 Tool and Equipment Safety Tether System (T.E.S.T.S) Part # T353012 Rev 2 Reliance Industries LLC 2802 East X Street Deer Park, Texas 77536 281-930-800
20 INSTRUCTIONS FOR USE AND PRODUCT GUIDE 799953 / 799955 Tool and Equipment Safety Tether System (T.E.S.T.S) Part # T353012 Rev 2 Reliance Industries LLC 2802 East X Street Deer Park, Texas 77536 281-930-800
Contents. Awnings USA - Full Protective Hood Manual Instructions ft 11" - 11ft 6" Awnings
 Awnings USA - Full Protective Hood Manual Instructions Contents Warning We recommend that two or more people are required to lift the awning into place. 4ft 11" - 11ft 6" Awnings 8 x Expansion bolts **
* * KR54-F, KR9854 & KR9954 Installation Instructions. Read All Warnings Before Starting Installation! Index:
 *941061-00* 941061-00 Keyed Removable Mullion KR54-F, KR9854 & KR9954 Installation Instructions CLASSIFIED CLASSIFIED C Read All Warnings Before Starting Installation! Index: General Information ----------------
User s Manual Trampoline 8
 User s Manual Trampoline 8 Model! WARNING Read all precautions and instructions in this manual before using this equipment. Save this manual for future reference. Maximum user weight 17 lbs. ASSEMBLY IMPORTANT
Tarp Return. Questions? Contact Customer Or Parts Diagrams see Parts and Diagrams section on web at
 Roll Rite, LLC and its entire staff would like to not only Thank You but congratulate you on your purchase of one of what we feel to be the finest line of tarping systems in the industry. Tarp Return RR
RAFTER VI. Installation and Operation CAREFREE WITH AUTOMATIC AWNING SUPPORT. RV Accessory PRODUCT OVERVIEW
 CAREFREE RAFTER VI RV Accessory WITH AUTOMATIC AWNING SUPPORT Installation and Operation PRODUCT OVERVIEW The gives the awning user the ability to easily tighten the center fabric when the awning is extended.
SECTION 5. Hardware and Optional Accessories for Steel Doors:
 SECTION 5 Hardware and Optional Accessories for Steel Doors: Yale Grade 2 Cylindrical Lock Yale Grade 1 Cylindrical Lock Yale Mortise Lock Standard Duty Exit Device Heavy Duty Exit Device Standard Duty
BigStack. Minimum Crossbar spread 24 For factory racks: Check fitlist notes, or Yakima.com for your vehicle s crossbar spread.
 BigStack Minimum Crossbar spread 24 For factory racks: Check fitlist notes, or Yakima.com for your vehicle s crossbar spread. HEAVY Duty strap (2x) PAD (4x) ADJUSTMENT KNOB (2x) T-BOLT (2x) BAIL (2x) BigStack
Aftermarket Installation Manual
 Straptek Installation Manual Table of Contents Introduction... 2 Straptek Weight Tension Technology.... 2 Disadvantages with Typical Weight Distribution Systems (WDS)... 2 Straptek Advantages:... 2 Quick
CJ-7 YJ PREPARATION INSTALLING THE WHEEL WELLS. Jeep Wrangler CJ-7/YJ BedRug Interior Installation Instructions
 CJ-7 YJ BRCJ76R BRCJ81R REAR KITS: BRYJ87R Jeep Wrangler CJ-7/YJ BedRug Interior Installation Instructions Congratulations on choosing the finest interior flooring kit available for your Jeep. BedRug material
INSTRUCTION SHEET DETHATCHER KIT. STS-422LX LPSTS-42JD Assembly Installation Operation Repair Parts L-1660-D. Visit us on the web!
 INSTRUCTION SHEET DETHATCHER KIT MODEL: DK-422LX FOR USE WITH SWEEPER MODEL: STS-422LX LPSTS-42JD Assembly Installation Operation Repair Parts For use with Riders and Lawn/Garden Tractors For the latest
PARTS INCLUDED IN YOUR KIT. You may want to lay them out in this manner for accessibility. Foam has NO adhesive to touch truck finish.
 INSTALL ATION SHEET Tarp Assembly with Cab Rail, Tail Rail and Support Bows attached. Left and Right Side Rail Assemblies U Clamps (x 6) NOTICE: If your truck has a bedliner that wraps over any top edges,
QUALITY TIME 2013/14
 QUALITY TIME 2013/14 PHIL OSO PHY Ever since Dick Allen turned metal tubing, straps, and padding into the first trunk mounted bicycle carrier in 1965, Allen s design philosophy has been governed by the
300 Model 870 Four Wheel Hose Cart Owner s Manual
 300 Model 870 Four Wheel Hose Cart Owner s Manual IMPORTANT: READ THE OWNER S MANUAL BEFORE ASSEMBLING TOOLS REQUIRED: TWO ADJUSTABLE WRENCHES; HAND PUMP Estimated assembly time: 30 minutes PARTS LIST
BR B Bike Rack Instructions
 IMPORTANT NOTE: It is common that vehicles with lids and hatches have a single rear wiper. It is important that you make yourself aware that the wiper cannot be used while the rack is attached to the vehicle.
TensionLite Plus 10 ft. Wave Shape Mural Wall Design 2
 TensionLite Plus 10 ft. Wave Shape Mural Wall Design 2 TensionLite is a collection of sophisticated, ergonomically designed exhibit booths. Formulate combines state-of-the-art zipper pillowcase dye-sublimated
VISIT OUR WEBSITE: OR CALL US TOLL FREE AT
 Model #710 WATH THE VIEO Owner s Manual VISIT OUR WEBSITE: WWW.LIBERTYGARENPROUTS.OM OR ALL US TOLL FREE AT 1-866-820-5805 LIBERTY GAREN PROUTS, IN. 1161 SOUTH PARK RIVE, KERNERSVILLE N 27284 IMPORTANT:
Installation Guide: Round Trampoline
 Trampolines & trampoline parts designed to survive in the harsh Oz climate. www.oztrampolines.com.au Installation Guide: Round Trampoline Safety Tips Here at Oz Trampolines we are passionate about your
HARD DOOR UPGRADE KIT
 RV Accessories OWNER'S MANUAL HARD DOOR UPGRADE KIT FOR ADD-A-ROOM & BREEZEWAY SCREEN ROOMS THIS MANUAL SUPPLEMENTS THE ADD-A-ROOM INSTRUCTIONS TABLE OF CONTENTS First Time Assembly... 2 Assembling the
4-foot Economy Sign Post. 4-foot post is rated at 2 pounds per foot. 7-foot Economy Sign Post
 Introduction: ComplianceSigns.com offers a variety of sign posts, sign mounting hardware, sign bases, mounting tape and more to mount your safety signs indoors or out. We offer three styles of sign posts,
Operation Manual SUPER BEAST Multi-tool SC-11M-10
 Operation Manual SUPER BEAST Multi-tool SC-11M-10 Technical Specifications General Safety/Operating Instructions Attaching/Changing the Head Using the SUPER BEAST as a Cutter Using the SUPER BEAST as a
HUNTCO SITE FURNISHINGS. Double Bike Locker Assembly Instructions HUNTCO SITE FURNISHINGS
 Double Bike Locker Assembly Instructions Includes instructions for both handle styles. Padlock Handle with U Lock Box and Keyed Pop Out T Handle SITE FURNISHINGS SITE FURNISHINGS and architectural site
Check Out Our Web Site at: To Order, Call Toll-Free From anywhere in North America
 Central Tarp has pioneered the design and evolution of the chip trailer Rollover Tarp. Here are just some of the features that have made our tarps so long-lasting! Premium Quality Vinyl: We use North American
DRAWER SYSTEMS HEAVY-DUTY STEEL & ALUMINUM Heavy-Duty Steel Drawer System. Heavy-Duty Aluminum Drawer System
 HEAVY-DUTY STEEL & ALUMINUM DRAWER SYSTEMS Heavy-Duty Steel Drawer System 500 lb. Rated Slides - Drawer slides are rated to hold up to the rigors of heavy-duty use and will support heavy tools and other
KAWNEER 1786 RIM EXIT DEVICE
 FEBRUARY, 2015 1 DOOR STILE Device C L 40" 41-9/32" Cylinder C L Bottom of door RIM EXIT DEVICE LOCATION DOGGING KEY EXIT DEVICE FILLER PLATE CYLINDER & CYLINDER RING HOUSING COVER CYLINDER INSTALLATION
PARTS INCLUDED IN YOUR KIT. You may want to lay them out in this manner for accessibility. Foam has NO adhesive to touch truck finish.
 -'07 Ford Sport Trac Tarp Assembly with Cab Rail, Tail Rail and Support Bows attached. Left and Right Side Rail Assemblies Sport Trac Brackets (x4) Clamp Bolts Allen Wrench PARTS INCLUDED IN YOUR KIT.
4 Corner Section. 4x8. 4x12. 4x16. 5x8. 5x12. 5x16. The Dock-Lock. Standard Dock Sizes
 Aqua Lounge OUR COMMITMENT TO QUALITY Aqua Lounge Producing superior products at competitive prices is our goal here at Aqua Lounge. We are not content with duplicating products already available on today
Notes, Parts List & Drawings
 Biomass Chopper/Cutter Notes, Parts List & Drawings Page 1 of 16 The Easy BioChop biomass chopper/cutter was designed to cut both wet and dry biomass and to accomplish a number of goals. The objectives
Suggested Installation Instructions for: , Embroidered Front End Mask
 I I 1 Suggested Installation Instructions for: 602-246, 1975-1979 Embroidered Front End Mask 2-Cover Hooks 4-Air Foil Inserts 2-2" "U" Shaped Trim Locks 4-2" ADHESIVE BACKED Hook Strips 2-14" ADHESIVE
INSTRUCTION MANUAL ALEKO RETRACTABLE AWNING
 INSTRUCTION MANUAL for ALEKO RETRACTABLE AWNING www.alekoproducts.com FAILURE TO FOLLOW THESE INSTRUCTIONS MAY RESULT IN PERSONAL INJURY! 1 Important Safety Precautions WARNING NOTE: FOR PERSONAL SAFETY,
Primrose Awnings - Standard Manual Instructions
 Primrose Awnings - Standard Manual Instructions Contents Warning 1.5m - 3.0m Awnings 4 x Expansion bolts (2 per bracket)** 2 x brackets 1 x Awning 1 x Winder handle 3.5m - 4m Awnings 6 x Expansion bolts
13401 Brooks Drive Baldwin Park, CA p f shademakerusa.com
 13401 Brooks Drive Baldwin Park, CA 91706 p 626.338.8810 f 626.338.8816 info@shademakerusa.com shademakerusa.com 2018 Shademaker. All rights reserved. SMOM-LIBRA-0718 W A R R A N T Y : Upon receipt of
Assembly and Installation Instructions
 U.S. patent number 8,708,369 part number 4750 for Blue Ox tow bars with Blue Ox brackets, Demco tow bars with Demco brackets, and all motorhome-mounted ROADMASTER tow bars Assembly and Installation Instructions
Formulate Designer Series 10 Backwall - Kit 10
 Formulate Designer Series 10 Backwall - Kit 10 FMLT-DS-10-10 Formulate Designer Series 10ft displays have unique stylistic features and shapes, are portable and easy to assemble. The aluminum tube frame
, & Series Nested Hardware
 RECORD THIS INFORMATION FOR FUTURE REFERENCE BEFORE INSTALLING THE UNIT: Model Number Serial Number Date Purchased Place of Purchase USA SERVICE OFFICE Dometic Corp. 509 So. Poplar St. LaGrange, IN 46761
ALEKO Victoria Series Retractable Awning Instructions for Installation and Operation
 www.alekoproducts.com ALEKO Victoria Series Retractable Awning Instructions for Installation and Operation PLEASE DO NOT RETURN THIS PRODUCT TO THE STORE! The owner s manual includes assembly and operating
Assembly and Installation Instructions
 U.S. patent number 8,708,369 part number 4750 for Blue Ox tow bars with Blue Ox brackets, Demco tow bars with Demco brackets, and all motorhome-mounted ROADMASTER tow bars Assembly and Installation Instructions
INSTALLATION INSTRUCTIONS for vertical awnings
 Custom made Awnings and Blinds Item No 0759 INSTALLATION INSTRUCTIONS for vertical awnings IMPORTANT INFORMATION BEFORE INSTALLING YOUR Updated 08/09/15 AN AWNING INSTALLATION IS A HOME IMPROVEMENT PROJECT
Retractable Awning Owner s Manual
 Retractable Awning Owner s Manual TABLE OF CONTENTS SECTION-1 2 CONGRATULATIONS ON PURCHASE 2 OPERATING YOUR SHADELINE AWNING 2 GEAR CRANK OPERATION 2 EXTENDING YOUR AWNING 2 RETRACT 2 SECTION-2 3 MOTORIZED
www Littleton, 9861.horn Titan Park Circle CO etoutdoors.com BEYOND COMPARE
 9861 Titan Park Circle Littleton, CO 80125 303.408.0250 www.hornetoutdoors.com BEYOND COMPARE Cargo Bed Rack RZR 2015 RZR-900, 900-S, 900-4 Rack with removable bottom $399.95 Hornet Roof Rack Spare Tire
Kontrol Kube Advanced Owners Manual
 Mobile Containment. Simplified. TM Kontrol Kube Advanced Owners Manual KONTROL KUBE www.kontrolkube.com 800.343755 1 IMPORTANT SAFETY INFORMATION SAVE THESE INSTRUCTIONS. CAREFULLY READ AND FOLLOW THESE
Formulate Designer Series 10 Backwall - Kit 06
 Formulate Designer Series 10 Backwall - Kit 06 FMLT-DS-10-06 Formulate Designer Series 10ft displays have unique stylistic features and shapes, are portable and easy to assemble. The aluminum tube frame
Tavernier Round. 3/8 x 1-7/8 Washer /8-16 Serrated Flange Nut
 Tavernier Round Part # 420989 Round Packing List ITEM DESCRIPTION PART # 8 12 15 18 21 24 27 30 33 Carton # 1 8 x52 Gray Sawgrass 121449 1 - - - - - - - - Carton # 2 Carton # 3 12 x52 Gray Sawgrass 121450-1
The safe & affordable install
 QSLG1000 Quick-Sling SPECS QSLG1000 Each arm attaches to wood using 2 zip screws for stability & a 4 through bolt & wing nut for security. Installs to steel using steel beam adapters. 28 points of anti-vibration
ASSEMBLY & CARE INSTRUCTIONS
 ASSEMBLY & CARE INSTRUCTIONS 7 x TRAILER TENT SERIES 3 9 Part No. FT3711 - on road FT3923 - off road OPTIONAL SUNROOM Wall and floor kit Part No. FT3723 - on road FT39 - off road OPTIONAL SPARE ROOM Roof,
Assembly TOOLS REQUIRED: 17mm and 14mm or equivalent wrenches.
 Instructions for 3 Trimmer Rack, 3TR* *Patents Pending Assembly TOOLS REQUIRED: 17mm and mm or equivalent wrenches. 15 26 26 16 15 16 Attach the lower mounting brackets to the Trimmer Rack poles as shown
TCWS.38NG03.C BLACK DIAMOND BURNER KIT INSTRUCTIONS
 IMPORTANT: THESE INSTRUCTIONS ARE TO REMAIN WITH THE HOMEOWNER These instructions are supplementary to the Installation and Operating Instructions supplied with the fireplace and should be kept together.
HANDLES, LE VERS & CR ANKS
 Handles, Levers & Cranks Plastic Pull/Lift Handle...112 Plastic Revolving Fold-Away Handle... 95 Plastic Revolving Heavy Duty Handle With Steel Shank... 92 Plastic Revolving Handle With Steel Through Shank...
INSTANT GARAGE MODEL NO: CIG81224 ASSEMBLY INSTRUCTIONS PART NO: ORIGINAL INSTRUCTIONS
 INSTANT GARAGE MODEL NO: CIG81224 PART NO: 3503578 ASSEMBLY INSTRUCTIONS ORIGINAL INSTRUCTIONS GC1117 INTRODUCTION Thank you for purchasing this CLARKE Instant Garage. When erected, the CIG81224 garage
Colonial and Grand Colonial Fire Pit Tables. Installation Instructions for
 Colonial and Grand Colonial Fire Pit Tables Installation Instructions for Colonial-48-M-K, Col-48-MNB-K, Grand-Colonial-48-K, CM-48-DIN-K, MNB-48-DIN-K, GC-48-DIN-K, CM-48-PUB-K, MNB-48-PUB-K, GC-48-PUB-K
INSTALLATION SHEET. PARTS INCLUDED IN YOUR KIT. You may want to lay them out in this manner for accessibility.
 INSTALLATION SHEET Gas Struts (x2) Lower Hinge Rail Side Rails (L and R) Spring Bows (x2-short Bed) (x3-long Bed) L Bars (L and R) with clamps included L Channel w/seal MISSING PARTS??? Call Extang at
Formulate 10 Horizontal Curve - Kit 6
 Formulate 10 Horizontal Curve - Kit 6 FMLT-WH10-06 Formulate TM is a collection of sophisticated, ergonomically designed exhibit booths. Formulate combines state-of-the-art zipper pillowcase dye-sublimated
CRD120SC TUBING CUTTER
 CRD120SC TUBING CUTTER OPERATIONS MANUAL 1 VERSION 2.1 LAST EDITED 05.01.2018 cleanroomdevices.com Table of Contents Table of Contents....2 1.0 General Product & Safety Information... 3 1.1 Product Information
L&W ENGINEERING INC.
 L&W ENGINEERING INC. 2012-2013 107 INDUSTRIAL PARKWAY MIDDLEBURY, IN 46540 PHONE (574) 825-5351 FAX (574) 825-1006 WWW.LW-ENG.COM Pipe Hangers Welcome to L&W Engineering. Your quality source for fabricated
FREEDOM BUTTON KIT INSTALLATION GUIDE STEP 1
 FREEDOM BUTTON KIT INSTALLATION GUIDE Installation of the Freedom Button kit is very simple and similar to the installation of a standard rear takedown pin and bolt catch latch. Before installing your
Auxiliary 63.5l Fuel Tank Ford/Mazda Pick-up Truck 2012-Current READ ME! IMPORTANT WARNING!
 Auxiliary 63.5l Fuel Tank Ford/Mazda Pick-up Truck 2012-Current ENG FTFM006 90 min READ ME! Thank you for purchasing a Front Runner Ford/Mazda Pick-Up Truck 2012 - Current Fuel Tank. Before you start,
SELF RE-ERECTING MARKER POSTS
 ONE OF A KIND TECHNOLOGY FOR OUR TIMES MULTI APPLICATIONS SELF RE-ERECTING MARKER POSTS TEMPORARY OR PERMANENT BICYCLE LANES CROSSWALKS CHANALIZATION BRIDGES CITY US REFLECTOR WORK ZONES ALL-ROUND RUGGEDNESS
10x Corrosion Resistance 5x Abrasion Resistance 2x Chip Resistance 2x Scratch Resistance. 10x 5x 2x 2x. Textured Powder Paint Finish
 On-Site Storage The latest JOBOX innovations for unmatched security, versatility and durability New Textured Powder Paint Finish For Improved Durability* 10x 5x 2x 2x Site-Vault Security System 50% more
300 ft. 5/8 Hose wagon
 300 ft. 5/8 Hose wagon Model 95956 Assembly And Operation Instructions Due to continuing improvements, actual product may differ slightly from the product described herein. (Garden hose is not included).
A properly mounted pair of Rocky Mountain Saddle Bags. Bag Orientation
 Mounting instructions for the 2016 Rocky Mountain Saddle Bags #M1016 with our A146 Universal Saddle Bag Straps. Patents Pending. Thank you for purchasing the Rocky Mountain Saddle Bags *READ THROUGHLY