Performance Variable e.k. Am Tower 16 D Bitburg Ph/:
|
|
|
- Jean Stewart
- 5 years ago
- Views:
Transcription


1 Page: 1 Performance Variable e.k. Am Tower 16 D Bitburg Ph/: info@myskyshop.de
2 Page: 2 Table of Contents Pilot Chute Attachment, Handling 3-4 Installation of PD Soft Links 5 Harness-Container Description, Introduction 6 TSO, JTSO & Manufacturer Authorization 7-10 Description of the Omega, Components Hand-deploy Pilot Chute Packing Maintenance and Care Periodic Maintenance for the 3-ring Pre-Jump Equipment Check 20 Instructions for Ram-air Reserves 21 Illustrations 1-18 (Packing the Reserve) Assembling and Packing the Main Parachute 27 Illustrations 1-10 (Packing the Main) 28-30

3 Page: 3 Pilot Chute Attachment


4 Page: 4 Cock Pilot Chute


5 Page: 5 Installation of Performance Designs Soft Links
6 Page: 6 Omega Harness-Container Description Container Type Main & Reserve Canopy Container Number of Closing Flaps 6 Reserve Pilot Chute Manufacturer (LBA.G.0139 / JAR-21 G) AAD (Automatic Activation Device) RSL (Reserve Static Line) inside Performance Variable, Germany Cypres ready possible, indirect single-sided Webbing Material Nylon Webbing Type 7 / Type 8 TSO by DAeC 1995 & LBA 2001 as NAA TSO & JTSO C23d # LBA /05 by NAA Introduction Please read this manual thoroughly before assembling or using your Omega, even if you ve owned or jumped an Omega before. If, after reading this manual, you still have questions concerning the Omega, please contact us. We ll be happy to help you. TRAINING REQUIRED If you ve never jumped an Omega before, or if you re transitioning from other types of gear, be sure to receive instruction on its use from a certi fied instructor. This instruction should consist of a practice session in a suspended harness or on the ground where you practice both routine and emer gency procedures. This manual is not a course of instruction on how to make a parachute jump. Nor does it contain the various regulations that govern sport parachuting and related activities. The harness is constructed of Type-7 and Type-8 Mil-Spec. webbing and new not reconditioned hardware.

7 Page: 7
8 Page: 8
9 Page: 9

10 Page: 10
11 Page: 11 Description of the Omega The Omega is a piggyback harness and container system designed for free-fall, sport and military parachuting. It is available in a wide variety of container sizes to fit practically any main or reserve canopies, either round or ram-air. It is manufactured in accordance with the FAA TSO C23d. Main Parachute System The main parachute system of your custom Omega was built for either a hand deploy, ripcord or pull-out deployment. Refer to the applicable section pertaining to your deployment system. The main canopy may be jettisoned from the harness by its patented 3 -ring release system, a single point system that is activated by a soft handle located on the right main lift web. Reserve Parachute System The Omega reserve container can be manufactured to accept round or ram-air reserve canopies. The reserve parachute container is held closed by a single pin. The reserve ripcord handle is made of metal and fits in a pocket on the left-hand main lift web. The reserve system accepts all popular automatic activation devices produced by Air Tec. About Modifications It is common for jumpers to improve their rigs by altering them. A high percentage of these alterations can cause malfunctions or make the rig harder to use correctly. Typical alterations include conversion to a pull-out pilot chute, changing the dimensions of the harness, changing the length of the bridle, installing automatic activation devices and so forth. Check with PV before you make any changes to your Omega. It was designed and built the way it is after years of testing and development. There are reasons for having things the way they are reasons that might not be apparent at first. Check with us before you allow any changes be made; even insignificant alterations may have dangerous and unforeseen effects.
12 Page: 12 Second-hand Omegas If you obtained your Omega second-hand from a private party, be sure it is airworthy before using it. Have a rigger or loft inspected it before you jump it. If you prefer, PV will inspect your second-hand Omega. There is a reasonable charge for this service. If you obtain replacement parts from a source other than a PV dealer, be sure they exactly match the parts they replace. (For example, be sure the reserve ripcord is long enough. If it isn t, the rig might open prematurely.) Consult a rigger or loft whenever you replace any component of your Omega. COMPONENTS The Omega comes complete with these components: Harness and container Hand-deploy main pilot chute Main pilot chute bridle Main deployment bag Main locking loop Omega reserve pilot chute Reserve ripcord Reserve locking loop Reserve deployment free-bag Reserve pilot chute bridle Main risers and steering toggles 3-ring release handle Omega Owner s


13 Page: 13 Once you are sure you have these components, check to be sure the containers are sized properly for your main and reserve canopies. Contact PV or a PV dealer to find out which canopies will fit in your Omega. If you use components that were not supplied to the harness and container, be sure they have the correct dimensions and are made of the same materials. For instance, be sure the breakaway cables are of the proper length. Replacement components for the Omega are readily available from the PV. German and U.S. Federal Aviation Administration regulations require that reserve parachutes be inspected, maintained, assembled and packed by an appropriately rated rigger. Other countries may have similar regulations. The packing data card pocket is on the back of the 3-ring cover on the left main lift web of most Omegas. Hand-deploy Pilot Chute Your Omega comes with a 24-inch kill-line hand-deploy pilot chute. For safe and reliable openings, you have to fold and stow your P/C accurately. Please follow the steps below: A) Lay the pilot chute (P/C) out over the leg strap, mesh side up, so the edge of the circle is at the mouth of the spandex pouch. S-fold the bridle on half of the P/C. B) Fold the P/C in half over the bridle
 Fold once more in half, making a very skinny triangle. G) Now fold the pilot chute to the length of the pilot chute pouch and tuck the bridle under the rounded corner of the main container flap.")
14 Page: 14 C) Bring the corners up to form a wide triangle. D) Fold the triangle in half, forming a smaller triangle. E) Fold the triangle in thirds forming a skinny triangle. F) Fold once more in half, making a very skinny triangle. G) Now fold the pilot chute to the length of the pilot chute pouch and tuck the bridle under the rounded corner of the main container flap. Then make a 90-degree fold in the bridle.
15 Page: 15 H) Before inserting the P/C into the pouch, pat the bottom of the rig to flattenout the pouch area. Doing so will allow more room to insert the P/C and prevent a difficult extraction. I) Insert the P/C into the pouch until only the handle is exposed. Once again, pat the pouch into a flatter shape which will reduce the amount of force necessary to extract the P/C.! WARNING! The force needed to extract the curved pin must not exceed 12 lbs. Adjust the length of the locking loop accordingly. Never open the main container of a packed Omega and re-close it without removing the P/C from its pouch and extending the entire bridle. Doing so increases the likelihood of re-closing the Omega incorrectly and causing a pilot-chute-in-tow malfunction!
16 Page: 16 Maintenance and Care INTRODUCTION Your Omega will last longer, look better and function correctly if it is maintained. An Omega actually requires very little maintenance unless it is subjected to unusual conditions such as a jump into salt water or a muddy landing. INSPECTION The best approach in maintaining your rig is to periodically spend a few minutes examining every detail on it. This inspection should be done at least every month. If any wear or damage is found, have it fixed immediately. Putting off repairs might result in a malfunction. In addition to inspecting the rig yourself, ask your rigger to inspect the entire assembly every time the reserve is repacked. Particular attention should be given to these areas: 1. Breakaway System. Refer to the 3-ring section in this chapter for detailed information on inspecting the canopy releases. 2. Reserve System. This includes the reserve ripcord, locking loop, pins, handle, housing, container and associated stitching. You should not attempt any repairs or modifications to any of these items unless you are a rigger. You can, however, spot little problems before they become major. 3. Harness. The harness should be inspected periodically for broken stitching or frayed webbing. 4. Main Container. Inspect the plastic stiffeners in the container flaps and replace any that are broken. Replace any grommets that are badly deformed or are pulling out of their setting. 5. Main Pilot Chute. Check the center line (the length of nylon tape inside the pilot chute that extends from the handle to the base) of the main pilot chute. It must be firmly sewn at each end; there should be no broken stitches or torn fabric. Inspect the seam that joins the pilot chute mesh to the pilot chute fabric. If the mesh is torn or badly frayed, replace the pilot chute. 6. Locking Loop. The main container is held shut with a locking loop made of nylon suspension-line sheathing. This loop is subject to wear. If it wears out and breaks, the main canopy may release prematurely and a malfunction may result. Replace the loop with a new one if wear is noticed. CAUTION: Never jump an Omega with a worn locking loop.
17 Page: Velcro Tape has many applications within parachuting. Even though it can eventually wear out, there exist few materials that can compete with Velcro with regard to its flexibility, adaptability and wide variety of possible applications. 8. Hook Velcro often attracts dirt, bits of grass, hair and other debris. Cleaning the hook can be facilitated with the use of a fine-tooth comb. The pile section generally remains clean but the nylon fibers tend to get pulled out of place. When you find that your Velcro is losing its adhesive qualities, it should be replaced. Although the Performance Variable strives to find better alternatives to Velcro, there still remain some areas on the Omega where nothing else will do, namely the Velcro for the breakaway handles, ripcord pockets, steering toggles and reserve static line lanyards. Care Your Omega is manufactured mostly from nylon. Nylon is very durable but is susceptible to damage from several sources: 1. Sunlight. The ultraviolet rays in sunlight quickly and permanently weaken nylon. Keep your Omega out of direct sunlight as much as possible. 2. Acids. Nylon is also damaged by acids. Keep your Omega away from hangar floors, dirty car trunks and similar areas where acids may be found. If such contamination does occur, immediately and thoroughly wash the rig with plenty of warm soapy water. Until a rig can be washed, baking soda will quickly neutralize most acids. If acid damage occurs or is suspected, a rigger should thoroughly inspect your Omega. 3. Oil and Grease. Most petroleum compounds do not weaken nylon; they simply stain it. Such stains should be promptly removed by a rigger using the proper petroleum solvent. 4. Water. Water will not structurally damage your Omega, but prolonged agitation in clear water weakens webbing or may cause some fabric and tape colors to run. Salt water may damage nylon and rust hardware if not promptly and thoroughly washed off with plenty of fresh water. Your rig will maintain its new appearance longer if it is kept dry.
18 Page: Soil. Soil may damage your Omega. Brush off the soil after it has dried and gently wash with warm soapy water. Be sure that the soil is not in the housings, snaps, 3-ring releases or reserve ripcord pins or loops. Consult a rigger if your rig is heavily soiled or extremely dirty. 6. Sand. Fine sand will weaken and abrade webbing and fabrics of all kinds. Prolonged exposure to sand will shorten the life of the entire parachute assem bly. 7. Abrasion. Nylon quickly frays if dragged over concrete or other rough surfaces. Do not drag your rig on the concrete while packing. 8. High Temperatures. Cumulative prolonged exposure to high temperatures (as in the trunk of a car) may weaken nylon. FAA regulations require that reserves worn in the USA be inspected every 120 days by a certified rigger. REQUIRED PERIODIC MAINTENANCE FOR THE 3-RING The 3-ring release system has been in use for many years with excellent results. Although the system is as durable as the rest of the rig, it requires periodic maintenance and inspection to ensure proper operation. Generally, it is NOT recommended that the risers be attached to the harness when new and forgotten. Like all skydiving gear, the 3-ring release should be carefully inspected and operated on a regular basis. The procedures below should be done at least every month. This is especially important if the rig has not been used for a month or more, such as during the winter. Immediate inspection is required if it has been subjected to some abuse such as a drag across the runway, a water landing or exposure to a lot of dust or sand. It s important to maintain the system even more frequently in humid, muddy or freezing conditions. If the Omega becomes immersed in mud or muddy water, clean the 3-ring release system with a mild solution of soap and water. Any rusted components must be replaced. 1. Every month operate the 3-ring release system on the ground. Extract the cable completely from the housings and disconnect the risers. 2. While the system is disassembled, closely inspect it for wear, Check the white locking loops (the ones that pass over the smallest ring and through the grommet) to be sure they are not frayed.
19 Page: Check the Velcro on the breakaway handle and main lift web to be sure it is clean and adequately holds the handle. 4. Check the cable ends for a smooth finish. The ends are finished at the factory to have a smooth, tapered surface. This prevents the cable from hanging up in the loop. Check the cable ends and consult a rigger or the manufacturer if a burr or hook is present. 5. Check the stitching, including that which holds the large rings to the harness. 6. Check the 3-ring release housings for solid hand-tacking and proper stretch. The housing ends lay at the chest strap area pull downward on these housing ends and check that they do not move downwards more than 1/2 inch. Pull the housings from the free end and expect 1-2 inches of movement. 7. Take each riser and vigorously twist and flex the webbing near where it passes through each ring. The idea is to remove any set or deformation in the webbing. Do the same thing to the white loop. 8. Check the housings for dents or other obstructions. Use the cable to do this. 9. Clean and lubricate the release cable with a light oil such as 3-in-1 brand or silicon. Put a few drops on a paper towel and firmly wipe the cable a few times. A thin, invisible film should remain too much will attract grit and dirt, or the oil could become tacky in cold weather. Too much oil will require more force to extract the cable during a breakaway. 10. Inspect the fittings at the end of each housing. If one of these fittings were to come off the housing, a riser might release prematurely. 11. If any wear is found, consult Performance Variable or a rigger before using the Omega. 12. Reassemble the system. Double check it. Make sure the risers aren t reversed. REPLACEMENT PARTS Performance Variable supplies replacement parts for its rigs at a reasonable cost. When ordering parts for your rig, include the serial number, type and date of manufacture of your Omega so the proper items can be quickly supplied.
20 Page: 20 Pre-jump Equipment Check The equipment check should follow a logical order like top to bottom, front to back. Starting at the front: 1. Make sure the 3-ring system is assembled properly and free of dirt or other foreign matter. 2. Check the position of the breakaway and reserve ripcord handles. Don t remove them from their pockets unless you suspect a problem, because the Velcro will wear out quickly. Insure the chest strap is not threaded through the reserve ripcord handle. 3. Check the leg straps to be sure they are threaded properly (if you step into the harness), or if they are unthreaded, make sure they are not wrapped around the main lift web but hang straight (if you choose to thread them up every jump.) 4. Open the reserve container pin protector flap by grasping the sides of the flap, and pulling straight up. Do not grasp the bottom edge of the flap. This will cause the end of the flap to curl up, becoming permanently deformed and more easily snagged. Upon checking the pin, it should be straight and seated well into the locking loop with the end of the pin covered by the pin protection pocket. Note: When asking for a pin check by another jumper, brief them on the proper procedure. 5. Slide the reserve ripcord cable back and forth in its housing to be sure it moves freely. 6. Lift the main container pin-protector flap and check the curved locking pin. It must be at least halfway through the locking loop. 7. Be sure the bridle is routed correctly from the locking pin, under the right -hand flap and into the pilot chute pouch. Routing the bridle around the leg strap will cause a pilotchute-in-tow malfunction. 8. Check the 3-ring release (breakaway) handle. It should be mated to the Velcro on the harness properly. No more than 1/2 inch of yellow cable should be visible between the breakaway handle and the cable housings. 9. Calibrate and arm the AAD (if installed) according to the instructions provided by its manufacturer.

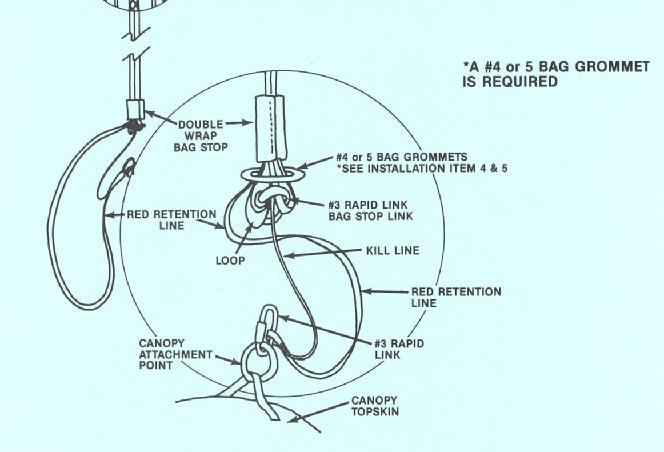
21 Page: 21 Packing Instructions for Ram-air Reserves Because of the wide variety of ram-air reserve canopies available today, this manual does not contain instructions on inspecting, assembling and flaking. For these steps, the rigger must follow instructions provided by the canopy manufacturer. Inspection Thoroughly inspect the ripcord, pilot chute, bridle, deployment bag, canopy, lines, links, risers, harness, container and locking loops. Setting the Brakes A) Open the Velcro cover on the riser. Use the toggle to pull the right-hand steering line down until the brake loop just passes through the guide ring. B) Insert the tapered end of the toggle all the way into the loop. Pull on the steering line above the guide ring to seat the toggle against the ring. C) Fold the bight of the line between the toggle and the loop in 3-inch folds and lay it neatly next to the toggle. D) Carefully close the Velcro cover to encase the stowed toggle and folded line. Be sure none of the steering line is caught between the layers of Velcro. Repeat the process for the left-hand toggle. A/B) C) D)


22 Page: 22 # 1 After the canopy is stacked on itself, unfold the top portion into two sections or small EARS. Dress each EAR neatly. If you use a molar strap during this section of packing do not forget to remove it after the canopy is placed into the free-bag. # 2 Carefully slide the bag over the canopy, pushing each EAR into the top corners of the free-bag filling the corners evenly and leaving a tapered shape. # 3 Make sure, that there is no excessive canopy material left. # 4 Lock the bag closed with two bights of suspension line. A shock cord Safety Stow is used (running loops).


23 Page: 23 # 5 Stow the remainder of the suspension lines into the pouch on the underside of the bag using S-folds that extend from one side of the pouch to the other. Be sure none of the lines are trapped between the Velcro at the mouth of the pouch. Remove the two Velcro protecting strips from the bag. # 6 Position the reserve risers in the reserve pack tray. Fan the links rather than stacking them on each other, placing the rear links to the outside. Be sure to place the reserve risers far enough in the pack tray so they will lie flat over the shoulders. Make sure that the two stowed brake line bundles on the rear risers face towards the bottom of the container. Pass the other pullup cord through the reserve locking loop. If a pull-up cord was passed through the bag, untie it and tie the end protruding from the... # 7..underside of the bag around both ends of the pull-up cord that was passed through the locking loop. Carefully pull on the other end to pull the locking loop through the packed canopy. Untie the other pull-up cord and set it aside. Place the bagged canopy in the pack tray taking extra care to fill the lower corners. Then use the pull-up cord to pull the... # 8..locking loop through the bagged canopy. Secure it with a temporary locking pin. Now thread the pull-up cord through the grommet on the lower #1 bottom kicker-flap. Pull the locking loop through and secure it with the temporary locking pin the same one you used before! Bottom kicker-flap #1 also contains the Cypres cutter.
 on top of the")


24 Page: 24 # 9 Tuck all excessive free-bag material under. # 10 S-fold one third of the bridle (5-6 small folds) on top of the free-bag (underneath top flap #2). # 11 Now close top flap #2 and secure it with the temporary locking pin (TLP) you used on bottom kicker flap #1. # 12 Pack one third of the remaining bridle (approx. 3 feet) by making long S-folds in the bridle from top of the bag to the bottom right hand corner as shown. Repeat the process on the left side with the remaining third of the bridle making the S-folds from top of the bag to the left-hand corner of the container shaping a big V.


25 Page: 25 # 13 Make sure the pilot chute is centered over the loop, then compress it straight down and lock it with the TLP. Pull all the fabric out, away from the spring. Folding the fabric, rather than stuffing it between the coils,increases the P/C launch performance and reduces the bulk of the packed container. After pulling the fabric away from the spring, check to make sure the P/C base is centered under the crown. # 14 Lay the fabric flat all around the P/C and fold it under in wide folds to the center. Fold the top and bottom first, then the sides. Keep the fabric folds out from under the open flaps. Now close the bottom #3 flap and secure it with the TLP you used before. # 15 Close the right top flap #4 and secure it with the TLP you used on bottom flap #3. Make sure that the folds in the P/C stay flat and neat. # 16 Close the left top flap #5 and secure it with the TLP you used on top flap #4. Make sure that the folds in the P/C stay flat and neat.


26 Page: 26 # 17 Thread the pull-up cord through the reserve top flap #6 and insert the TLP you used on flap #5. Make sure, that the reserve static line is connected with the reserve cable. Now replace the TLP with the reserve closing pin. Slowly remove the pull-up cord. # 18 Insert the ripcord handle into its pouch on the main lift web. - Dress the container, seal, sign and log the reserve. - Close the reserve pin protector flap. - Count your tools! CAUTION: Use a scale to determine how much force is needed to extract the reserve closing pin 8 to 12 lbs. is correct. State-of-the-art Design by Performance Variable
27 Page: 27 Assembling and Packing the Main Parachute The Omega is compatible with almost every parachute in common use today. The Omega is available with a variety of main container sizes. Consult PV or a PV dealer to assure the volume of your main canopy size is compatible with your Omega. Oversized or undersized canopy volumes may cause a pilot-chute-in-tow or premature opening of the main container. This manual does not provide specific instructions for folding all of the various main canopies on the market that information must be obtained from the owner s manual for each canopy. Since only a handful of round canopies are in use today by sport parachutists, these instructions were written for ram-air canopies. A jumper should check with a rigger for guidance on packing a round main canopy into an Omega. Carefully inspect the main parachute for wear or manufacturing defects. Attach the main parachute to the main risers included with the Omega. Be sure the canopy is facing forward and that the lines extend from links to canopy without crossing over each other. Leaving the risers on the harness while attaching the canopy will help prevent confusion. If the canopy uses Rapid Links, make sure the barrel nuts completely cover the threads. After hand tightening, turn the barrel 1/4 turn with the proper sized wrench.! Warning! Slider bumpers must be properly installed to insure that they do not interfere with proper slider functioning and deployment of the canopy. Follow the canopy manufacturer s instructions for the correct procedures for installing and securing slider bumpers.


28 Page: 28 Main Container Packing Instructions # 1 Fold and pack your main canopy according to the canopy manufacturer s instructions. Be sure the canopy is folded as wide as possible so that it will fill the corners. # 2 Pick the bag up by it sides and set it into the container on its line stows. Now roll the bag down into the container with its line stows against the bottom of the container. # 3 Push the bag s top corners into the top of the container, so that the connector links are kept in place between the bag and the container s sides. Be sure that there are no flaps under the bag. Pull the bridle to its full length.


29 Page: 29 # 4 Thread a pull-up cord through the closing loop on the bottom flap and thread the pull-up cord through the grommet on the #2 top flap. # 5 Now thread the pull-up cord through the grommet on the #3 flap on the right... # 6 and thread the pull-up cord through the #4 flap on the left.


30 Page: 30 # 7 Insert the bridle s curved pin through the locking loop from right to left. NOTE: Correct bridle routing is critical if your Omega is to function properly. Remove the pull-up cord slowly. # 8 Place the bridle under the #3 flap on the right. Fold the pilot chute and insert it into the BOC pouch (see pages 4 6). Make sure that there is no excessive bridle visible between the BOC pouch and the #3 flap. # 9 Make sure that your main risers are exactly placed on top of the lower closing flap of the reserve container. Check again that there are no main risers in direct contact with the reserve risers! # 10 And here it is a correctly rigged Omega.
31 Page: 31 Thanks again for choosing our product! Performance Variable e.k. Am Tower 16 D Bitburg Ph/:
4.2 Assembly Instructions
 4.2 Assembly Instructions 4.2.1 Assembly of Reserve Canopy. Assembly of Reserve Canopy using Rapide Links. After inspecting the Parachute and the Wings Harness/Container System, hang or lay the parachute
Section 4.0 Rigger Information
 Section 4.0 Rigger Information page 28 Parachute Assembly Inspection Form! Note: Count all Tools Before Starting Assembly Qty: A Harness and Container manufacturer: model: date of manufacture: serial no:
ZEROX OWNERS MANUAL INDEX
 INDEX PAGE # DESCRIPTION 1 INDEX 2 INTRODUCTION AND FACTS ABOUT THOMAS SPORTS EQUIPMENT. 3 DESCRIPTION OF THE MAIN CONTAINER FUNCTIONS. DESCRIPTION OF THE THROW AWAY MAIN PILOT CHUTE. DESCRIPTION OF THE
ZEROX & PANTHERA OWNERS MANUAL
 Thomas Defence Systems Ltd Pinfold Lane Bridlington East Yorkshire Great Britain YO16 6XS Tel: +44 01262 678299 Fax: +44 01262 602063 www.thomas-sports.com enquires@thomas-sports.com 1 INDEX PAGE # DESCRIPTION
Butler Personnel Parachute Systems, LLC
 Butler Personnel Parachute Systems, LLC 1820 Loudon Avenue NW PO Box 6098 Roanoke, VA 24017-0098 (540) 342-2501 (540) 342-4037 (FAX) Info@butlerparachutes.com Butler Personnel Parachute Systems Back Pack
AVALON Pop Top. AVALON PopTop. HARNESS CONTAINER PACKING MANUAL Student harness
 AVALON PopTop HARNESS CONTAINER PACKING MANUAL Student harness Advanced Parachute Systems Ltd. Bulgaria, 3431 Erden, Airport Erden email: info@avalonskydive.bg Page 1/38 After big success of AVALON Sport
General Canopy Folding and Packing Instructions for H-X Series Personnel Parachute Canopies. Manufactured by Butler Parachute Systems, Inc.
 General Canopy Folding and Packing Instructions for H-X Series Personnel Parachute Canopies Manufactured by Butler Parachute Systems, Inc. Issued 24 July 1998 This set of instructions is for the routine
TEAR DROP 1 PIN SF & VIPER OWNERS MANUAL
 Thomas Defence Systems Ltd Pinfold Lane Bridlington East Yorkshire Great Britain YO16 6XS Tel: +44 01262678299 Fax: +44 01262 602063 www.thomas-sports.com enquires@thomas-sports.com Thomas Defence Systems
Click here for update to manual
 Click here for update to manual Click here for update to manual 1 SERIAL # CONTAINER SIZE YOKE HARNESS LATERAL LEGPAD P.O. # Sun Path Products, Inc. 4439 Skydive Lane Zephyrhills, Fl 33540 USA www.sunpath.com
We re dedicated to making the industries best harness/container. EVERYTIME!
 Thanks for choosing Sun Path Products, Inc. Home of the We re dedicated to making the industries best harness/container. EVERYTIME! 4439 Skydive Lane Zephyrhills, Fl 33540 USA REVISON: 01 - ISSUE: 01 4439
PACKING INSTRUCTIONS for the Strong Enterprises. Military Tandem Tether Bundle MTTB. Canopy Part No
 PACKING INSTRUCTIONS for the Strong Enterprises Military Tandem Tether Bundle MTTB Canopy Part No. 420709 Manual No. 510055 REV: B May 2004 Parachuting is a hazardous activity that can result in serious
Wings Reserve Packing/ Container Closing Sequence
 Wings Reserve Packing/ Container Closing Sequence Follow reserve parachute manufacturers instructions for flaking and packing of the canopy. If possible, Wings recommends Pro-packing the reserve for optimal
FS-14R Parachute Packing Instructions
 United States Department of Agriculture Forest Service Technology & Development Program 5700 Aviation June 2008 0857 2835P MTDC FS-14R Parachute Packing Instructions FS-14R Parachute Packing Instructions
Butler Personnel Parachutes
 Butler Personnel Parachutes Chest Pack Emergency Parachute System Assembly and Packing Instructions Use this manual with: General Folding and Packing Instructions for the HX & Lopo Series Canopies General
Emergency Parachute Manual
 National Parachute Industries, Inc. PO Box 245 - Palenville, NY 12463 - USA PH 908-782-1646 FAX 908-782-5638 E-mail info@nationalparachute.com Emergency Parachute Manual Seat Supplement National 360-S,
Click here for update to manual
 Click here for update to manual Click here for update to manual WARNING Parachuting is a hazardous activity that can result in serious injury or death. Failure to follow all warnings, instructions and
PACKING INSTRUCTIONS. for the Strong Enterprises. Military Tandem Tether Bundle MTTB. Canopy. Part No Manual No REV: A May 2001
 PACKING INSTRUCTIONS for the Strong Enterprises Military Tandem Tether Bundle MTTB Canopy Part No. 420709 Manual No. 510055 REV: A May 2001 STRONG ENTERPRISES 11236 SATELLITE BLVD. ORLANDO, FL 32837 Tel
Butler Tactical Parachute Systems, LLC
 Butler Tactical Parachute Systems, LLC A division of Butler Parachute Systems Group, Inc. TT-600 TETHERED TANDEM BUNDLE DELIVERY SYSTEM ASSEMBLY MANUAL (Revision A) Page 1 of 40 INTRODUCTION This manual
USER MANUAL PRESERVE I : Model FFE 201 (- D) PRESERVE III : Model GE 21 (- B)
 PRESERVE III : Model GE 21 (- B)") USER MANUAL PRESERVE I : Model FFE 201 (- D) PRESERVE III : Model GE 21 (- B) P.O. Box 1548 Wildomar, CA 92595 (951) 245-1734 www.freeflightent.com [Blank Page] TABLE OF CONTENTS Contents Inspect the Canopy
USER MANUAL PRESERVE I : Model FFE 201 (- D) PRESERVE III : Model GE 21 (- B) P.O. Box 1548 Wildomar, CA 92595 (951) 245-1734 www.freeflightent.com [Blank Page] TABLE OF CONTENTS Contents Inspect the Canopy
Butler Tactical Parachute Systems, LLC TT-600 TETHERED TANDEM BUNDLE DELIVERY SYSTEM. ASSEMBLY MANUAL (Revision D) 18 FEB 2009
 18 FEB 2009") Butler Tactical Parachute Systems, LLC A division of Butler Parachute Systems Group, Inc. TT-600 TETHERED TANDEM BUNDLE DELIVERY SYSTEM ASSEMBLY MANUAL (Revision D) 18 FEB 2009 Page 1 of 42 INTRODUCTION
Butler Tactical Parachute Systems, LLC A division of Butler Parachute Systems Group, Inc. TT-600 TETHERED TANDEM BUNDLE DELIVERY SYSTEM ASSEMBLY MANUAL (Revision D) 18 FEB 2009 Page 1 of 42 INTRODUCTION
AERODYNE RESEARCH CORPORATION RACE TRACK ROAD, TAMPA, FLORIDA, 33626, USA PHONE (813) FAX
 FAX") RESERVE PACKING MANUAL Manual TM159 Edition 02-2004 P1482-00 Smart 99 P1482-10 Smart 110 P1482-20 Smart 120 P1482-30 Smart 135 P1482-40 Smart 150 P1482-50 Smart 160 P1482-60 Smart 175 P1482-70 Smart 190
RESERVE PACKING MANUAL Manual TM159 Edition 02-2004 P1482-00 Smart 99 P1482-10 Smart 110 P1482-20 Smart 120 P1482-30 Smart 135 P1482-40 Smart 150 P1482-50 Smart 160 P1482-60 Smart 175 P1482-70 Smart 190
Butler Parachute Systems, Inc.
 Butler Parachute Systems, Inc. 1820 Loudon Avenue NW PO Box 6098 Roanoke, Virginia 24017-0098 540-342-2501 540-342-4037 (FAX) info@butlerparachutes.com General Canopy Folding & Packing Instructions for
PD Series Ram-Air Reserve Parachute Owner s Manual Addendum. PRO Packing Instructions
 PD Series Ram-Air Reserve Parachute Owner s Manual Addendum PRO Packing Instructions This document is a supplement to the PD Series Ram-Air Reserve Parachute Owner s Manual, Third Edition. It contains
Addendum Packing the Patronus Reserve into the DHT Container
 Addendum Packing the Patronus Reserve into the DHT Container P/N: 510451 Rev. A 1/16 A-2 1.0 Preparing the Freebag 1.0.1 Place bungee loops through grommets on freebag sub flap. Then place four rubber
WARNING: SKYDIVING CAN KILL YOU!
 WARNING: SKYDIVING CAN KILL YOU! Parachuting equipment does not always work the way it is intended to, and this piece of equipment could be no exception. Each time you use this parachute system, no matter
Table of Contents. [ Home ][ Products ][ Catapult System ][ Owner's Manual ][ Rigger Information ] [ Authorized Dealers ][ Corporate Information ]
![Table of Contents. [ Home ][ Products ][ Catapult System ][ Owner's Manual ][ Rigger Information ] [ Authorized Dealers ][ Corporate Information ]](/thumbs/76/73609944.jpg "Table of Contents. [ Home ][ Products ][ Catapult System ][ Owner's Manual ][ Rigger Information ] [ Authorized Dealers ][ Corporate Information ]") Owner's Manual Table of Contents Table of Contents Disclaimer 1. Introduction 2. Assemble and Pack Main 3. User Information 4. Deployment 5. Rigger Information 6. Reserve Packing Instructions 7. Cypres
Owner's Manual Table of Contents Table of Contents Disclaimer 1. Introduction 2. Assemble and Pack Main 3. User Information 4. Deployment 5. Rigger Information 6. Reserve Packing Instructions 7. Cypres
Table of Contents. Personnel parachutes and their components must be examined and approved!
 1 MANUAL Performance Variable, Saarlouis-Düren Airport D-66798 Wallerfangen-Düren, Germany Ph: 06837-91707 - Fax: 06837-91708 email: performancevariable@t-online.de web site: www.performance-variable.com
Owners Manual. Skylark tm Student Canopy WARNING
 Owners Manual Skylark tm Student Canopy WARNING THE USER ASSUMES ALL RISK!!! PARACHUTE SYSTEMS SOMETIMES FAIL CAUSING DEATH OR SERIOUS INJURY REGARDLESS OF HOW IT IS MAINTAINED, PACKED, DEPLOYED OR OPERATED.
USER MANUAL CONTENTS. Please read this carefully before doing anything with your new container system
 CONTENTS USER MANUAL CONGRATULATIONS ON YOUR PURCHASE OF A SQUIRREL CRUX 3R ( PRODUCT ). BY PURCHASING THIS PRODUCT, YOU ACKNOWLEDGE THAT ENGAGING IN SKYDIVING, BASE JUMPING, PARACHUTING, AND WINGSUITING
Happy Reserve System. PILOT'S MANUAL Thank you for taking the time to read this booklet. Happy 1
 Happy Reserve System PILOT'S MANUAL Thank you for taking the time to read this booklet. Happy 1 CONTENTS 1. Introduction 2. Pre flight 3. Care and maintenance 4. Storage 5. Drying and airing 6. Cleaning
VECTOR 3 M A N U A L
 i CONTENTS WARNING DISCLAIMER NO WARRANTY A WORD FROM THE OWNER CONVENTIONS USED IN THIS MANUAL CONTACT INFORMATION MANUAL REVISION HISTORY v v vi vii vii viii SECTION 1 1 INTRODUCTION 2 THE HISTORY BEHIND
Page 2: /26/2003. Rev 0
 Page 2:88 V E C T O R O W N E R S M A N U A L CONTENTS AT A GLANCE CONTENTS 3 WARRANTY AND DISCLAIMER 4 LETTER FROM THE PRESIDENT 5 CONVENTIONS USED 6 SECTION 1 7 INTRODUCTION SECTION 2 15 RESERVE ASSEMBLY
We urge you and your rigger to carefully inspect your new canopy and completely familiarize yourself with the Horizon s features and functionality.
 PACKING MANUAL About This Manual Congratulations on the purchase of your new Horizon canopy by Performance Designs! We are confident that you will be pleased with it in every way. The Horizon has been
PACKING & USER INSTRUCTIONS
 PACKING & USER INSTRUCTIONS PRESERVE V MODEL FFE-H2090(-) P.O. BOX 1419, LAKE ELSINORE, CA 92531 951-245-1734 http://www.freeflightent.com !! DISCLAIMER - NO WARRANTY!! BECAUSE OF THE UNAVOIDABLE DANGER
Issue: December 2016 / Update # 1: January 2018 OPERATING MANUAL. CutAway
 OPERATING MANUAL CutAway Dear Customers, Thank you for choosing AVA Sport equipment! The CutAway is the harness that raises whole new standards safety in paragliding. regarding "3 is always better than
OPERATING MANUAL Series
 OPERATING MANUAL 2015 Series Dear Customers, Thank you for choosing AVA Sport equipment! The Acro Base is the harness that raises whole new standards regarding safety in paragliding. Integrating the usual
Special Operations Vector By Relative Workshop
 Special Operations Vector By Relative Workshop M I L I T A R Y V E C T O R O W N E R S M A N U A L CONTENTS AT A GLANCE SECTION 1: INTRODUCTION CONTENTS 2 WARRANTY AND DISCLAIMER 3 INTRODUCTION 4 SECTION
DOWN MANUAL. Aeros Ltd. St. Post-Volinskaya, 5 Kiev, UKRAINE
 DOWN HG & PG rescue parachute system MANUAL Aeros Ltd. St. Post-Volinskaya, 5 Kiev, 03061 UKRAINE Tel. +(380 44) 455 41 20 Fax. +(380 44) 455 41 16 E-mail: aerosint@aerosint.kiev.ua http://www.aeros.com.ua
User s Manual Trampoline 8
 User s Manual Trampoline 8 Model! WARNING Read all precautions and instructions in this manual before using this equipment. Save this manual for future reference. Maximum user weight 17 lbs. ASSEMBLY IMPORTANT
USER MANUAL CONTENTS. Please read this carefully before doing anything with your new container system
 USER MANUAL CONGRATULATIONS ON YOUR PURCHASE OF A SQUIRREL CRUX ( PRODUCT ). BY PURCHASING THIS PRODUCT, YOU ACKNOWLEDGE THAT ENGAGING IN SKY-DIVING, BASE JUMPING, PARACHUTING, AND WINGSUITING IS AN INHERENTLY
TANDEM 425 AND 525 MAIN AND RESERVE OWNER'S MANUAL
 4357 D Park Drive Norcross, Ga. 30093 USA Phone (770)-279-7733 FAX (770)-279-7729 E-MAIL fci@fcint.com TANDEM 425 AND 525 MAIN AND RESERVE OWNER'S MANUAL AUG 2006 1. TRAINING AND/OR EXPERIENCE ARE REQUIRED
Military Javelin (MJ) Technical Manual, Revision 11.1
 Technical Manual, Revision 11.1") Military Javelin (MJ) Technical Manual, Revision 11.1 1320 E. International Speedway Blvd. Suite 1 DeLand, Florida 32724 USA Tel: (+1) 386-736-3862 Fax: (+1) 386-736-3899 www.cpsworld.com technicalsupport@cpsworld.com
Military Javelin (MJ) Technical Manual, Revision 11.1 1320 E. International Speedway Blvd. Suite 1 DeLand, Florida 32724 USA Tel: (+1) 386-736-3862 Fax: (+1) 386-736-3899 www.cpsworld.com technicalsupport@cpsworld.com
FEATURES & BENEFITS OF THE TOW PRO LITE :
 To Protect & Preserve PRODUCT MANUAL & FITTING GUIDE tow pro lite TYPE: SEMI - FIT EACH TOW PRO LITE COMES WITH THE FOLLOWING : 16 side securing straps & buckles (8 either side) 1 HITCH STRAP & buckles
Quantum Series Hang glider Parachute Manual
 Quantum Series Hang glider Parachute Manual High Energy Sports Inc. 1081 Shepard Unit A Anaheim, CA 92806 Phone: (714) 632-3323 FAX: (714) 632-6622 www.highenergysports.com rev. 8-04 Warrantees Disclaimer
Table of Contents. Warning / Disclaimer. Table of Contents
 Table of Contents Warning / Disclaimer Table of Contents Strong Enterprises Service Manual. SET-10 1 1.0 Introduction... 2 1.1 Scope... 2 1.2 Equipment Name... 2 1.3 Purpose of equipment... 2 1.4 Capabilities
OWNER'S MANUAL AND PACKING INSTRUCTIONS
 RIGGING INNOVATIONS, INC. GENERA OWNER'S MANUAL AND PACKING INSTRUCTIONS $8.00 RI - 1311 - (2) Revision 1.0 page i WARNING! 1. Training and/or experience are required to lower the risk of serious bodily
v /2017 G-LITE Rescue Parachute Manual Please read this manual prior to installing the GIN rescue parachute into your harness
 v.1.0 07/2017 EN G-LITE Rescue Parachute Manual Please read this manual prior to installing the GIN rescue parachute into your harness Thank You 2 Thank for choosing Gin Gliders. We are confident you ll
Morpheus Technologies Owner s Manual Owner s Manual. Morpheus Technologies
 Owner s Manual Owner s Manual Page 1 Owner s Manual!! BASE jumping is extremely dangerous! You may be seriously injured or killed. and all of its affiliates advise you to seriously consider the potential
IC Main Canopy Manual June 2017 v.2. ICARUS Main canopy manual - June 2017 v.2
 IC Main Canopy Manual June 2017 v.2 Dear Customer Welcome to the ICARUS WORLD We would like to thank you for trusting ICARUS and its products. By purchasing an ICARUS canopy, you have made a choice for
NEXGEN ICON PACKING MANUAL ADDENDUM RESERVE CONTAINER CLOSING SEQUENCE INSTRUCTION
 NEXGEN ICON PACKING MANUAL ADDENDUM RESERVE CONTAINER CLOSING SEQUENCE INSTRUCTION JULY 2013 NEXGEN ICON HARNESS/CONTAINER PACKING MANUAL Addendum July 2013 ICON PRO, STUDENT & ACCURACY CONTAINER & HARNESS
Morpheus Technologies Owner s Manual
 Owner s Manual Owner s Manual 5107 Lantana Street Zephyrhills, FL 33542 Tel: (813) 780-8961 Fax: (813) 788-7072 Email: info@baserigs.com Page 1 Owner s Manual!! BASE jumping is extremely dangerous! You
OWNER'S MANUAL AND PACKING INSTRUCTIONS
 OWNER'S MANUAL AND PACKING INSTRUCTIONS :$51,1* 1. Training and/or experience are required to lower the risk of serious bodily injury or death. NEVER use this equipment unless you have: A. Read the warning
Contents. Introduction 3 Description 4 Deploying 6 Packing 8 Mounting 12 Maintenance 13 Inspection 14 Guarantee 15 Closing 16
 1 Contents Introduction 3 Description 4 Deploying 6 Packing 8 Mounting 12 Maintenance 13 Inspection 14 Guarantee 15 Closing 16 2 Paragliders with Personality OOPS Owner s Manual Reserve Parachute Introduction
USER'S MANUAL FOR THE PACKING AND USE
 User's manual for the packing and use Pilot emergency back parachute system PTCH-P50 Page: 1 USER'S MANUAL FOR THE PACKING AND USE PILOT EMERGENCY BACK PARACHUTE SYSTEM PTCH-P50 Issue No.: 2 Date of issue
PEAK 1 GENERAL INFORMATION 1.1 THE CONCEPT 1.2 SAFETY 1.3 THE SPEED SYSTEM 2 THE EMERGENCY PARACHUTE 2.1 EMERGENCY PARACHUTE ASSEMBLY
 PEAK 1 GENERAL INFORMATION 1.1 THE CONCEPT 1.2 SAFETY 1.3 THE SPEED SYSTEM 2 THE EMERGENCY PARACHUTE 2.1 EMERGENCY PARACHUTE ASSEMBLY 3 ADJUSTING YOUR PEAK 3.1 ADJUSTING THE SITTING POSITION 3.2 ADJUSTING
Table of Contents. Strong Enterprises Service Manual. SET-10R
 Table of Contents Strong Enterprises Service Manual. SET-10R 1 1. Introduction... 2 1.1 Scope... 2 1.2 FAA Approval... 2 1.3 Operational Limitations... 2 1.4 Parachute Repack Interval... 2 1.5 Model Description...
HARNESS/CONTAINER OWNERS MANUAL TM162: Revision May 2017
 HARNESS/CONTAINER OWNERS MANUAL TM162: Revision May 2017 AERODYNE Research LLC. 1407 Flightline Blvd. Unit 14, Deland, FL 32724 One Source for All Your Skydiving Needs ICON HARNESS/CONTAINER PACKING MANUAL
Contents. Introduction Technical description Adjusting your Goya The alternative methods of emergency parachute connection ...
 GOYA Contents Introduction... 3 Technical description... 3 Adjusting your Goya... 4 The alternative methods of emergency parachute connection... 6 Speed systém... 10 Towing... 10 Tandem flying... 10 Harness
TABLE OF CONTENTS WARNING... 2 DISCLAIMER... 4 SERIAL NUMBER AND DATE OF MANUFACTURE RECORD Section 1 - General Information...
 TABLE OF CONTENTS WARNING... 2 DISCLAIMER... 4 SERIAL NUMBER AND DATE OF MANUFACTURE RECORD... 5 Section 1 - General Information... 7 1.1 VOODOO TSO 1.2 Certification rigger qualifications 1.3 Am I qualified
OPERATOR INSTRUCTION MANUAL INCLUDING REPAIR PARTS FOR MODULAR GENERAL PURPOSE TENT SYSTEM (MGPTS) TYPE I
 TYPE I") OPERATOR INSTRUCTION MANUAL INCLUDING REPAIR PARTS FOR MODULAR GENERAL PURPOSE TENT SYSTEM (MGPTS) TYPE I Johnson Outdoors Gear, Inc. Eureka! branded tent products 625 Conklin Road Binghamton, NY 13903
OPERATOR INSTRUCTION MANUAL INCLUDING REPAIR PARTS FOR MODULAR GENERAL PURPOSE TENT SYSTEM (MGPTS) TYPE I Johnson Outdoors Gear, Inc. Eureka! branded tent products 625 Conklin Road Binghamton, NY 13903
Performance Designs, Inc.
 Performance Designs, Inc. POWERED PARACHUTE CANOPY USER/OWNER MANUAL Performance Designs, Inc. 1300 International Speedway Blvd DeLand, Florida USA 32724 (386) 738-2224 Fax: (386) 734-8297 MAN-0022 rev
U S A S O C S T A T I C L I N E J U M P M A S T E R C O U R S E N O M E N C L A T U R E S T U D Y G U I D E
 U S A S O C S T A T I C L I N E J U M P M A S T E R C O U R S E N O M E N C L A T U R E S T U D Y G U I D E 1 ST BATTALION 1 ST SPECIAL FORCES GROUP (AIRBORNE) THE SKY MORE THAN THE SEA, IS TERRIBLY UNFORGIVING
VACATION'R A ROOM FOR VERTICAL ARM AWNINGS
 VACATION'R A ROOM FOR VERTICAL ARM AWNINGS RV Made of durable, lightweight polyester material - the same material used for tents. Does not require hardware that is attached to the RV. No rafters to install.
MANUAL. Contrail. Razor Sharp Stellar Flight
 MANUAL Contrail Razor Sharp Stellar Flight Performance Variable, Saarlouis-Düren Airport D-66798 Wallerfangen-Düren, Germany Ph: (49) 6837-91707 - Fax: (49) 6837-91708 email: performancevariable@t-online.de
Assembly Instructions & User s Manual Grand Ponderosa 10P Cabin Tent
 Assembly Instructions & User s Manual Grand Ponderosa 10P Cabin Tent FSMGCT2010 Please keep this instruction manual for future reference Customer Service: (888) 922-2336 7:00 am to 12:00 am CST (daily)
Installation and User s Manual 12 x 10 MOTORIZED AWNING
 12 x 10 MOTORIZED AWNING Installation and User s Manual 12 x 10 MOTORIZED AWNING 088-1763-0 Stop Please read and understand this manual before any assembly or use of this product. Before beginning assembly
PREVENTIVE MAINTENANCE CHECKLIST FOR IMPROVED OUTER TACTICAL VEST (IOTV) AND IMPROVED OUTER TACTICAL VEST GEN II (IOTV GEN II)
 AND IMPROVED OUTER TACTICAL VEST GEN II (IOTV GEN II)") PREVENTIVE MAINTENANCE CHECKLIST FOR TM 10-8470-208-10PMC IMPROVED OUTER TACTICAL VEST (IOTV) AND IMPROVED OUTER TACTICAL VEST GEN II (IOTV GEN II) PART OF THE INTERCEPTOR BODY ARMOR SYSTEM NOTICE To effectively
PREVENTIVE MAINTENANCE CHECKLIST FOR TM 10-8470-208-10PMC IMPROVED OUTER TACTICAL VEST (IOTV) AND IMPROVED OUTER TACTICAL VEST GEN II (IOTV GEN II) PART OF THE INTERCEPTOR BODY ARMOR SYSTEM NOTICE To effectively
Technical Description P Instructions for the packaging and use of the WITTY PLUS Reserve parachute (WP-110, WP-130, WP-150, WP-175, WP-210)
") Instructions No. P 011 96 for the Packing and Use of the WITTY PLUS Reserve Parachute (WP-110, WP-130, WP-150, WP-175, WP-210) Technical Description of the WITTY PLUS Reserve Parachute 11 th edition In
Instructions No. P 011 96 for the Packing and Use of the WITTY PLUS Reserve Parachute (WP-110, WP-130, WP-150, WP-175, WP-210) Technical Description of the WITTY PLUS Reserve Parachute 11 th edition In
V-series reserve manual
 V-series reserve manual Ver 1.2/May 2015. Dear customer, Thank you for purchasing a AIR VUISA quality product. We are a growing family of professionals with the aim of producing high quality products for
AEROS. Rescue System OK. Owners Manual
 AEROS Rescue System OK Owners Manual 2002 Type of Rescue: AEROS OK Size: Serial # : Manufacturing Date: Colors: Dealer: Date of Sale: 1. Introduction. This manual describes OK - rescue system for hang
SOF Harness System SOF HARNESS. Part No.: HA30-OD
 SOF Harness System Part No.: HA30-OD SOF HARNESS The SOF Harness is an adjustable, diagonal-strap pack harness intended for use with military parachuting. It is lightweight, made of nylon webbing, and
Honda Ridgeline Installation Instructions
 Honda Ridgeline Installation Instructions READ THIS... If you read these instructions from beginning to end before starting you will probably not need to look at them again during the installation, but
10 X 20 X 8 Dome Canopy
 10 X 20 X 8 Dome Canopy Warning Keep all flame and heat sources away from this tent fabric. Refer to labels for flamability specification. It is not fire proof. The tent fabric will burn if left in continuous
Emergency Parachute Manual
 National Parachute Industries, Inc. PO Box 245 - Palenville, NY 12463 - USA PH 908-782-1646 FAX 908-782-5638 E-maill info@nationalparachute.com Emergency Parachute Manual NATIONAL 360 / NATIONAL 425 /
OWNERS MANUAL PACKING INSTRUCTIONS PARAGLIDER EMERGENCY SYSTEM B-SAFE 120 L
 1 of 8 OWNERS MANUAL PACKING INSTRUCTIONS PARAGLIDER EMERGENCY SYSTEM B-SAFE 120 L INDEX (1) GENERAL DESCRIPTION (2) FITTING THE SYSTEM TO THE HARNESS - Standard Harnesses - Comfort/Integral Harnesses
S E L E C T I O N. Abdominal Crunch. User manual
 and S E L E C T I O N T H E S T R E N G T H E V O L U T I O N User manual and and The identification plate of the and manufacturer, affixed along side the seat on the frame of the weight stack, gives the
Kontrol Kube Advanced Owners Manual
 Mobile Containment. Simplified. TM Kontrol Kube Advanced Owners Manual KONTROL KUBE www.kontrolkube.com 800.343755 1 IMPORTANT SAFETY INFORMATION SAVE THESE INSTRUCTIONS. CAREFULLY READ AND FOLLOW THESE
Assembly instructions for Eurotramp trampolines Series: Ultimate, Grand Master Exclusiv, Grand Master, Master
 Assembly instructions for Eurotramp trampolines Series: Ultimate, Grand Master Exclusiv, Grand Master, Master 1. Assembly instructions 2. Attaching the plastic coated steel cables on the Ultimate frame
Instructions No. P for the Packing and Use of the WITTY PLUS Emergency Parachute. Technical Description of the WITTY PLUS Emergency Parachute
 Instructions No. P 011 96 for the Packing and Use of the WITTY PLUS Emergency Parachute (WP-110, WP-130, WP-150, WP-175, WP-210, WP-260) Technical Description of the WITTY PLUS Emergency Parachute (WP-110,
Training Container of the STUDENT 01 Parachute Technical Specifications. Instructions for Packing and Use No. P
 Training Container of the STUDENT 01 Parachute Technical Specifications Instructions for Packing and Use No. P 004 01 In Jevíčko 09/2009 6 th Edition 1 Chapter I The STUDENT 01 Parachute Container System
HR-360-R2 HEAVY RESERVE PARACHUTE BY PERFORMANCE DESIGNS, INC.
 HR-360-R2 HEAVY RESERVE PARACHUTE BY PERFORMANCE DESIGNS, INC. 1300 E. International Speedway Blvd. DeLand, FL 32724 TEL: 386.738.2224 www.performancedesigns.com FAX: 386.734.8297 TMAN-002 - FEB 2005 -
ROOFTOP CARGO BAG (FRONT OF VEHICLE) HOOK (x4) ATTACHMENT STRAP (x4)
 HOOK (x4) ATTACHMENT STRAP (x4)") CargoPack, DryTop, SoftTop ROOFTOP CARGO BAG Zipper Flap HOOK (x4) Grab handle ATTACHMENT STRAP (x4) (FRONT OF VEHICLE) Naked roof STRAP (2X) IMPORTANT WARNING IT IS CRITICAL THAT ALL YAKIMA RACKS AND
CargoPack, DryTop, SoftTop ROOFTOP CARGO BAG Zipper Flap HOOK (x4) Grab handle ATTACHMENT STRAP (x4) (FRONT OF VEHICLE) Naked roof STRAP (2X) IMPORTANT WARNING IT IS CRITICAL THAT ALL YAKIMA RACKS AND
FORM (Apr. 2006)
") 2212 Slcier MODEL 2212 SLICER MODEL 2212 ML-136132 701 S. RIDGE AVENUE TROY, OHIO 45374-0001 937 332-3000 www.hobartcorp.com FORM 35215 (Apr. 2006) Installation, Operation, and Care of MODEL 2212 Slicer
2212 Slcier MODEL 2212 SLICER MODEL 2212 ML-136132 701 S. RIDGE AVENUE TROY, OHIO 45374-0001 937 332-3000 www.hobartcorp.com FORM 35215 (Apr. 2006) Installation, Operation, and Care of MODEL 2212 Slicer
Product instruction manual Ream Cutting Systems RE3943, RE3946, RE3947, RE3971, RE3952E
 Product instruction manual Ream Cutting Systems RE3943, RE3946, RE3947, RE3971, RE3952E The Trimfast Ream Cutters are reliable, high performance cutters that will give you the results you need quickly
FS-14 Parachute. Packing Instructions. United States Department of Agriculture. Forest Service. Technology & Development Program
 United States Department of Agriculture Forest Service Technology & Development Program 5700 Aviation June 1998 9857-2817-MTDC Revised June 1998 Packing Instructions FS-14 Parachute Pat Wilson Project
AND LOAD CANOPY RACK SPECIFICATIONS
 8MAY15 INSTRUCTIONS for the LOCK AND LOAD CANOPY RACK SPECIFICATIONS and SAFE LOADING REQUIREMENTS The Lock and Load ladder carrier for Truck Caps is a rack designed to mount to the top of a pickup truck
Instructions No. P for the Packing and Use of the WITTY PLUS Emergency Parachute. Technical Description of the WITTY PLUS Emergency Parachute
 Instructions No. P 011 96 for the Packing and Use of the WITTY PLUS Emergency Parachute (WP-110, WP-130, WP-150, WP-175, WP-210, WP-260) Technical Description of the WITTY PLUS Emergency Parachute (WP-110,
INSTALLATION INSTRUCTIONS
 GENUINE PARTS INSTALLATION INSTRUCTIONS 1. DESCRIPTION: Hatch Tent 2. APPLICATION: See dealer application chart 3. PART NUMBER: 999T7 XR100 and 999T7 XY100 4. KIT CONTENTS: Item Qty Description A 1 Tent
NATIONAL Your One Last Chance
 National Parachute Industries, Inc. 47 East Main Street - Flemington, New Jersey 08822 - USA PH 908-782-1646 FAX 908-782-5638 E-mail info@nationalparachute.com Emergency Parachute Manual NATIONAL 360 /
Dual Identity. Manufactured in our state of the art factory in China
 Dual Identity IMPORTANT We strongly suggest setting up your new tent before going camping to insure that all parts are present and to familiarize yourself with the tents assembly. This will have a great
Step by Step Set Up Guide
 lite Step by Step Set Up Guide 1 lifting lug Secure lifting lugs to a certified lifting sling. Stand and stabilize escape system under work platform. Position module with round lunette ring facing work
Spekon GmbH Manual Issue 1 Rescue parachute SE-5L. Manual. Rescue parachute SE-5L
 Manual Rescue parachute Sächsische Spezialkonfektion GmbH Tel.: ++49 (0)3586 456-0 Nordstraße 40 Fax: ++49 (0)3586 456-167 D-02782 Seifhennersdorf e-mail: info@spekon.com GERMANY http:// www.spekon.com
Travel Pod Xpress Instructions & care manual
 Travel Pod Xpress Instructions & care manual Kampa UK Limited Witham, CM8 3EU mcl/kampa/2013 12 CARE WELCOME Thank you for purchasing your Kampa awning. Please read these instructions carefully before
BT013 Redleg 3 7 x7 x52 (H)
") BT03 Redleg 3 7 x7 x52 (H) IMPORTANT We strongly suggest setting up your new tent before going camping to insure that all parts are present and to familiarize yourself with the tents assembly. This will
BT03 Redleg 3 7 x7 x52 (H) IMPORTANT We strongly suggest setting up your new tent before going camping to insure that all parts are present and to familiarize yourself with the tents assembly. This will
Krisis Rogallo 130 Reserve Parachute Owner s Manual
 Krisis Rogallo 130 Reserve Parachute Owner s Manual VERSION 1.0 VALID FROM: 2010 REVISION: 07.04.2011 Kortel Design 1096, avenue André Lasquin 74700 Sallanches France Telephone: + 33(0)9 50 10 73 27 Fax:
Instruction Manual. Mag Mission 8P Tent Style# Please keep this instruction manual for future reference. Customer Service: (877)
") Instruction Manual Mag Mission 8P Tent Style# 153640 Please keep this instruction manual for future reference Customer Service: (877) 579-1550 Business Hours: Monday thru Friday 8:30am to 5:30pm, EST (Made
Instruction Manual Mag Mission 8P Tent Style# 153640 Please keep this instruction manual for future reference Customer Service: (877) 579-1550 Business Hours: Monday thru Friday 8:30am to 5:30pm, EST (Made
VACATION'R A ROOM FOR VERTICAL ARM AWNINGS 2015 & ON
 VACATION'R A ROOM FOR VERTICAL ARM AWNINGS 2015 & ON RV Before operating the awning, carefully review the Owner's Manual. The manual contains important safety information, detailed operating instructions,
English translation. Equipment Handbook for the Parachute-System. Omega with Quick. Performance Variable e.k. Am Tower 16, Bitburg
 Page: 1 of 65 English translation for the Parachute-System Omega with Quick Manufacturer: Performance Variable e.k. Am Tower 16, 54634 Bitburg Telefon 06561 / 949680, Fax 06561 / 949681 Email: info@myskyshop.com
CHAPTER 14: PERSONAL EQUIPMENT
 CHAPTER 14: PERSONAL EQUIPMENT The proper personal equipment can contribute to your comfort, safety, and enjoyment while flying. In this chapter, you will learn about the proper clothing to wear while
VACATION'R A ROOM FOR VERTICAL ARM AWNINGS 2015 & ON
 RV VACATION'R A ROOM FOR VERTICAL ARM AWNINGS 2015 & ON Before operating the awning, carefully review the Owner's Manual. The manual contains important safety information, detailed operating instructions,