THANK YOU SAFETY NOTE
|
|
|
- Emory Mills
- 5 years ago
- Views:
Transcription

1
2 THANK YOU We would like to thank you for choosing one of our products. We invite you to read this important document, the harness user manual and to pay special attention to the two most important paragraphs concerning: Inserting the reserve parachute The reserve parachute is a life-saving piece of equipment. It must be inserted so that it works correctly when required whether this happens in two days time, or two years from now. Adjusting the harness The harness is the connecting point between the pilot and the paraglider, and it is a necessary component for optimising flight performance and pleasure. A bad harness that is well adjusted may enable you to fly well, but a good harness that is badly adjusted may put you off flying altogether. We are confident that this harness will give you great comfort, control, performance and enjoyment in flight. We are conscious of the fact that reading an instruction manual is not an exciting experience. However, please remember that this product is not a citrus juicer or a mobile phone, and that correct use of the harness helps reduce the risk of flying accidents. This manual contains all the information necessary to assemble, adjust, fly and store your harness. Thorough knowledge of your equipment will improve your personal safety and your level of flying. Team Woody Valley SAFETY NOTE By the purchase of Woody Valley equipment, you are responsible for being a certified paraglider pilot and you accept all risks inherent with paragliding activities including injury and death. Improper use or misuse of equipment greatly increases these risks. In no case shall Woody Valley or Woody Valley equipment resellers be held liable for personal or third party injuries or damages under any circumstances. If any aspect of the use of our equipment remains unclear, please contact your local reseller or Woody Valley directly. We suggested watching the videos at the following links: FEATURES MANUAL PARACHUTE INSTALLATION LEG COVER INSTALLATION
3 CONTENTS 1.1- CONCEPT GTO LIGHT PROTECTIONS SAFETY LOCK SYSTEM S.O.S. LABEL BEFORE USING HOW TO WEAR IT RESERVE PARACHUTE Handle with deployment bag Connecting the reserve parachute to the harness Inserting the reserve parachute Extracting the reserve parachute Back pocket HARNESS ADJUSTMENTS Seating position and back adjustment Shoulder-pad adjustment Chest-strap adjustment Leg-cover Speed-bar adjustment Pee Tube FLYING WITH GTO LIGHT PREFLIGHT CHECKS POCKETS CAMEL-BAG USING THE COCKPIT
4 3.5- LOWER TENT OR BALLAST HOLDER POCKET ANTI-G DRAG PARACHUTE DORSAL PROTECTION FLYING OVER WATER ASSISTED TAKE-OFF HOOK LANDING WITH GTO LIGHT DISPOSING OF THE HARNESS REGULATIONS FOR BEHAVIOUR IN NATURAL ENVIRONMENTS TANDEM FLYING PACKING THE HARNESS CHARACTERISTICS AND INSTALLATION OF OPTIONAL EQUIPMENT BALLAST BAG CONCERTINA LIGHT RUCKSACK MAINTENANCE AND REPAIR REPLACING SIDE SLATS REPLACING AIR INLET REINFORCEMENTS PERIODIC DORSAL PROTECTION CHECKS REPLACING THE LEG COVER TECHNICAL DATA
5 1- GENERAL INFORMATION This equipment must contain: Harness Footrest board in carbon Snap-hook Handle with built-in deployment bag for reserve parachute deployment 2 reserve elastic loops for closing the reserve parachute Three-step light speed-bar Lightshield protection Dorsal protection Leg cover with zip closure 2 mylars for air inlets The main options available are: Rucksack Concertina light Bag for front ballast equipped with transport handles, tube and valve Anti-G drag parachute 3


6 1.1- Concept GTO Light is designed to be used as a harness for sport paragliding flying with a maximum weight of 120 kg. The GTO Light is the most extreme example of Woody Valley s many years of experience in cross-country harnesses. It has been designed to meet the needs of all pilots who have high demands for lightness without sacrificing comfort, piloting and aerodynamics. GTO Light is equipped with a pocket for an optional Anti-G drag parachute and a safety system to help prevent you from forgetting to fasten the leg straps GTO Light Protections GTO Light is equipped with two protections: One protection in LTF regulation foam under the seat, with a thickness of 16 cm One category 2 TÜV/GS certified lightshield in accordance with EU standard 89/686/ECC for protecting the top part of the pilot s back. This does not affect the results of the certification tests, so it is therefore removable by accessing the zipper behind the back which is between the base and the pocket. 4


7 1.3- Safety Lock System To address the issue of forgetting to fasten the chest and leg straps on the harness, the Woody Valley team has developed a leg-cover closure system, through which the pilot is required to grasp the leg strap and is thus reminded to close it. This system cannot replace a failure to hook the leg straps S.O.S. label This red with white lettering label is clearly visible in a pocket on the right shoulder padding and is easily removable. On the back of this label, you can write information that you think should be given to rescue workers in case of accident. 5


8 2- BEFORE USING GTO Light is supplied with dorsal protection and also with a lightshield that has already been pre-assembled by the manufacturer. Reserve parachute installation must be carried out with the utmost care and attention by a qualified professional operator, for example your instructor. Only then should the pilot adjust the harness for comfort How to wear it Put the arms in the shoulder straps, take the leg straps and insert the red buckles into the ones of the left and right chest piece. Take the right hand white hook and attach it to the black loop which is attached to the Lycra on the left hand side. Take the black loop next to the instrument panel and insert it through the metal rectangle next to the left karabiner, then hold the rectangle in place by inserting the white hook (connected near the left buckle of the leg strap) into the black loop. 6

9 2.2- Reserve parachute GTO Light has a parachute container located under the seat at the back just after the dorsal protection. The reserve parachute must be attached to the harness before being inserted in the built-in container. The connection takes the form of a dual bridle and is fixed in two points at shoulder height to provide better load distribution and to ensure a correct landing position in case the parachute is deployed. This helps to minimise the risk of injury. The built-in harness bridle has a central loop to which the parachute connects Handle with deployment bag GTO Light is supplied complete with a handle built into the deployment bag. Do not use other deployment bags or handles adapted for this purpose. The connection triangle between the handle and the deployment bag (with respect to the parachute pocket) must be positioned upward and outward. 7


: The emergency bridle should pass through the harness bridle loop.")
10 Connecting the reserve parachute to the harness There are three different methods of attaching the reserve parachute bridle to the harness bridle. First system (for non-pilot-controlled parachutes): Use a screw-lock karabiner with a breaking strength of at least 2,400 kg. In this case, the bridles should be held in position within the karabiner using elastic bands, to prevent the karabiner from rotating and taking the strain laterally instead of vertically. The karabiner s screw-lock should be tightly screwed shut to avoid any possibility of it opening accidentally. This type of connection can absorb a higher opening shock than the second system, and for this reason this is without doubt the recommended system. Second system (for non-pilot-controlled parachutes): The emergency bridle should pass through the harness bridle loop. Next, the emergency parachute should be passed through the large loop of the emergency parachute bridle. The result is a connection that should be tightened as much as possible so as to prevent dangerous friction between the two cables during emergency opening shock. 8

11 Third system (for pilot-controlled or non-pilot-controlled parachutes with double bridle): If you are using a reserve parachute with a dual bridle, it can be connected to the harness using the two loops positioned at the base of the harness bridle, near the padded shoulder straps. In this case, the harness s reserve parachute bridle will not be used, and so it should be folded, fastened using two elastic bands, and positioned under the cover behind the pilot s neck. The two connections should be made using screw-lock karabiners with a breaking strength of at least 1,400 kg. It is important to verify that the length of the bridle is sufficient to position the reserve parachute inside the harness pocket, and that there is sufficient play to enable the parachute to be taken out of the pocket without causing the reserve parachute deployment bag itself to open during extraction. CAUTION: - To prevent abnormal side loads, the cable is hooked to both loops on their respective shoulder-straps. Not only to one of the two. 9

 into each elastic loop which you will use to help close the container.")

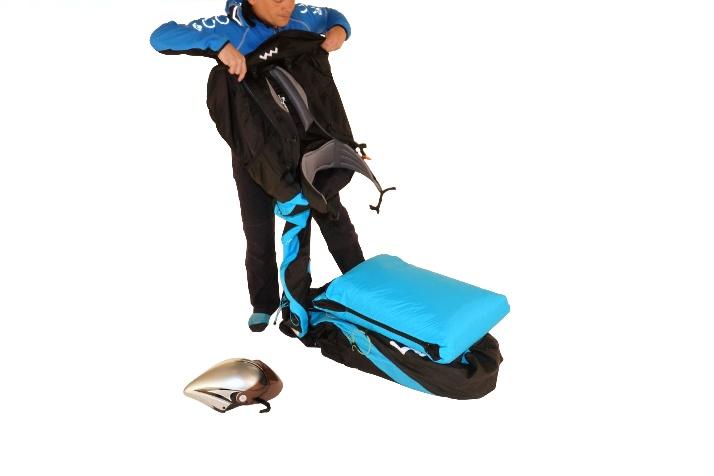
12 Inserting the reserve parachute Bring the bridle passage zipper slider to its Lycra pocket, which is located at the top of the harness behind the neck. Open the zipper starting from the closing flap so as to achieve free passage of the bridle between the loop and the parachute. After having connected the reserve to the harness with one of the previously described systems. Introduce a thin rope (paragliding line type) into each elastic loop which you will use to help close the container. Insert the elastic loops in the corresponding pockets and through the small eyelets. Insert the parachute in the harness container with rescue handle facing upwards and rescue parachute lines facing the harness tail. Complete the process by inserting the handle into the corresponding housing. Close the large black plastic flap using the cord and block the elastic loop using the longest pin, having it pass first through the hole just under the handle insertion, then in the elastic loop and finally in the hole located after the elastic strap. Then remove the thin cord. 10

 to the")


13 Move the zipper slider (on the part covering the bridle) to the limit near the handle. Then close the zipper about 10 cm and, using the second thin cord inserted in the other white elastic strap, close the smaller flap, inserting the shorter pin. Then insert the remaining part of the short pin in the nearby hole. Then remove the thin cord. 11

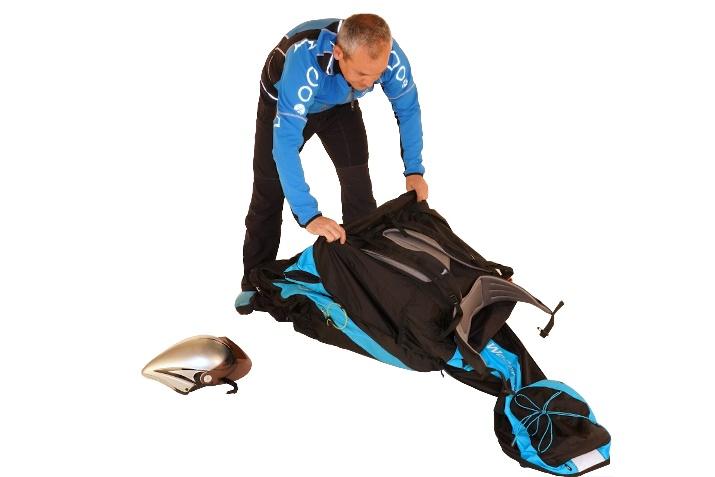
14 The cord must be removed at the end of this phase and must be extracted slowly in order to avoid damaging the elastic loops due to excessive friction between the parts. CAUTION: - Each new combination of reserve parachute and harness or external container that is assembled for the first time must be inspected by an official reseller of the harness or the reserve chute or a flight instructor to verify that it can be effectively deployed. Deployment of the emergency chute must be perfectly possible from the normal flying position. The paraglider harness and the emergency parachute opening system are not suitable for use in free falls and in strong shocks. Its bearing structure has been designed, tested and certified to withstand emergency parachute opening shock in accordance with the standard requirements for paragliding. This does not mean that the other parts of the harness will not become damaged due to emergency parachute opening shock. This is true whether it occurs due to actual need in the event of an accident or if it occurs voluntarily, for example during a safety course Extracting the reserve parachute It is very important to periodically feel for the position of the reserve parachute deployment handle during normal flight, so that the action for reaching for the reserve parachute handle becomes instinctive in an emergency. The deployment procedure is as follows in emergency situations: Look for the reserve parachute handle and grasp it firmly with one hand. Pull the handle outwards in order to extract the reserve parachute from the harness container. Look for a clear area and, in a continuous motion, throw the reserve parachute away from yourself and the glider. After opening, keep the paraglider from interfering with the reserve parachute as follows: - If the connecting edge is turned upward, grip straps "D" or the brakes and break down your paraglider. - If instead the connecting edge of the glider is turned downward, pull back strap "D" or a brake and have the glider rotate with the connecting edge upward and then pull both brakes or straps to help break down your paraglider. On landing, adopt an upright body position and ensure that you perform a parachute landing fall to minimise the risk of injury. 12


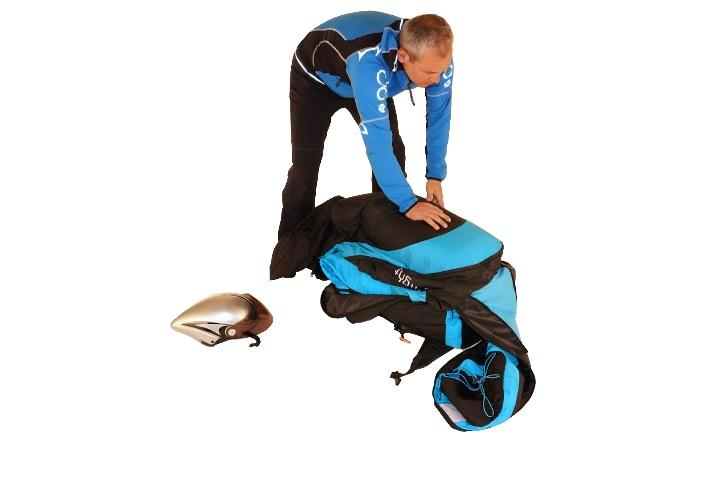
15 Back pocket To access the back pocket, you must first fully open the zipper on the rear aerodynamic side of the harness and turn it for easier access to the pocket. This compartment has been carefully designed and sized to hold the transport and clothing rucksack or a sleeping bag. Inside are two pockets, one to hold a camel-bak and one to hold trekking poles. To close the pocket and the rear aerodynamic part, simply close the zippers. CAUTION: - Overfilling the back pocket could compromise correct inflation of the aerodynamic part of the harness. - Evenly distribute all the objects inside the volume of the back pocket so as not to deform the shape of the container. - Be sure to completely close the zipper of the aerodynamic back part for correct inflation. 13

16 2.3- Harness adjustments 14

17 KEY: 1. Load-bearing strap 2. Back adjustment strap paragraph Seating depth adjustment strap.. paragraph Leg angle adjustment strap.. paragraph Shoulder adjustment strap paragraph Chest adjustment strap paragraph Leg strap. 8. Abs strap.. 9. Front cover cords paragraph Safety System paragraph Footrest adjustment strap.. paragraph GTO Light is supplied already adjusted to a standard ergonomic setting, apart from adjustments required for pilot height. Therefore, for the first flight we recommend adjusting the harness for height alone, leaving the other settings unchanged, because they have proved to be satisfactory for the vast majority of pilots. If you wish to change the other settings, remember that you can always return to the factory settings by making reference to the red marks on all adjustment straps. 15

18 Please remember that the size of your GTO Light must be chosen according to your height and not according to the width of the seat. Unlike a "sitting" harness, where the height of the back support is not essential for comfort, the height of the back support is decisive in a harness that requires "lying" piloting for obtaining comfort and a correct flight position. It is therefore important to choose the right size, paying more attention to the height of the back without worrying about the width of the seat. To find the optimum position we recommend hanging with the harness, simulating flight position and conditions. Therefore, it is best to place all the material which you normally take into flight with you in the back pocket. CAUTION: - Before carrying out any adjustment the reserve parachute must be inserted. - Each adjustment must be carried out symmetrically on both sides. - Each adjustment strap must be tensioned Seating position and back adjustment In this photo, you can see how the "lateral" adjustments are arranged and how many points actually go to support the pilot, from the upper part of the back to the lumbar part. All these adjustments offer the great advantage of supporting the pilot and, moreover, allow for adaptation to every type of back. 16
, distributing the loads between the seat and the lumbar")


19 In detail, adjustment No. 1 varies the angle between the legs and the back (seating depth), distributing the loads between the seat and the lumbar area, thereby providing the pilot with greater comfort. The main adjustment that allows you to select the inclination of the torso with respect to the vertical flight axis is n 2 for back adjustment. Adjustment 3 varies the angle of the legs. If you want to change the adjustments, you must loosen the first strap and then subsequently adjust it to the most comfortable point. Once these adjustments have been made, re-tighten the overlying strap to secure the new set point Shoulder-pad adjustment Adjustment of the shoulder pads compensates for the variation in pilot height and the adjustment buckle is located at the apex of the same. The shoulder pads also bear part of the weight of the torso for improved comfort. We recommend adjusting the shoulder pads so that they fit against your shoulders without being too slack or too tight. 17

20 Chest-strap adjustment The chest strap which controls the distance between the two karabiners has a maximum opening of 50 centimetres. For the first flight with GTO Light, we suggest setting the chest strap to the halfway point and then locating the preferred length in flight by means of gradual adjustment. When the chest strap is shorter and tighter, stability is greater. An excessive distance between karabiners does not improve glider performance and tightening the chest strap excessively may exacerbate the twist effect that may follow an asymmetric collapse of the wing. 18


21 Leg-cover The leg cover is made of special, very lightweight wind-proof and water-proof Lycra material. The geometry of the innovate cords of the leg-cover s automatic closing system makes it easier for the pilot to insert their legs after take-off. This cover can be adjusted length-wise using the two buckles on the sides just over the ankles, highlighted in the picture below. We recommend lengthening or shortening as needed while respecting the symmetry Speed-bar adjustment GTO Light is already equipped with a 3-step speed-bar: After having adjusted the sitting position to the optimum configuration, the length must be adjusted. To adjust the system correctly, the pilot has to adopt a flying position in the harness, suspended from a flight simulator, and hook into the risers of the paraglider or have another person then help by supporting the risers, so the pilot can adjust the length of the speed-system cords. If the speed-bar cord is too short, it could cause a constant force on the speed-system during flight, so that it is unintentionally engaged at all times in flight. It is safest to take off with the speed-bar a little too long, progressively shortening it during the next flights. Remember that all adjustments have to be performed symmetrically, on both sides. If you want to change the bar, we advise against the use of rigid speed-bars that can damage the external Lycra cover. The bar s cords should be passed through the pulleys located near the back corners of the seat and then moved directly up to the paraglider riser connections, passing through the eyelet hole on the Lycra, placed in the leg cover. The two elastic bands must also be installed, fixed by means of simple knots to the two loops on the lower side of the footrest. This allows the speed bar to always be well stretched out and ready for use. 19


22 Pee Tube In the blue part on the left side of the harness is a hole for passage of the pee tube. 20


23 3- FLYING WITH GTO Light 3.1- Preflight checks For maximum safety use a valid and complete preflight inspection method and repeat the same sequences mentally for each flight. Check that: The two buckles on the chest strap and the Safety-Lock system are closed The reserve parachute handle is fastened in its correct position, and the pins are firmly inserted The pockets and zips are closed The paraglider is connected correctly to the harness, and that both karabiners are locked closed by means of their locking system The speed bar is attached correctly to the glider 3.2- Pockets In addition to the back pocket seen in section 2.2.5, GTO Light features a spacious back pocket and various side pockets. One of these is located comfortably near the right main karabiner and is equipped with a safety slot for radio or mobile phone housing. The harness is also equipped with other two very spacious side pockets. The instrument panel is designed so that it can be easily removed from the cockpit so that tools are always available for various briefings and to keep them safe from any possible crushing due to harness packing. 21


24 3.3- Camel-bag GTO Light is set up for a camel-bak. Position the camel-bak in its special compartment inside the back pocket. Pass the hose through the special hole set indicated with a H2O logo, through which you can reach the red strap fixed inside the Lycra on the left side near the karabiner (as shown in the photos), where a second "H2O" logo is fixed. 22


25 3.4- Using the cockpit The cockpit is built into the leg-cover and has a support base for detachable instruments. 23


26 3.5- Lower tent or ballast holder pocket GTO Light houses a pocket under the seat, designed to hold a single-seater tent and an ultralight inflatable mattress, or alternatively for inserting a ballast bag Anti-G drag parachute The Anti-G drag parachute is a safety device that allows safer spiral descents by reducing the G force in a spiral dive. This system is very simple to use and works with any type of glider. Stowage is provided in the front pocket just below the flight instruments for anti-g installation on the GTO Light. Attach the anti-g bridle to the right karabiner of the harness. 24

27 To correctly use the braking parachute, simply open the zip, pull it out, release it, and start the spiral to the right. The advantages of using it are a higher sink rate and up to a 40% reduction in G-Force. You can descend in spiral and then disable the drag chute using the handle and land as normal with the Anti-G parachute deployed (but disabled). Otherwise, once exiting the spiral, you need to disable it and then put it back in its pocket and close the pocket zipper. At this point it is ready to be used again. CAUTION: To ensure correct use of the Anti-G parachute it is important that you carefully read and understand the instructions included in the parachute manual. The Anti-G drag parachute is optional equipment and can be purchased separately. 25
28 3.7 Dorsal protection The GTO Light is equipped with a TüV and CE (level 2) approved dorsal protection which is found inside the back of the harness. This protection increases back comfort but can be removed by accessing the zipper on the back of the backrest. BREATHABLE COATING 95% IMPACT ABSORPTION ADAPTIVE PU-FOAM 145 gr VERY LIGHT +30 C SEGMENTED EPS CORE -20 C TEMPERATURE RANGE DAMPING COATINGS 26
29 150 kn kn 18 CE-LEVEL 1 9 CE-LEVEL t Impact curve without protection Impact curve with protection time The absorption effect of the back protector reaches approximately the required value with a residual force of only 975 kn. This means that approximately 94% of the impact energy is absorbed. The materials and their protective function are TÜV SÜD approved in accordance with European standard EU-Norm 89 /686 / EWG and have been tested/certified as personal protection equipment category 2 (PSA). They also meet standard TÜV/GS on product safety Flying over water GTO Light poses no specific problems connected to flying above water but, in any case, landing in water is always dangerous. Woody Valley recommends using a suitable life jacket when flying above water. 27
30 3.9- Assisted take-off hook GTO Light harnesses can be used for towed launches. The tow bridle release should be hooked directly to the main karabiners, ensuring that the karabiners are positioned with the opening bar facing the rear. For further details see your tow hook instructions or ask a qualified towing instructor at your air field Landing with GTO LIGHT Before landing, slide your legs out and off the seat surface, so that you take up a standing position. Never land in the seated position; it is very dangerous for your back even if you have foam dorsal protection, which provides exclusively passive protection. Standing up before landing is an active safety precaution, and it is much more effective than passive forms of protection Disposing of the harness The materials used in a paragliding harness require correct disposal. Please give your harness back to us instead of throwing it away, we ll take care of its correct disposal Regulations for behaviour in natural environments Please respect the nature and landscapes that surround us when practising sport. Please do not leave marked trails, do not dispose of waste, do not make loud noises and please respect the delicate balance that exists in the mountains Tandem flying GTO Light cannot be used as a tandem harness for pilots or for passengers. 4- PACKING THE HARNESS The GTO Light harness can be packed into the rucksack whether or not the paraglider is hooked onto the karabiners. The sequence of operations shown below will help you pack up the harness properly. Fold the leg cover, then place the footrest on top, then position the glider over the harness and slip on the rucksack from the bottom. 28


31 29


32 Once the harness is inserted, turn over the entire package and close the zipper. Fold the tail inside. The materials used allow any extent of folding without affecting how it functions in flight. Enough space will be available in the top part for the instruments and helmet. 5- CHARACTERISTICS AND INSTALLATION OF OPTIONAL EQUIPMENT 5.1- Ballast bag Our ballast bag is equipped with transport handles, a tube and drainage tap. It can hold from 3.8 litres up to 5.7 litres of water (depending on the size of the harness) and can be inserted into the ballast holder under the seat. 30


33 5.2- Concertina light A convenient concertina light for folding your paraglider is available as an optional extra. It weighs approximately 275 grams and is equipped with two side zippers to reduce the volume of the paraglider and facilitate its insertion into the rucksack. 31


34 5.3- Rucksack As an optional, we also offer a rucksack, sized to hold the harness, the paraglider and the rest of your equipment. Equipped with various pockets, pole holder, camel bak holder and a convenient external elastic cord jacket holder. An emergency whistle is located on the chest strap closure. Very comfortable and enveloping, it will accompany you on your walks to reach take-off. Available in four sizes, starting from S with a volume of 95 litres, M 105 litres, L 115 litres and XL 120 litres. 32

 outside normal flying activities. Wherever possible, protect the harness from humidity and heat.")

 you must remove it from the harness, dry it and repack it before putting it back in the container.")

35 6- MAINTENANCE AND REPAIR Check the harness after every impact, bad landing or launch, or in the case that there are signs of damage or excessive wear. We recommend having your harness checked by your retailer every two years, and replacing the main karabiners every two years. To prevent unnecessary wear and deterioration of the harness, it is important to avoid scraping it against the ground, rocks or abrasive surfaces. Do not expose the harness unnecessarily to UV radiation (sunlight) outside normal flying activities. Wherever possible, protect the harness from humidity and heat. Store all your paragliding equipment in a cool, dry place, and never put it away while damp or wet. Keep your harness as clean as possible by regularly cleaning off dirt with a plastic bristle brush and/or a damp cloth. If the harness gets exceptionally dirty, wash it with water and a mild soap. Allow the harness to dry naturally in a well-ventilated area away from direct sunlight. If your reserve parachute ever gets wet (e.g. in a water landing) you must remove it from the harness, dry it and repack it before putting it back in the container. Repairs and replacement of harness components cannot be performed by the user, but exclusively by the manufacturer or staff authorised by the manufacturer. The manufacturer and authorized service staff alone can use materials and techniques ensuring correct product functionality and its complete conformity to product certification. Zip fasteners should be kept clean and lubricated with silicone spray. In the case of making any request to an official retailer or Woody Valley for maintenance operations, please quote the complete identification number shown on the silver label in the rear pocket. In order to create a high-performance, lightweight harness, the materials used are of excellent quality, but have a lower weight per square meter with respect to standard harnesses. Therefore, pilots should take the utmost care when using and packing the GTO Light harness. 33


, which can be")

36 Correct use will extend harness life. In the event of damage to the harness, repairs can only be performed by the manufacturer or by workshops certified by the manufacturer. The only exceptions are small cuts or holes in the covering material (with a length of less than 20 cm), which can be covered and glued with appropriate materials Replacing side slats The fibreglass side slats of the seat can be replaced in the event of breakage by pulling them from the back of the bags in which they are inserted. 34


37 6.2- Replacing air inlet reinforcements Remove the damaged Mylar and replace it with the spare that you will find in the nylon bag by rewinding it in the two pockets that are just inside the air inlet Periodic dorsal protection checks It is advisable after a crash to check the condition of the seams of the parts that make up the dorsal protection. Open the zipper under the seat on the left side of the harness. Remove the protection and open its zipper. Remove the three polyethylene panels and the second container. Open the zipper on the second container and remove the four parallelepipeds, check the seams of the latter and the two containers. Once the condition of all the seams have been inspected, reassemble everything. 35
38 6.3- Replacing the leg cover The leg cover is made with a very elastic, very lightweight Lycra. We invite you to follow some recommendations for greater durability: - In case of take-offs with crushed stone or in the presence of thistles, lay the harness on the ground delicately. Do not move the harness by dragging it on the ground. - Do not use metal speed bars or those that have protruding parts that can damage the Lycra. - To avoid stressing the elasticity and the surface of the Lycra too much, get used to pushing the speed-bar in a horizontal line, avoiding pushing downward, dragging shoes along the Lycra. The GTO Light leg cover is equipped with a zipper for replacement when needed. In case of replacement, follow the procedure shown in the video available at the following link: Every effort has been made to ensure that the information contained in this manual is correct, but please remember that it has been produced for guidance only. This owner s manual is subject to change without prior notice. Please check for Non è stata trovata alcuna voce d'indice. the latest information regarding the GTO Light harness. Latest update: JULY
39 7- TECHNICAL DATA Distance between karabiner and seat S = cm 46 M = cm 48 L cm 50.5 XL cm 52 Distance between karabiners (min - max) S = cm M = cm L cm XL cm Total weight of GTO Light, complete with reserve parachute handle with pod, protections, karabiners and speed-bar. Type of dorsal protection S = Kg M = 3.05 Kg L = 3.28 Kg XL = 3.37 Kg Protection in 16 cm foam Type of back protection Lightshield protection (TÜV cat. 2 ) Type of straps Reserve parachute housing volume Limit of use LTF certification number Front pocket capacity Get-Up without rigid seat cm 120 dan EAPR-GZ-0831/18 1 litre Bottom pocket capacity S = 3.8 litres M= 4.5 litres L= 5.3 litres XL= 5.7 litres Rucksack volume (optional) S = 95 litres M= 105 litres L= 115 litres XL= 120 litres Rucksack weight (optional) S = 610 g M= 648 g L= 660 g XL= 667 g Easy Bag weight (optional) 275 g VWe hope that you enjoy great flights and happy landings with GTO Light! 37
Please read this manual before flying with the VOYAGER for the first time.
 Please read this manual before flying with the VOYAGER for the first time. THANK YOU! We would like to thank you for having chosen one of our products, and we invite you to read this important document,
Please read this manual before flying with the VOYAGER PLUS for the first time.
 Please read this manual before flying with the VOYAGER PLUS for the first time. THANK YOU! We would like to thank you for having chosen one of our products, and we invite you to read this important document,
PEAK 1 GENERAL INFORMATION 1.1 THE CONCEPT 1.2 SAFETY 1.3 THE SPEED SYSTEM 2 THE EMERGENCY PARACHUTE 2.1 EMERGENCY PARACHUTE ASSEMBLY
 PEAK 1 GENERAL INFORMATION 1.1 THE CONCEPT 1.2 SAFETY 1.3 THE SPEED SYSTEM 2 THE EMERGENCY PARACHUTE 2.1 EMERGENCY PARACHUTE ASSEMBLY 3 ADJUSTING YOUR PEAK 3.1 ADJUSTING THE SITTING POSITION 3.2 ADJUSTING
Please read this manual before flying with the X-OVER 3 for the first time.
 Please read this manual before flying with the X-OVER 3 for the first time. THANK YOU! We would like to thank you for having chosen one of our products, and we invite you to read this important document,
Please read this manual before flying with the VELVET 2 and VELVET 2 AIRBAG for the first time.
 Please read this manual before flying with the VELVET 2 and VELVET 2 AIRBAG for the first time. THANK YOU! We would like to thank you for having chosen one of our products, and we invite you to read this
THANK YOU! SAFETY NOTE
 THANK YOU! We would like to thank you for having chosen one of our products, and we invite you to read this important document, the User Manual for the harness. Please pay special attention to the two
THANK YOU! SAFETY NOTE. Insertion of the reserve parachute. Adjusting the harness. Team Woody Valley
 THANK YOU! We would like to thank you for having chosen one of our products, and we invite you to read this important document, the User Manual for the harness. Please pay special attention to the two
Contents. Introduction Technical description Adjusting your Goya The alternative methods of emergency parachute connection ...
 GOYA Contents Introduction... 3 Technical description... 3 Adjusting your Goya... 4 The alternative methods of emergency parachute connection... 6 Speed systém... 10 Towing... 10 Tandem flying... 10 Harness
Genie II Owner s Manual. Please read this manual before flying with the Genie II for the first time.
 Genie II Owner s Manual Please read this manual before flying with the Genie II for the first time. Thank You Thank you for choosing the Genie II harness. We are confident that this harness will provide
MANUAL. This manual is copyrighted. Partial reproduction is allowed only after prior approval by ICARO paragliders, all other rights are reserved.
 Page 1 en MANUAL This manual is copyrighted. Partial reproduction is allowed only after prior approval by ICARO paragliders, all other rights are reserved. Version 1.0/2015 Page 2 Verification of Checks
HAVEN PARAGLIDING HARNESS
 HAVEN PARAGLIDING HARNESS Please read this manual before flying with the Haven for the first time. Version 1.1 Stand 1.10.2014 Contents MAC PARA COMMUNITY...2 Thank You...3 Safety Notice...3 Introducing
DOWN MANUAL. Aeros Ltd. St. Post-Volinskaya, 5 Kiev, UKRAINE
 DOWN HG & PG rescue parachute system MANUAL Aeros Ltd. St. Post-Volinskaya, 5 Kiev, 03061 UKRAINE Tel. +(380 44) 455 41 20 Fax. +(380 44) 455 41 16 E-mail: aerosint@aerosint.kiev.ua http://www.aeros.com.ua
Thank you for flying SKY PARAGLIDERS products
 English 2010 Index TWIN - description... 5 Main advantages... 6 Sizes and accesories... 7 Before your first take off... 8 Adjustment... 9 Rescue assembly... 10 Speed system length adjustment... 16 Production
APCO Aviation Setting Future Standards. Version (rev 1.01)
") Version 1.02 2018 11 19 01 23 (rev 1.01) APCO Aviation Setting Future Standards Factory: 7, Chalamish Street - Industrial Park - Caesarea 38900 ISRAEL Tel: +972 4 6273727 Fax +972 4 6273728 2 CONTENTS:
Version 1.02 2018 11 19 01 23 (rev 1.01) APCO Aviation Setting Future Standards Factory: 7, Chalamish Street - Industrial Park - Caesarea 38900 ISRAEL Tel: +972 4 6273727 Fax +972 4 6273728 2 CONTENTS:
Please read this manual carefully before your first flight.
 Low hangpoint PPG harness User manual Please read this manual carefully before your first flight. Congratulations! Thank you for choosing the Powerseat Comfort harness. We have done our best to present
Contents. Introduction 3 Description 4 Deploying 6 Packing 8 Mounting 12 Maintenance 13 Inspection 14 Guarantee 15 Closing 16
 1 Contents Introduction 3 Description 4 Deploying 6 Packing 8 Mounting 12 Maintenance 13 Inspection 14 Guarantee 15 Closing 16 2 Paragliders with Personality OOPS Owner s Manual Reserve Parachute Introduction
v /2017 G-LITE Rescue Parachute Manual Please read this manual prior to installing the GIN rescue parachute into your harness
 v.1.0 07/2017 EN G-LITE Rescue Parachute Manual Please read this manual prior to installing the GIN rescue parachute into your harness Thank You 2 Thank for choosing Gin Gliders. We are confident you ll
User manual SUCCESS3 Edition 1 / 03_2013
 SUCCESS 3 User manual Edition 1 / 03_2013 Edition 1 / 03_2013 Contents... 4... 5... 6 Welcome on board... 6 Outstanding features of the SUCCESS 3... 6 Important details... 7... 8 General advice about paragliding...
Introduction Safety notice Attaching a rescue system A Fixing a paraglider Attaching a winch...
 CONTENTS Introduction...... 2 1. Safety notice..... 3 2. Attaching a rescue system.......... 4 3. A Fixing a paraglider....... 7 4. Attaching a winch......... 8 5. How to adjust a harness......... 8 6.
Please read this manual carefully before first flight.
 Light harness with a footrest User manual Please read this manual carefully before first flight. Congratulations Thank you for choosing the Jazz harness. We have done our best to present you with a highest
Happy Reserve System. PILOT'S MANUAL Thank you for taking the time to read this booklet. Happy 1
 Happy Reserve System PILOT'S MANUAL Thank you for taking the time to read this booklet. Happy 1 CONTENTS 1. Introduction 2. Pre flight 3. Care and maintenance 4. Storage 5. Drying and airing 6. Cleaning
There are a number of types (e.g. general purpose, lightweight mountain, competition harness) available and the first things to think about are:
 available and the first things to think about are:") A buyer s guide to choosing a paragliding harness By Judith Mole Published in Skywings, October 2008 This article is about the issues to think about when choosing a new harness. There are a lot of different
A buyer s guide to choosing a paragliding harness By Judith Mole Published in Skywings, October 2008 This article is about the issues to think about when choosing a new harness. There are a lot of different
4.2 Assembly Instructions
 4.2 Assembly Instructions 4.2.1 Assembly of Reserve Canopy. Assembly of Reserve Canopy using Rapide Links. After inspecting the Parachute and the Wings Harness/Container System, hang or lay the parachute
pilot manual v1.2, 05/2015
 pilot manual v1.2, 05/2015 Tandem Pilot Contents Thank you... 5 Warning 6 About Gin Gliders 7 Introducing the Fuse Pilot 8 Before you fly 13 Flying with the Fuse Pilot 25 Maintenance and repairs 28 Final
Owner s Manual Please read this manual before flying with the Genie Race 2 for the first time.
 Owner s Manual Please read this manual before flying with the Genie Race 2 for the first time. Rev.2.0, 21/06/2011 Gin Gliders Inc. 285-1 Galdam-Ri, Mohyun-Myun, Yongin-City, Kyunggi-Do, Korea www.gingliders.com,
Please read this manual carefully before your first flight.
 Light harness with a footrest User manual Please read this manual carefully before your first flight. Congratulations Thank you for choosing the Funky harness. We have done our best to present you with
pilot manual v1.2 04/2016
 1 pilot manual v1.2 04/2016 Intermediate lite airbag harness 3 Contents Thank you...5 Warning...6 About Gin Gliders...7 Introducing the Gingo Airlite...8 Specifications...9 Before you fly...13 Flying with
Happy flights and safe landings, The Flow Paragliders team. 2 P a g e. Paragliders
 Thank you for choosing the Flow rescue system, AURA. AURA is a pulled down apex conical emergency parachute designed for paragliding use only. AURA represents the maximum in safety, functionality and quality.
V-series reserve manual
 V-series reserve manual Ver 1.2/May 2015. Dear customer, Thank you for purchasing a AIR VUISA quality product. We are a growing family of professionals with the aim of producing high quality products for
Congratulations! WARNING! READ USER MANUAL FIRST! USE AT YOUR OWN RISK!
 Congratulations! You just became the owner of the EXIT cutaway harness! We are sure that you will have ton s of fun using this product! Enjoy but use responsible and with care! WARNING! READ USER MANUAL
USER MANUAL CONTENTS. Please read this carefully before doing anything with your new container system
 USER MANUAL CONGRATULATIONS ON YOUR PURCHASE OF A SQUIRREL CRUX ( PRODUCT ). BY PURCHASING THIS PRODUCT, YOU ACKNOWLEDGE THAT ENGAGING IN SKY-DIVING, BASE JUMPING, PARACHUTING, AND WINGSUITING IS AN INHERENTLY
Krisis Rogallo 130 Reserve Parachute Owner s Manual
 Krisis Rogallo 130 Reserve Parachute Owner s Manual VERSION 1.0 VALID FROM: 2010 REVISION: 07.04.2011 Kortel Design 1096, avenue André Lasquin 74700 Sallanches France Telephone: + 33(0)9 50 10 73 27 Fax:
OVERVIEW PEUTEREY PEUTEREY 40 / PEUTEREY 30
 BACKPACK MANUAL OVERVIEW PEUTEREY PEUTEREY 40 / PEUTEREY 30 Congratulations on your purchase of a SALEWA Pack. We want to be sure that you understand and utilize your new SALEWA pack in the best way. Following
PEUTEREY 40 PEUTEREY 30
 OVERVIEW Congratulations on your purchase of a SALEWA Pack. We want to besure that you understand and utilize your new SALEWA pack in the best way. Following you will find a description of all functions
Issue: December 2016 / Update # 1: January 2018 OPERATING MANUAL. CutAway
 OPERATING MANUAL CutAway Dear Customers, Thank you for choosing AVA Sport equipment! The CutAway is the harness that raises whole new standards safety in paragliding. regarding "3 is always better than
Rescue Parachute User Manual
 Rescue Parachute User Manual Sky Paragliders, a.s. Kadlčákova 1466 739 11 Frýdlant nad Ostravicí CONTENT CHAPTER I. Technical Specification of Rescue Parachute SKY DRIVE 1) Intended Use 2) Technical-Tactical
Please read this manual carefully before your first flight.
 Light harness with a pod User Manual Please read this manual carefully before your first flight. Congratulations Thank you for choosing the Soul harness. We have done our best to present you with highest
AERODYNE RESEARCH CORPORATION RACE TRACK ROAD, TAMPA, FLORIDA, 33626, USA PHONE (813) FAX
 FAX") RESERVE PACKING MANUAL Manual TM159 Edition 02-2004 P1482-00 Smart 99 P1482-10 Smart 110 P1482-20 Smart 120 P1482-30 Smart 135 P1482-40 Smart 150 P1482-50 Smart 160 P1482-60 Smart 175 P1482-70 Smart 190
RESERVE PACKING MANUAL Manual TM159 Edition 02-2004 P1482-00 Smart 99 P1482-10 Smart 110 P1482-20 Smart 120 P1482-30 Smart 135 P1482-40 Smart 150 P1482-50 Smart 160 P1482-60 Smart 175 P1482-70 Smart 190
Please read this manual carefully before your first flight.
 Light harness with a pod User s manual Please read this manual carefully before your first flight. Congratulations! Thank you for choosing the Techno harness. We have done our best to present you with
OWNERS MANUAL PACKING INSTRUCTIONS PARAGLIDER EMERGENCY SYSTEM B-SAFE 120 L
 1 of 8 OWNERS MANUAL PACKING INSTRUCTIONS PARAGLIDER EMERGENCY SYSTEM B-SAFE 120 L INDEX (1) GENERAL DESCRIPTION (2) FITTING THE SYSTEM TO THE HARNESS - Standard Harnesses - Comfort/Integral Harnesses
OVERVIEW GUIDE GUIDE 45 / GUIDE 35
 BACKPACK MANUAL OVERVIEW GUIDE GUIDE 45 / GUIDE 35 Congratulations on your purchase of a SALEWA Pack. We want to be sure that you understand and utilize your new SALEWA pack in the best way. Following
OPERATING MANUAL Series
 OPERATING MANUAL 2015 Series Dear Customers, Thank you for choosing AVA Sport equipment! The Acro Base is the harness that raises whole new standards regarding safety in paragliding. Integrating the usual
OPERATOR INSTRUCTION MANUAL INCLUDING REPAIR PARTS FOR MODULAR GENERAL PURPOSE TENT SYSTEM (MGPTS) TYPE I
 TYPE I") OPERATOR INSTRUCTION MANUAL INCLUDING REPAIR PARTS FOR MODULAR GENERAL PURPOSE TENT SYSTEM (MGPTS) TYPE I Johnson Outdoors Gear, Inc. Eureka! branded tent products 625 Conklin Road Binghamton, NY 13903
OPERATOR INSTRUCTION MANUAL INCLUDING REPAIR PARTS FOR MODULAR GENERAL PURPOSE TENT SYSTEM (MGPTS) TYPE I Johnson Outdoors Gear, Inc. Eureka! branded tent products 625 Conklin Road Binghamton, NY 13903
APEX CLIMB 2 OVERVIEW APEX CLIMB 25
 OVERVIEW Congratulations on your purchase of a SALEWA Pack. We want to besure that you understand and utilize your new SALEWA pack in the best way. Following you will find a description of all functions
Page 1 MANUAL. Version 3.0/2015
 Page 1 en MANUAL Version 3.0/2015 Page 2 Verification of Checks and repairs ENERGY CROSS Serial number:. First check by ICARO / date:.. Name/ Stamp Check (C) Repair (R) Which repair/ Check? Check valid
User s manual. English version SUPAIR-VLD PARC ALTAÏS 34 RUE ADRASTÉE ANNECY CHAVANOD FRANCE
 User s manual SUPAIR manufactures its products in Europe. The majo rity of the components used come from Europe. English version SUPAIR-VLD PARC ALTAÏS 34 RUE ADRASTÉE 74650 ANNECY CHAVANOD FRANCE 45 54.024
AVALON Pop Top. AVALON PopTop. HARNESS CONTAINER PACKING MANUAL Student harness
 AVALON PopTop HARNESS CONTAINER PACKING MANUAL Student harness Advanced Parachute Systems Ltd. Bulgaria, 3431 Erden, Airport Erden email: info@avalonskydive.bg Page 1/38 After big success of AVALON Sport
RANDONEE 36 RANDONEE 30
 OVERVIEW Congratulations on your purchase of a SALEWA Pack. We want to besure that you understand and utilize your new SALEWA pack in the best way. Following you will find a description of all functions
OVERVIEW ULTRA TRAIN ULTRA TRAIN 18
 BACKPACK MANUAL OVERVIEW ULTRA TRAIN ULTRA TRAIN 18 Congratulations on your purchase of a SALEWA Pack. We want to be sure that you understand and utilize your new SALEWA pack in the best way. Following
When moving the frame don t force anything! Move the leg to allow the brace to go over the rod.
 THE IDLER Assembly and Care Instructions General notes Please read these instructions in their entirety before constructing your Idler Construction Before you begin constructing your Idler consider where
This manual is copyrighted. Partial reproduction is allowed only after prior approval by ICARO paragliders, all other rights are reserved.
 This manual is copyrighted. Partial reproduction is allowed only after prior approval by ICARO paragliders, all other rights are reserved. Page 2 Verification of Checks and repairs LOXIA Serial number:.
Gingo Owner s Manual. Please read this manual before flying with the Gingo for the first time.
 Gingo Owner s Manual Please read this manual before flying with the Gingo for the first time. Thank You Thank you for choosing the Gingo harness. We are confident that this harness will provide you with
Travel Pod Xpress Instructions & care manual
 Travel Pod Xpress Instructions & care manual Kampa UK Limited Witham, CM8 3EU mcl/kampa/2013 12 CARE WELCOME Thank you for purchasing your Kampa awning. Please read these instructions carefully before
S E L E C T I O N. Abdominal Crunch. User manual
 and S E L E C T I O N T H E S T R E N G T H E V O L U T I O N User manual and and The identification plate of the and manufacturer, affixed along side the seat on the frame of the weight stack, gives the
User s Manual Trampoline 8
 User s Manual Trampoline 8 Model! WARNING Read all precautions and instructions in this manual before using this equipment. Save this manual for future reference. Maximum user weight 17 lbs. ASSEMBLY IMPORTANT
Users manual Thanks to read this manual before use.
 Users manual Thanks to read this manual before use. Page 1 on 11 Thanks for having chosen an Opale-Parmodels product. We truly believe this radio-controlled paraglider is going to give you hours of enjoyment
APCO Aviation Setting Future Standards. Revision 2.1 Date:
 Revision 2.1 Date: 30.12.2013 APCO Aviation Setting Future Standards Factory: 7, Chalamish Street - Industrial Park - Caesarea 38900 ISRAEL Tel: +972 4 6273727 Fax +972 4 6273728 1. Introduction 3 2. Harness
TUAREG. Owner s manual. Onika Paraglider. Technical description: Harness Tuareg. page 1
 Owner s 05.05.2012 manual Harness Tuareg With the Tuareg you got one of the most comfortable and most functional harnesses, which is available on the market at present. We thank you for the confidence,
independence gliders for real pilots Owner s manual version Rescue system Evo CROSS 100 Evo CROSS 120 Evo CROSS 160
 independence gliders for real pilots www.independence-world.com Owner s manual version 1.1-06.06.2012 Rescue system Evo CROSS 100 Evo CROSS 120 Evo CROSS 160 Fly market GmbH & Co. KG Am Schönebach 3 D-87637
FEATURES & BENEFITS OF THE TOW PRO LITE :
 To Protect & Preserve PRODUCT MANUAL & FITTING GUIDE tow pro lite TYPE: SEMI - FIT EACH TOW PRO LITE COMES WITH THE FOLLOWING : 16 side securing straps & buckles (8 either side) 1 HITCH STRAP & buckles
AEROS. Rescue System OK. Owners Manual
 AEROS Rescue System OK Owners Manual 2002 Type of Rescue: AEROS OK Size: Serial # : Manufacturing Date: Colors: Dealer: Date of Sale: 1. Introduction. This manual describes OK - rescue system for hang
OVERVIEW LITE TRAIN LITE TRAIN 14 BP
 BACKPACK MANUAL OVERVIEW LITE TRAIN LITE TRAIN 14 BP Congratulations on your purchase of a SALEWA Pack. We want to be sure that you understand and utilize your new SALEWA pack in the best way. Following
Ultra CROSS 75, 100, 125, 150, 210. Owner s manual Rescue system. Fly market GmbH & Co. KG Am Schönebach 3 D Eisenberg.
 Fassung 1.5 vom 20.04.2017 Owner s manual Rescue system Ultra CROSS 75, 100, 125, 150, 210 manufactured by Fly market GmbH & Co. KG Am Schönebach 3 D-87637 Eisenberg Tel.: +49-8364-9833-0 Fax: +49-8364-9833-33
BowDown. MiniMuM Crossbar spread 24 (61CM) Steel Hook (2X) Buckle Strap (2X) Plastic Tube (2X) Plain Strap (2X) SHORT BLACK T-BOLT (2x) BOWDOWN (2x)
 Steel Hook (2X) Buckle Strap (2X) Plastic Tube (2X) Plain Strap (2X) SHORT BLACK T-BOLT (2x) BOWDOWN (2x)") BowDown MiniMuM Crossbar spread 24 (61CM) Heavy Duty strap (2x) SHORT BLACK T-BOLT (2x) BOWDOWN (2x) Bow Stern Tie Down Buckle Strap (2X) Plastic Tube (2X) Plain Strap (2X) Steel Hook (2X) IMPORTANT WARNING
BowDown MiniMuM Crossbar spread 24 (61CM) Heavy Duty strap (2x) SHORT BLACK T-BOLT (2x) BOWDOWN (2x) Bow Stern Tie Down Buckle Strap (2X) Plastic Tube (2X) Plain Strap (2X) Steel Hook (2X) IMPORTANT WARNING
ALPTREK 50+5 ALPTREK 45+5
 OVERVIEW Congratulations on your purchase of a SALEWA Pack. We want to besure that you understand and utilize your new SALEWA pack in the best way. Following you will find a description of all functions
ALP TRAINER 25 2 OVERVIEW ALP TRAINER 25
 OVERVIEW Congratulations on your purchase of a SALEWA Pack. We want to besure that you understand and utilize your new SALEWA pack in the best way. Following you will find a description of all functions
User manual. v1.0-11/2017
 EN User manual v1.0-11/2017 1 Introducing the Yeti Xtrem 2 The Yeti Xtrem features the latest in lightweight design. It is ideal for hike n fly, para-alpinism, speedflying, travel, soaring or simply to
ASSEMBLY & CARE INSTRUCTIONS
 ASSEMBLY & CARE INSTRUCTIONS 7 x TRAILER TENT SERIES 3 9 Part No. FT3711 - on road FT3923 - off road OPTIONAL SUNROOM Wall and floor kit Part No. FT3723 - on road FT39 - off road OPTIONAL SPARE ROOM Roof,
Kontrol Kube Advanced Owners Manual
 Mobile Containment. Simplified. TM Kontrol Kube Advanced Owners Manual KONTROL KUBE www.kontrolkube.com 800.343755 1 IMPORTANT SAFETY INFORMATION SAVE THESE INSTRUCTIONS. CAREFULLY READ AND FOLLOW THESE
USER MANUAL CONTENTS. Please read this carefully before doing anything with your new container system
 CONTENTS USER MANUAL CONGRATULATIONS ON YOUR PURCHASE OF A SQUIRREL CRUX 3R ( PRODUCT ). BY PURCHASING THIS PRODUCT, YOU ACKNOWLEDGE THAT ENGAGING IN SKYDIVING, BASE JUMPING, PARACHUTING, AND WINGSUITING
CONTENTS. v1.0 May 2017
 Pilots Manual CONTENTS Thank You 01 Warning 02 Your Ozium 2 03 Sizing 04 Pod options 04 Preparation 06 Underseat Mousse 06 Speed System 07 Reserve Parachute Installation 08 Fitting 12 Adjustments 14 Shoulder
PACKING INSTRUCTIONS for the Strong Enterprises. Military Tandem Tether Bundle MTTB. Canopy Part No
 PACKING INSTRUCTIONS for the Strong Enterprises Military Tandem Tether Bundle MTTB Canopy Part No. 420709 Manual No. 510055 REV: B May 2004 Parachuting is a hazardous activity that can result in serious
Dual Identity. Manufactured in our state of the art factory in China
 Dual Identity IMPORTANT We strongly suggest setting up your new tent before going camping to insure that all parts are present and to familiarize yourself with the tents assembly. This will have a great
CONTENTS Thank You Warning Your Oxygen 2+ Preparation Fitting Adjustments Features Use and Maintenance Technical Specifications
 Pilots Manual CONTENTS Thank You 01 Warning 02 Your Oxygen 2+ 03 Overview 04 Preparation 05 Protection 05 Seat plate 06 Speed System 07 Reserve Parachute Installation 08 Fitting 12 Adjustments 14 Shoulder
ASSEMBLY & CARE INSTRUCTIONS. 7 x4 TRAILER TENT SERIES 4 9. OPTIONAL SUNROOM Wall and floor kit. OPTIONAL SPARE ROOM Roof, wall and floor kit
 ASSEMBLY & CARE INSTRUCTIONS 7 x TRAILER TENT SERIES 9 Part No. TM709 OPTIONAL SUNROOM Wall and floor kit Part No. TM723 OPTIONAL SPARE ROOM Roof, wall and floor kit Part No. TM76 Please keep these instructions
MANTA / MIRA SERIES MANTA 34 MANTA 24 MIRA 32
 MANTA / MIRA SERIES MANTA 34 MANTA 24 MIRA 32 MIRA 22 Welcome to Osprey. We pride ourselves on creating the most functional, durable and innovative carrying products for your adventures. Please refer to
Manufactured in our state of the art factory in China
 IMPORTANT We strongly suggest setting up your new tent before going camping to insure that all parts are present and to familiarize yourself with the tents assembly. This will have a great effect on how
Squeeze ballistic protection and carry system -17 MANUAL
 Squeeze ballistic protection and carry system -17 MANUAL The Snigel system CLOTHING Our garments have good freedom of movement, ventilation and give good protection. They are designed to work with the
Butler Tactical Parachute Systems, LLC
 Butler Tactical Parachute Systems, LLC A division of Butler Parachute Systems Group, Inc. TT-600 TETHERED TANDEM BUNDLE DELIVERY SYSTEM ASSEMBLY MANUAL (Revision A) Page 1 of 40 INTRODUCTION This manual
Installation Guide: Round Trampoline
 Trampolines & trampoline parts designed to survive in the harsh Oz climate. www.oztrampolines.com.au Installation Guide: Round Trampoline Safety Tips Here at Oz Trampolines we are passionate about your
USER INSTRUCTIONS. Applicable to Lanyard : REF. NO. : ,
 USER INSTRUCTIONS Applicable to Lanyard : REF. NO. : 10185600, 10185613 Manufacturer : MSA Europe GmbH, Schlüsselstr. 12, CH- 8645 Rapperswil-Jona Switzerland Body : SATRA Technology Centre, Wyndham Way,
A.M. SERIES HYDRATION PACKS
 A.M. SERIES HYDRATION PACKS DUTHIE W S SIOUXON FEATURING THE HIGHLY BREATHABLE FLOATAIR BACK PANEL for optimum riding comfort, these rugged, versatile hydration packs are built to carry all the water and
ROOK / RENN SERIES ROOK 65 ROOK 50 RENN 65
 ROOK / RENN SERIES ROOK 65 ROOK 50 RENN 65 RENN 50 Welcome to Osprey. We pride ourselves on creating the most functional, durable and innovative carrying products for your adventures. Please refer to this
Alternative Designs Report Joshua s Jumper
 Alternative Designs Report Joshua s Jumper By Elyssa Polomski, Michael Ballintyn, and Tianyi Xu Team # 21 Client: Joshua Bouchard Client Contact: Sue and Ron Bouchard, soupanony@aol.com, (508) 823-6113
READ ME FIRST! IMPORTANT WARNING! ENG. Roof top tent
 Roof top tent ENG TENT031 220 min READ ME FIRST! Thank you for purchasing a Front Runner Roof Top Tent. Before you start, take a moment to familiarize yourself with these Fitting Instructions and the components
independence gliders for real pilots Owner s manual Version 1.3 /
 independence gliders for real pilots www.independence-world.com Owner s manual Version 1.3 / 16.03.2009 Rescue system Piccolo EVO Annular EVO 20 Annular EVO 22 Annular EVO 24 Annular EVO Tandem Annular
english User manual Edition 1 / 10_2016
 english User manual Edition 1 / 10_2016 Welcome to ADVANCE Many thanks for choosing the STRAPLESS, an ADVANCE high-quality ultralight product. We wish you plenty of fun and many enjoyable hours in the
Butler Tactical Parachute Systems, LLC TT-600 TETHERED TANDEM BUNDLE DELIVERY SYSTEM. ASSEMBLY MANUAL (Revision D) 18 FEB 2009
 18 FEB 2009") Butler Tactical Parachute Systems, LLC A division of Butler Parachute Systems Group, Inc. TT-600 TETHERED TANDEM BUNDLE DELIVERY SYSTEM ASSEMBLY MANUAL (Revision D) 18 FEB 2009 Page 1 of 42 INTRODUCTION
Butler Tactical Parachute Systems, LLC A division of Butler Parachute Systems Group, Inc. TT-600 TETHERED TANDEM BUNDLE DELIVERY SYSTEM ASSEMBLY MANUAL (Revision D) 18 FEB 2009 Page 1 of 42 INTRODUCTION
User Manual Setup and Adjustment
 www.easyrig.com User Manual Setup and Adjustment 2 Made in Sweden Congratulations on your new Easyrig! Easyrig is patented and specially designed by a photographer for professional photographers. It can
Step by Step Set Up Guide
 lite Step by Step Set Up Guide 1 lifting lug Secure lifting lugs to a certified lifting sling. Stand and stabilize escape system under work platform. Position module with round lunette ring facing work
Genie 4 Owner s Manual
 Genie 4 Owner s Manual Please read this manual before flying with the Genie 4 for the first time. Thank You Thank you for choosing the Genie 4 harness. We are confident that this harness will provide you
Owners Manual. Skylark tm Student Canopy WARNING
 Owners Manual Skylark tm Student Canopy WARNING THE USER ASSUMES ALL RISK!!! PARACHUTE SYSTEMS SOMETIMES FAIL CAUSING DEATH OR SERIOUS INJURY REGARDLESS OF HOW IT IS MAINTAINED, PACKED, DEPLOYED OR OPERATED.
MYRIAD Banner Stand is a trademark of Skyline Exhibits. Patent Pending PN32294-B. MYRIAD Banner Stand
 is a trademark of Skyline Exhibits Patent Pending 1.1 1. Banner Stand Setup 1.1 Remove banner stand from standard case or Arrive Portable Display & Workstation and assemble pole. 1.2 Insert pole into base
General Canopy Folding and Packing Instructions for H-X Series Personnel Parachute Canopies. Manufactured by Butler Parachute Systems, Inc.
 General Canopy Folding and Packing Instructions for H-X Series Personnel Parachute Canopies Manufactured by Butler Parachute Systems, Inc. Issued 24 July 1998 This set of instructions is for the routine
MANUAL. Fly & more Handels GmbH, ICARO Paragliders. LITE 105/120 Lightweight Rescue systems
 MANUAL Fly & more Handels GmbH, ICARO Paragliders LITE 105/120 Lightweight Rescue systems Version: 1.2 E, 09.05.2012 Page 1 Congratulations on buying a new LITE 105/120 lightweight rescue system and welcome
Section 4.0 Rigger Information
 Section 4.0 Rigger Information page 28 Parachute Assembly Inspection Form! Note: Count all Tools Before Starting Assembly Qty: A Harness and Container manufacturer: model: date of manufacture: serial no:
INSTANT GARAGE MODEL NO: CIG81224 ASSEMBLY INSTRUCTIONS PART NO: ORIGINAL INSTRUCTIONS
 INSTANT GARAGE MODEL NO: CIG81224 PART NO: 3503578 ASSEMBLY INSTRUCTIONS ORIGINAL INSTRUCTIONS GC1117 INTRODUCTION Thank you for purchasing this CLARKE Instant Garage. When erected, the CIG81224 garage
INSTRUCTION MANUAL (0)
") CANVAS BELL TENT INSTRUCTION MANUAL SETTING up YOUR CANVAS BELL TENT 1 3 Unpack the bell tent and lay out on the tent with the groundsheet down. Find the door and rotate the tent. so it s facing the desired
CANVAS BELL TENT INSTRUCTION MANUAL SETTING up YOUR CANVAS BELL TENT 1 3 Unpack the bell tent and lay out on the tent with the groundsheet down. Find the door and rotate the tent. so it s facing the desired
ABS Model Background Stand
 ABS Model Background Stand Product Overview: The completely redesigned Ravelli ABS model background stand is 10' tall by 12.3' wide. It is comprised of two tripod stands and four 3 cross bar sections and
Gradient Golden3. Paramotor appendix
 Gradient Golden3 Paramotor appendix INTRODUCTION After using all sizes of the Golden3 for a whole season, the Gradient Team reached the conclusion that the wing is a very good first choice multipurpose